

 10-23-2015, 05:08 PM
Last edit by: IB Advertising
See related guides and technical advice from our community experts:
Browse all: Ford Mustang Interior Guides
- Ford Mustang V6 and Mustang GT 2005-2014: How to Replace Gauge Cluster
Step by step instructions for do-it-yourself repairs.
Browse all: Ford Mustang Interior Guides

HOW TO: Rebuild your cluster
03-13-2011, 12:32 AM
#1
Before attempting this, Please read this HOW TO fully.
My instrument cluster has been like this for over 2 years now:

(Notice oil pressure)
My fuel gage does the same thing as well as my tachometer but they seem to fix themselves.
I’m sick and tired of looking at this so I decided it was time to fix it.
A new cluster from Ford, with a shop discount is $333.00. That doesn’t sound too bad but there is a $300 core on it. So you have to fork out $633.00 and wait to get the 300 back. I don’t have that kind of money, I do however have $80
The issue with the 05 clusters is the stepper motors and all that needs to be done to fix this problem is replace them. Sounds easy right? It wasn’t!!!!
Before you take on this challenging task you will need:
7mm socket
50 watt soldering iron or higher (I had to buy a new one. My 30 W wasn’t hot enough)
Solder
Flux (this helps prevent the solder from sticking to everything )
Pliers
Stepper motors (Part number: X25. 589)
Two small flat blade screwdrivers
A Dinner fork
And all the patience you can gather!
I replaced all 6 of my stepper motors. I figured it would save me time just replacing them all now instead of waiting for another to go bad.

Alight here we go!
First, use the bathroom, eat, get comfortable, clear an area for you to work, gather your things, Relax, and DON’T RUSH!!!!!
We are going to disable the air bag now to make sure it doesn’t go off. Not sure if this is totally necessary but I figured why take a chance.
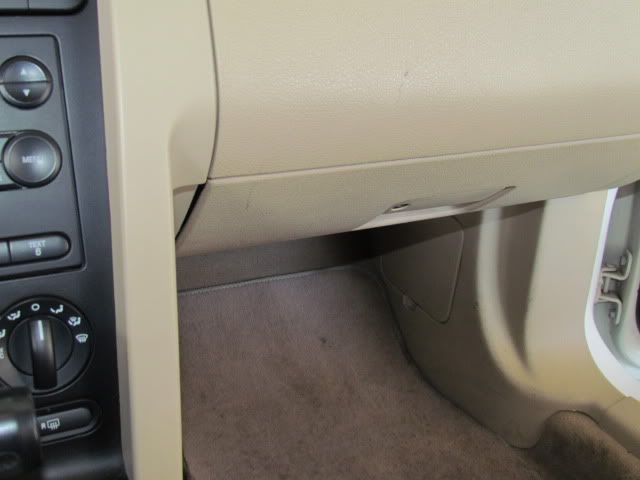
Locate the passenger side kick panel Here:
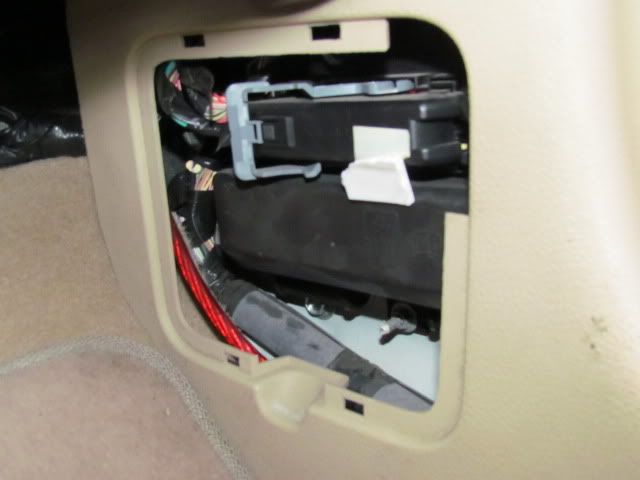
Open it up and expose the fuse panel:
There are some plastic tabs on either side of this cover, gently pull them away from the fuse box and toward you exposing all of the fuses:
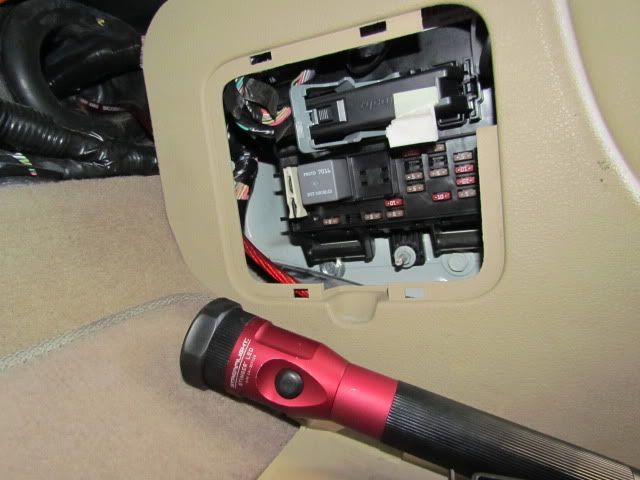
Locate fuse no. 17. (10 amp fuse)
Pull it out.

Now, turn the key ON Engine off.
Wait 30 seconds; Make sure the Air bag light stays ON. If it goes out, you pulled the wrong fuse out.

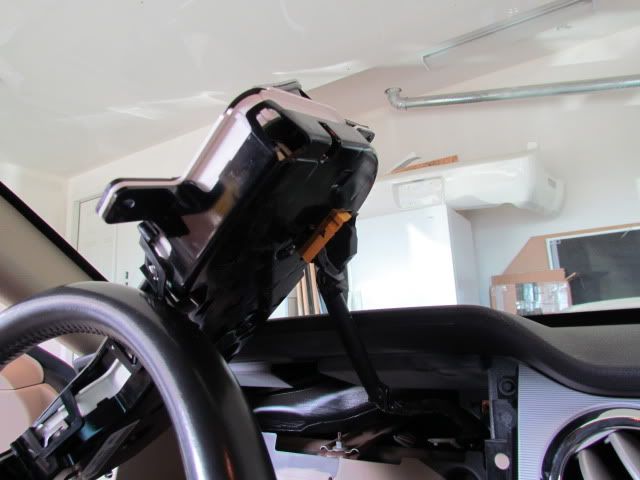
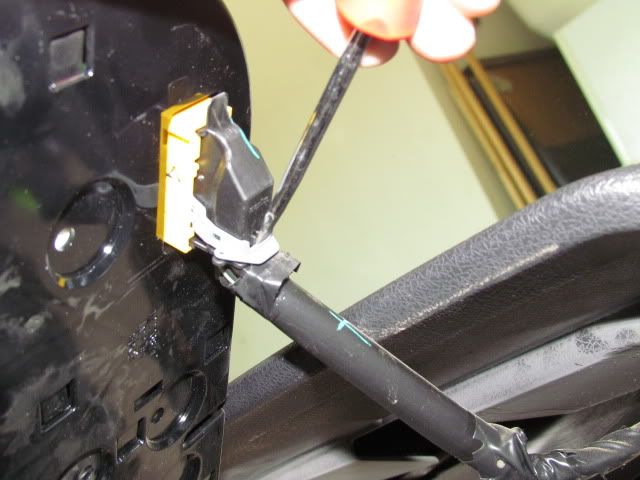
Grab the dash by the tachometer gauge plastic and speedometer gauge plastic and pull toward you
The whole panel should pull right out. Pull it straight so you don’t break any clips.

Your left with the cluster screws exposed:

Notice the 4 yellow circles, this is where the screws are, they are hard to see from my picture but they are there. They are 7mm screws. Unscrew these and pull your cluster case toward you. Look on the back and see the plug.
This YELLOW plug with grey clip needs to come off so GENTLY push down on the black tab behind the grey clip and pull on the grey clip:
Take your cluster to your CLEAN work area.
--Don’t drive your car without your cluster in, don’t even put the key in the ignition, you will mess up your car!!!---

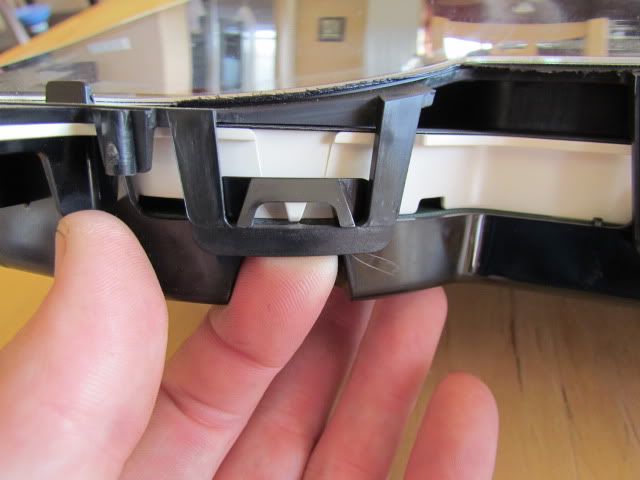
Pop the clear plastic panel off by pulling up (Carefully) on the plastic tabs round the edges. I believe there are four of these. And set the panel aside:

Now you have exposed the face plate with the needles.
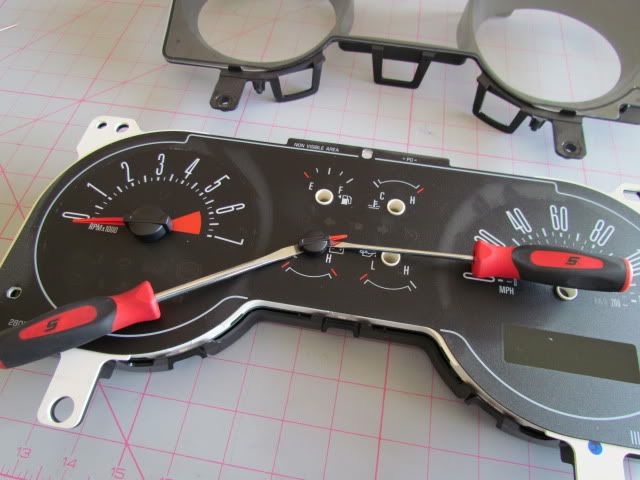
Pull straight up on the needles at the BASE (Black bit)
A few of mine were stuck so I used two screwdrivers on opposite sides to pull up being careful not to scratch or break anything.
I then realized i could use a fork to make this easier
Set your needles aside and DON’T LOOSE THEM
Now separate the FACE PLATE from the BACKING PLATE. Use a screw driver to gently pull out on the black plastic tabs.

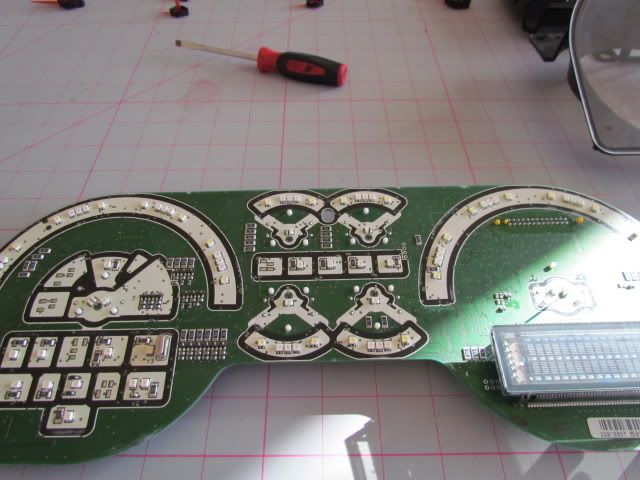
Set the face and backing plates aside, now take a good long look at your circuit board. Don’t touch anything. You don’t want to damage the circuit board.
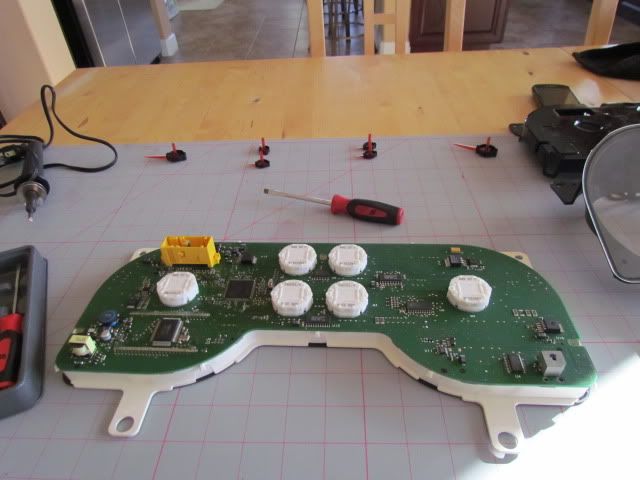
The six white circles are the stepper motors.
Flip the board over and notice where the motor comes through:
Youll see where the needle attaches and four solder points round the needle.
We need to remove the solder so we can pull out the old motors.
This is HARD Very hard! It took me over two hours.
Its tricky because you cannot touch the circuit board with the soldering iron, it will damage it and your out $333.
I used a piece of copper wire to pull the solder away from the board but wasn’t having much luck. After about 40 minutes of frustration I decided I needed a can of soda!
It put me back in the zone. I then looked closer at the motor and saw 4 plastic tabs:
I pulled them apart
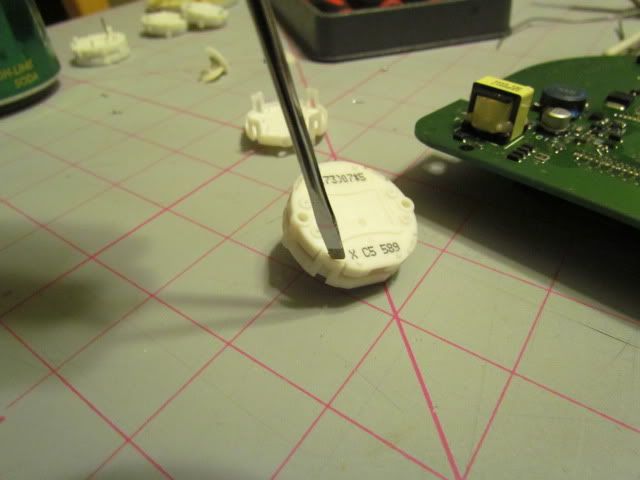
(picture was taken after I had finished)
This exposes the motor, pull out the little gears and break off the black and copper things.

Now you can pull off the plastic and your left with the four metal pins.
Pinch one side of the pin with pliers and heat the other side up with your soldering iron and the pin should come right out.
Some of them don’t bring the solder with them so I used a sewing pin and poked it through .
Now place the new motors on the board making sure all pins are through the holes. Solder these four pins with as little solder as you can use.
Once that’s all done. Plug the board into your car and turn the key on. Make sure everything lights up!
If nothing works, check your plug and if it still doesn’t work, Im sorry, you messed up big time!
Bring the cluster back to the table and put the face plate and backing plate on but NOT the clear plastic cover.
Now, eat, relax for 30 mins because the next bit is tedious also.
Plug your cluster in and turn the key on. Wait for all the motors to stop spinning (you’ll hear them)
Now turn the key OFF. Press all of your needles on LIGHTLY, don’t snap them in just yet. Set them all to just below where they should be when the car is off.
Now turn the key on and make sure all the needles go to where they are supposed to. If they don’t, this is where you can move them . turn the key off.
My problem was they kept going way below where they were supposed to go and it wasn’t working so here’s what to do:
Turn all the gauges clockwise lightly till they stop. Now force them a little further round.
Turn them Counter clockwise will they stop. They should now stop a little above where they should normally sit.
Force them just below Zero. Turn the key on and take a look.
I ran my car for 10 mins to warm up so I could check my temp gauge.
I also filled up my gas tank.
Keep playing with them till they are perfect. I was doing this for over an hour.
Now that they are perfect, DON’T UNPLUG THE CLUSTER AGAIN.
Push all the needles firmly till they stop
Check them again for accuracy
Pop the plastic panel back on
Put your screws back in
Push your dash back on
Put your fuse back in and put everything back together
Make sure your airbag light goes out after 30 seconds
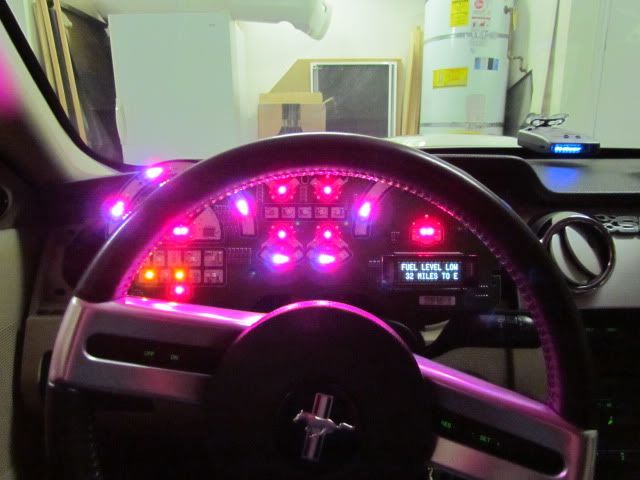
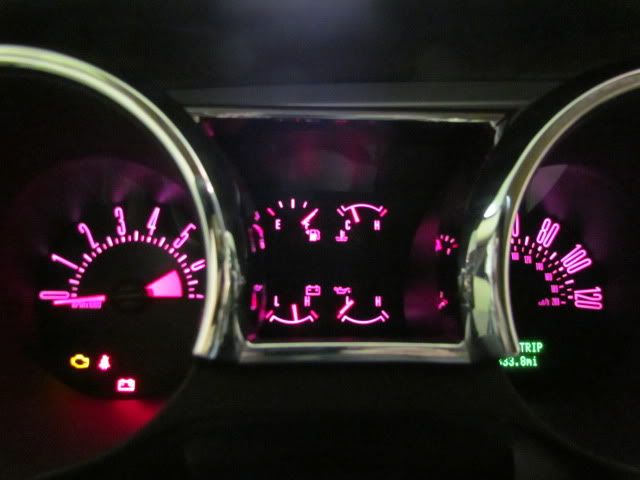
Enjoy your new cluster. Free of issues!
-------A few side Notes--------
This was HARD. Don’t attempt this if you have never soldered before. Practice on an old cable modem or something until you feel comfortable.
Don’t rush, Slow and steady win the race. If you rush you will break a tab and your cluster will rattle or you will burn the board
Make sure you have all the tools you need. You wont be able to drive your car without the cluster if you forgot to get something.
Don’t hold the soldering iron on the metal pins for too long (Over 45 seconds) you will warm up the circuit board and damage it.
I don’t want to ever do this again, it was a pain in the butt and very time consuming. It was worth the effort though.
If you have any questions I am happy to answer them. I don’t have much time these days but I will eventually get back to you.
I purchased my stepper motors from EBay.
Hope this helps some of you.
-Chris
My instrument cluster has been like this for over 2 years now:
(Notice oil pressure)
My fuel gage does the same thing as well as my tachometer but they seem to fix themselves.
I’m sick and tired of looking at this so I decided it was time to fix it.
A new cluster from Ford, with a shop discount is $333.00. That doesn’t sound too bad but there is a $300 core on it. So you have to fork out $633.00 and wait to get the 300 back. I don’t have that kind of money, I do however have $80
The issue with the 05 clusters is the stepper motors and all that needs to be done to fix this problem is replace them. Sounds easy right? It wasn’t!!!!
Before you take on this challenging task you will need:
7mm socket
50 watt soldering iron or higher (I had to buy a new one. My 30 W wasn’t hot enough)
Solder
Flux (this helps prevent the solder from sticking to everything )
Pliers
Stepper motors (Part number: X25. 589)
Two small flat blade screwdrivers
A Dinner fork
And all the patience you can gather!
I replaced all 6 of my stepper motors. I figured it would save me time just replacing them all now instead of waiting for another to go bad.
Alight here we go!
First, use the bathroom, eat, get comfortable, clear an area for you to work, gather your things, Relax, and DON’T RUSH!!!!!
We are going to disable the air bag now to make sure it doesn’t go off. Not sure if this is totally necessary but I figured why take a chance.
Locate the passenger side kick panel Here:
Open it up and expose the fuse panel:
There are some plastic tabs on either side of this cover, gently pull them away from the fuse box and toward you exposing all of the fuses:
Locate fuse no. 17. (10 amp fuse)
Pull it out.
Now, turn the key ON Engine off.
Wait 30 seconds; Make sure the Air bag light stays ON. If it goes out, you pulled the wrong fuse out.
Grab the dash by the tachometer gauge plastic and speedometer gauge plastic and pull toward you
The whole panel should pull right out. Pull it straight so you don’t break any clips.
Your left with the cluster screws exposed:
Notice the 4 yellow circles, this is where the screws are, they are hard to see from my picture but they are there. They are 7mm screws. Unscrew these and pull your cluster case toward you. Look on the back and see the plug.
This YELLOW plug with grey clip needs to come off so GENTLY push down on the black tab behind the grey clip and pull on the grey clip:
Take your cluster to your CLEAN work area.
--Don’t drive your car without your cluster in, don’t even put the key in the ignition, you will mess up your car!!!---
Pop the clear plastic panel off by pulling up (Carefully) on the plastic tabs round the edges. I believe there are four of these. And set the panel aside:
Now you have exposed the face plate with the needles.
Pull straight up on the needles at the BASE (Black bit)
A few of mine were stuck so I used two screwdrivers on opposite sides to pull up being careful not to scratch or break anything.
I then realized i could use a fork to make this easier
Set your needles aside and DON’T LOOSE THEM
Now separate the FACE PLATE from the BACKING PLATE. Use a screw driver to gently pull out on the black plastic tabs.
Set the face and backing plates aside, now take a good long look at your circuit board. Don’t touch anything. You don’t want to damage the circuit board.
The six white circles are the stepper motors.
Flip the board over and notice where the motor comes through:
Youll see where the needle attaches and four solder points round the needle.
We need to remove the solder so we can pull out the old motors.
This is HARD Very hard! It took me over two hours.
Its tricky because you cannot touch the circuit board with the soldering iron, it will damage it and your out $333.
I used a piece of copper wire to pull the solder away from the board but wasn’t having much luck. After about 40 minutes of frustration I decided I needed a can of soda!
It put me back in the zone. I then looked closer at the motor and saw 4 plastic tabs:
I pulled them apart
(picture was taken after I had finished)
This exposes the motor, pull out the little gears and break off the black and copper things.
Now you can pull off the plastic and your left with the four metal pins.
Pinch one side of the pin with pliers and heat the other side up with your soldering iron and the pin should come right out.
Some of them don’t bring the solder with them so I used a sewing pin and poked it through .
Now place the new motors on the board making sure all pins are through the holes. Solder these four pins with as little solder as you can use.
Once that’s all done. Plug the board into your car and turn the key on. Make sure everything lights up!
If nothing works, check your plug and if it still doesn’t work, Im sorry, you messed up big time!
Bring the cluster back to the table and put the face plate and backing plate on but NOT the clear plastic cover.
Now, eat, relax for 30 mins because the next bit is tedious also.
Plug your cluster in and turn the key on. Wait for all the motors to stop spinning (you’ll hear them)
Now turn the key OFF. Press all of your needles on LIGHTLY, don’t snap them in just yet. Set them all to just below where they should be when the car is off.
Now turn the key on and make sure all the needles go to where they are supposed to. If they don’t, this is where you can move them . turn the key off.
My problem was they kept going way below where they were supposed to go and it wasn’t working so here’s what to do:
Turn all the gauges clockwise lightly till they stop. Now force them a little further round.
Turn them Counter clockwise will they stop. They should now stop a little above where they should normally sit.
Force them just below Zero. Turn the key on and take a look.
I ran my car for 10 mins to warm up so I could check my temp gauge.
I also filled up my gas tank.
Keep playing with them till they are perfect. I was doing this for over an hour.
Now that they are perfect, DON’T UNPLUG THE CLUSTER AGAIN.
Push all the needles firmly till they stop
Check them again for accuracy
Pop the plastic panel back on
Put your screws back in
Push your dash back on
Put your fuse back in and put everything back together
Make sure your airbag light goes out after 30 seconds
Enjoy your new cluster. Free of issues!
-------A few side Notes--------
This was HARD. Don’t attempt this if you have never soldered before. Practice on an old cable modem or something until you feel comfortable.
Don’t rush, Slow and steady win the race. If you rush you will break a tab and your cluster will rattle or you will burn the board
Make sure you have all the tools you need. You wont be able to drive your car without the cluster if you forgot to get something.
Don’t hold the soldering iron on the metal pins for too long (Over 45 seconds) you will warm up the circuit board and damage it.
I don’t want to ever do this again, it was a pain in the butt and very time consuming. It was worth the effort though.
If you have any questions I am happy to answer them. I don’t have much time these days but I will eventually get back to you.
I purchased my stepper motors from EBay.
Hope this helps some of you.
-Chris
 03-13-2011, 03:33 AM
#4
4th Gear Member
Join Date: Dec 2010
Location: Gallifrey
Posts: 1,596
Good job.
I would like to point out however, yes, it is unnecessary to pull the airbag fuse. And driving around without the cluster will not �mess your car up�.
I had mine removed for days at a time while working on it previously waiting for LEDs to ship and such. Just obviously not advisable as you will have no gauges, and no indicators of any kind. Everything will still function, turn signals, etc.., just no indicators of their functioning(ticking turn-signal sound included). And the couple of things depending on the cluster for operation won�t work (TCS to control on/off, passenger air-bag disable from weight).
Here is another thread from some time ago on the subject. You can unsolder them (use soldering braid or sucker) for a direct swap without pulling apart the replacements.
Last edited by wayne613; 03-13-2011 at 07:14 AM.
03-13-2011, 11:08 AM
#5
6th Gear Member

Join Date: Jul 2008
Location: Acworth, GA
Posts: 12,260
Very good write up! I attempted to replace my stepper for my RPM a few months ago and ended up botching it. I got a hell of a deal at the local dealership for a new one. Oh and heres another similar write up:
http://www.mustangcollective.com/sho...cluster+repair
http://www.mustangcollective.com/sho...cluster+repair
03-13-2011, 12:39 PM
#6
2nd Gear Member
Join Date: Jan 2010
Location: NY
Posts: 369
Great write up!
FYI, you need to get a solder sucker which will make unsoldering the stepper motors *much* easier. Damage to the circuit board is unlikely if you don't use excessive heat. Once the solder is melted, "suck" it out and remove heat. The risk of damage comes from too much heat for a prolonged period which will cause de-lamination of the copper foil traces from the base substrate.
Keep in mind the circuit board is designed to take temps in excess of 450 degrees F for short periods of time during both manufacturing and assembly.
You could user a solder wick also but they don't work as well and require more heat.
Disclosure: I worked at a PCB manufacturing facility for 15 years.
02-03-2012, 12:37 PM
#9

Join Date: Feb 2012
Location: Nevada
Posts: 4
Great post..I just ordered the stepper motors of EBAY for 23 bucks and will attempt to swap them out on my own. I have a '05 GT and the RPM gauge was the 1st to go, then the speedo and temp soon followed. After poking around the net, seems like this is a common problem for '05's and up..wondering when Ford will issue a recall???
11-17-2012, 02:55 PM
#10
2nd Gear Member
Join Date: Apr 2005
Location:
Posts: 193
Thanks for the write up!
in the last couple of months my tach and gas gauge were acting funny from time to time. Then, recently my speedo started acting up, and finally ended up pointing straight down. I bought the stepper motors for about $30 on ebay and replaced all 6. Took me a total of 2 hours following most of the steps above.
My only recommendations are to pull the old motors apart as mentioned above, then instead of breaking the little pieces off, pull on them while touching the soldering iron to the other side. The pull right out.
Then, to install the new motors, I left the little bit of solder on the board, and while pushing the new motors into place, I touched the iron to each of the four prongs one at a time. The solder would melt and it would push on little by little. Not as easy as it sounds, but not too bad.
Thanks again!