
The m90's going in!!!
 07-12-2011, 09:10 PM
#11
4th Gear Member
Join Date: Apr 2008
Location: toronto,canada
Posts: 1,176
Just read the instruction's over before you start! I found it easier to download the instructions to my lap top,make sure you have the tool for the spring loaded clamps(makes it easier)and the tool to disconnect the fuel line.those are the plugs that i have for mine(no problems) also you have the updated heads! good luck and take your time,you will be fine!


 07-12-2011, 10:05 PM
#14
2nd Gear Member

Join Date: Mar 2010
Location: TX
Posts: 179
Just read the instruction's over before you start! I found it easier to download the instructions to my lap top,make sure you have the tool for the spring loaded clamps(makes it easier)and the tool to disconnect the fuel line.those are the plugs that i have for mine(no problems) also you have the updated heads! good luck and take your time,you will be fine!
- Get the fuel line tool (it's about $7 at autozone) and the tool to hold the springs for the coolant lines. Those are a PITA to get on with some of the IC pipes especially when your 8 hours into it already.
- Also, when you repin the sensor (can't recall which one it was) the white piece inside the clip pulls out. Took me 10 mins to figure out how to get the wires out of the stock clip until I just pried it out. It popped out and slides into the new clip from Roush.
- Have a good cut of wheel for the alternator moddifications and ideally a friend that can help.
- BE VERY CAREFULL when torq the intake to head bolts. Those are very easy to snap. You don't want to know how I know but lets just say it added about an hour to my install.
- Make sure you have all the right parts before you start. I was sent a TVS intake tube with my kit.
- Take your time with the wiring. It's not hard but makes a difference when it's done sloppy.
Overall it's a great kit and was easy to install. Just take your time. I'd recommend breaking it out into 2 days rather than trying to fit it all into one as you don't want to make any "tired eye mistakes". That's how I snapped a bolt off in the head....
Once it's installed, be CAREFULL, especially with the 4.10's. The car will be completly different. Mine will spin easisly (3.73) in 1st, 2nd and 3rd gears.
07-12-2011, 10:18 PM
#15
2nd Gear Member
Join Date: Mar 2010
Location: TX
Posts: 179
Also, be sure to measure twice and cut once on the hoses. If done right it all goes back together easily.
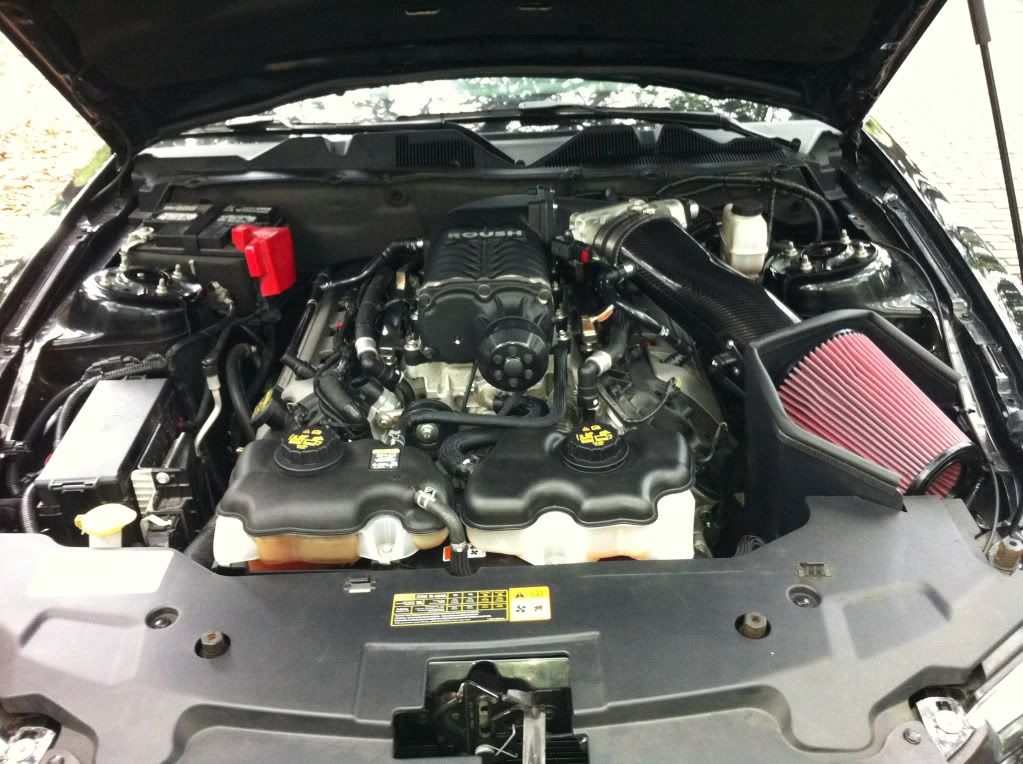
Hope I'm not spamming with pics but here are a bunch I took. In the first two take not of the catch can I added. I'd recommend getting one of these as you can tell in the pics with the stock intake removed that even when NA their was a lot of oil blow-by occuring. The car had about 12K miles on it at time of install.


Hope I'm not spamming with pics but here are a bunch I took. In the first two take not of the catch can I added. I'd recommend getting one of these as you can tell in the pics with the stock intake removed that even when NA their was a lot of oil blow-by occuring. The car had about 12K miles on it at time of install.
Last edited by black2010; 07-12-2011 at 10:22 PM.
07-12-2011, 11:56 PM
#16
4th Gear Member
Thread Starter

Join Date: Sep 2010
Location: Not sure
Posts: 1,724
Charlie - Thanks man I really hope everything goes well.
Reaper - Thanks for the post man but the 5.0 setups are much different and wouldnt want to mess things up lol. I can just imagine being like "wtf why doesnt mine look like that".
Black - Thanks for all the pics man they really gave me a good idea of how things look and what they should look like. I noticed you took your bumper off before doing anything else and it seems like a smart move so I may do that as well. Plus it wont get scratched from leaning into the engine bay.
My 2.55" pulley isnt coming until thursday so I am breaking the install up into wednesday and thursday. I am waking up at 6am to start and going to try and get a decent amount done, than maybe hit the gym and relax for a few hours this way I dont end up getting frustrated and groggy like my 10hr header install. I will be sure to post back if I run into any problem which I am hoping doesnt happen. I also need to get my UD pullies off first thing and get the stock ones on before I start anything s/c related.

 07-13-2011, 05:00 PM
#20
4th Gear Member
Thread Starter
Join Date: Sep 2010
Location: Not sure
Posts: 1,724
I've been taking many pics, but there on my camera so I'll upload them tonight. So far I have the entire dis-assembly part of the install done. Started around 11am but ran into problems with getting my under drive pullies off and also had to run back and forth to autozone 3 times. All in all everything seems to be going well just hope it stays like this!