
HOWTO: Install a 2010+ Steering Wheel and have fully functional audio controls
 04-26-2014, 04:40 PM
#1
Thread Starter

Join Date: Apr 2014
Location: Fl
Posts: 5
This how to is going to go over how to install a 2010+ steering wheel into your 05-09 (I did the Boss steering wheel into my 06) and have all of the buttons function properly.
PLEASE READ THE ENTIRE THING BEFORE STARTING, TRUST ME
I'm not responsible if you mess something up
Required Tools and Parts
Before you start you are going to want all of this because this isn't really a project to stop halfway through.
These are required just to install the wheel/cruise control:
Once you have all of this it's time to get started.
1. The first step is to disconnect your battery for at least 20 minutes. This is to let the airbag's charge drain so you don't accidentally set it off
2. Remove the two protective caps from your steering wheel (this is where a flathead is helpful). They are just in front of the stalks one on the left and one on the right
3. Once these caps are off use the 5/16 adapter and your ratchet to remove the two bolts (these will frequently fall in the hole a bit, needlenoses are helpful)

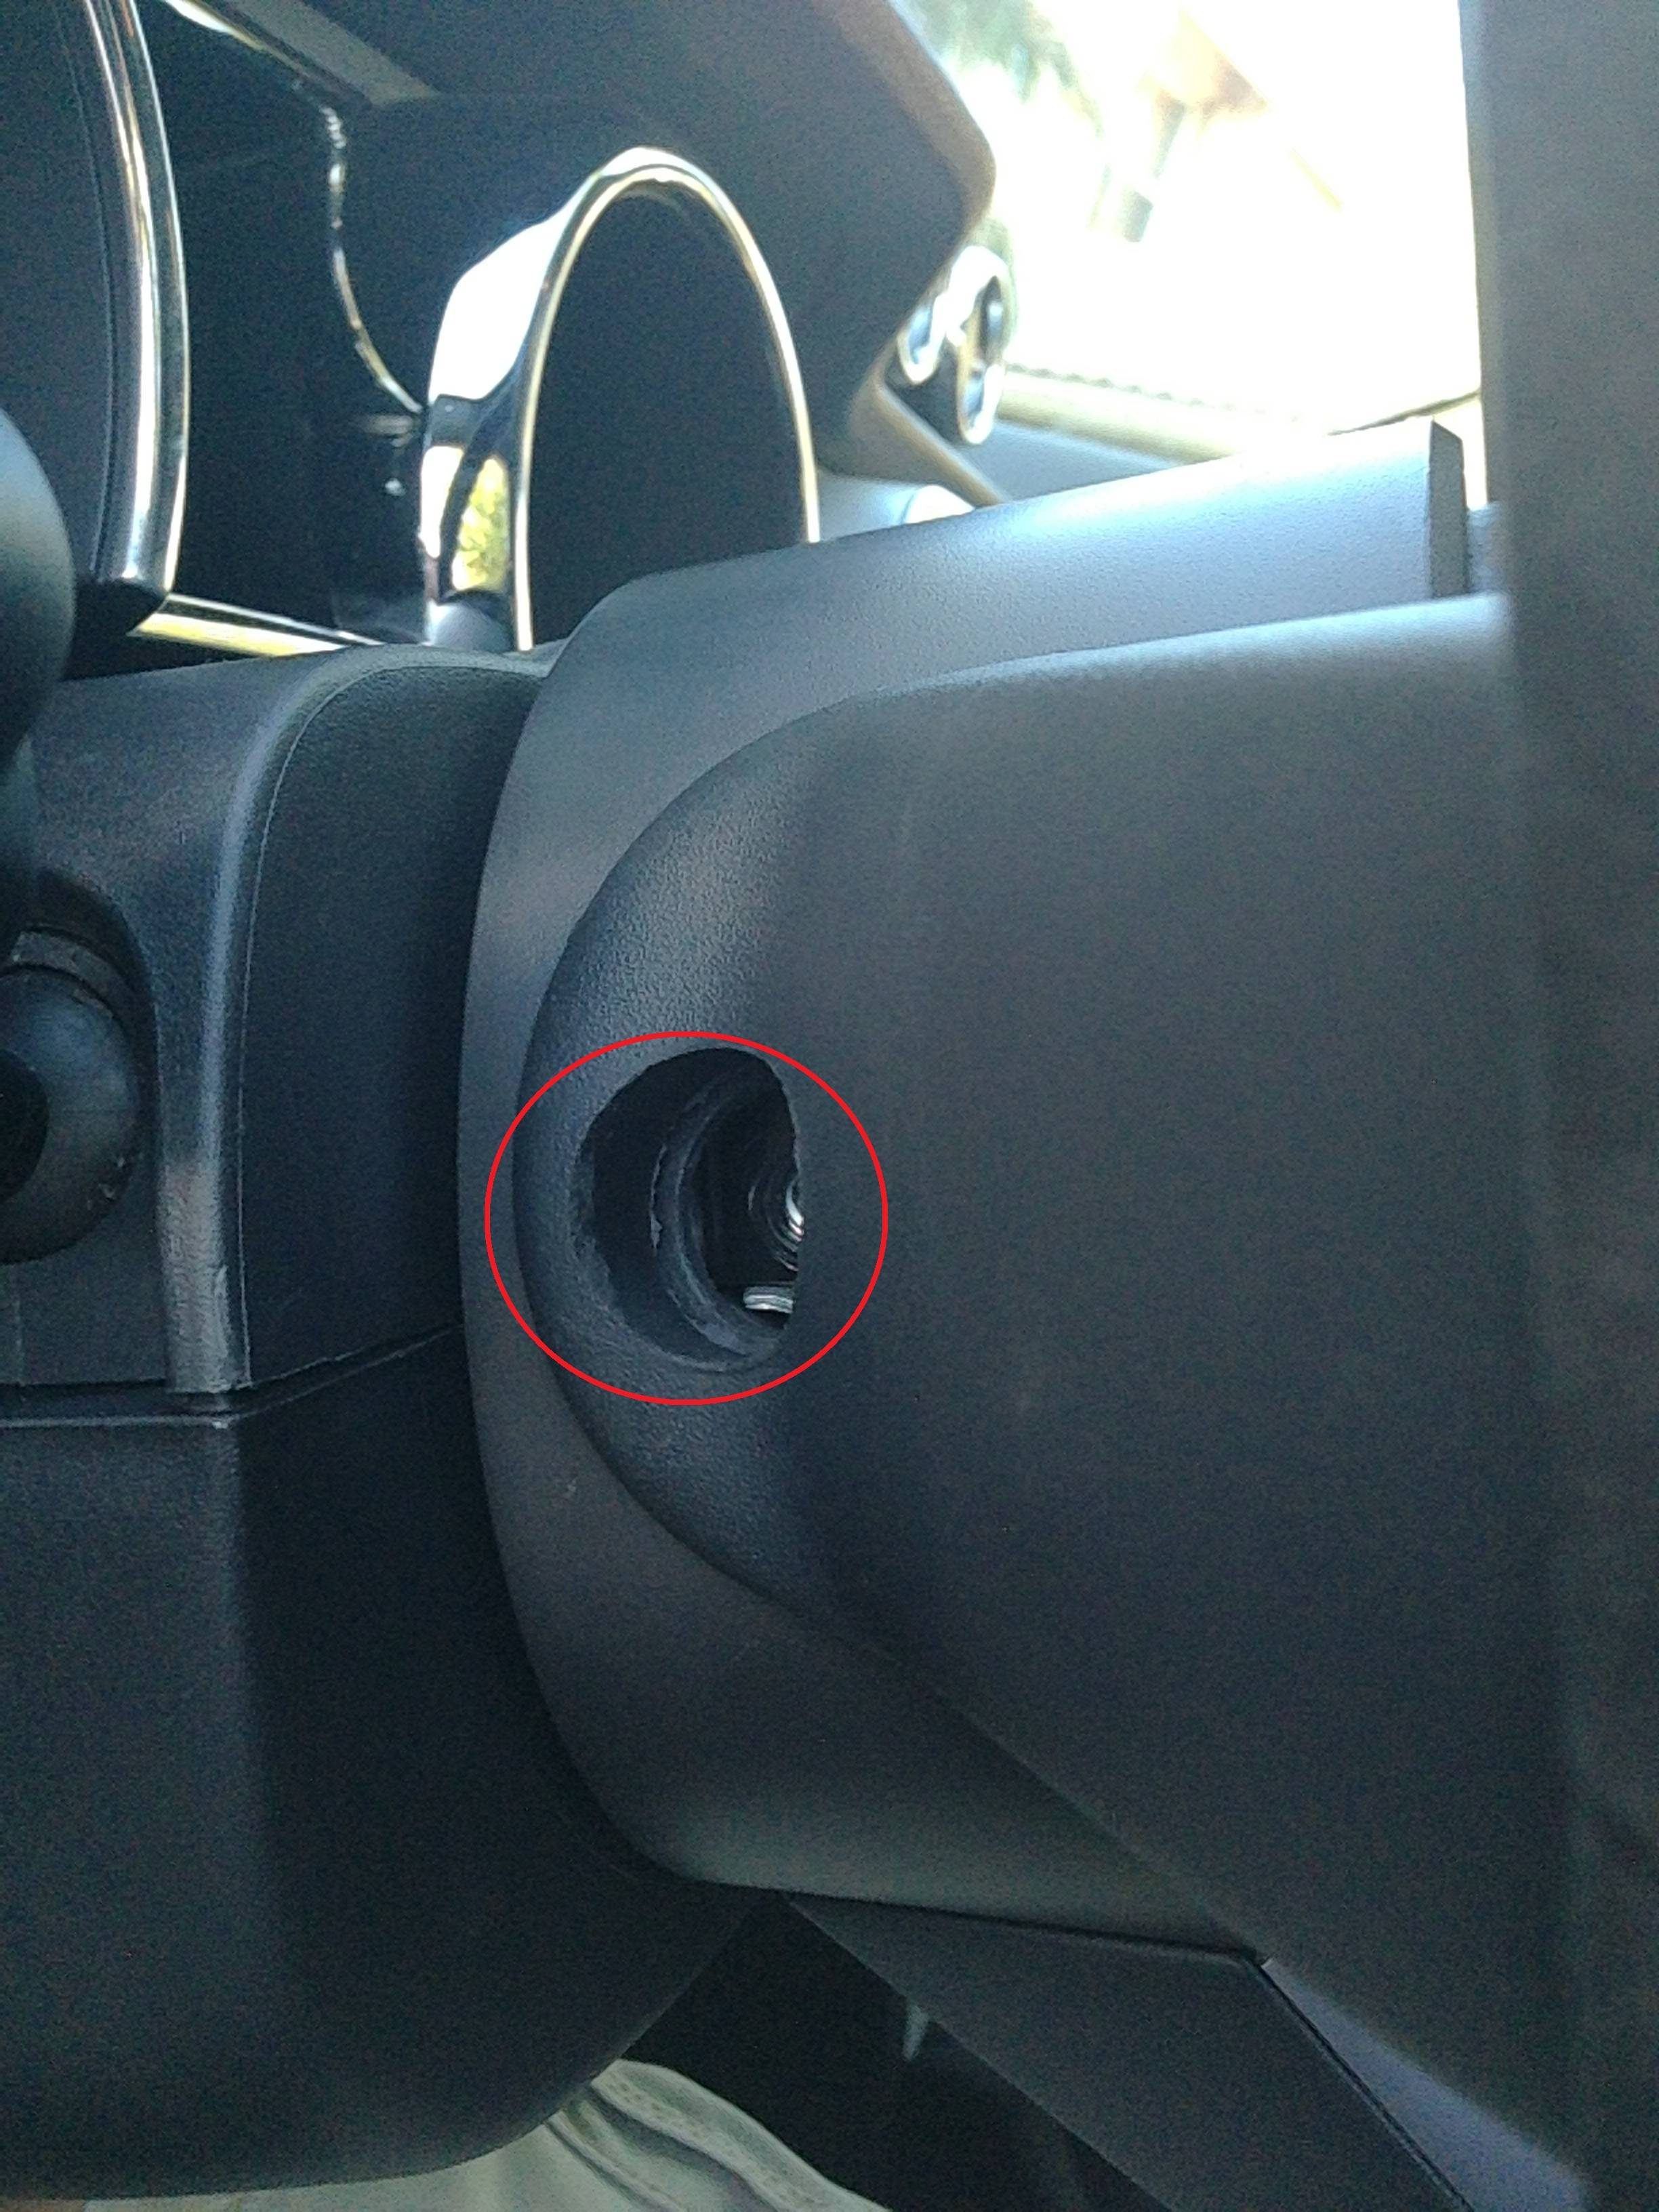
4. Now you to need to remove the airbag assembly to do this you basically just grab it and pull forward, be cautious of the wires behind it as they will need to be disconnected prior to removal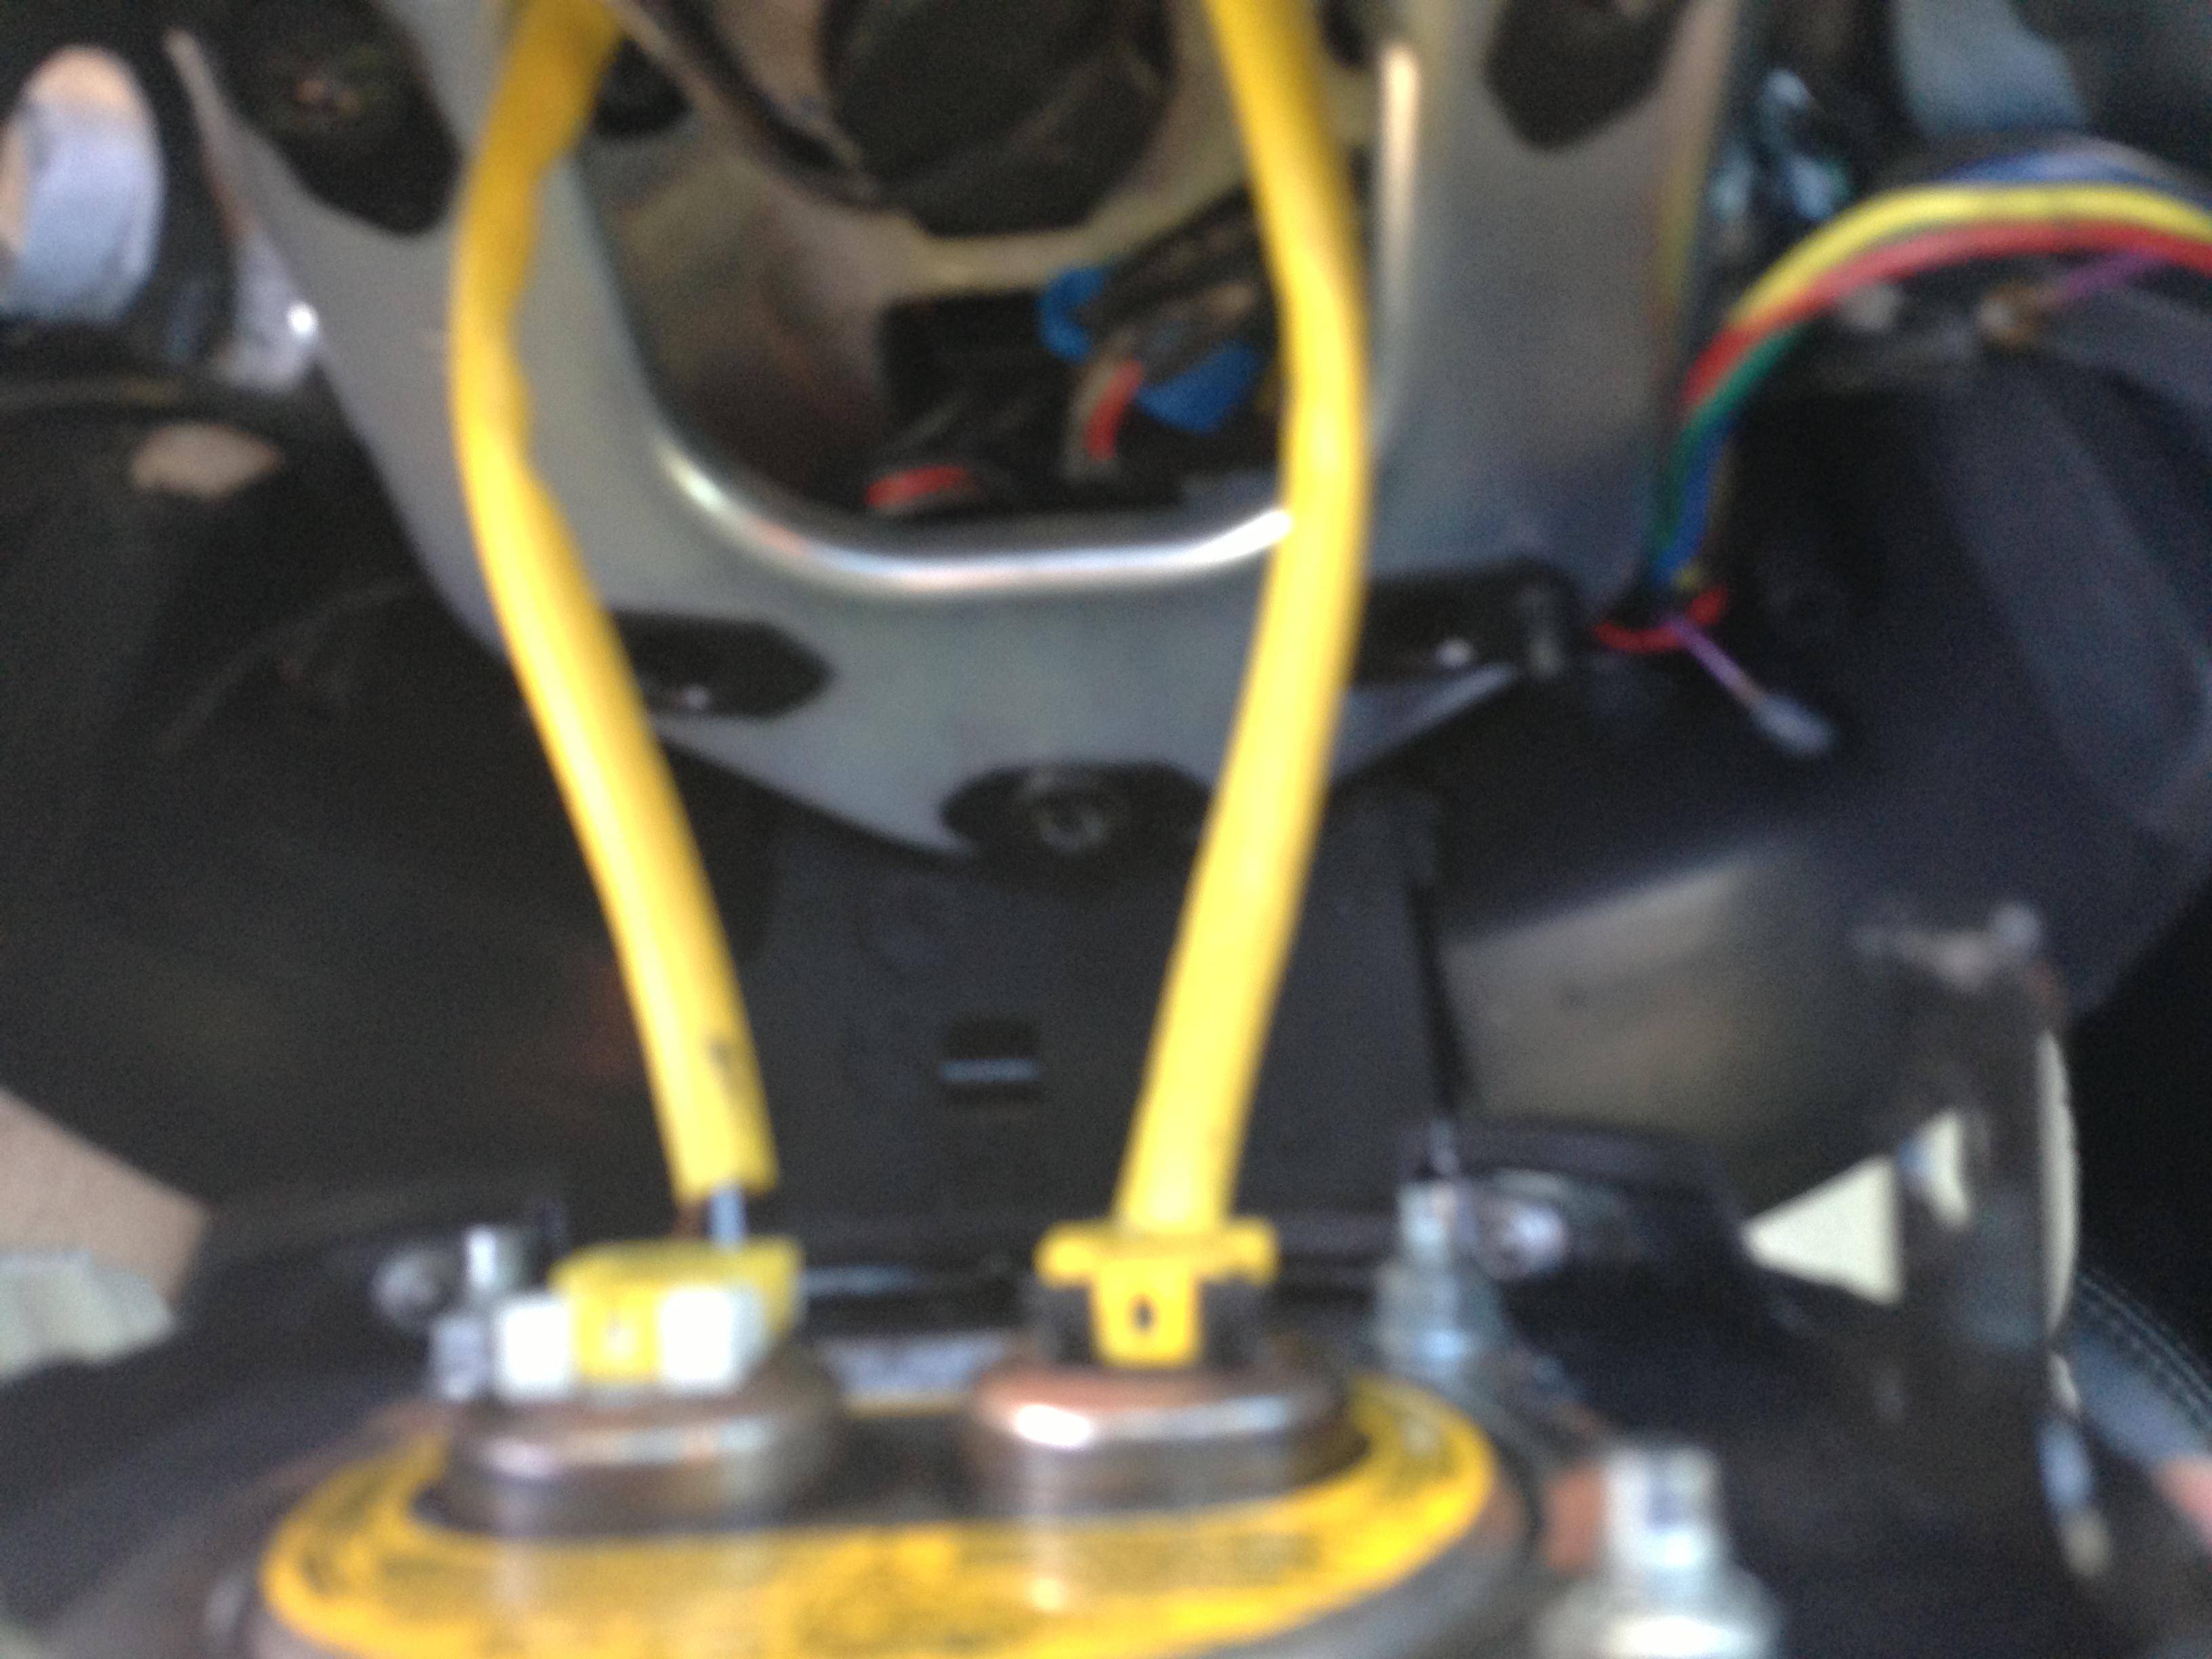 Once removed set this aside somewhere safe where no one will kick it.
5. Now you are going to see this: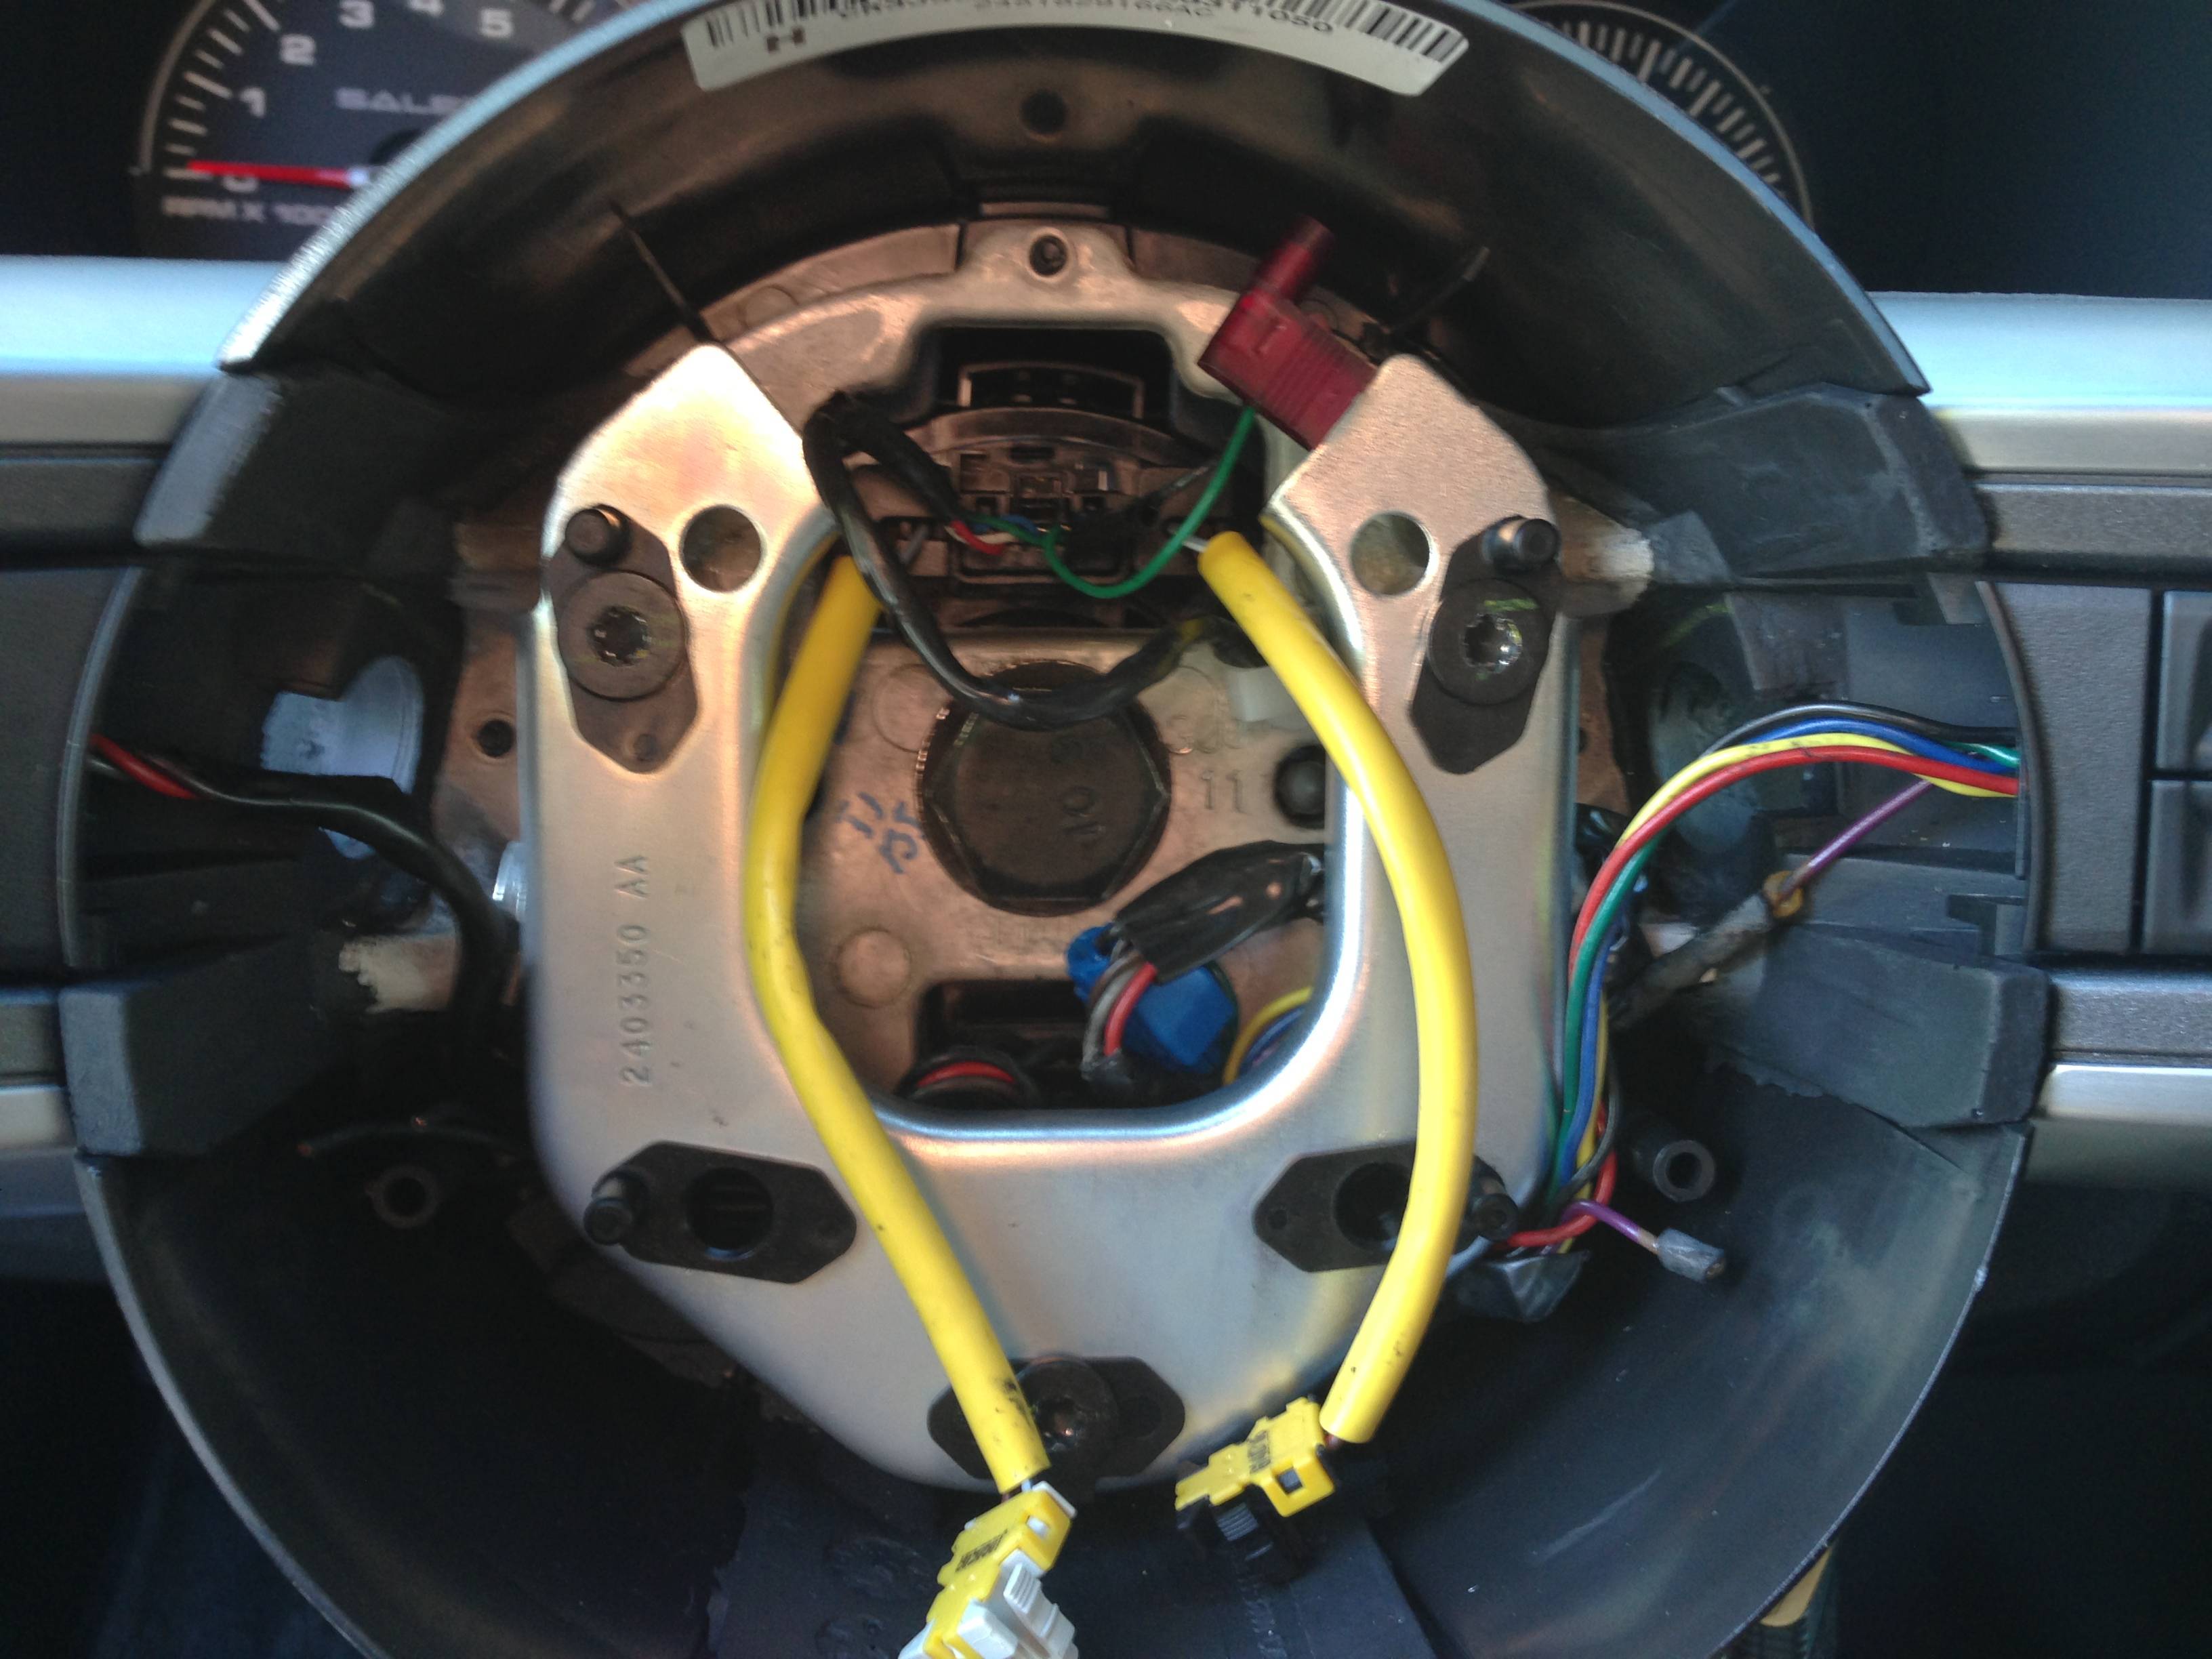
For ease we are going to get everything out of our way, first unscrew the horn (U shape). There are three T30 screws securing it in place (one at the bottom and one at each top piece) be sure to not lose the springs underneath it, also ensure you disconnect the red plug (top right) prior to removal.
Next remove the wire harness from it's plugs. One plug goes into the buttons on the left and the other goes into the buttons on the right. Then the main plug is at the top center between the airbag wires. Each of these plugs has a little safety tab mechanism that you need to use to remove it. Finally unscrew the ground (green wire top right) using a T20 driver.
At this point you have a nice clean view with no obstruction: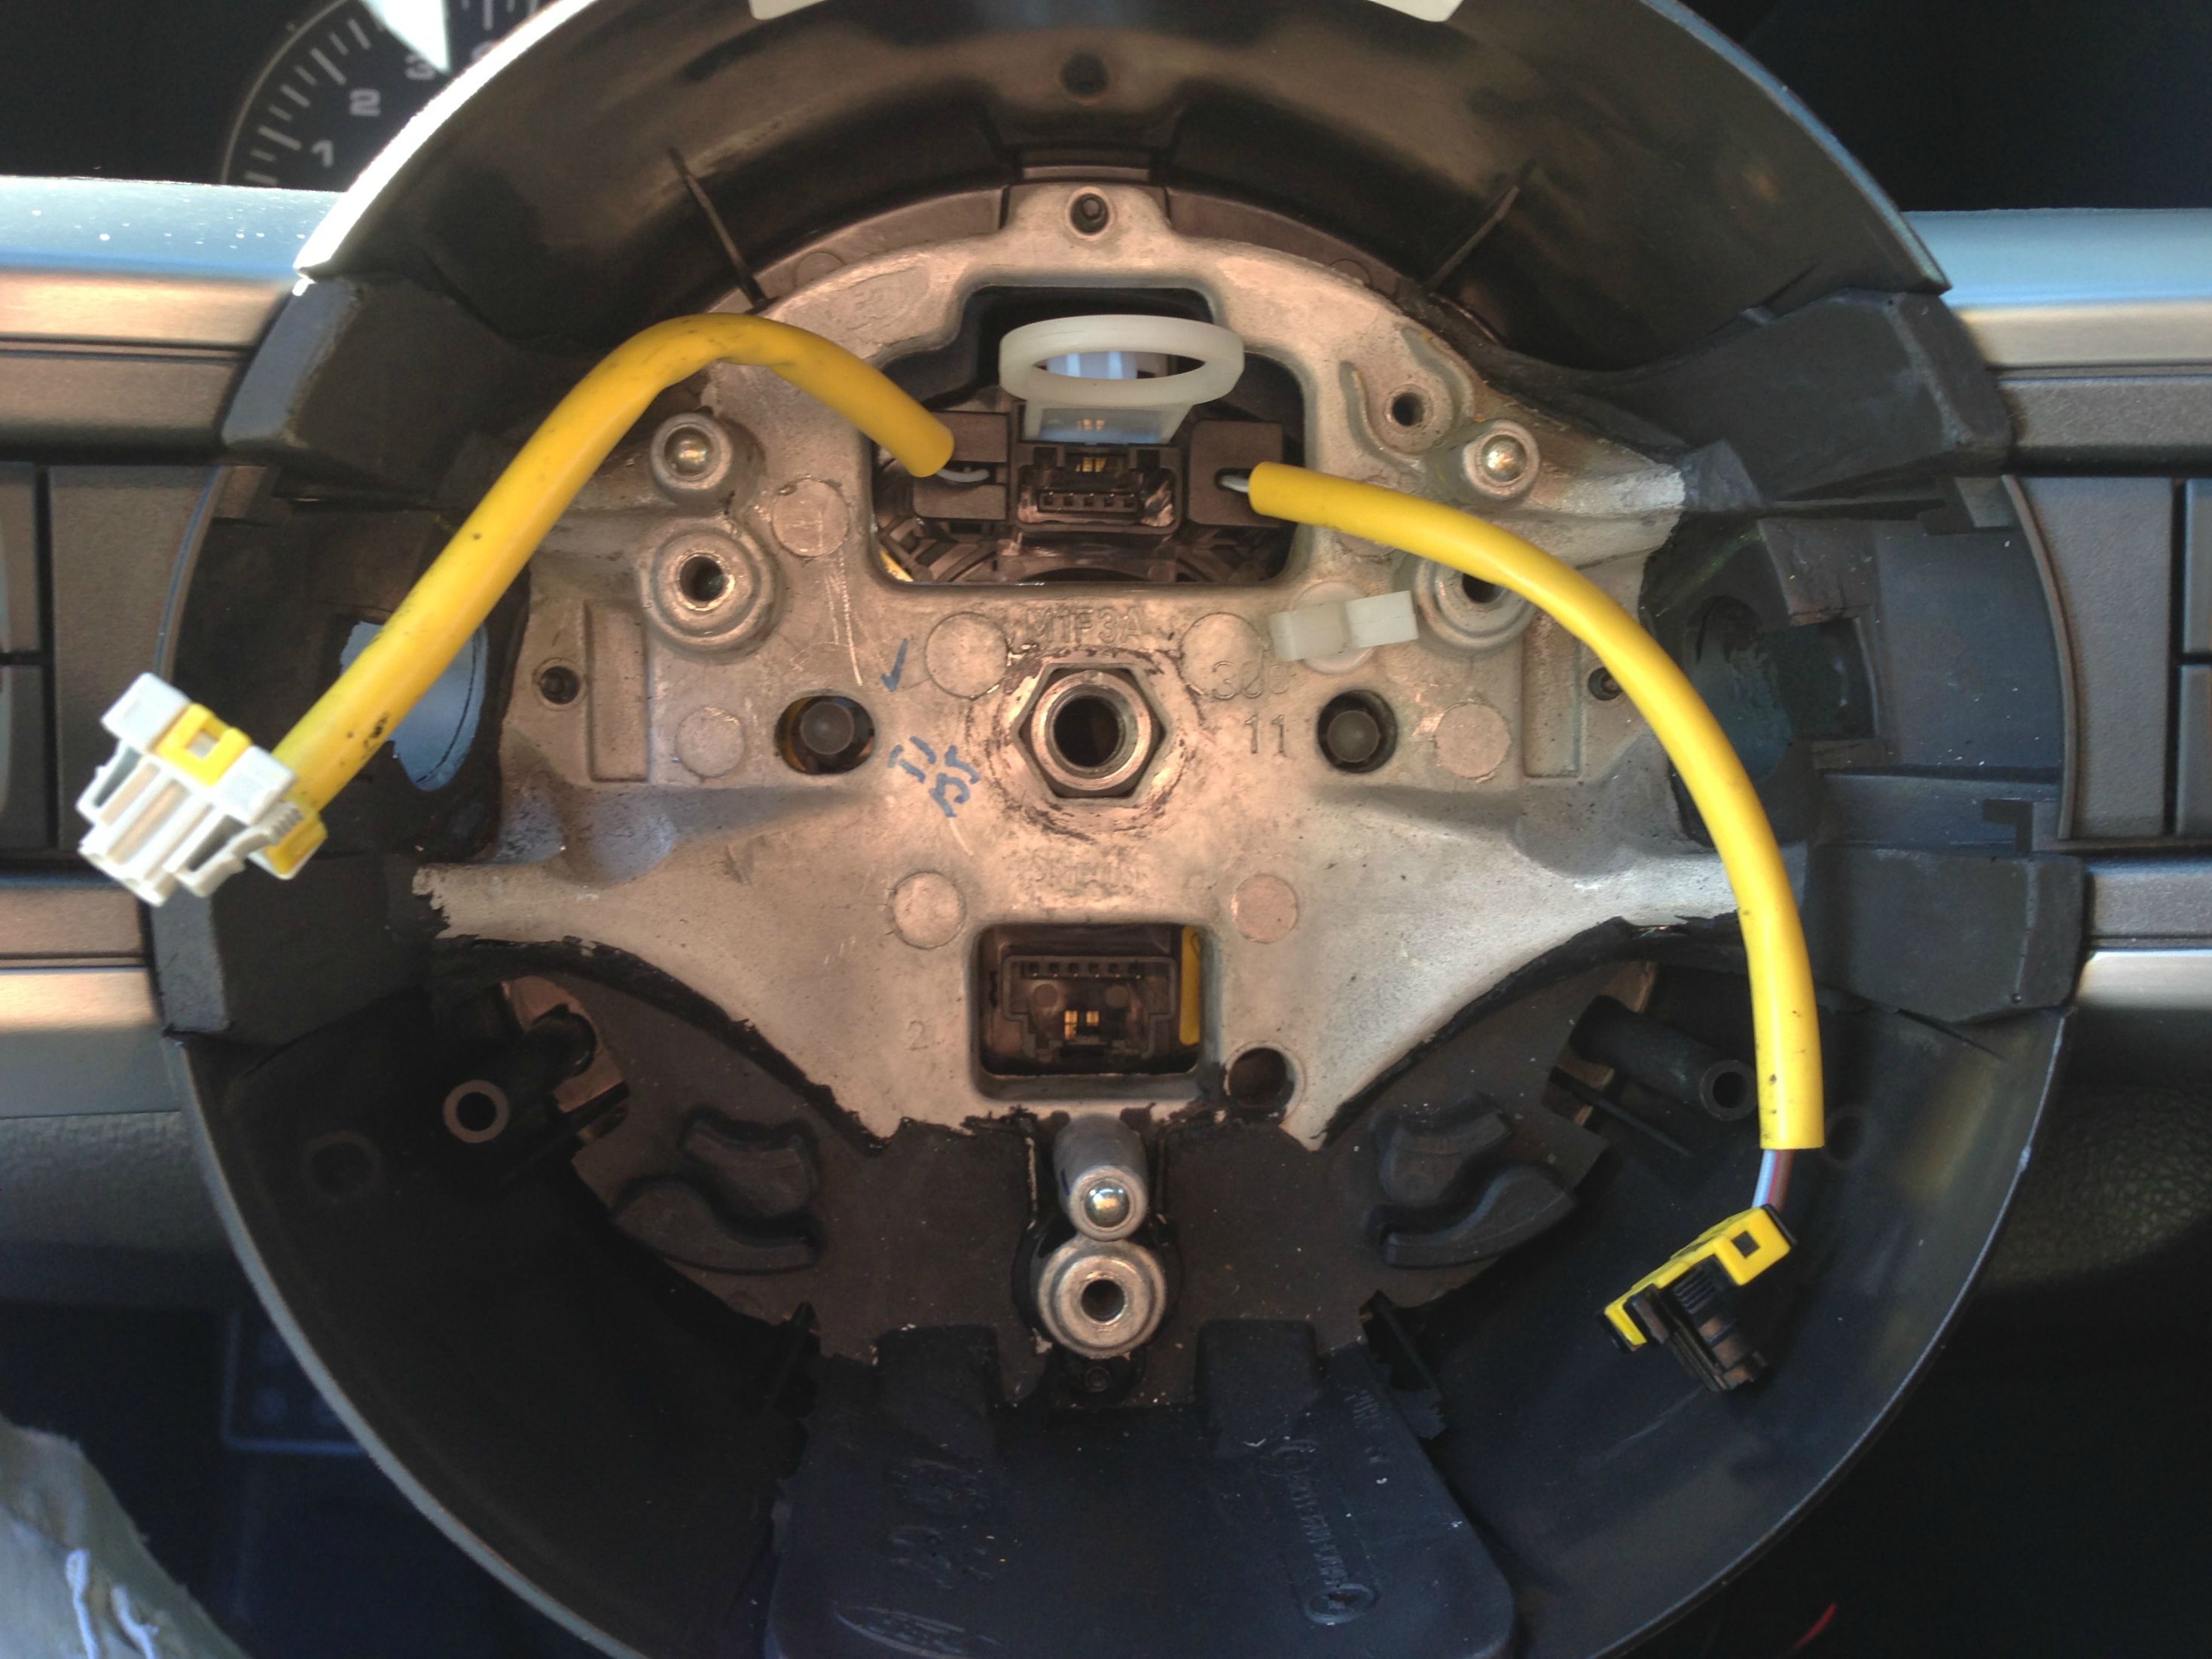
6. Now use the 15/16 adapter to remove the big bolt dead in the middle of the wheel. Once the bolt is removed you can pull the wheel right off (mind that the airbag wires go through the hole cleanly)
Now for the fun part
RESIST THE TEMPTATION TO SPIN THE CLOCK SPRING IT WILL MESS UP YOUR ALIGNMENT
At this point you can get out of the car so you have more room to work with. Now we need to do the wiring. This is the point of no return so be sure before the next step
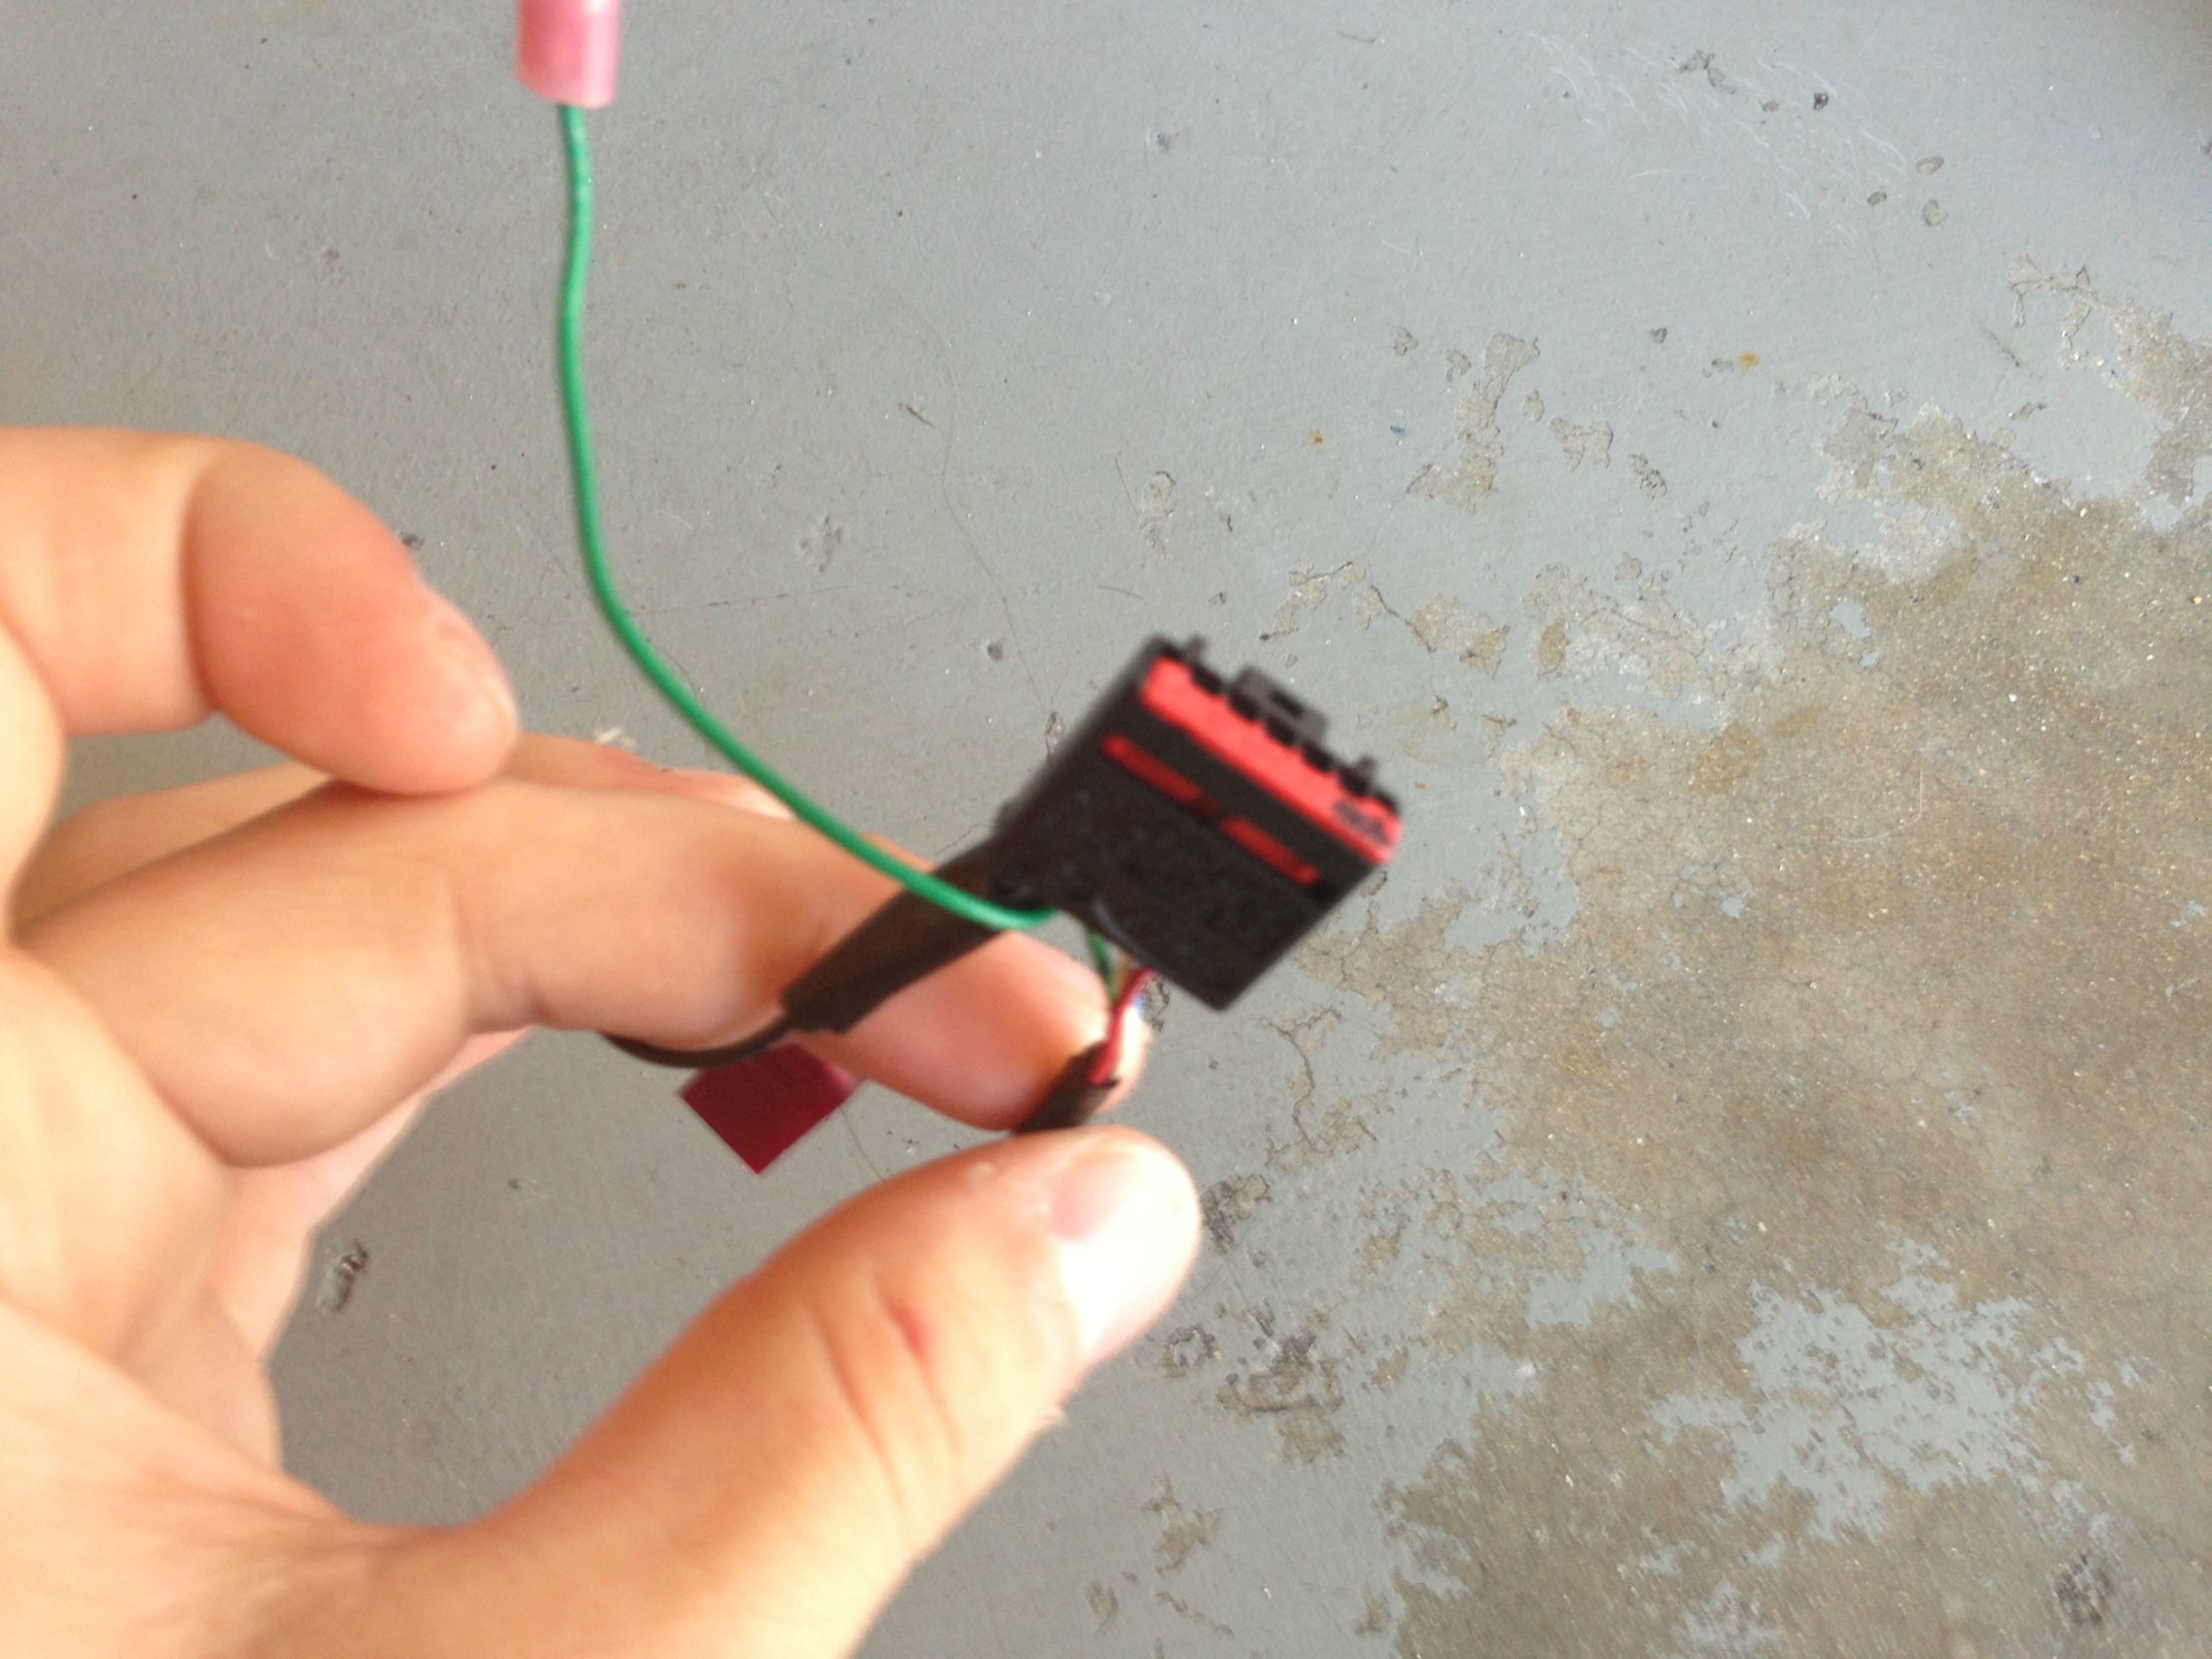
7. Cut the plug that went into the clockspring (not the cruise control buttons) off of its harness (be sure to leave some wire so that you can attach this plug to the new harness later
8. Now do the same to the harness from the new steering wheel (sorry I don't have a picture)
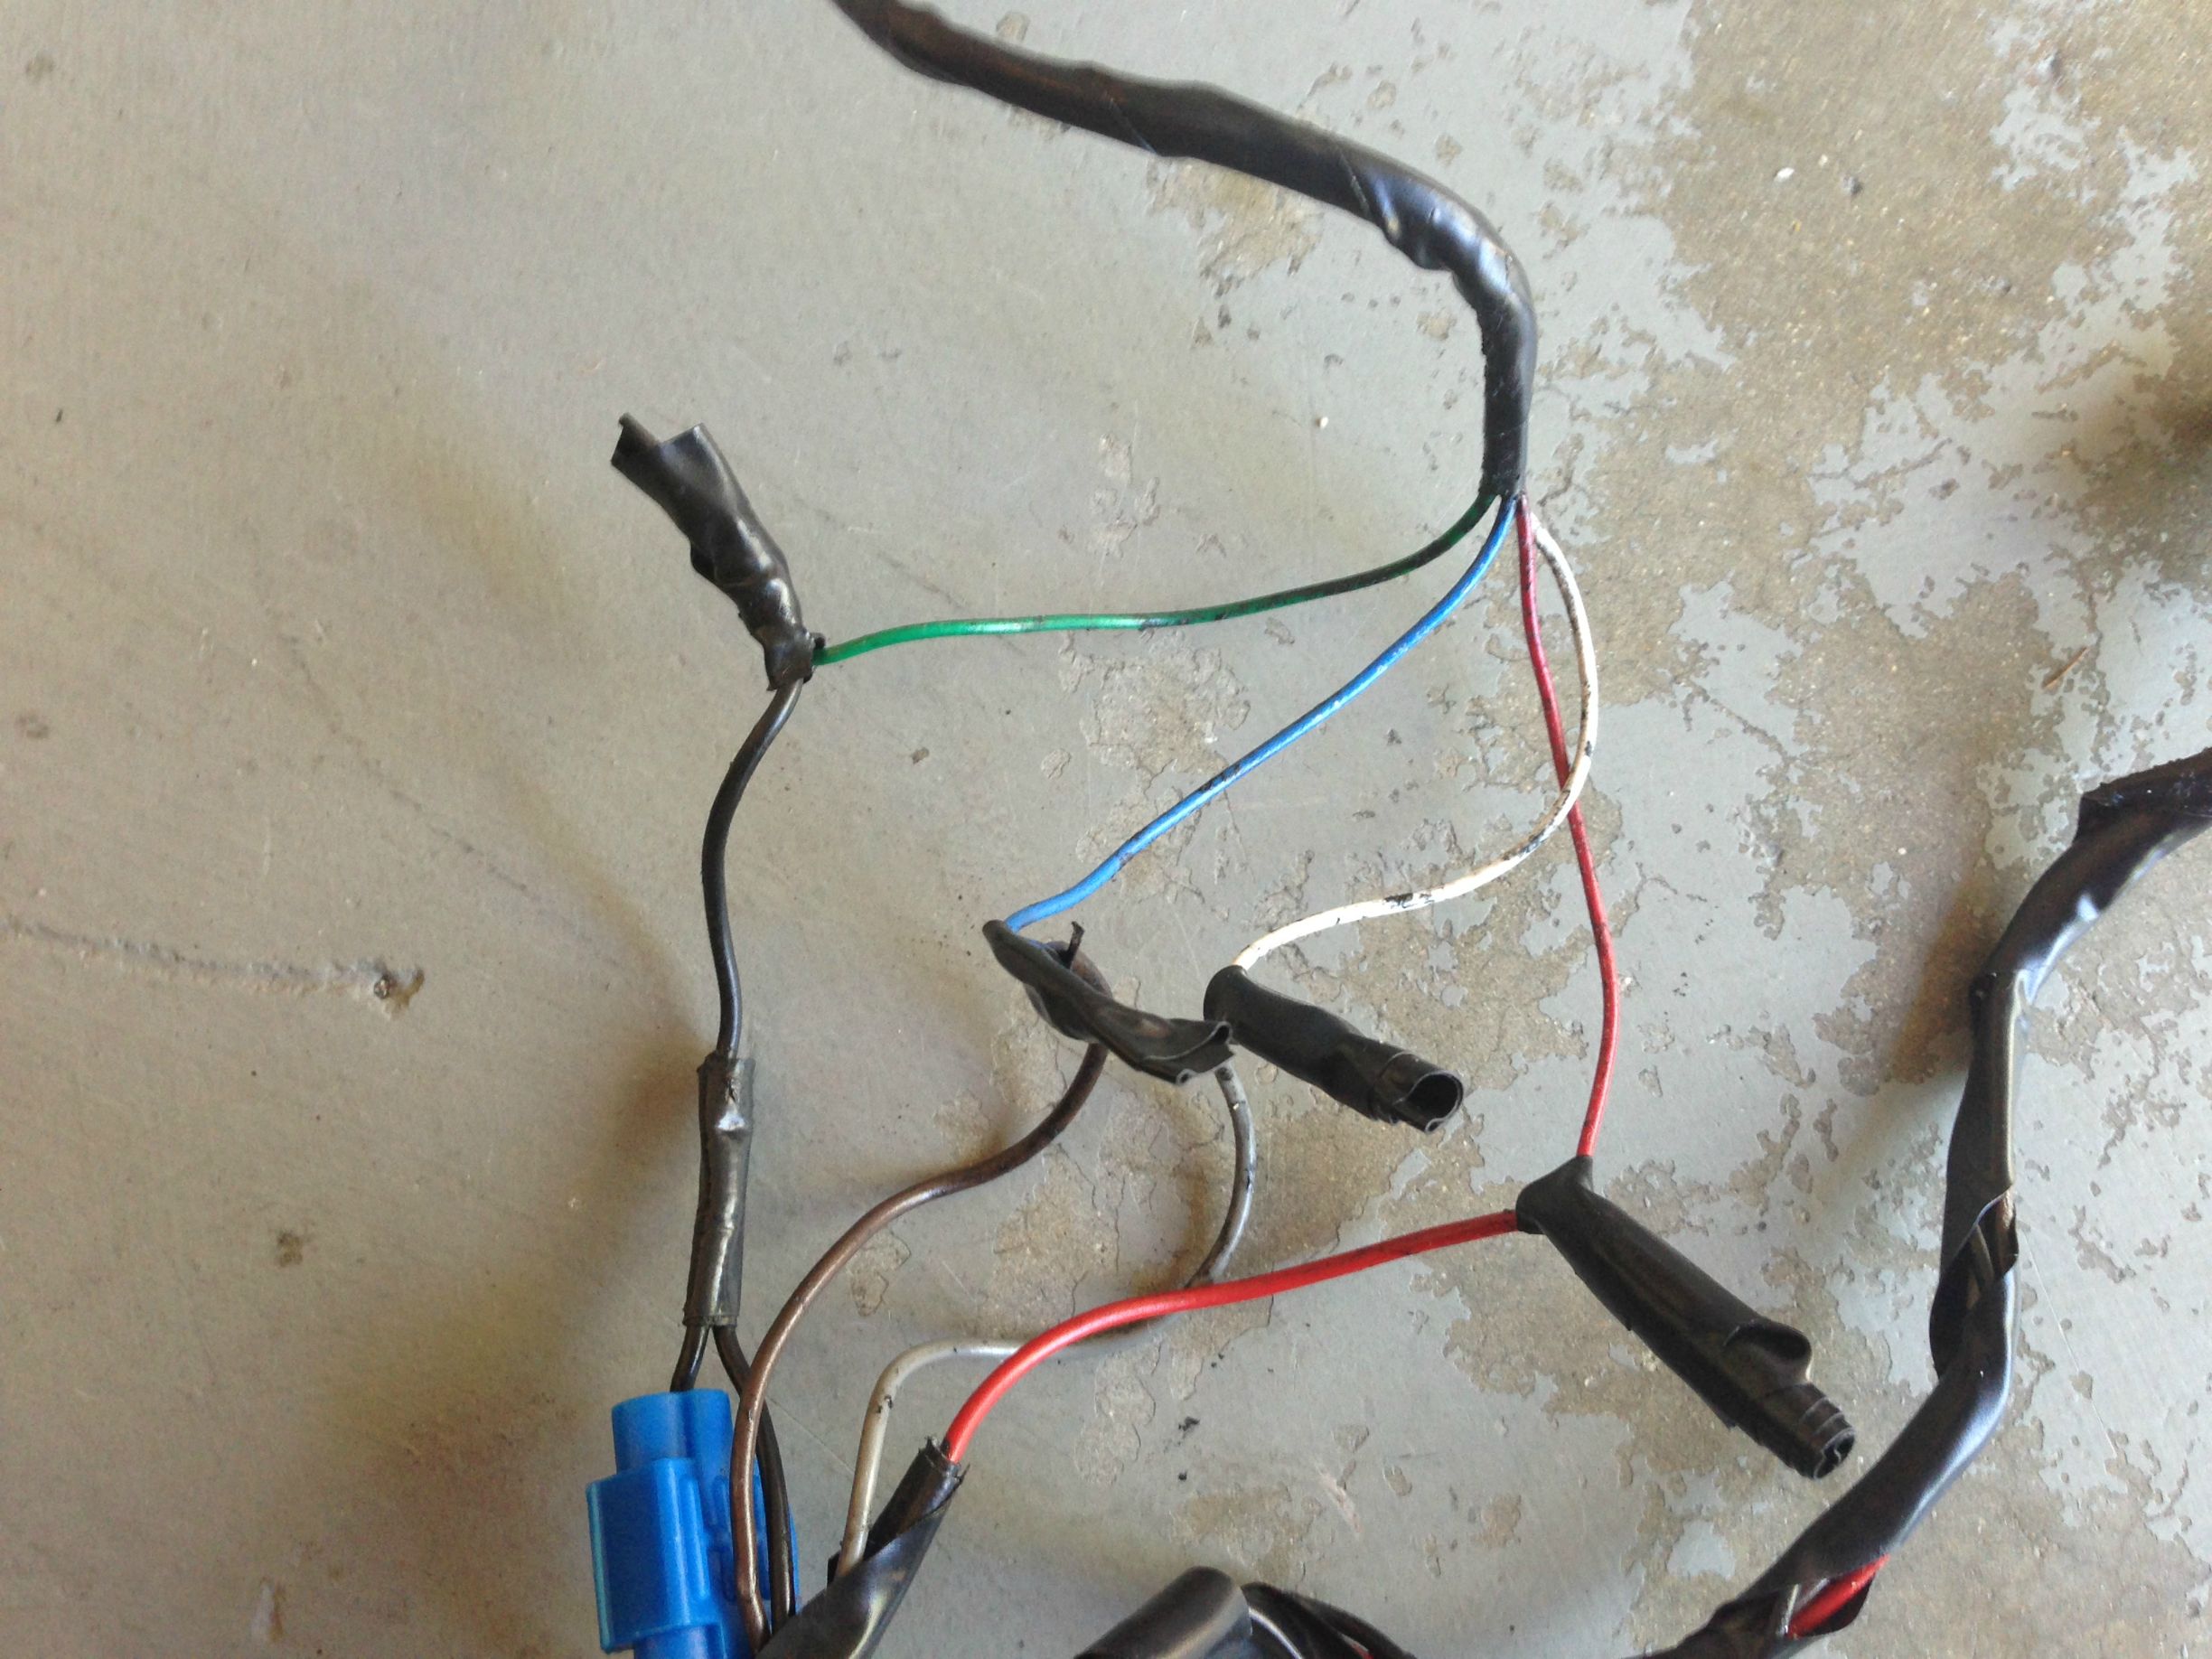
9. Now we need to connect the new harness to the old plug
New Harness -- Old Plug
Gray -- White
Brown -- Blue
Black -- Green (Ground)
Red -- Red (Power)
If you don't care about audio controls then you can stop here.
If you want audio controls then continue:
10. Cut the purple wire (runs from the button plug) and attach it to a wire on one of your WPT-440s (any wire works but I recommend one of the end ones)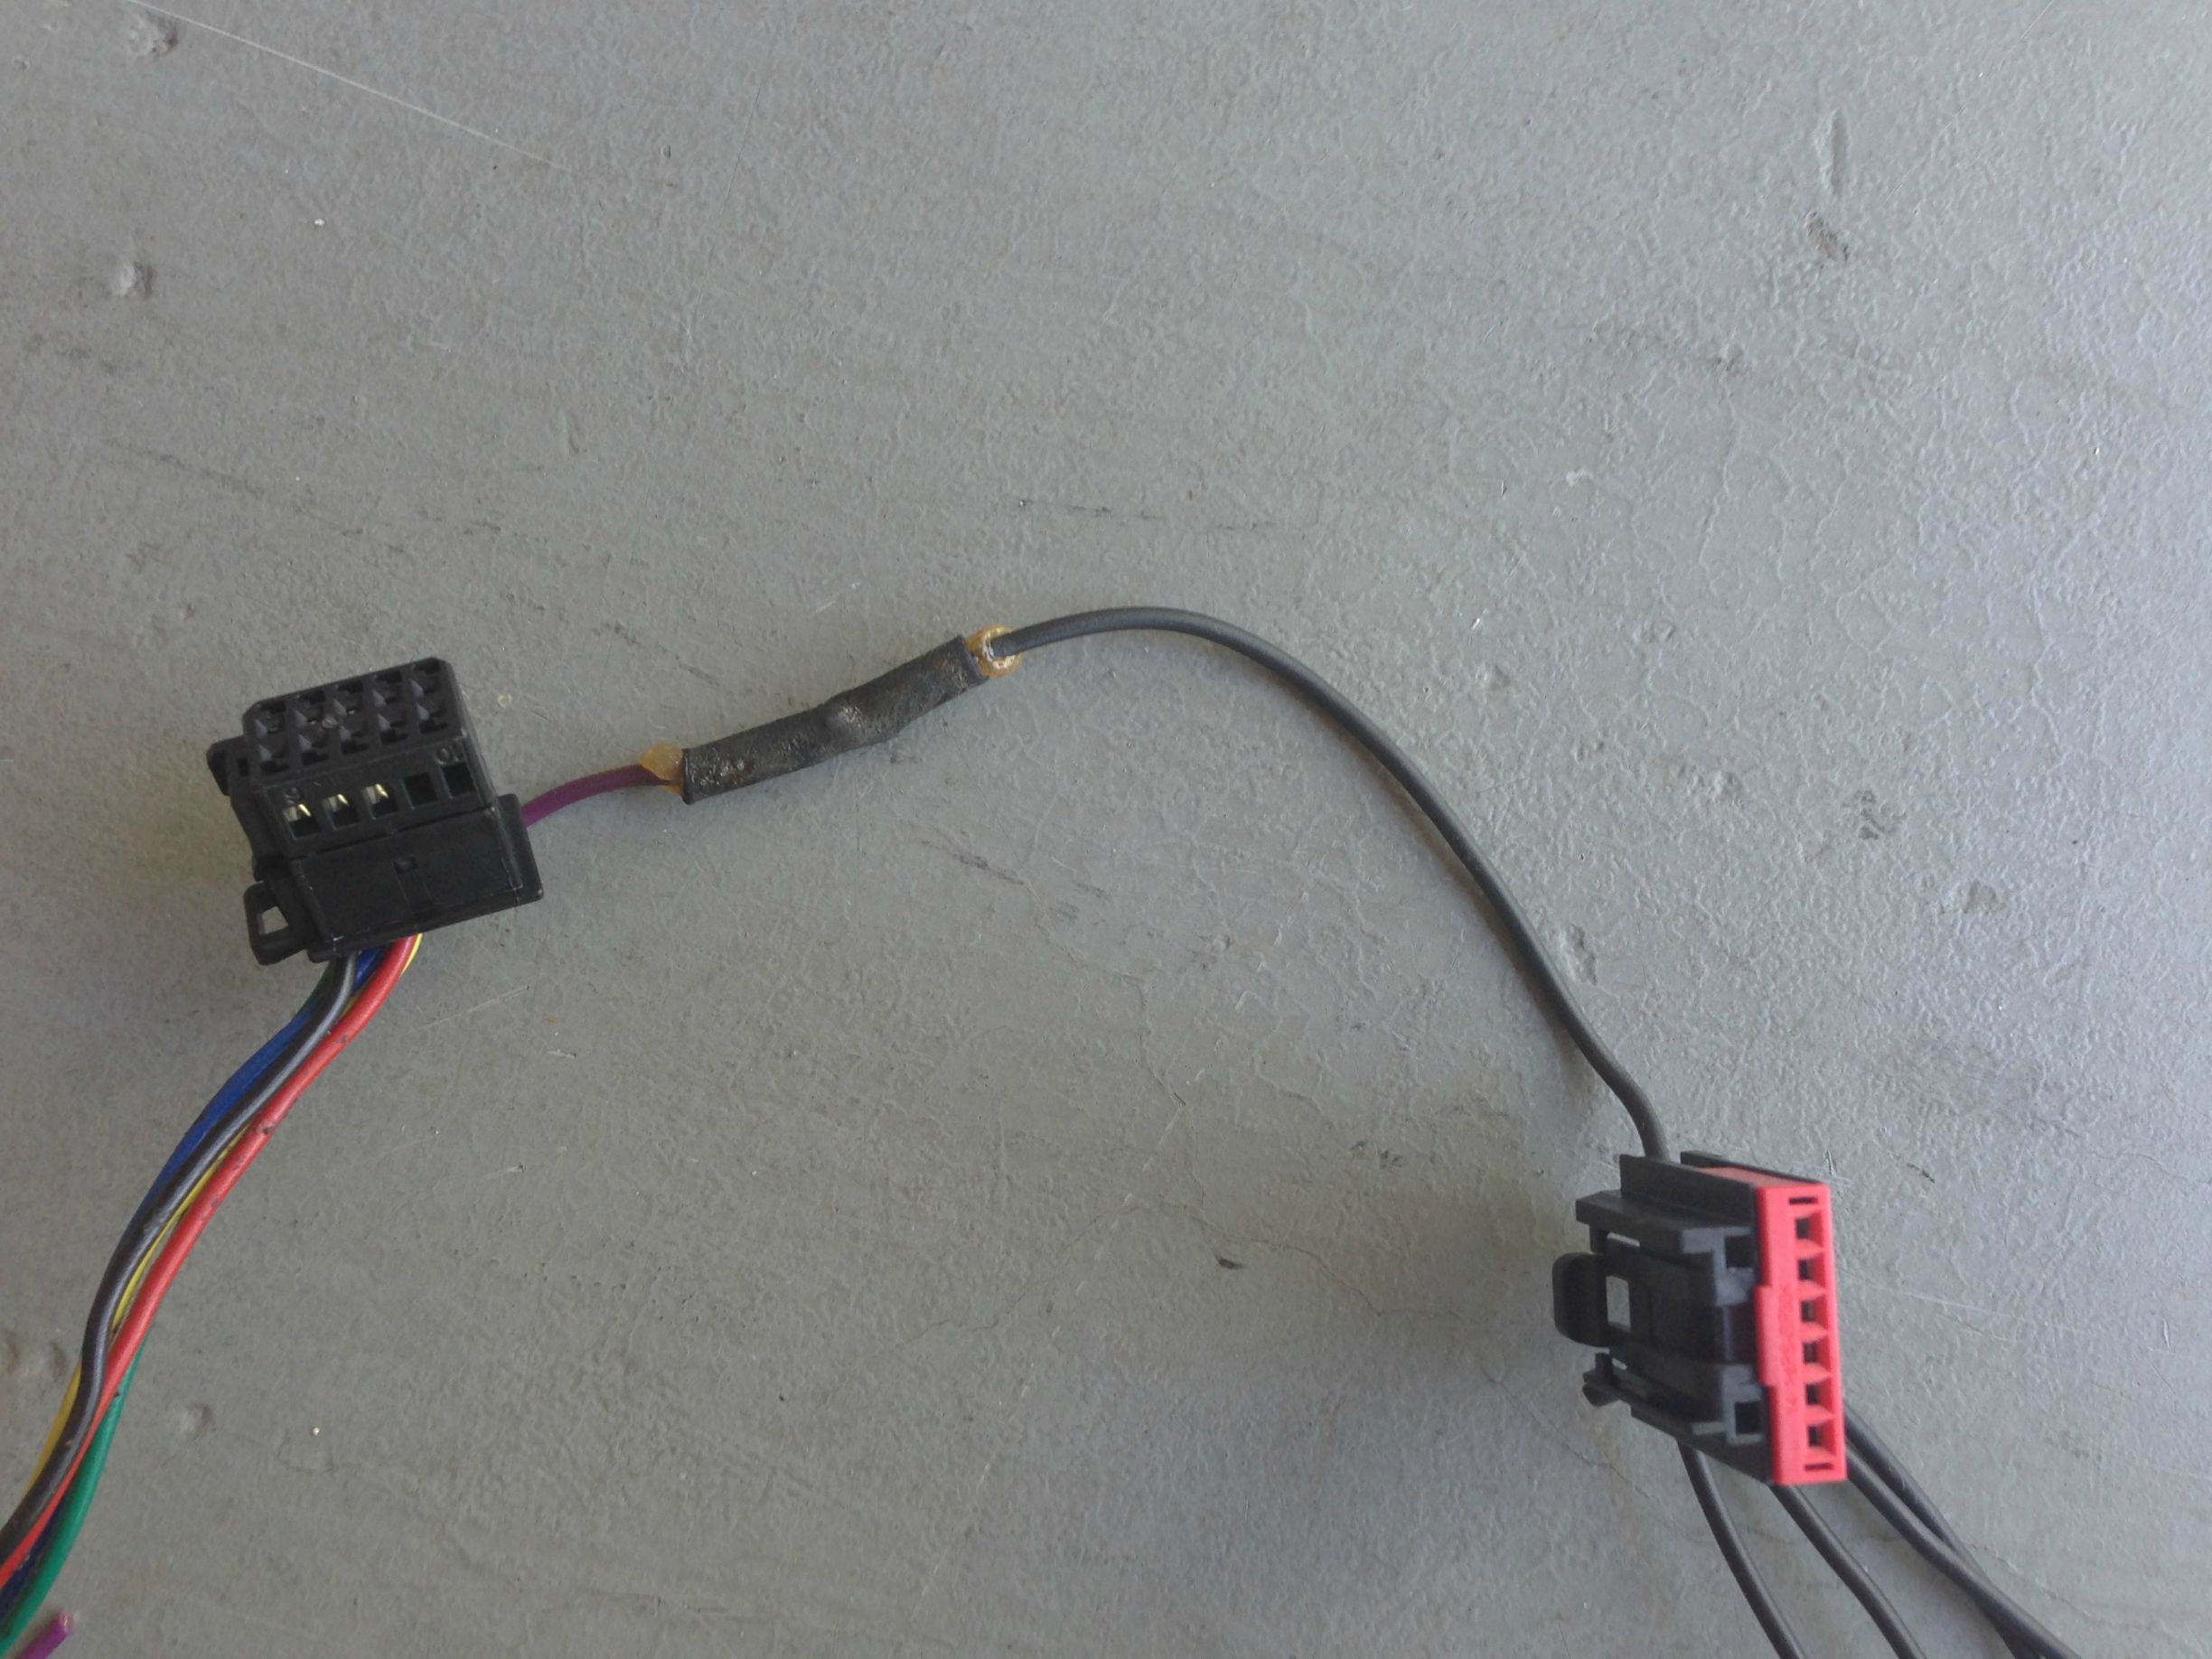
11. Now it is time to move to the PAC adapter.
12. Connect the PAC's red wire to power and black wire to ground (I recommend using the radio's power since the two devices will be working together) Be sure to see where your hiding the PAC before this step or else you'll end up with the harness on the wrong side of your dash
13. Cut the brown loop wire in half (doesn't matter where) and insulate the ends
14. Cut the purple loop in half and tape off the outer half.
15. Use the other half of the purple wire with a 100 ohm resistor and join it into the white wire (I chose to cut the white wire in half but there's other ways to get this done)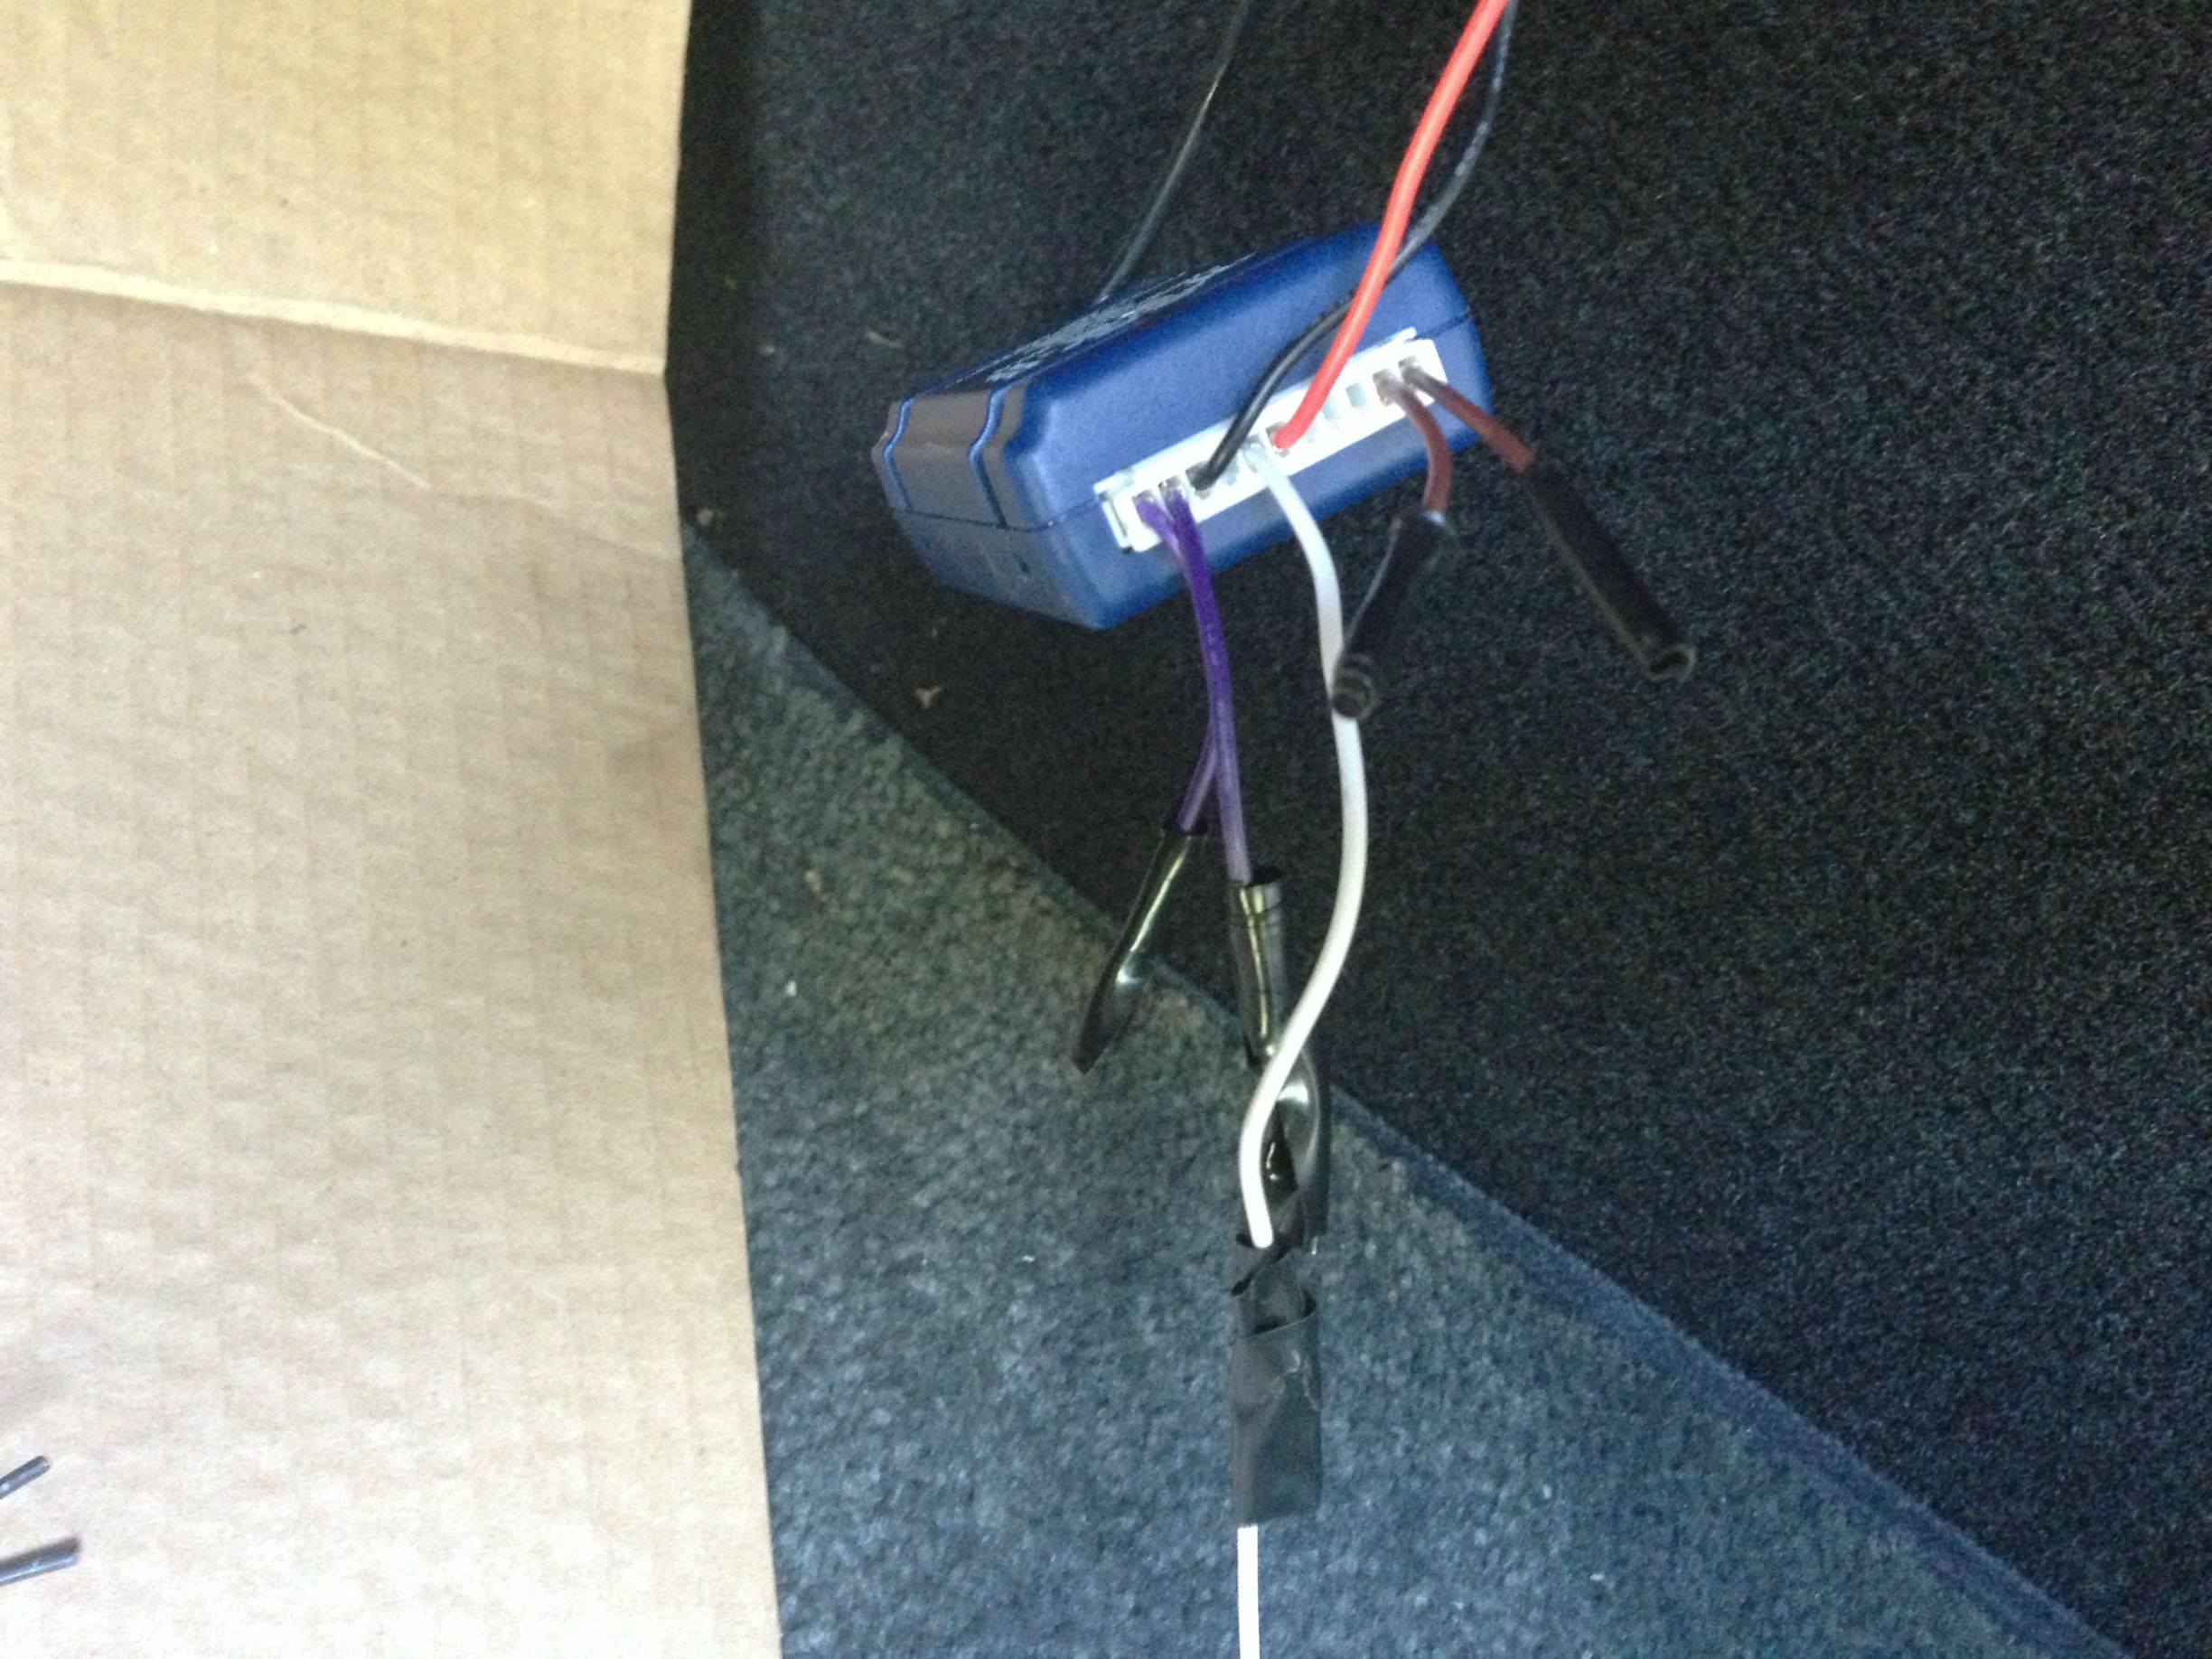
16. The other wires are unneeded, I chose to rip them out to avoid clutter.
17. Now connect the end of the white wire to the other WPT-440 BE SURE TO USE THE SAME NUMBER WIRE THAT YOU DID ON THE FIRST ONE (this is why i recommend the end wire)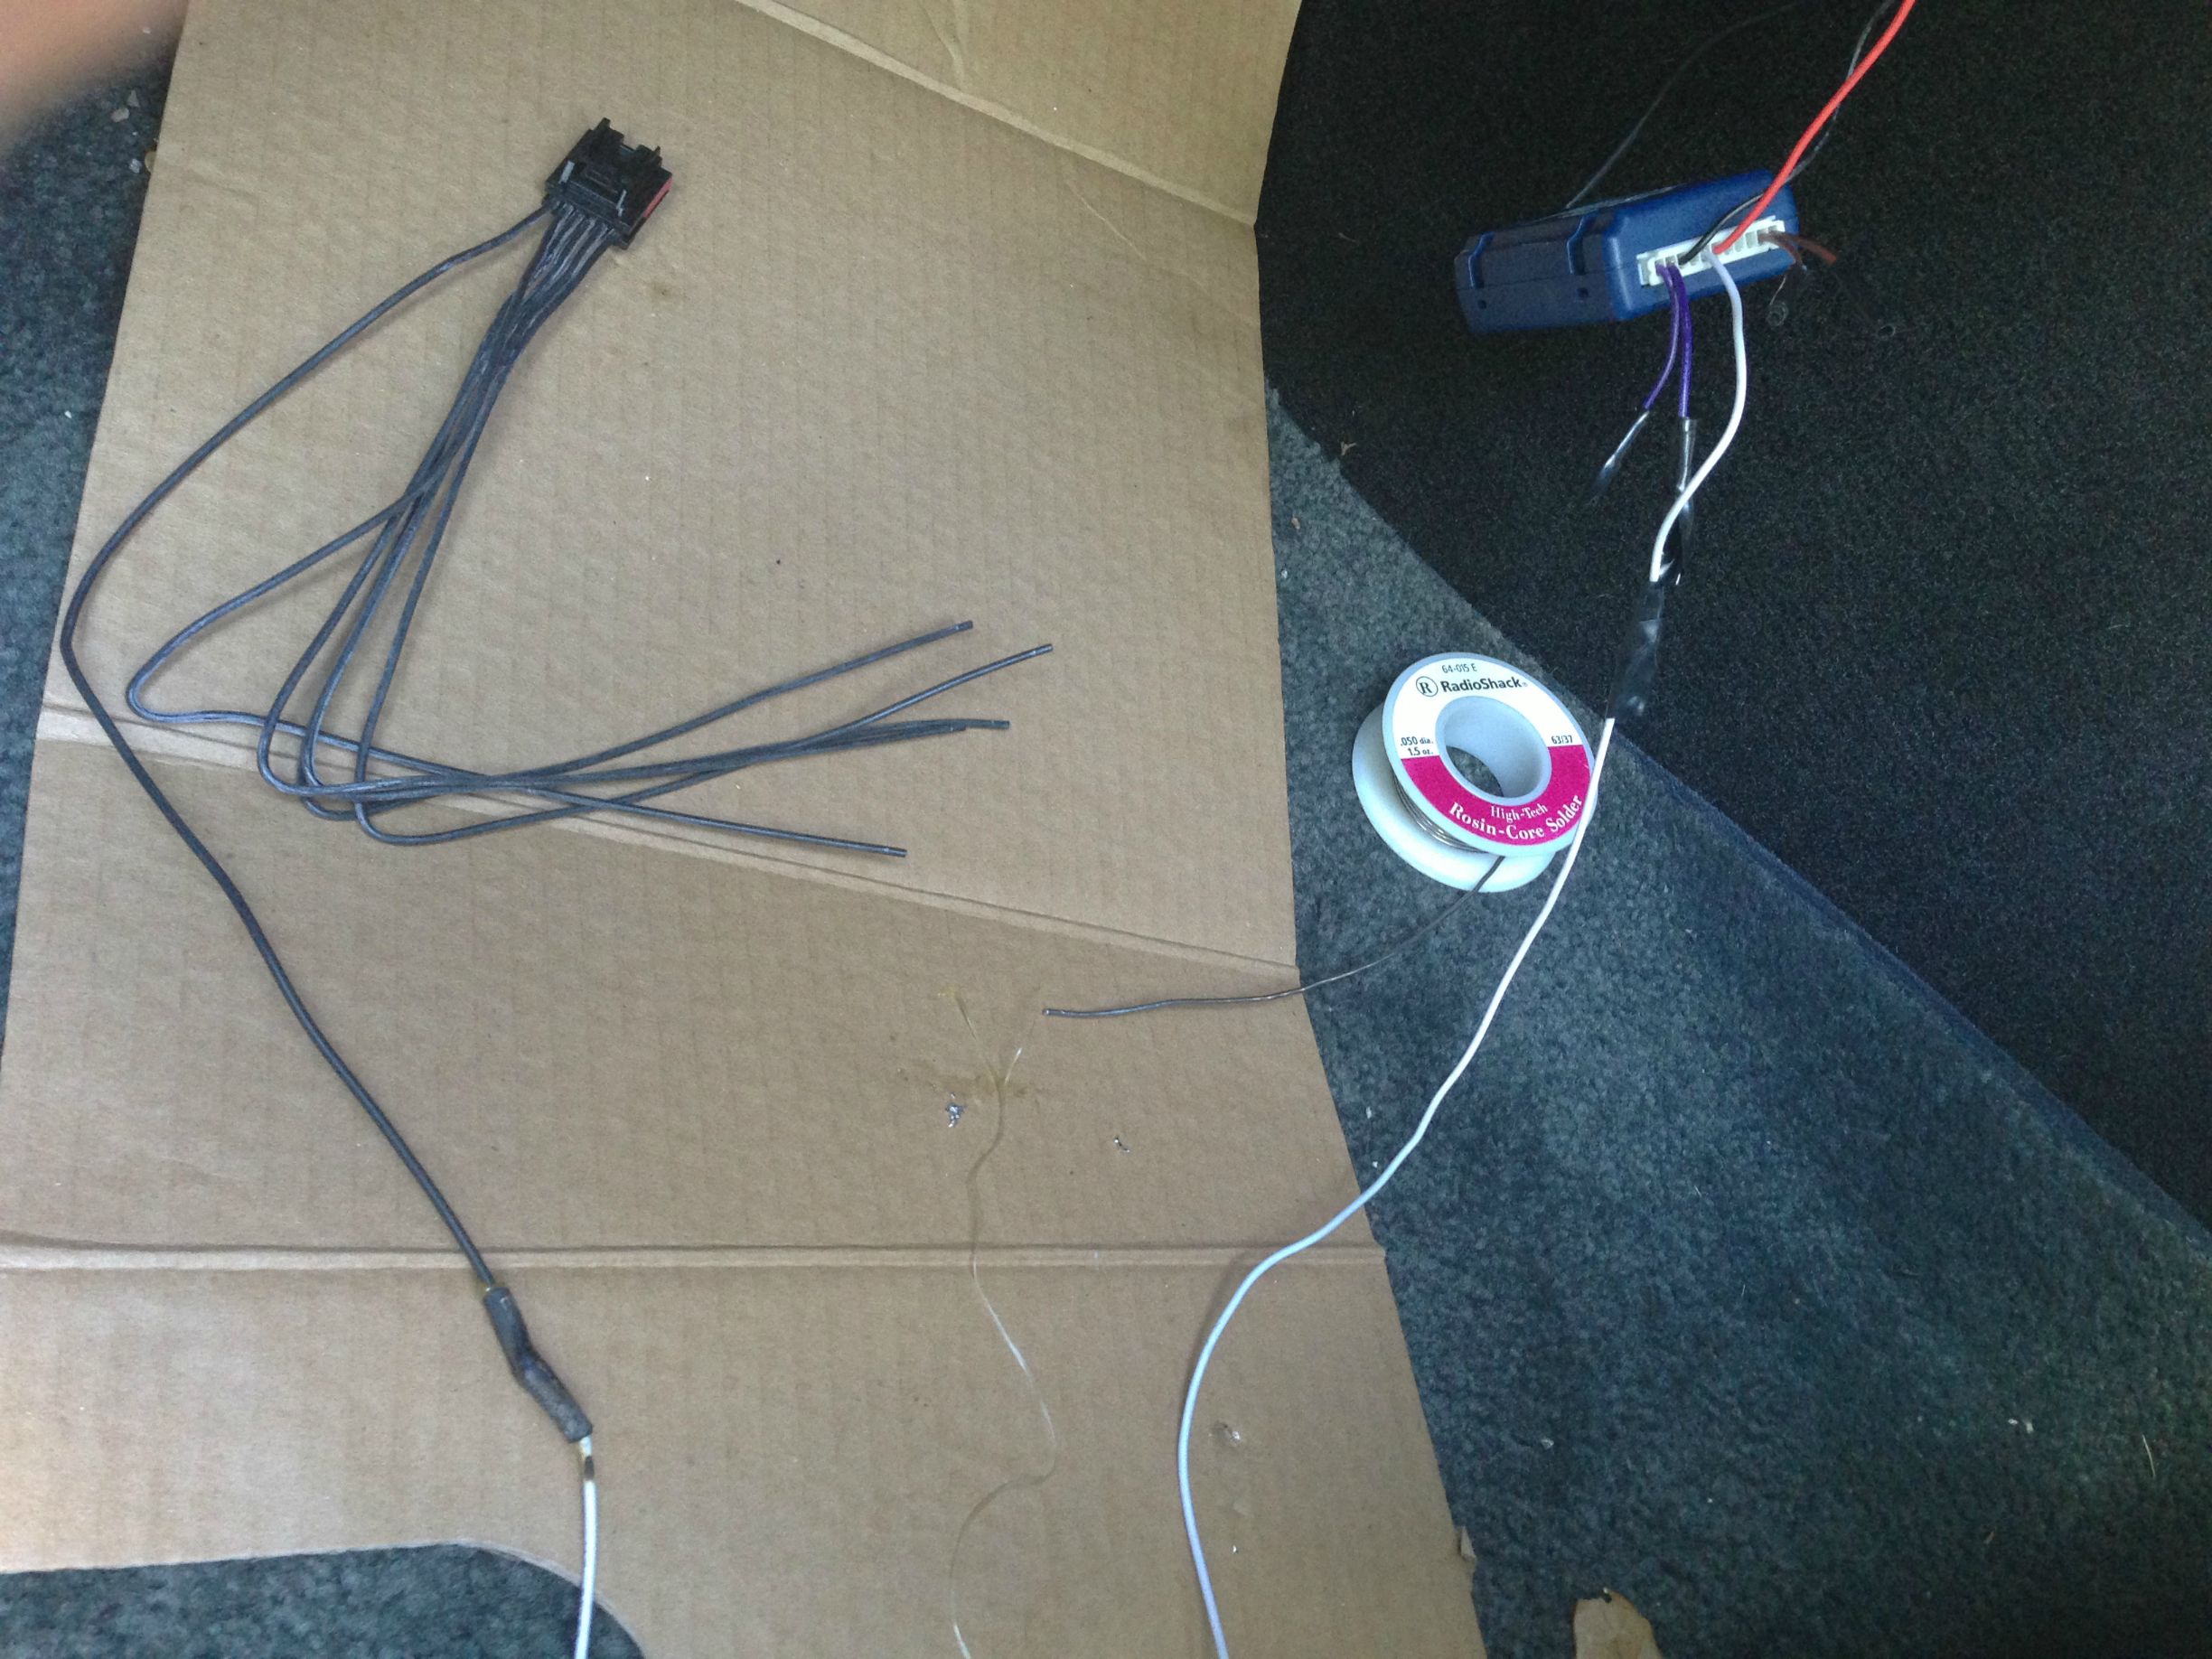
18. Now it's time to plug in and test.
19. Remove/loosen the plastic on the lower half of the clock spring by removing the two underside screws (T20)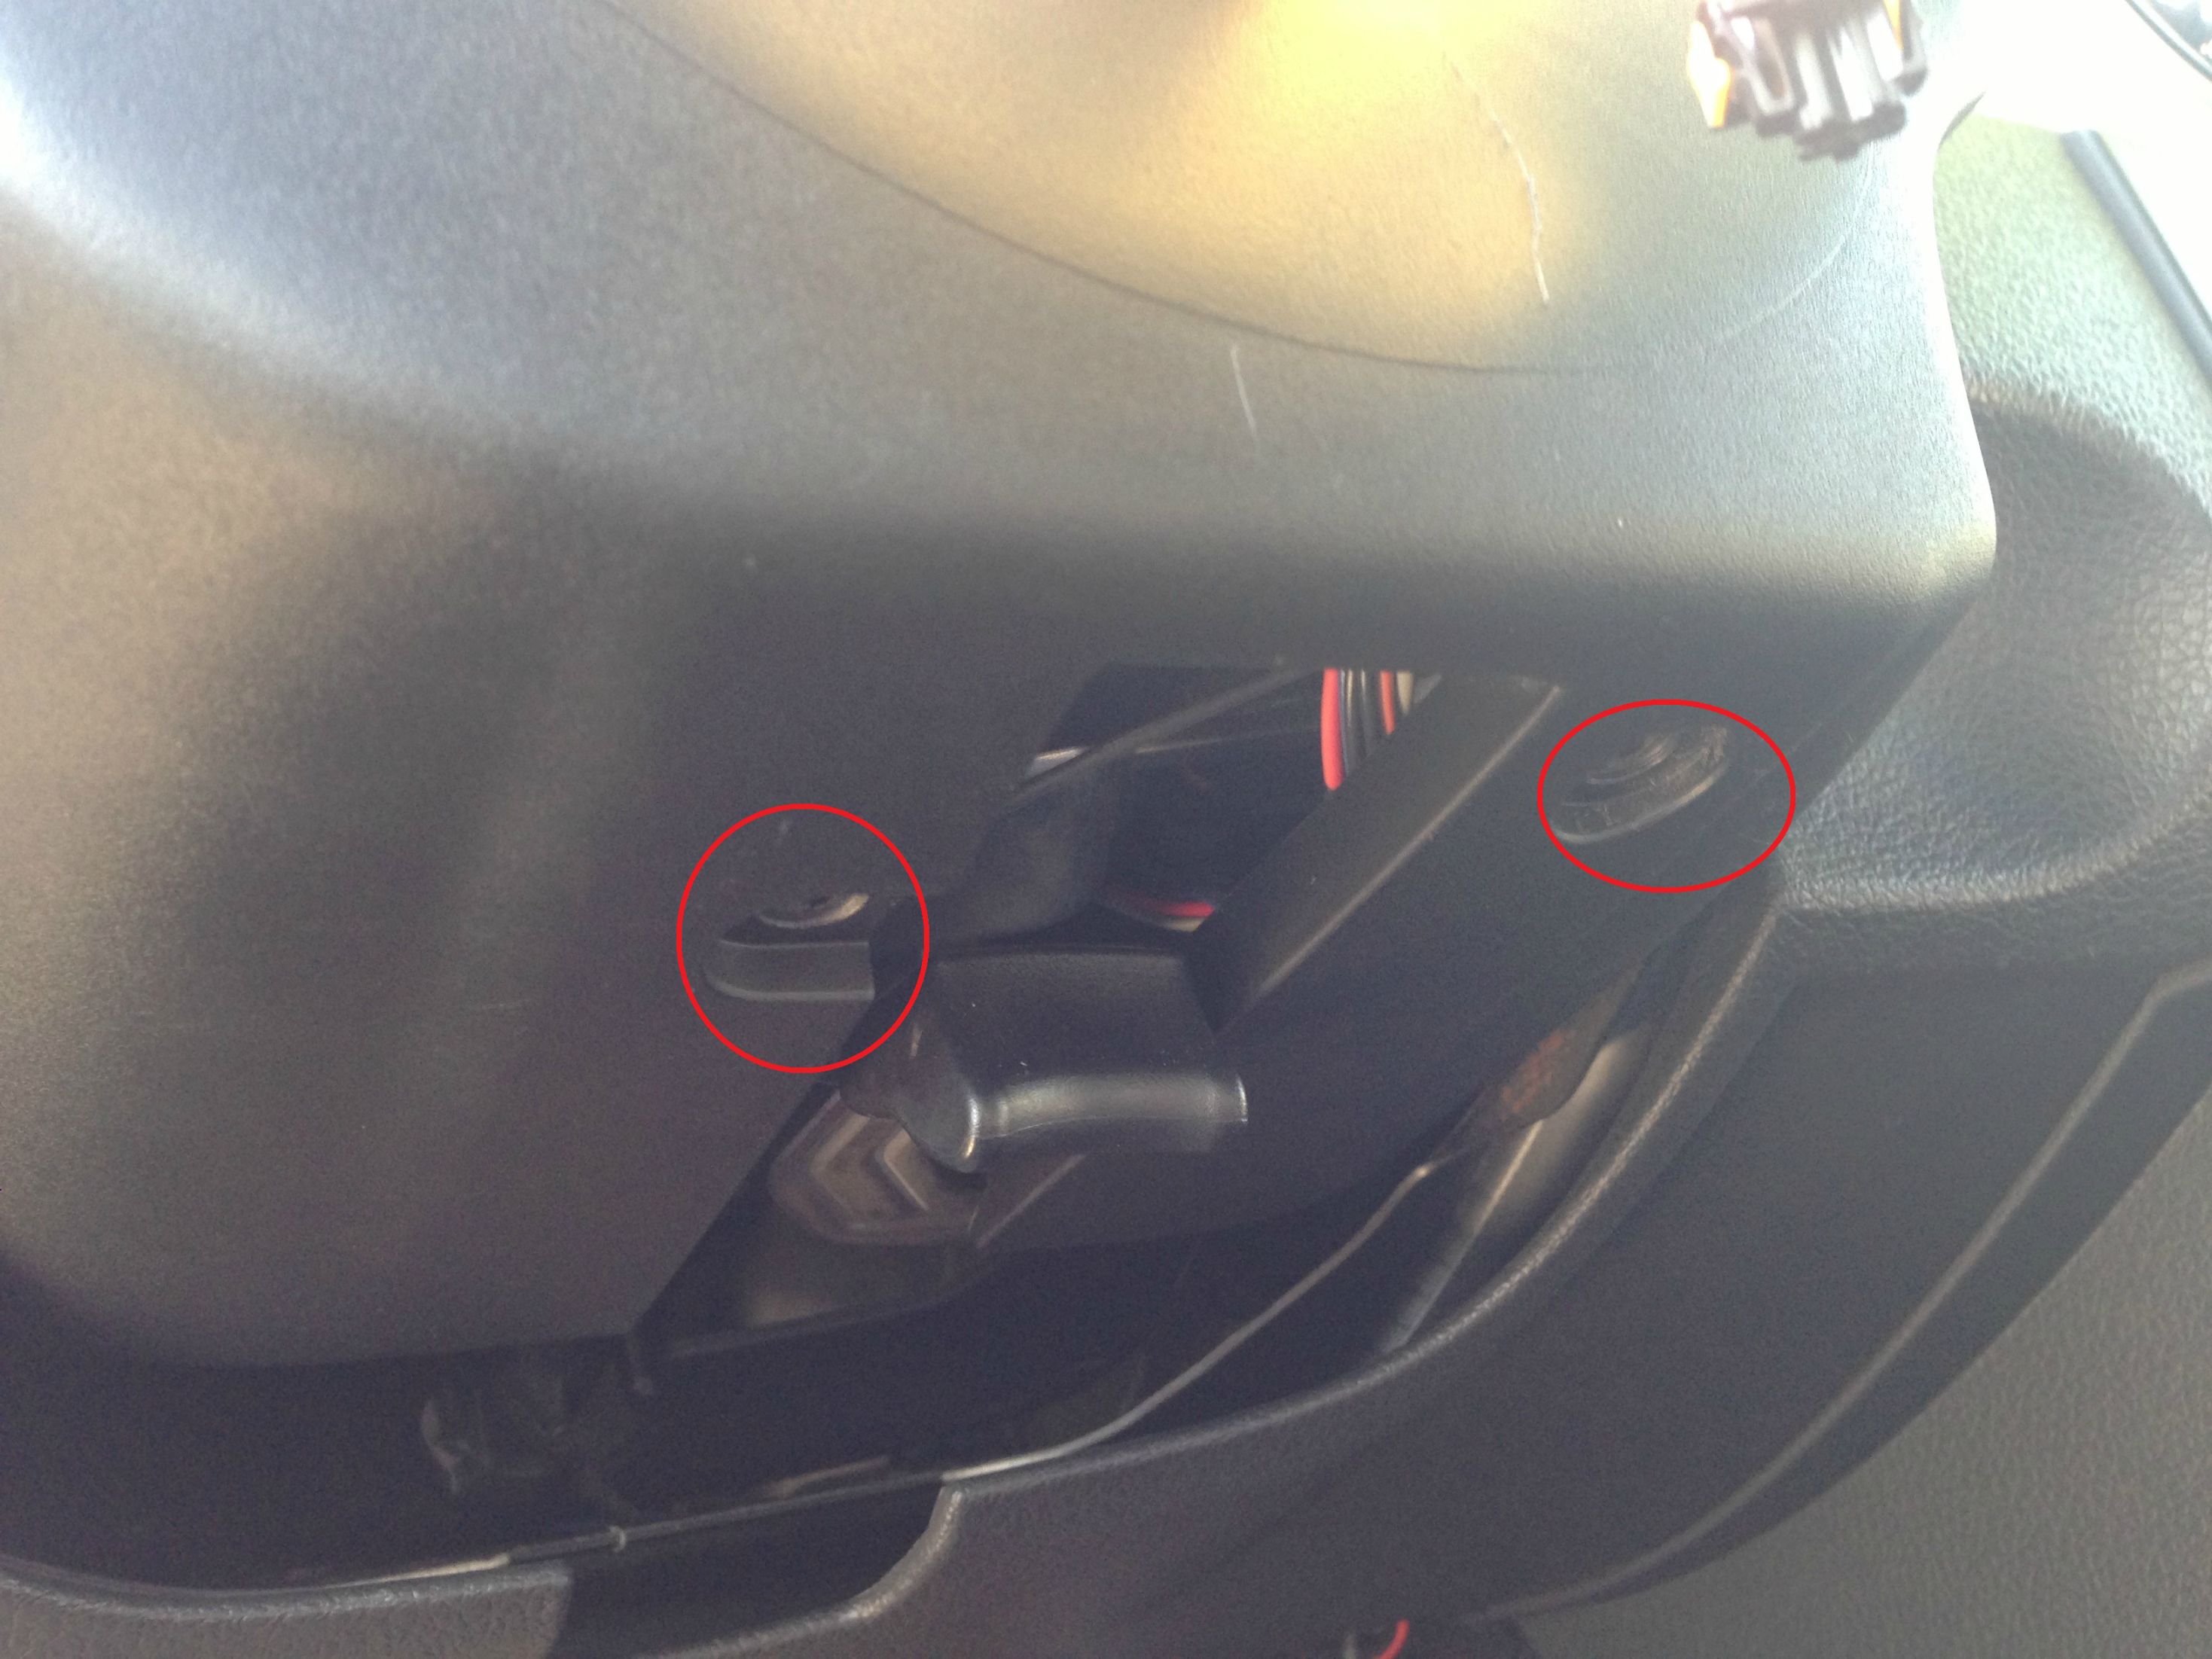
We need to see this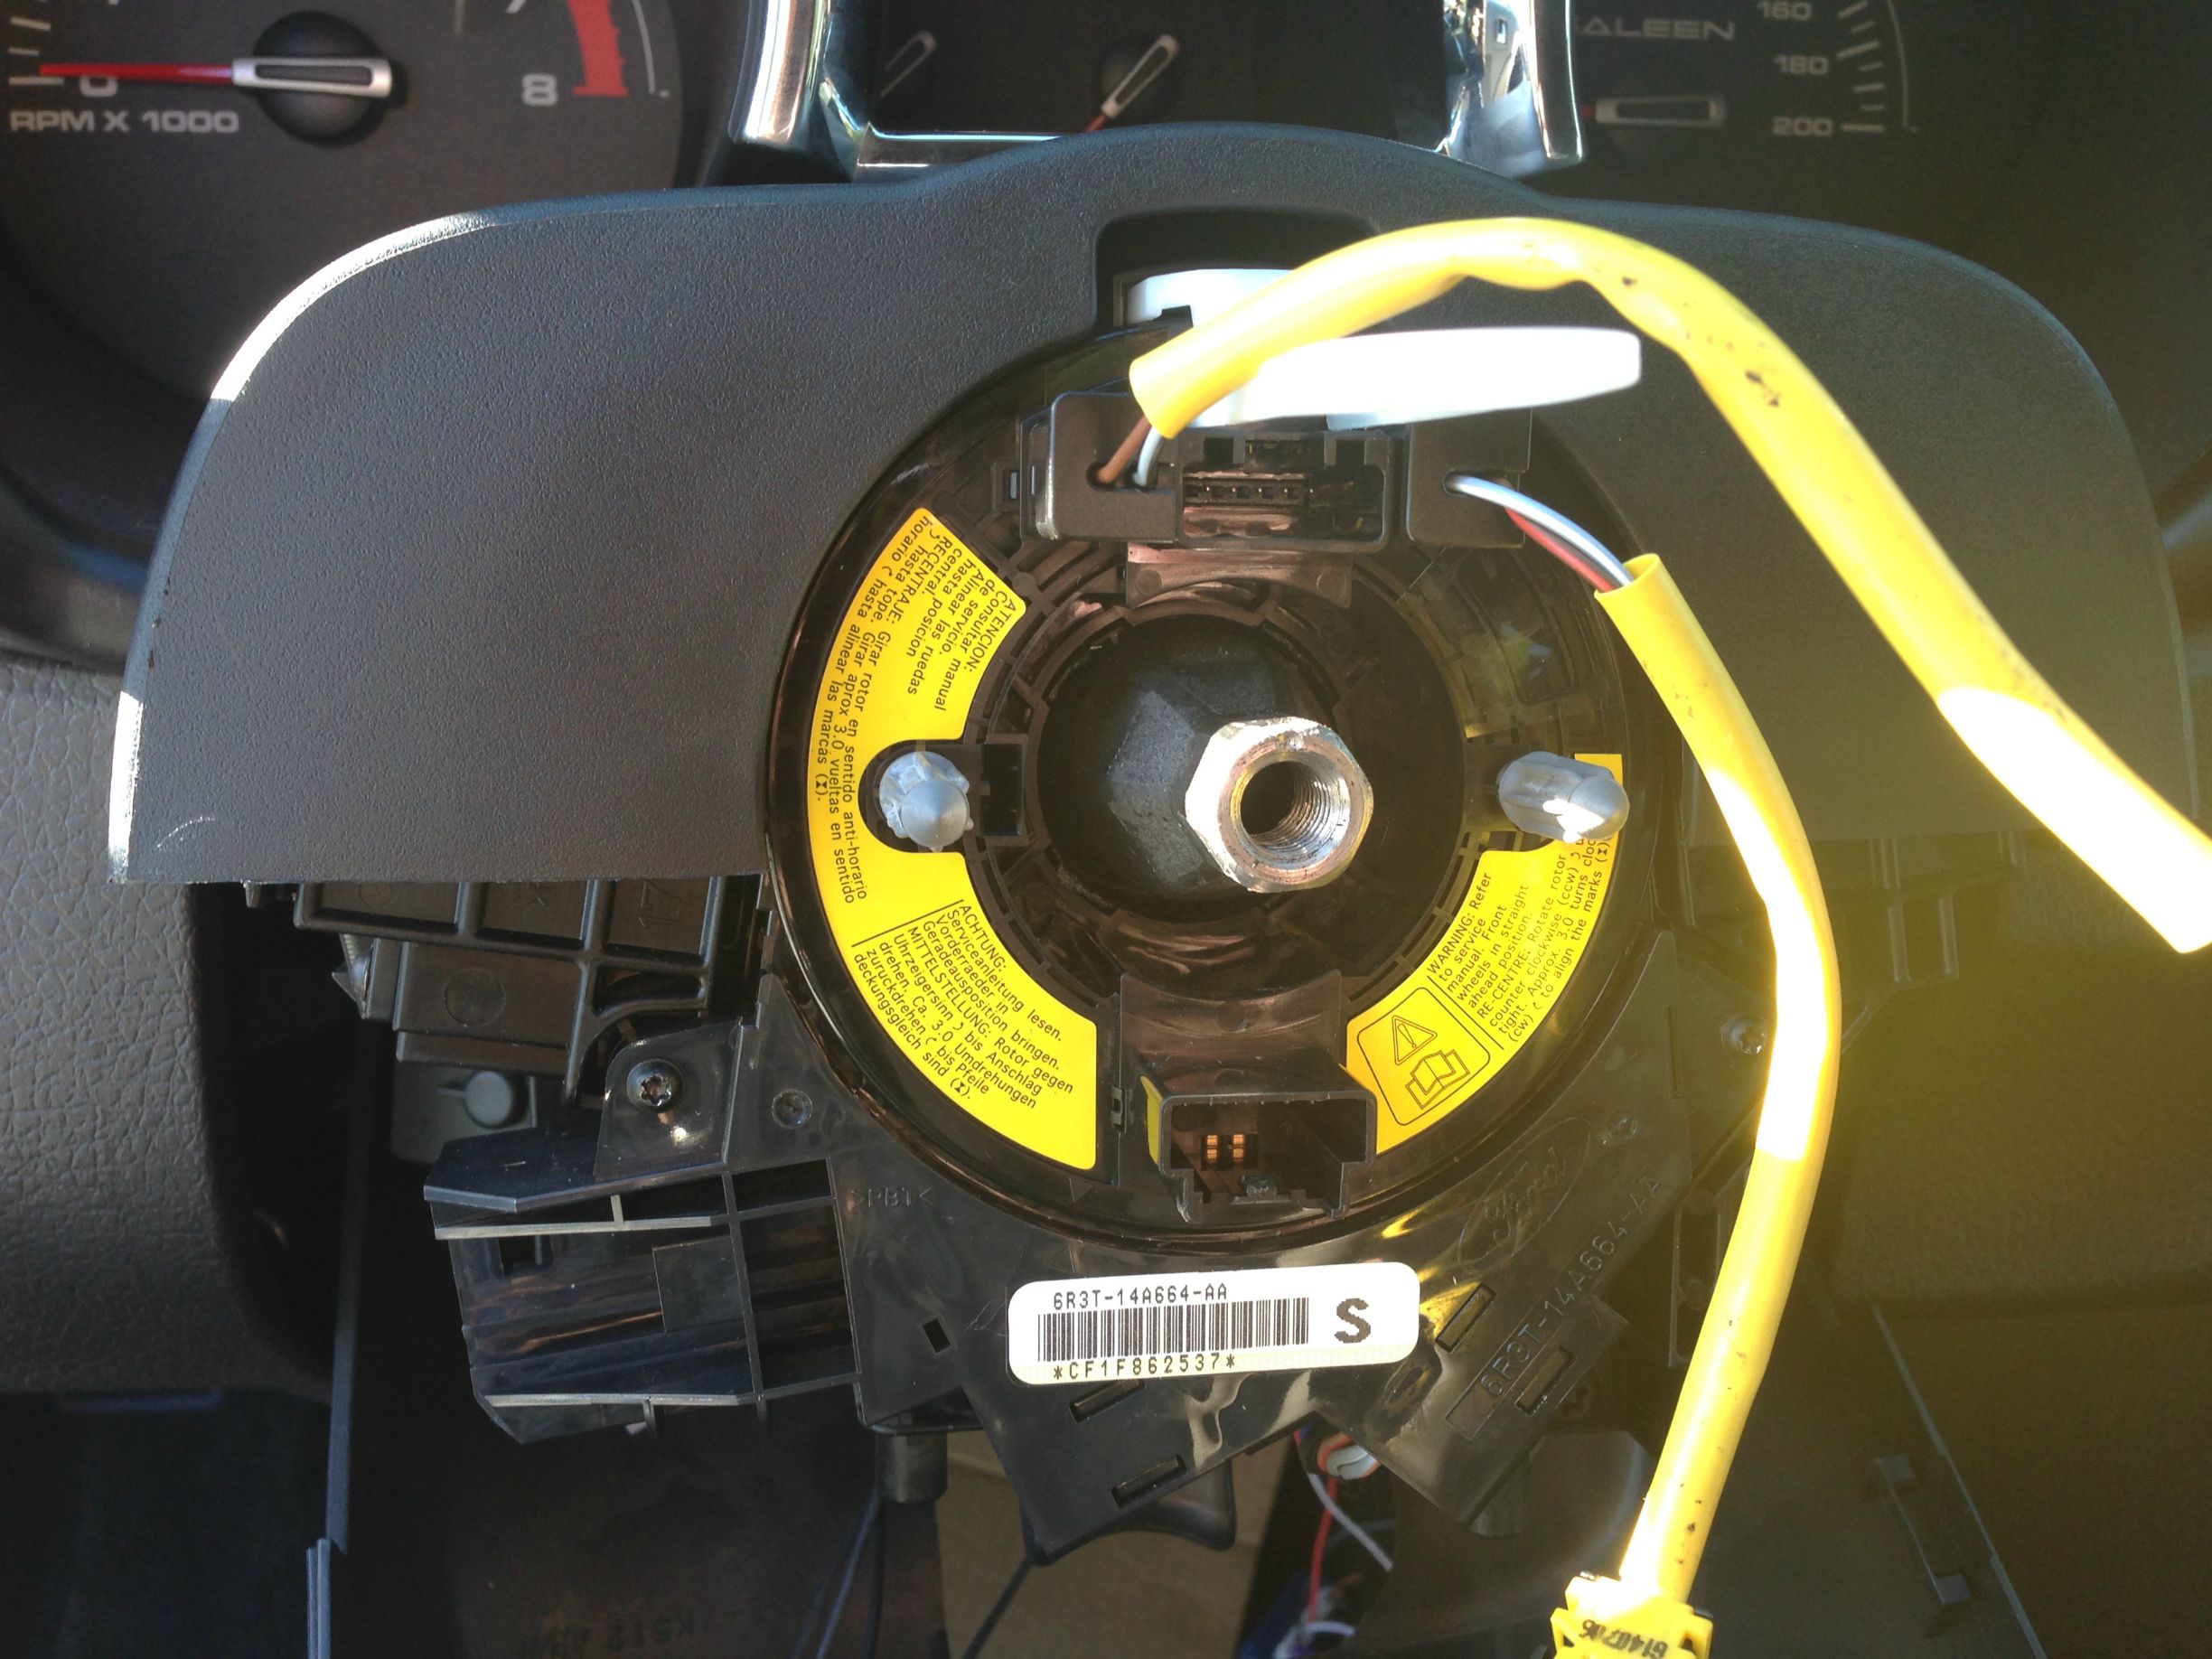
20. Plug the WPT-440 attached to the PAC to the bottom left of the clock spring shown here:
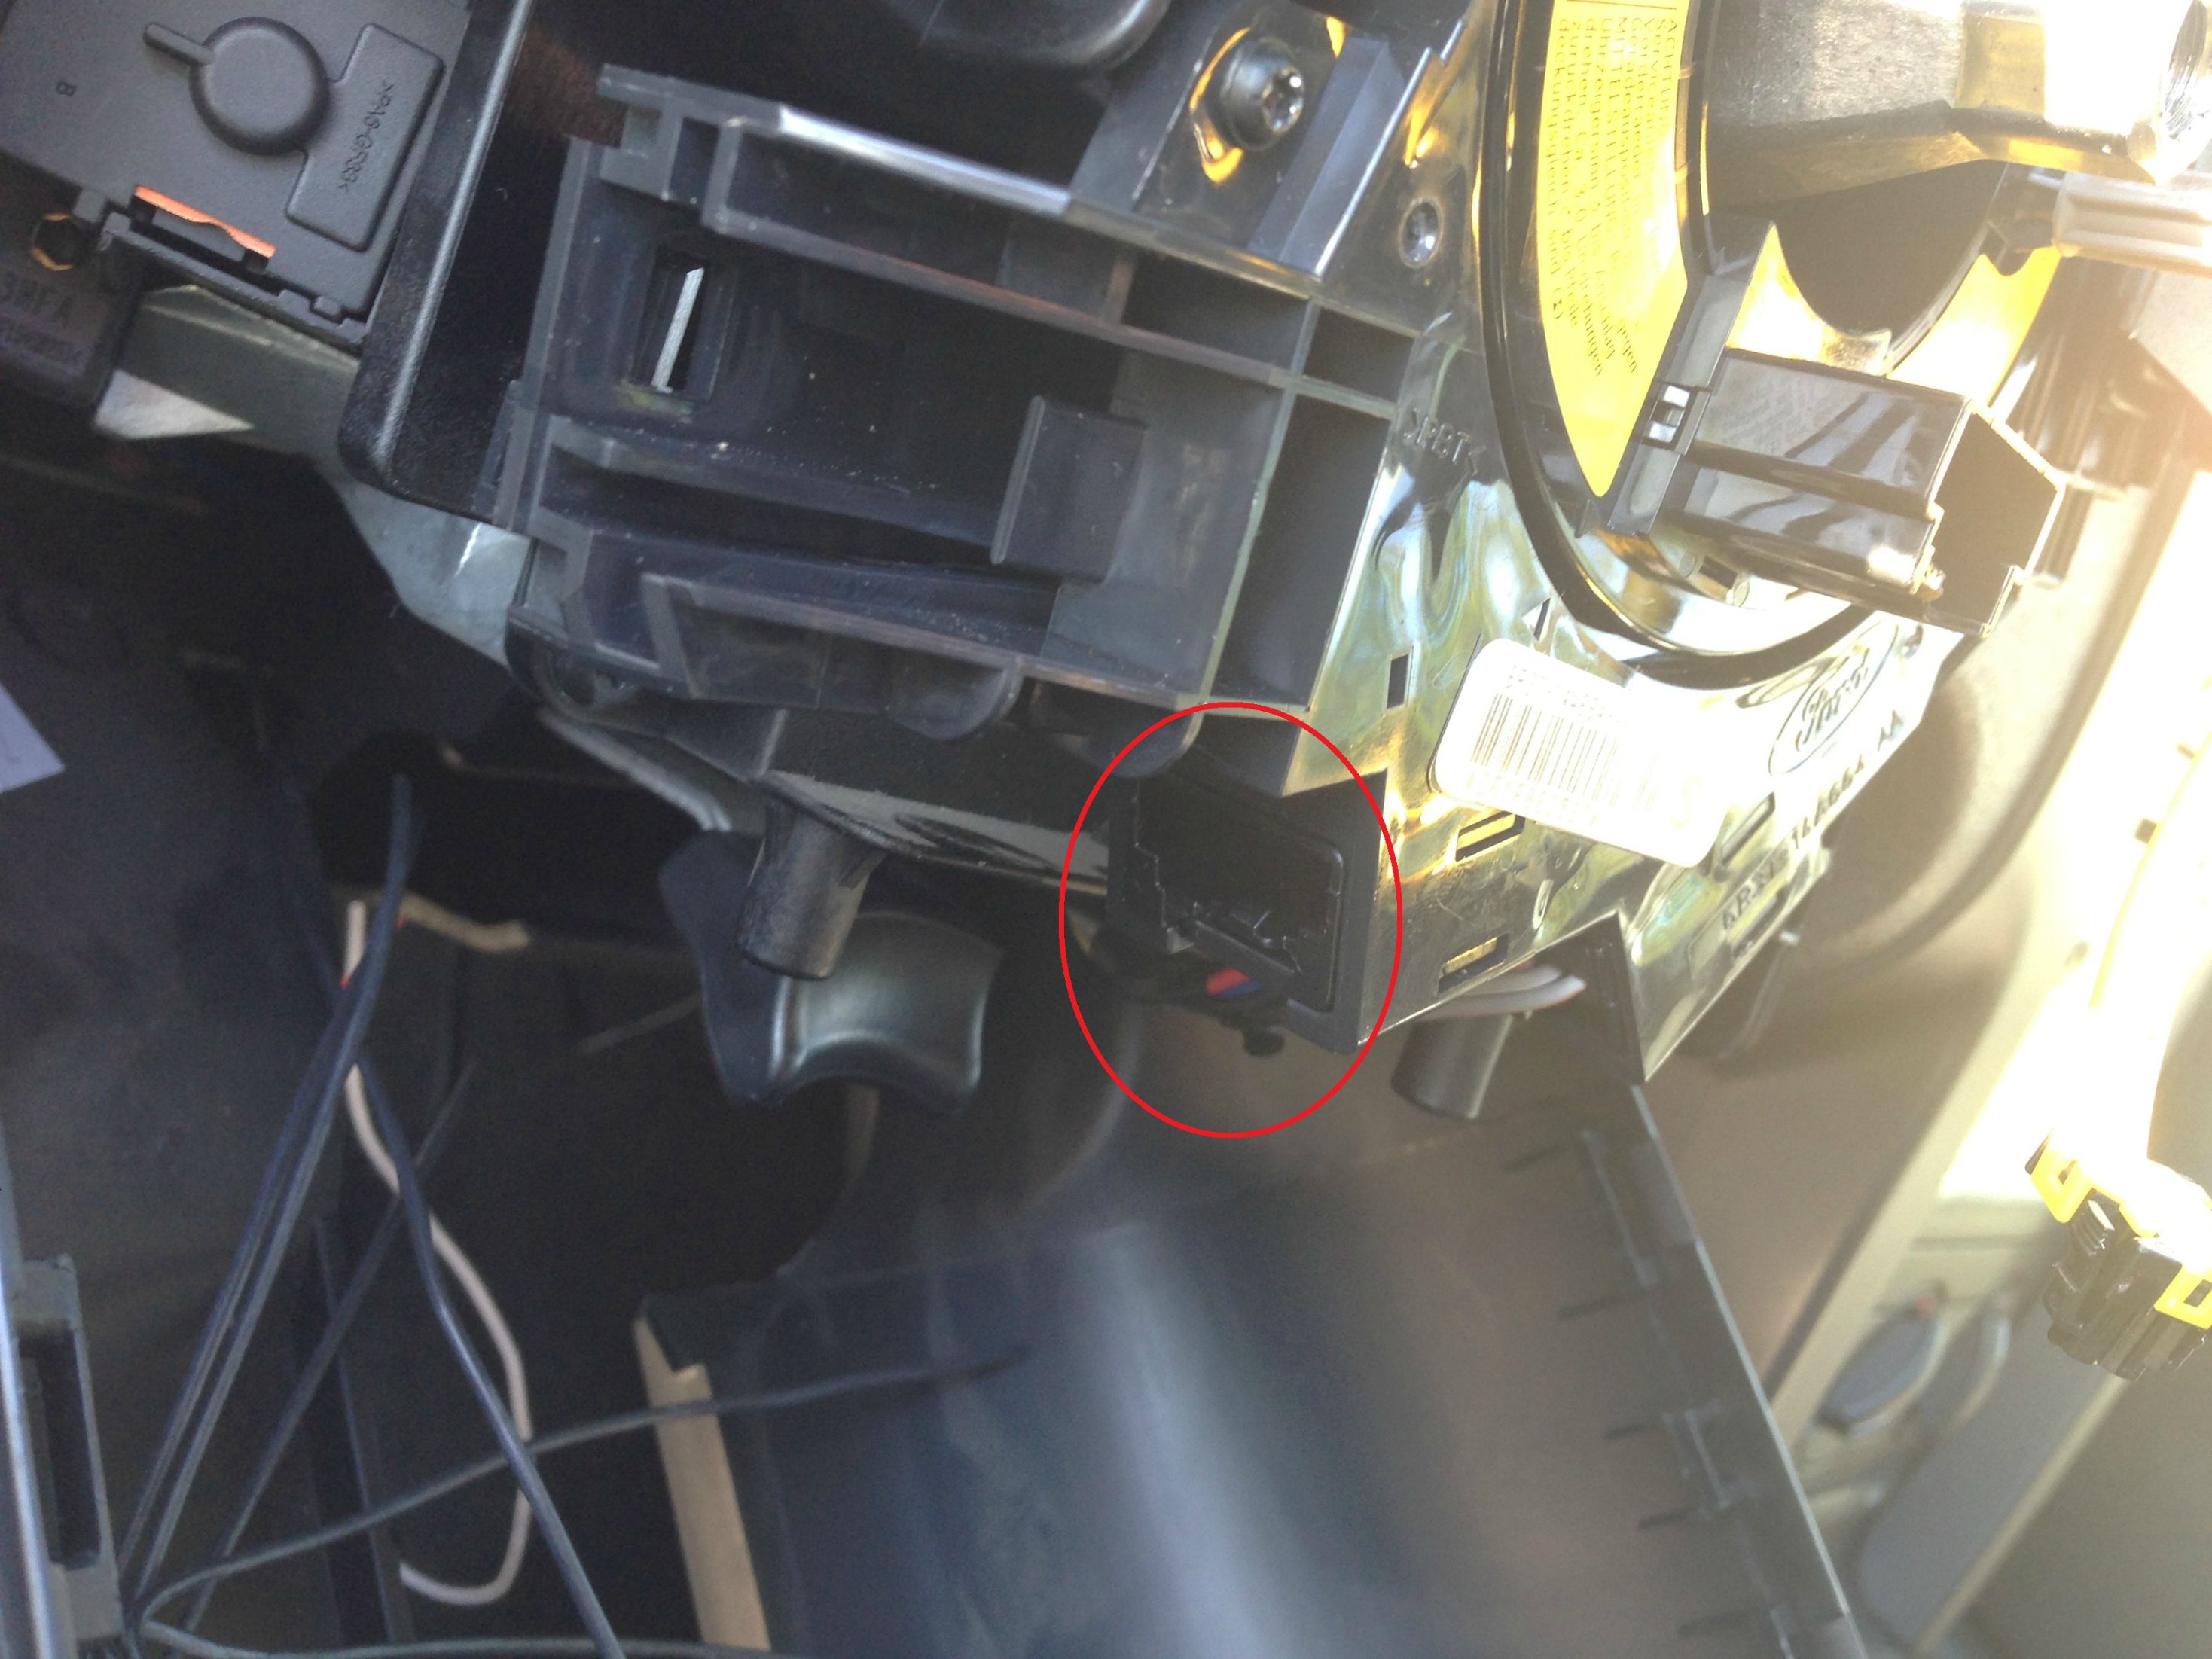
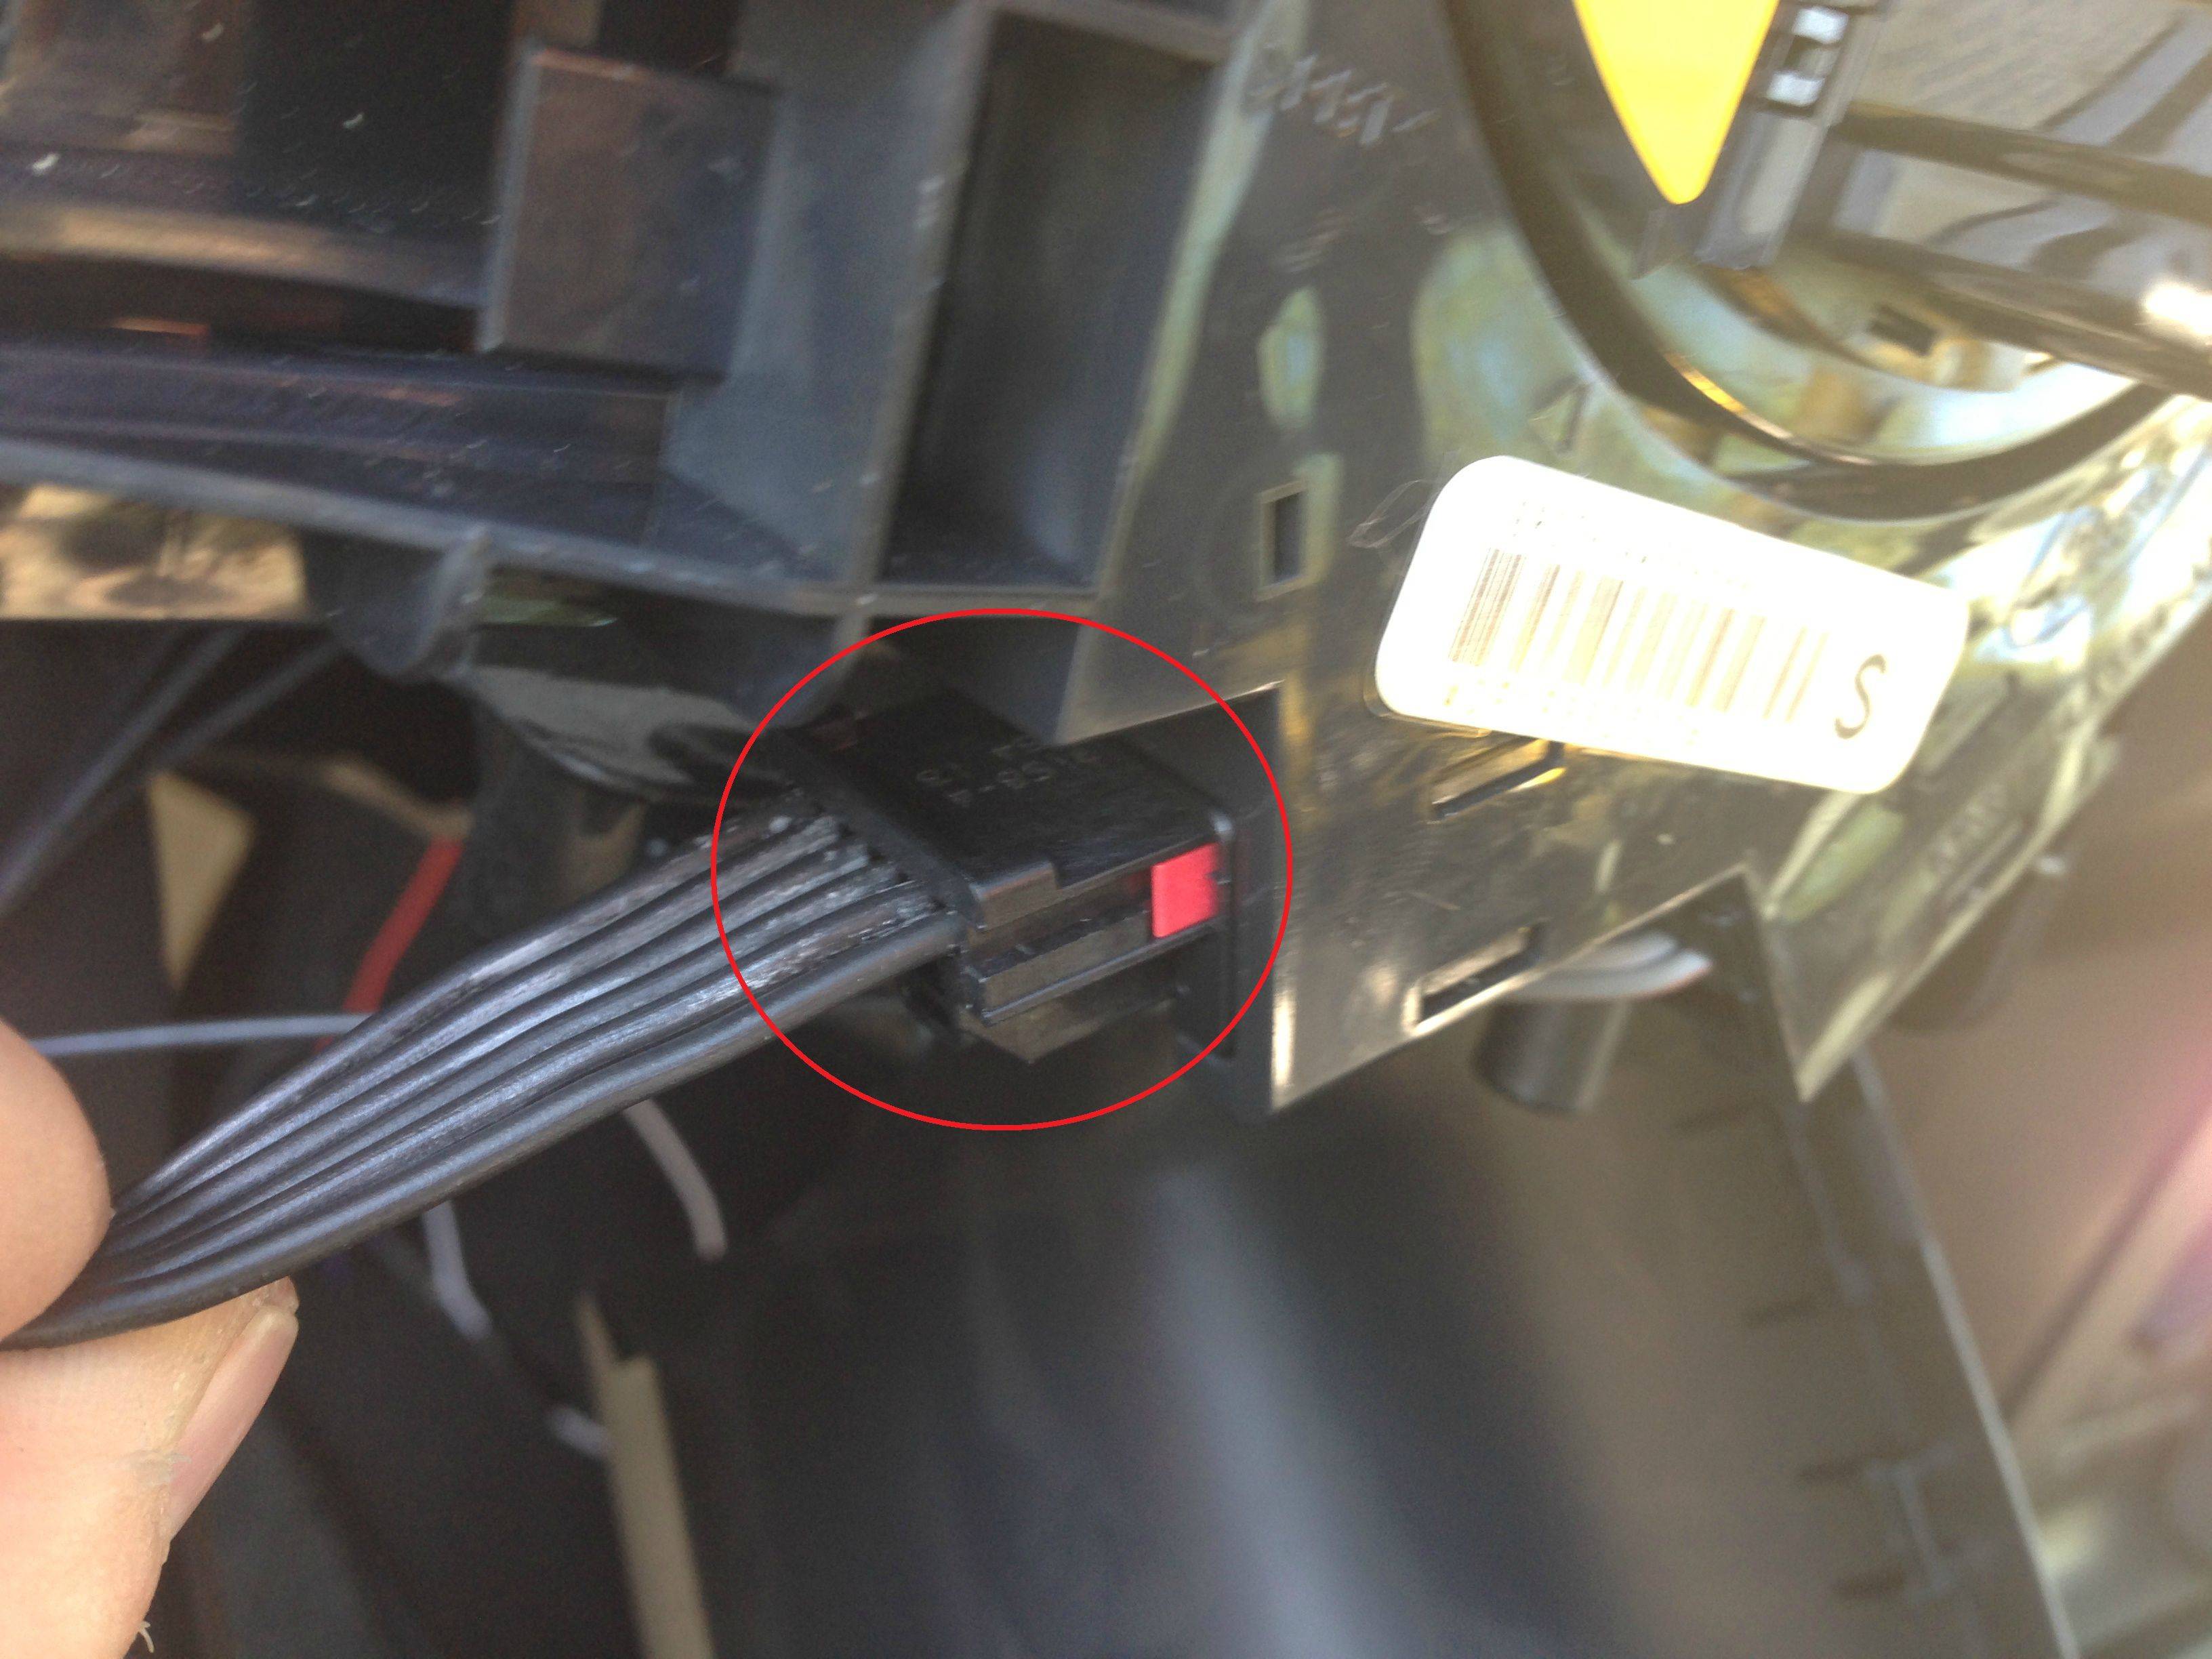
Be mindful of how you run this wire as you want the panel to reattach later.
21. Slide the new steering wheel into place. Plug the plugs into their respective jacks (none of them will fit in the wrong place). You'll notice that you have an extra plug (the WPT-440) this plugs into the bottom of the clock spring where there is usually a small white plastic cap, just pry the cap out and plug in.
22. Screw the ground back into place.
23. Connect the battery and turn on your headlights, the buttons on the wheel should illuminate. If they don't you have a bad connection.
24. At this point you may want to program and test the PAC as well, follow the instructions from PAC (these vary by the company who makes your head unit)
25. If it doesn't work you need to trouble shoot or ask for help. If it does then move on to reassembly.
26. Take the wheel back off of the hub and put it somewhere safe.
27. Tuck the PAC away and then run the WPT-440 to its location on the underside of the clock spring.
28. Put the plastic shell back over the lower half of the clock spring and screw it back in.
29. Put the wheel back on the hub (be mindful of airbag wires)
30. Reconnect the wiring harnesses and ground.
31. Put the horn horse shoe back in place, make sure to not displace the springs. Do not overtighten here as that will result in your horn never shutting off. Likewise if you are too loose the horn will require punches to be set off. You may need to come back to this step to fix this.
32. Hold the airbag up and plug the two connectors in (again you can't plug this in wrong)
33. Slide the airbag back into place
34. Tighten airbag screws
35. Place caps back in place
36. Test it all again
37. Be glad your car now has this: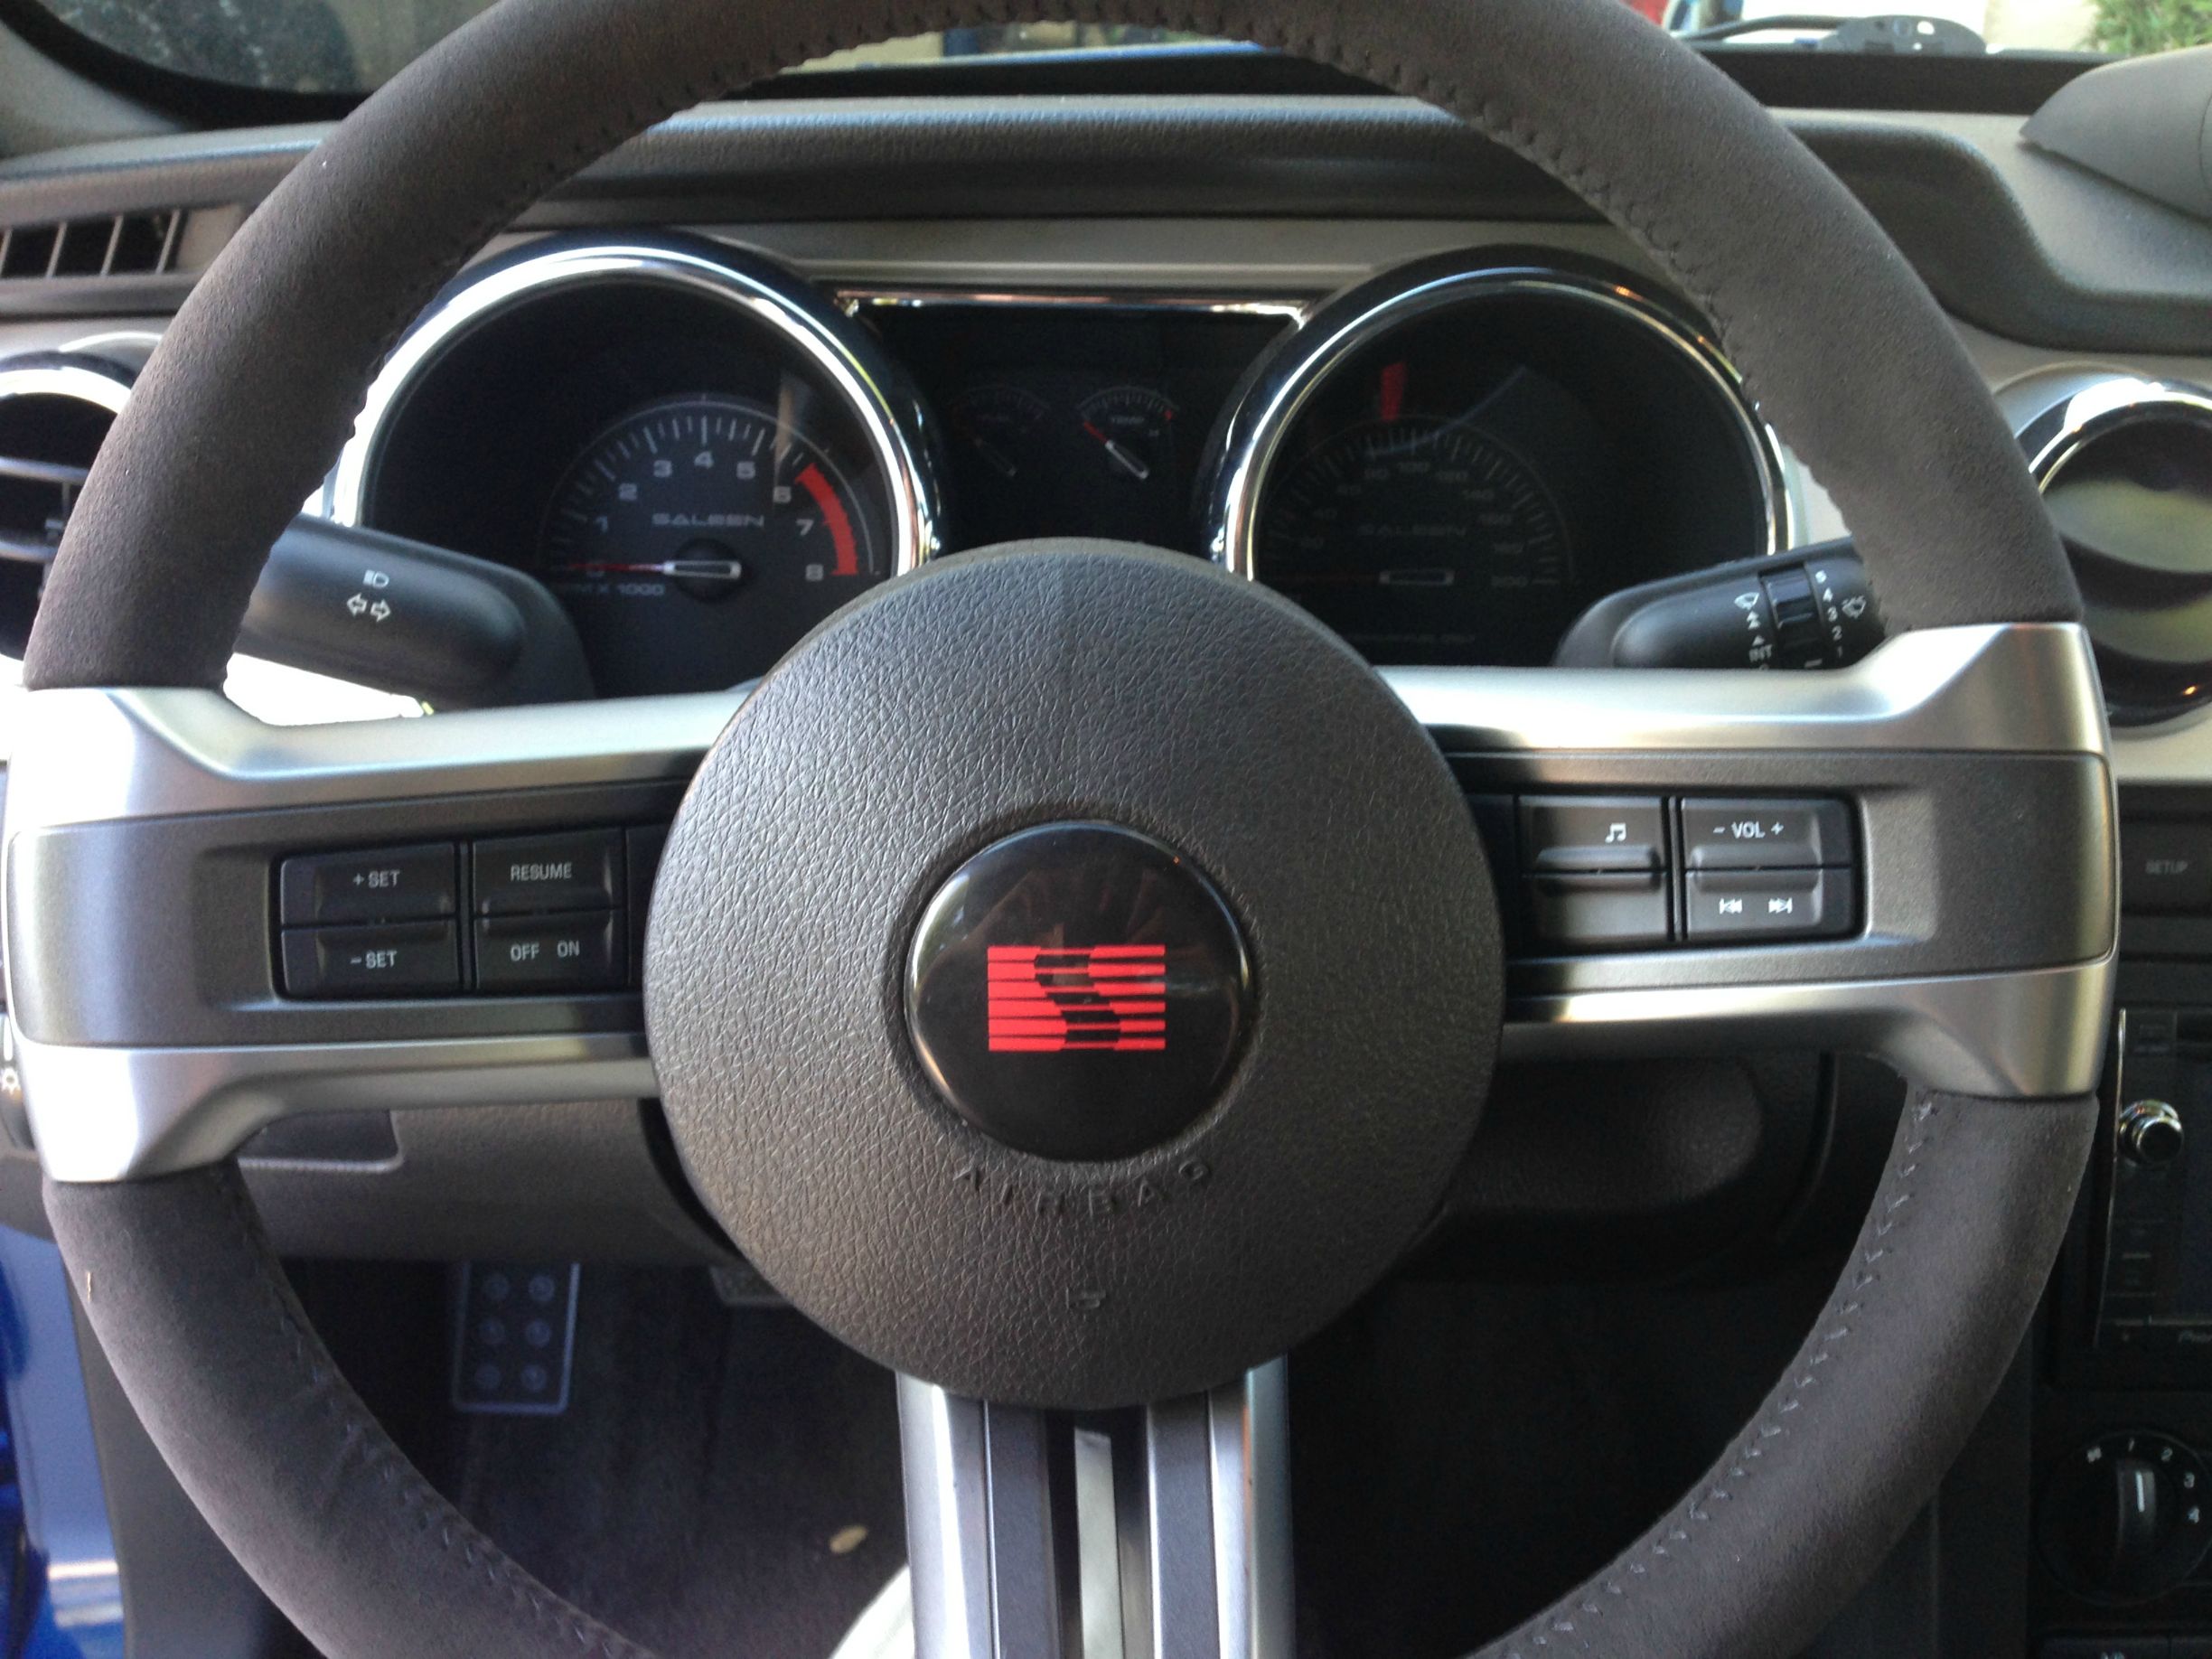
If anything is unclear or you run into any trouble feel free to ask me.
PLEASE READ THE ENTIRE THING BEFORE STARTING, TRUST ME
I'm not responsible if you mess something up
Required Tools and Parts
Before you start you are going to want all of this because this isn't really a project to stop halfway through.
These are required just to install the wheel/cruise control:
- Torque Wrench capable of 41 ft-lbs
- Ratchet
- 5/16 Adapter for Ratchet
- 15/16 Adapter for Torque Wrench
- Torx 20 and 30 Screwdrivers
- Whatever method you want to use for wire joining (solder, splices, etc.)
- The Steering Wheel
- Flathead screwdriver and needlenose pliers optional but helpful
- An aftermarket Headunit
- 2 WPT-440s
- PAC SWI adapter
Once you have all of this it's time to get started.
1. The first step is to disconnect your battery for at least 20 minutes. This is to let the airbag's charge drain so you don't accidentally set it off
2. Remove the two protective caps from your steering wheel (this is where a flathead is helpful). They are just in front of the stalks one on the left and one on the right
3. Once these caps are off use the 5/16 adapter and your ratchet to remove the two bolts (these will frequently fall in the hole a bit, needlenoses are helpful)
4. Now you to need to remove the airbag assembly to do this you basically just grab it and pull forward, be cautious of the wires behind it as they will need to be disconnected prior to removal
Once removed set this aside somewhere safe where no one will kick it. 5. Now you are going to see this:
For ease we are going to get everything out of our way, first unscrew the horn (U shape). There are three T30 screws securing it in place (one at the bottom and one at each top piece) be sure to not lose the springs underneath it, also ensure you disconnect the red plug (top right) prior to removal.
Next remove the wire harness from it's plugs. One plug goes into the buttons on the left and the other goes into the buttons on the right. Then the main plug is at the top center between the airbag wires. Each of these plugs has a little safety tab mechanism that you need to use to remove it. Finally unscrew the ground (green wire top right) using a T20 driver.
At this point you have a nice clean view with no obstruction:
6. Now use the 15/16 adapter to remove the big bolt dead in the middle of the wheel. Once the bolt is removed you can pull the wheel right off (mind that the airbag wires go through the hole cleanly)
Now for the fun part
RESIST THE TEMPTATION TO SPIN THE CLOCK SPRING IT WILL MESS UP YOUR ALIGNMENT
At this point you can get out of the car so you have more room to work with. Now we need to do the wiring. This is the point of no return so be sure before the next step
7. Cut the plug that went into the clockspring (not the cruise control buttons) off of its harness (be sure to leave some wire so that you can attach this plug to the new harness later
8. Now do the same to the harness from the new steering wheel (sorry I don't have a picture)
9. Now we need to connect the new harness to the old plug
New Harness -- Old Plug
Gray -- White
Brown -- Blue
Black -- Green (Ground)
Red -- Red (Power)
If you don't care about audio controls then you can stop here.
If you want audio controls then continue:
10. Cut the purple wire (runs from the button plug) and attach it to a wire on one of your WPT-440s (any wire works but I recommend one of the end ones)
11. Now it is time to move to the PAC adapter.
12. Connect the PAC's red wire to power and black wire to ground (I recommend using the radio's power since the two devices will be working together) Be sure to see where your hiding the PAC before this step or else you'll end up with the harness on the wrong side of your dash
13. Cut the brown loop wire in half (doesn't matter where) and insulate the ends
14. Cut the purple loop in half and tape off the outer half.
15. Use the other half of the purple wire with a 100 ohm resistor and join it into the white wire (I chose to cut the white wire in half but there's other ways to get this done)
16. The other wires are unneeded, I chose to rip them out to avoid clutter.
17. Now connect the end of the white wire to the other WPT-440 BE SURE TO USE THE SAME NUMBER WIRE THAT YOU DID ON THE FIRST ONE (this is why i recommend the end wire)
18. Now it's time to plug in and test.
19. Remove/loosen the plastic on the lower half of the clock spring by removing the two underside screws (T20)
We need to see this
20. Plug the WPT-440 attached to the PAC to the bottom left of the clock spring shown here:
Be mindful of how you run this wire as you want the panel to reattach later.
21. Slide the new steering wheel into place. Plug the plugs into their respective jacks (none of them will fit in the wrong place). You'll notice that you have an extra plug (the WPT-440) this plugs into the bottom of the clock spring where there is usually a small white plastic cap, just pry the cap out and plug in.
22. Screw the ground back into place.
23. Connect the battery and turn on your headlights, the buttons on the wheel should illuminate. If they don't you have a bad connection.
24. At this point you may want to program and test the PAC as well, follow the instructions from PAC (these vary by the company who makes your head unit)
25. If it doesn't work you need to trouble shoot or ask for help. If it does then move on to reassembly.
26. Take the wheel back off of the hub and put it somewhere safe.
27. Tuck the PAC away and then run the WPT-440 to its location on the underside of the clock spring.
28. Put the plastic shell back over the lower half of the clock spring and screw it back in.
29. Put the wheel back on the hub (be mindful of airbag wires)
30. Reconnect the wiring harnesses and ground.
31. Put the horn horse shoe back in place, make sure to not displace the springs. Do not overtighten here as that will result in your horn never shutting off. Likewise if you are too loose the horn will require punches to be set off. You may need to come back to this step to fix this.
32. Hold the airbag up and plug the two connectors in (again you can't plug this in wrong)
33. Slide the airbag back into place
34. Tighten airbag screws
35. Place caps back in place
36. Test it all again
37. Be glad your car now has this:
If anything is unclear or you run into any trouble feel free to ask me.
 04-29-2014, 07:30 AM
#4
3rd Gear Member
Join Date: Apr 2009
Location: Clearwater FL
Posts: 608
I'm also interested. I have a pioneer AVH-P3200BT. You are the man by the way, I've wanted to do this for a while and just haven't found much.
04-29-2014, 12:31 PM
#5
Thread Starter
Join Date: Apr 2014
Location: Fl
Posts: 5
When I figured it out all I could find was some write-ups in other languages unfortunately. But I have been using this set up for about 14 months now and it has been basically perfect.
I used the PAC SWI-PS which is the product for Pioneer head units. I have the Pioneer Avic-X940BT
I used the PAC SWI-PS which is the product for Pioneer head units. I have the Pioneer Avic-X940BT
01-04-2016, 08:07 PM
#6

Join Date: Jan 2016
Location: ohio
Posts: 1
So I have an alpine audio head unit and can't figure out how to get it to work. I followed your steps and the light either flashes uncontrollably and affects my head unit to cha he volume real loud or quiet then will randomly mute. I've tried to figure out the directions from the papers but I'm clueless
05-19-2017, 05:14 PM
#7

Join Date: May 2017
Location: Tennessee
Posts: 1
This how to is going to go over how to install a 2010+ steering wheel into your 05-09 (I did the Boss steering wheel into my 06) and have all of the buttons function properly.
PLEASE READ THE ENTIRE THING BEFORE STARTING, TRUST ME
I'm not responsible if you mess something up
Required Tools and Parts
Before you start you are going to want all of this because this isn't really a project to stop halfway through.
These are required just to install the wheel/cruise control:
Once you have all of this it's time to get started.
1. The first step is to disconnect your battery for at least 20 minutes. This is to let the airbag's charge drain so you don't accidentally set it off
2. Remove the two protective caps from your steering wheel (this is where a flathead is helpful). They are just in front of the stalks one on the left and one on the right
3. Once these caps are off use the 5/16 adapter and your ratchet to remove the two bolts (these will frequently fall in the hole a bit, needlenoses are helpful)

4. Now you to need to remove the airbag assembly to do this you basically just grab it and pull forward, be cautious of the wires behind it as they will need to be disconnected prior to removal Once removed set this aside somewhere safe where no one will kick it.
5. Now you are going to see this:
For ease we are going to get everything out of our way, first unscrew the horn (U shape). There are three T30 screws securing it in place (one at the bottom and one at each top piece) be sure to not lose the springs underneath it, also ensure you disconnect the red plug (top right) prior to removal.
Next remove the wire harness from it's plugs. One plug goes into the buttons on the left and the other goes into the buttons on the right. Then the main plug is at the top center between the airbag wires. Each of these plugs has a little safety tab mechanism that you need to use to remove it. Finally unscrew the ground (green wire top right) using a T20 driver.
At this point you have a nice clean view with no obstruction:
6. Now use the 15/16 adapter to remove the big bolt dead in the middle of the wheel. Once the bolt is removed you can pull the wheel right off (mind that the airbag wires go through the hole cleanly)
Now for the fun part
RESIST THE TEMPTATION TO SPIN THE CLOCK SPRING IT WILL MESS UP YOUR ALIGNMENT
At this point you can get out of the car so you have more room to work with. Now we need to do the wiring. This is the point of no return so be sure before the next step
7. Cut the plug that went into the clockspring (not the cruise control buttons) off of its harness (be sure to leave some wire so that you can attach this plug to the new harness later

8. Now do the same to the harness from the new steering wheel (sorry I don't have a picture)
9. Now we need to connect the new harness to the old plug
New Harness -- Old Plug
Gray -- White
Brown -- Blue
Black -- Green (Ground)
Red -- Red (Power)

If you don't care about audio controls then you can stop here.
If you want audio controls then continue:
10. Cut the purple wire (runs from the button plug) and attach it to a wire on one of your WPT-440s (any wire works but I recommend one of the end ones)
11. Now it is time to move to the PAC adapter.
12. Connect the PAC's red wire to power and black wire to ground (I recommend using the radio's power since the two devices will be working together) Be sure to see where your hiding the PAC before this step or else you'll end up with the harness on the wrong side of your dash
13. Cut the brown loop wire in half (doesn't matter where) and insulate the ends
14. Cut the purple loop in half and tape off the outer half.
15. Use the other half of the purple wire with a 100 ohm resistor and join it into the white wire (I chose to cut the white wire in half but there's other ways to get this done)
16. The other wires are unneeded, I chose to rip them out to avoid clutter.
17. Now connect the end of the white wire to the other WPT-440 BE SURE TO USE THE SAME NUMBER WIRE THAT YOU DID ON THE FIRST ONE (this is why i recommend the end wire)
18. Now it's time to plug in and test.
19. Remove/loosen the plastic on the lower half of the clock spring by removing the two underside screws (T20)
We need to see this
20. Plug the WPT-440 attached to the PAC to the bottom left of the clock spring shown here:


Be mindful of how you run this wire as you want the panel to reattach later.
21. Slide the new steering wheel into place. Plug the plugs into their respective jacks (none of them will fit in the wrong place). You'll notice that you have an extra plug (the WPT-440) this plugs into the bottom of the clock spring where there is usually a small white plastic cap, just pry the cap out and plug in.
22. Screw the ground back into place.
23. Connect the battery and turn on your headlights, the buttons on the wheel should illuminate. If they don't you have a bad connection.
24. At this point you may want to program and test the PAC as well, follow the instructions from PAC (these vary by the company who makes your head unit)
25. If it doesn't work you need to trouble shoot or ask for help. If it does then move on to reassembly.
26. Take the wheel back off of the hub and put it somewhere safe.
27. Tuck the PAC away and then run the WPT-440 to its location on the underside of the clock spring.
28. Put the plastic shell back over the lower half of the clock spring and screw it back in.
29. Put the wheel back on the hub (be mindful of airbag wires)
30. Reconnect the wiring harnesses and ground.
31. Put the horn horse shoe back in place, make sure to not displace the springs. Do not overtighten here as that will result in your horn never shutting off. Likewise if you are too loose the horn will require punches to be set off. You may need to come back to this step to fix this.
32. Hold the airbag up and plug the two connectors in (again you can't plug this in wrong)
33. Slide the airbag back into place
34. Tighten airbag screws
35. Place caps back in place
36. Test it all again
37. Be glad your car now has this:
If anything is unclear or you run into any trouble feel free to ask me.
PLEASE READ THE ENTIRE THING BEFORE STARTING, TRUST ME
I'm not responsible if you mess something up
Required Tools and Parts
Before you start you are going to want all of this because this isn't really a project to stop halfway through.
These are required just to install the wheel/cruise control:
- Torque Wrench capable of 41 ft-lbs
- Ratchet
- 5/16 Adapter for Ratchet
- 15/16 Adapter for Torque Wrench
- Torx 20 and 30 Screwdrivers
- Whatever method you want to use for wire joining (solder, splices, etc.)
- The Steering Wheel
- Flathead screwdriver and needlenose pliers optional but helpful
- An aftermarket Headunit
- 2 WPT-440s
- PAC SWI adapter
Once you have all of this it's time to get started.
1. The first step is to disconnect your battery for at least 20 minutes. This is to let the airbag's charge drain so you don't accidentally set it off
2. Remove the two protective caps from your steering wheel (this is where a flathead is helpful). They are just in front of the stalks one on the left and one on the right
3. Once these caps are off use the 5/16 adapter and your ratchet to remove the two bolts (these will frequently fall in the hole a bit, needlenoses are helpful)
4. Now you to need to remove the airbag assembly to do this you basically just grab it and pull forward, be cautious of the wires behind it as they will need to be disconnected prior to removal
Once removed set this aside somewhere safe where no one will kick it. 5. Now you are going to see this:
For ease we are going to get everything out of our way, first unscrew the horn (U shape). There are three T30 screws securing it in place (one at the bottom and one at each top piece) be sure to not lose the springs underneath it, also ensure you disconnect the red plug (top right) prior to removal.
Next remove the wire harness from it's plugs. One plug goes into the buttons on the left and the other goes into the buttons on the right. Then the main plug is at the top center between the airbag wires. Each of these plugs has a little safety tab mechanism that you need to use to remove it. Finally unscrew the ground (green wire top right) using a T20 driver.
At this point you have a nice clean view with no obstruction:
6. Now use the 15/16 adapter to remove the big bolt dead in the middle of the wheel. Once the bolt is removed you can pull the wheel right off (mind that the airbag wires go through the hole cleanly)
Now for the fun part
RESIST THE TEMPTATION TO SPIN THE CLOCK SPRING IT WILL MESS UP YOUR ALIGNMENT
At this point you can get out of the car so you have more room to work with. Now we need to do the wiring. This is the point of no return so be sure before the next step
7. Cut the plug that went into the clockspring (not the cruise control buttons) off of its harness (be sure to leave some wire so that you can attach this plug to the new harness later
8. Now do the same to the harness from the new steering wheel (sorry I don't have a picture)
9. Now we need to connect the new harness to the old plug
New Harness -- Old Plug
Gray -- White
Brown -- Blue
Black -- Green (Ground)
Red -- Red (Power)
If you don't care about audio controls then you can stop here.
If you want audio controls then continue:
10. Cut the purple wire (runs from the button plug) and attach it to a wire on one of your WPT-440s (any wire works but I recommend one of the end ones)
11. Now it is time to move to the PAC adapter.
12. Connect the PAC's red wire to power and black wire to ground (I recommend using the radio's power since the two devices will be working together) Be sure to see where your hiding the PAC before this step or else you'll end up with the harness on the wrong side of your dash
13. Cut the brown loop wire in half (doesn't matter where) and insulate the ends
14. Cut the purple loop in half and tape off the outer half.
15. Use the other half of the purple wire with a 100 ohm resistor and join it into the white wire (I chose to cut the white wire in half but there's other ways to get this done)
16. The other wires are unneeded, I chose to rip them out to avoid clutter.
17. Now connect the end of the white wire to the other WPT-440 BE SURE TO USE THE SAME NUMBER WIRE THAT YOU DID ON THE FIRST ONE (this is why i recommend the end wire)
18. Now it's time to plug in and test.
19. Remove/loosen the plastic on the lower half of the clock spring by removing the two underside screws (T20)
We need to see this
20. Plug the WPT-440 attached to the PAC to the bottom left of the clock spring shown here:
Be mindful of how you run this wire as you want the panel to reattach later.
21. Slide the new steering wheel into place. Plug the plugs into their respective jacks (none of them will fit in the wrong place). You'll notice that you have an extra plug (the WPT-440) this plugs into the bottom of the clock spring where there is usually a small white plastic cap, just pry the cap out and plug in.
22. Screw the ground back into place.
23. Connect the battery and turn on your headlights, the buttons on the wheel should illuminate. If they don't you have a bad connection.
24. At this point you may want to program and test the PAC as well, follow the instructions from PAC (these vary by the company who makes your head unit)
25. If it doesn't work you need to trouble shoot or ask for help. If it does then move on to reassembly.
26. Take the wheel back off of the hub and put it somewhere safe.
27. Tuck the PAC away and then run the WPT-440 to its location on the underside of the clock spring.
28. Put the plastic shell back over the lower half of the clock spring and screw it back in.
29. Put the wheel back on the hub (be mindful of airbag wires)
30. Reconnect the wiring harnesses and ground.
31. Put the horn horse shoe back in place, make sure to not displace the springs. Do not overtighten here as that will result in your horn never shutting off. Likewise if you are too loose the horn will require punches to be set off. You may need to come back to this step to fix this.
32. Hold the airbag up and plug the two connectors in (again you can't plug this in wrong)
33. Slide the airbag back into place
34. Tighten airbag screws
35. Place caps back in place
36. Test it all again
37. Be glad your car now has this:
If anything is unclear or you run into any trouble feel free to ask me.
Love this detailed instruction on how to do this I told my ole lady about 8t and she just was kinda like ahhh that's cool I guess lol but I really wanna do to this to my mustang... so the only real question I have is will this work on my 2009 mustang gt california special and which steering wheel will work? I looked on eBay and the only ones I found said for gt500 right around 250-300 brand new, oh and the other question is... my car has the shaker 1000 in it , I have already replaced th3 factory unit with a 7 inch touchscreen jvc and had to buy one of these PACS you are referring to to keep the subs and amps working. Any help would greatly appreciated!
Thanks,
Jeremy
07-13-2019, 03:02 PM
#8

Join Date: Jul 2019
Location: Virginia
Posts: 1
I wired it up and can't seem to get it to work. So I come to the conclusion that the switch is bad so I bought a new one and it's on the way. These are data switches so I couldn't get any readings. The old switch from the 2005 steering wheel works great. The new one does light up but I can't get it to work. So I'm going to try the new switch when it comes in.

