
BMR Watts link installed!
 11-10-2015, 02:27 AM
#1
5th Gear Member
Thread Starter
Join Date: Sep 2007
Location: Nor Cali
Posts: 2,059
Some of you may already know that BMR came out with their Watts link not too long ago. I've always wanted a Watts link and when BMR announced they were developing one with an attractive price point I decided to wait for it. I ordered one through Late Model Restoration and installed it over the weekend. The install took longer than expected. They say it should take 3-4 hrs but there were a few issues that made it take much longer for me. Probably about 12 hrs split between Saturday and Sunday with a lot of breaks and a couple of runs to the hardware store. The instructions kinda suck. It doesn't tell you where every washer goes but I figured it out. It doesn't mention any torque specs for a lot of the bolts (e.g., axle clamp bolts). It only says to "tighten" them. Only a few bolts had torque specs.
Now for the issues...
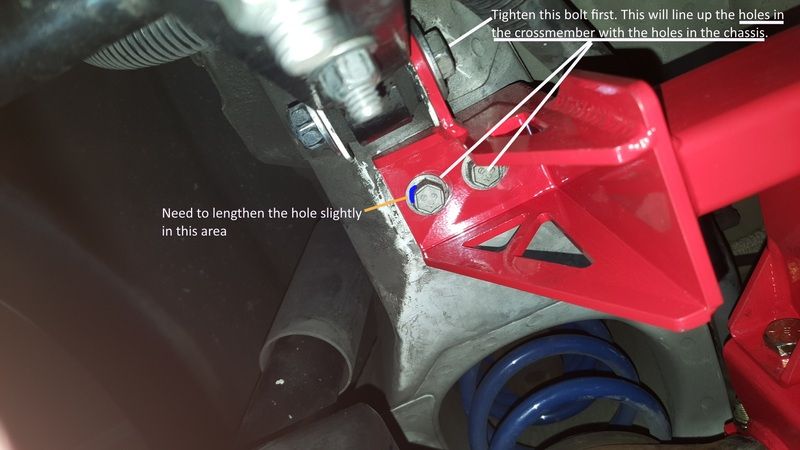
I had to lengthen the outboard hole in the driver's side crossmember mount because I couldn't get the bolt started. The guy in this Youtube video had the same issue. Skip to 7:37.
I took a dremel to the crossmember hole in the area under the blue line to allow insertion of bolt. You only need to grind a little off. Just enough to get the bolt started.
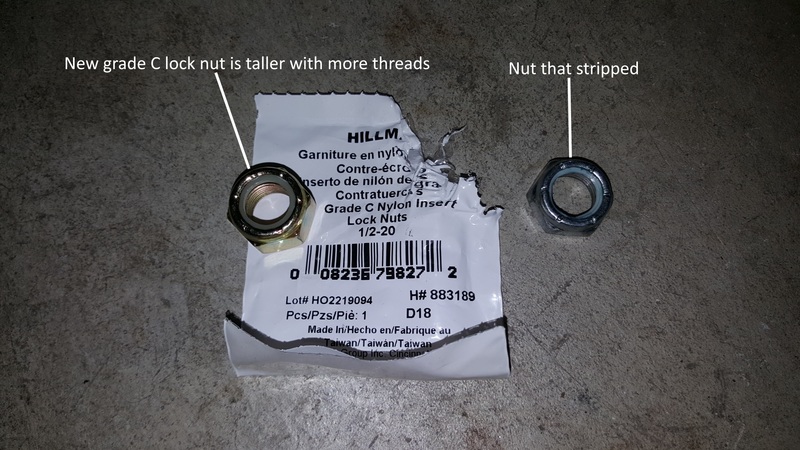
The other issue was the cheap lock nut they give you for the axle mounts (piece that bolts to the axle clamps) that requires 80 ft/lbs of torque. I didn't even reach the torque spec when the lock nut suddenly turned freely. Bad. Real bad. Cheap nut got stripped. Word of advice. Go to your hardware store BEFORE the install and pick up 2 pcs of grade C (8), 1/2-20 lock nuts. You can send me a Hallmark card to thank me later. The other side was also nearly stripped. Didn't notice until I removed it later to adjust the axle centering. More later.
Get yourself new lock nuts like the one on the left. New lock nut is taller with more threads and of course stronger at grade C, i.e. 8.
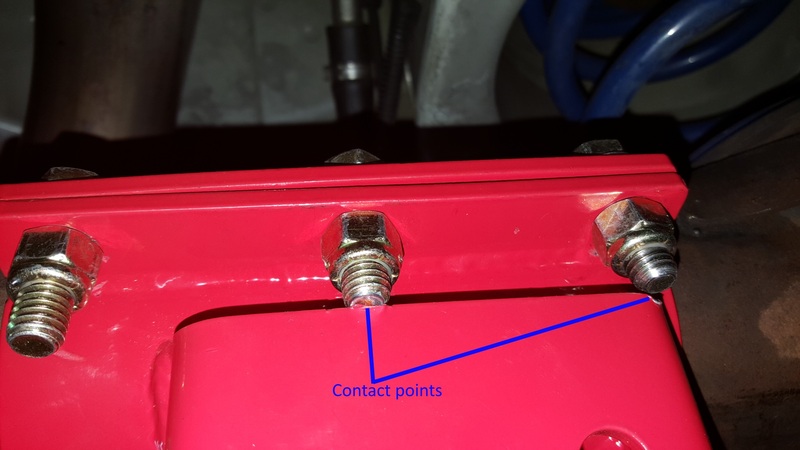
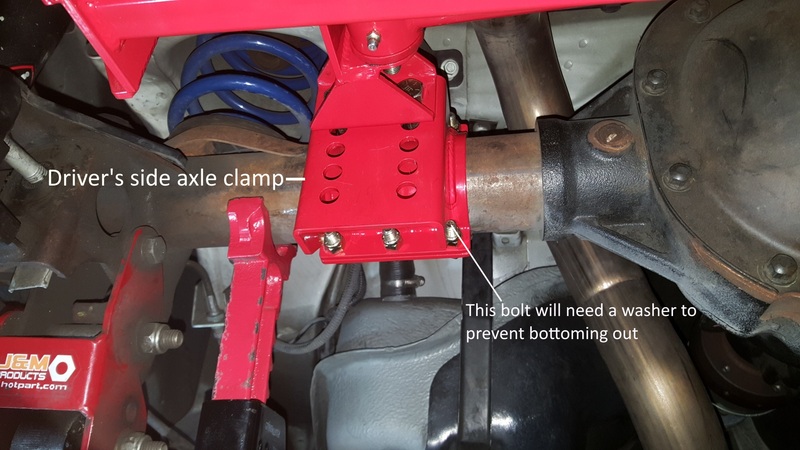
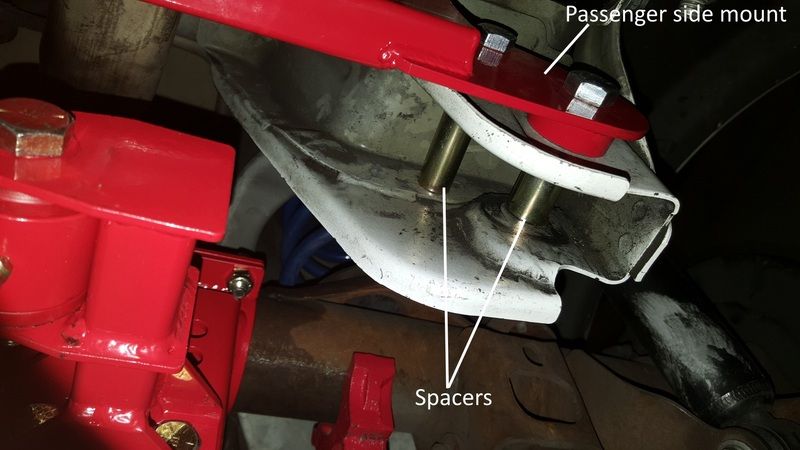
Another issue...Some of the bolts in the axle clamps are a bit too long and makes contact at end of bolt travel. I had to use lock washers to prevent it.
Passenger side:
Driver's side:
That's it for the issues.
Now some miscellaneous pics.
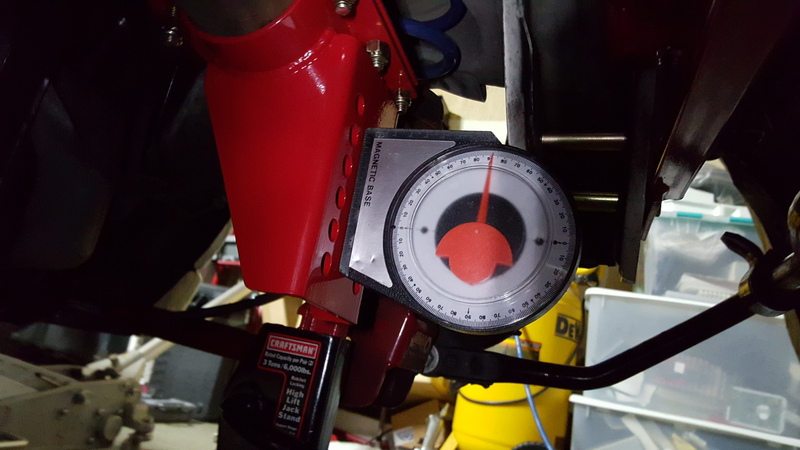
I used an angle finder and set the links as close to zero degrees as possible.

Setting angle of axle clamps to match center of crossmember. Should be close to 90�. My crossmember angle was 91� so I set the axle clamps to 91�. Make sure axle is loaded to simulate ride height. I had mine on jack stands.
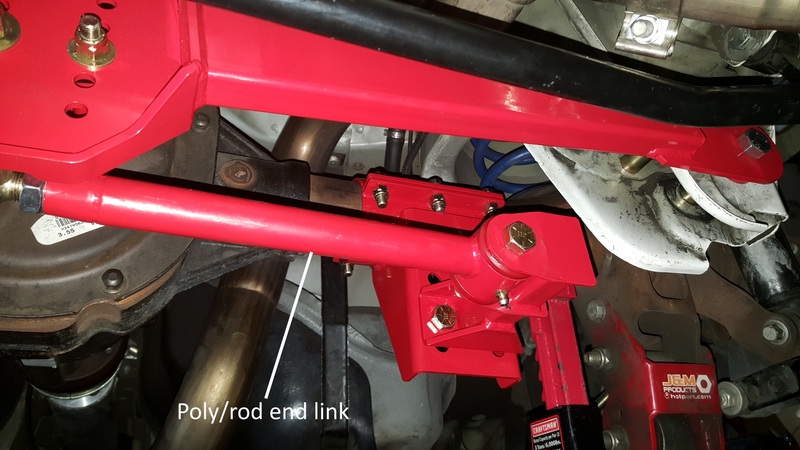
I mentioned earlier about the discovery of the other axle mount nut being nearly stripped. This was during one of the most time consuming parts of the install which is the centering of the axle. Instructions do not tell you how. I had to figure it out myself. This was a Bitch with a capital B. I didn't notice the poly/rod end links weren't adjustable on the car when I made the purchase. If I had known, I would've purchased model WL006 which is rod ends on both sides and double adjustable. This would save a lot of time.
At first I tried removing one of the end links at the axle mount (poly end) and shorten or lengthen them depending on which way I want the axle to go. This caused a problem where I can't reinsert the bolt because the hole in the poly bushing no longer lines up with the axle mount hole. Argh! I finally decided to try, with hesitation, to remove the pivot assembly in the center and leave the other end link connected. In this case, I had removed the driver's side end link at the axle mount and the pivot assembly and left the passenger side untouched. I shortened the driver's side link 3/16". I then lengthened the passenger side 3/16" by turning the pivot assembly which in turn spins the rod end. I then finish by reinstalling the driver's side link first which is easy because the poly bushing hole now matches up with the axle mount since the pivot is dangling in the middle. Lastly, I position the pivot assembly into place and tighten everything down. I had to do this process three times. Each time having to take the car off jack stands to measure how much each tire sticks out. Like I said, Bitch with a capital B. lol
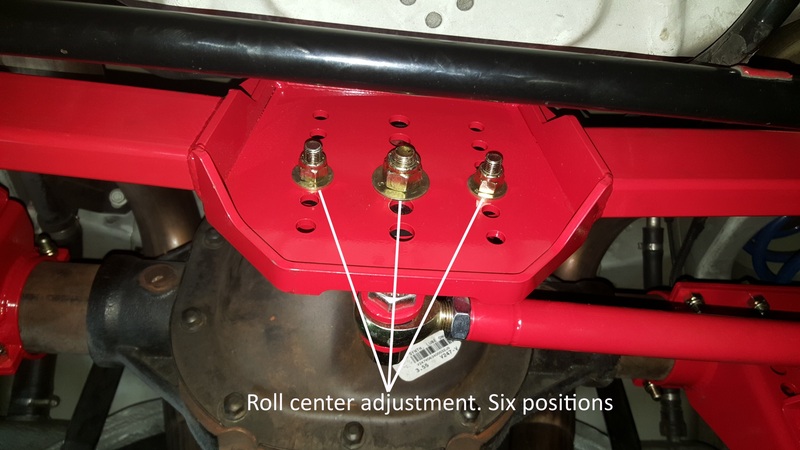
Remove the three roll center adjustment bolts to remove pivot assembly.
This is probably BMR's first production run and they'll probably have some of the issues ironed out eventually. They're not major issues. Just mainly some cheap nuts, bolts that are a bit too long and that hole I had to dremel out.
All in all it was worth it. The rear feels less twitchy on rough roads. It feels more planted and smooth. This is probably my second favorite mod next to the Whipple. I should've done it a long time ago.
Now for the issues...
I had to lengthen the outboard hole in the driver's side crossmember mount because I couldn't get the bolt started. The guy in this Youtube video had the same issue. Skip to 7:37.
I took a dremel to the crossmember hole in the area under the blue line to allow insertion of bolt. You only need to grind a little off. Just enough to get the bolt started.

The other issue was the cheap lock nut they give you for the axle mounts (piece that bolts to the axle clamps) that requires 80 ft/lbs of torque. I didn't even reach the torque spec when the lock nut suddenly turned freely. Bad. Real bad. Cheap nut got stripped. Word of advice. Go to your hardware store BEFORE the install and pick up 2 pcs of grade C (8), 1/2-20 lock nuts. You can send me a Hallmark card to thank me later.
The other side was also nearly stripped. Didn't notice until I removed it later to adjust the axle centering. More later. Get yourself new lock nuts like the one on the left. New lock nut is taller with more threads and of course stronger at grade C, i.e. 8.

Another issue...Some of the bolts in the axle clamps are a bit too long and makes contact at end of bolt travel. I had to use lock washers to prevent it.
Passenger side:

Driver's side:

That's it for the issues.
Now some miscellaneous pics.
I used an angle finder and set the links as close to zero degrees as possible.


Setting angle of axle clamps to match center of crossmember. Should be close to 90�. My crossmember angle was 91� so I set the axle clamps to 91�. Make sure axle is loaded to simulate ride height. I had mine on jack stands.

I mentioned earlier about the discovery of the other axle mount nut being nearly stripped. This was during one of the most time consuming parts of the install which is the centering of the axle. Instructions do not tell you how. I had to figure it out myself. This was a Bitch with a capital B. I didn't notice the poly/rod end links weren't adjustable on the car when I made the purchase. If I had known, I would've purchased model WL006 which is rod ends on both sides and double adjustable. This would save a lot of time.
At first I tried removing one of the end links at the axle mount (poly end) and shorten or lengthen them depending on which way I want the axle to go. This caused a problem where I can't reinsert the bolt because the hole in the poly bushing no longer lines up with the axle mount hole. Argh! I finally decided to try, with hesitation, to remove the pivot assembly in the center and leave the other end link connected. In this case, I had removed the driver's side end link at the axle mount and the pivot assembly and left the passenger side untouched. I shortened the driver's side link 3/16". I then lengthened the passenger side 3/16" by turning the pivot assembly which in turn spins the rod end. I then finish by reinstalling the driver's side link first which is easy because the poly bushing hole now matches up with the axle mount since the pivot is dangling in the middle. Lastly, I position the pivot assembly into place and tighten everything down. I had to do this process three times. Each time having to take the car off jack stands to measure how much each tire sticks out. Like I said, Bitch with a capital B. lol
Remove the three roll center adjustment bolts to remove pivot assembly.


This is probably BMR's first production run and they'll probably have some of the issues ironed out eventually. They're not major issues. Just mainly some cheap nuts, bolts that are a bit too long and that hole I had to dremel out.
All in all it was worth it. The rear feels less twitchy on rough roads. It feels more planted and smooth. This is probably my second favorite mod next to the Whipple. I should've done it a long time ago.
Last edited by 2007CalSpec; 11-10-2015 at 02:52 PM.
 11-10-2015, 02:35 PM
#2
3rd Gear Member

Join Date: Oct 2007
Location: Santo Domingo, Dominican Republic
Posts: 920
Thanks for this excellent post, I was on the fence between this one and the Cortex watts link. Your post just made the decision a no-brainer. I know it's almost twice as expensive but I'm going to go with the Cortex, I don't want something breaking on the track and sending the car against the guardrails. The BMR looks like a good street piece though, just not track resistant enough.
11-10-2015, 08:45 PM
#3
5th Gear Member
Thread Starter
Join Date: Sep 2007
Location: Nor Cali
Posts: 2,059
Thanks for this excellent post, I was on the fence between this one and the Cortex watts link. Your post just made the decision a no-brainer. I know it's almost twice as expensive but I'm going to go with the Cortex, I don't want something breaking on the track and sending the car against the guardrails. The BMR looks like a good street piece though, just not track resistant enough.
http://www.steeda.com/blog/2013/08/s...ng-watts-link/
I decided I wanted a chassis mounted unit and got the BMR one when it came out. I didn't like the look of Steeda's Watts link and someone said their passenger axle clamp hangs too low for a lowered car.
The Cortex Watts link is a nice unit but I didn't like the fact that the center pivot is axle mounted on the pumpkin. It does look a hell of a lot easier to install though.
Anyway, I've been doing some spirited driving to and from work and around town and the car feels so much better now. I can take corners faster without the rear feeling loose like it did before. Bumpy roads are a breeze. Oh, and there's no noise in the rear now. My aftermarket panhard bar used to clack, clack, clack going over bumps.
Last edited by 2007CalSpec; 11-10-2015 at 09:26 PM.
11-11-2015, 09:19 AM
#4
3rd Gear Member
Join Date: Oct 2007
Location: Santo Domingo, Dominican Republic
Posts: 920
Got a point there. I might get the BMR and just replace all the fasteners with quality ones. The unit itself looks well built, but as you said the Cortex looks much easier to install.
I just read the Steeda article. Interesting pitch for their overpriced contraption. The BMR and Fays look much better built and are 1/2 the price. I know Sam Strano likes the Fays. Don't know if he has seen the BMR yet, but if he has I wish he'd pitch in, I swear I'm getting a headache with the roll center thing.
I wonder why Ford didn't go with a Watts link, even the Crown Vic had one.
Last edited by flash_xx; 11-11-2015 at 09:46 AM.
11-11-2015, 10:31 AM
#5

Join Date: Nov 2015
Location: Florida
Posts: 5
I saw your link on our YouTube video and I wanted to jump in here and address a few things for you.
First things first, I'm sorry about the issues that you've had with your kit. This certainly isn't the norm with our parts, but we have had some growing pains with the Watts kit. Unfortunately with new products, especially those as complicated as the Watts, we can't always nail them on the first shot (no matter how hard we try!). I have spoken with the designer about getting the hole slotted on the pivot mount to avoid that bolt fitment issue in the future.
We have also addressed the axle clamp bolts being too long. I had the same issue on my car when I was installing the WL005. I ended up using 3/8 by 1" bolts, so we made the change to our hardware pack to include these in kits going forward. If you'd like, I'd be more than happy to get a set sent out to you so that you can swap them out. 20 ft-lbs for those bolts and they're good to go! It doesn't take a lot of torque to keep the clamps in place.
The pivot nuts that you stripped out were not the correct hardware for the WL kit. I'm not sure how they ended up there, but you should have had some nuts similar to what you purchased.
Again, I'm sorry that you had issues with your kit. This was an early kit and we were battling issues with the first few kits. It's a new kit for everyone, so our assembly guys are learning new parts, new hardware packets, and trying to keep up with the changes we had to make on the fly. Things have settled down and the issues with the WL should be all sorted now. I'm glad to hear that you're enjoying your kit though, and if you have any other issues or things you need addressed, don't hesitate to contact me!
The fasteners we include in the Watts are quality, zinc coated grade 8 and 10.9 nuts and bolts. Unfortunately it appears that there were just a few mix ups with the hardware packet in some of our early kits. Rest assured, we don't use junk hardware. No need to replace the hardware. 
First things first, I'm sorry about the issues that you've had with your kit. This certainly isn't the norm with our parts, but we have had some growing pains with the Watts kit. Unfortunately with new products, especially those as complicated as the Watts, we can't always nail them on the first shot (no matter how hard we try!). I have spoken with the designer about getting the hole slotted on the pivot mount to avoid that bolt fitment issue in the future.
We have also addressed the axle clamp bolts being too long. I had the same issue on my car when I was installing the WL005. I ended up using 3/8 by 1" bolts, so we made the change to our hardware pack to include these in kits going forward. If you'd like, I'd be more than happy to get a set sent out to you so that you can swap them out. 20 ft-lbs for those bolts and they're good to go! It doesn't take a lot of torque to keep the clamps in place.
The pivot nuts that you stripped out were not the correct hardware for the WL kit. I'm not sure how they ended up there, but you should have had some nuts similar to what you purchased.
Again, I'm sorry that you had issues with your kit. This was an early kit and we were battling issues with the first few kits. It's a new kit for everyone, so our assembly guys are learning new parts, new hardware packets, and trying to keep up with the changes we had to make on the fly. Things have settled down and the issues with the WL should be all sorted now. I'm glad to hear that you're enjoying your kit though, and if you have any other issues or things you need addressed, don't hesitate to contact me!
Got a point there. I might get the BMR and just replace all the fasteners with quality ones. The unit itself looks well built, but as you said the Cortex looks much easier to install.
I just read the Steeda article. Interesting pitch for their overpriced contraption. The BMR and Fays look much better built and are 1/2 the price. I know Sam Strano likes the Fays. Don't know if he has seen the BMR yet, but if he has I wish he'd pitch in, I swear I'm getting a headache with the roll center thing.
I wonder why Ford didn't go with a Watts link, even the Crown Vic had one.
I just read the Steeda article. Interesting pitch for their overpriced contraption. The BMR and Fays look much better built and are 1/2 the price. I know Sam Strano likes the Fays. Don't know if he has seen the BMR yet, but if he has I wish he'd pitch in, I swear I'm getting a headache with the roll center thing.
I wonder why Ford didn't go with a Watts link, even the Crown Vic had one.
11-11-2015, 01:17 PM
#8
Join Date: Nov 2015
Location: Florida
Posts: 5
Don't worry though, we will get you all squared away if you have any issues with the hardware in the kit. You can always give me a call and we can go over everything to verify that it's all correct. Alternatively, a couple quick pictures emailed to me will allow me to see and make sure it's all correct.
11-11-2015, 10:37 PM
#9
5th Gear Member
Thread Starter
Join Date: Sep 2007
Location: Nor Cali
Posts: 2,059
I saw your link on our YouTube video and I wanted to jump in here and address a few things for you.
First things first, I'm sorry about the issues that you've had with your kit. This certainly isn't the norm with our parts, but we have had some growing pains with the Watts kit. Unfortunately with new products, especially those as complicated as the Watts, we can't always nail them on the first shot (no matter how hard we try!). I have spoken with the designer about getting the hole slotted on the pivot mount to avoid that bolt fitment issue in the future.
We have also addressed the axle clamp bolts being too long. I had the same issue on my car when I was installing the WL005. I ended up using 3/8 by 1" bolts, so we made the change to our hardware pack to include these in kits going forward. If you'd like, I'd be more than happy to get a set sent out to you so that you can swap them out. 20 ft-lbs for those bolts and they're good to go! It doesn't take a lot of torque to keep the clamps in place.
The pivot nuts that you stripped out were not the correct hardware for the WL kit. I'm not sure how they ended up there, but you should have had some nuts similar to what you purchased.
Again, I'm sorry that you had issues with your kit. This was an early kit and we were battling issues with the first few kits. It's a new kit for everyone, so our assembly guys are learning new parts, new hardware packets, and trying to keep up with the changes we had to make on the fly. Things have settled down and the issues with the WL should be all sorted now. I'm glad to hear that you're enjoying your kit though, and if you have any other issues or things you need addressed, don't hesitate to contact me!
The fasteners we include in the Watts are quality, zinc coated grade 8 and 10.9 nuts and bolts. Unfortunately it appears that there were just a few mix ups with the hardware packet in some of our early kits. Rest assured, we don't use junk hardware. No need to replace the hardware.
The pivot nuts stripping was pretty frustrating though when I was so close to being done and I had to run out to the hardware store at 6-7pm on a Sunday. lol
There's no need to send me shorter axle mount bolts. Thanks for offering though. I've already put lock washers under the bolts in question to prevent contact. I'm not getting under there again. I nearly knocked myself out when the passenger side link swung down off the crossmember and smacked me in the face because I had put it up there temporarily out of the way so I can work.
There's a couple of other small issues I need to mention. Your instructions had me scratching my head with IMAGE 5. I was looking all over for the two lock washers and some of the hardware on the list isn't in the picture although they were in the kit. I figured since all of the nuts are the poly-lock kind then the lock washers were probably left out for that reason.

Also, on your website, the description for WL005 appears to have been a copy and paste from the description for WL006. Under Description, It says, "The links are built from heavy-duty aluminum with left and right hand threaded 5/8-inch rod ends for easy on-car adjustability" and under Features, it says "Double Adjustable." I know for a fact they're not adjustable on the car. lol

Last edited by 2007CalSpec; 11-11-2015 at 10:44 PM.
11-12-2015, 08:28 AM
#10
Join Date: Nov 2015
Location: Florida
Posts: 5
LMR is where I got mine.
I'm just glad everything worked out and the Watts link is working great. I understand there may be some issues when a new product comes out. I had that thought in mind when I ran into these problems.
The pivot nuts stripping was pretty frustrating though when I was so close to being done and I had to run out to the hardware store at 6-7pm on a Sunday. lol
There's no need to send me shorter axle mount bolts. Thanks for offering though. I've already put lock washers under the bolts in question to prevent contact. I'm not getting under there again. I nearly knocked myself out when the passenger side link swung down off the crossmember and smacked me in the face because I had put it up there temporarily out of the way so I can work. I tightened all of the axle clamp bolts pretty good. I didn't want those suckers coming off. If they only need 20 ft/lbs of torque then I should be golden.
There's a couple of other small issues I need to mention. Your instructions had me scratching my head with IMAGE 5. I was looking all over for the two lock washers and some of the hardware on the list isn't in the picture although they were in the kit. I figured since all of the nuts are the poly-lock kind then the lock washers were probably left out for that reason.
Also, on your website, the description for WL005 appears to have been a copy and paste from the description for WL006. Under Description, It says, "The links are built from heavy-duty aluminum with left and right hand threaded 5/8-inch rod ends for easy on-car adjustability" and under Features, it says "Double Adjustable." I know for a fact they're not adjustable on the car. lol
I'm just glad everything worked out and the Watts link is working great. I understand there may be some issues when a new product comes out. I had that thought in mind when I ran into these problems.
The pivot nuts stripping was pretty frustrating though when I was so close to being done and I had to run out to the hardware store at 6-7pm on a Sunday. lol
There's no need to send me shorter axle mount bolts. Thanks for offering though. I've already put lock washers under the bolts in question to prevent contact. I'm not getting under there again. I nearly knocked myself out when the passenger side link swung down off the crossmember and smacked me in the face because I had put it up there temporarily out of the way so I can work.
There's a couple of other small issues I need to mention. Your instructions had me scratching my head with IMAGE 5. I was looking all over for the two lock washers and some of the hardware on the list isn't in the picture although they were in the kit. I figured since all of the nuts are the poly-lock kind then the lock washers were probably left out for that reason.
Also, on your website, the description for WL005 appears to have been a copy and paste from the description for WL006. Under Description, It says, "The links are built from heavy-duty aluminum with left and right hand threaded 5/8-inch rod ends for easy on-car adjustability" and under Features, it says "Double Adjustable." I know for a fact they're not adjustable on the car. lol
I've got the site updated and brought the instruction error to my designers attention. Hopefully we will have a revised set and a revised image up quickly. You are correct in assuming that the lock washers on the pivot aren't necessary!