All Base Trim Mustang Owners Look Here – Redline Goods Leather Ebrake Review /Install
 09-16-2014, 01:13 PM
#1
2nd Gear Member
Thread Starter

Join Date: Jun 2011
Location: CA
Posts: 348
Back in October of last year, I contacted Jack through one of his Redline Goods threads and asked him if he could design/sale a leather ebrake cover for the 2010+ base trim owners. I hated how easily the rubber ebrake handle was susceptible to getting scratched and didn’t like the popular billet covers offered in our current market. No one was selling such a product online so I thought asking Redline Goods was a good idea since they seem open to making/designing new products for anyone asking. He said he’d look into it, but I never really followed up.
Fast forward…I found myself on RedlineGoods.com the other day when lo and behold…there it was…a leather ebrake cover for sale on their website!!! I just want to say that RedlineGoods is an exceptional company because they listen and if at all possible…will make/design a product for the little guy.
On RedlineGood.com, they provide an installation guide to install the leather ebrake cover. Below, I took cues from their instructions and decided to offer another way of installing the leather cover since the rubber handle cannot be removed as it is molded to the entire ebrake unit.
Note: Firstly, the communication was great…besides having a recent inquiry answered by Jack on the forum, Mike also followed up to make sure I was taken care of. A confirmation was emailed shortly after I made the online purchase and was notified about the description of the envelope that was being shipped.
Shipping was fast and upon inspection, the product was made with high quality leather and crafted exceptionally well. They also provided a lot of thread, plus a needle.
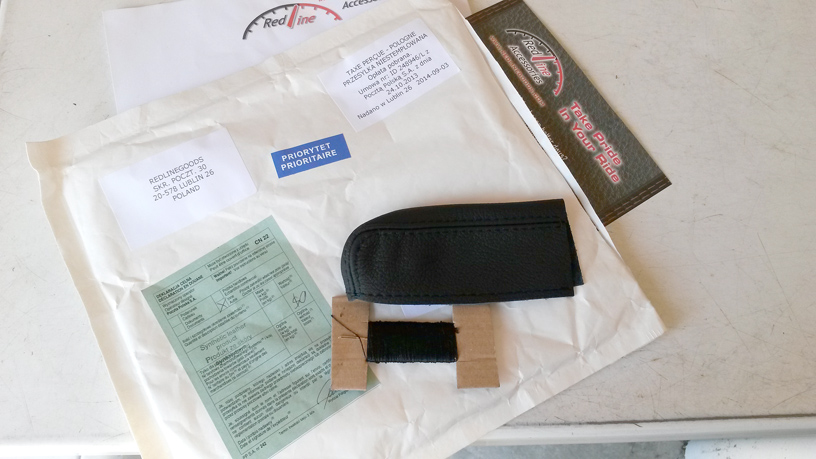
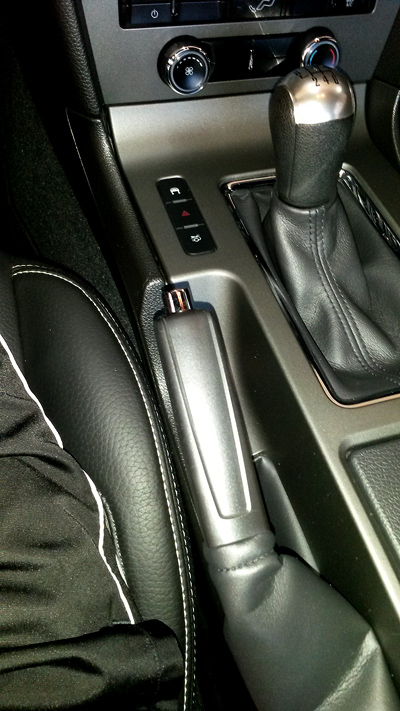
This is a before shot…rubber ebrake handle:
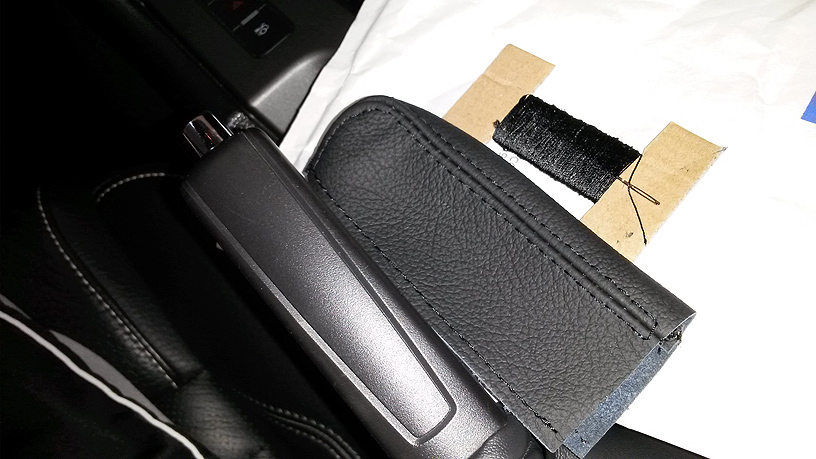
Another shot of the kit next to the rubber ebrake handle:
Note: My apologies…it was 94 degrees outside and a lot hotter in the garage…even with the garage door open and car windows rolled down…I was sweating like a pig so I wasn’t able to take pics of every play-by-play action…The installation took about 60-90 minutes because I kept on taking breaks and double/triple/quadruple checking everything I did.
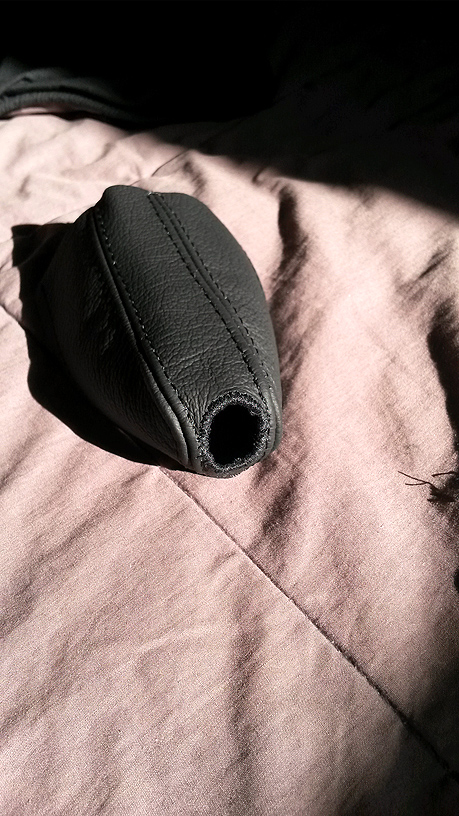
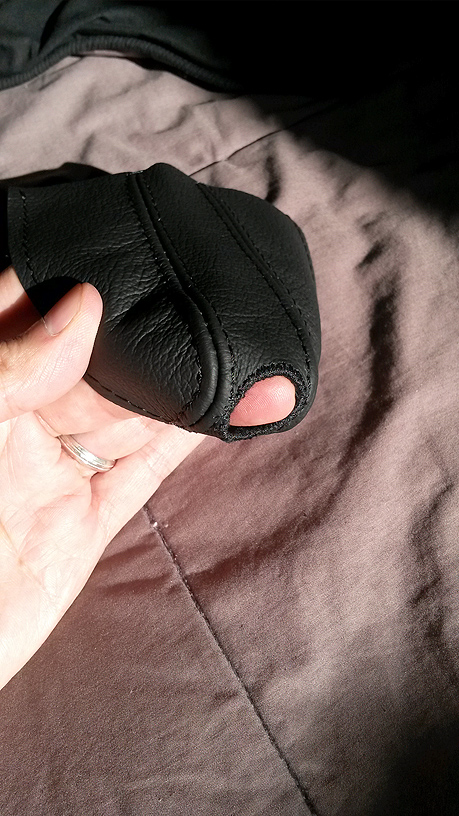
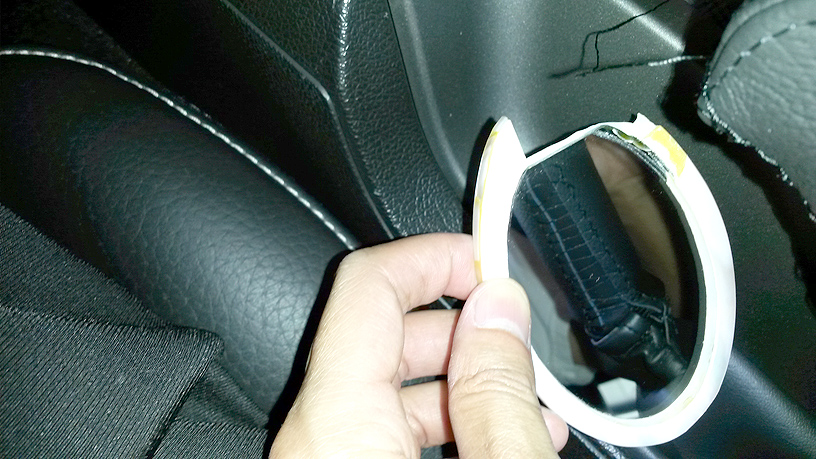
Anyway, I test fitted the cover over the ebrake, and it was a perfect fit. The first challenge was figuring out how to measure and cut the hole for the ebrake release button. I used this puffy, Scotch double sided tape:
I eyeballed and cut out a circle from the double sided tape (using scissors…Note: I actually used small scisscors found in a men’s grooming kit) and matched it to the size of the ebrake release button…kept on trimming it until it was about perfect. Then I centered and stuck the newly cut, circle shaped tape onto the flat, top surface of the ebrake’s metal release button and peeled off the backing to expose the other sticky side of the tape. Next, I slid the leather cover over the rubber handle until the tip of the cover made contact with the exposed sticky tape that is stuck onto the ebrake release button. Use some pressure to push the tip of the leather cover onto the taped, ebrake release button and carefully pull/peel off the leather cover (from the bottom to the top), making sure that the tape is still stuck onto the inside of the leather cover as the other side of the tape is released from the top of the ebrake’s release button. Carefully flip the leather cover inside out to see where the double sided tape has attached itself. Now you know where you’ll need to cut out the hole so the ebrake’s release button can slide through! Use a pen or thin marker to mark around the circumference of the circle shaped tape and peel off/discard the circle shaped tape.
Now in RedlineGood’s installation guide, they mention that using an Xacto knife works, but is difficult to control…They warn you because it’s TRUE!!! I tried using one to score/cut around the inside of the circumference I marked and almost messed up. If you cut holding the Xacto knife at too steep of an angle to the leather surface, it will cut past the area you intentionally want to cut. Make sure you cut a smaller circle inside of the original, traced marking so you don’t find yourself cutting outside of the circle. Once the smaller circle is cut out, discard the small leather cutout. Note: This would be a good time to test fit the position of the small circular cutout you just made to see how it will eventually fit over the ebrake’s release button. Next, I used the small scissors (mentioned earlier) to finish off /trim a perfect circle around the traced marking. Note: Again, use this time to test fit the leather cover over the ebrake handle. You may need to trim a little more to make sure the ebrake’s release button slides easily through the hole you just cut. Make sure you pull the bottom of the leather cover (by pulling on both ends) to make sure everything fits tight as that is how you want the cover to wrap around the ebrake handle.
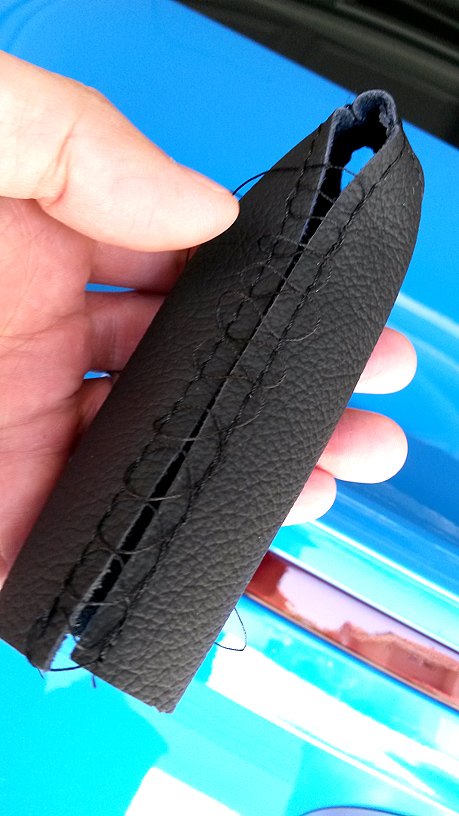
I didn’t have any leather glue to seal around the hole that was just cut out (Note: See Step 10 of RedlineGood’s installation guide), and wanted to take the look of the leather ebrake cover to the next level…so I used my own black thread and a smaller needle to sew around the hole until it looked like this:
It took me a bit of time as I sewed around the hole 5 times by hand. Here’s another shot:
Because the ebrake’s rubber handle cannot be removed, the only way to install and stitch up the leather cover was by installing it inside the car with the ebrake pulled up. I found that the best and easiest way (for me) was to loosely lace up (Note: See Step 6 and 7 of RedlineGood’s installation guide) the leather ebrake cover and slide it over the rubber ebrake handle.
Pull and position/fit the leather ebrake cover over the rubber ebrake handle. (Note: At this point, you may pull the top of the ebrake boot off to allow the bottom of the leather ebrake cover to slide all the way down/over the rubber ebrake handle. The top of the boot is wrapped via an elastic band so don’t be afraid to pull it down/off…it will come off).
You will think that by looking at the pic below, it is gonna be a difficult job to lace up the leather ebrake cover, but it wasn’t that bad at all. I used a small mirror and a needle (as a tool) to carefully pull (from the bottom working my way to the top) each “loop” until everything was laced up tightly. (Note: Think of it as lacing up a shoe). Once you are able to pull on each loop, use your fingers to pull on it to tighten up the previous loops, and move on to the next.
Finally, once you stitch your way to the top of the leather ebrake handle, sew through and loop through a few of the stitches and make/tie a knot (Note: See Step 7 of RedlineGood’s installation guide)…make/tie a few knots on top of your knot and use the scissors to cut the rest of the thread.
Here is the fruit of my (and possibly your) labor:
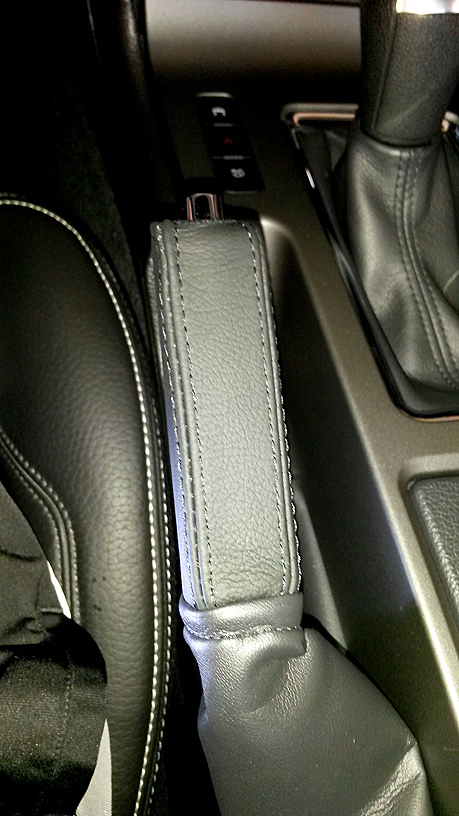
I think it looks freakin’ awesome!!! Make sure you pull the top of the ebrake boot over and around the bottom of the leather ebrake handle. Thanks for reading and Enjoy!!!
Note: I didn't use any glue...and it seems like the installed leather ebrake cover is not going anywhere...
Fast forward…I found myself on RedlineGoods.com the other day when lo and behold…there it was…a leather ebrake cover for sale on their website!!! I just want to say that RedlineGoods is an exceptional company because they listen and if at all possible…will make/design a product for the little guy.
On RedlineGood.com, they provide an installation guide to install the leather ebrake cover. Below, I took cues from their instructions and decided to offer another way of installing the leather cover since the rubber handle cannot be removed as it is molded to the entire ebrake unit.
Note: Firstly, the communication was great…besides having a recent inquiry answered by Jack on the forum, Mike also followed up to make sure I was taken care of. A confirmation was emailed shortly after I made the online purchase and was notified about the description of the envelope that was being shipped.
Shipping was fast and upon inspection, the product was made with high quality leather and crafted exceptionally well. They also provided a lot of thread, plus a needle.
This is a before shot…rubber ebrake handle:
Another shot of the kit next to the rubber ebrake handle:
Note: My apologies…it was 94 degrees outside and a lot hotter in the garage…even with the garage door open and car windows rolled down…I was sweating like a pig so I wasn’t able to take pics of every play-by-play action…The installation took about 60-90 minutes because I kept on taking breaks and double/triple/quadruple checking everything I did.
Anyway, I test fitted the cover over the ebrake, and it was a perfect fit. The first challenge was figuring out how to measure and cut the hole for the ebrake release button. I used this puffy, Scotch double sided tape:
I eyeballed and cut out a circle from the double sided tape (using scissors…Note: I actually used small scisscors found in a men’s grooming kit) and matched it to the size of the ebrake release button…kept on trimming it until it was about perfect. Then I centered and stuck the newly cut, circle shaped tape onto the flat, top surface of the ebrake’s metal release button and peeled off the backing to expose the other sticky side of the tape. Next, I slid the leather cover over the rubber handle until the tip of the cover made contact with the exposed sticky tape that is stuck onto the ebrake release button. Use some pressure to push the tip of the leather cover onto the taped, ebrake release button and carefully pull/peel off the leather cover (from the bottom to the top), making sure that the tape is still stuck onto the inside of the leather cover as the other side of the tape is released from the top of the ebrake’s release button. Carefully flip the leather cover inside out to see where the double sided tape has attached itself. Now you know where you’ll need to cut out the hole so the ebrake’s release button can slide through! Use a pen or thin marker to mark around the circumference of the circle shaped tape and peel off/discard the circle shaped tape.
Now in RedlineGood’s installation guide, they mention that using an Xacto knife works, but is difficult to control…They warn you because it’s TRUE!!! I tried using one to score/cut around the inside of the circumference I marked and almost messed up. If you cut holding the Xacto knife at too steep of an angle to the leather surface, it will cut past the area you intentionally want to cut. Make sure you cut a smaller circle inside of the original, traced marking so you don’t find yourself cutting outside of the circle. Once the smaller circle is cut out, discard the small leather cutout. Note: This would be a good time to test fit the position of the small circular cutout you just made to see how it will eventually fit over the ebrake’s release button. Next, I used the small scissors (mentioned earlier) to finish off /trim a perfect circle around the traced marking. Note: Again, use this time to test fit the leather cover over the ebrake handle. You may need to trim a little more to make sure the ebrake’s release button slides easily through the hole you just cut. Make sure you pull the bottom of the leather cover (by pulling on both ends) to make sure everything fits tight as that is how you want the cover to wrap around the ebrake handle.
I didn’t have any leather glue to seal around the hole that was just cut out (Note: See Step 10 of RedlineGood’s installation guide), and wanted to take the look of the leather ebrake cover to the next level…so I used my own black thread and a smaller needle to sew around the hole until it looked like this:
It took me a bit of time as I sewed around the hole 5 times by hand. Here’s another shot:
Because the ebrake’s rubber handle cannot be removed, the only way to install and stitch up the leather cover was by installing it inside the car with the ebrake pulled up. I found that the best and easiest way (for me) was to loosely lace up (Note: See Step 6 and 7 of RedlineGood’s installation guide) the leather ebrake cover and slide it over the rubber ebrake handle.
Pull and position/fit the leather ebrake cover over the rubber ebrake handle. (Note: At this point, you may pull the top of the ebrake boot off to allow the bottom of the leather ebrake cover to slide all the way down/over the rubber ebrake handle. The top of the boot is wrapped via an elastic band so don’t be afraid to pull it down/off…it will come off).
You will think that by looking at the pic below, it is gonna be a difficult job to lace up the leather ebrake cover, but it wasn’t that bad at all. I used a small mirror and a needle (as a tool) to carefully pull (from the bottom working my way to the top) each “loop” until everything was laced up tightly. (Note: Think of it as lacing up a shoe). Once you are able to pull on each loop, use your fingers to pull on it to tighten up the previous loops, and move on to the next.
Finally, once you stitch your way to the top of the leather ebrake handle, sew through and loop through a few of the stitches and make/tie a knot (Note: See Step 7 of RedlineGood’s installation guide)…make/tie a few knots on top of your knot and use the scissors to cut the rest of the thread.
Here is the fruit of my (and possibly your) labor:
I think it looks freakin’ awesome!!! Make sure you pull the top of the ebrake boot over and around the bottom of the leather ebrake handle. Thanks for reading and Enjoy!!!
Note: I didn't use any glue...and it seems like the installed leather ebrake cover is not going anywhere...
Last edited by magnido45; 09-17-2014 at 09:49 AM. Reason: mistype

 09-17-2014, 02:47 AM
#3

WOW! This is AWESOME INSTALALTION JOB! Congratulations on your pursuit for perfection! The idea of pre-lacing the cover on the handle still in the car is something I would never come up with myself 
Anyway - looks lilke you're in need of a set of leather boots to match. And I am willing to offer you a DEAL on them in exchange for this referral and write-up
Interested?
Take care
Jack
RedlineGoods Team
Anyway - looks lilke you're in need of a set of leather boots to match. And I am willing to offer you a DEAL on them in exchange for this referral and write-up
Interested?
Take care
Jack
RedlineGoods Team
09-17-2014, 08:57 AM
#4
2nd Gear Member
Thread Starter
Join Date: Jun 2011
Location: CA
Posts: 348
WOW! This is AWESOME INSTALALTION JOB! Congratulations on your pursuit for perfection! The idea of pre-lacing the cover on the handle still in the car is something I would never come up with myself
Anyway - looks lilke you're in need of a set of leather boots to match. And I am willing to offer you a DEAL on them in exchange for this referral and write-up
Interested?
Take care
Jack
RedlineGoods Team
Anyway - looks lilke you're in need of a set of leather boots to match. And I am willing to offer you a DEAL on them in exchange for this referral and write-up
Interested?
Take care
Jack
RedlineGoods Team
09-17-2014, 09:45 AM
#5
09-17-2014, 10:03 AM
#6
2nd Gear Member
Thread Starter
Join Date: Jun 2011
Location: CA
Posts: 348
http://www.redlinegoods.com/ShiftKnobs.php
I'm sure some members will chime in to express their interest for a leather cover for the OEM Standard shift ****
ADDED: Just for the curious, would the leather standard shift **** cover wrap over the entire shift **** or expose the top where the shift pattern is displayed?
Last edited by magnido45; 09-17-2014 at 10:16 AM. Reason: added a question...
09-17-2014, 10:56 AM
#7
We'd like to expose the shifting pattern as I think this is what most of you guys will expect but there's another option - we can cover the whole **** in leather and emboss shifting pattern at the top - just as we did here:
What do you think?
Take care
Jack
RedlineGoods Team
What do you think?
Take care
Jack
RedlineGoods Team
09-17-2014, 11:00 AM
#8
2nd Gear Member
Thread Starter
Join Date: Jun 2011
Location: CA
Posts: 348
We'd like to expose the shifting pattern as I think this is what most of you guys will expect but there's another option - we can cover the whole **** in leather and emboss shifting pattern at the top - just as we did here:
What do you think?
Take care
Jack
RedlineGoods Team
What do you think?
Take care
Jack
RedlineGoods Team
Added: The emboss shift pattern is definitely a game changer!!!
Last edited by magnido45; 09-17-2014 at 11:04 AM. Reason: added comment...

Thread
Thread Starter
Forum
Replies
Last Post
NTO_GUY
Vendor For Sale / Group Buy Classifieds
4
12-24-2015 11:23 AM