
Steeda Ultralight lowering springs install (w/pics)
 04-18-2007, 03:32 PM
#1
2nd Gear Member
Thread Starter
Join Date: Jun 2006
Location:
Posts: 415
Here's theinstallation of the Steeda Ultralight lowering springs on my 2006 GT coupe with the (64W) Polished Bullitts.
Baseline measurements were taken before the install.
DRIVERS SIDE
FRONT (GROUND TO Wheel Well CENTER): 28 5/8"
REAR: 29 3/8"
FRONT (TOP OF TIRE TO WW CENTER): 2"
REAR: 2 3/4"
PASSENGER SIDE
FRONT (GROUND TO WW CENTER): 28 7/8"
REAR: 29 7/8"
FRONT (TOP OF TIRE TO WW CENTER): 2 1/4"
REAR: 3"
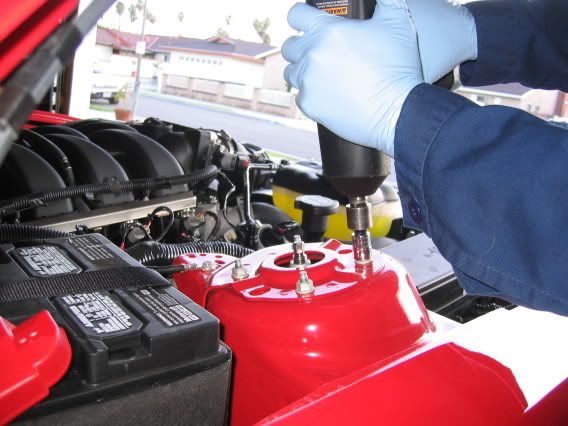
PART 1
REAR INSTALL
Rear was jacked up from the rear differential (pumpkin) and jack stands placed under the frame.[/align]Note: Use caution when placing the jack pad under the pumpkin. The rear differential cover can be easily dented and damaged (can potentially cause a leak) if the jack pad isn't positioned properly. There's a flat section on the pumpkinto jack from just forward of the cover. Using a piece of 2x4 on the jack pad may help.

[/align]
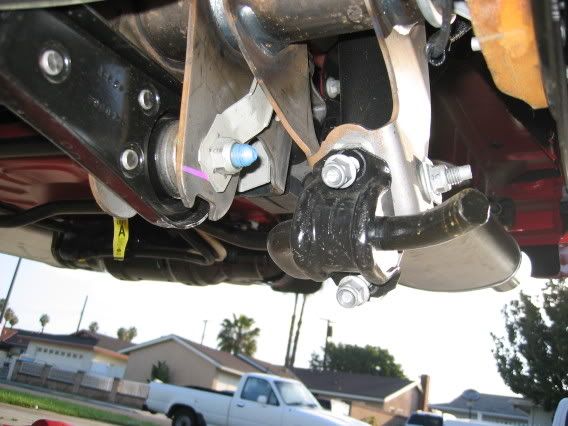
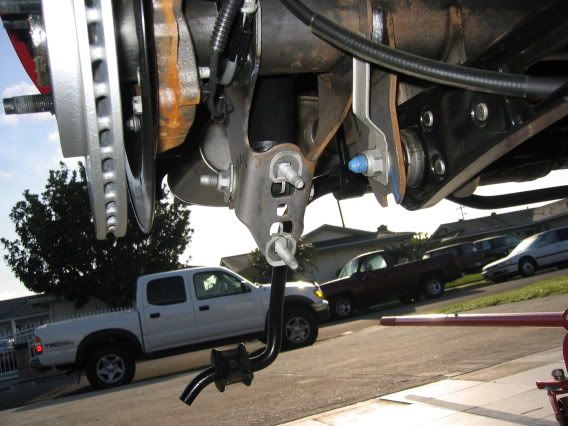
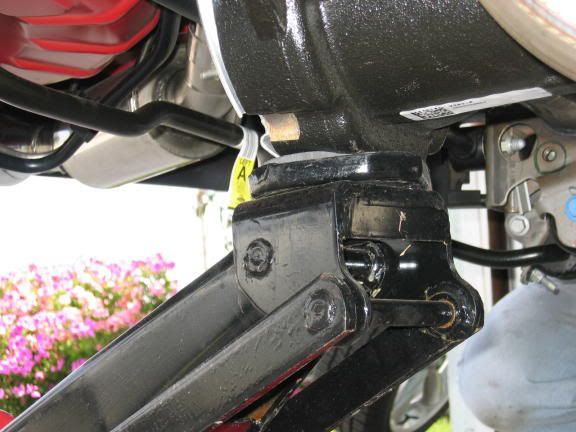
Removed the anti-rollbar clamps (2 places each, both sides).[/align]Note: Another option is to remove 2 bolts (1 each side) from the swaybar link support to body (see 4th pic down).
 [/align]
 [/align]
 [/align][/align](optional)[/align]
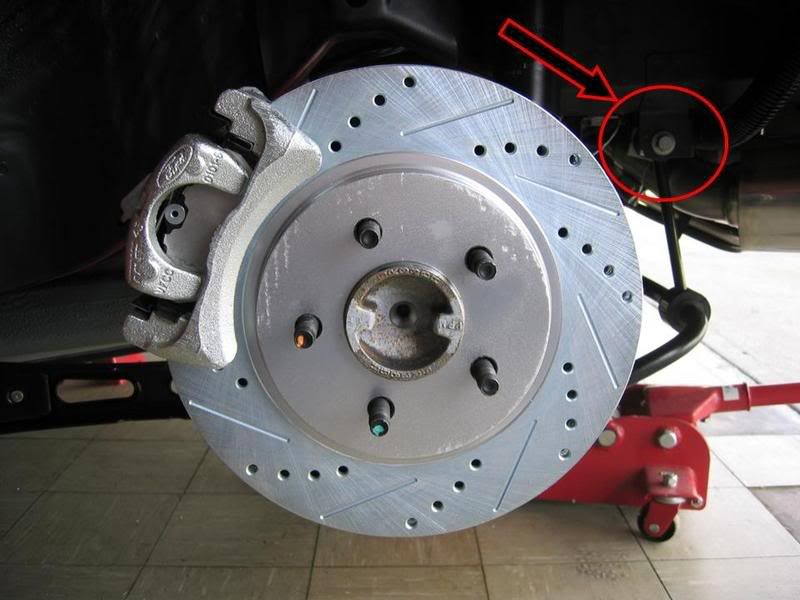
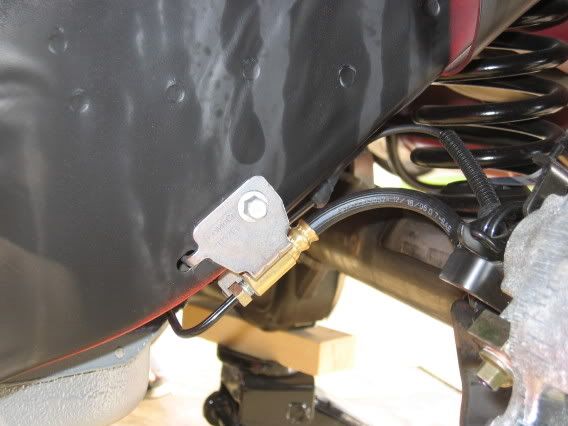
[/align]Removed brake line support bracket (both sides).
 [/align]
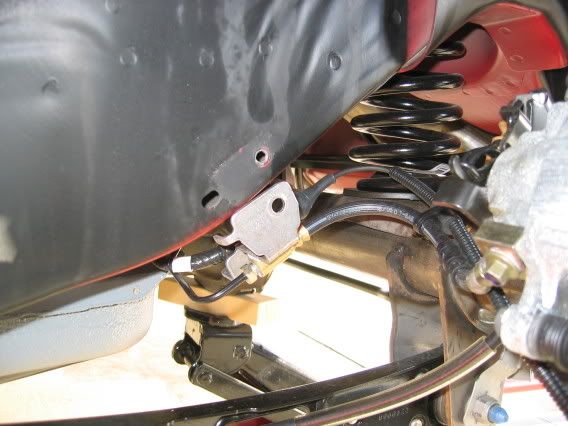
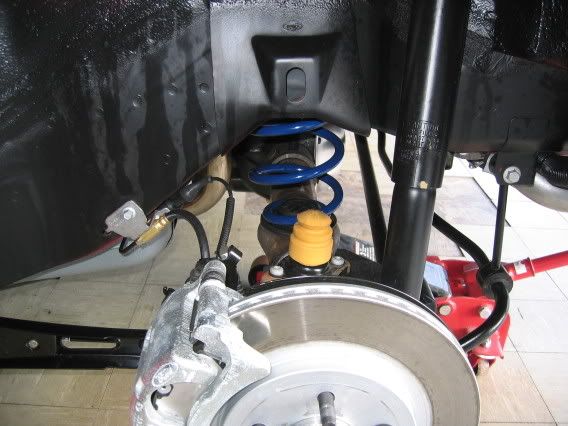
[/align]Removed lower shock mount bolt (both sides).
 [/align]
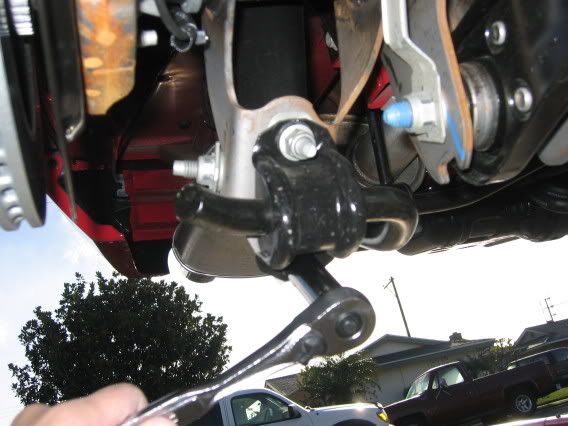
[/align]Slowly dropped rear pumpkin low enough to remove the OEM springs (both sides, had to push down at outer end of axle a little, near disc brake, to give that extra room to pull the spring out).
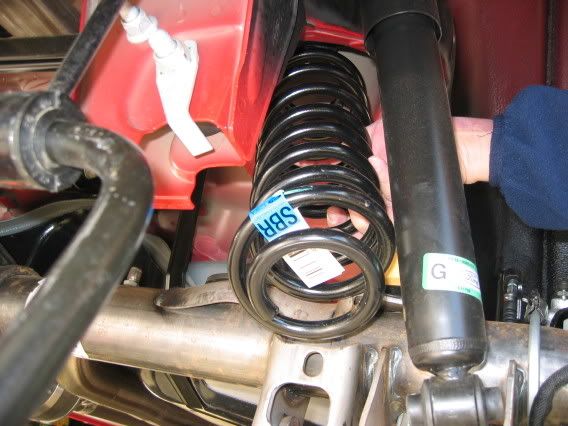
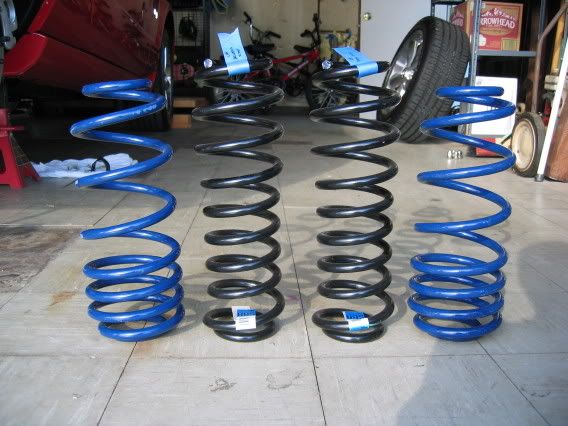
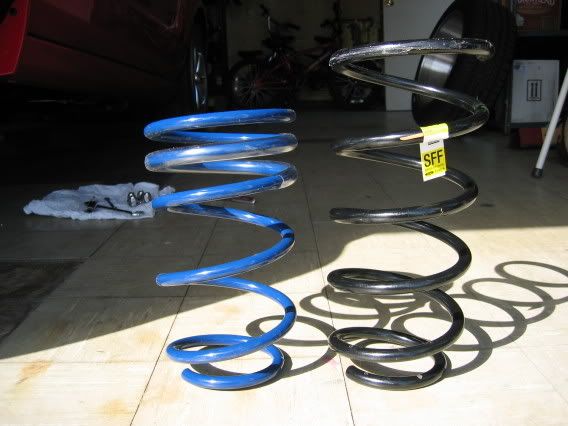
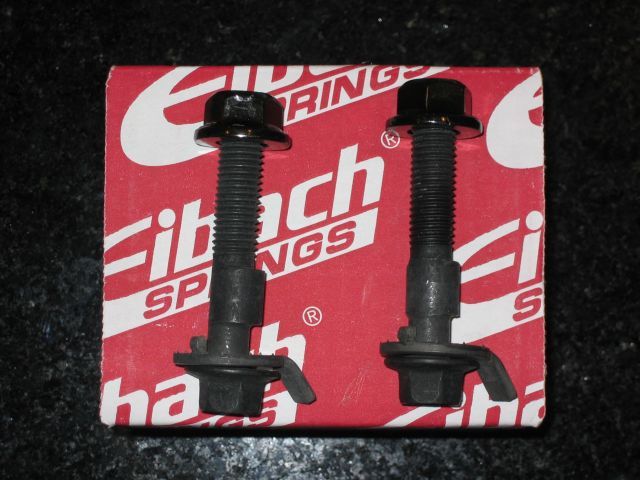
[/align]Comparison between stock OEM rear springs and the Steeda Ultralites.
[/align]Picture of lower spring mount on axle.
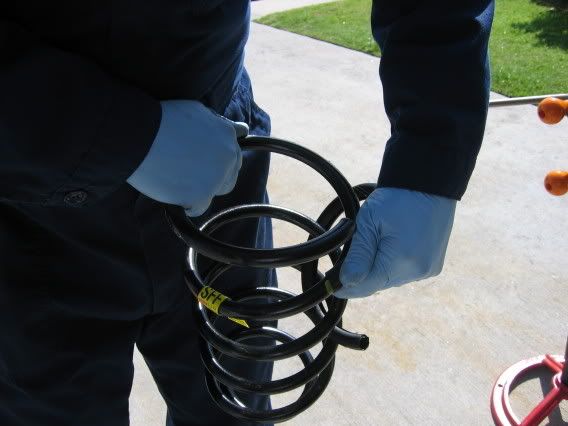
[/align]Install the new springs on both sides, then jack pumpkin back up to align the lower shock mounting holes. Re-assemble what you removed/disconected from the above steps.[/align][/align]Picture of new Steeda spring installed. [/align][/align]Note: Tight wound coil going up into the body, loose wound coil toward axle. Steeda directions does not address spring orientation. I called Steeda Tech Support to validate correct position. Also, there's no mention on which way to orientate the coil pigtail ends, I just positioned the Steeda coil ends where the OEM ones were.
[/align]Installation complete.
[/align]Ready to lower jack. Rear is done!
See Part 2 for front install.[/align][/align]PART 2
FRONT INSTALL
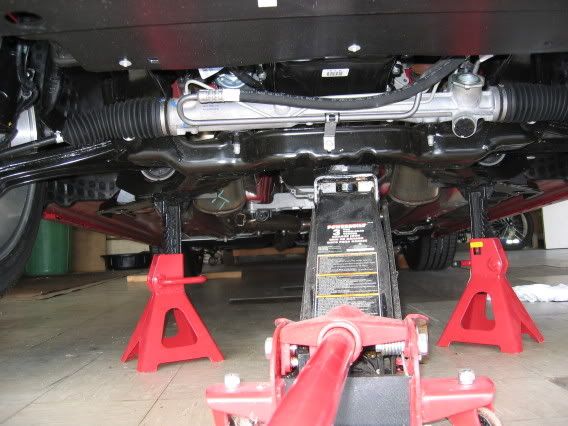
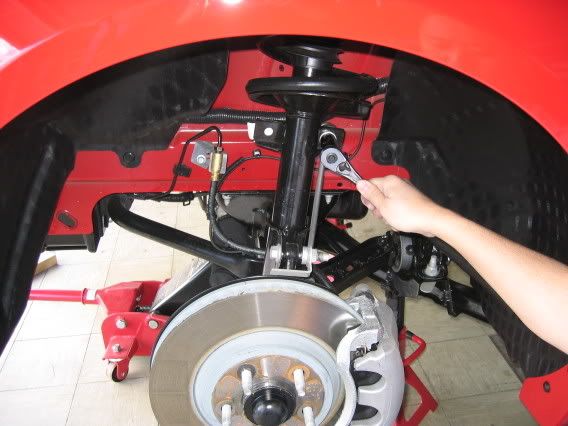
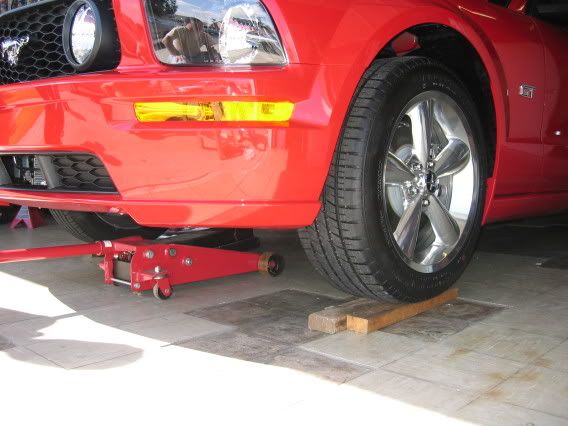
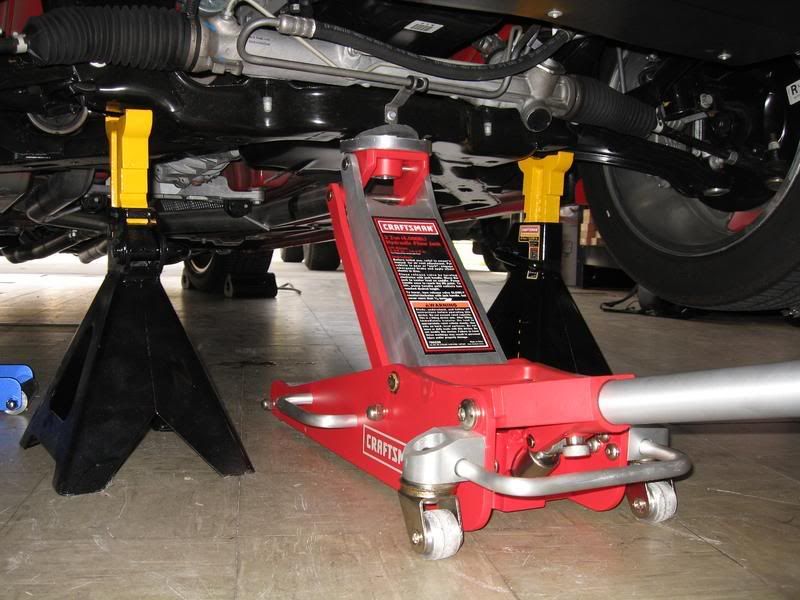
Front end jacked up.
[/align]Lift and jack placement.[/align]Note: I now place the jack stands on the ends of the front crossmember support, not far back on the frame as in the pic below.
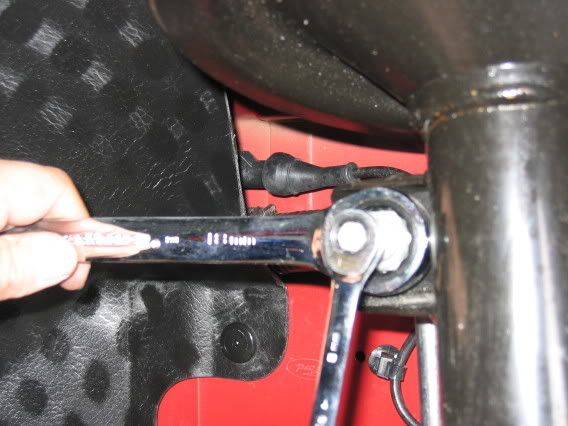
[/align]Removed brake line clamp on strut housing (both sides). (10mm bolt I think)
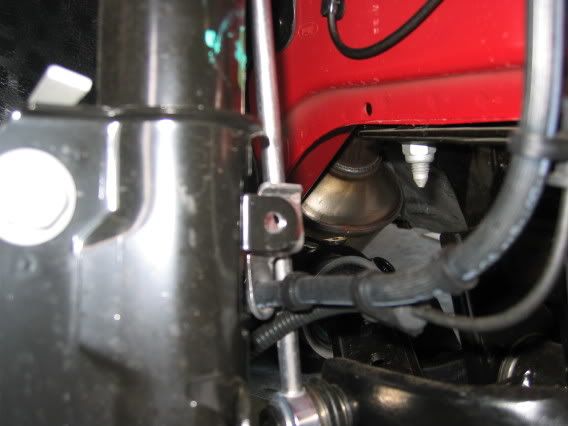
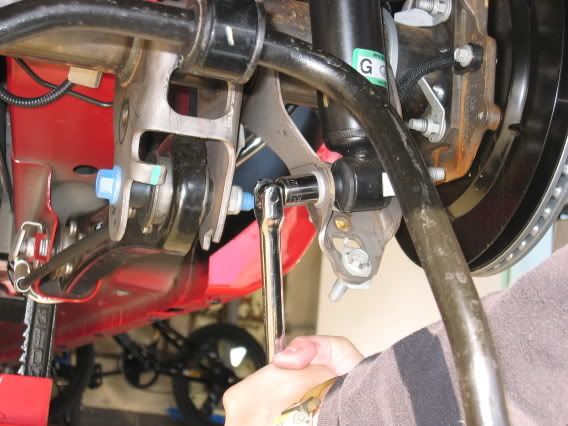
[/align]Break loose upper front anti-rollbar link from strut housing (both sides).
[/align]Removed the anti-rollbar linkattachment nut, you may have touse 2 wrenches to remove this nut(both sides).
[/align]Remove ABS electrical wire support plastic clamp (Christmas tree type, one way). This was a pain to pull out without breaking it. Needle nose pliers help. (Both sides)

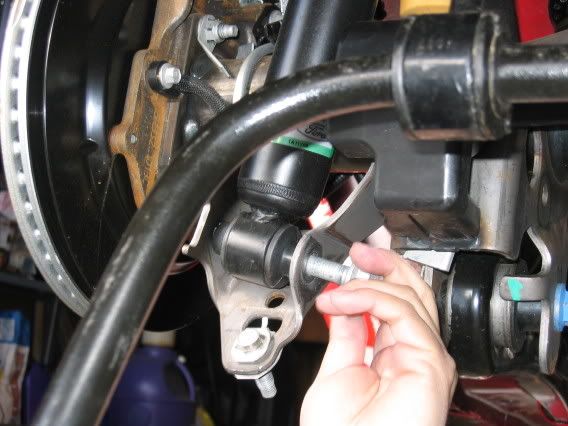
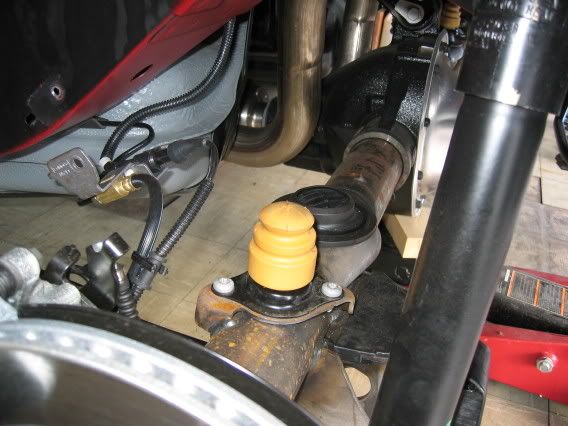
[/align]After removal of the 2 lower strutbolts and nuts from the spindle, support brake assembly with some rope to lessen thestrain on the brake line(both sides).
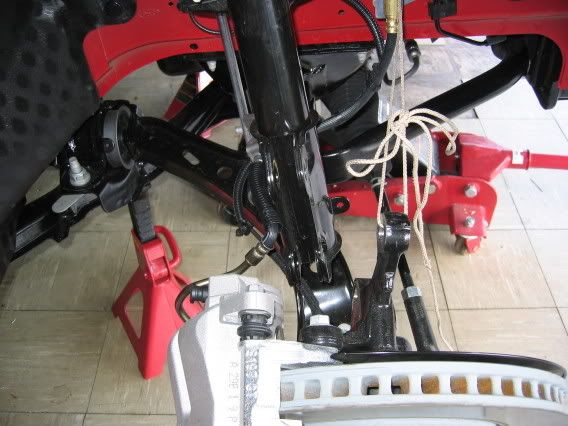
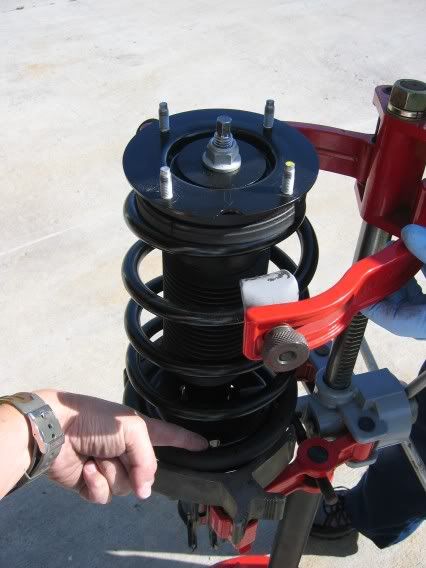
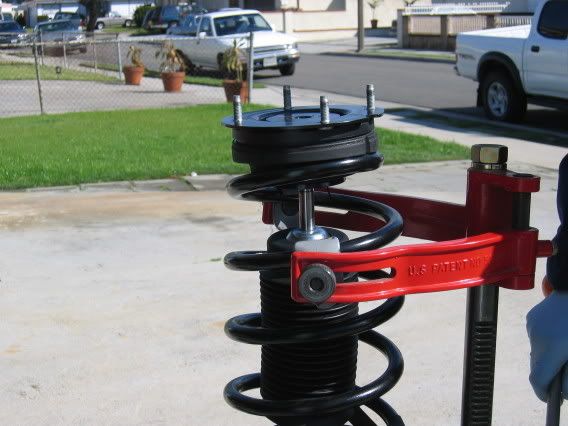
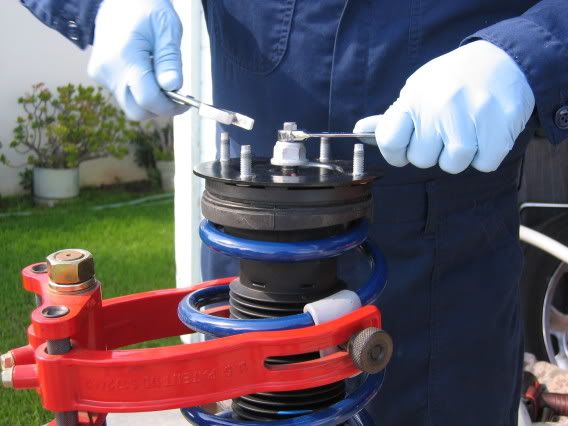
[/align]With nothing attached to the lower section of the strut, have someone support it while the 4 nuts on top of the strut tower are removed (one side at a time). With care, ease the strut assembly out from the wheel well.
[/align]Picture of strut assembly out.

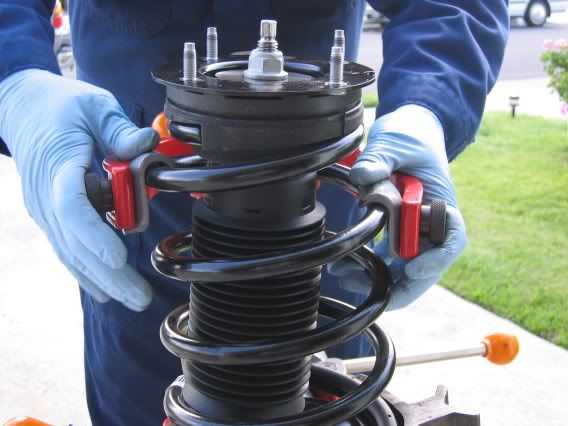
[/align]Picture of strut assembly being positioned into spring compressing tool. [/align]Take note that the half circle cutout on top of the bearing cap is in line with the hole in the bottom perch. THIS IS THE ORIENTATION WHEN YOU PUT IT BACK TOGETHER!
 [/align]
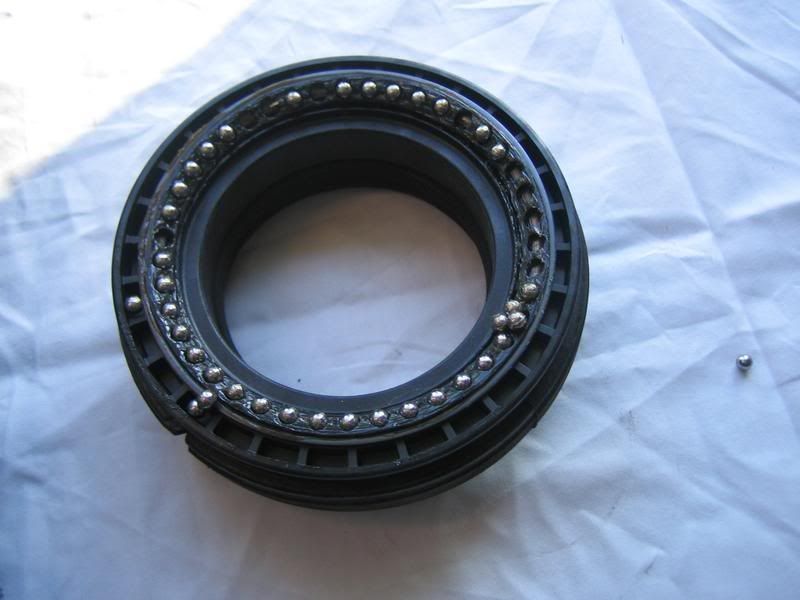
[/align]With the springs compressed, remove top strut bearing cap.[/align]I think the center nutrequires a 22mm wrench.
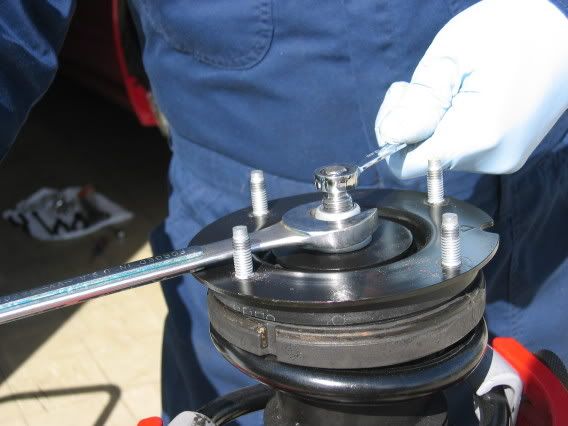
[/align]Picture of strut bearing cap removed.[/align]IMPORTANT: If the bearing cap comes apart or you have suspicion that some of the ball bearings may have popped out from the race, you'll need to re-assemble it. Don't worry, it's not a big deal. Lay down a clean rag on the floor and take apartboth halves of the bearing cap (it just clips in together). Clean off any ball bearings that may have fallen out, re-grease, and place back into the race. Clip back together.


Remove lower black plastic coil protector/isolator off of OEM coil and install onto new Steeda coil in the same position. Note: Steeda had installed a clear plastic protector on the coil about 2 coils up; we left it alone.
This step is required for ALL spring swaps, not only the Ultralites.
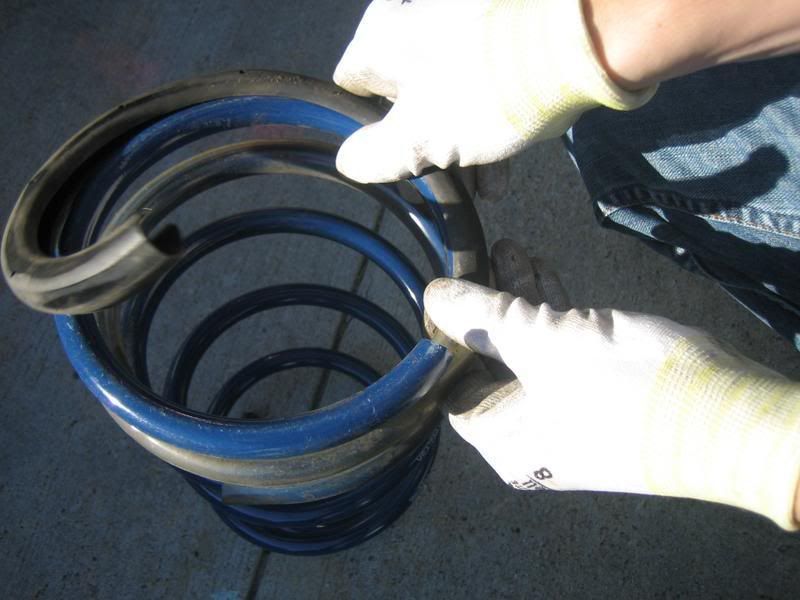
Picture of stock OEM front spring compared to the Steeda.
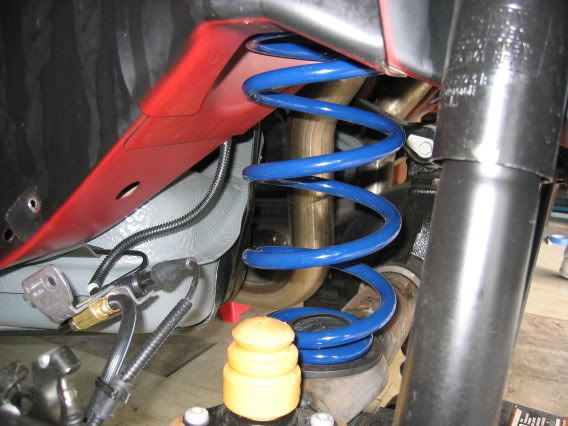
With the new spring into position, it's once again compressed to allow the installation of the top bearing cap. Note: Tighten the nut all the way down and align the factory torque stripe.
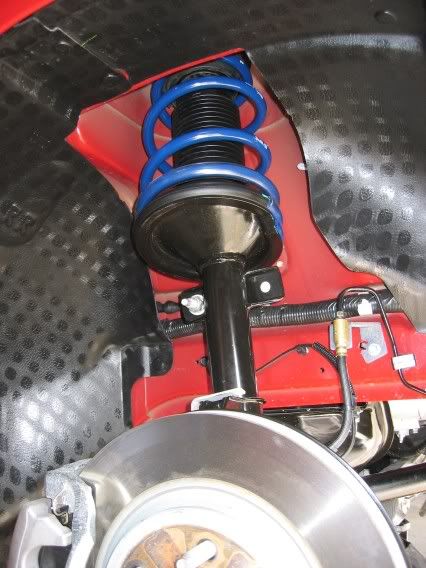
Picture of strut assembly installed back into car.
Once the 4 studs come up through the strut tower, hand tighten the nuts on them to keep the strut in place while you attach the 2 lower strut bolts to the spindle.
Once the 2 strut bolts are tight, position the center strut shaft within the center hole in the tower and tighten down the 4 nuts (hint: You maybe able to see marks in the paint where the nuts were, just postion them in the same place).
Re-assemble what you removed/disconected from the above steps.
I put a couple of 2x4's under the front tires before lowering the jack, just incase I couldn't pull the jack out from under the car (since it's lower now). Ended up not needing them. But, if you're installing a lower (than the Ultralite) spring kit or have an aftermarket spoiler, you most definitely want to do this at the minimum, you'll most likely have to drop the wheels on something higher to get the floor jack out. Just lower the jack slowly and see what's going on.
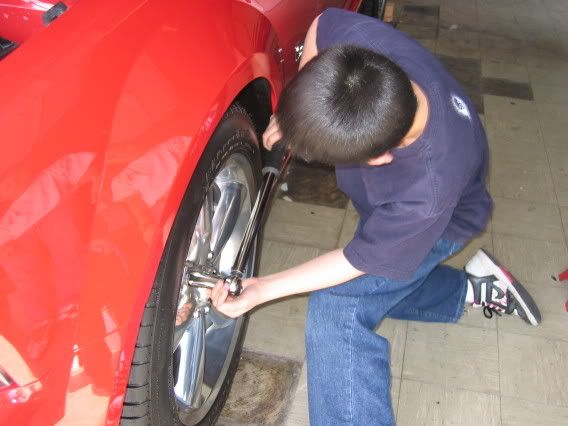
After the wheels were on the ground, my son went for final wheel torque (with a little help).
So here we go with some before/after pics:
BEFORE
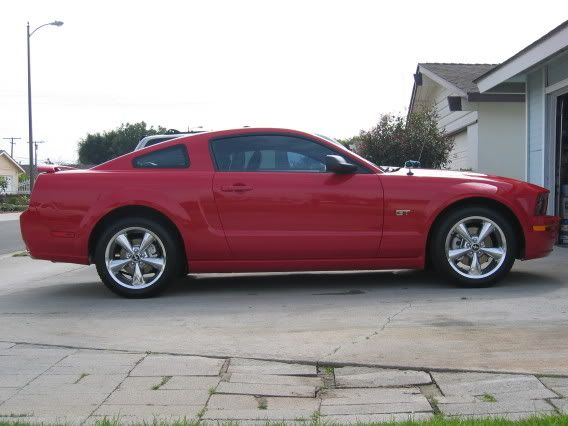
AFTER
(other side)

Note: This spring install was done in March of 2006. That's why my car looked a little 'bare'. This is how she sits now...
All bolt/nut torque specs can be found here:
FRONT SUSPENSION: Work Instructions
REAR SUSPENSION: Work Instructions
Final drop dimensions:
DRIVERS SIDE
FRONT (GROUND TO Wheel Well CENTER): 28"
REAR: 28 3/8"
FRONT (TOP OF TIRE TO WW CENTER): 1 5/8"
REAR: 1 3/4"
PASSENGER SIDE
FRONT (GROUND TO WW CENTER): 28 1/8"
REAR: 28 7/8"
FRONT (TOP OF TIRE TO WW CENTER): 1 3/4"
REAR: 2"
REAR AXLE POSITION (plumb bob from center of WW to center of wheel cap (Pony logo); dimension is between line to center wheel cap):
BEFORE
DRIVERS SIDE: 1 7/16"
PASSENGER SIDE: 1 1/4"
AFTER
DRIVERS SIDE: 1 3/8"
PASSENGER SIDE: 1 3/8"
Adustable panhard bar NOT required! Even if it were a little off, I don't think it's a big deal unless you're running some wide tires out back, then the axle shift will be apparent.
FRONT GROUND CLEARANCE AFTER LOWERING:
CENTER OF CAR: 7 3/4"
OUTER ENDS OF LOWER BUMBER: 7"
How's the ride? Great! To be honest, it's only slightly stiffer than stock. If you were to jump into the car and started driving, and not knowing it was lowered, you probably wouldn't notice the difference in ride quality.
Overall drop is not as drastic as other kits (ie. Eibach Pro) and it did retain the slight forward rake, which I happen to like.
I purchased these adjustable camber bolts just incase my camber was off, but ended up not needing them.
Here's my alignment data:
When checked at max positive camber with the factory strut bolts in place, drivers side measured in at -1.0 degree, passenger side measured at -1.3 degrees.
Caster was also verified.
It was suggested to me to bring in the drivers side to -1.3 degrees to match the other side in lieu of installing the adjustable camber bolts.
Rationale: Based upon my annual mileage and driving conditions, I won't see any appreciable tire wear for several years (or several thousand miles). Another factor was not driving in the rain, which negative camber can introduce unwanted hydroplaning.
Track camber settings can range from -1.5 to 2 degrees of negative camber. At -1.3 degrees, I'm at 'agressive street' driving.
Baseline measurements were taken before the install.
DRIVERS SIDE
FRONT (GROUND TO Wheel Well CENTER): 28 5/8"
REAR: 29 3/8"
FRONT (TOP OF TIRE TO WW CENTER): 2"
REAR: 2 3/4"
PASSENGER SIDE
FRONT (GROUND TO WW CENTER): 28 7/8"
REAR: 29 7/8"
FRONT (TOP OF TIRE TO WW CENTER): 2 1/4"
REAR: 3"
PART 1
REAR INSTALL
Rear was jacked up from the rear differential (pumpkin) and jack stands placed under the frame.[/align]Note: Use caution when placing the jack pad under the pumpkin. The rear differential cover can be easily dented and damaged (can potentially cause a leak) if the jack pad isn't positioned properly. There's a flat section on the pumpkinto jack from just forward of the cover. Using a piece of 2x4 on the jack pad may help.
[/align]
Removed the anti-rollbar clamps (2 places each, both sides).[/align]Note: Another option is to remove 2 bolts (1 each side) from the swaybar link support to body (see 4th pic down).
[/align][/align][/align][/align](optional)[/align][/align]Removed brake line support bracket (both sides).
[/align][/align]Removed lower shock mount bolt (both sides).
[/align][/align]Slowly dropped rear pumpkin low enough to remove the OEM springs (both sides, had to push down at outer end of axle a little, near disc brake, to give that extra room to pull the spring out).
[/align]Comparison between stock OEM rear springs and the Steeda Ultralites.
[/align]Picture of lower spring mount on axle.
[/align]Install the new springs on both sides, then jack pumpkin back up to align the lower shock mounting holes. Re-assemble what you removed/disconected from the above steps.[/align][/align]Picture of new Steeda spring installed. [/align][/align]Note: Tight wound coil going up into the body, loose wound coil toward axle. Steeda directions does not address spring orientation. I called Steeda Tech Support to validate correct position. Also, there's no mention on which way to orientate the coil pigtail ends, I just positioned the Steeda coil ends where the OEM ones were.
[/align]Installation complete.
[/align]Ready to lower jack. Rear is done!
See Part 2 for front install.[/align][/align]PART 2
FRONT INSTALL
Front end jacked up.
[/align]Lift and jack placement.[/align]Note: I now place the jack stands on the ends of the front crossmember support, not far back on the frame as in the pic below.
[/align]Removed brake line clamp on strut housing (both sides). (10mm bolt I think)
[/align]Break loose upper front anti-rollbar link from strut housing (both sides).
[/align]Removed the anti-rollbar linkattachment nut, you may have touse 2 wrenches to remove this nut(both sides).
[/align]Remove ABS electrical wire support plastic clamp (Christmas tree type, one way). This was a pain to pull out without breaking it. Needle nose pliers help. (Both sides)
[/align]After removal of the 2 lower strutbolts and nuts from the spindle, support brake assembly with some rope to lessen thestrain on the brake line(both sides).
[/align]With nothing attached to the lower section of the strut, have someone support it while the 4 nuts on top of the strut tower are removed (one side at a time). With care, ease the strut assembly out from the wheel well.
[/align]Picture of strut assembly out.
[/align]Picture of strut assembly being positioned into spring compressing tool. [/align]Take note that the half circle cutout on top of the bearing cap is in line with the hole in the bottom perch. THIS IS THE ORIENTATION WHEN YOU PUT IT BACK TOGETHER!
[/align][/align]With the springs compressed, remove top strut bearing cap.[/align]I think the center nutrequires a 22mm wrench.
[/align]Picture of strut bearing cap removed.[/align]IMPORTANT: If the bearing cap comes apart or you have suspicion that some of the ball bearings may have popped out from the race, you'll need to re-assemble it. Don't worry, it's not a big deal. Lay down a clean rag on the floor and take apartboth halves of the bearing cap (it just clips in together). Clean off any ball bearings that may have fallen out, re-grease, and place back into the race. Clip back together.
Remove lower black plastic coil protector/isolator off of OEM coil and install onto new Steeda coil in the same position. Note: Steeda had installed a clear plastic protector on the coil about 2 coils up; we left it alone.
This step is required for ALL spring swaps, not only the Ultralites.
Picture of stock OEM front spring compared to the Steeda.
With the new spring into position, it's once again compressed to allow the installation of the top bearing cap. Note: Tighten the nut all the way down and align the factory torque stripe.
Picture of strut assembly installed back into car.
Once the 4 studs come up through the strut tower, hand tighten the nuts on them to keep the strut in place while you attach the 2 lower strut bolts to the spindle.
Once the 2 strut bolts are tight, position the center strut shaft within the center hole in the tower and tighten down the 4 nuts (hint: You maybe able to see marks in the paint where the nuts were, just postion them in the same place).
Re-assemble what you removed/disconected from the above steps.
I put a couple of 2x4's under the front tires before lowering the jack, just incase I couldn't pull the jack out from under the car (since it's lower now). Ended up not needing them. But, if you're installing a lower (than the Ultralite) spring kit or have an aftermarket spoiler, you most definitely want to do this at the minimum, you'll most likely have to drop the wheels on something higher to get the floor jack out. Just lower the jack slowly and see what's going on.
After the wheels were on the ground, my son went for final wheel torque (with a little help).
So here we go with some before/after pics:
BEFORE
AFTER
(other side)
Note: This spring install was done in March of 2006. That's why my car looked a little 'bare'. This is how she sits now...
All bolt/nut torque specs can be found here:
FRONT SUSPENSION: Work Instructions
REAR SUSPENSION: Work Instructions
Final drop dimensions:
DRIVERS SIDE
FRONT (GROUND TO Wheel Well CENTER): 28"
REAR: 28 3/8"
FRONT (TOP OF TIRE TO WW CENTER): 1 5/8"
REAR: 1 3/4"
PASSENGER SIDE
FRONT (GROUND TO WW CENTER): 28 1/8"
REAR: 28 7/8"
FRONT (TOP OF TIRE TO WW CENTER): 1 3/4"
REAR: 2"
REAR AXLE POSITION (plumb bob from center of WW to center of wheel cap (Pony logo); dimension is between line to center wheel cap):
BEFORE
DRIVERS SIDE: 1 7/16"
PASSENGER SIDE: 1 1/4"
AFTER
DRIVERS SIDE: 1 3/8"
PASSENGER SIDE: 1 3/8"
Adustable panhard bar NOT required! Even if it were a little off, I don't think it's a big deal unless you're running some wide tires out back, then the axle shift will be apparent.
FRONT GROUND CLEARANCE AFTER LOWERING:
CENTER OF CAR: 7 3/4"
OUTER ENDS OF LOWER BUMBER: 7"
How's the ride? Great! To be honest, it's only slightly stiffer than stock. If you were to jump into the car and started driving, and not knowing it was lowered, you probably wouldn't notice the difference in ride quality.
Overall drop is not as drastic as other kits (ie. Eibach Pro) and it did retain the slight forward rake, which I happen to like.
I purchased these adjustable camber bolts just incase my camber was off, but ended up not needing them.
Here's my alignment data:
When checked at max positive camber with the factory strut bolts in place, drivers side measured in at -1.0 degree, passenger side measured at -1.3 degrees.
Caster was also verified.
It was suggested to me to bring in the drivers side to -1.3 degrees to match the other side in lieu of installing the adjustable camber bolts.
Rationale: Based upon my annual mileage and driving conditions, I won't see any appreciable tire wear for several years (or several thousand miles). Another factor was not driving in the rain, which negative camber can introduce unwanted hydroplaning.
Track camber settings can range from -1.5 to 2 degrees of negative camber. At -1.3 degrees, I'm at 'agressive street' driving.

 04-18-2007, 05:44 PM
#6
3rd Gear Member

Join Date: Mar 2007
Posts: 573
TacoBill, thanks for the great write-up. This may sound like a stupid question, but can you go into more detail about where you place the jack to lift the car (front or rear) and where you are putting the jackstands (frontor rear) so you can work on the car? The reason I ask is the Ford Workshop Manual only lists the jack points (you know, the rocker panel pinch welds) as lift points (That can't be the only ones, right?) and says not to use the differential, (which is often done anyway). I've never been as comfortable working with unibody construction. Stupid question #2, How tall should the jackstands set for a useful but safe height. Thanks in advance to anyone who takes the time to answer this,
Sleeper2
Sleeper2
04-18-2007, 06:05 PM
#7
2nd Gear Member
Thread Starter
Join Date: Jun 2006
Location:
Posts: 415
ORIGINAL: sleeper2
This may sound like a stupid question, but can you go into more detail about where you place the jack to lift the car (front or rear) and where you are putting the jackstands (frontor rear) so you can work on the car? The reason I ask is the Ford Workshop Manual only lists the jack points (you know, the rocker panel pinch welds) as lift points (That can't be the only ones, right?) and says not to use the differential, (which is often done anyway). I've never been as comfortable working with unibody construction. Stupid question #2, How tall should the jackstands set for a useful but safe height. Thanks in advance to anyone who takes the time to answer this,
Sleeper2
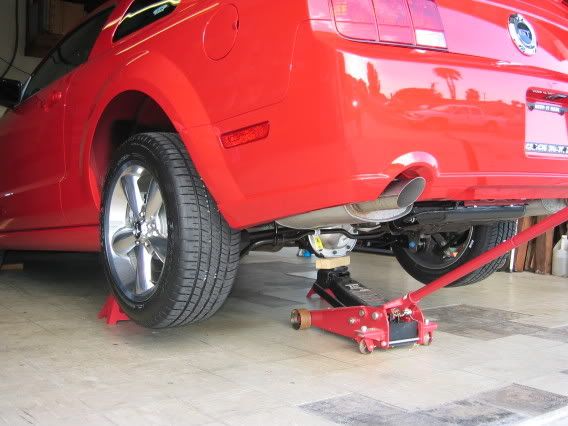
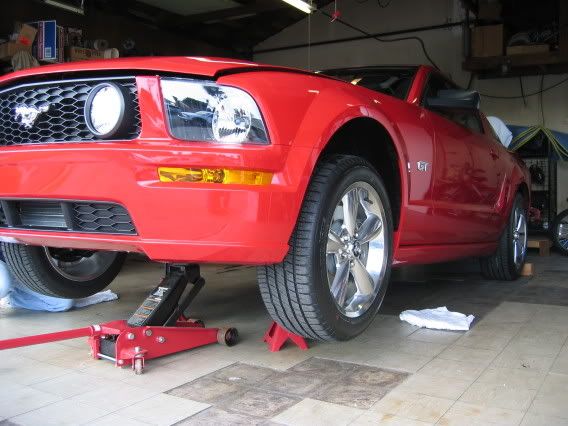
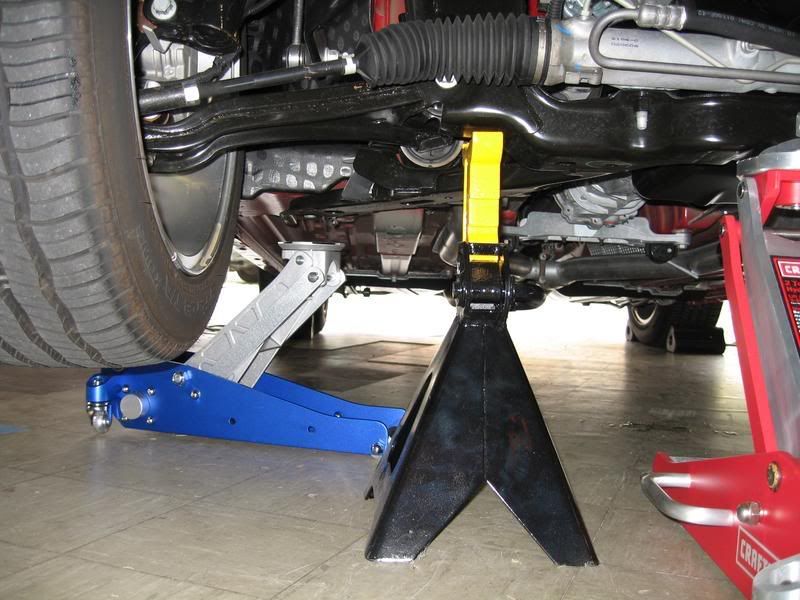
For the front, I always place the floor jack pad under the center crossmember support. The jack stands get placed just outboard of it. If at all possible, I always leave the floor jack in position even though the weight of the vehicle is on the jack stands (for extra safety).
For the rear, as outlined in this post, I jack from the rear pumpkin. Jack stand placement can be anywhere along the side frame rails, farther back the better.
And yes, I'm aware of the manual dead fast againstjacking up from the pumpkin(and a few guys I know as well), but I think it maybe more of a liability statement than the chance of the rear axle bending. But, this is a personal choice, jack the rear how you feel it should be done.
As far as how high the jack stands should go, Ionly go as high as the job requires, and no higher.
Also, make sure you chock thetires (front or back) so the car doesn't roll when jacking it up (or when lowering it).


