How to do your own gears
 01-11-2007, 01:18 AM
#1
I ♥ Acer
Thread Starter

Join Date: Mar 2006
Location: Colorado- 8500 feet!
Posts: 5,928
Just found this awesome gear how to write up. (credited to Explorerforum.com)
With all the questions recently like 'can I install my own gears?' or 'can I swap to an open carrier from a LSD unit?' I figured it was appropriate time to bring this up for everyone to benefit from.
I made this post in a thread a while back, in effort to enlighten the thread on what is involved in a gear install. All this information was written from my own gearing experience...
The pictures are from my personal collection of other gear installs around the net, most I used to learn from. The rest is for you to enjoy.
Things you will need:
Obviously the MAIN thing you are going to need to do this install is MONEY. In all honestly, I would have saved money having a shop doing this for me. But with the knowledge and experience I have earned, it’s something I could never have paid a shop to do. Not only that, my rear-ends will never go bad =)
I would say I spent around $1500 for this. Gears/Kits (4x4) = ~$700; Limited slip (USED TRUETRAC) = $300; and that’s just the toys, Tools = another $500. Plus you got to take in account the months of reading (write up's like this one), and all the visualization in my head it took to make this all work out. So now, after 10k miles, I can say I did a good job, or at least it still works haha.
1) A Locker, Limited slip, or your Stock carrier, which ever you plan on using. If you are using 4.56 gears or lower (numerically higher), you will need to notch the cross pin to clear the outer tip of the teeth on the ring gear. That is if you plan to use the stock carrier. If you plan on using a Truetrac (or any other 'full' locker/limited slip) and big gears (4.56+) you shouldn't need to do any modification, but in some instances you might need to grind down the very tip of the toe side on one or two teeth to clear the cross shaft (1/16th"-1/8")
2) Master install kit: Bearings, races, pinion seal (BCA is by far the best brand for this), new crush sleeve (probably want to go to Napa and get some extras), pinion nut (has to be a new one), pinion shims, carrier shim flanges, carrier shims.
3) Ring and Pinion Set: I recommend Motive Gear
4) Inlb Torque Wrench (10-50inlbs)
5) Ftlb Torque wrench
6) Threadlocker/Loktite
7) A good breaker bar
8) Jack and Jack stands
9) LOTS of brake cleaner (I went through 9 cans myself)
10) Like a quart or two of some cheap gear oil (80w-90) to clean the housing out with, and also (at least 5 quarts, 2.5 for break-in period, 2.5 for after break-in period) high-temp synthetic (I used Richmond Gear 70w-140). Synthetic is recommended if you plan on using any ratio larger then 4.33. Synthetic gear oil also has friction modifier added into the mix, adding more would actually be detrimental to a limited slip. Also a tube/sprayCan of lithium grease is good to pre-lube your bearings with, more on this later.
11) A Dial Indicator
12) Magnetic Base for the dial indicator
13) Dial calipers
14) Bearing puller (if you plan on pulling the bearings off the carrier and pinion yourself)
15) Bearing press (if you plan on pressing the bearings off the carrier and pinion yourself, do not use a hammer, do not use heat/cold to try and slip it on, all those methods are just asking for something to go wrong, and will **** you off... use a press.
16) Slide hammer (if you plan on removing/replacing your wheel bearings)
17) Wide variety of sockets (mainly Metric, you will need a 1 1/8" or 1 1/4" SAE for the pinion nut
18) Drain pan for old gear oil (Wider is better... always)
19) 24oz ball peen hammer
20) Rubber mallet
Important Specs:
Before you start, get your new ring gear pressed on to your new carrier (locker, limited slip). It’s not very common that a gear (new or used) will just slip on the carrier. I could get 7 of the 10 ring gear bolts in, but the last 3 wouldn’t catch. I fixed this by baking the ring gear in the oven for 3 hours at 300 degrees F. I also put my Truetrac (carrier) in the freezer during this time. Using this process works great, in fact the ring gear slipped right on the carrier, no effort needed what so ever.
Don’t try and Force the ring gear on too much. If you beat at it for too long the gear can warp. Although I would imagine it being somewhat difficult, it can happen. Once you get it on snug with all 10 bolts. Torque the bolts down to 77ftlbs with Thread locker. Do this in a star/cross pattern. Go from one bolt, to another bolt (directly or not) across from it; basically what ever you can do that’s not in a circle pattern. Make sure to do this with graduating intervals. For example, torque them to 25ftlbs first, then 35ftlbs... work your way up to 77ftlbs
There are 4 basic measurements you need to get.
1) Pinion Depth
2) Backlash
3) Pinion Bearing preload
4) Carrier bearing preload
I would recommend removing the entire axle (ford 8.8) from underneath the car. Especially if this is your first time doing gears. It’s tighter then a 400lb man's underpants underneath there, and that carrier is not exactly light; approximately 30lbs. Man-handling a 30lb object underneath a car is probably bad for you in one way or another (unless you got a lift in your garage), but at least it’s not a transmission.
Start by removing the differential cover. Make sure you got some kind of pan underneath the axle; gear oil is going to go everywhere. Once you get this far, spin the carrier around until you see the Cross shaft bolt shown here...
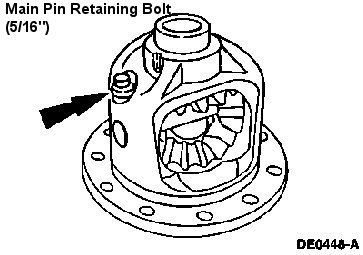
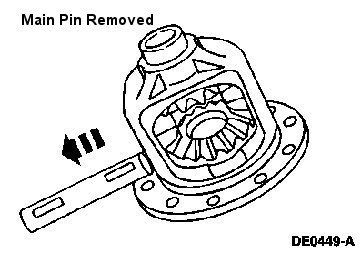
I forget the size of this bolt, but it was quite small; I believe it was actually one of the smallest box wrenches I had! (8mm?) Be careful on this little sucker, too often do we just get in the rhythm of things and forget to take our time and 'feel' what the metal is trying to tell us. Too often does this sucker BREAK! And isn’t easy removing it! What I do to keep myself from getting in this situation, is hit that bolt up with some PBlaster or WD-40. After about 5-10 minutes of letting the penetrate do its job, I bust out the ol' MAPP Gas (20 bucks at most auto parts stores) and I heat the carrier around the bolt. DONT heat the bolt up directly! That should be enough to get that sucker out gracefully. This is what you are trying to accomplish... with the Cross Shaft removed.
With the cross shaft removed the C-Clip port should be in view, Push one of the axles inward (from the side of the axle), which will reveal the c-clip, remove it. Use needle nosed pliers (or just your hands) to pull the C-clips out. Once the c-clips are removed the axle shafts can be pulled. When you go to pull out the axle shafts, be careful not to put too much stress the bearing seal at the end of the axle tube. Do this for both sides.
Remove the four big bolts that hold the carrier bearing caps on (shown below), then try and pull on the carrier/ring gear, to where it will pop out. If it’s too tight to be tugged out, a crow-bar to peal out the carrier. You can pry against ring gear bolts on the backside of the carrier. If you tug right on its sweet spot, you can get the carrier all the way out in just one tug, on one side... if you jar up the carrier (i mean, sort of jamming it side-to-side, which you will probably do your first couple times) you will have to pry from the opposite side (which has no bolts to pry on [IMG]http://www.explor
With all the questions recently like 'can I install my own gears?' or 'can I swap to an open carrier from a LSD unit?' I figured it was appropriate time to bring this up for everyone to benefit from.
I made this post in a thread a while back, in effort to enlighten the thread on what is involved in a gear install. All this information was written from my own gearing experience...
The pictures are from my personal collection of other gear installs around the net, most I used to learn from. The rest is for you to enjoy.
Things you will need:
Obviously the MAIN thing you are going to need to do this install is MONEY. In all honestly, I would have saved money having a shop doing this for me. But with the knowledge and experience I have earned, it’s something I could never have paid a shop to do. Not only that, my rear-ends will never go bad =)
I would say I spent around $1500 for this. Gears/Kits (4x4) = ~$700; Limited slip (USED TRUETRAC) = $300; and that’s just the toys, Tools = another $500. Plus you got to take in account the months of reading (write up's like this one), and all the visualization in my head it took to make this all work out. So now, after 10k miles, I can say I did a good job, or at least it still works haha.
1) A Locker, Limited slip, or your Stock carrier, which ever you plan on using. If you are using 4.56 gears or lower (numerically higher), you will need to notch the cross pin to clear the outer tip of the teeth on the ring gear. That is if you plan to use the stock carrier. If you plan on using a Truetrac (or any other 'full' locker/limited slip) and big gears (4.56+) you shouldn't need to do any modification, but in some instances you might need to grind down the very tip of the toe side on one or two teeth to clear the cross shaft (1/16th"-1/8")
2) Master install kit: Bearings, races, pinion seal (BCA is by far the best brand for this), new crush sleeve (probably want to go to Napa and get some extras), pinion nut (has to be a new one), pinion shims, carrier shim flanges, carrier shims.
3) Ring and Pinion Set: I recommend Motive Gear
4) Inlb Torque Wrench (10-50inlbs)
5) Ftlb Torque wrench
6) Threadlocker/Loktite
7) A good breaker bar
8) Jack and Jack stands
9) LOTS of brake cleaner (I went through 9 cans myself)
10) Like a quart or two of some cheap gear oil (80w-90) to clean the housing out with, and also (at least 5 quarts, 2.5 for break-in period, 2.5 for after break-in period) high-temp synthetic (I used Richmond Gear 70w-140). Synthetic is recommended if you plan on using any ratio larger then 4.33. Synthetic gear oil also has friction modifier added into the mix, adding more would actually be detrimental to a limited slip. Also a tube/sprayCan of lithium grease is good to pre-lube your bearings with, more on this later.
11) A Dial Indicator
12) Magnetic Base for the dial indicator
13) Dial calipers
14) Bearing puller (if you plan on pulling the bearings off the carrier and pinion yourself)
15) Bearing press (if you plan on pressing the bearings off the carrier and pinion yourself, do not use a hammer, do not use heat/cold to try and slip it on, all those methods are just asking for something to go wrong, and will **** you off... use a press.
16) Slide hammer (if you plan on removing/replacing your wheel bearings)
17) Wide variety of sockets (mainly Metric, you will need a 1 1/8" or 1 1/4" SAE for the pinion nut
18) Drain pan for old gear oil (Wider is better... always)
19) 24oz ball peen hammer
20) Rubber mallet
Important Specs:
Before you start, get your new ring gear pressed on to your new carrier (locker, limited slip). It’s not very common that a gear (new or used) will just slip on the carrier. I could get 7 of the 10 ring gear bolts in, but the last 3 wouldn’t catch. I fixed this by baking the ring gear in the oven for 3 hours at 300 degrees F. I also put my Truetrac (carrier) in the freezer during this time. Using this process works great, in fact the ring gear slipped right on the carrier, no effort needed what so ever.
Don’t try and Force the ring gear on too much. If you beat at it for too long the gear can warp. Although I would imagine it being somewhat difficult, it can happen. Once you get it on snug with all 10 bolts. Torque the bolts down to 77ftlbs with Thread locker. Do this in a star/cross pattern. Go from one bolt, to another bolt (directly or not) across from it; basically what ever you can do that’s not in a circle pattern. Make sure to do this with graduating intervals. For example, torque them to 25ftlbs first, then 35ftlbs... work your way up to 77ftlbs
There are 4 basic measurements you need to get.
1) Pinion Depth
2) Backlash
3) Pinion Bearing preload
4) Carrier bearing preload
I would recommend removing the entire axle (ford 8.8) from underneath the car. Especially if this is your first time doing gears. It’s tighter then a 400lb man's underpants underneath there, and that carrier is not exactly light; approximately 30lbs. Man-handling a 30lb object underneath a car is probably bad for you in one way or another (unless you got a lift in your garage), but at least it’s not a transmission.
Start by removing the differential cover. Make sure you got some kind of pan underneath the axle; gear oil is going to go everywhere. Once you get this far, spin the carrier around until you see the Cross shaft bolt shown here...
I forget the size of this bolt, but it was quite small; I believe it was actually one of the smallest box wrenches I had! (8mm?) Be careful on this little sucker, too often do we just get in the rhythm of things and forget to take our time and 'feel' what the metal is trying to tell us. Too often does this sucker BREAK! And isn’t easy removing it! What I do to keep myself from getting in this situation, is hit that bolt up with some PBlaster or WD-40. After about 5-10 minutes of letting the penetrate do its job, I bust out the ol' MAPP Gas (20 bucks at most auto parts stores) and I heat the carrier around the bolt. DONT heat the bolt up directly! That should be enough to get that sucker out gracefully. This is what you are trying to accomplish... with the Cross Shaft removed.
With the cross shaft removed the C-Clip port should be in view, Push one of the axles inward (from the side of the axle), which will reveal the c-clip, remove it. Use needle nosed pliers (or just your hands) to pull the C-clips out. Once the c-clips are removed the axle shafts can be pulled. When you go to pull out the axle shafts, be careful not to put too much stress the bearing seal at the end of the axle tube. Do this for both sides.
Remove the four big bolts that hold the carrier bearing caps on (shown below), then try and pull on the carrier/ring gear, to where it will pop out. If it’s too tight to be tugged out, a crow-bar to peal out the carrier. You can pry against ring gear bolts on the backside of the carrier. If you tug right on its sweet spot, you can get the carrier all the way out in just one tug, on one side... if you jar up the carrier (i mean, sort of jamming it side-to-side, which you will probably do your first couple times) you will have to pry from the opposite side (which has no bolts to pry on [IMG]http://www.explor
 01-11-2007, 01:48 AM
#3
3rd Gear Member

Join Date: Oct 2005
Location: San Marcos, TX
Posts: 916
I'm just gonna say this. It took my guy 2+ hours today, and he was using a lift and pneumatic tools. So if you are going to try this yourself, make SURE you have all the proper tools and have patience. Excellent find on this write-up btw.
01-11-2007, 02:00 AM
#4
1st Gear Member

Join Date: Jun 2006
Location:
Posts: 132
Wow, I thought it would be harder than that. ItsTEDIOUS AS HELL though. I was wanting to throw some gears in my 04 GT, but it looks like I will be practiing on my 89 when I get some money.
Besisdes, I want to be the other option my Mustang Club has when they want to install gears. I can see some profit coming my way
Besisdes, I want to be the other option my Mustang Club has when they want to install gears. I can see some profit coming my way
03-17-2008, 11:42 PM
#5
3rd Gear Member
Join Date: Nov 2006
Location: Chicago
Posts: 527
i want to to do most the work on my car myself but trans and gears are something i dont want to mess with. intake i did exhaust i did fine but when you get into gears and trans your talking about a million small parts and no turning back once you start lol. good luck to all who try this.

Thread
Thread Starter
Forum
Replies
Last Post
KingRando
2005-2014 Mustangs
5
10-02-2015 08:06 AM
junior04
4.6L (1996-2004 Modular) Mustang
1
09-28-2015 10:53 AM