PI intake Manifold on NPI heads
 03-31-2013, 07:56 PM
#21
5th Gear Member
Thread Starter

Join Date: Oct 2003
Location: Northern Wisconsin
Posts: 2,010
Im pretty sure they used all plastic PI intakes on the 99's as well. Someone correct me if im wrong, but im pretty sure that's factory Jeff.
heres a pic of an all plastic PI intake on the left
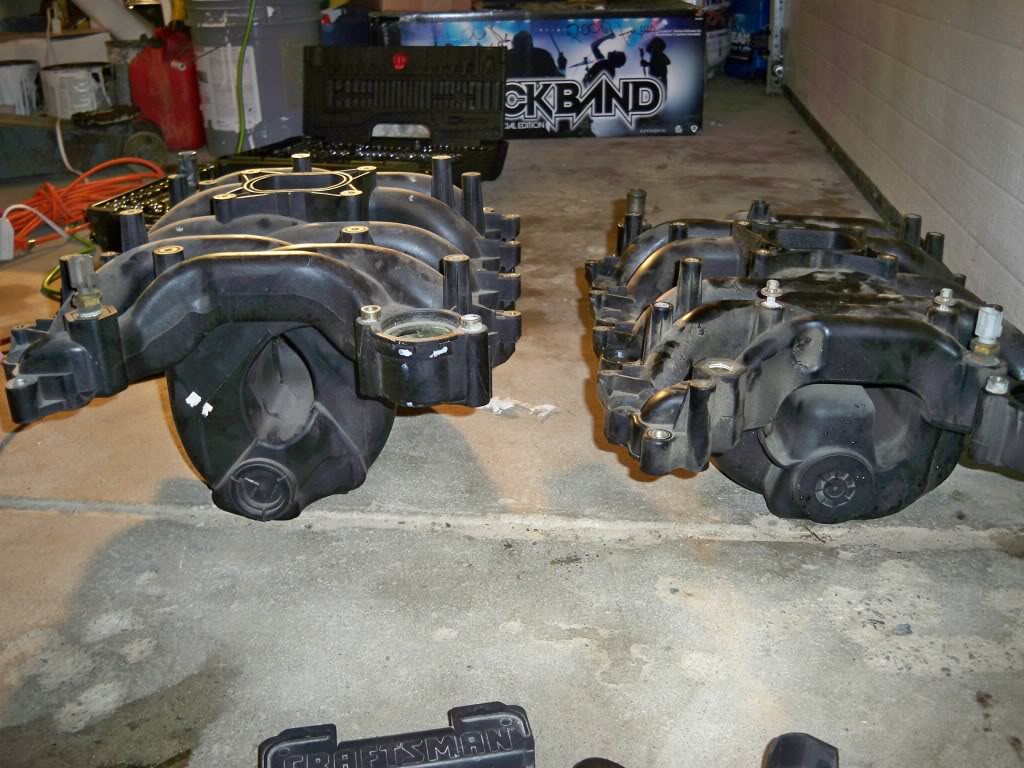
all plastic PI intake as well..

You can also see a VISUAL different between the two. NPI manifold on the left, and PI manifold on the right. Notice how the runners are shaped differently?

heres a pic of an all plastic PI intake on the left
all plastic PI intake as well..
You can also see a VISUAL different between the two. NPI manifold on the left, and PI manifold on the right. Notice how the runners are shaped differently?
Last edited by BlackMage; 03-31-2013 at 08:00 PM.
 04-02-2013, 07:11 AM
#22

Ok here is one for you.... is there a NPI intake that is NOT all plastic... i am not sure if mine is PI, or NPI (since I bought it used) and looking at my intake my water inlet is metal not plastic... but my runners look like they are the size and shape of the NPI....
 04-02-2013, 01:16 PM
#24
yup that is the one I have.. even with the little opening near the intake point, and all the reinforcement ribs...
Thanks... and here I was hoping I had a PI intake with heads already so I wouldn't have to do the swap.. looks like I will be getting my hands dirty in the near future.. once I get a set of heads and a new intake manifold
Thanks... and here I was hoping I had a PI intake with heads already so I wouldn't have to do the swap.. looks like I will be getting my hands dirty in the near future.. once I get a set of heads and a new intake manifold
02-03-2014, 12:21 AM
#26

Join Date: May 2013
Location: Georgia
Posts: 4
The thread this used to be in got locked and is missing half the content, so im re-writing it for future knowledge...
Alright so it seems that people might still be debating whether or not a PI intake manifold can be attached to NPI heads. Well here is a how to put on the PI manifold onto the NPI heads. This swap works and there is not a whole lot to do to get it to work. This how to is how I did the swap. Some people may want to do it differently or will make you do different things. Read up do your homework and decide what is best for you. This process worked for me, here it goes, got pics, not sure on the torque specs cuz i dont have them readily available, but you get the point.
First off you will need to get the necessary parts. Some parts can be jerry rigged if you wish or you can do it the right way. These are the parts thatI bought.
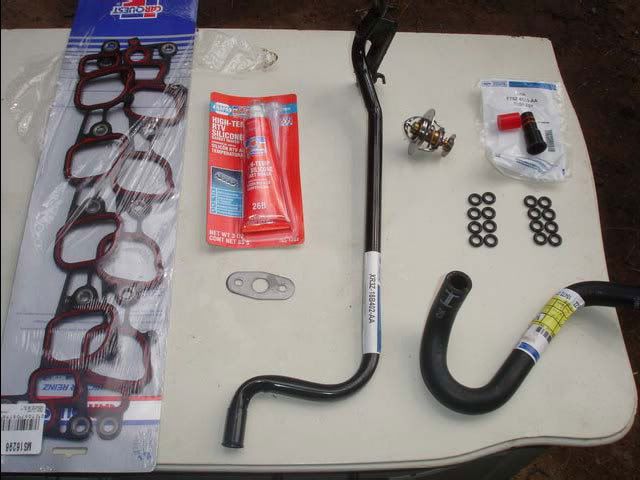
Mind you most of these parts are for a 2001 Mustang GT. I just went to the parts counter at the dealer and said i needed this and this for a 2001 GT. You can do the same. There are PIintake manifoldgaskets, a PI water coolant tube, PI water pump nipple, 180 degree thermostat, thermostat gasket, EGR gasket, Coolant hose from heater core to intake manifold(cuz i had to cut mine), 16 new O-Rings for the fuel injectors, and High Temp RTV sealant. I forgot to buy a waterpump o-ring and it leaked after i re-installed it, so i recommend getting one of those also. The next thing you will also be needing is a PI intake manifold.


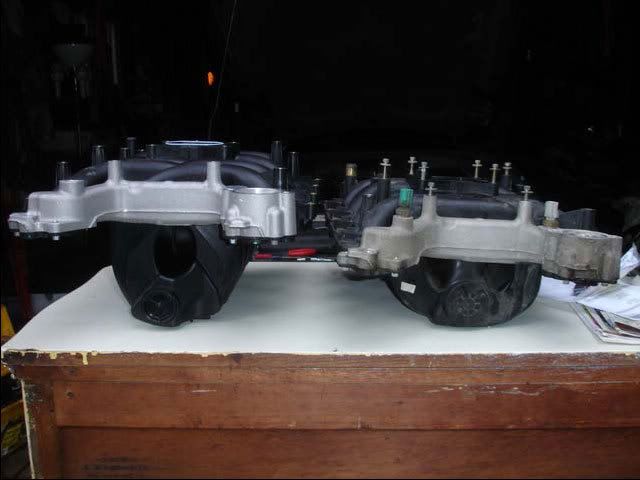
Here you can obviously see the difference between the PI manifold on the left and the NPI manifold on the right hand side. The PI manifold has much longer and larger runners and is one of the reasons you need different parts of the PI mustangs to make it work.
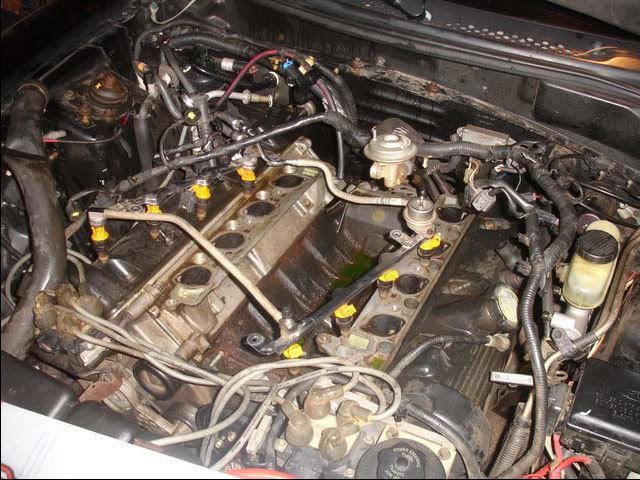
Ok so now for the actual work. Disconnect your battery and apply your parking brake(if manual). You will have to drain the coolant out of your engine so that when you pull all the hoses and manifold you wont get coolant everywhere and cause a big mess. So save yourself the hassle and drain the coolant. The next thing would be to pull the strut tower brace if equipped. There are 8 bolts and then it slides right off. The next step is to disconnect the MAF and intake temp sensors and pull off the intake tubing to the throttle body.
Next step would be to pull off the alternator, alternator bracket, upper coolant hose, the plastic tubes coming from the PCV valves, and drive belt. I also disconnected all of my spark plug wires so that they would be out of the of everything, might want to number em if you feel you won't remember where they go. If you have an aluminum crossover on your NPI intake manifold already you will not need to buy this part. If you are converting over from the original all plastic NPI intake manifold you may need to pick one of these up, but you can get away without it. I already have the aluminum crossover so I did not need to find one.

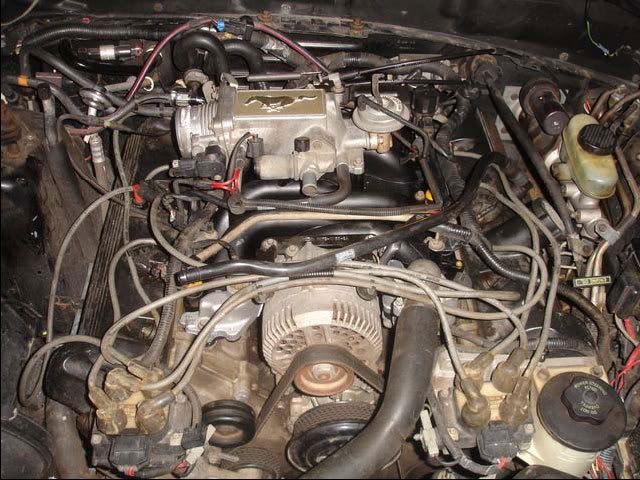
Now this is also where people may differ on how to remove the intake manifold and the components on it. (For your information, I didnt take pictures of taking it all apart, just putting it back together, so the PI manifold is already on it, but its the same procedure putting it on as it is taking it off, so dont nag on me tellin me that i already have a PI intake on it ) I decided to disconnect all the wiring, vacuum lines, EGR valve, and throttle cables running to the throttle and upper plenum, then loosened the 5 or 6 bolts holding it on. You will need to take this off and swap it onto the new manifold so might as well do it now. If a bolt is stuck you will have a heck of a time trying to hold onto it while its spinning on your work bench. I also pulled off at this time a sensor of somesort that has two vacuum lines running into it on the drivers side of the intake manifold. Comes off with two bolts.

the next step would be to take off the fuel rails and injectors. First I took all the connectors off the injectors and the rest of the sensors that were still connected. I didnt really feel like disconnecting the fuel lines from the rails, so i took off the bolts holding down the rails and layed the fuel rails with injectors off to one side out of the way for now. Be careful here again because the rails still have pressure in them, release this pressure by depressing the valve(it lookes like a valve stem) on the fuel rail, it will spray some fuel so cover it with a rag, and then you should be safe.

There are now only11 bolts keeping you away from taking off that manifold. Make sure not to bust any of these off in the head. There are two holding down the thermostat housing, make sure to take both out as they are also holding down the intake manifold.
Now it is time to remove the water pump. Take off the bolts holding it and and pull it straight out, it might stick a little because it is held in place by an o-ring rather than gasket, so dont go overboard and wreck your water pump. Then you will need to disconnect the coolant hose running along the v of the block. There is a 13mm bolt and a 10mm bolt holding it on, they are on the back side of the drivers side head. Take your time and get a good grip on them, you do not want to round these off, they are kind of difficult but like i said, take your time. You will then need to take out the nipple from where the back of the water pump is. Now i've heard of people already having the correct nipple on their car, so it might not apply to you, I will show you a picture of the one you NEED to use if you buy the new coolant hose. It doesn't use a rubber hose to connect to it, it is all metal and needs to seal with the o-rings of the new nipple. This will take a little bit to get out, it is press fit in and will take some blows from a rubber mallet, you may need to resort to a plastic or metal hammer but be careful here also, you don't want this thing stuck in that hole, it will then be a pain the ****.


You can then slide the new water pump nipple into where the old one was, you might need to get the handle side of a screwdriver to pursuade it into place. Once that is on you can install the new coolant pipe and bolt it onto the back of the head. It only uses the one bolt to hold it on, so i suggest you put the other one away someplace so at the end of assembly you dont get worried when you have an extra bolt in your hands.

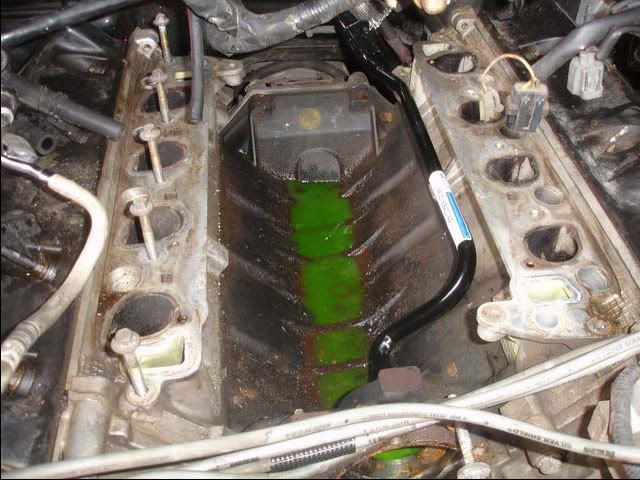
Now go ahead and clean up your water pump and put a new o-ring on it. Put the water pump back on your engine. Tighten the bolts good and tight. Now comes the fun part, putting your PI intake manifold onto your engine. Scrape all the mating surfaces of the head to make sure all the old gasket material is off and any debris or dirt is cleaned off. You can also then spray this with a little brake cleaner or carb cleaner.
But a couple things to know first. When you buy PI head gaskets they do not line up with the ports on the NPI heads. I've heard of people getting around this using the NPI manifold gaskets, but I chose to do it with PI manifold gaskets, I did not want to risk having any vacuum leaks. You can do it however you want to do it. The PI manifold gaskets have small alignment tabs that will need to be trimmed off, I used a set of snips to take them off, but be careful as they are plastic and might crack into the port openings.
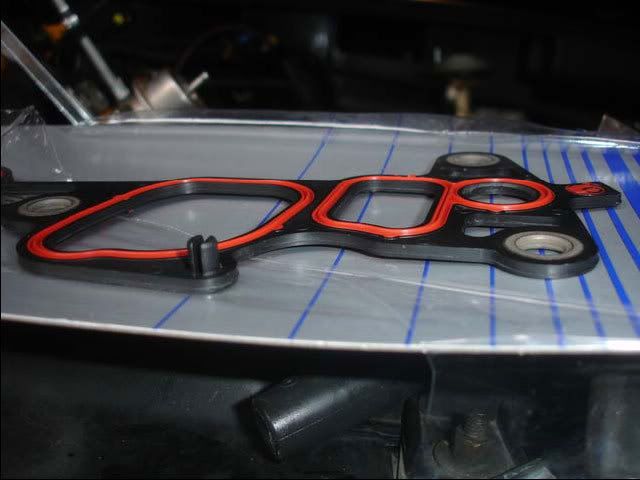
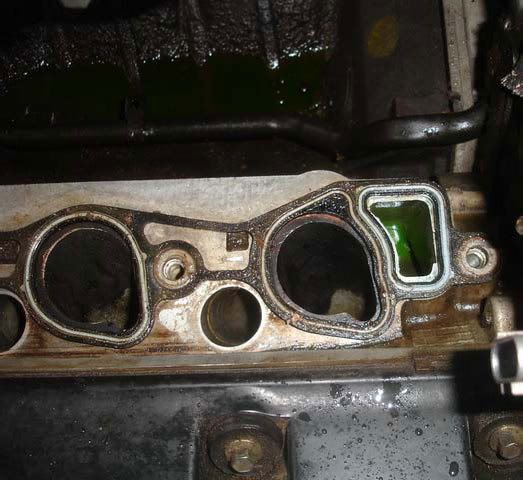
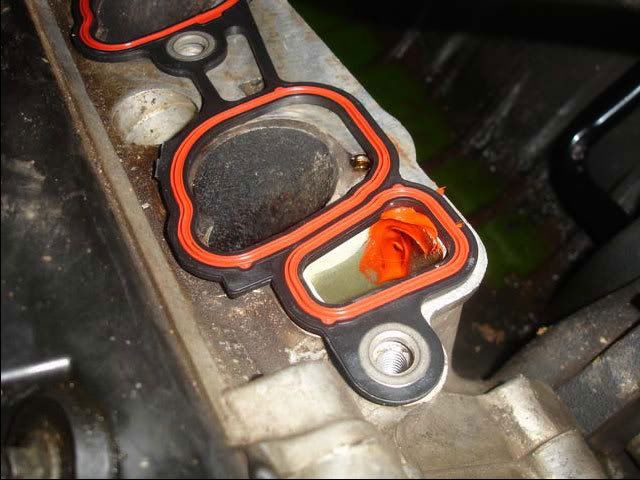
With the PI gaskets in place on the head you will notice that the coolant ports on the front of the passenger head and the back of the driver�s side head, the ports resemble a boot shape, well the intake ports on the PI intake are larger and therefore the coolant ports on the heads shrank. So the ports on the gasket resemble a rectangle. You will need to do a small modification for this. I filled the port in with silicone and then also put some on the head by the port to make sure nothing leaked.
This is the NPI intake gasket above, and the PI intake gasket on the bottom with the silicone in the coolant passageway.
Now don�t forget to put the silicone in each head or you might end up with a leak. You could try it without the silicone but it might not work, so be safe and use it. Now there are a couple different things you can do here. The new PI intake manifold has only one hole tapped for a coolant sensor. The NPI intake manifold has two sensors. Now you can swap over the aluminum crossover from the NPI to the P, but I don�t want to risk harming the o-rings underneath the crossover. These o-rings cannot be found anywhere, and Ford does not carry them for some reason. So I would leave it the way it is and tap a new hole for the sensor. Put it all together and bring it into a shop if you don�t have the tools to do it, or you can get by without the sensor but you will have a coolant light on. I have it without the coolant sensor and it has run fine. So go ahead and put the gaskets on and then put the intake manifold on and tighten everything down according to spec. At this time I also put in the new thermostat which was 180 degrees and also a new thermostat gasket.
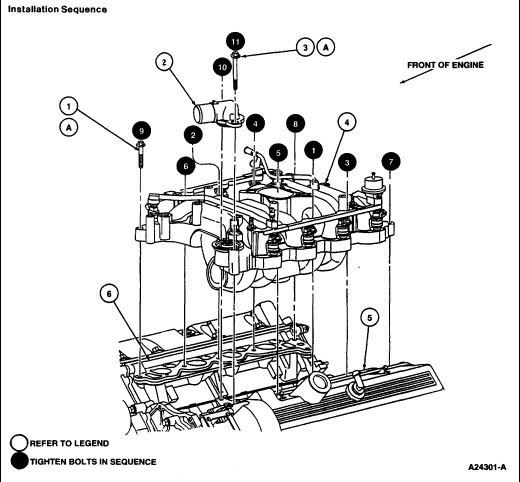
Torque all of the bolts down in order and to 15-22 ft. lbs. And now your PI manifold is bolted into place.
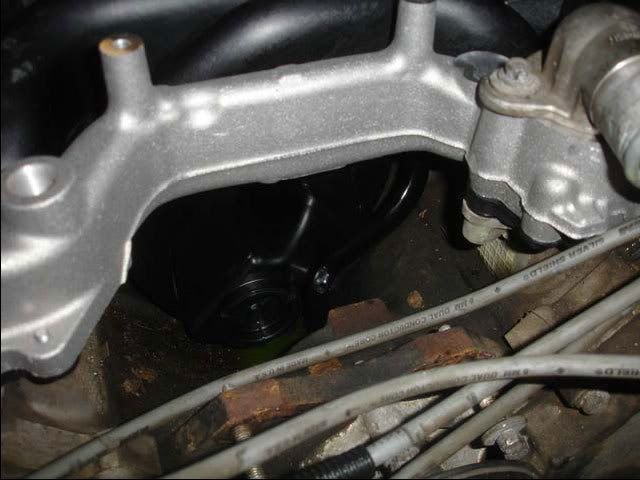
As you can see here this is why you need the water pump nipple and coolant hose of the PI engines. The old hose would not clear it.
After torquing the manifold, pull off all the injectors from the fuel rail and replace the o-rings on the top and bottom of them. This part is not necessary but you should replace them every time you pull them off to be sure. Once again better to be safe than sorry.
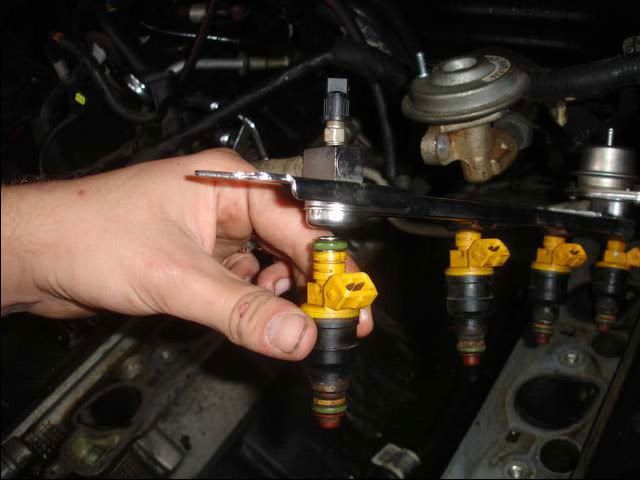
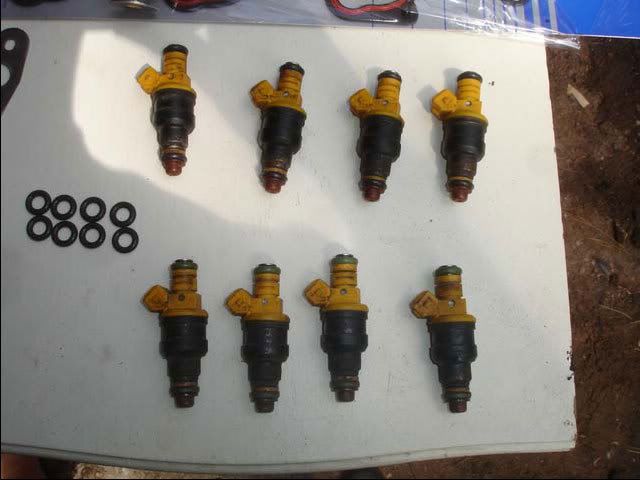
(Below) Its hard to tell but the injectors with the new o-rings are across the top of this picture and the old ones across the bottom. The o-rings on the bottom of the bottom row of injectors are slightly flattened, and this is a possibility for air to pass through and cause a leak.
Now go ahead and push the injectors into their new home on the PI intake manifold and bolt down the fuel rails. Make sure if you left the fuel lines and fuel rails connected that you did not kink any lines or break any. Tighten down the fuel rail with the four bolts. All the bolt holes on the PI manifold are exactly the same as the NPI manifolds. You can then install the alternator and drive belt after this. The alternator bracket can also be put on at this time. If you opt not to get this part, just make sure your spark plug wires stay out of the way of the alternator and belt.
You can then go ahead and start hooking up the injector wires and some of the vacuum lines. Then you can install the upper intake plenum and throttle body. The PI intake manifold does not need a gasket between it and the upper plenum as it comes right on the manifold, so don't re-use the one off the NPI manifold. Then connect the small vacuum thing that was on the drivers side of the intake manifold, then you can connect the rest of your wires and vacuum lines, and also the throttle cable and cruise control cable.
Then the spark plug wires are ready to be put back in and the pcv valve tubes can be put back on. Then the intake tubing is ready to be put back on and the MAF and intake temp. sensor can be hooked back up. Don't forget to install the large vacuum line onto the backside of the upper plenum.
Make sure all of your coolant hoses are also hooked back up and do a good run over of the engine bay to make sure everything is hooked back up and nothing is hanging in the drive belt and all your tools are out of the engine bay. Then go ahead and fill it with coolant. You should wait overnight before putting coolant in to let the RTV to dry adequately. The strut tower brace went on after I knew everything was ok and nothing was leaking. Then go ahead and hook up the battery and start it up!

Alright so it seems that people might still be debating whether or not a PI intake manifold can be attached to NPI heads. Well here is a how to put on the PI manifold onto the NPI heads. This swap works and there is not a whole lot to do to get it to work. This how to is how I did the swap. Some people may want to do it differently or will make you do different things. Read up do your homework and decide what is best for you. This process worked for me, here it goes, got pics, not sure on the torque specs cuz i dont have them readily available, but you get the point.
First off you will need to get the necessary parts. Some parts can be jerry rigged if you wish or you can do it the right way. These are the parts thatI bought.
Mind you most of these parts are for a 2001 Mustang GT. I just went to the parts counter at the dealer and said i needed this and this for a 2001 GT. You can do the same. There are PIintake manifoldgaskets, a PI water coolant tube, PI water pump nipple, 180 degree thermostat, thermostat gasket, EGR gasket, Coolant hose from heater core to intake manifold(cuz i had to cut mine), 16 new O-Rings for the fuel injectors, and High Temp RTV sealant. I forgot to buy a waterpump o-ring and it leaked after i re-installed it, so i recommend getting one of those also. The next thing you will also be needing is a PI intake manifold.
Here you can obviously see the difference between the PI manifold on the left and the NPI manifold on the right hand side. The PI manifold has much longer and larger runners and is one of the reasons you need different parts of the PI mustangs to make it work.
Ok so now for the actual work. Disconnect your battery and apply your parking brake(if manual). You will have to drain the coolant out of your engine so that when you pull all the hoses and manifold you wont get coolant everywhere and cause a big mess. So save yourself the hassle and drain the coolant. The next thing would be to pull the strut tower brace if equipped. There are 8 bolts and then it slides right off. The next step is to disconnect the MAF and intake temp sensors and pull off the intake tubing to the throttle body.
Next step would be to pull off the alternator, alternator bracket, upper coolant hose, the plastic tubes coming from the PCV valves, and drive belt. I also disconnected all of my spark plug wires so that they would be out of the of everything, might want to number em if you feel you won't remember where they go. If you have an aluminum crossover on your NPI intake manifold already you will not need to buy this part. If you are converting over from the original all plastic NPI intake manifold you may need to pick one of these up, but you can get away without it. I already have the aluminum crossover so I did not need to find one.
Now this is also where people may differ on how to remove the intake manifold and the components on it. (For your information, I didnt take pictures of taking it all apart, just putting it back together, so the PI manifold is already on it, but its the same procedure putting it on as it is taking it off, so dont nag on me tellin me that i already have a PI intake on it ) I decided to disconnect all the wiring, vacuum lines, EGR valve, and throttle cables running to the throttle and upper plenum, then loosened the 5 or 6 bolts holding it on. You will need to take this off and swap it onto the new manifold so might as well do it now. If a bolt is stuck you will have a heck of a time trying to hold onto it while its spinning on your work bench. I also pulled off at this time a sensor of somesort that has two vacuum lines running into it on the drivers side of the intake manifold. Comes off with two bolts.
the next step would be to take off the fuel rails and injectors. First I took all the connectors off the injectors and the rest of the sensors that were still connected. I didnt really feel like disconnecting the fuel lines from the rails, so i took off the bolts holding down the rails and layed the fuel rails with injectors off to one side out of the way for now. Be careful here again because the rails still have pressure in them, release this pressure by depressing the valve(it lookes like a valve stem) on the fuel rail, it will spray some fuel so cover it with a rag, and then you should be safe.
There are now only11 bolts keeping you away from taking off that manifold. Make sure not to bust any of these off in the head. There are two holding down the thermostat housing, make sure to take both out as they are also holding down the intake manifold.
Now it is time to remove the water pump. Take off the bolts holding it and and pull it straight out, it might stick a little because it is held in place by an o-ring rather than gasket, so dont go overboard and wreck your water pump. Then you will need to disconnect the coolant hose running along the v of the block. There is a 13mm bolt and a 10mm bolt holding it on, they are on the back side of the drivers side head. Take your time and get a good grip on them, you do not want to round these off, they are kind of difficult but like i said, take your time. You will then need to take out the nipple from where the back of the water pump is. Now i've heard of people already having the correct nipple on their car, so it might not apply to you, I will show you a picture of the one you NEED to use if you buy the new coolant hose. It doesn't use a rubber hose to connect to it, it is all metal and needs to seal with the o-rings of the new nipple. This will take a little bit to get out, it is press fit in and will take some blows from a rubber mallet, you may need to resort to a plastic or metal hammer but be careful here also, you don't want this thing stuck in that hole, it will then be a pain the ****.
You can then slide the new water pump nipple into where the old one was, you might need to get the handle side of a screwdriver to pursuade it into place. Once that is on you can install the new coolant pipe and bolt it onto the back of the head. It only uses the one bolt to hold it on, so i suggest you put the other one away someplace so at the end of assembly you dont get worried when you have an extra bolt in your hands.
Now go ahead and clean up your water pump and put a new o-ring on it. Put the water pump back on your engine. Tighten the bolts good and tight. Now comes the fun part, putting your PI intake manifold onto your engine. Scrape all the mating surfaces of the head to make sure all the old gasket material is off and any debris or dirt is cleaned off. You can also then spray this with a little brake cleaner or carb cleaner.
But a couple things to know first. When you buy PI head gaskets they do not line up with the ports on the NPI heads. I've heard of people getting around this using the NPI manifold gaskets, but I chose to do it with PI manifold gaskets, I did not want to risk having any vacuum leaks. You can do it however you want to do it. The PI manifold gaskets have small alignment tabs that will need to be trimmed off, I used a set of snips to take them off, but be careful as they are plastic and might crack into the port openings.
With the PI gaskets in place on the head you will notice that the coolant ports on the front of the passenger head and the back of the driver�s side head, the ports resemble a boot shape, well the intake ports on the PI intake are larger and therefore the coolant ports on the heads shrank. So the ports on the gasket resemble a rectangle. You will need to do a small modification for this. I filled the port in with silicone and then also put some on the head by the port to make sure nothing leaked.
This is the NPI intake gasket above, and the PI intake gasket on the bottom with the silicone in the coolant passageway.
Now don�t forget to put the silicone in each head or you might end up with a leak. You could try it without the silicone but it might not work, so be safe and use it. Now there are a couple different things you can do here. The new PI intake manifold has only one hole tapped for a coolant sensor. The NPI intake manifold has two sensors. Now you can swap over the aluminum crossover from the NPI to the P, but I don�t want to risk harming the o-rings underneath the crossover. These o-rings cannot be found anywhere, and Ford does not carry them for some reason. So I would leave it the way it is and tap a new hole for the sensor. Put it all together and bring it into a shop if you don�t have the tools to do it, or you can get by without the sensor but you will have a coolant light on. I have it without the coolant sensor and it has run fine. So go ahead and put the gaskets on and then put the intake manifold on and tighten everything down according to spec. At this time I also put in the new thermostat which was 180 degrees and also a new thermostat gasket.
Torque all of the bolts down in order and to 15-22 ft. lbs. And now your PI manifold is bolted into place.
As you can see here this is why you need the water pump nipple and coolant hose of the PI engines. The old hose would not clear it.
After torquing the manifold, pull off all the injectors from the fuel rail and replace the o-rings on the top and bottom of them. This part is not necessary but you should replace them every time you pull them off to be sure. Once again better to be safe than sorry.
(Below) Its hard to tell but the injectors with the new o-rings are across the top of this picture and the old ones across the bottom. The o-rings on the bottom of the bottom row of injectors are slightly flattened, and this is a possibility for air to pass through and cause a leak.
Now go ahead and push the injectors into their new home on the PI intake manifold and bolt down the fuel rails. Make sure if you left the fuel lines and fuel rails connected that you did not kink any lines or break any. Tighten down the fuel rail with the four bolts. All the bolt holes on the PI manifold are exactly the same as the NPI manifolds. You can then install the alternator and drive belt after this. The alternator bracket can also be put on at this time. If you opt not to get this part, just make sure your spark plug wires stay out of the way of the alternator and belt.
You can then go ahead and start hooking up the injector wires and some of the vacuum lines. Then you can install the upper intake plenum and throttle body. The PI intake manifold does not need a gasket between it and the upper plenum as it comes right on the manifold, so don't re-use the one off the NPI manifold. Then connect the small vacuum thing that was on the drivers side of the intake manifold, then you can connect the rest of your wires and vacuum lines, and also the throttle cable and cruise control cable.
Then the spark plug wires are ready to be put back in and the pcv valve tubes can be put back on. Then the intake tubing is ready to be put back on and the MAF and intake temp. sensor can be hooked back up. Don't forget to install the large vacuum line onto the backside of the upper plenum.
Make sure all of your coolant hoses are also hooked back up and do a good run over of the engine bay to make sure everything is hooked back up and nothing is hanging in the drive belt and all your tools are out of the engine bay. Then go ahead and fill it with coolant. You should wait overnight before putting coolant in to let the RTV to dry adequately. The strut tower brace went on after I knew everything was ok and nothing was leaking. Then go ahead and hook up the battery and start it up!
Great Post,
It gave me the information I need to make the upgrade to a PI intake on NPI heads. The parts list was very helpful. Detail was good along with the photos. Thanks for your assistance,
02-19-2014, 02:50 PM
#27
1st Gear Member

Join Date: Jan 2012
Location: Nevada
Posts: 115
Great write up and very useful! So is it safe to say that the only reason not to do a headswap at this point is money? With the exception of another couple hours to pull the valve covers, dipstick and drop the headers, the tear down is about 90% done isn't it?
I'm so close to pulling the trigger on a set of frpp pi heads I can taste it.
I'm so close to pulling the trigger on a set of frpp pi heads I can taste it.
02-20-2014, 07:13 AM
#28
5th Gear Member
Thread Starter
Join Date: Oct 2003
Location: Northern Wisconsin
Posts: 2,010
Great write up and very useful! So is it safe to say that the only reason not to do a headswap at this point is money? With the exception of another couple hours to pull the valve covers, dipstick and drop the headers, the tear down is about 90% done isn't it?
I'm so close to pulling the trigger on a set of frpp pi heads I can taste it.
I'm so close to pulling the trigger on a set of frpp pi heads I can taste it.
02-23-2014, 06:44 PM
#30
1st Gear Member
Join Date: Jan 2012
Location: Nevada
Posts: 115
Went to the local pick n pull yesterday afternoon and found a 00 gt vert that just came in 2 weeks ago with totaled front end. Found the intake in great shape but some a$$monkey used a hammer/screwdriver to bash a hole in the valve covers and took the cam gears off, and destroyed the ends of the camshafts in the process. Going back first thing tomorrow morning to snag the intake before its ruined as well.
Just to clarify when putting in the manifold gasket, you only put a bead of sealant on the head between the coolant port and first intake port, then built up a ridge in the coolant port so the gasket would have something more to grab hold of? Really only want to do this once and want to avoid any leaks.
Also been searching for 03-04 stock pi cams and not having any luck. Anyone know where to find them without paying $300/pair?