Looks good to me :)
 06-06-2013, 11:34 AM
#1

Just wanted to share on what's been done to my stang ever since i bought it.
Mostly appearance, but worth spending time and little money to make a beautiful car, look a little better.
This whole thing took me about 2 days to do, painting of course is a time consuming process, but with a little money and effort you can make your Stang look better in no time.
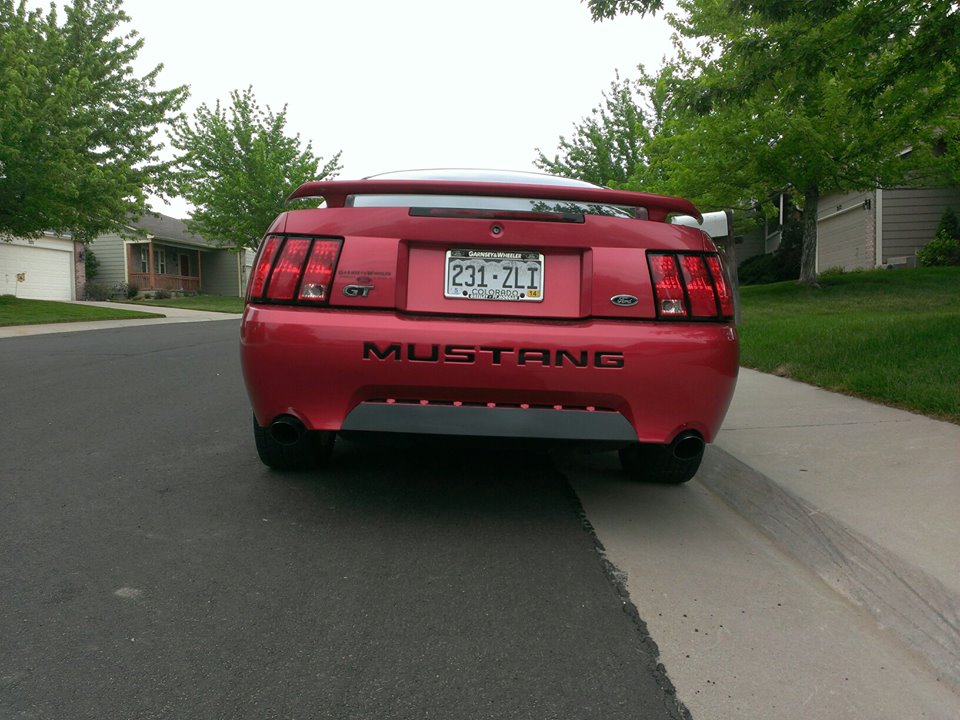
Front lights were horrible when i just got this stang, they were all foggy, scratched, and just in a bad condition overall.
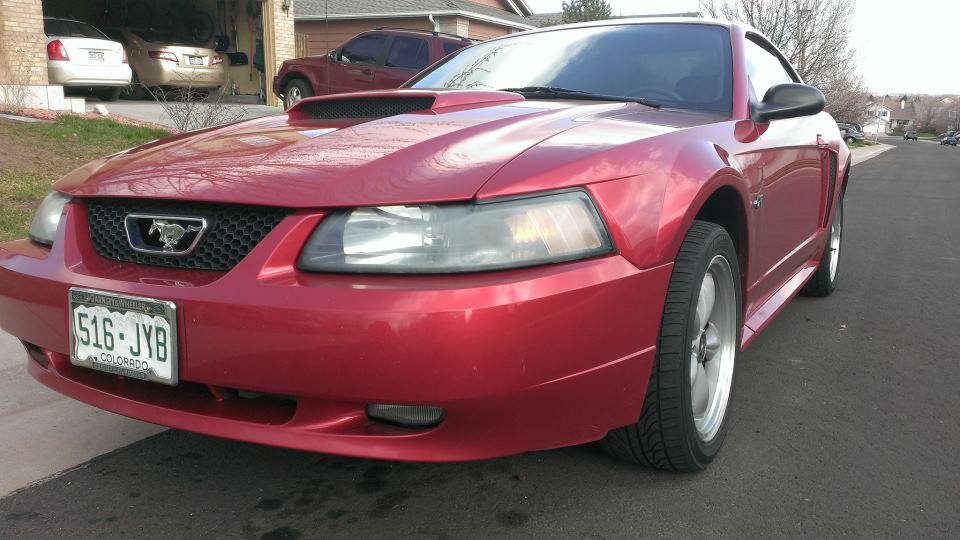
There was nothing done to the car appearance wise. All stock.
But then comes this
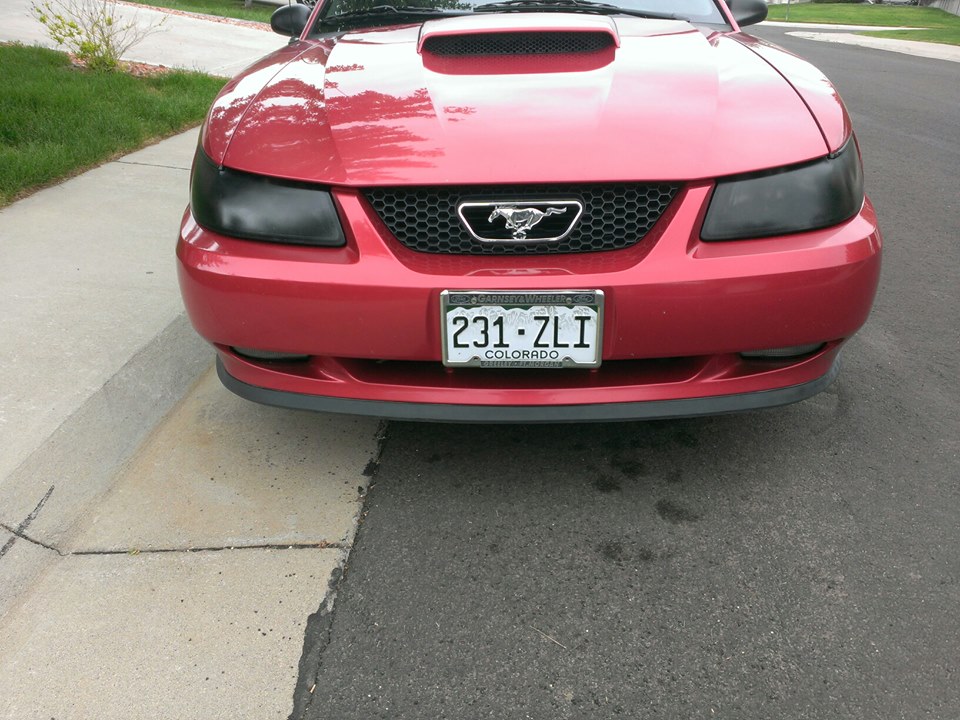
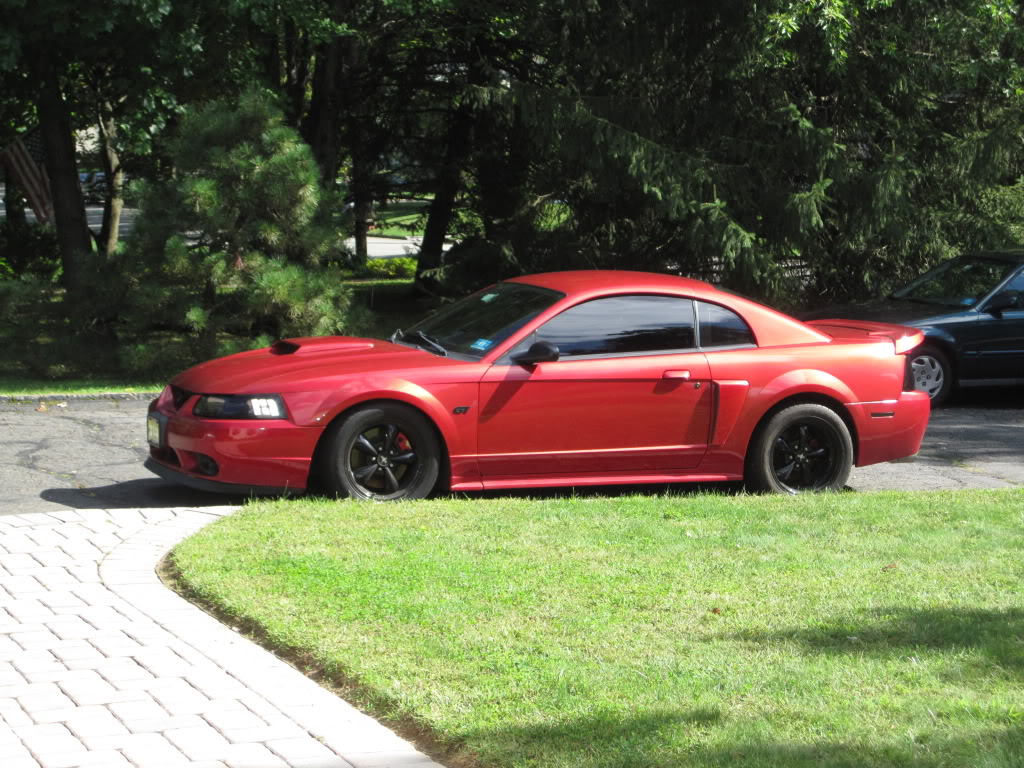
Front chin spoiler took me about 30 minutes to do, and 30$ total. All materials were bought at Lowes/Home Depot. This idea came to me from a product called Ez Lip, basically a universal lip that you can put on every car. But instead of waiting for shipping i just got a V or 90* shape rubber door/window insulation + double site tape.
I have not seen a more simple light installation than this. 2 Metal slides hold a headlight, who ever came up with this is a genius, i wish Germans would start making simple things in cars like this. Lights took me about 4 hours to complete. I took them out and started with a sand paper and some soapy water. After that, let them dry and started spraying black tint. Put about 4 layers, and then clear coat, then buffing. Didn't turn that great, but still looking good.
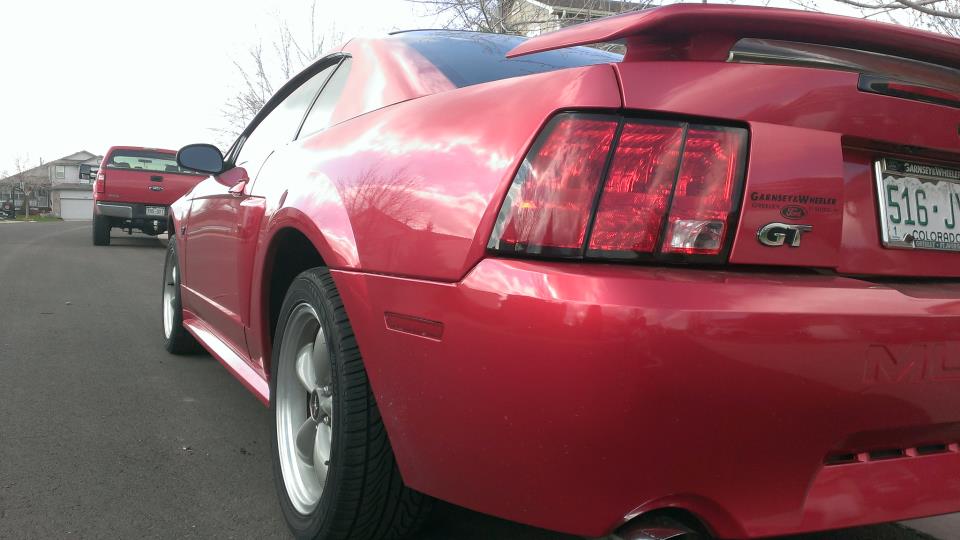
Side scoops were the easiest things of all. Just pull them out carefully not to break brackets and clips. Used 600grid sand paper to get free from clear coat and then sprayed black. Finished with a clear coat and some buffing.
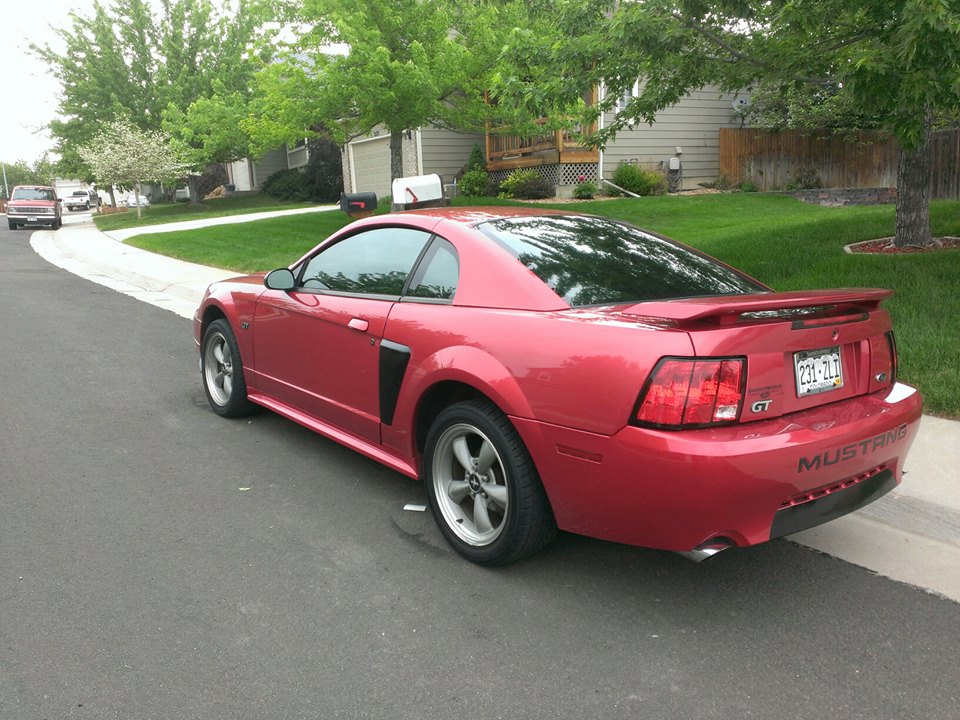
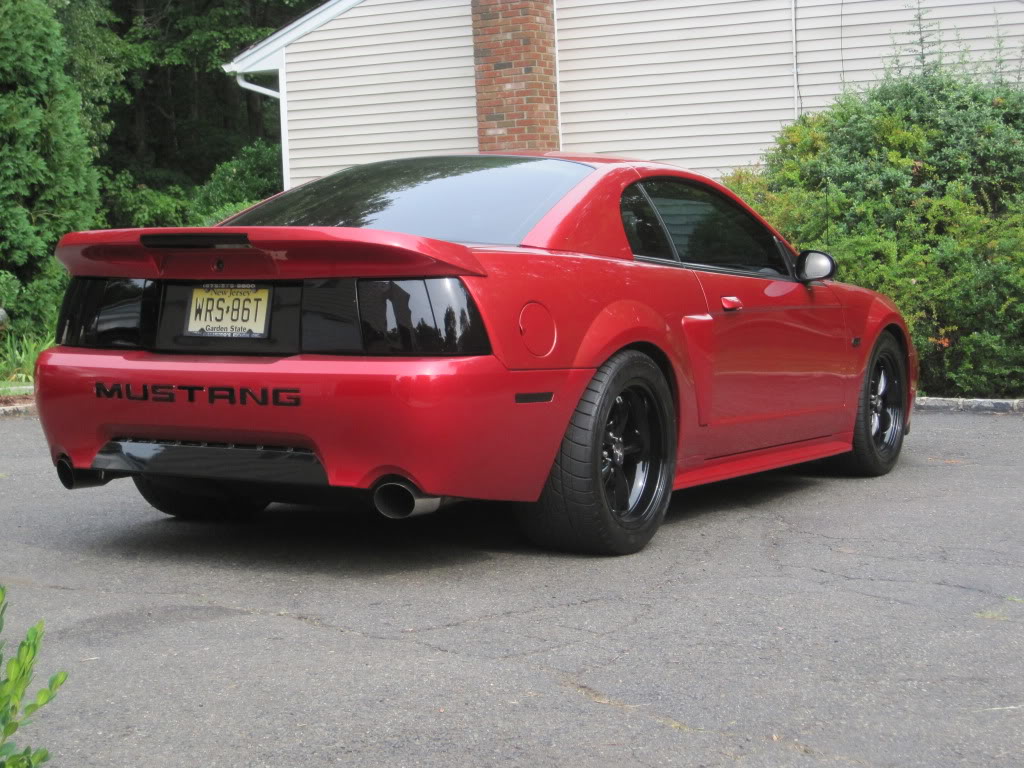
Finally, i got my letter in mail that i got for 4.89$ of Amazon. Perfect cut, and fit perfectly, i rushed and didn't read instructions, but still managed to put it there, screwed up a letter "M" but everything else went fine. I dont know what you call it, but rear bumper insert was painted too instead of a decal. Decals are about 20$ of any internet source just for that insert. It took me about 30 minutes to tape everything and another 30 minutes to paint it for just 7$.
Mostly appearance, but worth spending time and little money to make a beautiful car, look a little better.
This whole thing took me about 2 days to do, painting of course is a time consuming process, but with a little money and effort you can make your Stang look better in no time.
Front lights were horrible when i just got this stang, they were all foggy, scratched, and just in a bad condition overall.

There was nothing done to the car appearance wise. All stock.

But then comes this
Front chin spoiler took me about 30 minutes to do, and 30$ total. All materials were bought at Lowes/Home Depot. This idea came to me from a product called Ez Lip, basically a universal lip that you can put on every car. But instead of waiting for shipping i just got a V or 90* shape rubber door/window insulation + double site tape.
I have not seen a more simple light installation than this. 2 Metal slides hold a headlight, who ever came up with this is a genius, i wish Germans would start making simple things in cars like this. Lights took me about 4 hours to complete. I took them out and started with a sand paper and some soapy water. After that, let them dry and started spraying black tint. Put about 4 layers, and then clear coat, then buffing. Didn't turn that great, but still looking good.

Side scoops were the easiest things of all. Just pull them out carefully not to break brackets and clips. Used 600grid sand paper to get free from clear coat and then sprayed black. Finished with a clear coat and some buffing.

Finally, i got my letter in mail that i got for 4.89$ of Amazon. Perfect cut, and fit perfectly, i rushed and didn't read instructions, but still managed to put it there, screwed up a letter "M" but everything else went fine. I dont know what you call it, but rear bumper insert was painted too instead of a decal. Decals are about 20$ of any internet source just for that insert. It took me about 30 minutes to tape everything and another 30 minutes to paint it for just 7$.

 06-06-2013, 11:41 AM
#2
4th Gear Member

Join Date: May 2012
Location: New York
Posts: 1,220
might i suggest getting a grille delete kit? itll look alot cleaner imo. I like everything you did except the black side scoops, stands out too much but thats just me i guess. Either way, looks alot better
06-06-2013, 11:47 AM
#3
. I only got 17 hours/week to work at my job until next semester starts, so i am pretty much broke
06-06-2013, 12:49 PM
#5
2nd Gear Member
Join Date: Apr 2013
Location: Viera, FL
Posts: 216
Great innovative job man! I'm also not a fan of the painted side scoops but the rest looks awesome. That home made chin spoiler is a stroke of genius and looks factory to me. I wonder if the tape will hold though. Mine bolts on.
06-06-2013, 02:18 PM
#6
Just in case you can always drill about 10 holes along the chin and bolt it onto bumper. From what i experienced, the tape is so strong that once you put it on the bumper, its impossible to take it off without screwing things up.
06-06-2013, 02:59 PM
#7
1st Gear Member
Join Date: Mar 2013
Location: California
Posts: 91
I like the chin spoiler and the rear bumper inserts. Like the other users said, I'm not much of a fan of the side scoops and the headlights look kinda hazy, matte. They still look better than mine though. The clear coat on my black headlights is peeling and it looks all nasty.
Last edited by JJ Glo; 06-06-2013 at 03:01 PM.
06-06-2013, 04:20 PM
#9
5th Gear Member
Join Date: Sep 2006
Location: Raleigh, NC
Posts: 2,966
I am still deciding on the grill delete. The point of this was to show that things can be done at home, in your own garage for no more than 60$ overall. Just the grill delete kit cost 100$. I might come up with something homemade . I only got 17 hours/week to work at my job until next semester starts, so i am pretty much broke 
. I only got 17 hours/week to work at my job until next semester starts, so i am pretty much broke
06-06-2013, 04:21 PM
#10
6th Gear Member
Join Date: Oct 2006
Location: NJ
Posts: 6,817
If you're going with the black out theme. There is a lot you can do...
Blackout emblems and side reflectors
Black out in between the tails and the 3rd brake light would really clean up that rear end. And pull off that dealership vinyl on the decklid.
Blackout emblems and side reflectors

Black out in between the tails and the 3rd brake light would really clean up that rear end. And pull off that dealership vinyl on the decklid.
