3G alt walkthrough....
 07-07-2006, 04:12 AM
#1
5th Gear Member
Thread Starter
Join Date: Nov 2004
Location: Texas
Posts: 3,834
Mods, can you please sticky this in the Tech section.....
Things you'll need:
--6-8' 4 awg wire (car audio place is a good place to look and will have high quality wire)
--2 10 awg ring connectors to fit on stud on back of alt.
--2 ring connectors for the 4 awg wire (or just one depending on whether you connect it to the 12V side of the starter relay or directly to the battery)
--1 small female spade connector for 12 awg wire (or stator plug--available from PA performance for $5)
--wire cutters and strippers (<--for the wires, sthmarty panths!!<Officer Barbrady voice>
--Soldering gun
**Check the top hole of the 3G alt...if it is threaded, you can reuse the stock bolt. Mine was not so I got a 7/16 (or similar) bolt, nut, and a couple of washers. The size does not matter as long as it fits the hole. <--LOL, that's what she said...
PA Performance sells the wire kit (and alt's, of course) to make it easier and sometimes cheaper.
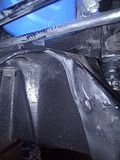
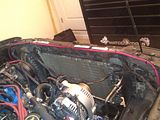
Disconnect the negative side of the battery. Remove the connectors going to the old alternator and remove the alternator. Depending on the alt. you get, you may need to grind part of the bracket down (Pic 1). Keep the bolts b/c you will be reusing them.
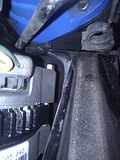
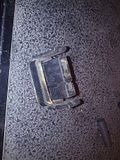
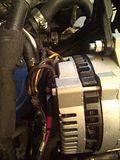
Once the bracket is modified, you can install the 3G. Notice the 3G alt will have some different connections than your stock 2G, but you WILL reuse the D-shaped plug (Pic 2). Cut the wires on the rectangle-shaped connector as close as you can to allow more wire to work with (Pic 3).
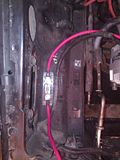
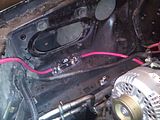
Install the ring connectors on the 4 awg wire and solder them to ensure connectivity. Route the wire from the battery [or starter solenoid], behind the radiator, and around to the alt. (Pic 4). The connector on the other end depends on how/where you choose to connect it. I went with the ring terminal, but installed it on the positive battery terminal w/ an aftermarket battery terminal connector. I chose to go this route b/c I did not have much room on the 12V side of the starter solenoid.
Install and solder the 10 awg ring connectors on the 2 blk/org wires that were cut from the rectangular connector. Install the small spade or stator plug on the white or light yellow 12 awg wire (only remaining wire from rectangular connector). Refer to Pic 5. I used heat shrink first, and then electrical tape. Since the picture, I have replaced the spade connector w/ the stator plug from PA.
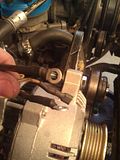
Connect both blk/org wires AND the 4 gauge wire to the stud on the back of the alternator (mine had a red plastic piece around it). Connect the spade/stator plug to the stator terminal on alternator and also install D-shaped plug. Refer to Pics 2 and 6.
Make sure all connections are tight and reconnect your battery. I run 13V’s all day long, even w/ A/C and my electric fan cranking.
If I missed any steps or info, please let me know so I can add it.
[IMG]local://upfiles/10560/12C91A2385E64826BB4E5ADC8B7882B3.jpg[/IMG]
[IMG]local://upfiles/10560/F9585A1778CB4A5ABE7746B704E9BBF7.jpg[/IMG]
[IMG]local://upfiles/10560/29C28E6930C94441AB64DC35DB6FC80C.jpg[/IMG]
[IMG]local://upfiles/10560/EF9C99E056F54095B034CA51AFDF7F58.jpg[/IMG]
[IMG]local://upfiles/10560/5DCF571320C442A8B2867DCAE2F9AA37.jpg[/IMG]
Things you'll need:
--6-8' 4 awg wire (car audio place is a good place to look and will have high quality wire)
--2 10 awg ring connectors to fit on stud on back of alt.
--2 ring connectors for the 4 awg wire (or just one depending on whether you connect it to the 12V side of the starter relay or directly to the battery)
--1 small female spade connector for 12 awg wire (or stator plug--available from PA performance for $5)
--wire cutters and strippers (<--for the wires, sthmarty panths!!<Officer Barbrady voice>
--Soldering gun
**Check the top hole of the 3G alt...if it is threaded, you can reuse the stock bolt. Mine was not so I got a 7/16 (or similar) bolt, nut, and a couple of washers. The size does not matter as long as it fits the hole. <--LOL, that's what she said...
PA Performance sells the wire kit (and alt's, of course) to make it easier and sometimes cheaper.
Disconnect the negative side of the battery. Remove the connectors going to the old alternator and remove the alternator. Depending on the alt. you get, you may need to grind part of the bracket down (Pic 1). Keep the bolts b/c you will be reusing them.
Once the bracket is modified, you can install the 3G. Notice the 3G alt will have some different connections than your stock 2G, but you WILL reuse the D-shaped plug (Pic 2). Cut the wires on the rectangle-shaped connector as close as you can to allow more wire to work with (Pic 3).
Install the ring connectors on the 4 awg wire and solder them to ensure connectivity. Route the wire from the battery [or starter solenoid], behind the radiator, and around to the alt. (Pic 4). The connector on the other end depends on how/where you choose to connect it. I went with the ring terminal, but installed it on the positive battery terminal w/ an aftermarket battery terminal connector. I chose to go this route b/c I did not have much room on the 12V side of the starter solenoid.
Install and solder the 10 awg ring connectors on the 2 blk/org wires that were cut from the rectangular connector. Install the small spade or stator plug on the white or light yellow 12 awg wire (only remaining wire from rectangular connector). Refer to Pic 5. I used heat shrink first, and then electrical tape. Since the picture, I have replaced the spade connector w/ the stator plug from PA.
Connect both blk/org wires AND the 4 gauge wire to the stud on the back of the alternator (mine had a red plastic piece around it). Connect the spade/stator plug to the stator terminal on alternator and also install D-shaped plug. Refer to Pics 2 and 6.
Make sure all connections are tight and reconnect your battery. I run 13V’s all day long, even w/ A/C and my electric fan cranking.
If I missed any steps or info, please let me know so I can add it.
[IMG]local://upfiles/10560/12C91A2385E64826BB4E5ADC8B7882B3.jpg[/IMG]
[IMG]local://upfiles/10560/F9585A1778CB4A5ABE7746B704E9BBF7.jpg[/IMG]
[IMG]local://upfiles/10560/29C28E6930C94441AB64DC35DB6FC80C.jpg[/IMG]
[IMG]local://upfiles/10560/EF9C99E056F54095B034CA51AFDF7F58.jpg[/IMG]
[IMG]local://upfiles/10560/5DCF571320C442A8B2867DCAE2F9AA37.jpg[/IMG]
 12-28-2011, 04:13 PM
#5

Just did this install and took some pictures so I figured I would update the thread for anyone else doing this.
Grinding bracket for alternator
Rectangle connecter to remove
Installed the 4awg wire/150 amp fuse under the airbox, as close to the verticle side as possible and it clears the airbox just fine.
Add the 2 ring terminals to the blk/org wires and the female spade to the white/blk wire
Wires hooked up and alternator installed.
I run 14.6V at idle and 14.3V at idle with my electric fan and A/C running.
Grinding bracket for alternator


Rectangle connecter to remove

Installed the 4awg wire/150 amp fuse under the airbox, as close to the verticle side as possible and it clears the airbox just fine.


Add the 2 ring terminals to the blk/org wires and the female spade to the white/blk wire

Wires hooked up and alternator installed.

I run 14.6V at idle and 14.3V at idle with my electric fan and A/C running.
Last edited by N3mi5is; 12-28-2011 at 08:19 PM. Reason: Changed to thumbnails
12-29-2011, 07:25 AM
#8
5th Gear Member
Join Date: May 2007
Location: Pittsburgh
Posts: 2,459
"Connect both blk/org wires AND the 4 gauge wire to the stud on the back of the alternator (mine had a red plastic piece around it). Connect the spade/stator plug to the stator terminal on alternator and also install D-shaped plug. Refer to Pics 2 and 6."
This is very important. I drove my stang for only 5k miles with no aftermarket audio system and no A/C, the gauge worked fine and I had absolutely no charging issues, however...the red plastic on the terminal on the back of my alternator was charred. The only explanation I can think of is from not reinstalling the two blk/org wires. All connections were tight and clean, and the alternator was brand new.
The directions given with the kit by PA Performance never mention the removal of the two blk/org wires.
Last edited by Tony71502; 12-29-2011 at 07:28 AM.
12-29-2011, 09:46 PM
#9
2nd Gear Member

Join Date: Dec 2004
Location: New Orleans,La.
Posts: 198
hmmm,this is interesting.i read somewhere that they say by reinstalling the black and orange wires,theres no point installing a fuse on the 4 gauge wire cause if the alternator fails,them wires will burn up anyway,then i have read elsewhere that the 4 gauge was to work in conjunction with the black and orange?somewhere else says find the point that black and orange wires become one,cut and heat shrink end and stuff into harness and leave the wire at solenoid hooked up because they share a fuse link.we really should find out what to do so none of us burns our car down.
12-30-2011, 07:24 AM
#10
5th Gear Member
Join Date: May 2007
Location: Pittsburgh
Posts: 2,459
Well... not installing a fuse thinking the black/orange wires will burn up is just plain retarded. Fuses do not work that way. If they did burn up then full amperage would go through the 4 gage wire.
Amperage works like water. It flows where it can with the least resistance. The black/orange wires simply act to help provide a path for that amperage.
PA Performance installation papers don't say disconnect them. I'm guessing it is because they want them to be there when the alternator is at max output to help divert some amperage. But like I said, I may be wrong... I'm not an electrical engineer. I'm still investigating why the red plastic on my alternator was charred. No other damage done. Maybe it got wet and shorted to the alternator housing for a minute, I'm not sure...

