Carb To EFI Conversion Write Up
 08-02-2011, 10:32 AM
#1
M.A.D. Motorsports
Thread Starter
Join Date: Jul 2006
Location: Indiana
Posts: 8,014
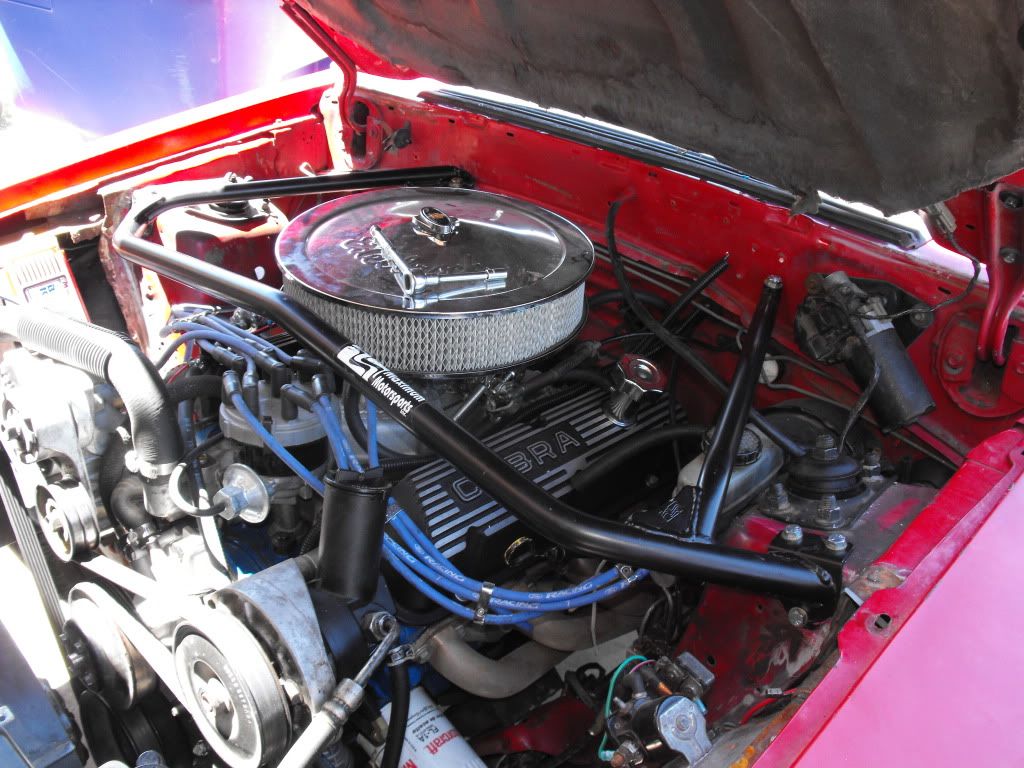
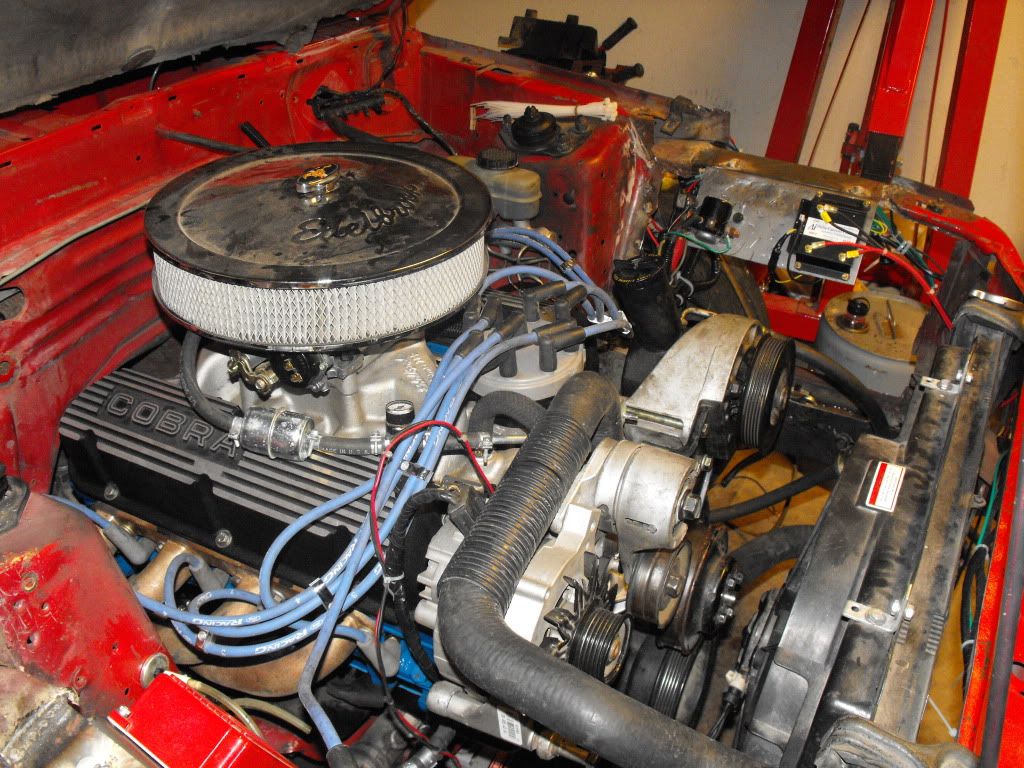
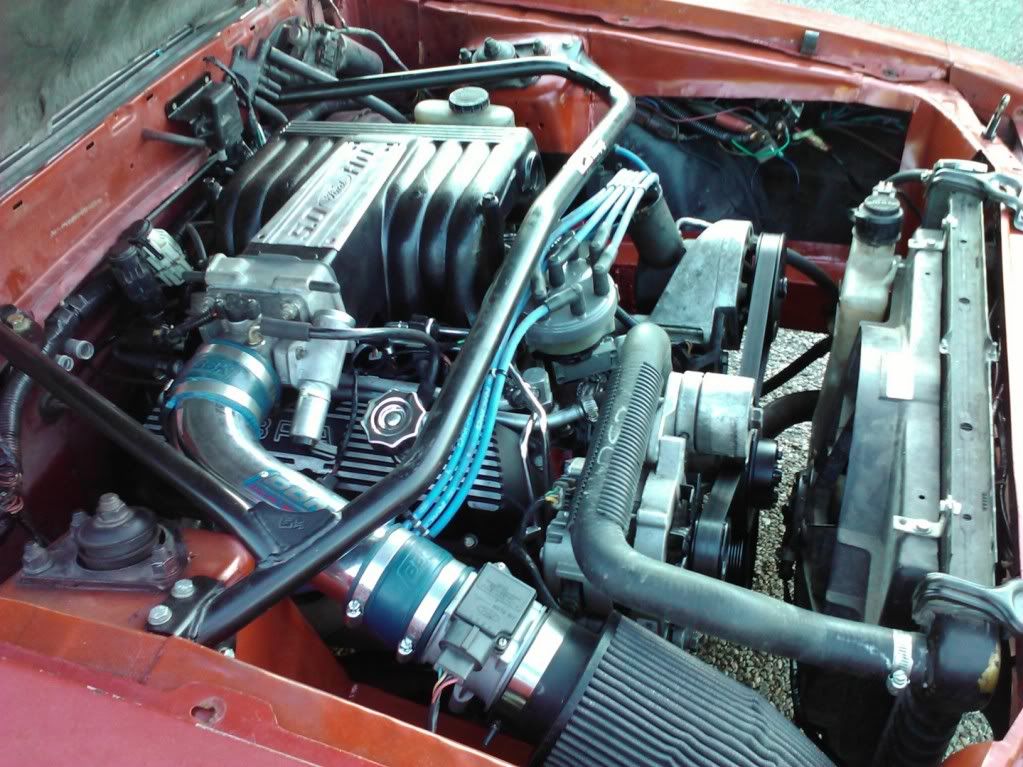
As some of you know I just recently converted my 93 from a carb setup to an Mass Air EFI setup. I figured I would go ahead and make a write up on the parts needed and what to do. However I didn't have that thought till today so I didn't take many pics but its also kind of obvious. In my descriptions I will say where the part is located. I scored most of my parts used either from craigslist, other members on here or other forums, or the junk yard. I did purchase a couple sensors new for specific reasons. I also am not running emissions on my car so I am not covering it. If you have questions on it just ask in the general discussion section.
My before and after.....


*The EFI setup uses 3 harnesses, the main harness, injector harness, and o2 harness.
*If you are converting an older mustang (79-85) the fuel system will need a couple extra items that I will cover also.
*Speed density setups contain the same parts except for the MAF, BAP, computer and the harnesses are different.
Parts needed:
Computer - A9L, A9P, or A9M- all will work for a manual trans but A9P and A9M are auto specific.
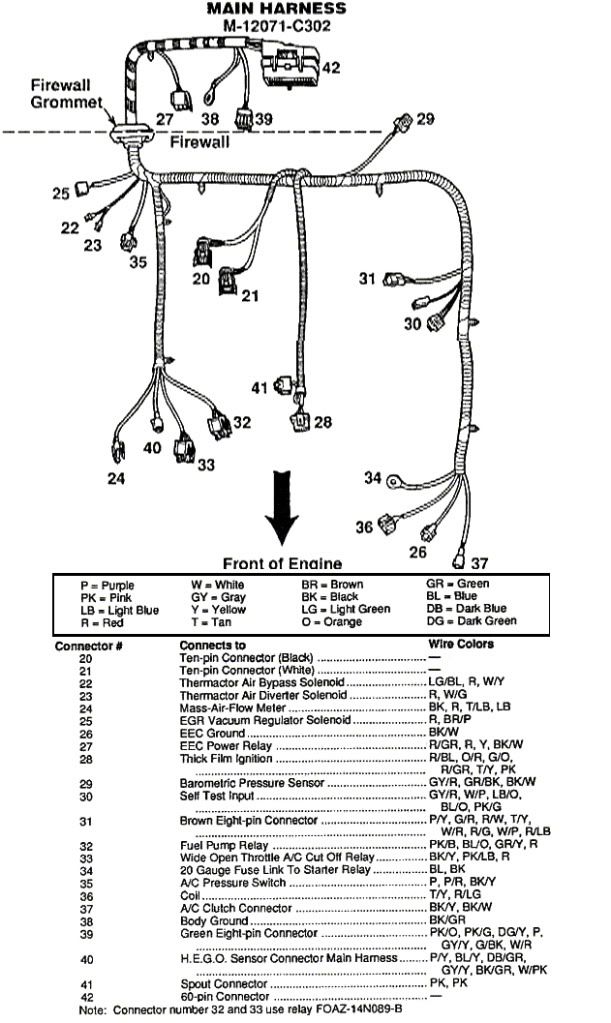
Main Harness - This harness runs from the computer through the firewall and branches out to bother fender wells and the back of the motor. On some 91-93 models this also contains the fuel pump relay.
Injector Harness - This connects to the main harness at the salt and pepper shakers (2 connectors, black and white, 10 pin connectors)
o2 Harness - This connects to the main harness on the passenger side and runs under the motor to the o2 sensors.
EEC Relay - This relay is located in the passenger kick panel with the computer.
Fuel Pump Relay - Controls the fuel pump. Most are located under the driver seat connected to the cars body harness but some 91-93 models are located at the driver side fender apron.
A/C WOT Relay - Cuts power to the A/C clutch at WOT. Located at the driver fender apron with the fuel pump relay.
EFI Gas Tank - 79-85 model tanks are different than 86-93. The older models only have one hole for the pick up and sending unit because they are one piece. The 87+ models have 2 holes, one for the fuel pump/pickup and the other is for the sending unit. Be sure to use new locking rings and gaskets for them and a new filler neck grommet.
Fuel Pump - Depending on your application you can either use a stock pump or purchase and aftermarket one. I recommend going ahead and upgrading while you are there. Be sure to pick up a fuel pump screen/filter if your kit or used pump doesn't have one. You will obviously also need the fuel pump pick up and bracket that the pump is attached to.
Gas Tank Sending Unit - 87-93 uses the same sending unit
Fuel Vapor Valve - This is located at the top of the gas tank. It channels the vapor from the tank to the front of the car to the charcoal canister. This helps lower emissions by having the vapor fed through the vacuum lines into the intake with the purge solenoid is activated by the computer.
EFI Body Fuel Lines - You have the soft lines that go from the tank to the fuel filter and hard line. Then you will need the hard lines that are riveted to the body. If you want you can also purchase aftermarket fuel lines/ kits from most performance websites such as summit or jegs.
Fuel Filter and Bracket - 87-93 fuel filter mounts in front of the gas tank.
Front Fuel Lines - At the passenger side frame rail there are also a set of hard fuel lines that are the connection between the body and the fuel rails.
Fuel Rail - Bolts to the lower intake and feeds the injectors.
Fuel Pressure Regulator - Bolts to the fuel rail on the rear, passenger side.
Fuel Injectors - Your build will determine what size injectors you will need. If you get used ones be sure to replace the o-rings and inspect them closely. They can be take apart and cleaned to a point.
Upper and Lower Intake - There are many brands and types. Like most your build determines what you will need. The lower intake also houses the coolant cross over tube, injectors, fuel rail, thermostat and housing, ACT sensor and the PCV valve. The upper intake is what feeds all the vacuum sources on the motor.
EGR Spacer - This bolts between the throttle body and the upper intake. It feeds exhaust gases that are coming through ports in the heads and intake. These gases are fed through the EGR spacer into the EGR valve (EVP sensor). There are also coolant passages that run through the spacer to keep it cool at the same time. This part is fed coolant from the crossover tube and then back into the lower intake.
Throttle Body - This is what regulates the air going into the motor via the throttle cable. The TPS sensor and the IAC motor bolt onto the throttle body.
CAI or Stock Intake Tubing - This is what feeds the air into the motor. The MAF meter is located in between the tubing and the air filter.
MAF Meter - This is what monitors how much air is being taken into the motor. The signal from the sensor is sent to the computer and helps adjust A/F ratios. Size and brand again are determined by your build. Be sure to do your research first.
ECT Sensor - The engine coolant temp sensor is located at the top of the coolant crossover tube. This is the coolant sensor that gives signals to the computer to help control A/F ratios.
Coolant Temp Sending Unit - This is located at the driver side front of the lower intake. It has a one wire connector that is in the injector harness. This is what controls the temp gauge.
Coolant Crossover Tube - This tube screws into the lower intake and holds the ECT sensor. This is what feeds coolant to the heater core so you can have heat in the car. The coolant is ran from the lower intake and the bottom post on the water pump.
TPS Sensor - Throttle position sensor. It tells the computer how far open the throttle is. Located at the top of the throttle body.
IAC Motor - Idle air control motor. Helps control the engines idle RPM by opening and closing allowing air to bypass the throttle blade. Located at the front of the throttle body.
BAP Sensor - Barometric Air Pressure sensor. Also known as the MAP sensor but they are not the same. Reads the atmospheric air pressure for the computer to help control the A/F ratios and timing. A key part of the mass air setup. Located on the firewall on the driver side.
ACT Sensor - Air Charge Temp sensor. Reads the temperature of the air being fed into the motor. Located in the lower intake at the front driver side.
o2 Sensors - Oxygen sensors. Located in the midpipe of the exhaust about 6 inches from the collector connections.
EFI Distributor - The distributor sends the spark from the coil to the spark pugs. It also has the TFI module mounted on the front of the distributor. It also has the PIP sensor located inside. Depending on what cam you are running you need to be sure to run the correct gear on the distributor to not destroy parts. Most roller cams are compatible with the stock dizzy gear so its not that big of an issue, just double check to be sure.
Coil - There are many different coils in the aftermarket but a stock EFI coil works great. Be sure to get the bracket that goes with it unless you are going to make your own like I did.
Fuel Pump Block Off - Carb setups that use a mechanical pumps need to have a block off plate bolted on. You can also just switch out the timing cover but swapping them is not needed.
Vacuum Tree - The stock EFI vacuum tree is located on the firewall above the brake booster. It splits the source vac to distribute it to the brake booster, HVAC, ect...
Throttle Cable/Bracket - The EFI cable is longer than the carb cable because it needs to reach the other side of the motor. The bracket bolts onto the EGR spacer.
Vacuum Lines - There are a small assortment of sizes and lengths. There are a couple of premolded lines that you will need to purchase if the parts don't come with them.
Heater Core Lines - The hoses for the heater core are premolded hoses that will need to be purchased. If you are not running a heater core you can loop the cross over tube into itself for remove it completely with some fittings.
WALK THROUGH
There are so many different variants of setups so I can't possibly cover every conversion needed. Again the 79-85 cars will need a little more work because of the fuel system, wiring the fuel pump, and relocating the starter solenoid to the driver side. Those questions can be answered in the forum.
The first thing you need to do is disconnect the battery. Then bring the motor up to TDC on the compression stroke so you will have everything lined up for the other distributor. Then go ahead and drain the coolant and oil.
Remove:
fan and shroud
belt
radiator
upper and lower coolant hoses
throttle cable
carb
intake
mechanical fuel pump
coolant lines to the heater core
fuel lines (if original carb car, remove all the way to the tank)
gas tank
Now you can clean all the gasket surfaces and start prep work. Be sure to cover the intake ports and oil galley before you do so that you do not drop anything into the motor. At this time it is best to go ahead and run all 3 harnesses and mount the ECU. You can hide them in the fenders also by feeding them through the holes behind the strut towers. Be sure to clean the surfaces for the grounds for the computer in the kick panel, the ground for the o2 sensors on the back of the head, and the ground by the battery for the computer.


Once you have all of that done go ahead and prep the lower intake with the coolant tube, ACT, ECT and temp sending unit. You can then go ahead and bolt it on and torque it down. Then connect the heater core hoses and the coolant lines on the water pump to the intake. Install the injectors and fuel rail. Once all of that is bolted down you can go ahead and connect the injector harness to the injectors and sensors. I would also suggest in going ahead and swapping out the throttle cables at this time as well.
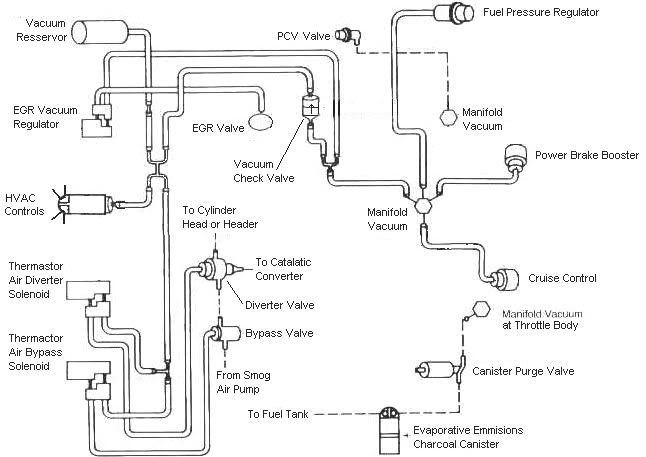
Prep the upper intake with the vacuum lines that are needed before you install it. Aftermarket intakes might have a slightly different setup for vac lines but vacuum is vacuum. Some extra T's can be added to give sources. You will need a source vacuum line for the vacuum tree. A small port for the fuel pressure regulator. The PCV also runs from the front of the upper intake, into a T on the intake and to the PCV valve. There is also a couple others that deal with the emissions that can be looked up in many places. Once all those are ready to go you can bolt the upper intake onto the lower and connect your vacuum lines. The source line goes to the tree and the tree feeds the brake booster and other things such as the cruise control and a/c controls.

If you haven't already you can now bolt on the throttle body and EGR plate. The EGR plate and also be replaced by a throttle body spacer but one or the other is needed to mount the throttle cable. I know the FRPP Cobra intake doesn't use the plate and the cable and EGR stuff bolts straight to the intake. Some others might as well. Then the intake tubing, MAF, and air filter can be bolted on and plugged in.
Now, go ahead and get your distributor and if you haven't done it before read up on the proper procedure and orientation of the dizzy. There is an excellent write up in the Tech Articles. Once it is in go ahead and plug it in. Also don't forget to mount your dizzy with the stock mount or your own mount.
How to Properly Stab Your Distributor
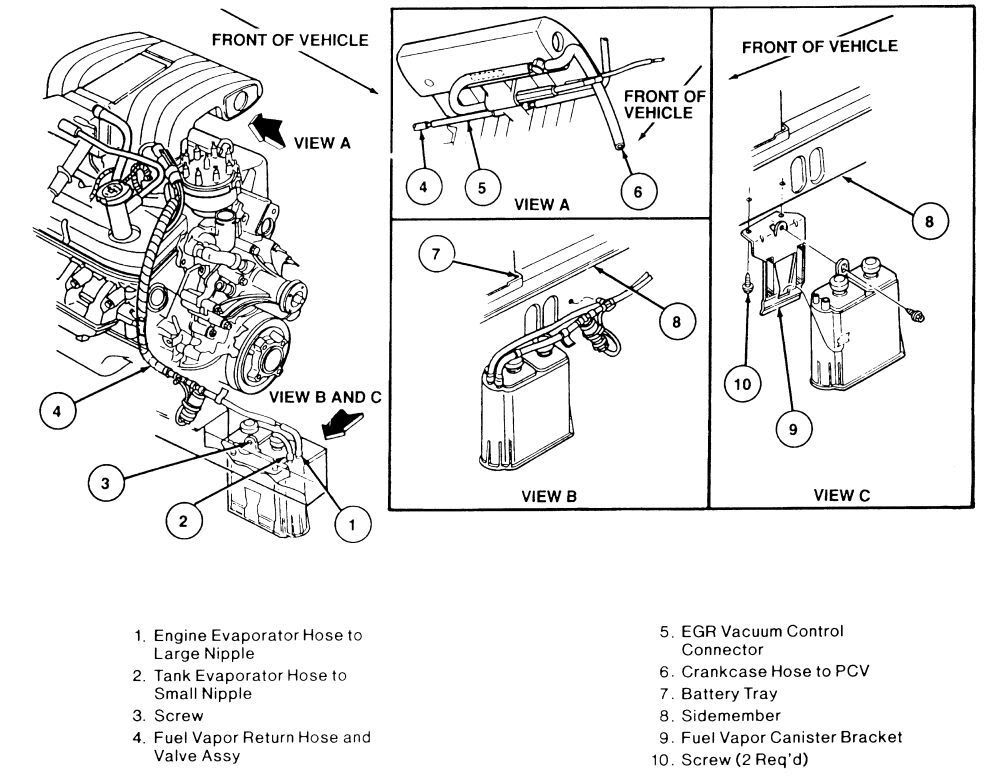
If you haven't already go ahead and run and mount the body fuel lines. Set up your gas tank and mount it up along with the fuel filter. Make sure all of your connections are tight so they do not leak. The vapor valve line also runs right next to the fuel lines and runs up to the charcoal canister mounted on the passenger frame rail. The canister is not needed if you are not running emissions but it will keep the fumes at bay and it won't hurt or rob HP by using it. If you can get one, use it and hook up the vacuum lines.
Also do not forget to install the o2 sensors. If your exhaust doesn't have the bungs for the o2's to go into you can purchase them separately or buy a mid pipe and they will come with them already installed.
Now that your fuel system is complete, your intake is bolted on, and the ignition is complete it is almost time to start up. Go ahead and reinstall your radiator, coolant lines, and cooling fan. Make sure you bolt all the power connectors on at the start solenoid. Once you have double checked everything go ahead and reconnect the battery. Turn the key on but do not try and start it yet. You should hear the EEC relay click on, the fuel pump prime and then it shut off. If you don't you have an issue somewhere that can be address shortly. Now with the key on go ahead and set your TPS voltage. Now, to do a simple ignition check loosen the distributor hold down and remove the plug wire at the coil. Hold the wire above the coil and rotate the dizzy back and forth. You should get a spark from the wire to the coil. Be sure to wear a glove. Be sure to tighten the hold down back up once complete. The spark doesn't feel good lol. If you do have any issues with the above read through the crank but no start link I will provide from another website.
If everything checks out its time to start it up. You will want to cycle the key on and off a couple times to let the fuel system prime. Once you do that go ahead and turn the key and hopefully hear the motor purrrr..... After it does start go ahead and set your timing. Your idle might be higher or lower than normal but that will address shortly. Let the motor idle so you can check for any leaks. Once you don't have any leaks go ahead and do a base idle reset (follow the link provided).
EFI No Start
TPS Adjustment
Base Idle Reset
From here you should be good to go and drive your EFI mustang

Here are a couple diagrams for Emissions Stuff

My before and after.....
*The EFI setup uses 3 harnesses, the main harness, injector harness, and o2 harness.
*If you are converting an older mustang (79-85) the fuel system will need a couple extra items that I will cover also.
*Speed density setups contain the same parts except for the MAF, BAP, computer and the harnesses are different.
Parts needed:
Computer - A9L, A9P, or A9M- all will work for a manual trans but A9P and A9M are auto specific.
Main Harness - This harness runs from the computer through the firewall and branches out to bother fender wells and the back of the motor. On some 91-93 models this also contains the fuel pump relay.
Injector Harness - This connects to the main harness at the salt and pepper shakers (2 connectors, black and white, 10 pin connectors)
o2 Harness - This connects to the main harness on the passenger side and runs under the motor to the o2 sensors.
EEC Relay - This relay is located in the passenger kick panel with the computer.
Fuel Pump Relay - Controls the fuel pump. Most are located under the driver seat connected to the cars body harness but some 91-93 models are located at the driver side fender apron.
A/C WOT Relay - Cuts power to the A/C clutch at WOT. Located at the driver fender apron with the fuel pump relay.
EFI Gas Tank - 79-85 model tanks are different than 86-93. The older models only have one hole for the pick up and sending unit because they are one piece. The 87+ models have 2 holes, one for the fuel pump/pickup and the other is for the sending unit. Be sure to use new locking rings and gaskets for them and a new filler neck grommet.
Fuel Pump - Depending on your application you can either use a stock pump or purchase and aftermarket one. I recommend going ahead and upgrading while you are there. Be sure to pick up a fuel pump screen/filter if your kit or used pump doesn't have one. You will obviously also need the fuel pump pick up and bracket that the pump is attached to.
Gas Tank Sending Unit - 87-93 uses the same sending unit
Fuel Vapor Valve - This is located at the top of the gas tank. It channels the vapor from the tank to the front of the car to the charcoal canister. This helps lower emissions by having the vapor fed through the vacuum lines into the intake with the purge solenoid is activated by the computer.
EFI Body Fuel Lines - You have the soft lines that go from the tank to the fuel filter and hard line. Then you will need the hard lines that are riveted to the body. If you want you can also purchase aftermarket fuel lines/ kits from most performance websites such as summit or jegs.
Fuel Filter and Bracket - 87-93 fuel filter mounts in front of the gas tank.
Front Fuel Lines - At the passenger side frame rail there are also a set of hard fuel lines that are the connection between the body and the fuel rails.
Fuel Rail - Bolts to the lower intake and feeds the injectors.
Fuel Pressure Regulator - Bolts to the fuel rail on the rear, passenger side.
Fuel Injectors - Your build will determine what size injectors you will need. If you get used ones be sure to replace the o-rings and inspect them closely. They can be take apart and cleaned to a point.
Upper and Lower Intake - There are many brands and types. Like most your build determines what you will need. The lower intake also houses the coolant cross over tube, injectors, fuel rail, thermostat and housing, ACT sensor and the PCV valve. The upper intake is what feeds all the vacuum sources on the motor.
EGR Spacer - This bolts between the throttle body and the upper intake. It feeds exhaust gases that are coming through ports in the heads and intake. These gases are fed through the EGR spacer into the EGR valve (EVP sensor). There are also coolant passages that run through the spacer to keep it cool at the same time. This part is fed coolant from the crossover tube and then back into the lower intake.
Throttle Body - This is what regulates the air going into the motor via the throttle cable. The TPS sensor and the IAC motor bolt onto the throttle body.
CAI or Stock Intake Tubing - This is what feeds the air into the motor. The MAF meter is located in between the tubing and the air filter.
MAF Meter - This is what monitors how much air is being taken into the motor. The signal from the sensor is sent to the computer and helps adjust A/F ratios. Size and brand again are determined by your build. Be sure to do your research first.
ECT Sensor - The engine coolant temp sensor is located at the top of the coolant crossover tube. This is the coolant sensor that gives signals to the computer to help control A/F ratios.
Coolant Temp Sending Unit - This is located at the driver side front of the lower intake. It has a one wire connector that is in the injector harness. This is what controls the temp gauge.
Coolant Crossover Tube - This tube screws into the lower intake and holds the ECT sensor. This is what feeds coolant to the heater core so you can have heat in the car. The coolant is ran from the lower intake and the bottom post on the water pump.
TPS Sensor - Throttle position sensor. It tells the computer how far open the throttle is. Located at the top of the throttle body.
IAC Motor - Idle air control motor. Helps control the engines idle RPM by opening and closing allowing air to bypass the throttle blade. Located at the front of the throttle body.
BAP Sensor - Barometric Air Pressure sensor. Also known as the MAP sensor but they are not the same. Reads the atmospheric air pressure for the computer to help control the A/F ratios and timing. A key part of the mass air setup. Located on the firewall on the driver side.
ACT Sensor - Air Charge Temp sensor. Reads the temperature of the air being fed into the motor. Located in the lower intake at the front driver side.
o2 Sensors - Oxygen sensors. Located in the midpipe of the exhaust about 6 inches from the collector connections.
EFI Distributor - The distributor sends the spark from the coil to the spark pugs. It also has the TFI module mounted on the front of the distributor. It also has the PIP sensor located inside. Depending on what cam you are running you need to be sure to run the correct gear on the distributor to not destroy parts. Most roller cams are compatible with the stock dizzy gear so its not that big of an issue, just double check to be sure.
Coil - There are many different coils in the aftermarket but a stock EFI coil works great. Be sure to get the bracket that goes with it unless you are going to make your own like I did.
Fuel Pump Block Off - Carb setups that use a mechanical pumps need to have a block off plate bolted on. You can also just switch out the timing cover but swapping them is not needed.
Vacuum Tree - The stock EFI vacuum tree is located on the firewall above the brake booster. It splits the source vac to distribute it to the brake booster, HVAC, ect...
Throttle Cable/Bracket - The EFI cable is longer than the carb cable because it needs to reach the other side of the motor. The bracket bolts onto the EGR spacer.
Vacuum Lines - There are a small assortment of sizes and lengths. There are a couple of premolded lines that you will need to purchase if the parts don't come with them.
Heater Core Lines - The hoses for the heater core are premolded hoses that will need to be purchased. If you are not running a heater core you can loop the cross over tube into itself for remove it completely with some fittings.
WALK THROUGH
There are so many different variants of setups so I can't possibly cover every conversion needed. Again the 79-85 cars will need a little more work because of the fuel system, wiring the fuel pump, and relocating the starter solenoid to the driver side. Those questions can be answered in the forum.
The first thing you need to do is disconnect the battery. Then bring the motor up to TDC on the compression stroke so you will have everything lined up for the other distributor. Then go ahead and drain the coolant and oil.
Remove:
fan and shroud
belt
radiator
upper and lower coolant hoses
throttle cable
carb
intake
mechanical fuel pump
coolant lines to the heater core
fuel lines (if original carb car, remove all the way to the tank)
gas tank
Now you can clean all the gasket surfaces and start prep work. Be sure to cover the intake ports and oil galley before you do so that you do not drop anything into the motor. At this time it is best to go ahead and run all 3 harnesses and mount the ECU. You can hide them in the fenders also by feeding them through the holes behind the strut towers. Be sure to clean the surfaces for the grounds for the computer in the kick panel, the ground for the o2 sensors on the back of the head, and the ground by the battery for the computer.
Once you have all of that done go ahead and prep the lower intake with the coolant tube, ACT, ECT and temp sending unit. You can then go ahead and bolt it on and torque it down. Then connect the heater core hoses and the coolant lines on the water pump to the intake. Install the injectors and fuel rail. Once all of that is bolted down you can go ahead and connect the injector harness to the injectors and sensors. I would also suggest in going ahead and swapping out the throttle cables at this time as well.
Prep the upper intake with the vacuum lines that are needed before you install it. Aftermarket intakes might have a slightly different setup for vac lines but vacuum is vacuum. Some extra T's can be added to give sources. You will need a source vacuum line for the vacuum tree. A small port for the fuel pressure regulator. The PCV also runs from the front of the upper intake, into a T on the intake and to the PCV valve. There is also a couple others that deal with the emissions that can be looked up in many places. Once all those are ready to go you can bolt the upper intake onto the lower and connect your vacuum lines. The source line goes to the tree and the tree feeds the brake booster and other things such as the cruise control and a/c controls.
If you haven't already you can now bolt on the throttle body and EGR plate. The EGR plate and also be replaced by a throttle body spacer but one or the other is needed to mount the throttle cable. I know the FRPP Cobra intake doesn't use the plate and the cable and EGR stuff bolts straight to the intake. Some others might as well. Then the intake tubing, MAF, and air filter can be bolted on and plugged in.
Now, go ahead and get your distributor and if you haven't done it before read up on the proper procedure and orientation of the dizzy. There is an excellent write up in the Tech Articles. Once it is in go ahead and plug it in. Also don't forget to mount your dizzy with the stock mount or your own mount.
How to Properly Stab Your Distributor
If you haven't already go ahead and run and mount the body fuel lines. Set up your gas tank and mount it up along with the fuel filter. Make sure all of your connections are tight so they do not leak. The vapor valve line also runs right next to the fuel lines and runs up to the charcoal canister mounted on the passenger frame rail. The canister is not needed if you are not running emissions but it will keep the fumes at bay and it won't hurt or rob HP by using it. If you can get one, use it and hook up the vacuum lines.
Also do not forget to install the o2 sensors. If your exhaust doesn't have the bungs for the o2's to go into you can purchase them separately or buy a mid pipe and they will come with them already installed.
Now that your fuel system is complete, your intake is bolted on, and the ignition is complete it is almost time to start up. Go ahead and reinstall your radiator, coolant lines, and cooling fan. Make sure you bolt all the power connectors on at the start solenoid. Once you have double checked everything go ahead and reconnect the battery. Turn the key on but do not try and start it yet. You should hear the EEC relay click on, the fuel pump prime and then it shut off. If you don't you have an issue somewhere that can be address shortly. Now with the key on go ahead and set your TPS voltage. Now, to do a simple ignition check loosen the distributor hold down and remove the plug wire at the coil. Hold the wire above the coil and rotate the dizzy back and forth. You should get a spark from the wire to the coil. Be sure to wear a glove. Be sure to tighten the hold down back up once complete. The spark doesn't feel good lol. If you do have any issues with the above read through the crank but no start link I will provide from another website.
If everything checks out its time to start it up. You will want to cycle the key on and off a couple times to let the fuel system prime. Once you do that go ahead and turn the key and hopefully hear the motor purrrr..... After it does start go ahead and set your timing. Your idle might be higher or lower than normal but that will address shortly. Let the motor idle so you can check for any leaks. Once you don't have any leaks go ahead and do a base idle reset (follow the link provided).
EFI No Start
TPS Adjustment
Base Idle Reset
From here you should be good to go and drive your EFI mustang
Here are a couple diagrams for Emissions Stuff
Last edited by projectresto83; 10-05-2011 at 01:14 PM. Reason: Diagrams,links and pics added....
 01-01-2012, 02:58 PM
#3

Join Date: Jan 2012
Location: New Mexico
Posts: 1
Projectresto83 I just wanted to say thanks for the great write up and photos of the carb to EFI conversion. I am a diehard Mustang fan and have had 6 of them but currently am restoring a 1980 F100 and want to swap out the carbureted 4.9L engine and 4 speed in favor of a 5.0L EFI engine and 5 spd transmission. I've searched the truck forums and Googled everything I could think of but could not find an in depth article like yours. Even though I am not doing a Mustang I plan to buy a used Mustang to get the engine and transmission (I won't be towing anything with the F100) to transplant into the F100. Thanks for taking the time to document your swap. You just saved me many hours of work and lots of headaches.
01-01-2012, 03:12 PM
#4
M.A.D. Motorsports
Thread Starter
Join Date: Jul 2006
Location: Indiana
Posts: 8,014
Projectresto83 I just wanted to say thanks for the great write up and photos of the carb to EFI conversion. I am a diehard Mustang fan and have had 6 of them but currently am restoring a 1980 F100 and want to swap out the carbureted 4.9L engine and 4 speed in favor of a 5.0L EFI engine and 5 spd transmission. I've searched the truck forums and Googled everything I could think of but could not find an in depth article like yours. Even though I am not doing a Mustang I plan to buy a used Mustang to get the engine and transmission (I won't be towing anything with the F100) to transplant into the F100. Thanks for taking the time to document your swap. You just saved me many hours of work and lots of headaches.
03-10-2012, 03:13 PM
#5

Join Date: Mar 2012
Location: AZ
Posts: 14
OK so I need to get a fuel pump, so what model , brand am I looking to get, Any one know a low cost place online?
also I am sure there is other things I need to buy, question what?( have have the wiring, upper lower and the wiring has almost all the components.
I have two computers and I do not see the a9l, a9m or a9p on these computers.
Now the 83 has the bat on pass side and the starter solenoid, I understand that the new cars do not, they run on the drivers side, can I not just run extra wiring and keep bat, solenoid it there? I do not see your bat, so what did you do place it in the trunk?
today I am going to start removing stuff, and going to get to the laying out the wire part I am sure...
I am hopping for your guys insight and hope I am not getting over my head(lol)
This car has only 70k miles and gxl rag top, I pulled the t5 and run an aod, all the body work is done once this conversion is complete, the car is going to be painted and look stock.
03-10-2012, 03:48 PM
#6
Join Date: Mar 2012
Location: AZ
Posts: 14
you say "The first thing you need to do is disconnect the battery. Then bring the motor up to TDC on the compression stroke so you will have everything lined up for the other distributor. Then go ahead and drain the coolant and oil."
I can not use the stock distributor?
I can not use the stock distributor?
03-10-2012, 04:03 PM
#7
M.A.D. Motorsports
Thread Starter
Join Date: Jul 2006
Location: Indiana
Posts: 8,014
OK so I need to get a fuel pump, so what model , brand am I looking to get, Any one know a low cost place online?
also I am sure there is other things I need to buy, question what?( have have the wiring, upper lower and the wiring has almost all the components.
I have two computers and I do not see the a9l, a9m or a9p on these computers.
Now the 83 has the bat on pass side and the starter solenoid, I understand that the new cars do not, they run on the drivers side, can I not just run extra wiring and keep bat, solenoid it there? I do not see your bat, so what did you do place it in the trunk?
today I am going to start removing stuff, and going to get to the laying out the wire part I am sure...
I am hopping for your guys insight and hope I am not getting over my head(lol)
This car has only 70k miles and gxl rag top, I pulled the t5 and run an aod, all the body work is done once this conversion is complete, the car is going to be painted and look stock.
also I am sure there is other things I need to buy, question what?( have have the wiring, upper lower and the wiring has almost all the components.
I have two computers and I do not see the a9l, a9m or a9p on these computers.
Now the 83 has the bat on pass side and the starter solenoid, I understand that the new cars do not, they run on the drivers side, can I not just run extra wiring and keep bat, solenoid it there? I do not see your bat, so what did you do place it in the trunk?
today I am going to start removing stuff, and going to get to the laying out the wire part I am sure...
I am hopping for your guys insight and hope I am not getting over my head(lol)
This car has only 70k miles and gxl rag top, I pulled the t5 and run an aod, all the body work is done once this conversion is complete, the car is going to be painted and look stock.
BBK, Trick Flow, Walbro, FRPP...all of them will work just fine. Depending on what your mods will be a 190lph pump will be fine. They are all just over $100.
As for your other components...go through my list and figure out what you do and do not have.
Where did you get the ECU's from? The markings are on the sticker that is supposed to be on the end of them. Off the top of my head I do not know any other way to ID them...
The EFI swap is not at all hard. SO LONG as you have the correct wiring and know how to look at a schematic to connect anything that might not be exact since you are going from a 4 eye to aero body wiring.
If you have any more questions please put them in the 5.0 General Discussion section.
 05-20-2017, 08:35 AM
#9
6th Gear Member
Join Date: Mar 2010
Location: Wisconsin
Posts: 5,061
Welcome to the forum.
Check out the dates on the threads before replying. Digging up old threads makes us all have to re-read the whole thread to understand just your question. We've all done it once .........ONCE !!!
lol.
Your AOD harness will work on a T5. When I did my swap, there was one electrical connection on the T5 (neutral safety switch) I think ??? I had to do some research on what wires go where to make that work, but it wasn't that bad at all.
EDIT: I misunderstood your question, you asked about the HEGO harness. I'm not sure of the difference, but I didn't have to swap any harness when I did my T5 swap. That was 8 yrs ago, but I reused all AOD wiringwith some splicing as I said earlier.
Good luck
Last edited by 88 orangepeel notch; 05-20-2017 at 08:42 AM.
11-06-2022, 11:04 AM
#10

O2 Harness Repin Diagram

Last edited by wbrockstar; 11-06-2022 at 11:31 AM.

Thread
Thread Starter
Forum
Replies
Last Post
dochawk
4.6L General Discussion
2
06-19-2022 10:06 AM
89FoxFan
5.0L (1979-1995) Mustang
5
05-11-2020 10:18 PM
The rent man
5.0L (1979-1995) Mustang
0
10-12-2010 05:22 PM