$233.93 rack and pinion w/pics (well almost)
 05-07-2009, 08:53 AM
#11
5th Gear Member
Join Date: Jul 2007
Location: Detroit; where the weak are killed and eaten.
Posts: 2,553
Start building them. Before you button everything up and have a harder time removing it all, make duplicates of your Tell everyone where to get the other parts, then sell your brackets for another $50 tacked on for your time (just to trace a couple brackets)
I'd buy a set. You'd make enough just off the members here alone to cover your TOTAL cost of your system in your car, and that doesn't even touch what you could make on ebay.
Just a thought.
I'd buy a set. You'd make enough just off the members here alone to cover your TOTAL cost of your system in your car, and that doesn't even touch what you could make on ebay.
Just a thought.
 05-07-2009, 09:44 AM
#12
2nd Gear Member

Join Date: Jan 2008
Location: Ontario & Michigan
Posts: 315
I seconds that. With a little research you could probably put a kit together with the brackets, drawings/specifications and a list of rack and pinion system that would work.
05-07-2009, 09:52 AM
#13
5th Gear Member
Join Date: Feb 2007
Location: Ramona, CA
Posts: 2,682
Yep,, Im tired of my leaky ram.. and the dead spot too. Rack and pinion at that price would be great. YOu could powdercoat the kit for pretty cheap too.
05-07-2009, 10:40 AM
#14
3rd Gear Member
Thread Starter

Join Date: Oct 2007
Location: Illinois
Posts: 584
Thanks guys. I do plan on making some dimensioned drawings of the brackets and giving more detail of all the steps in the modification. I figure there are a lot of guys like me that want rack and pinion, but don't want the high price of the store bought units. Therefore I planned from the beginning to make the drawings available free of charge to anyone that wants to build it. I have a few things I would want to check before I do that though and the drawings would be "use at your own risk". I'm guessing I can have done what I want to and get the drawings done by the end of the month. As far as producing the brackets, I'm not really interested in that right now because I just have too much going on. The brackets are really simple and can be made with a cut-off wheel, drill and welder if you had to. You could even make the pieces and take it to a welding shop for that step. The only part that required machining was the bearing holder for the steering column. You can't see this part in the pictures, but it is basically an aluminum donut that the bearing is pressed into and keeps the bearing centered in the outer steering column tube.
05-07-2009, 11:48 AM
#15
2nd Gear Member
Join Date: Jan 2008
Location: Ontario & Michigan
Posts: 315
What year/model was the rack pulled from?
05-07-2009, 01:54 PM
#16
3rd Gear Member
Thread Starter
Join Date: Oct 2007
Location: Illinois
Posts: 584
The rack I have was pulled from a 1992 Chevy Cavalier. This part cross references to several different GM cars. Here is a list I found online that shows what cars use the same rack:
- 1982-1989 Buick Skyhawk
- 1986-1993 Buick Skylark
- 1986-1987 Buick Somerset
- 1985-1985 Buick Somerset Regal
- 1982-1986 Cadillac Cimarron
- 1991-1993 Chevrolet Beretta
- 1982-1993 Chevrolet Cavalier
- 1987-1993 Chevrolet Corsica
- 1992-1993 Oldsmobile Achieva
- 1985-1987 Oldsmobile Calais
- 1985-1991 Oldsmobile Cutlass Calais
- 1982-1988 Oldsmobile Firenza
- 1985-1991 Pontiac Grand Am
- 1982-1986 Pontiac J2000
- 1984-1985 Pontiac J2000 Sunbird
- 1986-1993 Pontiac Sunbird
05-20-2009, 09:46 PM
#17
3rd Gear Member
Thread Starter
Join Date: Oct 2007
Location: Illinois
Posts: 584
Update:
Well I finally got time to temporarily install the engine and transmission to check the clearances of parts and pieces of the rack to the engine. Everything clears but some stuff is tooooooooo close. Not a big deal but I will have to fabricate up some new brackets to get it to have adequate clearance. Everything clears the engine and transmission itself beautifully. The header is the problem. I could probably just get some shorty headers and everything would be fine but I want to make it work at least with the long tube headers I already have.
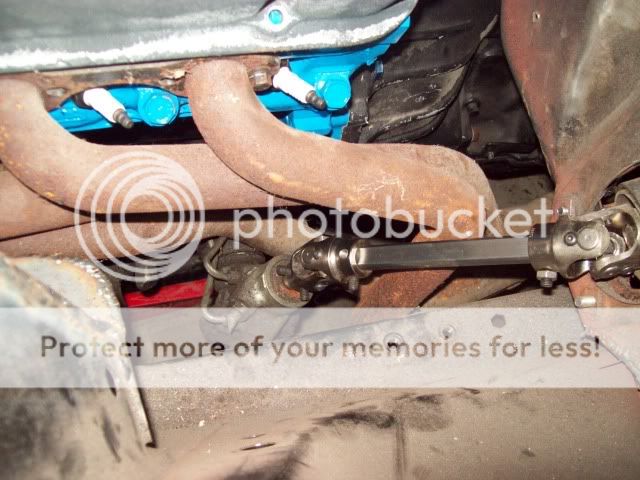
You can see in the pictures that the DD steering shaft clears the long tube headers, but there is only about 1/16" of clearance right now. The other problem is that the flexible bellows that cover the rack are only about 1/8" from the header. Can you say melt!!! Before anyone asks, the headers came with the car and I don't know what brand they are.
My plan is to make some new brackets that will move the rack forward about 1/2 to 3/4", rotate it forward a touch, and move it about 1/4" to the left. As I said before, once I get it sorted out I will post drawings of the brackets.
Anyway, here are some pictures:
Looks good from this angle doesn't it.
Not so good from a slightly different angle.

Everything clears the engine and transmission itself. BTW, in another thread someone had a stripped oil drain and in the picture you can see the way I modify all my oil pans if they ever come off the engine. There is a 1/2" nut welded to the oil pan and then I use either a copper, aluminum, or plastic sealing washer and a short 1/2" bolt for a drain plug.

Here you can see the bellows and the lack of clearance to the header.

Well I finally got time to temporarily install the engine and transmission to check the clearances of parts and pieces of the rack to the engine. Everything clears but some stuff is tooooooooo close. Not a big deal but I will have to fabricate up some new brackets to get it to have adequate clearance. Everything clears the engine and transmission itself beautifully. The header is the problem. I could probably just get some shorty headers and everything would be fine but I want to make it work at least with the long tube headers I already have.
You can see in the pictures that the DD steering shaft clears the long tube headers, but there is only about 1/16" of clearance right now. The other problem is that the flexible bellows that cover the rack are only about 1/8" from the header. Can you say melt!!! Before anyone asks, the headers came with the car and I don't know what brand they are.
My plan is to make some new brackets that will move the rack forward about 1/2 to 3/4", rotate it forward a touch, and move it about 1/4" to the left. As I said before, once I get it sorted out I will post drawings of the brackets.
Anyway, here are some pictures:
Looks good from this angle doesn't it.
Not so good from a slightly different angle.
Everything clears the engine and transmission itself. BTW, in another thread someone had a stripped oil drain and in the picture you can see the way I modify all my oil pans if they ever come off the engine. There is a 1/2" nut welded to the oil pan and then I use either a copper, aluminum, or plastic sealing washer and a short 1/2" bolt for a drain plug.
Here you can see the bellows and the lack of clearance to the header.
Last edited by 109jb; 05-20-2009 at 09:48 PM.
05-21-2009, 03:02 PM
#18
2nd Gear Member
Join Date: May 2008
Location: Washington
Posts: 323
What sort of brakes do you have? The reason I ask is because I am doing a swap from drums to disc that I picked up at a show. Guy said they came off another mustang, ran the numbers and they did come from a ford car in the 60's so I should be safe. Did that cause a problem with the tie rods and missing center link? I am anxious to see your specs when it is all said and done! I too own a 1970 mustang, coupe not fastback though, and wanted to try something like this out myself. Hope things fit a little better next time!
Last edited by Stangman70; 05-21-2009 at 03:04 PM.
05-21-2009, 03:16 PM
#19
3rd Gear Member
Thread Starter
Join Date: Oct 2007
Location: Illinois
Posts: 584
What sort of brakes do you have? The reason I ask is because I am doing a swap from drums to disc that I picked up at a show. Guy said they came off another mustang, ran the numbers and they did come from a ford car in the 60's so I should be safe. Did that cause a problem with the tie rods and missing center link? I am anxious to see your specs when it is all said and done! I too own a 1970 mustang, coupe not fastback though, and wanted to try something like this out myself. Hope things fit a little better next time!
05-21-2009, 03:25 PM
#20
6th Gear Member

Join Date: Oct 2006
Location: Cork, Ireland
Posts: 6,417
ohhh that's very close to header.
looks like you unmounted the clutch z-bar. any solution for that?
never mind ... just saw you have an automatic :-]
make sure to point out in the drawing that it won't clear clutch equalizer bar. So either auto or maybe will work with cable operated clutch ...
looks like you unmounted the clutch z-bar. any solution for that?
never mind ... just saw you have an automatic :-]
make sure to point out in the drawing that it won't clear clutch equalizer bar. So either auto or maybe will work with cable operated clutch ...
Last edited by kalli; 05-21-2009 at 03:30 PM.

