Resto-mod project
 05-03-2011, 11:57 AM
#251
4th Gear Member
Thread Starter
Join Date: Apr 2010
Location: Madison, Georgia
Posts: 1,643
On your patch pieces in the body only use the grinder to take away about 80% of the weld height. Then use a 40 grit flap wheel to take it down close to the metal surface and finish it with an 80 flap wheel. Don't use the grinder and nick the finished surface like you did. It will turn out much better and be less work.
 05-03-2011, 05:20 PM
#252
2nd Gear Member

Join Date: Feb 2010
Location: Ohio
Posts: 315
simply adjust the one bracket on the front and back so that the pivot point is about the center of mass for your car.
imagine trying to balance a 10 foot pole with one hand at a location 1 foot from the end versus near the center of its mass.
the following picture of mine shows where it was the happiest you almost won't need a latch if you don't push on it. each car will be slightly different.


imagine trying to balance a 10 foot pole with one hand at a location 1 foot from the end versus near the center of its mass.
the following picture of mine shows where it was the happiest you almost won't need a latch if you don't push on it. each car will be slightly different.
05-03-2011, 08:17 PM
#253
4th Gear Member
Thread Starter
Join Date: Apr 2010
Location: Madison, Georgia
Posts: 1,643
Adjust in which way? Vertically or horizontally? And do you mean adjust one side in the front and the opposite side in the back? Or both sides?
Sorry for the questions but we spent a lot of time fabricating the attachments for the bumper mounts so I'm hesitant to change things.
Sorry for the questions but we spent a lot of time fabricating the attachments for the bumper mounts so I'm hesitant to change things.
05-03-2011, 08:42 PM
#254
2nd Gear Member
Join Date: Feb 2010
Location: Ohio
Posts: 315
Adjust in which way? Vertically or horizontally? And do you mean adjust one side in the front and the opposite side in the back? Or both sides?
Sorry for the questions but we spent a lot of time fabricating the attachments for the bumper mounts so I'm hesitant to change things.
Sorry for the questions but we spent a lot of time fabricating the attachments for the bumper mounts so I'm hesitant to change things.
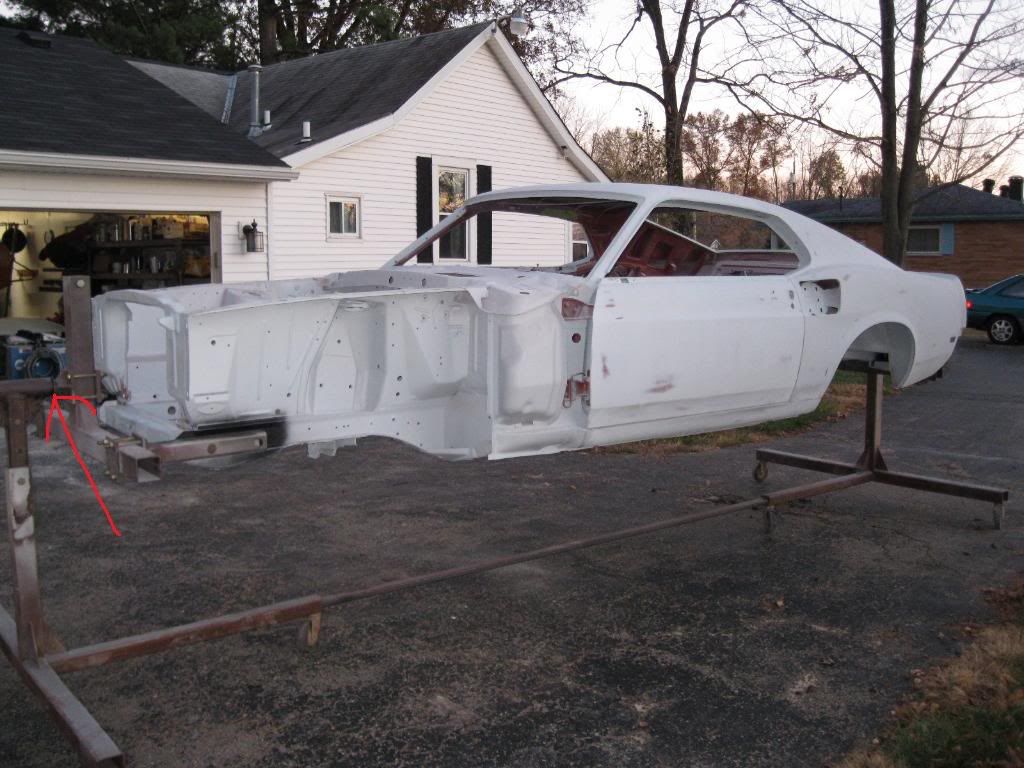
see the arrow in the following picture? that's the axis. you want that axis going through the center of mass of the car. right now your car is way to low on the axis so most of the mass is on the bottom. if you don't lock your pin your car the way it's positioned will want to naturally spin to have the bottom towards the floor. raise the car too high on that imaginary axis line and the roof will want to naturally rotate towards the floor. move the axis to far right on the car and the opposite side will rotate towards the floor.
adjust up/down/left/right until you find that balancing point.
if you were to rotisserie roast a hog would you put the pin in the center of the pig or would you put it all the way to one side?
 05-03-2011, 09:17 PM
#255
4th Gear Member
Thread Starter
Join Date: Apr 2010
Location: Madison, Georgia
Posts: 1,643
Ahhhh, now I see what you mean. That makes perfect sense! Thanks for the tip! I'll adjust it ASAP.
Btw I'm super jealous of your '69, that's my favorite year of mustang, for the fastback. Don't care too much for the '69 Coupe, I like '68 Coupes best of all.
Btw I'm super jealous of your '69, that's my favorite year of mustang, for the fastback. Don't care too much for the '69 Coupe, I like '68 Coupes best of all.
05-10-2011, 02:12 PM
#256
4th Gear Member
Thread Starter
Join Date: Apr 2010
Location: Madison, Georgia
Posts: 1,643
ANDDDDDDDDDDDDDDDDDDDDDD, done, finally with those stupid patches. But guess what, I have to fill ALL the little holes from the bumper guard trim that used to be on the doors and fender. I'm considering trashing my fenders and using the ones off my '67 cause they're in great condition and actually have all the emblems drilled for a '68.
Also have two small patches to do in the door.
Anyways, here's my final patch on the quarters, sorry the second pic came out bad. You'd think I'm trying to cover up my bad work, but I'll admit up front my patches look like crap anyways. It'll call for some bondo like any other patch.


AT LAST I can get to the underside! Media Blasting should start soon. Gotta sort the last of my problems with the air lines.
Also picked up a set of rims for a steal. Will update when I receive them.
Also have two small patches to do in the door.
Anyways, here's my final patch on the quarters, sorry the second pic came out bad. You'd think I'm trying to cover up my bad work, but I'll admit up front my patches look like crap anyways. It'll call for some bondo like any other patch.
AT LAST I can get to the underside! Media Blasting should start soon. Gotta sort the last of my problems with the air lines.
Also picked up a set of rims for a steal. Will update when I receive them.
06-01-2011, 08:38 PM
#258
5th Gear Member
Join Date: Aug 2007
Location: PA
Posts: 2,243
How did you weld your cowl in?
Did you buy welded together cowl or did you get the separate 2 part cowl?
I got a full welded together Dynacorn cowl with mine. Did you have to drill about 180 holes through the whole cowl and weld it in?
What did you do with the all the holes drilled in the lower cowl? Weld them up before putting the new one on?
I noticed my new '65 cowl has 4 bolting points for the fresh air vent compared to the 3 hole fresh air vent that is stock, so I got to do something about that when I go to do it.
Lynn
06-01-2011, 08:45 PM
#259
5th Gear Member
Join Date: Aug 2007
Location: PA
Posts: 2,243
No offense, but I've discovered weld through primer is pure evil....
I have nothing but trouble with it even if it scraped from the area of parts to be welded. I'll blow chunks out of new metal like a someone taking a bite of a sandwich. No matter how I dial my MIG in I have problems. I remove the stuff completely or better yet, don't use it and I have zero problems.
I should have listened to the guy that shown me how to weld and not use the stuff. He said to just weld the clean metal and seal the edges with sealer and your good to go, he called weld through primer nothing but a gimmick to sell people a product. The more people I have talked to about it have said the same thing.
So I threw mine out and I'll never look back.
Lynn
11-11-2011, 09:46 AM
#260
4th Gear Member
Thread Starter
Join Date: Apr 2010
Location: Madison, Georgia
Posts: 1,643
How did you weld your cowl in?
Did you buy welded together cowl or did you get the separate 2 part cowl?
I got a full welded together Dynacorn cowl with mine. Did you have to drill about 180 holes through the whole cowl and weld it in?
What did you do with the all the holes drilled in the lower cowl? Weld them up before putting the new one on?
I noticed my new '65 cowl has 4 bolting points for the fresh air vent compared to the 3 hole fresh air vent that is stock, so I got to do something about that when I go to do it.
Lynn
Did you buy welded together cowl or did you get the separate 2 part cowl?
I got a full welded together Dynacorn cowl with mine. Did you have to drill about 180 holes through the whole cowl and weld it in?
What did you do with the all the holes drilled in the lower cowl? Weld them up before putting the new one on?
I noticed my new '65 cowl has 4 bolting points for the fresh air vent compared to the 3 hole fresh air vent that is stock, so I got to do something about that when I go to do it.
Lynn
Sorry it's taken so long to get back to you. I've been 200 miles away from my 'stang at college, so I've yet to get back to work on it.
Anyways, I ordered a Dynacorn welded together cowl. Most people separate them and re-weld them together after treating the inside with extra rust proofing. I just left mine alone cause I didn't want to mess them up. And yes I drilled over 100 holes and welded it in, as well as welding the seams around in many places. It's not pretty but after grinding and body work it'll look fine.
No offense, but I've discovered weld through primer is pure evil....
I have nothing but trouble with it even if it scraped from the area of parts to be welded. I'll blow chunks out of new metal like a someone taking a bite of a sandwich. No matter how I dial my MIG in I have problems. I remove the stuff completely or better yet, don't use it and I have zero problems.
I should have listened to the guy that shown me how to weld and not use the stuff. He said to just weld the clean metal and seal the edges with sealer and your good to go, he called weld through primer nothing but a gimmick to sell people a product. The more people I have talked to about it have said the same thing.
So I threw mine out and I'll never look back.
Lynn
I have nothing but trouble with it even if it scraped from the area of parts to be welded. I'll blow chunks out of new metal like a someone taking a bite of a sandwich. No matter how I dial my MIG in I have problems. I remove the stuff completely or better yet, don't use it and I have zero problems.
I should have listened to the guy that shown me how to weld and not use the stuff. He said to just weld the clean metal and seal the edges with sealer and your good to go, he called weld through primer nothing but a gimmick to sell people a product. The more people I have talked to about it have said the same thing.
So I threw mine out and I'll never look back.
Lynn

I hope to get back to work on the mustang in december. I've got a month off from college, so it should be a chance to freeze my butt off while hopefully finishing the underside of the car.