A woman's project: 68 Fastback

 02-13-2014, 05:00 AM
#932
3rd Gear Member
Thread Starter
Join Date: Sep 2009
Location: Ohio
Posts: 756
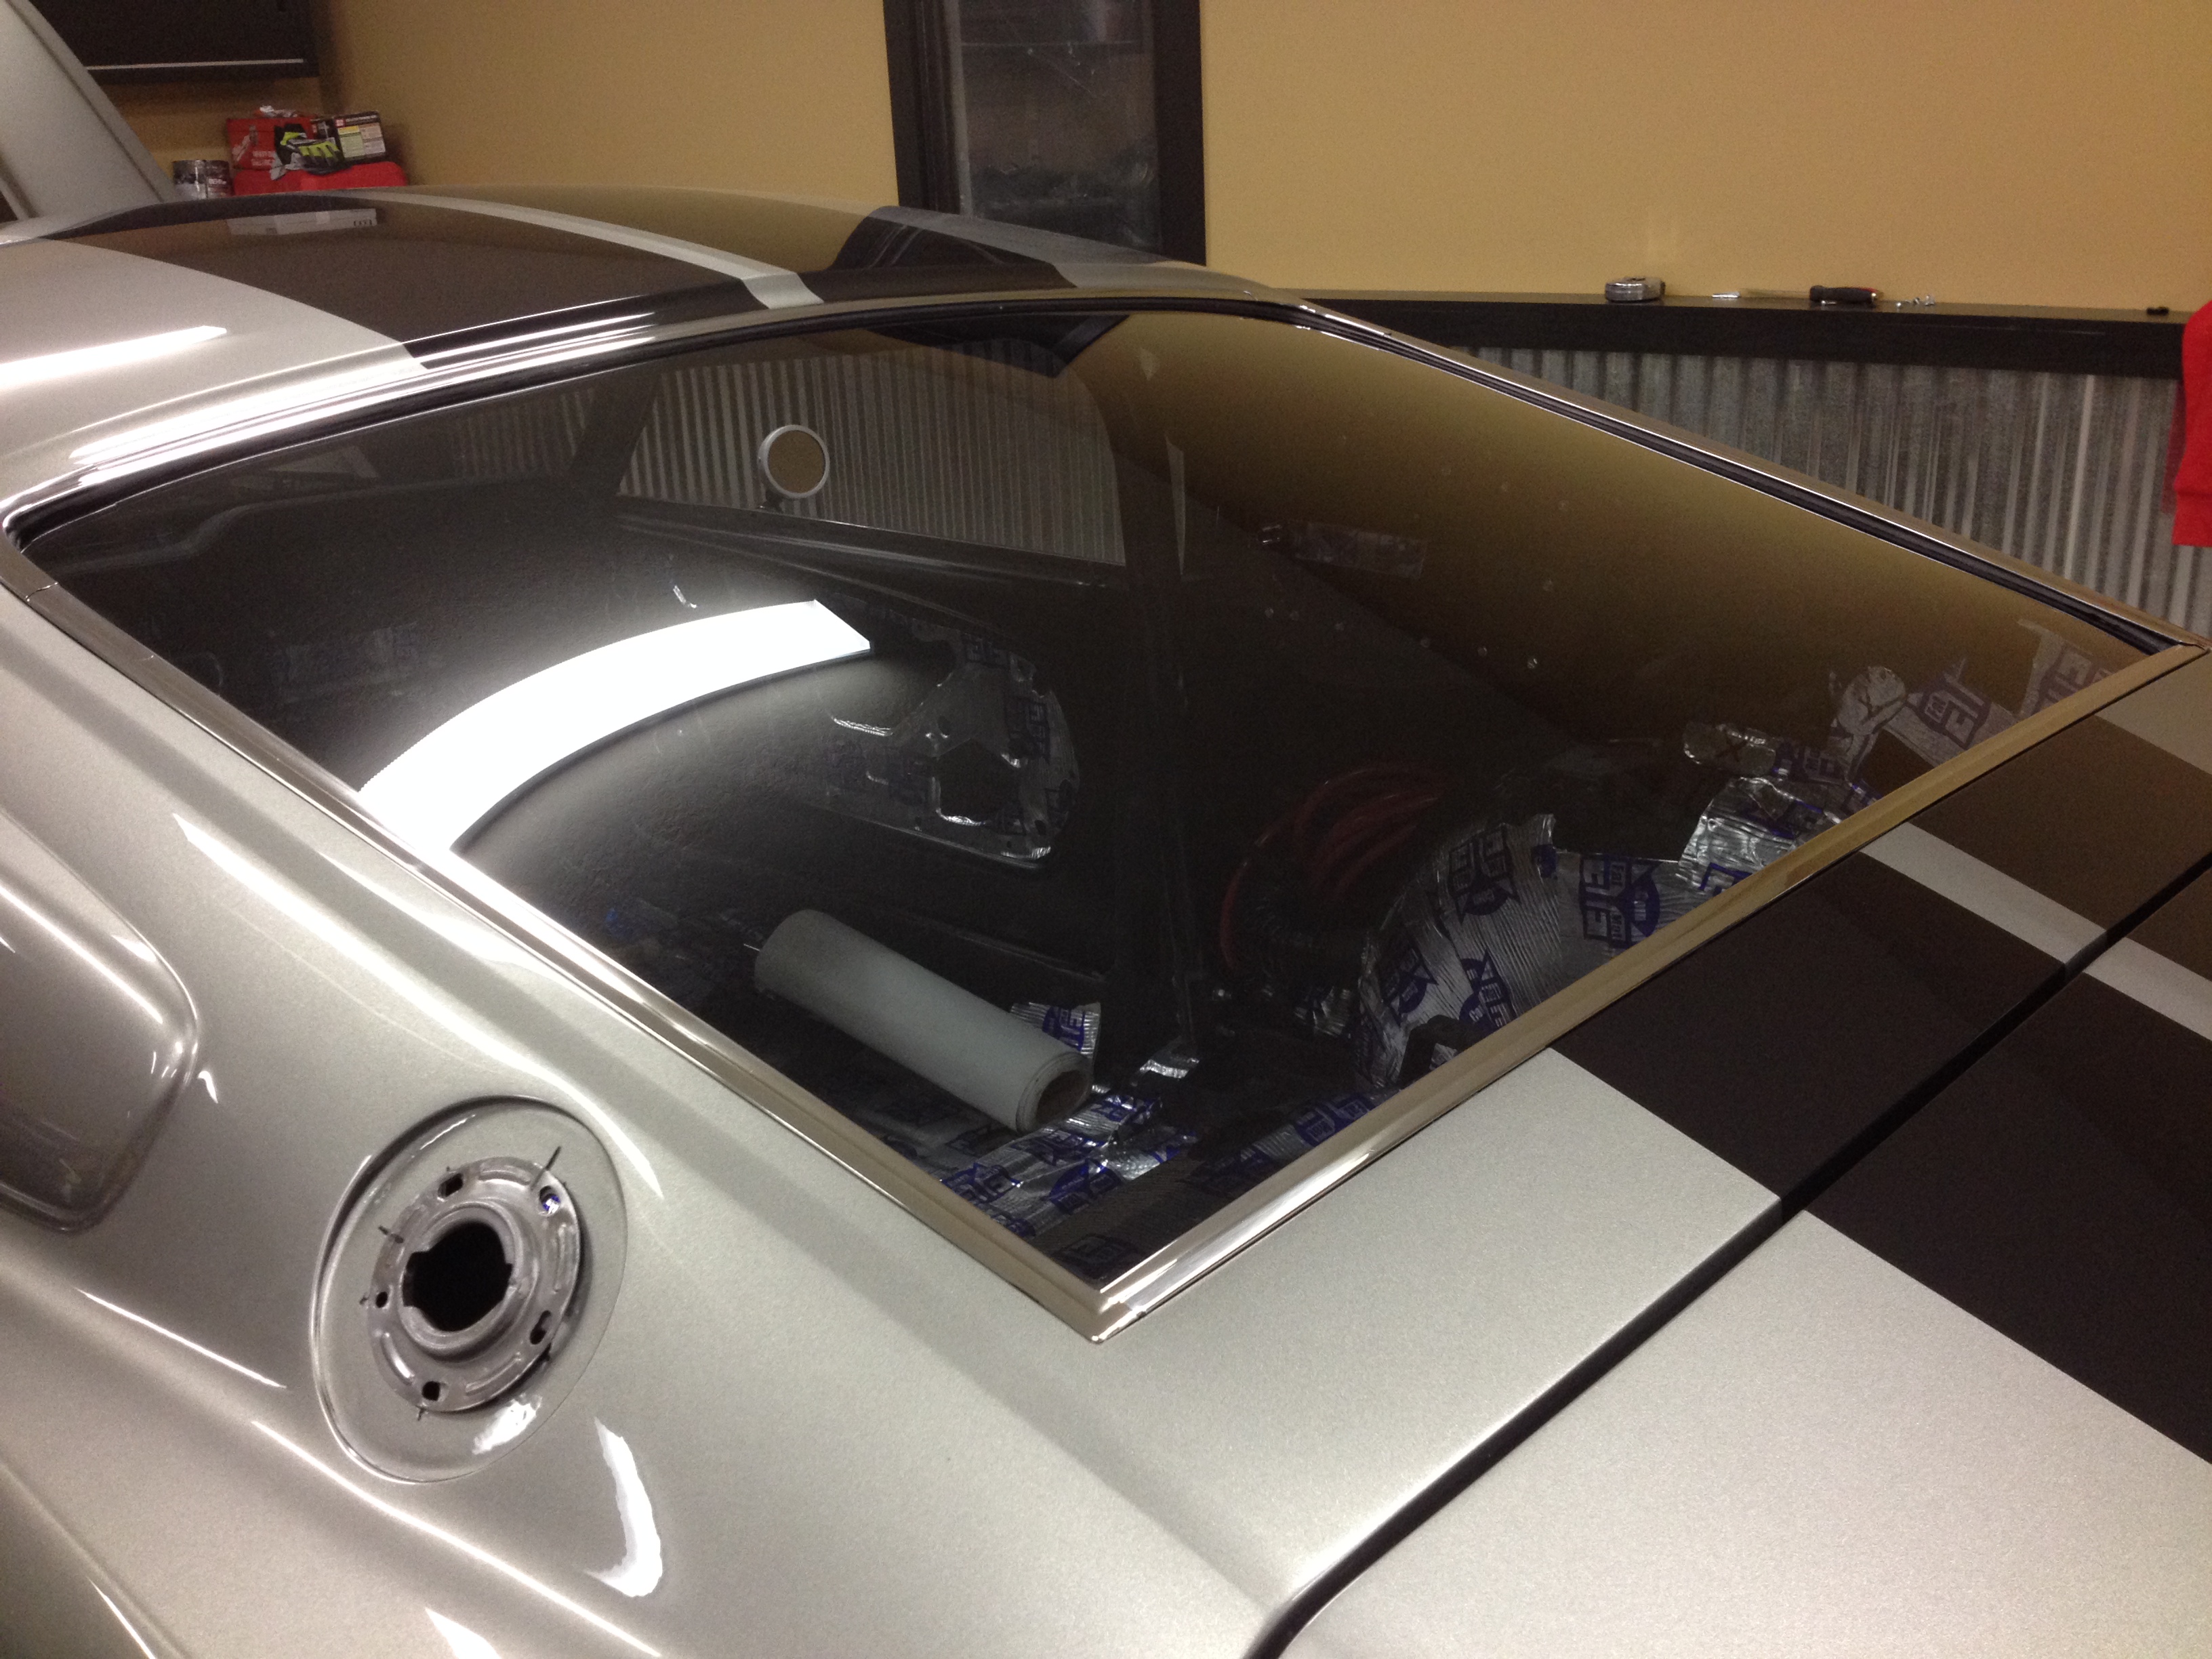
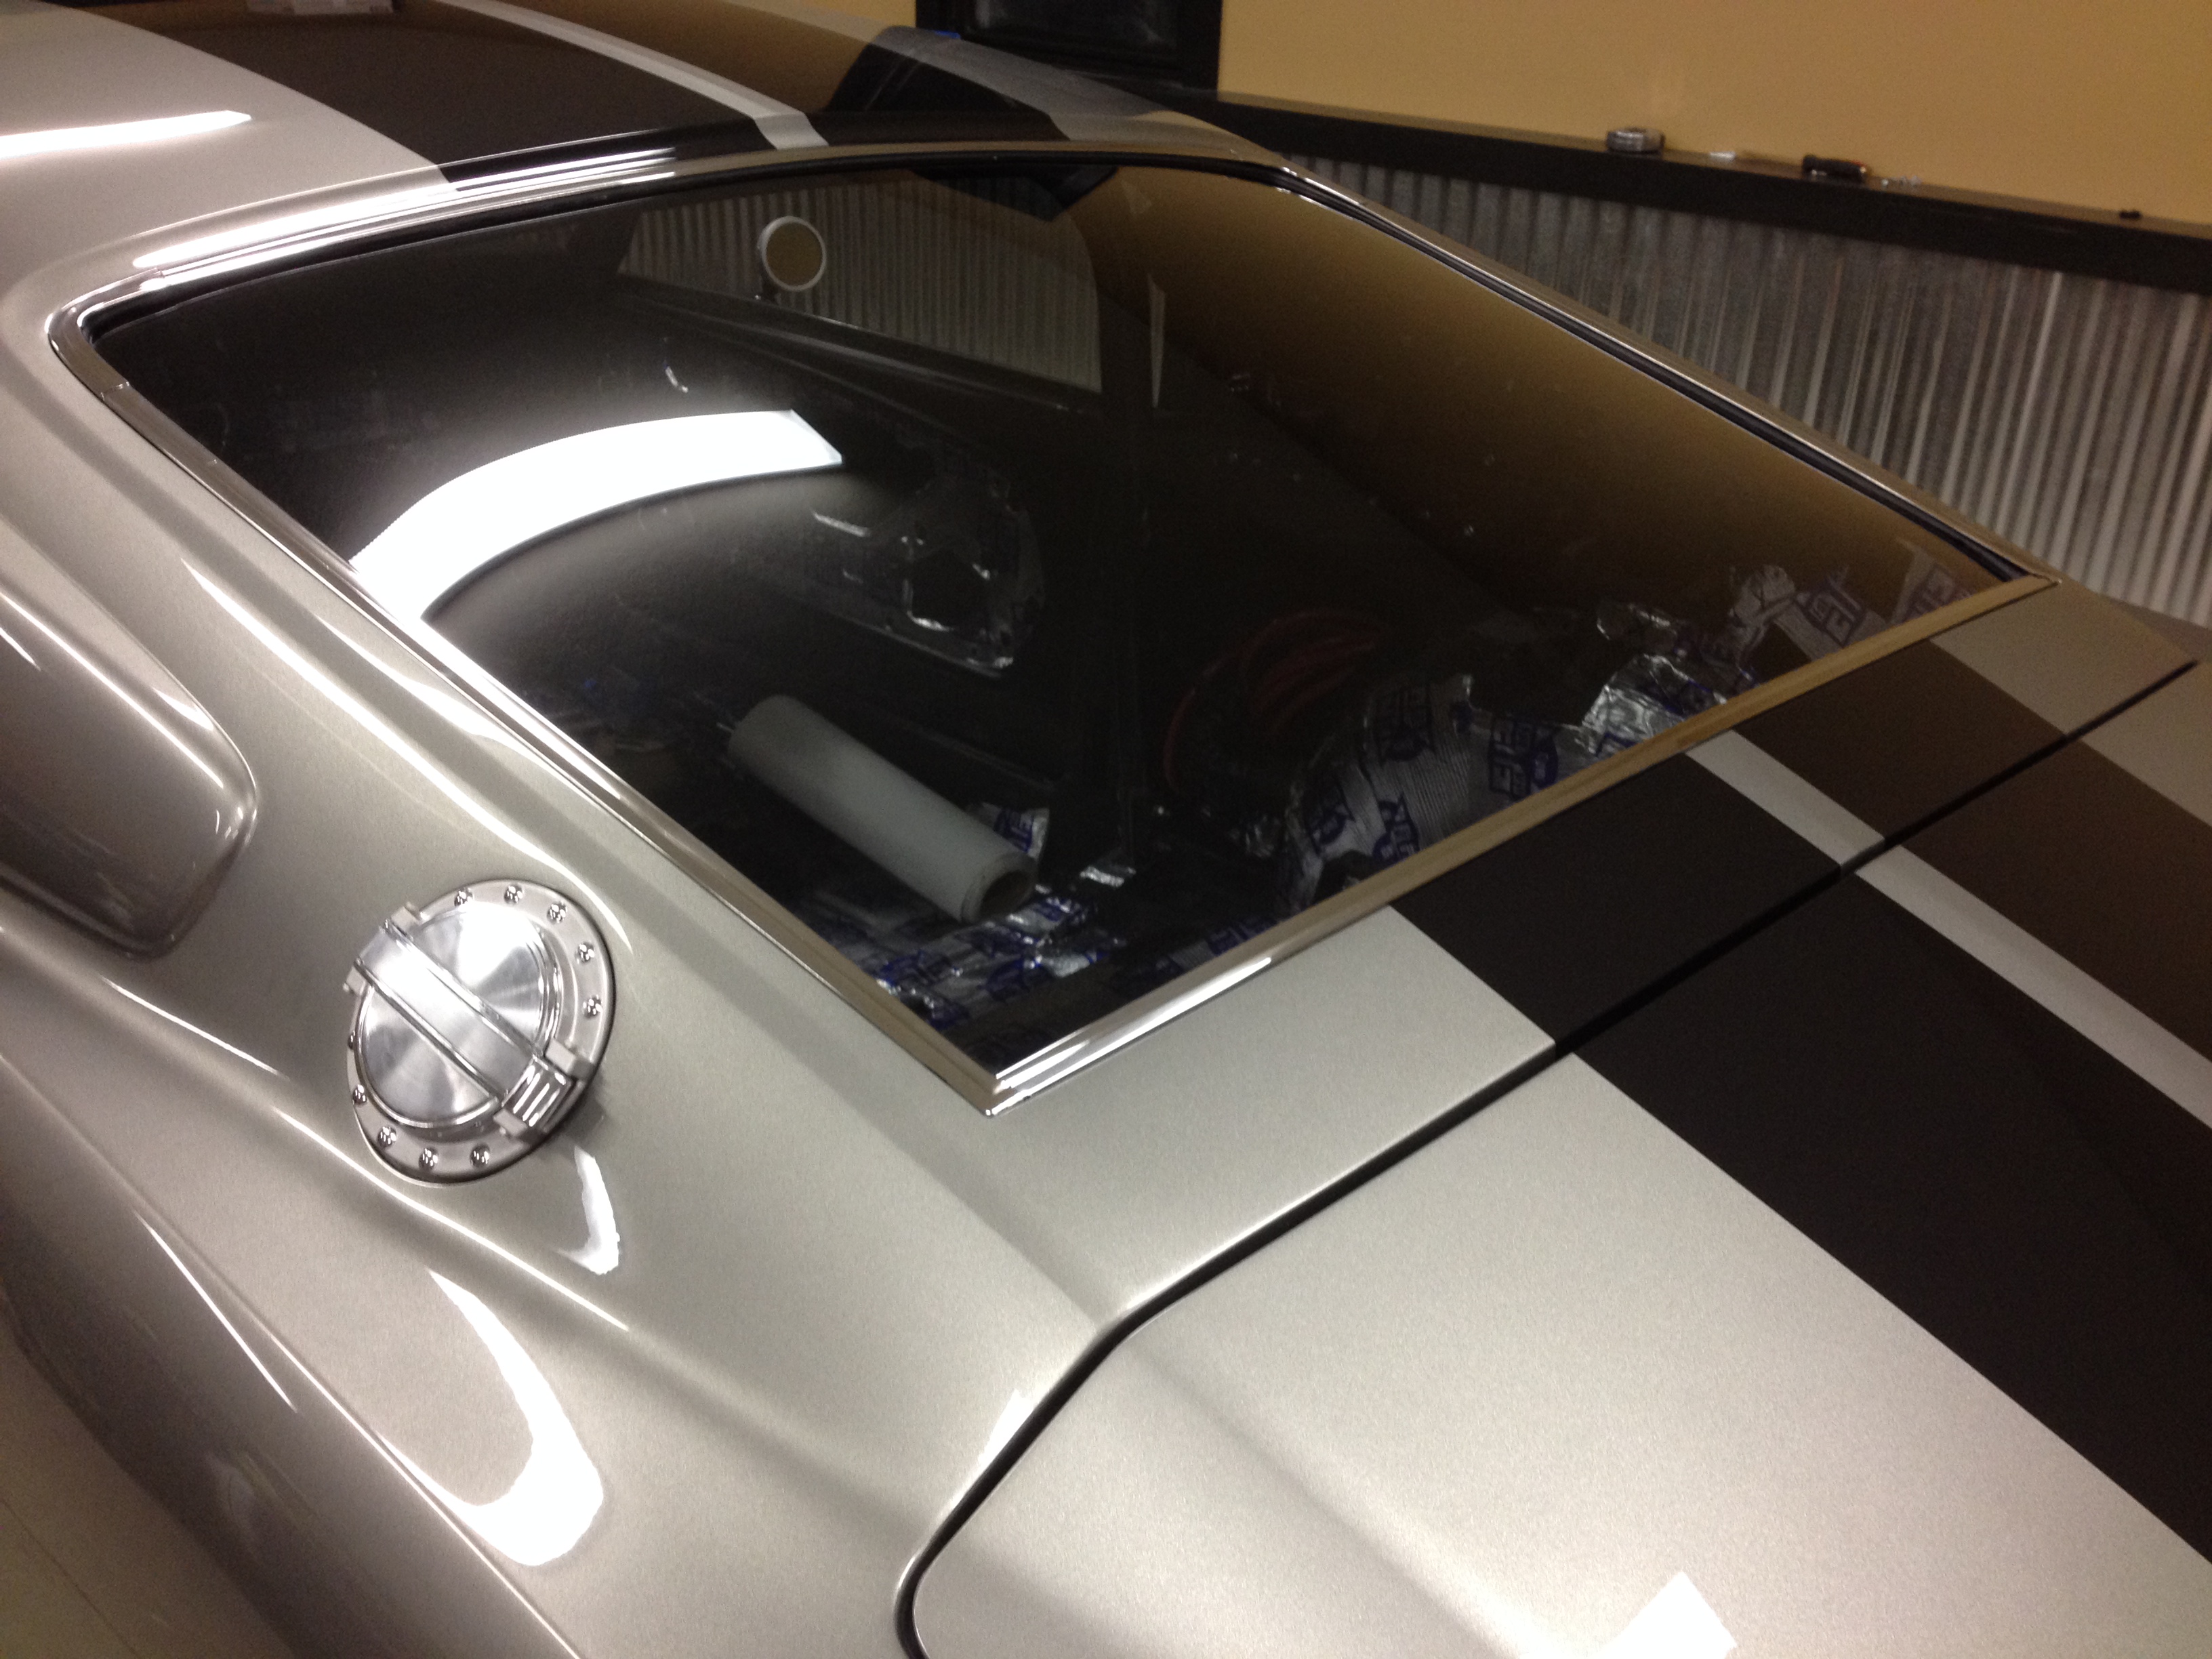
We installed the back glass this past weekend. A friend of ours works at a restoration shop offered to polish up the stainless window trim. There isn't too much original on the car but the trim happens to be one of them. He did a great job, they look awesome.

 02-20-2014, 07:38 AM
#934
3rd Gear Member
Thread Starter
Join Date: Sep 2009
Location: Ohio
Posts: 756
Thanks for the kind words Need4Speed!
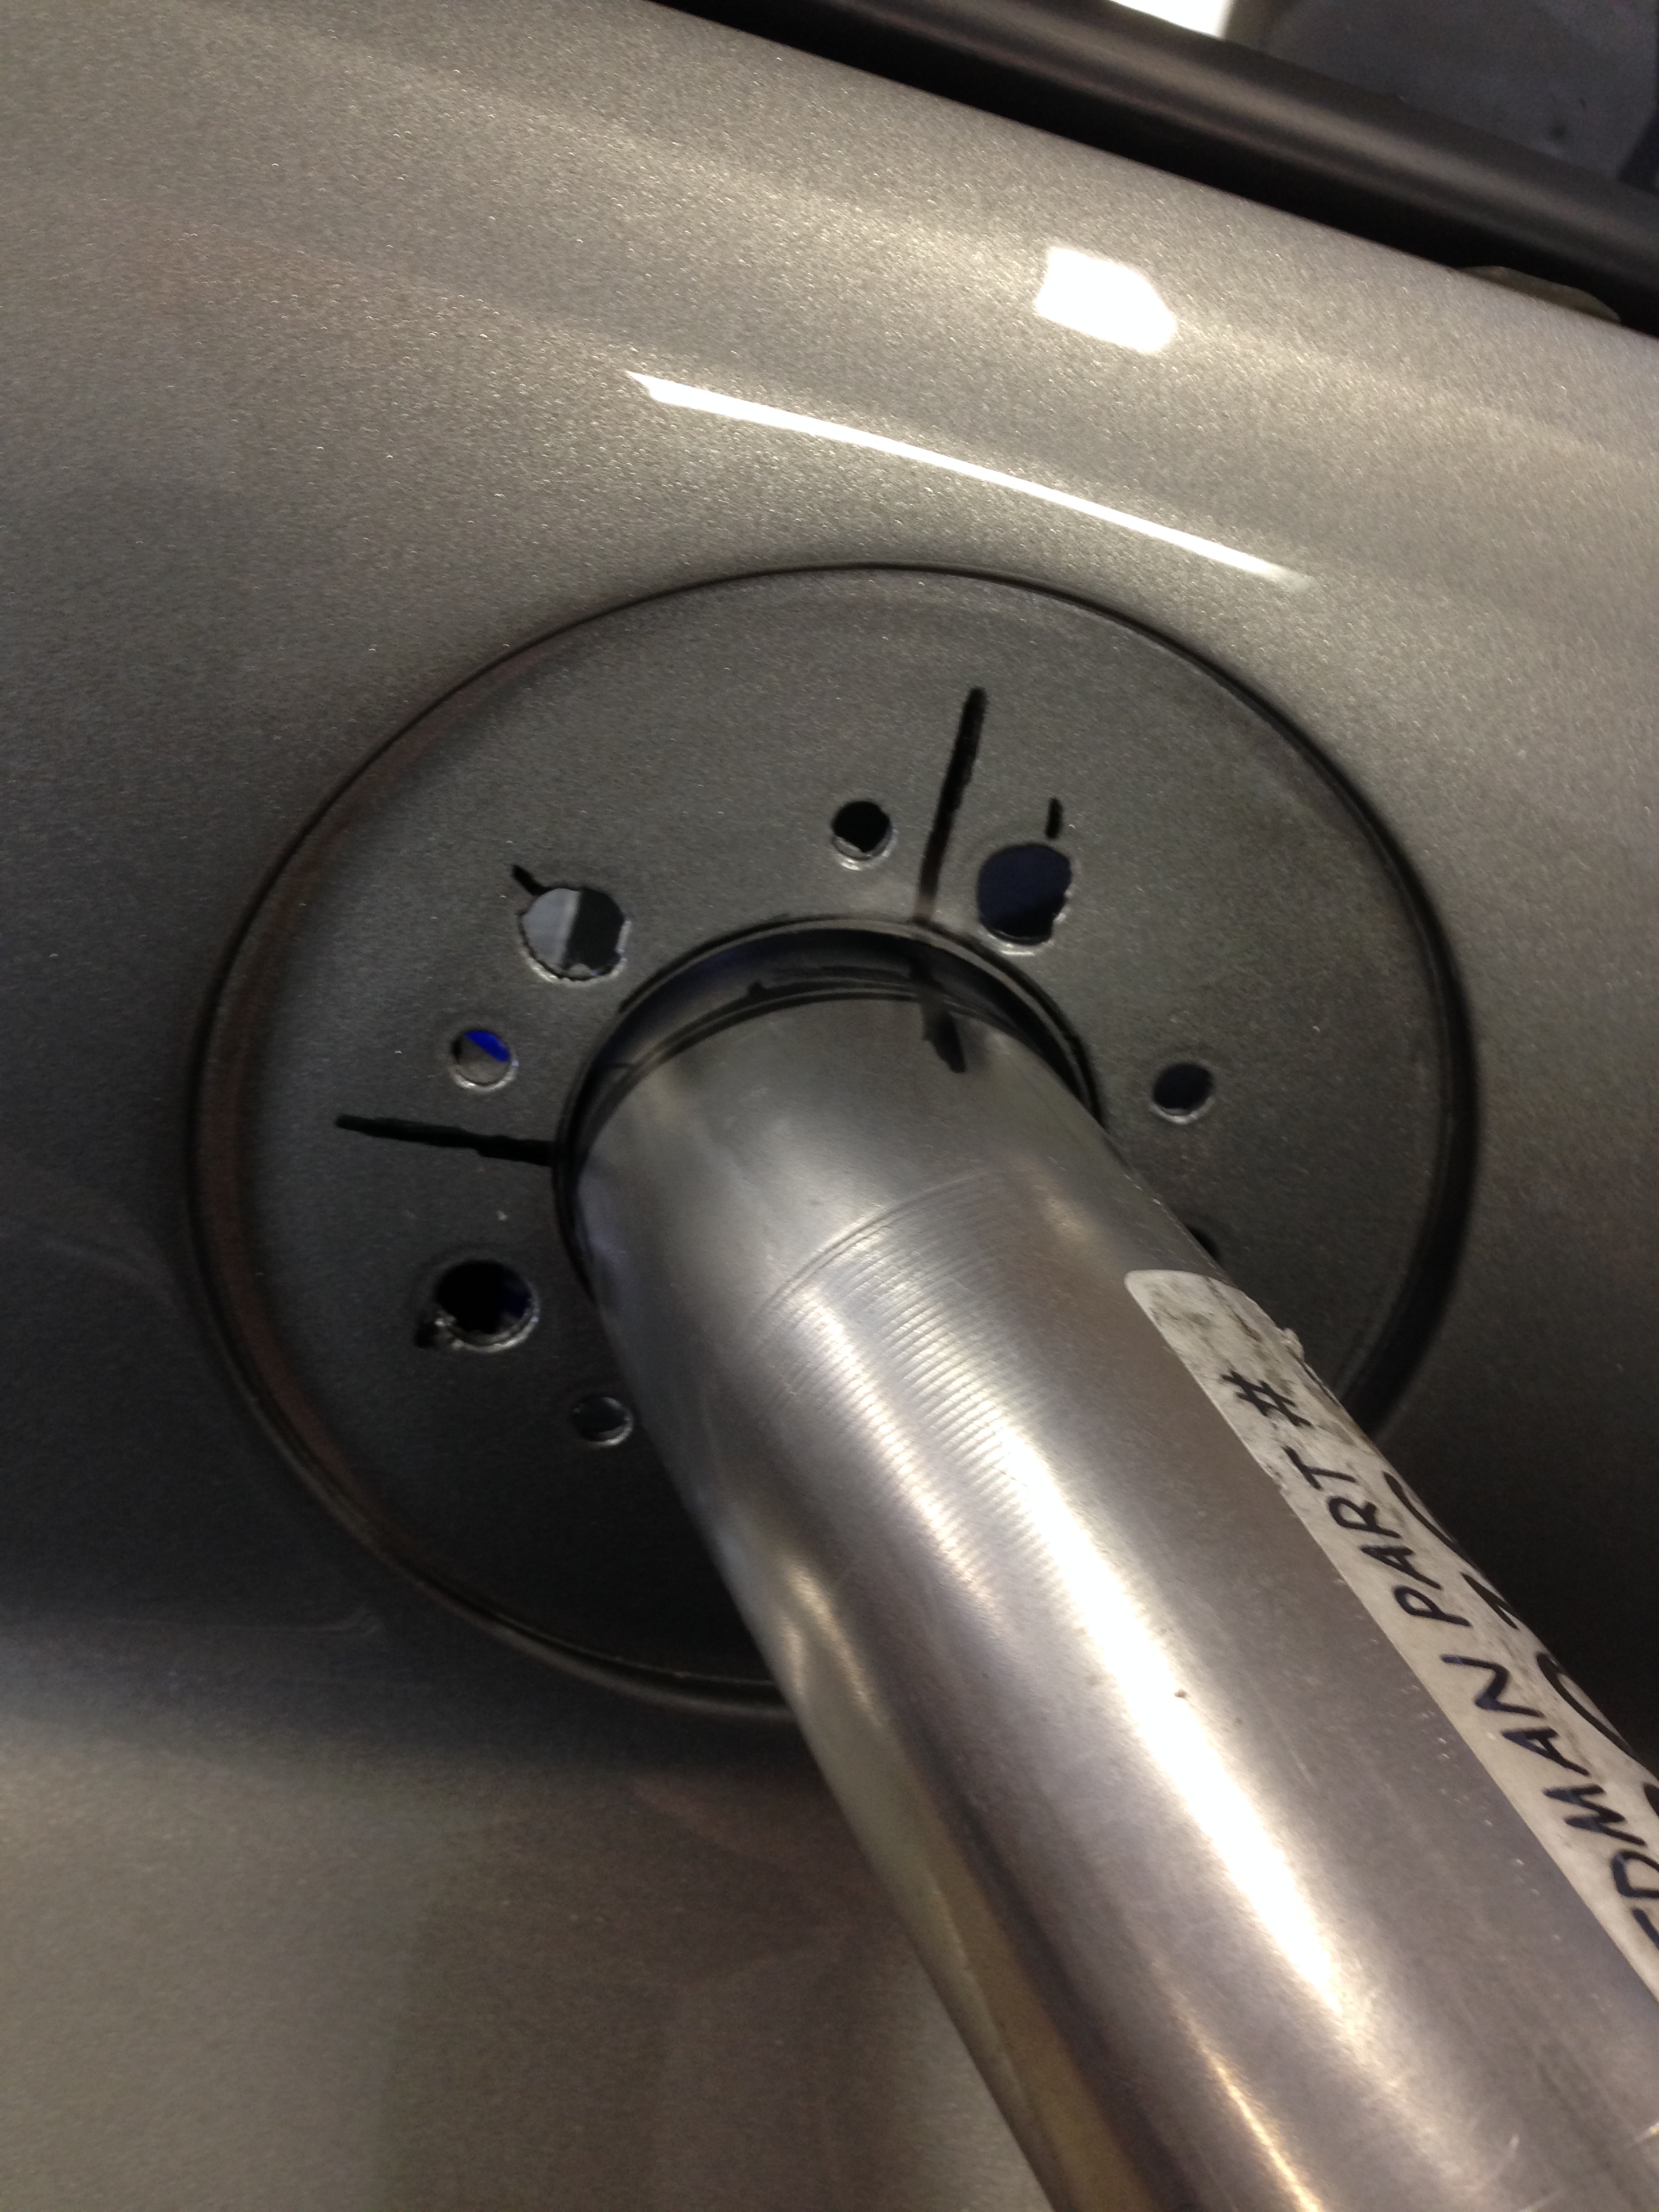
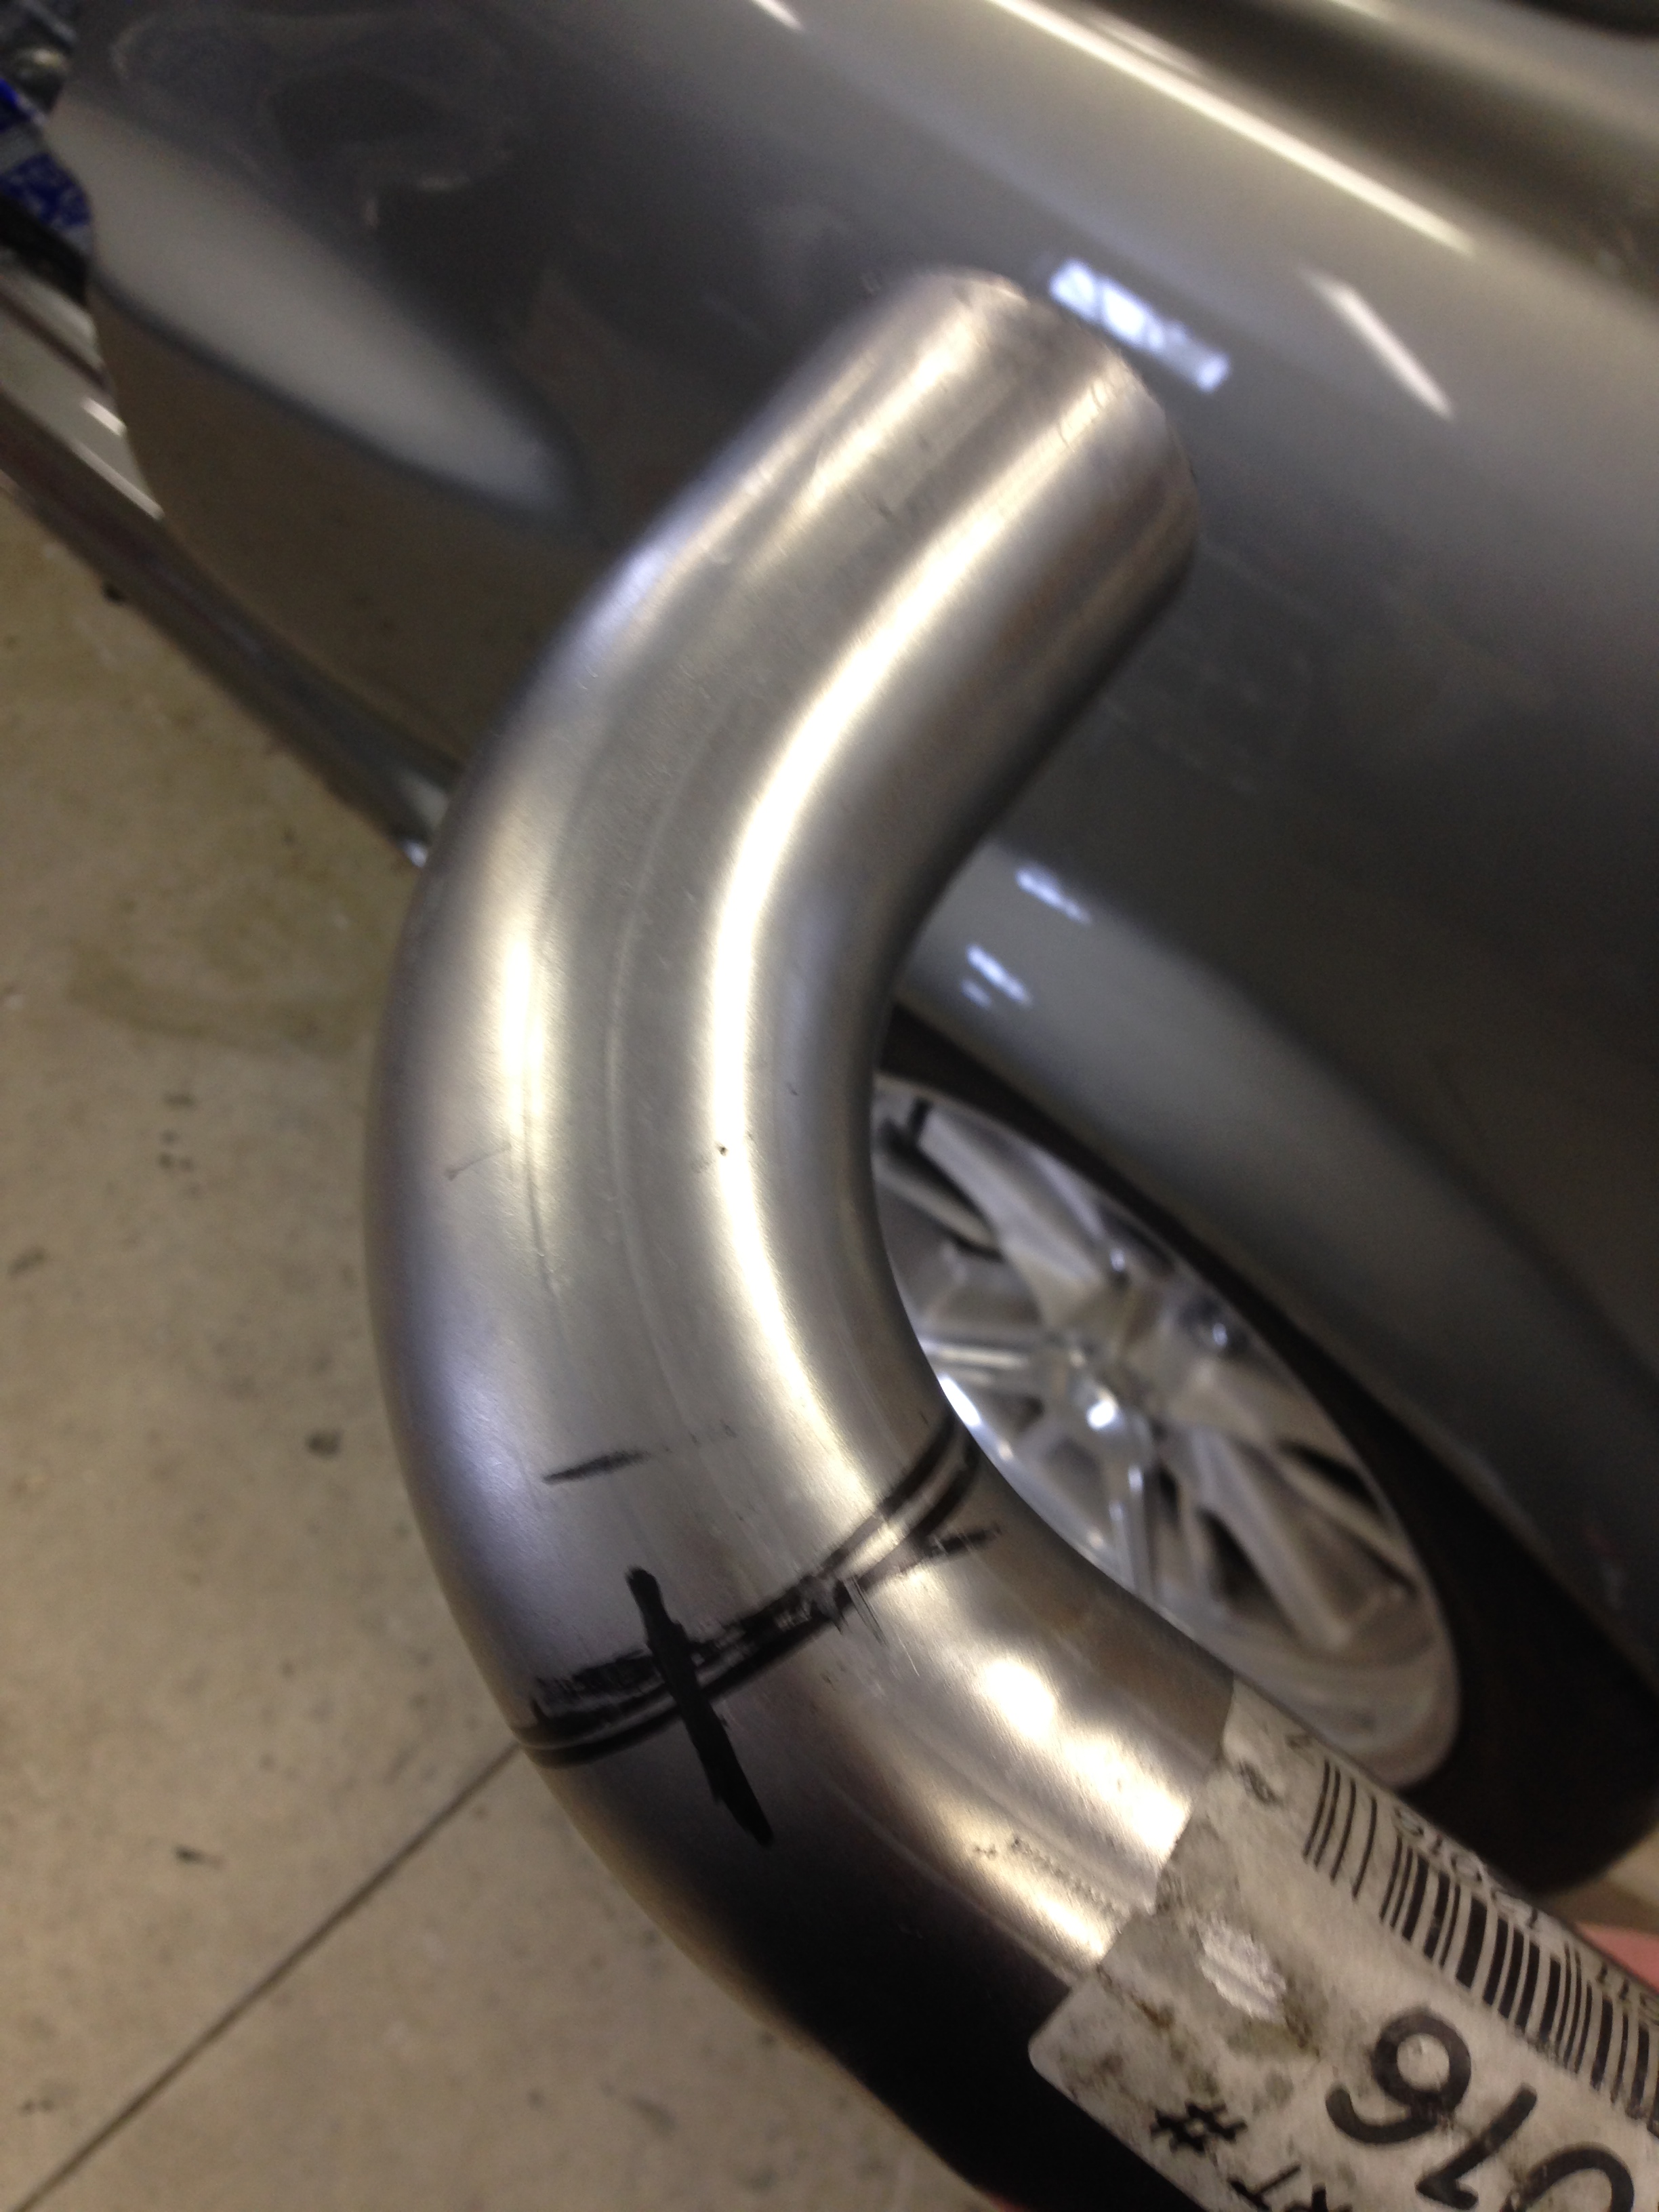
A few updates for you all. One thing that we decided on when we started building this car was that we wanted every element as "functional" as could be. Often times on cars we would see, the side scoops would be non-functional, side exhaust was non-existent and most of all, the side fuel filler would be simply a cap mounted on the side of the car with no filler tube in place. There are a few places selling the side fill kits, but they are either for the LeMans type mount (much lower to the trunk lid) or in the wrong spot completely. We had an exhaust shop bend a few pieces, which we ultimately destroyed through trial and error.
Finally, we found the tightest radius mandrel-bent pipe at Summit Racing. After fishing it though the hole and with some trimming, we marked where it needed to be cut, then we cut the flange off the original filler tube and silver soldered it to the new pipe. Inside the car, we will be able to connect the next pipe to the fuel tank.
We had a reproduction Mach 1 cap that we bought when we had to install the recess before paint. We used masking tape to protect the finish and when we were done with the mock up we removed the tape. The finish came right off with it, so we sent it back. We ended up finding this NOS cap on ebay.
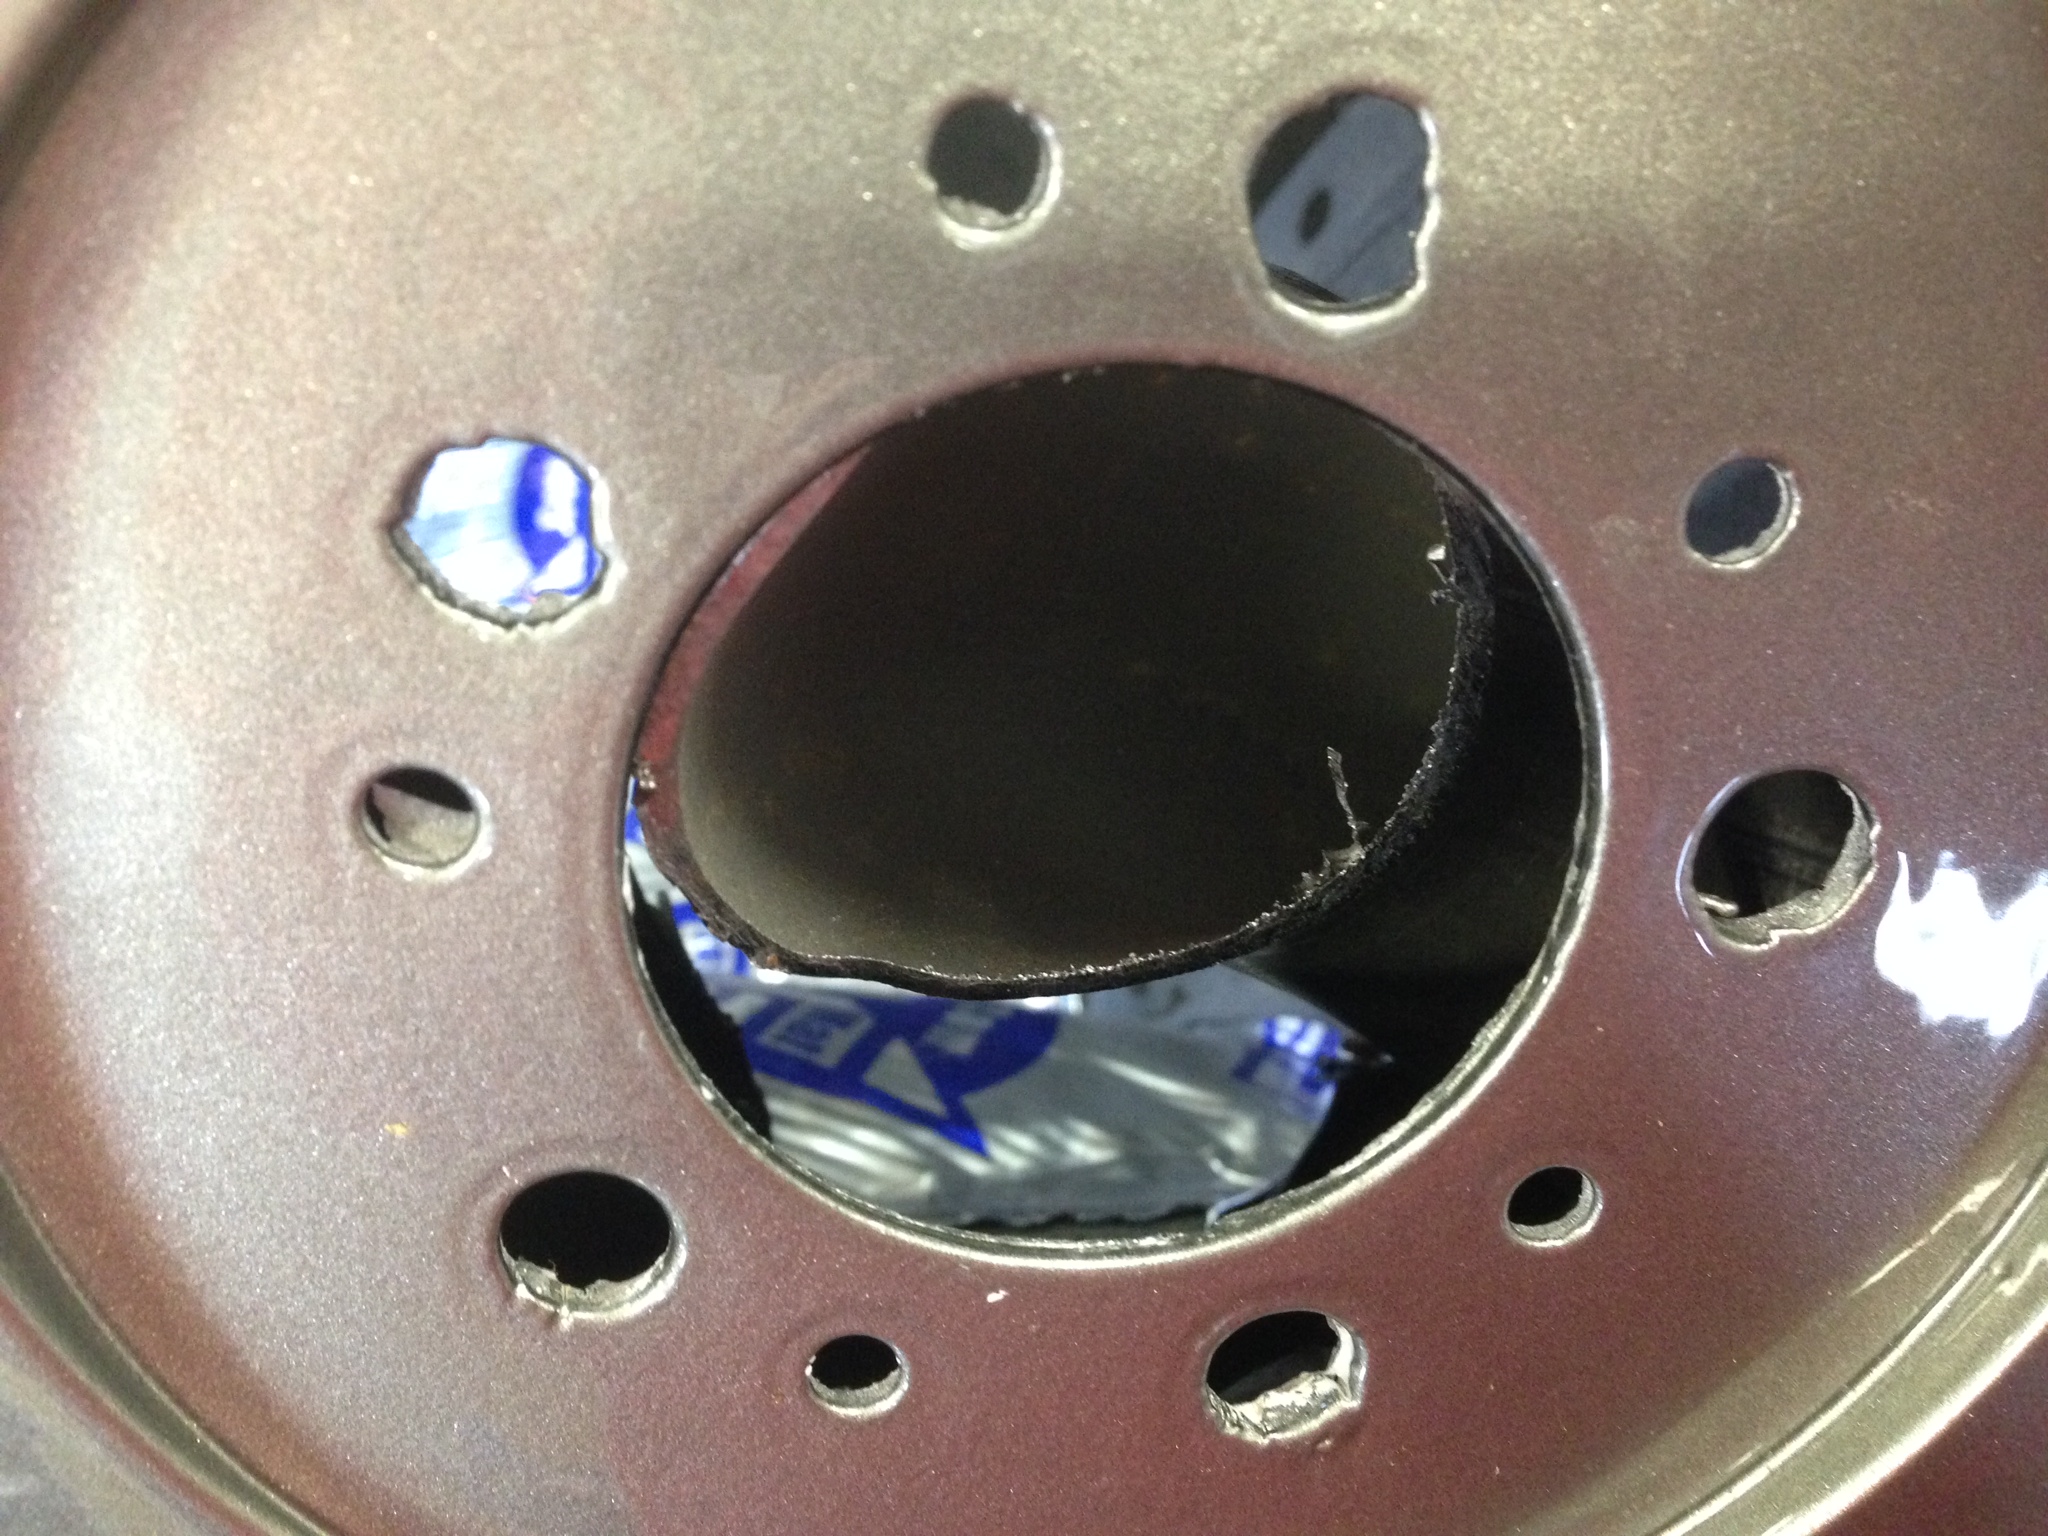
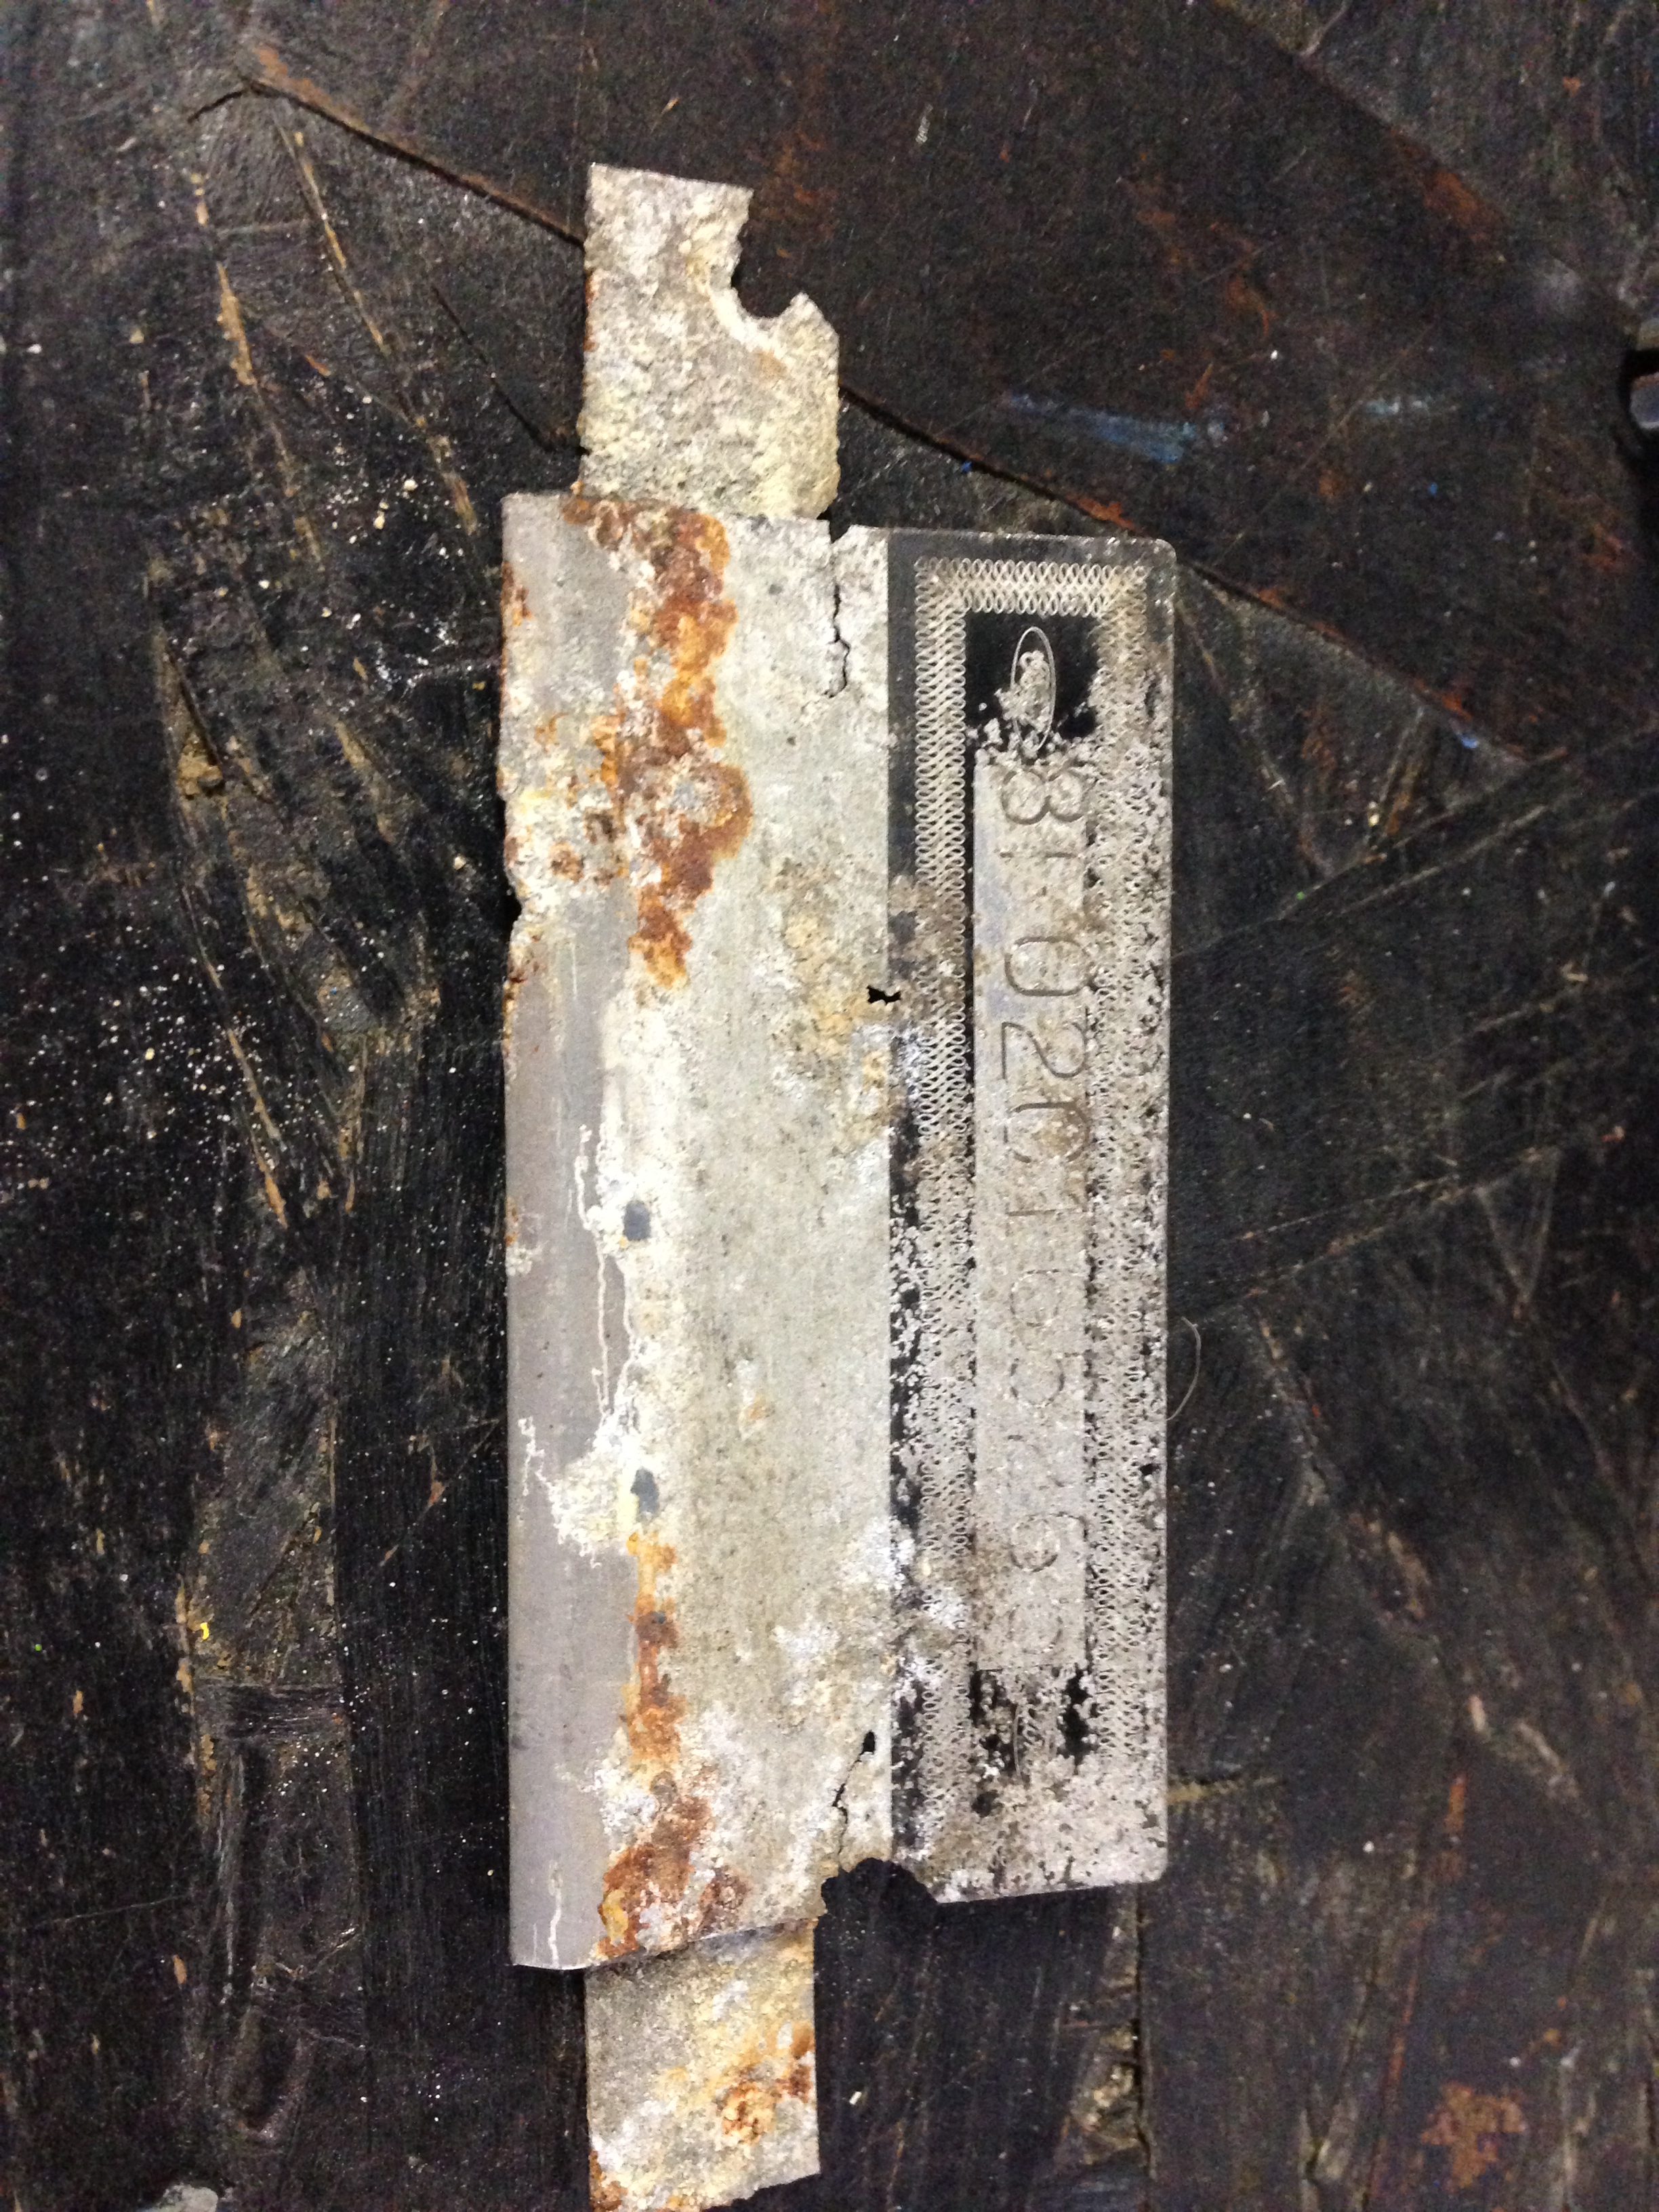
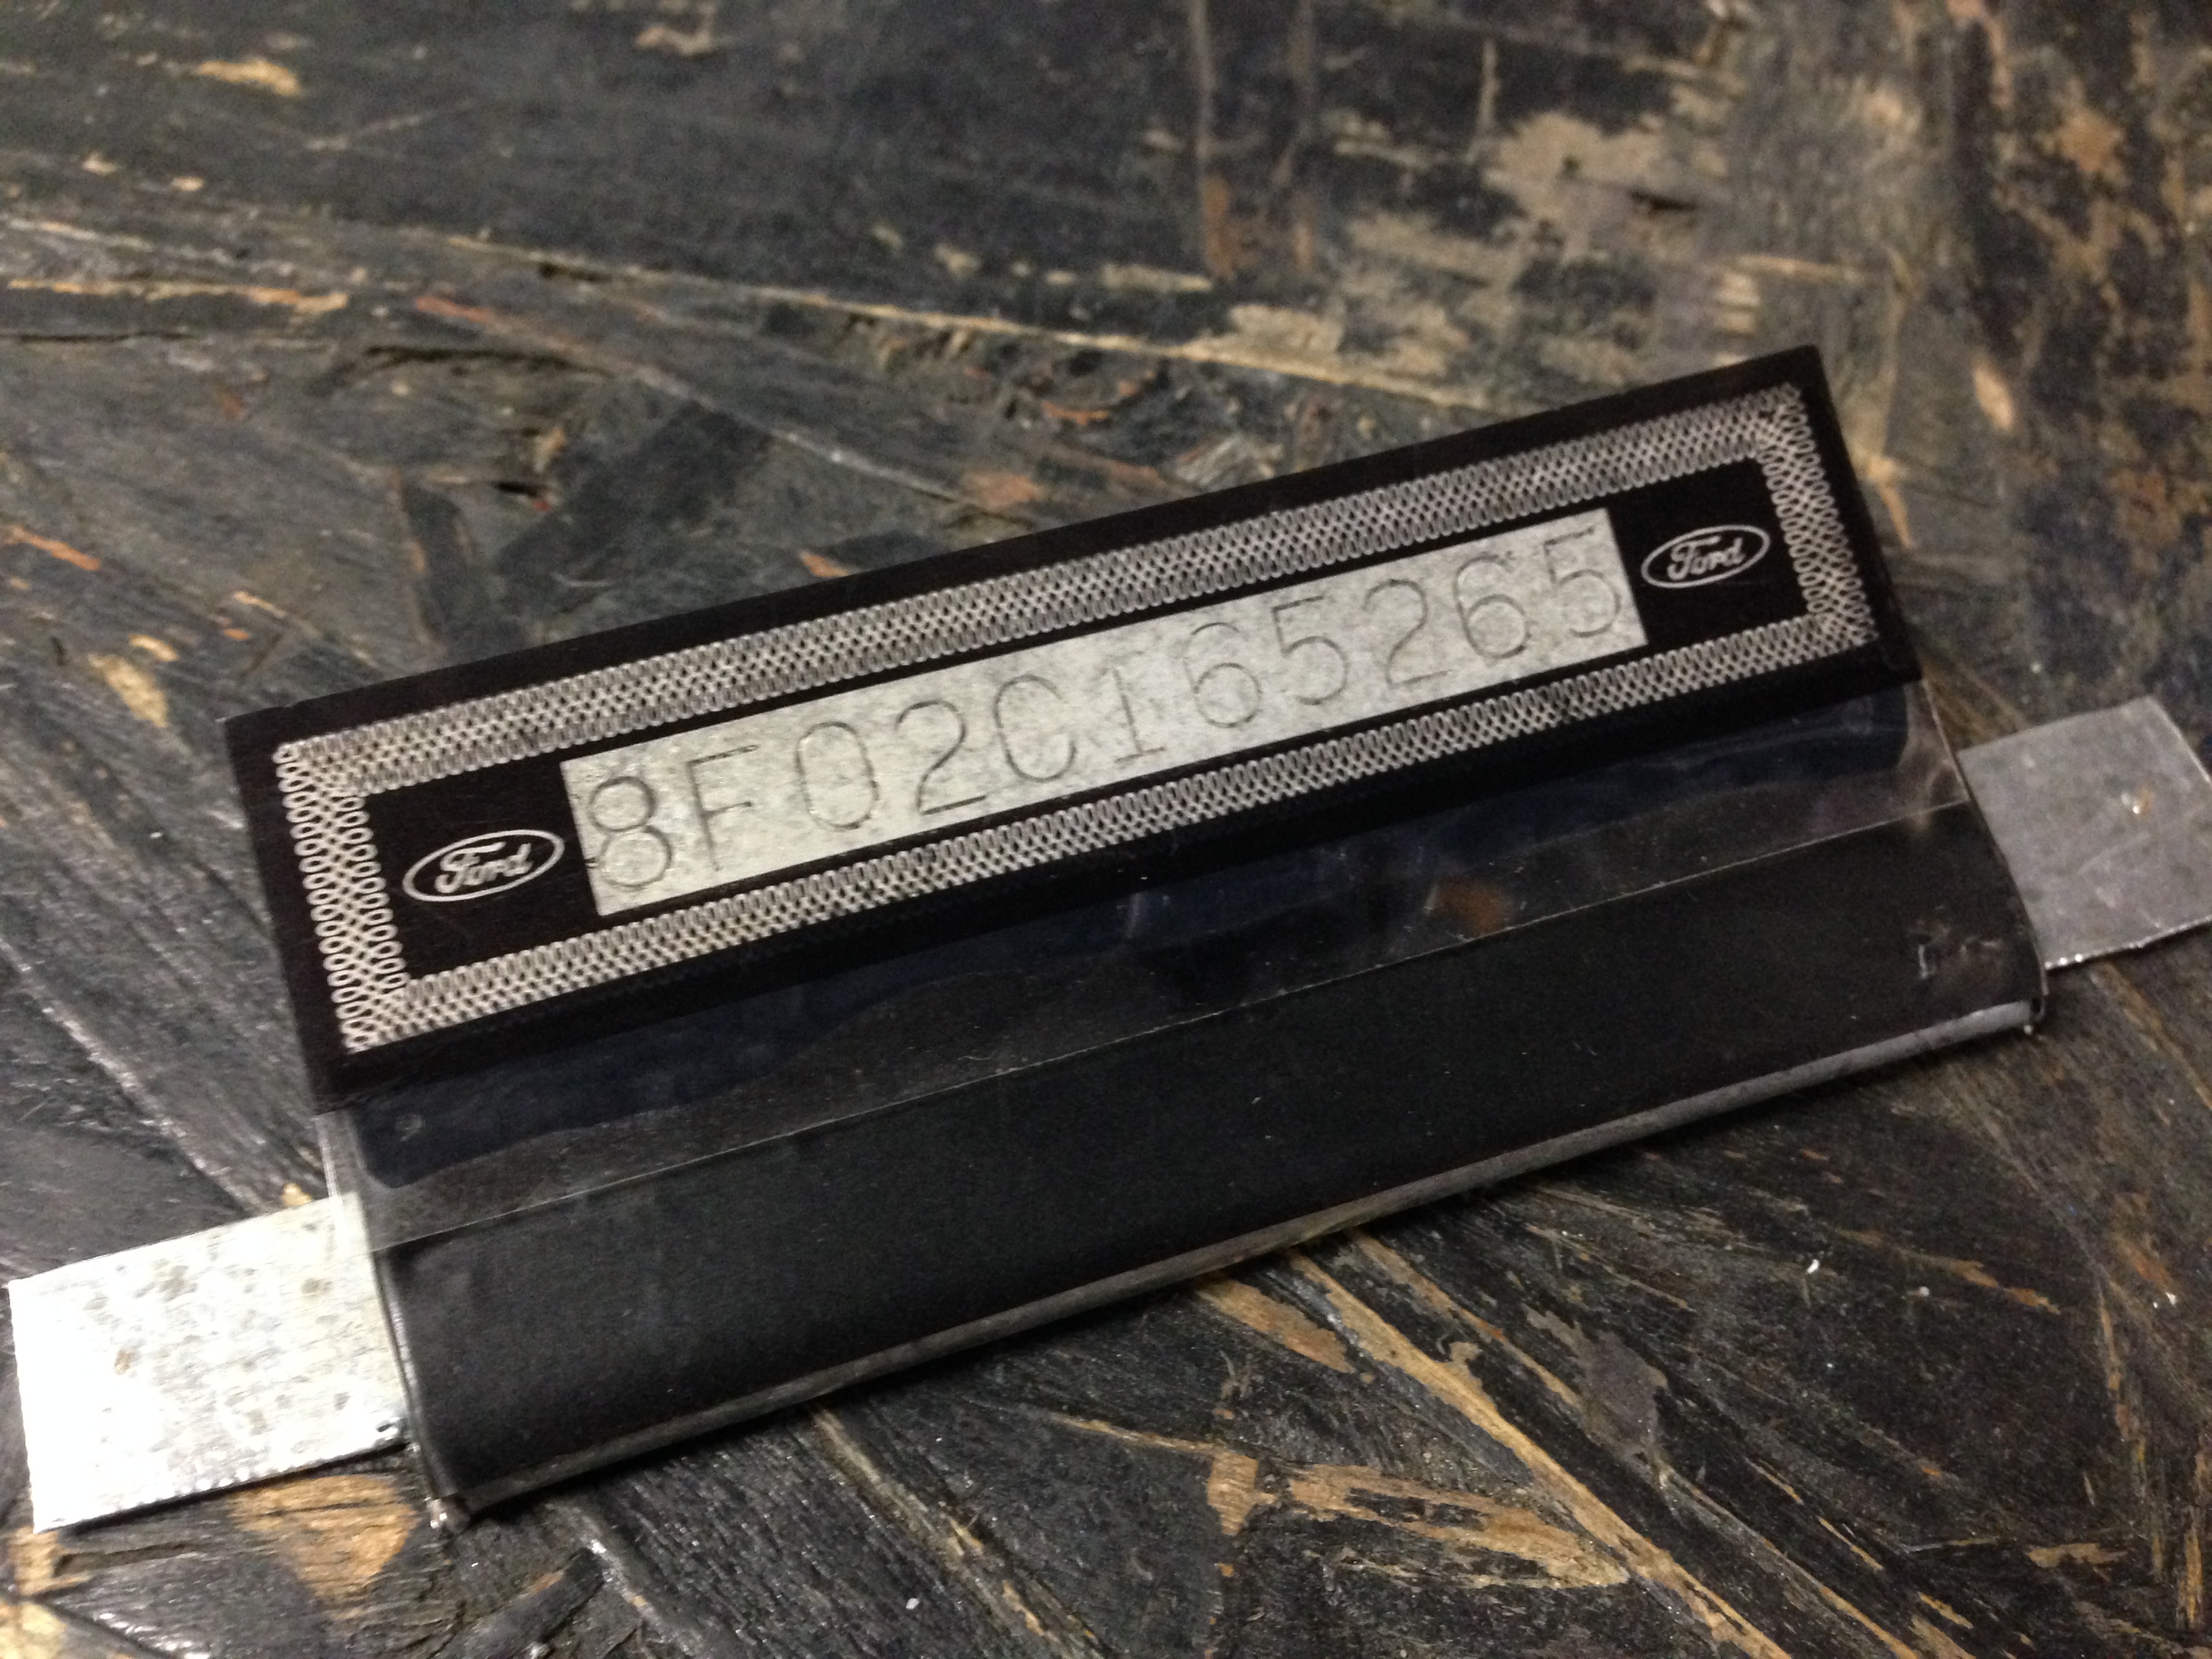
Before we installed the windshield, we had to rivet the VIN plate back in place. This VIN plate was not used in 67, but came about for the 68 cars. We remembered it needed some love, but this was much worse than we expected!
Before
After
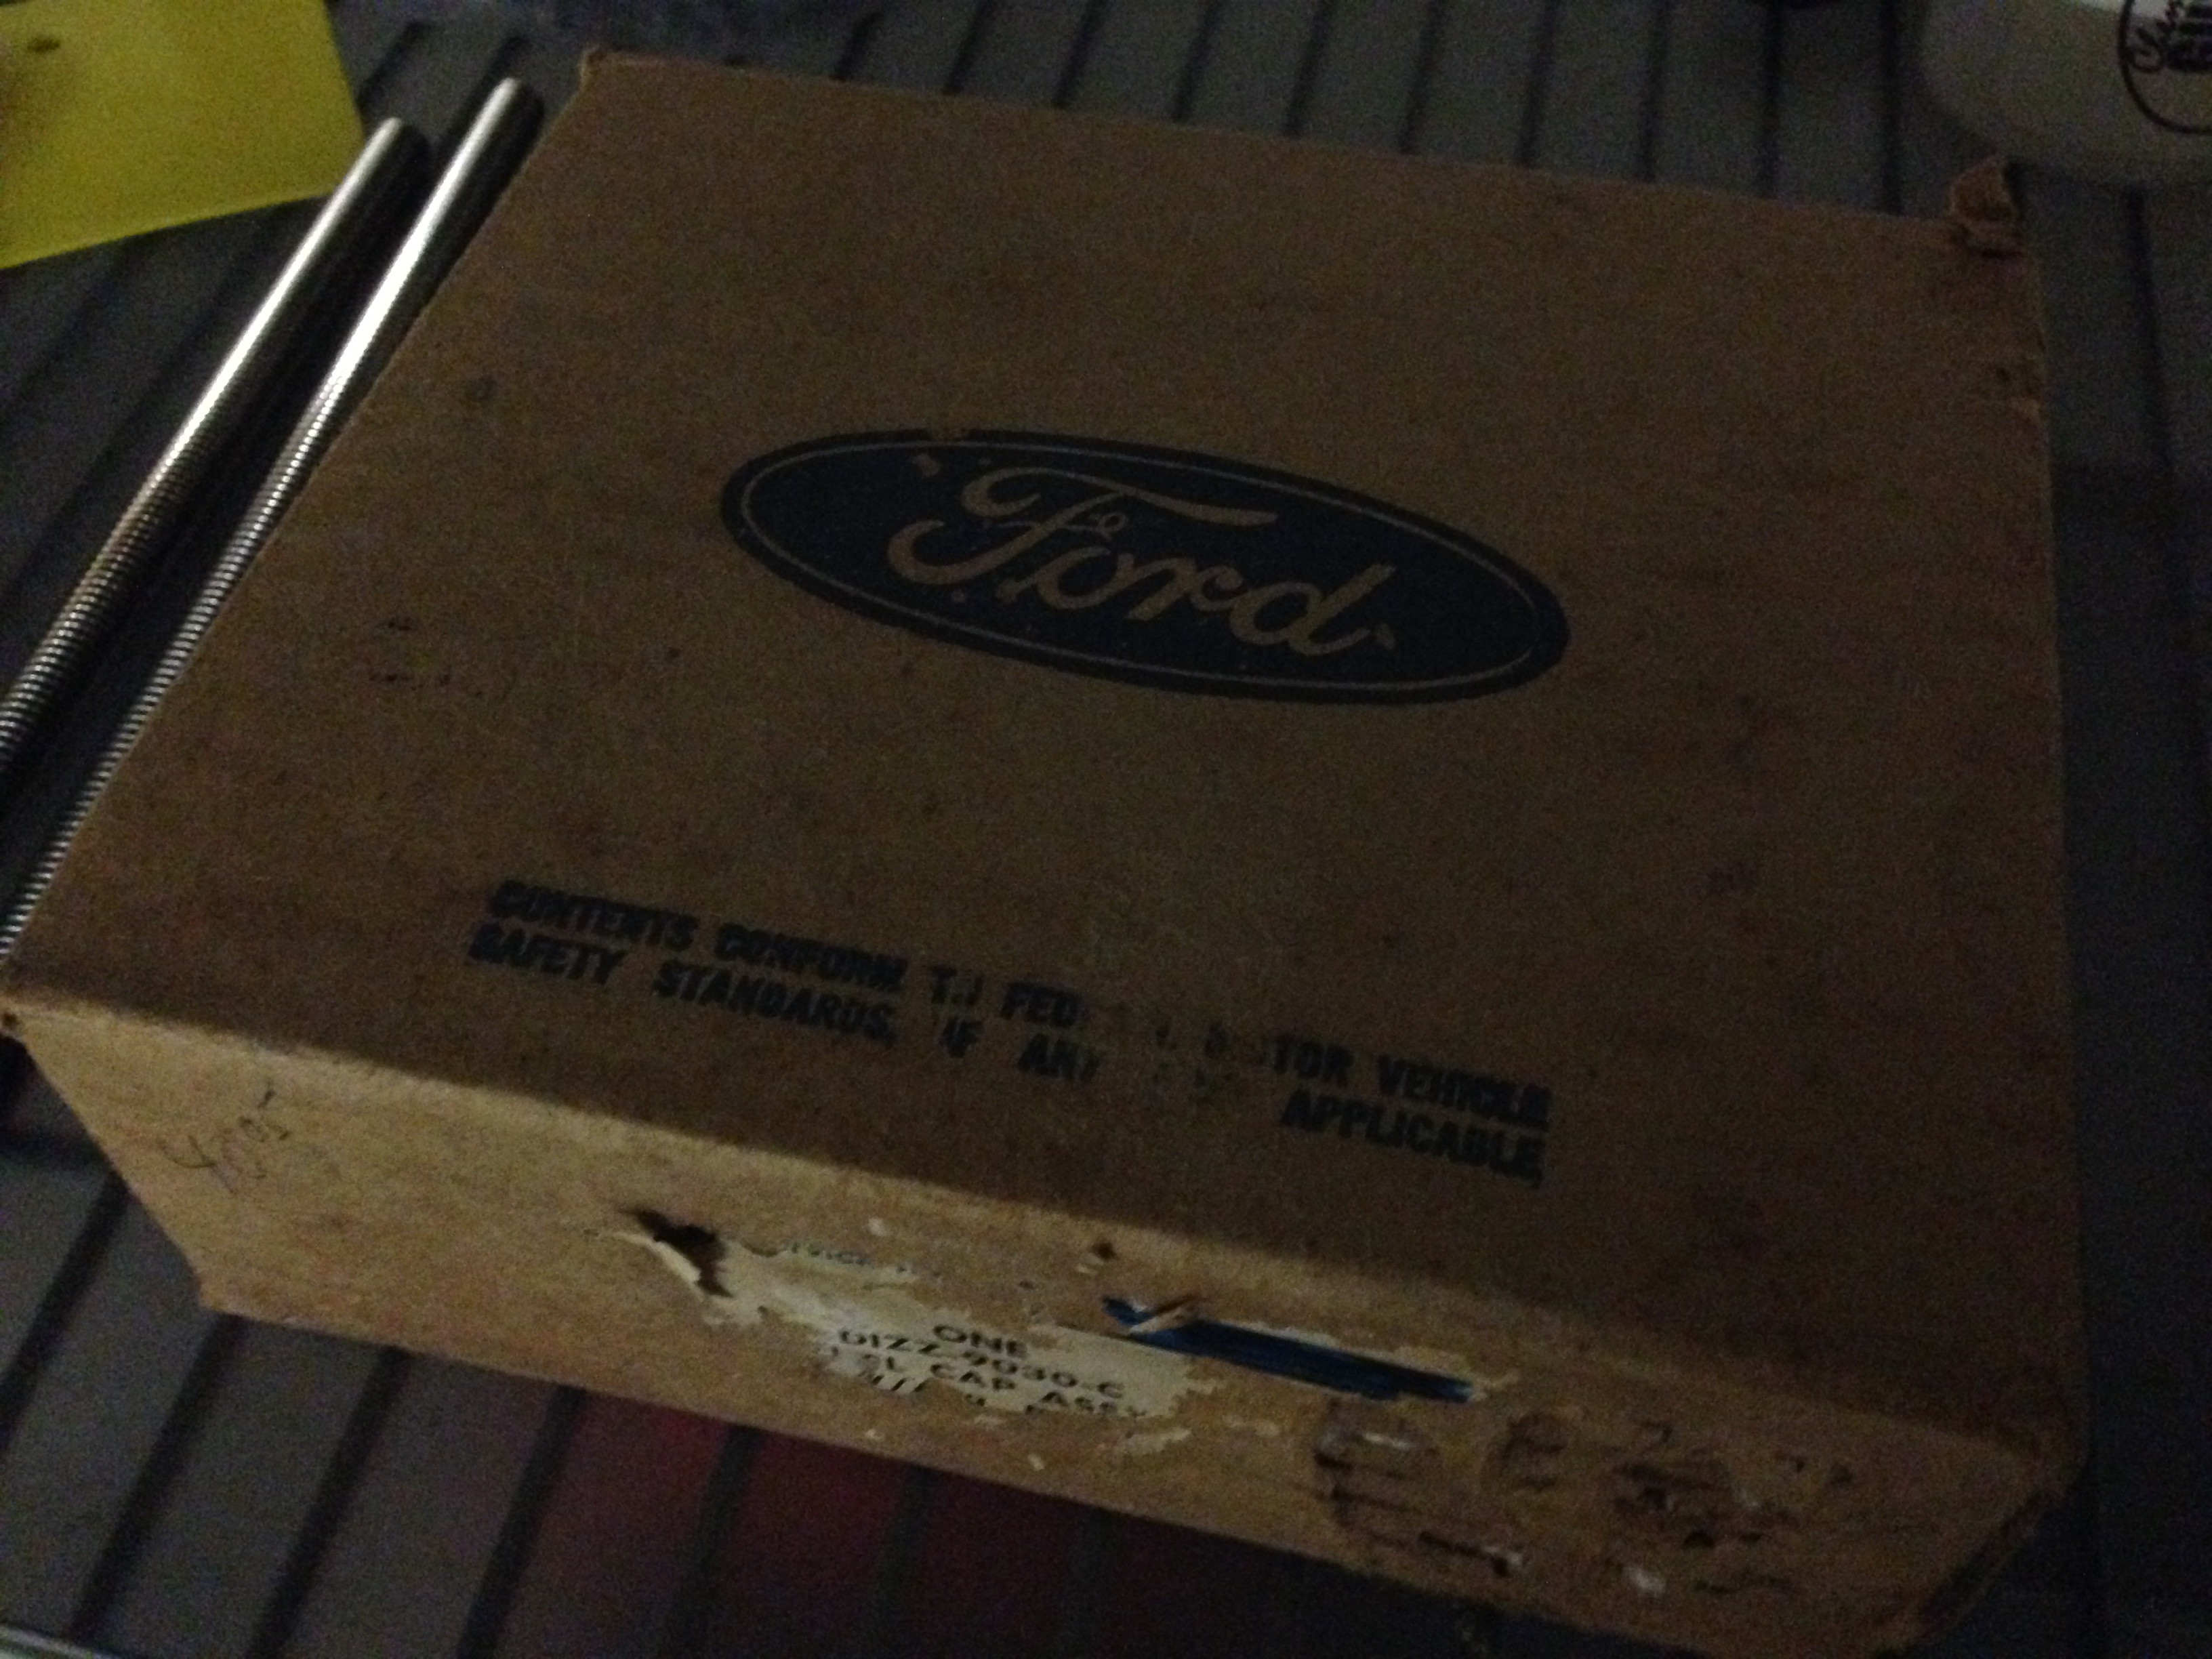
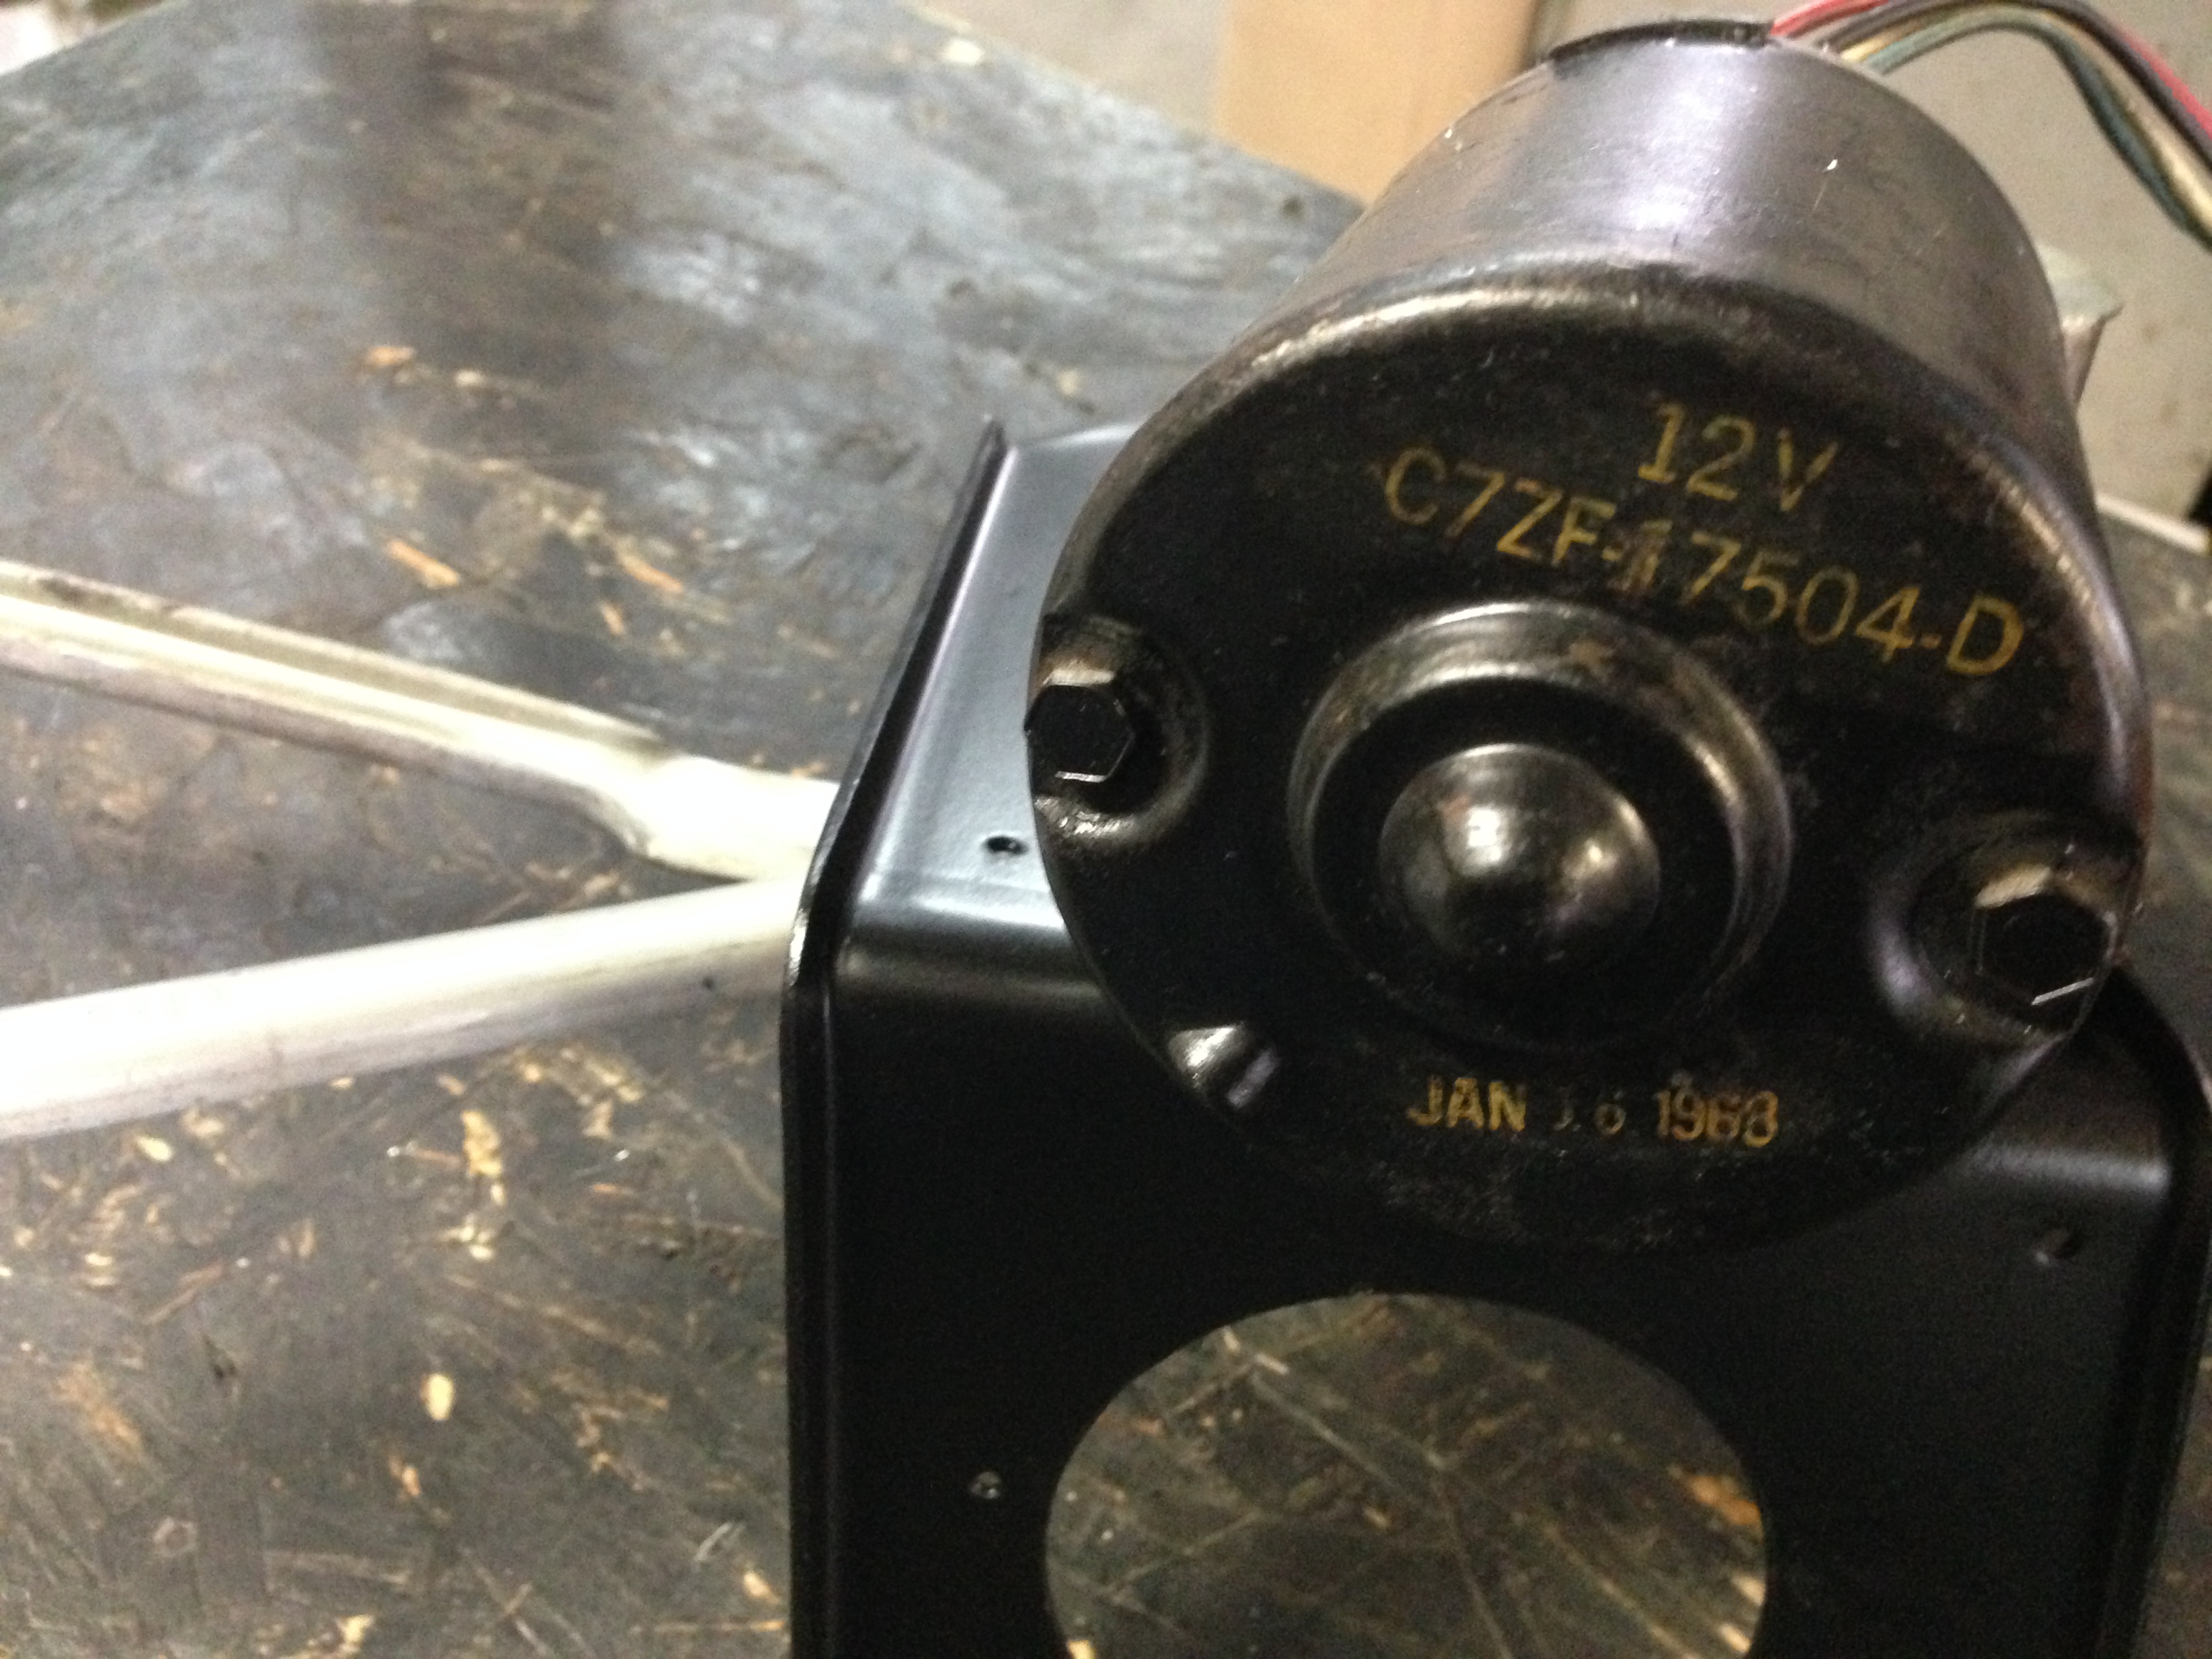
We also restored and repainted the wiper assembly and bracket before installing it. Yes that is the original motor and it works like a charm!
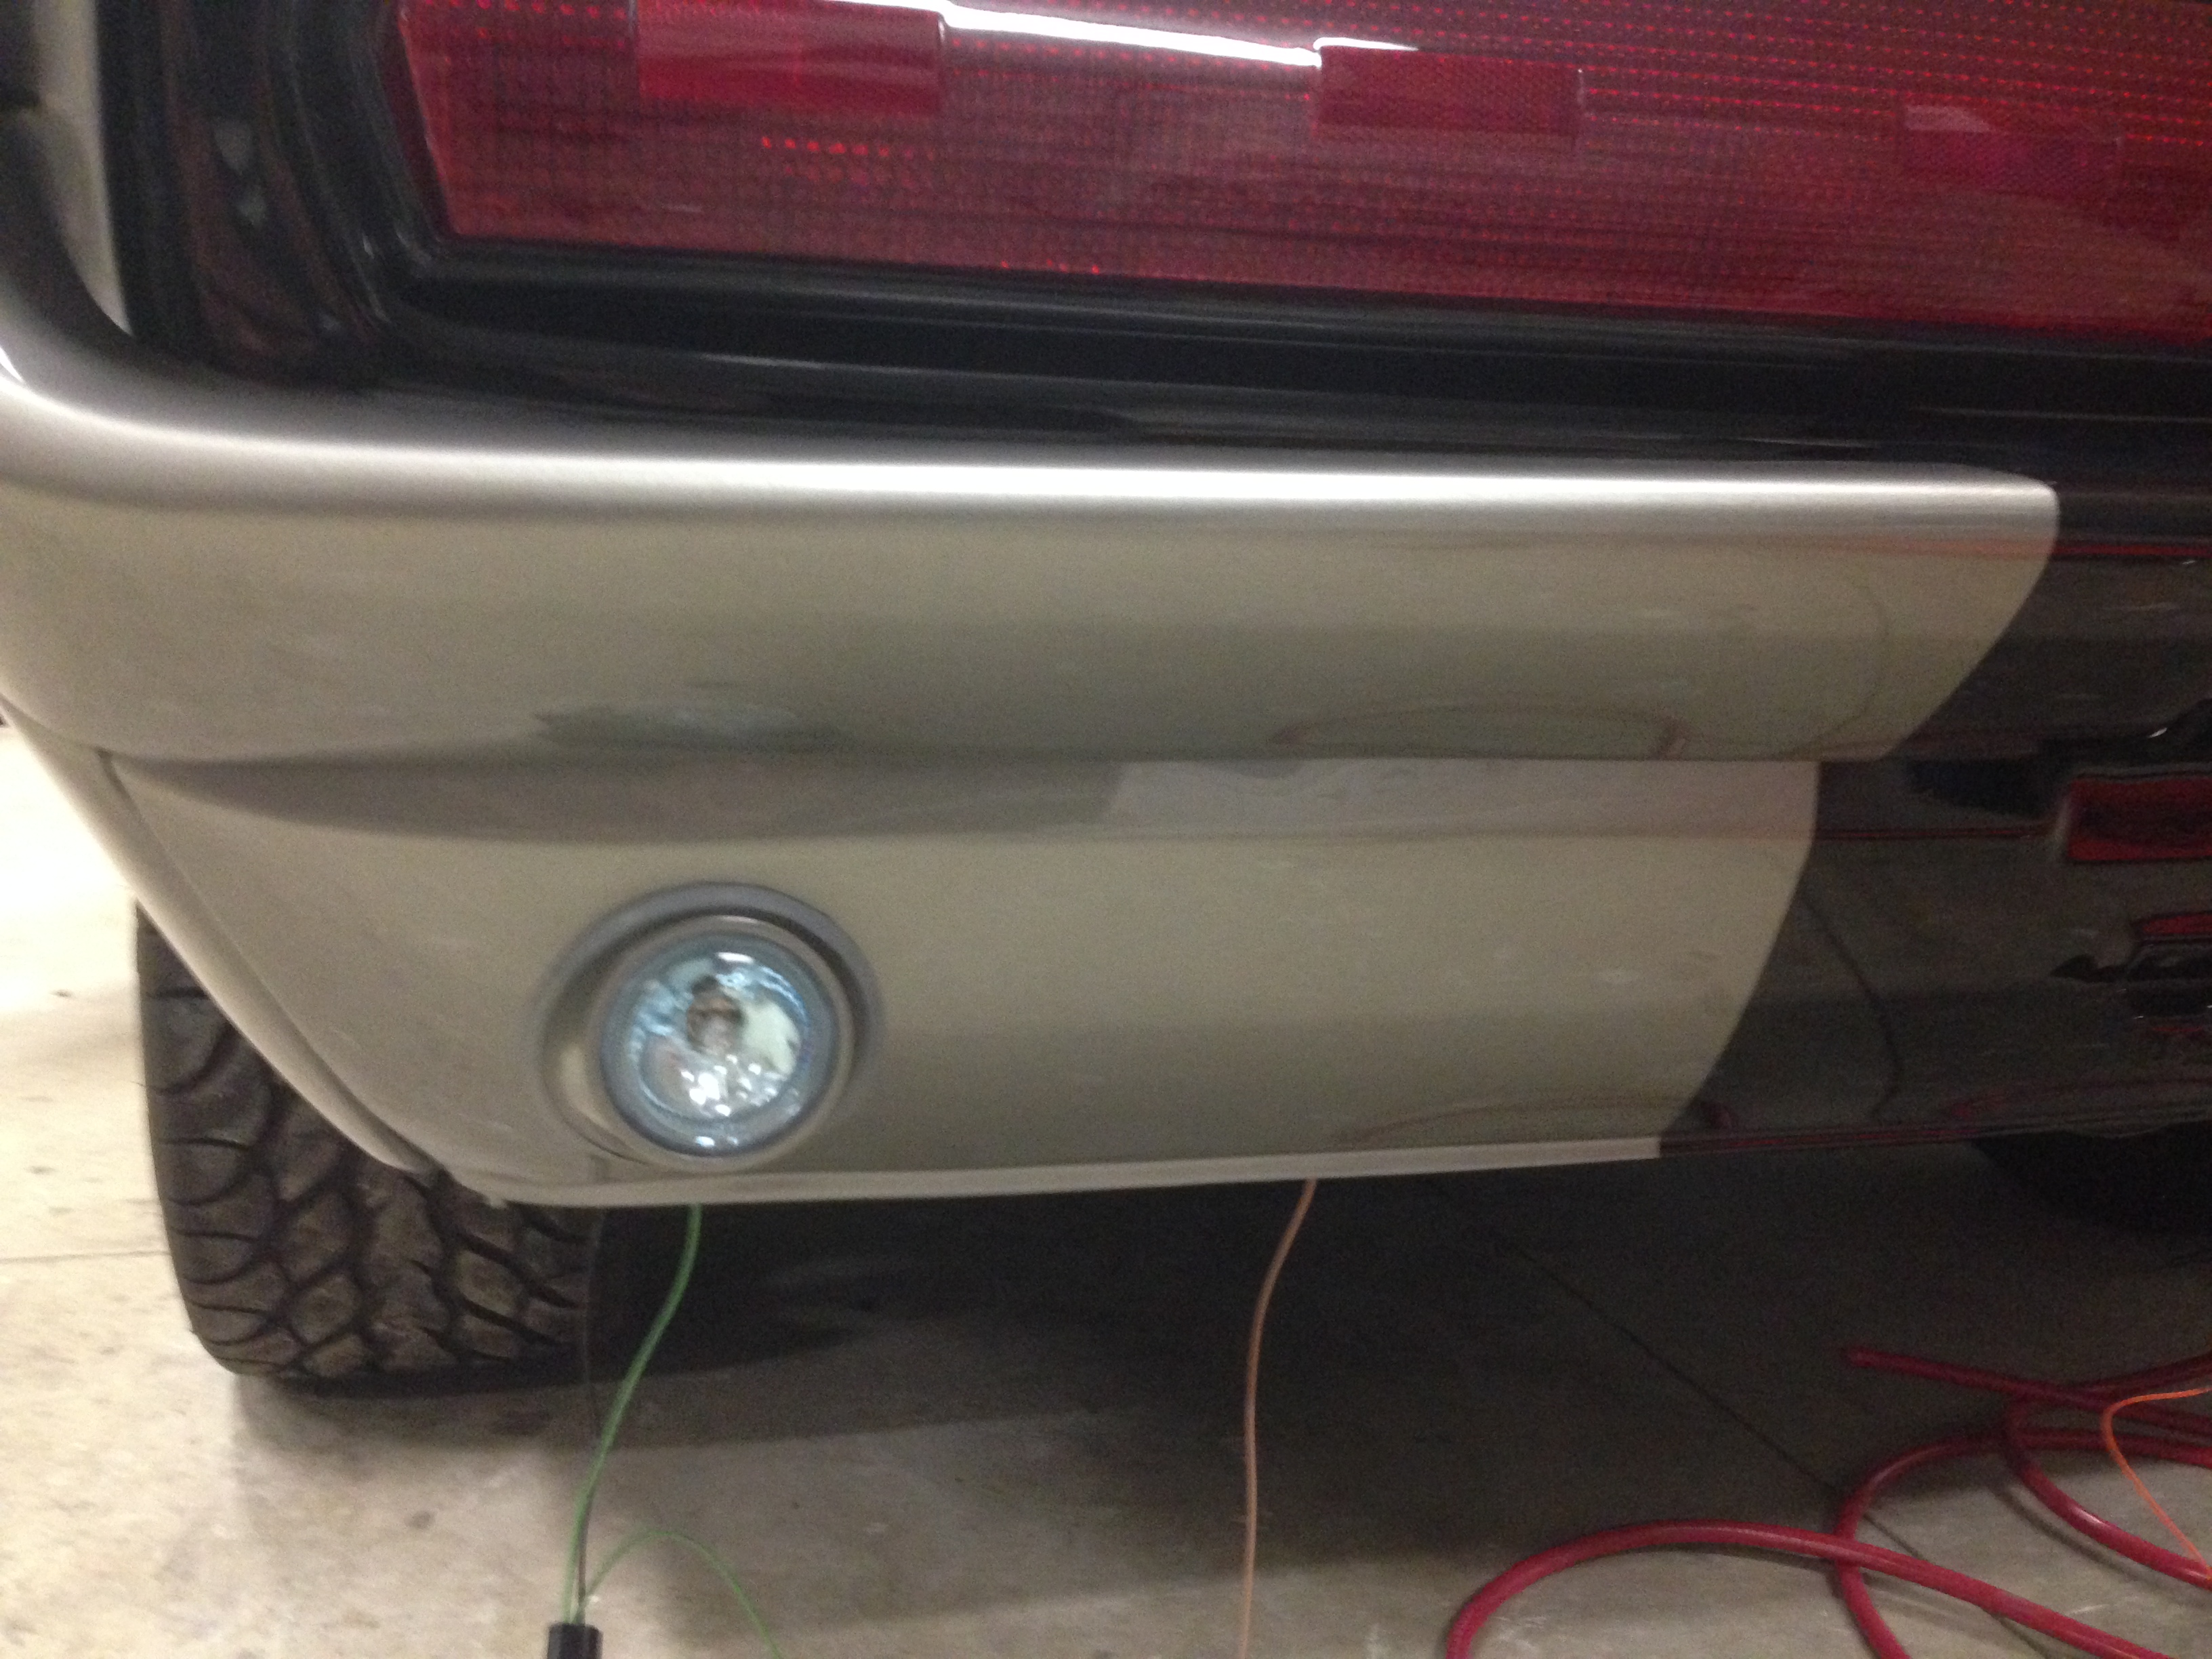
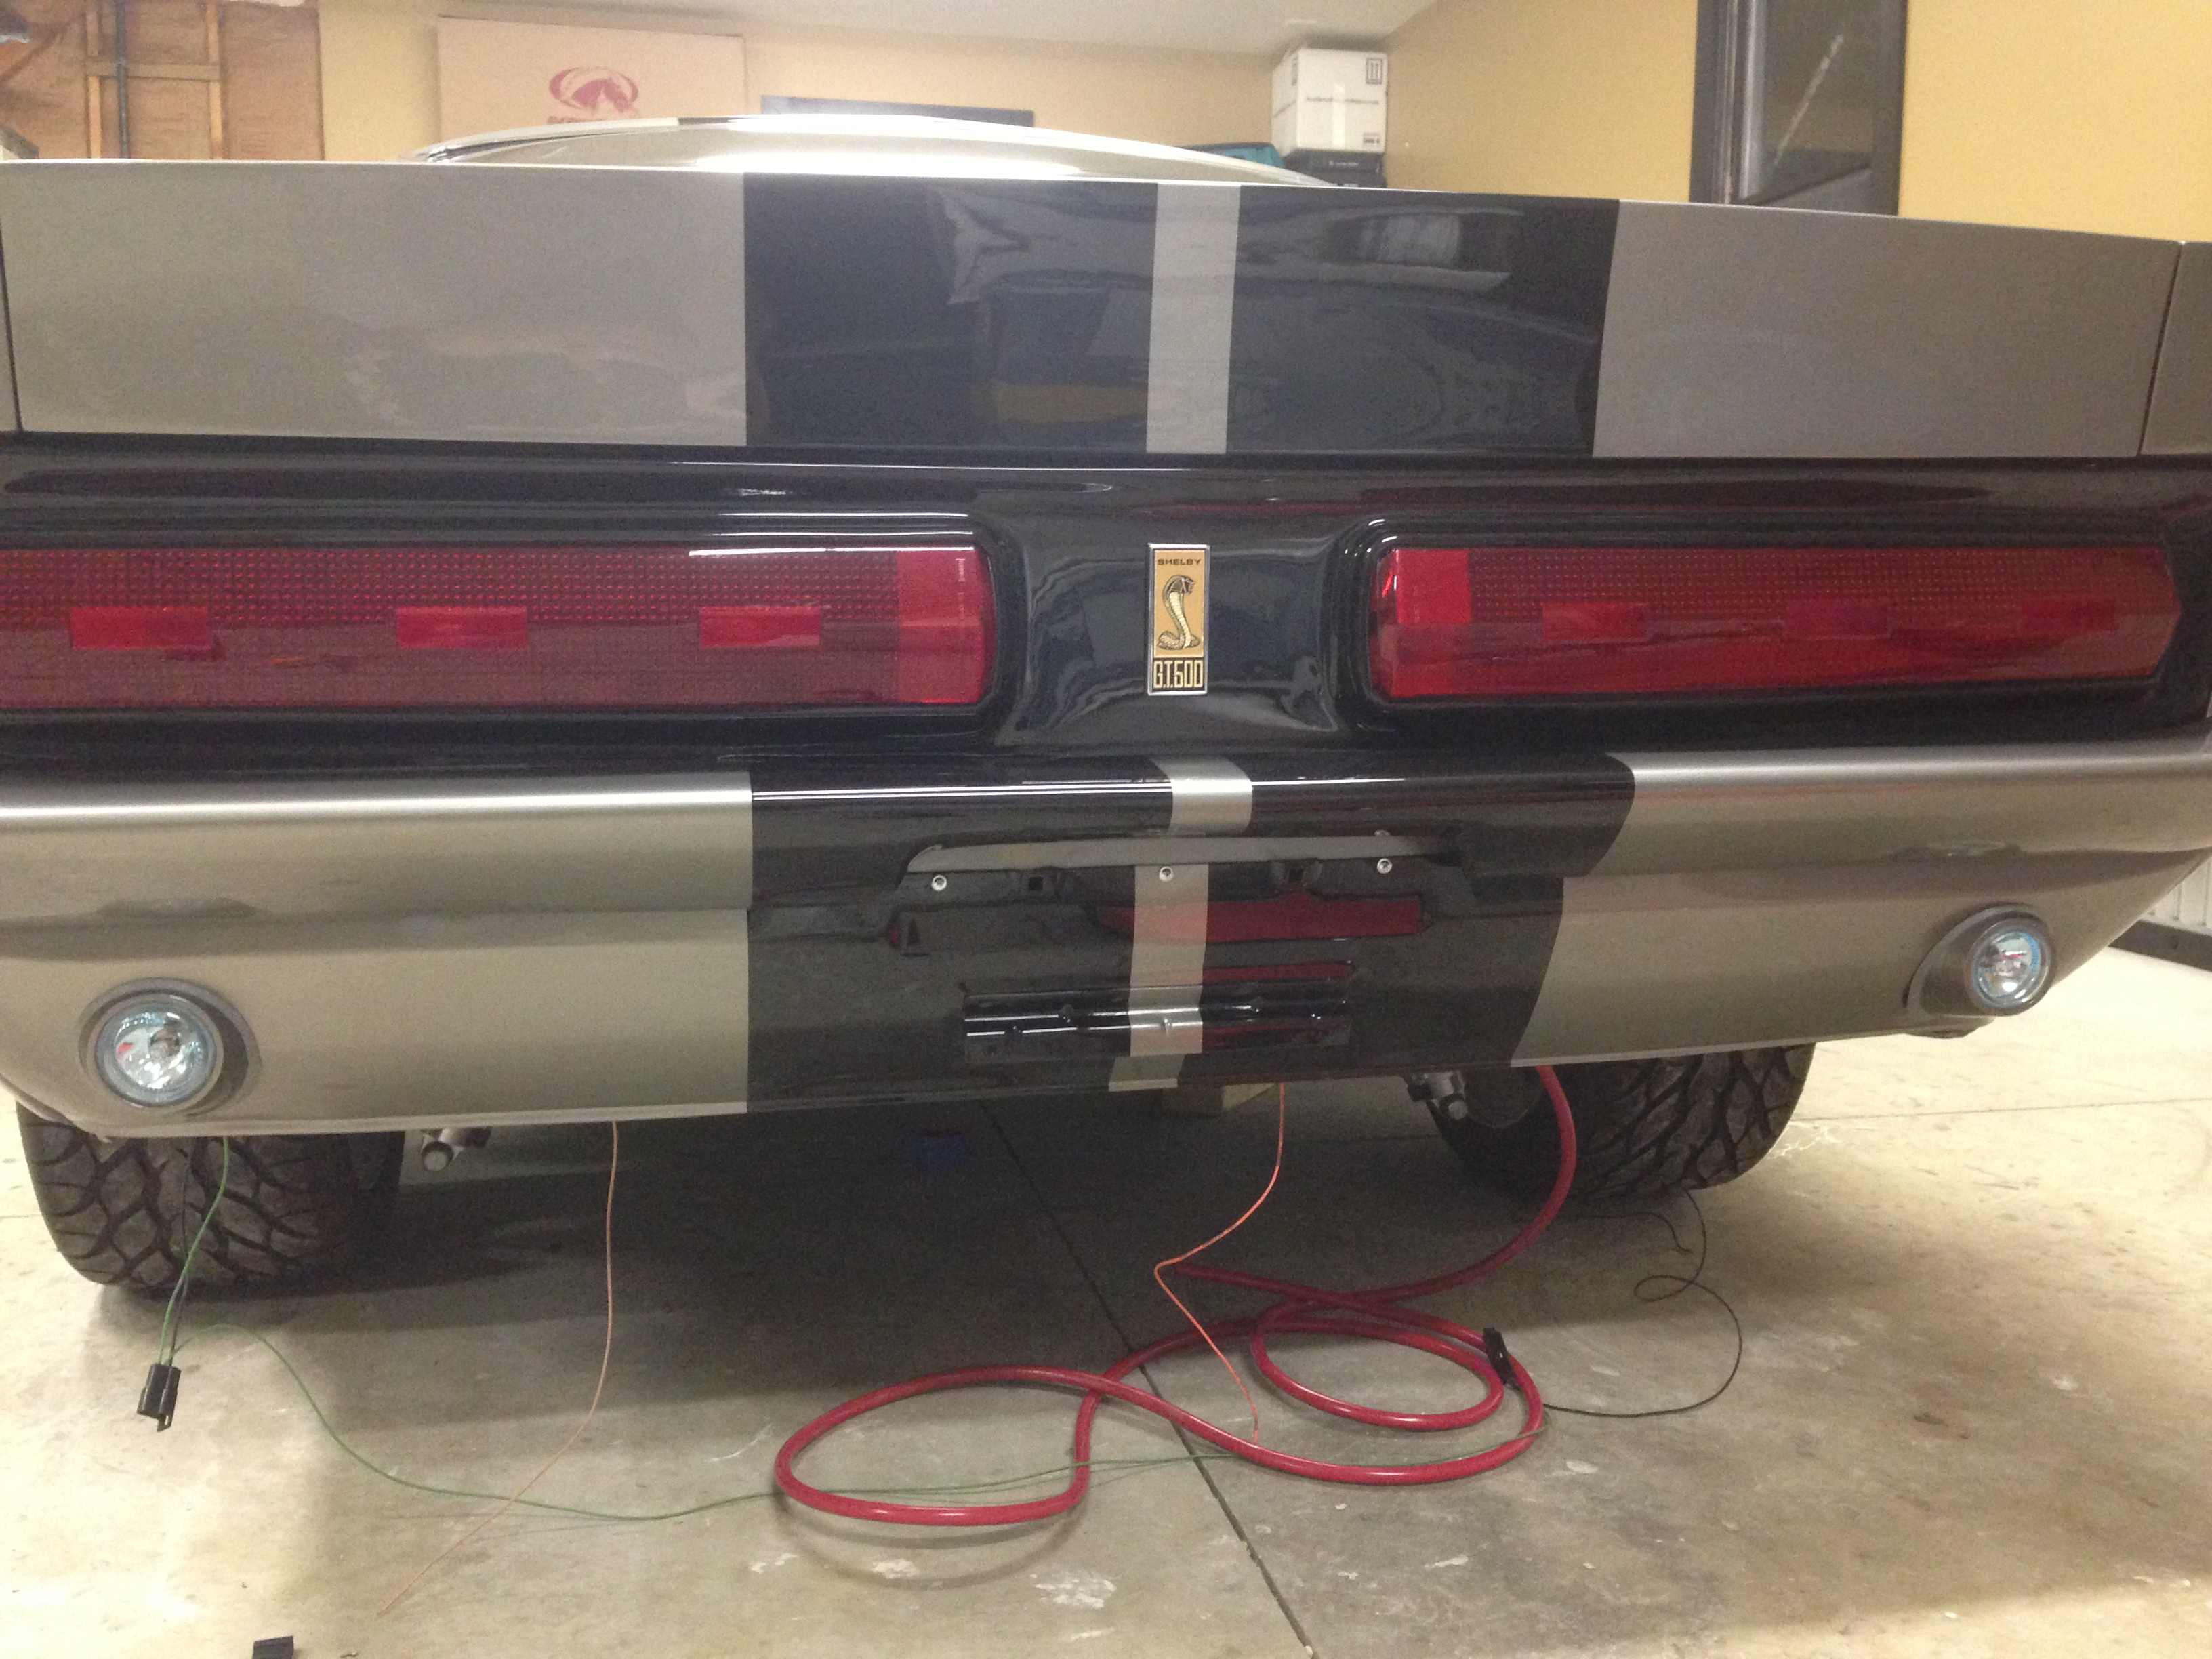
Another unique feature to "Eleanor" that you may have never noticed is the use of PIAA fog lights in the reverse light housings. To accomplish this, we started with the factory back up light housings and cut out the bulb retainer so the new fog light could be fitted. We also painted the housings body color. This is a subtle modification that is often overlooked.
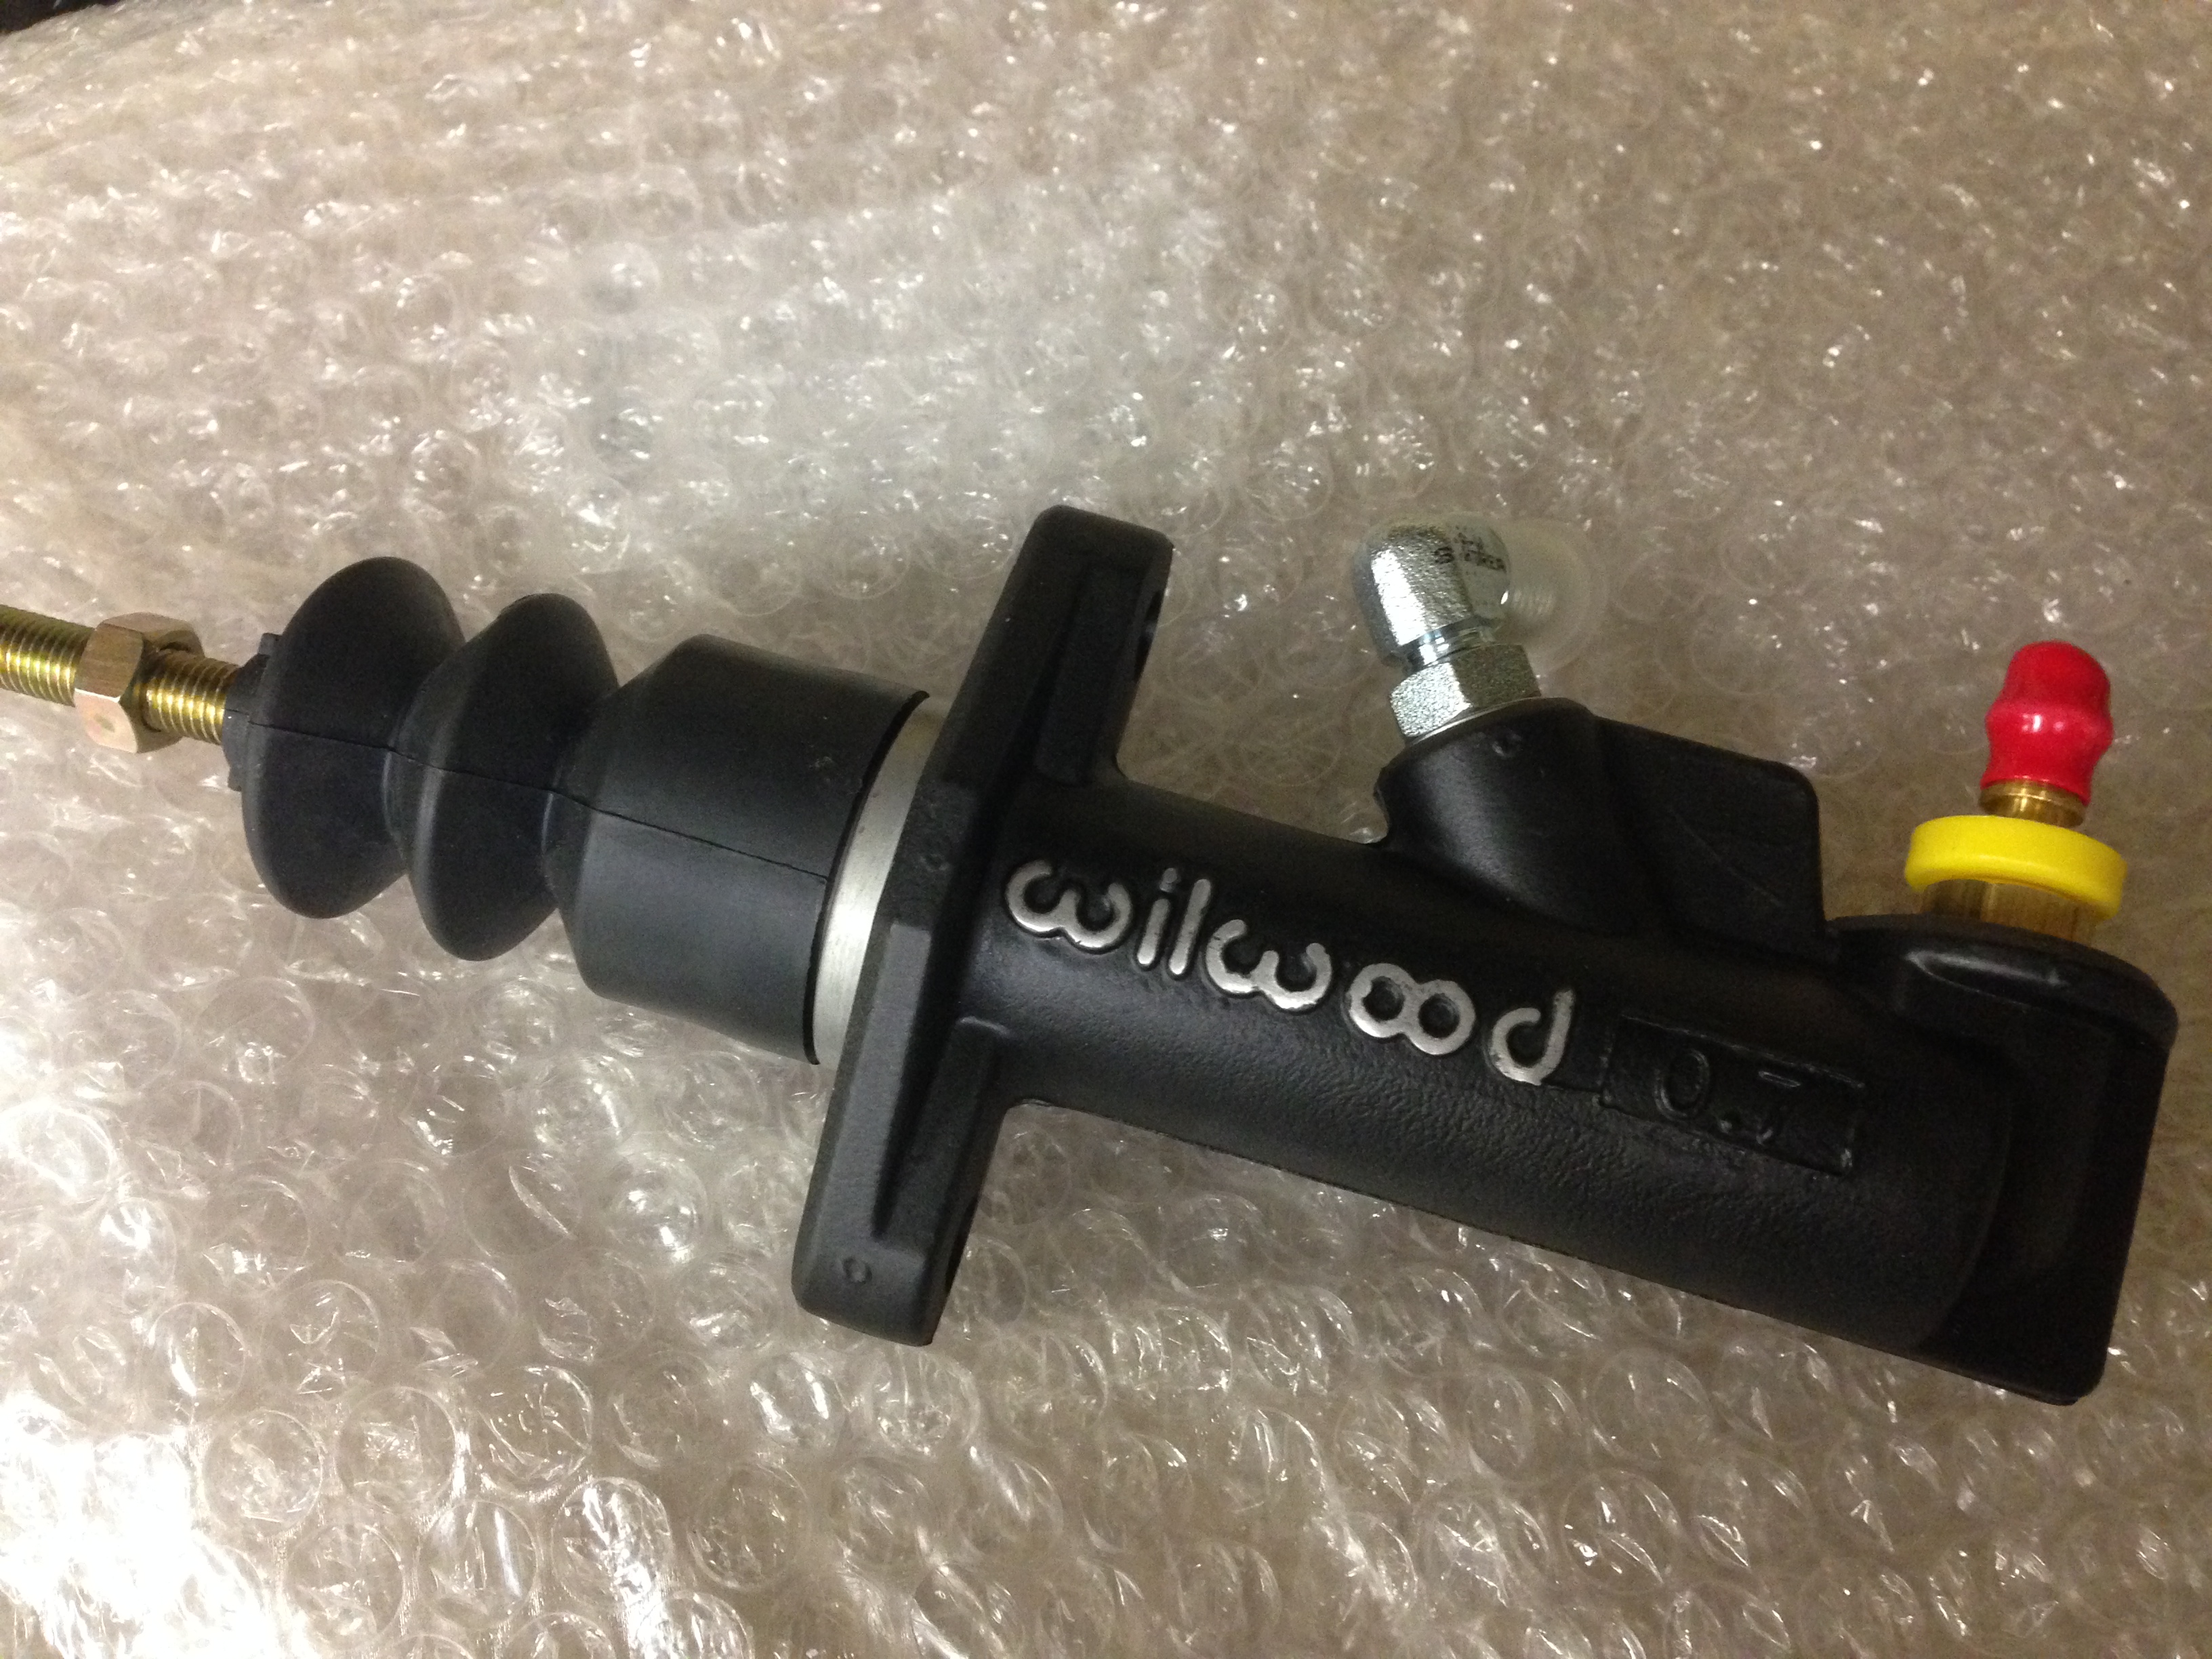
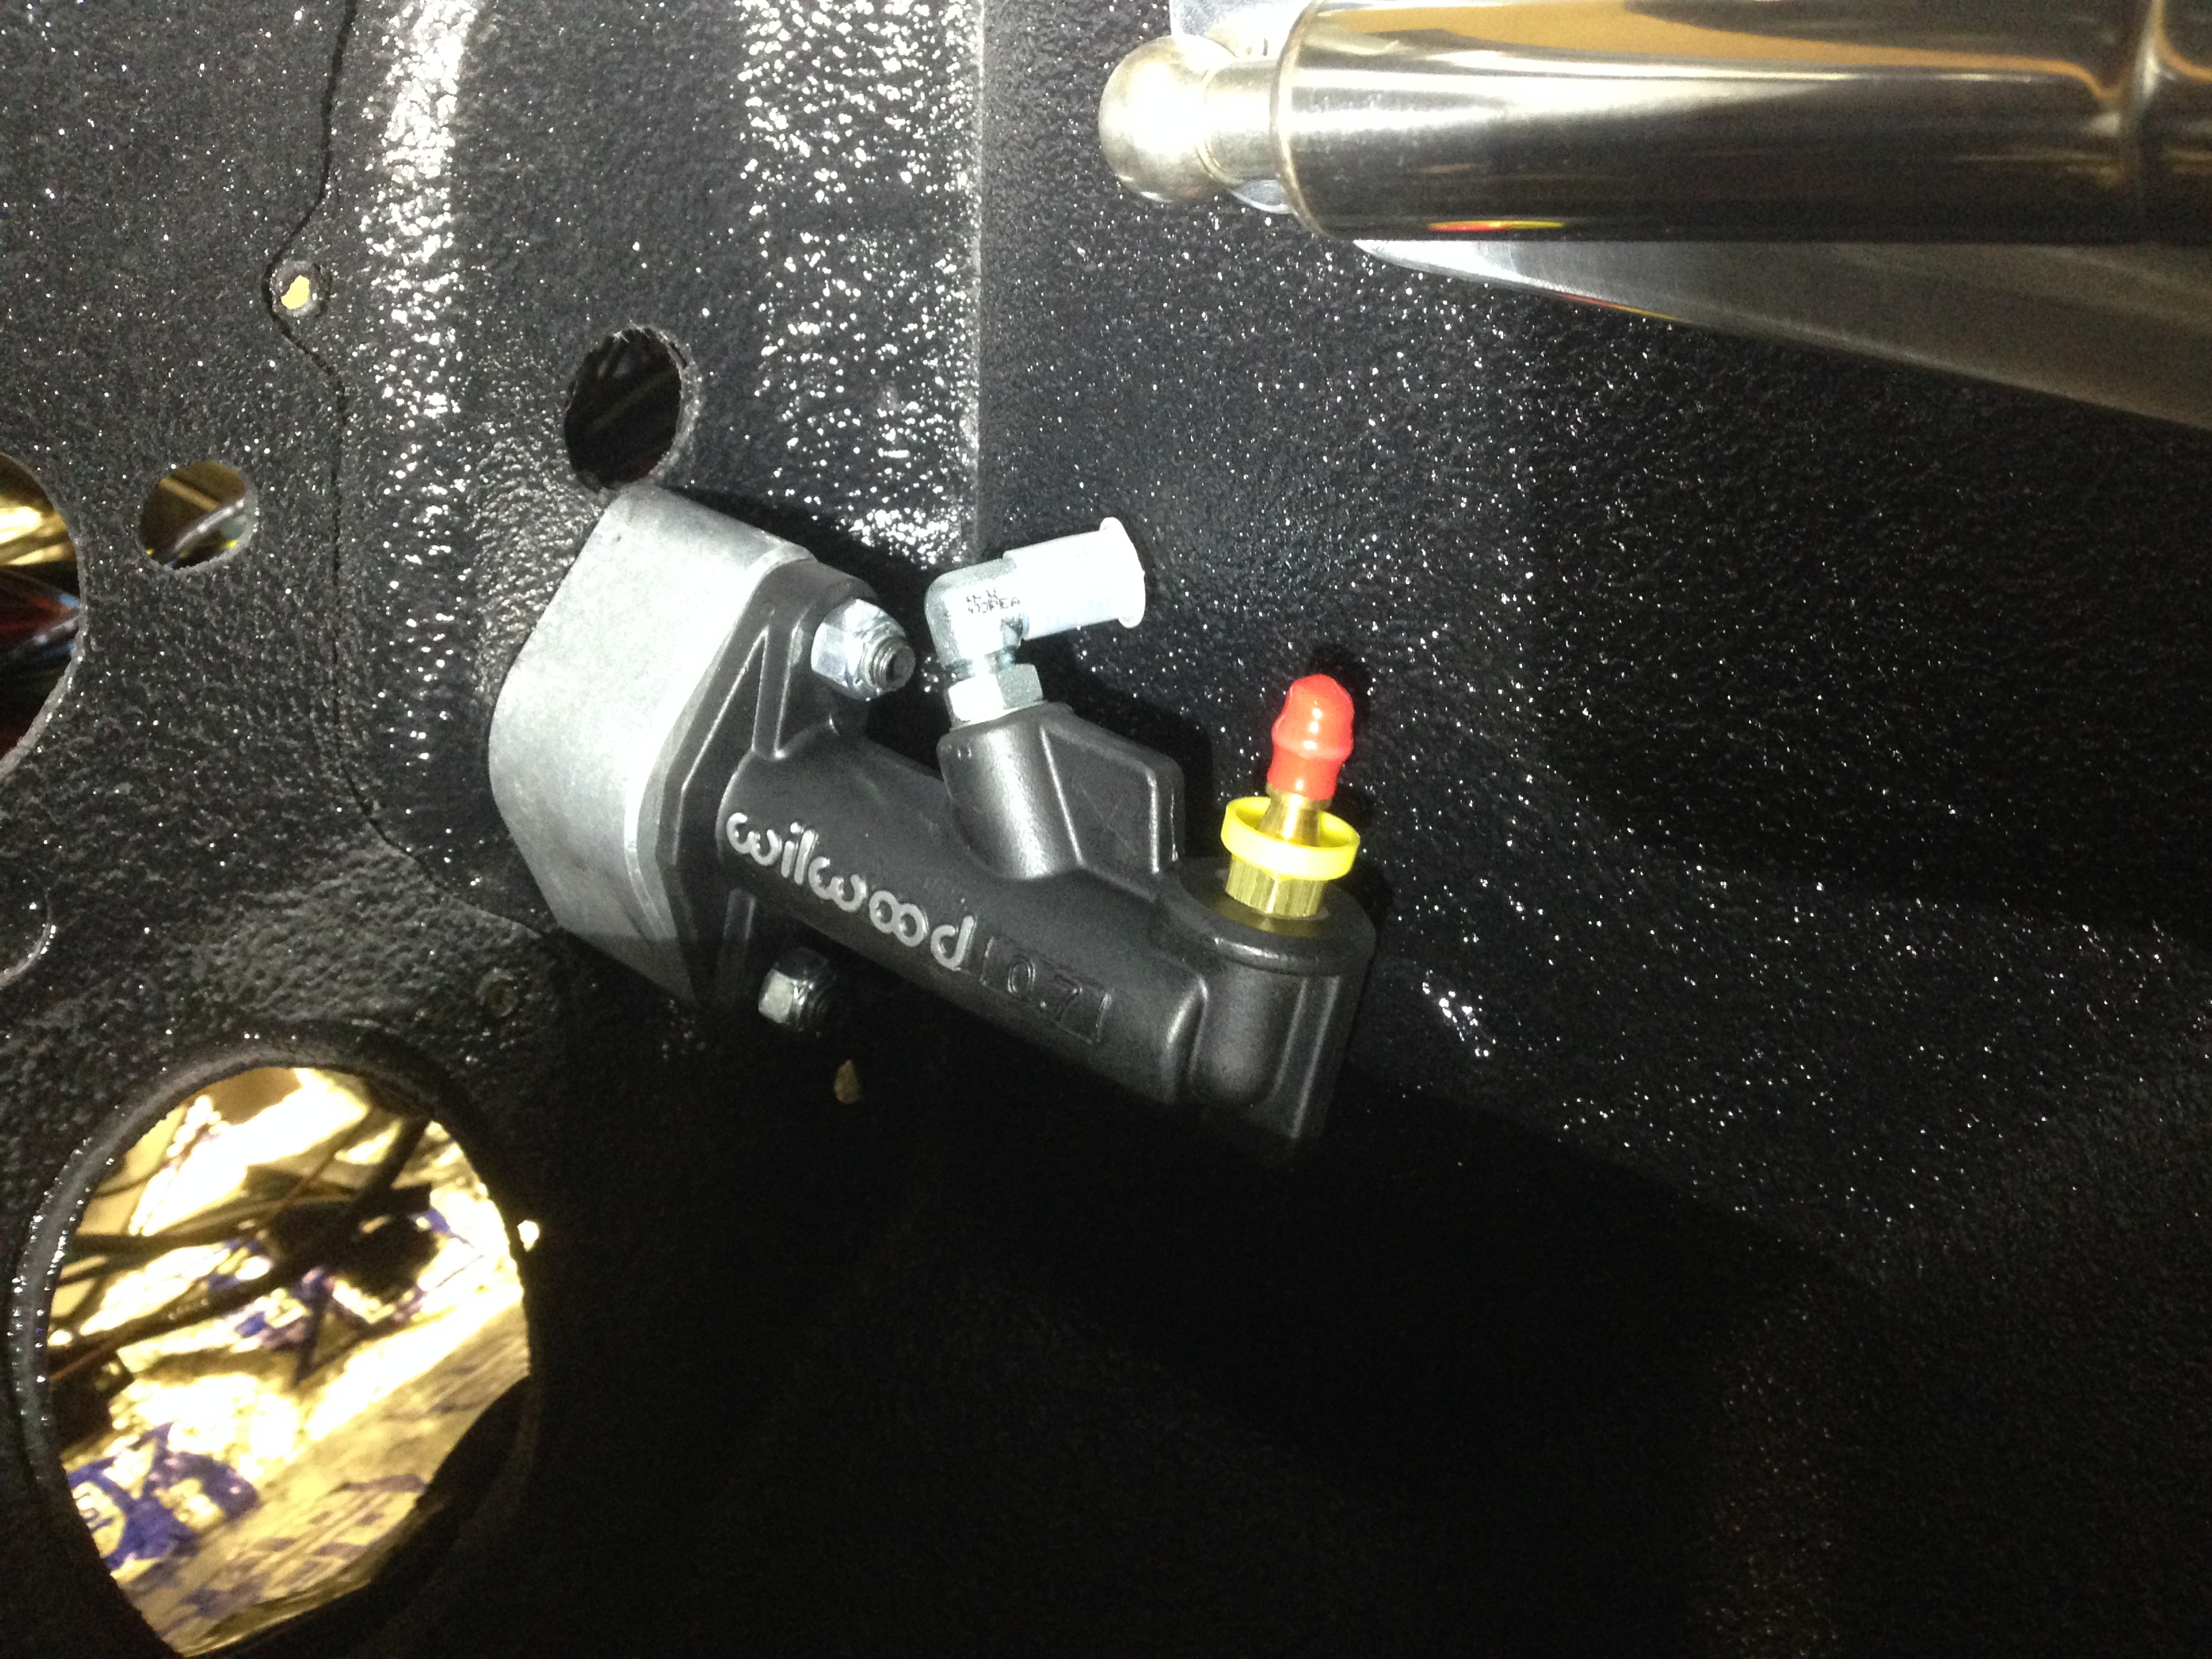
We went to install the clutch master cylinder and found the finish on it was pretty banged up right out of the packaging. It was an aluminum color and did not look very nice. We scuffed it, primed and painted it and then used 400 to break through the Wilwood lettering. We are going with a Wilwood black master cylinder so I think the complement will be well-worth the effort.
A few updates for you all. One thing that we decided on when we started building this car was that we wanted every element as "functional" as could be. Often times on cars we would see, the side scoops would be non-functional, side exhaust was non-existent and most of all, the side fuel filler would be simply a cap mounted on the side of the car with no filler tube in place. There are a few places selling the side fill kits, but they are either for the LeMans type mount (much lower to the trunk lid) or in the wrong spot completely. We had an exhaust shop bend a few pieces, which we ultimately destroyed through trial and error.
Finally, we found the tightest radius mandrel-bent pipe at Summit Racing. After fishing it though the hole and with some trimming, we marked where it needed to be cut, then we cut the flange off the original filler tube and silver soldered it to the new pipe. Inside the car, we will be able to connect the next pipe to the fuel tank.
We had a reproduction Mach 1 cap that we bought when we had to install the recess before paint. We used masking tape to protect the finish and when we were done with the mock up we removed the tape. The finish came right off with it, so we sent it back. We ended up finding this NOS cap on ebay.
Before we installed the windshield, we had to rivet the VIN plate back in place. This VIN plate was not used in 67, but came about for the 68 cars. We remembered it needed some love, but this was much worse than we expected!
Before
After
We also restored and repainted the wiper assembly and bracket before installing it. Yes that is the original motor and it works like a charm!
Another unique feature to "Eleanor" that you may have never noticed is the use of PIAA fog lights in the reverse light housings. To accomplish this, we started with the factory back up light housings and cut out the bulb retainer so the new fog light could be fitted. We also painted the housings body color. This is a subtle modification that is often overlooked.
We went to install the clutch master cylinder and found the finish on it was pretty banged up right out of the packaging. It was an aluminum color and did not look very nice. We scuffed it, primed and painted it and then used 400 to break through the Wilwood lettering. We are going with a Wilwood black master cylinder so I think the complement will be well-worth the effort.
02-20-2014, 09:50 AM
#935
3rd Gear Member
Join Date: Aug 2009
Location: Michigan
Posts: 516
So how exactly did you resurrect the VIN plate? That looks amazing, considering the corroded mess you started with. Love the blacked out M/C, very nice. I hope the sharp bend in the fuel filler tube doesn't splash back too much. You'd have to fill on the 'slow' rate. I like the driving lights fore reverse. I do that to my racing trailers, reverse lights are full on driving lights. It lets me see when backing out of the pits or at night.
02-24-2014, 08:14 AM
#937
3rd Gear Member
Thread Starter
Join Date: Sep 2009
Location: Ohio
Posts: 756
So how exactly did you resurrect the VIN plate? That looks amazing, considering the corroded mess you started with. Love the blacked out M/C, very nice. I hope the sharp bend in the fuel filler tube doesn't splash back too much. You'd have to fill on the 'slow' rate. I like the driving lights fore reverse. I do that to my racing trailers, reverse lights are full on driving lights. It lets me see when backing out of the pits or at night.
The sharp bend will definitely require slow fill-ups at the pump! We will install a vent tube in the filler which should help the flow a little bit.
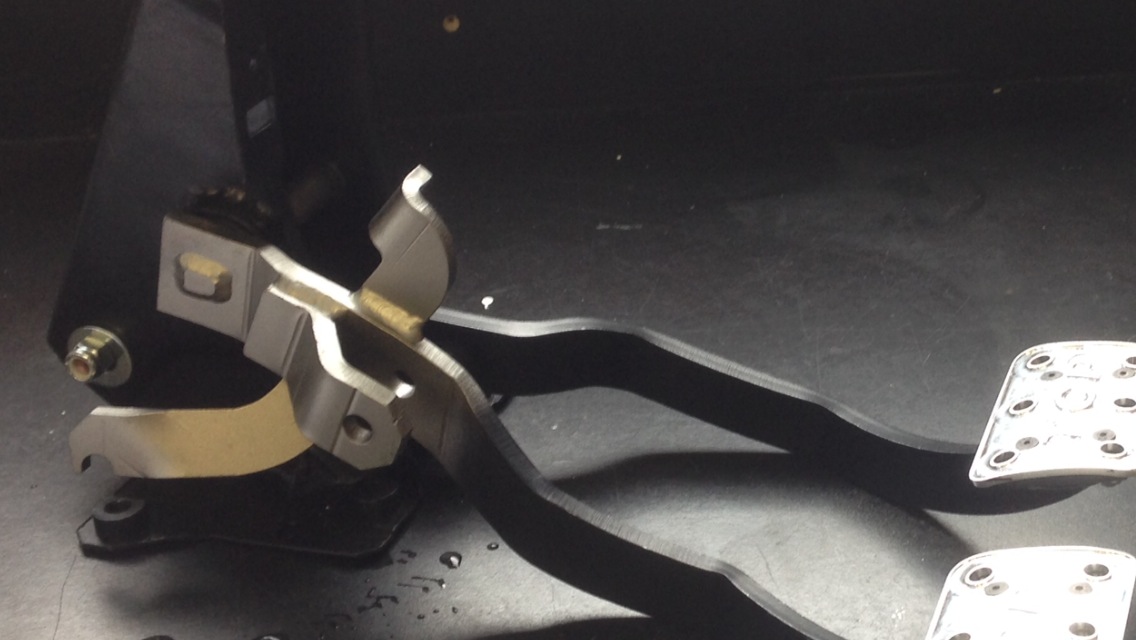
We have the pedal assembly restored and as soon as we round up the clutch pedal spring grommets, we can install it along with the booster.
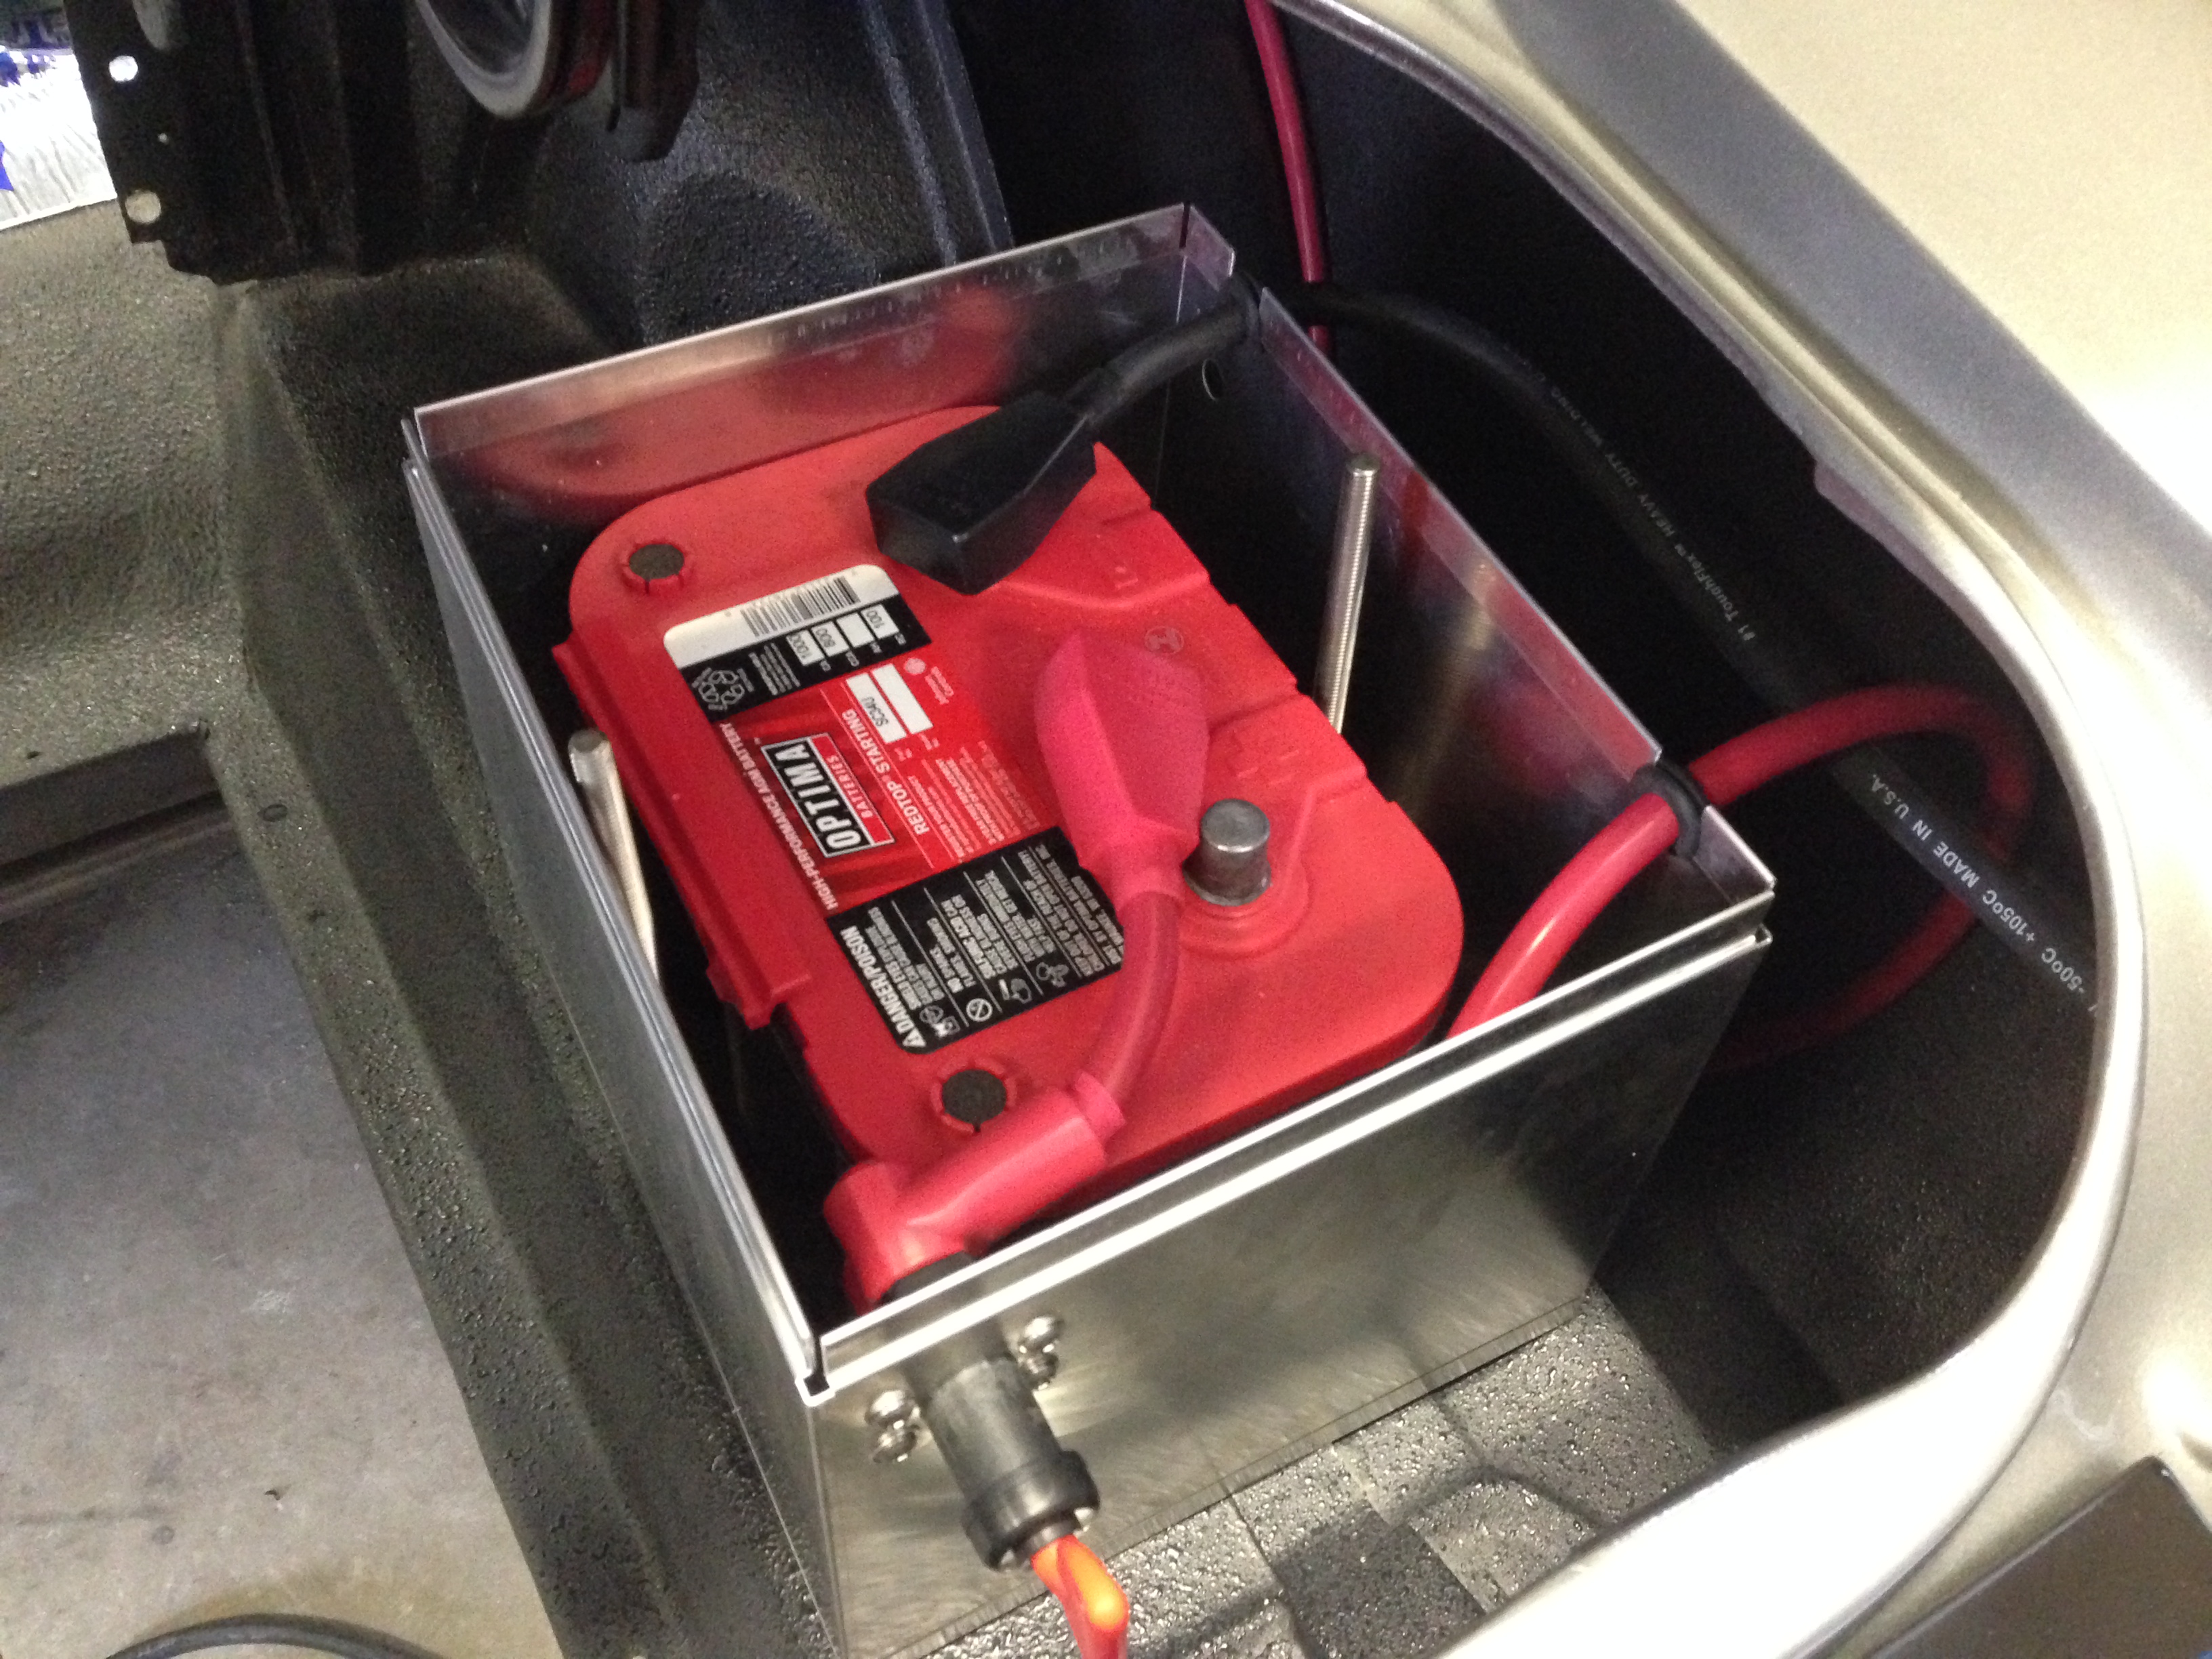
The wiring is almost finished up. We decided to put a master disconnect on the battery box for a cleaner install. The switch is rated at 350 Amps. We used Marine grade 1 AWG power wire and 1 AWG welding cable for the ground. Now we just need to tidy it all up. Every step is a process!
 04-04-2014, 06:04 AM
#940
3rd Gear Member
Thread Starter
Join Date: Sep 2009
Location: Ohio
Posts: 756
Well, you asked. At the time (few months ago) I didn't care to update about this because it's never good to post anything on the internet when you are fuming mad. But, we've had a long while to cool off so basically this is what happened. When we originally test fit the mock up 351w block while welding the Rod and Custom motor mounts to the cross member, we quickly realized that the Ford Motorsports oil pan was too tight to the rack and pinion. We talked to a few people and everyone said "yes it is super close." So, okay fine. When Rusty dropped the engine in with the Canton oil pan that was required due to the longer, high volume oil pump, he said that oil pan wasn't tight, but that it would flat out never clear. Either the oil pan had to be modified or the engine mounts weren't made right and needed to be modified. He decided to modify the mounts which made the engine come up and forward a 1/2 inch. Wala, it cleared. Put the intake on then and guess what, the intake doesn't clear the hood. Bolted the Supercharger on, guess what? Hood didn't come CLOSE to shutting. After a lot of staring, thinking, pondering, etc, we quickly learned that the supercharger (remember the whole engine package came from the tech editor of Modified Mustangs and Fords magazine) bracket was actually made for a 302, and not a 351. In fact we talked to Paxton and they told us they specifically do not make a bracket kit for the Novi 2000 to fit onto a 351w for this exact reason. (interesting enough, this engine was "supposed" to go into a 68 Mustang project they had going on for the mag...hmmm) So after a few people said "oh just modify the bracket," I said no way, on this car if you modify one thing then the next two things will need modified and we aren't doing that.
Back to the clearance issue with the intake/hood. We looking at Classic Recreations pictures till we were blue in the face. Noticed they are using what we think is a Moroso oil pan. So, we call Willie from Rod and Custom he said Classic Recreations is doing the same thing and has NEVER had an issue so we must be doing something wrong. K thanks, Willie. But, their oil pan does not look like our oil pan at all. So we got in touch with Jason, the owner of CR and he told us that they use a Moroso pan custom built for them. Then we called Moroso, and they wouldn't sell us the pan. Back to Rod and Custom. We told Willie that CR is using a Moroso pan and not the Canton pan. Willie got really defensive and said "I bet you don't know that Jason uses custom mounts and their 351w is a different deck height than yours." Well, okay then why did you tell me last convo that we're doing the same thing as them? Okay so then we asked Willie if we may have the wrong Canton pan (which we purchased from R&C) perhaps they accidently shipped us the wrong pan, who knows, mistakes happen. Willie insisted the pan was CUSTOM built for HIS front end kit by Canton Oil Pans. So, we called Canton Oil Pans and spoke with Bob Canton. We explained our situation and the problems we were running into. He asked which pan we were using and said "I'm not sure that's the best pan for your application. Where did you get it?" We told him, "Willie said this pan was custom made for his kit, by you guys" ... he said "Although they had done custom pans in the past for Rod and Custom, however this is NOT one of them." He did say however this wasn't the first time he had heard of pan clearance problems with Mustang II style suspension swaps. Back to Willie. Insists we are doing it wrong, can't tell us what and then sends us an email with 8 or so pictures of cars with his suspension and the 351w set up with Canton Pan. Great! Except for the fact that not ONE of the pictures show a 351w, Canton Pan, and Power Rack all used together. Not ONE.
So basically we threw our hands in the air and haven't done anything since. We sold off the supercharger because we weighed our options as far as purchasing a different s/c or going n/a and we are choosing to go the latter. Problem now is that we can't run the engine n/a with the current compression being so low. So, we either need to pull the engine and swap the pistons and cam, or sell it off too and start all over again. We think we have a solution as far as the hood clearance but it's still going to be very, very close. Basically after all that happened we decided to take a break. It's been such a long road that it pushed us over the edge. I don't know why everything's one big secret to all these car builders/car part manufacturers but I can tell you one thing is that it sucks all the fun out of it. We're hobbyists, and without them they'd have no livelihood. Sorry for the rant, but you all woke the dragon. But, on a better note I do have some glamour shots of the ol' girl if you'd like to see them. She is so pretty.

