Serafina - A 2002 v6 Build
 02-18-2012, 09:07 PM
#1

I've only just started modding my car, interior and exterior. I'm going to detail all of the mods I do here included what product I bought along with a link. The installation ease and whether or not I would recommend it again. Im doing this to help other people out who are just starting to mod and getting interested in it.
I will add posts and pics along with each mod I do. I have 3 or 4 already but don't have the time to type them tonight. Stay tuned. Many to follow!
Ps: Serafina is the name my fiance chose for my sixxer.
This is definitely going to be a PIC HEAVY Thread
***NOTE***
In several places, I mention that I left my battery connected and sometimes even my car running. This was simply me being lazy. Whenever you deal with anything that has to do with the electronics of your vehicle, I would recommend that you always disconnect your battery before proceeding. I will not be responsible for anything that happens to your car if you leave the battery connected during a mod procedure.
Last edited by slonison; 02-23-2012 at 07:24 AM.
 02-18-2012, 10:42 PM
#2
Mach 1 Chin Spoiler (99-04 GT, V6; 99-01 Cobra) $99.99
http://www.americanmuscle.com/ma1chsp.html
Ok, so this is considered a bolt-on, aesthetic mod and for all intents and purposes it is. The chin-spoiler is fairly easy just a little frustrating at times. the corners of the spoiler (which would be where the wheel wells are) tend to pinch in and make fitting a screwdriver/bolts difficult to hold steady and/or turn depending on the orientation.
The car will most likely need to be lifted a little where you're working, especially for me to fit the drill underneath and drill vertically. I used the simple spare tire jack (though I know this is not safe and I WAS extremely hesitant to even put my arms under the car). in order to prop the car up on each side.
I used a Dewalt power drill to drill the holes on the bottom of the bumper to install. Here's where I deviate from the way other people installed. Some people mentioned that they started in the corners and worked their way forward to the center to ensure the proper alignment of the bumper. My problem (and maybe others as well) was that the chin spoiler doesn't exactly make the reach from one wheel well to the other while going all the way around. If you look at the picture on American Muscle, you can see that theirs fall just short as well.

So my strategy was to line the center pre-drilled hole on the chin spoiler with the center of the bumper and work my way outwards in either direction. It reaches just about 1/2" short of either wheel well but I'm ok with this.

Overall it was easy though I did end up with a few scratches on my arms trying to reach around the sharp edges of the bumper.
Ease of Install: 9/10
Time: 2 hours
Recommend: Yes
http://www.americanmuscle.com/ma1chsp.html
Ok, so this is considered a bolt-on, aesthetic mod and for all intents and purposes it is. The chin-spoiler is fairly easy just a little frustrating at times. the corners of the spoiler (which would be where the wheel wells are) tend to pinch in and make fitting a screwdriver/bolts difficult to hold steady and/or turn depending on the orientation.
The car will most likely need to be lifted a little where you're working, especially for me to fit the drill underneath and drill vertically. I used the simple spare tire jack (though I know this is not safe and I WAS extremely hesitant to even put my arms under the car). in order to prop the car up on each side.
I used a Dewalt power drill to drill the holes on the bottom of the bumper to install. Here's where I deviate from the way other people installed. Some people mentioned that they started in the corners and worked their way forward to the center to ensure the proper alignment of the bumper. My problem (and maybe others as well) was that the chin spoiler doesn't exactly make the reach from one wheel well to the other while going all the way around. If you look at the picture on American Muscle, you can see that theirs fall just short as well.
So my strategy was to line the center pre-drilled hole on the chin spoiler with the center of the bumper and work my way outwards in either direction. It reaches just about 1/2" short of either wheel well but I'm ok with this.
Overall it was easy though I did end up with a few scratches on my arms trying to reach around the sharp edges of the bumper.
Ease of Install: 9/10
Time: 2 hours
Recommend: Yes
Last edited by slonison; 02-19-2012 at 10:41 PM.
02-18-2012, 11:13 PM
#3
Cold Air Intake (99-04 V6)
http://www.americanmuscle.com/muv6coairins.html
First ever under the hood Mod. Went fairly well. I used the video provided on American Muscle (thanks Autohow.tv) PS. If you're watching this video on your smart phone and pause to perform the action, if your phone display timesout and sleeps, the video will have to start over (Android)
Let me begin by pointing out the differences between the video and my car. During the video, the individual is shown disconnecting two plugs. My car only had one. From what it looks like, this is the intake air temperature sensor. Apparently my car doesn't have one because this was nonexistant on my stock intake. (anyone know where to get this.)
At 2:30 the narrator talks about installing the smaller of the two rubber couplings... This was a complete bitch, it's like trying to fit your thumb into a straw. Nothing like the video (which isn't the one you're installing.)
The rest of the installation went as is described in the video. On the intake, there IS a hole or the temperature sensor. I'm thinking about getting one, but until then I needed to plug this with a rubber stop, which someone else in the AM reviews pointed out. Also, watch out for your own hose which goes to some big thing having experienced dry rot, mine barely reaches and is screaming at me to replace it.
Overall, this was pretty easy, easier than the chin spoiler. The coolest part of this is that when I give the car a gas, the rumble is stronger and I hear a whooshing sound coming from under the hood. Sometimes it's loud, sometimes it's low, from what I've gather it depends on how much I'm changing the momentum of the car.
Before:

After: (Forgive the lighting, the sun had just set)

Ease of Install: 10/10
Time: 1 hour
Recommend: Yes
http://www.americanmuscle.com/muv6coairins.html
First ever under the hood Mod. Went fairly well. I used the video provided on American Muscle (thanks Autohow.tv) PS. If you're watching this video on your smart phone and pause to perform the action, if your phone display timesout and sleeps, the video will have to start over (Android)
Let me begin by pointing out the differences between the video and my car. During the video, the individual is shown disconnecting two plugs. My car only had one. From what it looks like, this is the intake air temperature sensor. Apparently my car doesn't have one because this was nonexistant on my stock intake. (anyone know where to get this.)
At 2:30 the narrator talks about installing the smaller of the two rubber couplings... This was a complete bitch, it's like trying to fit your thumb into a straw. Nothing like the video (which isn't the one you're installing.)
The rest of the installation went as is described in the video. On the intake, there IS a hole or the temperature sensor. I'm thinking about getting one, but until then I needed to plug this with a rubber stop, which someone else in the AM reviews pointed out. Also, watch out for your own hose which goes to some big thing having experienced dry rot, mine barely reaches and is screaming at me to replace it.
Overall, this was pretty easy, easier than the chin spoiler. The coolest part of this is that when I give the car a gas, the rumble is stronger and I hear a whooshing sound coming from under the hood. Sometimes it's loud, sometimes it's low, from what I've gather it depends on how much I'm changing the momentum of the car.
Before:
After: (Forgive the lighting, the sun had just set)
Ease of Install: 10/10
Time: 1 hour
Recommend: Yes
 02-22-2012, 10:42 PM
#5
LED Light Accents.
HVAC Bezel
2x WLED-x5
http://www.superbrightleds.com/cgi-b...ini-wedge.html
(First choice, fourthtab)
This was an interesting trip of a mod. First remove the bezel around the shifter.

Second remove the bezel around the consoles. It will look like this. Unscrew the 4 bolts holding in the HVAC unit and gently pull it out.

Pull off the 3 control handles and pop out the 9 tabs (5 on top, 4 on bottom) and remove the faceplate from the HVAC controls. You don't have to unplug the red plug, I was unsure of what I was doing and realized before I unplugged the other 4plugs not to.

On the back of the faceplate you'll see a green strip, this needs to be removed. I used a pair of needlenosed pliers to grip it and ripped the **** out of it to get it out.

Replace the bulbs on the back of the actual unit by unscrewing the latch, pull the bulbs out and put in the new LEDs. (Didn't take pictures here because it's pretty simple to find them. They're small and black.)
Replace the faceplate and voila...oh **** the ***** have green...

Remove the *****. Using a flathead screwdriver push down on the part that colors green and a small clear block will pop out.
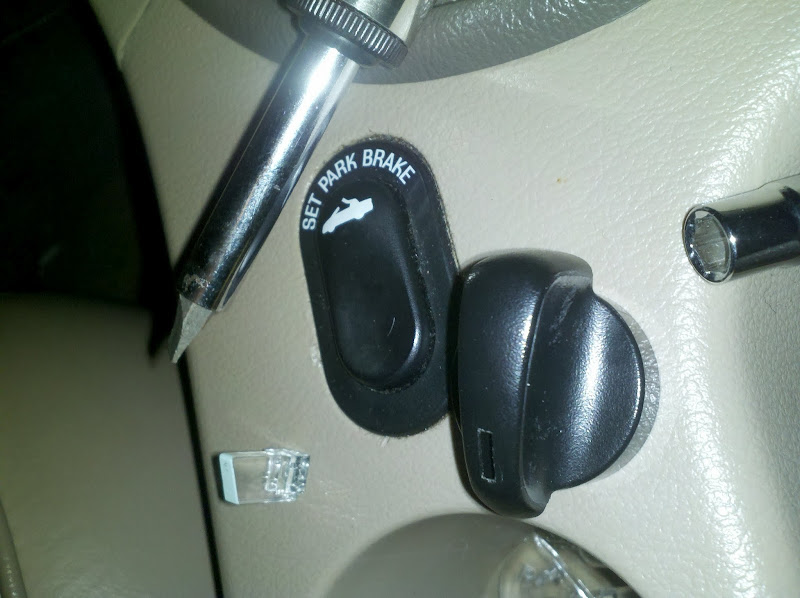
Using the screwdriver I scratched off the color and replaced the **** and here is the final result.
Do it to the next two and you're golden.
Ease of Install: 2/10
Time: 1 hour (maybe more)
Recommend: If you wanna change up the interior colors, go for it. On the bright side, once its done, the hard part (removing the green) will only ever have to be done once...
HVAC Bezel
2x WLED-x5
http://www.superbrightleds.com/cgi-b...ini-wedge.html
(First choice, fourthtab)
This was an interesting trip of a mod. First remove the bezel around the shifter.
Second remove the bezel around the consoles. It will look like this. Unscrew the 4 bolts holding in the HVAC unit and gently pull it out.
Pull off the 3 control handles and pop out the 9 tabs (5 on top, 4 on bottom) and remove the faceplate from the HVAC controls. You don't have to unplug the red plug, I was unsure of what I was doing and realized before I unplugged the other 4plugs not to.
On the back of the faceplate you'll see a green strip, this needs to be removed. I used a pair of needlenosed pliers to grip it and ripped the **** out of it to get it out.
Replace the bulbs on the back of the actual unit by unscrewing the latch, pull the bulbs out and put in the new LEDs. (Didn't take pictures here because it's pretty simple to find them. They're small and black.)
Replace the faceplate and voila...oh **** the ***** have green...
Remove the *****. Using a flathead screwdriver push down on the part that colors green and a small clear block will pop out.
Using the screwdriver I scratched off the color and replaced the **** and here is the final result.
Do it to the next two and you're golden.
Ease of Install: 2/10
Time: 1 hour (maybe more)
Recommend: If you wanna change up the interior colors, go for it. On the bright side, once its done, the hard part (removing the green) will only ever have to be done once...
Last edited by slonison; 02-23-2012 at 07:22 AM.
02-22-2012, 10:48 PM
#6
Replacing Rear View Mirror bulbs with LEDs
2x WLED-x5
http://www.superbrightleds.com/cgi-b...ini-wedge.html
It's really easy. Pop out the clear plastic covers with a flathead screwdriver or your fingernail (I used).

Using needlenosed pliers, pull out the bulb. One bulb came right out. One bulb (drivers side) would not come out even if I had the jaws of life, so I squeezed it into glass shards and dust, which, as you would expect, flew everywhere. Pulled out the remainder, plugged the new LEDs in. Car lights up 10x brighter. This picture has the new LEDs in.

I would recommend cool white for this simply because if you have a chick who's gonna wanna put on makeup and such, these are not going to make her feel like she's in the twilight zone.

PS. I did this with the car running, it was cold, I was listening to music, and I was not about to disco the battery for a 5 minute bulb swap.
Ease of Install: 1/10
Time: 10minutes
Recommend: Yes
2x WLED-x5
http://www.superbrightleds.com/cgi-b...ini-wedge.html
It's really easy. Pop out the clear plastic covers with a flathead screwdriver or your fingernail (I used).
Using needlenosed pliers, pull out the bulb. One bulb came right out. One bulb (drivers side) would not come out even if I had the jaws of life, so I squeezed it into glass shards and dust, which, as you would expect, flew everywhere. Pulled out the remainder, plugged the new LEDs in. Car lights up 10x brighter. This picture has the new LEDs in.
I would recommend cool white for this simply because if you have a chick who's gonna wanna put on makeup and such, these are not going to make her feel like she's in the twilight zone.
PS. I did this with the car running, it was cold, I was listening to music, and I was not about to disco the battery for a 5 minute bulb swap.
Ease of Install: 1/10
Time: 10minutes
Recommend: Yes
Last edited by slonison; 02-23-2012 at 07:15 AM.
02-23-2012, 07:15 AM
#8
Replacing License Plate Bulbs with LEDs
2x WLED-x5
http://www.superbrightleds.com/cgi-b...ini-wedge.html
There are two ways to go about doing this. I used method 1 for both because I wanted to take the light housing off and clean the inside of burnt-out light fragments and dust. I just used to water for that and waited till they dried.
1. You can unscrew the 2 screws on each light protector and replace the bulb.

2. You can twist out the white bulb insert, pull it out, replace the bulb and push it back in. The white inserts are NOT the plastic pieces with green wires coming out. They're the plastic pieces in my image BELOW the trunk bolts. Very easy to see, look in my picture for the large silver bolts. The left one is slightly hidden. They have large black wire bundles coming out.

Either way, same result. You will definitely have a much brighter look near your license plate. Will add pic when it get's dark. Once again, did this with the car battery attached but not the car running.
Ease of Install: 1/10
Time: 10 minutes
Recommend: Yes, if you want to make it easier for people to see your plate. I don't know about anywhere else, but in NJ "STAY AWAY FROM BLUE!!!" Police WILL pull you over for anything blue anywhere on the outside of your car.
2x WLED-x5
http://www.superbrightleds.com/cgi-b...ini-wedge.html
There are two ways to go about doing this. I used method 1 for both because I wanted to take the light housing off and clean the inside of burnt-out light fragments and dust. I just used to water for that and waited till they dried.
1. You can unscrew the 2 screws on each light protector and replace the bulb.
2. You can twist out the white bulb insert, pull it out, replace the bulb and push it back in. The white inserts are NOT the plastic pieces with green wires coming out. They're the plastic pieces in my image BELOW the trunk bolts. Very easy to see, look in my picture for the large silver bolts. The left one is slightly hidden. They have large black wire bundles coming out.
Either way, same result. You will definitely have a much brighter look near your license plate. Will add pic when it get's dark. Once again, did this with the car battery attached but not the car running.
Ease of Install: 1/10
Time: 10 minutes
Recommend: Yes, if you want to make it easier for people to see your plate. I don't know about anywhere else, but in NJ "STAY AWAY FROM BLUE!!!" Police WILL pull you over for anything blue anywhere on the outside of your car.
Last edited by slonison; 02-23-2012 at 07:22 AM.

Thread
Thread Starter
Forum
Replies
Last Post
Gary Ugarek
4.6L (1996-2004 Modular) Mustang
63
12-11-2015 02:01 PM
cheapLEY
4.6L General Discussion
7
09-05-2012 06:39 PM