Ford Mustang 1994-2004: Why is My Car Overheating?
Not only is an overheating engine a major inconvenience that may leave you sitting on the side of the road, but it can wreak major damage to your engine and wallet alike if left untreated. Taking some time to properly inspect cooling system components will usually have the source of the problem staring you straight in the face. Fortunately, many overheating issues can be quickly resolved to restore cooling system efficiency.
This article applies to the V6 Ford Mustang (1994-2004).
Reliable operation of an internal combustion engine requires an efficient cooling system. The combustion of gasoline inside an engine allows for chemical energy to be converted into mechanical energy. Unfortunately, this process is a bit crude, and a large portion of the energy is lost by way of heat. This heat must be rapidly absorbed and shed from the engine, or it would destroy itself in a short period of time. To ensure proper operation and longevity, hollow areas throughout the engine, known as water jackets, are filled with coolant that is continuously transferred from the engine to the radiator where the heat energy is released to the atmosphere. A cooling system that is unable to effectively transfer heat energy from the engine can result in engine overheating and potential engine damage. If your engine is overheating, prompt diagnosis can go a long way in preventing a large repair bill. Most overheating issues stem from a minor problem that can be quickly and easily corrected. This article will outline typical causes of engine overheating on the 1994 to 2004 V6 Ford Mustang.

Materials Needed
- Metric and American wrenches/sockets
- Ratchet and extensions
- Digital multimeter
- Jumper wires
- Funnel
- Catch pan
- Screwdriver
- New coolant

Step 1 – Inspect coolant
The first step to diagnosing an overheating engine is to ensure the coolant level is in good condition and is topped up. Coolant circulates through the engine and absorbs heat energy produced by combustion. The hot coolant is then pumped to the radiator where passing air allows it to cool down before being recirculated back into the engine where the process begins again. Over time, coolant will break down and can often become contaminated with rust and scale that will reduce cooling system efficiency. In severe cases, cooling system components can degrade from the inside-out and lead to further cooling system problems. Additionally, a low coolant level may not allow sufficient coolant to circulate through the engine and absorb heat energy, thus leading to engine overheating.
- With the engine cool to the touch, inspect the coolant level in the coolant reservoir and the radiator. A highly discolored, gritty, or thick coolant is a cause for concern and should be flushed (Related Articled: How to Flush Radiator - MustangForums.com). If the coolant level is low, top off the radiator and fill the reservoir to the cold fill line with pre-diluted 50/50 antifreeze coolant mix.
- Inspect the condition of the radiator cap. A radiator cap that has a bad seal will not keep the cooling system under pressure, thus lowering the coolant's resistance to boiling. A cracked, split, hardened, or missing radiator cap seal can lead to overheating, so a new cap should be installed.

Pro Tip
If you have to regularly add coolant, there is a leak somewhere in the cooling system. Inspecting all hose connections as well as following the steps below can help identify the source of the leak.
Step 2 – Inspect radiator
As previously mentioned, neglected radiator maintenance can lead to a variety of cooling system issues, with the most susceptible component being the radiator. Radiators are composed of small passages, known as cores, that allow for coolant to flow from one side of the radiator to the other as it is being cooled. Unfortunately, these cores are easily plugged with sediment, rust, and scale that can inhibit coolant flow. Flushing the cooling system can clear out much of the buildup and restore cooling functionality. Additionally, radiators can become partially blocked with leaves, trash, etc. and reduce cooling efficiency. Check to make sure there are no obstructions that may be reducing airflow across the radiator. Also, a general inspection of the outside of the radiator can typically indicate if a coolant leak is present. Pay close attention to where the plastic end tanks meet the radiator core as the crimped seams are often the first area to leak. Similarly, the plastic tanks and radiator filler neck have also been known to become brittle with age and crack. While the first choice should always be to replace a leaking radiator, a stop-leak product can often seal small leaks and allow for additional service life without the need of an immediate replacement.

Step 3 – Inspect thermostat
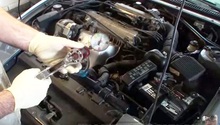
Higher mileage vehicles tend to have overheating issues caused by a stuck thermostat, and the Mustang is no exception. The thermostat is a temperature controlled valve that regulates coolant flow through the engine to ensure the engine remains at its optimum operating temperature. The thermostat blocks coolant flow to allow the engine to quickly reach operating temperature before it opens. Not only is this beneficial for emissions control, but it allows for the heater to heat up the car much sooner than would be possible with unrestricted coolant flow. In a cold climate, the thermostat may continuously open and close to keep the coolant temperature constant. Unfortunately, the thermostat can fail in either the opened or closed position. While a "failed open" thermostat is generally not detrimental to engine operation, a "failed closed" thermostat will cut-off all coolant flow and allow the engine to quickly overheat. Fortunately, the thermostat is located on the topside of the engine and can be removed by draining a bit of coolant and removing the thermostat housing. Although the thermostat can be tested for functionality, most owners typically replace it since it is an inexpensive part available at all auto parts stores.

(Related Article: How to Replace Thermostat - MustangForums.com)
Pro Tip
A thermostat can be tested by placing it in a pot of boiling water. The thermostat should be in the closed position, but open once it is placed in the hot water.
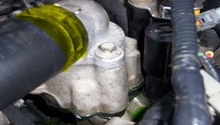
Step 4 – Inspect water pump
The water pump is considered the heart of the cooling system as it is responsible for circulating the coolant throughout the engine block and associated components. While water pumps are quite robust and last many miles, it is not uncommon for them to fail sooner than 50,000 miles. Perhaps the most common type of water pump failure is when the water pump seal goes bad. The seal in the water pump is in place to keep coolant from leaking into water pump bearing and causing premature bearing failure. When the seal fails, coolant will leak out of the weep hole, located on the front side of the water pump. If leaking goes unnoticed, it can cause a low coolant level and eventual overheating. The water pump can also have an impellar failure in which the blades corrode or break, leading to reduced coolant flow and eventual overheating issues. A broken impellar typically will not cause the water pump to leak; however, squeezing the upper radiator hose with the engine running at operating temperature will allow you to feel if there is a strong flow of water through the hose. If the water pump is making a growling noise, has a pulley wobble, or has excessive shaft play, it should be replaced.

Pro Tip
The serpentine belt can be removed and the water pump pulley spun by hand to get a generally feeling of the water pump bearing and shaft condition. If it feels gritty or has excessive movement up and down, or in and out, the pump should be replaced.
Step 5 – Inspect cooling fan
The Mustang is equipped with an electric cooling fan that pulls air through the radiator when additional cooling is required. The electric fan should operate whenever the air-conditioner (A/C) is switched on, or the coolant temperature reaches 221° F. If your overheating issue seems to occur only when your car is sitting stationary, it is likely a cooling fan issue. Turning the air-conditioner on with the engine running can indicate if the problem is within the fan, fuses, relays, or temperature sensor. If the fan activates with the A/C on, this confirms that the fan motor, fuse, and constant control relay module (CCRM) are all functioning and the problem likely lies within the coolant temperature sensor. If the fan does not power on with the A/C switched on, test the fan by supplying the motor with 12 volts. If the fan powers on, the problem is within the fan fuse or CCRM. If the fan fails to run, the fan motor is bad and the fan assembly needs to be replaced. It is worth noting that any air trapped in the cooling system will cause the coolant temperature sensor to read a low temperature and not activate the cooling fan. If you have recently flushed the cooling system or replaced any component that required draining of the cooling system, be sure all residual air is bled out of the system or overheating will occur.

Figure 6. Cooling fan assembly located on backside of radiator. 
Figure 7. Coolant temperature sensor.
Pro Tip
Around 2001, Ford switched from an engine coolant temperature sensor to a cylinder head temperature sensor to monitor coolant temperatures for the PCM. This change helped to minimize the chances of trapped air causing false coolant temperature readings and preventing normal fan operation.
Step 6 – Inspect for blown head gasket
In the event that all other cooling system components are functional, but your Mustang is still overheating, chances are it has a leaking or blown cylinder head gasket. Unlike other cooling system components that can be visually inspected for wear and leaks, the cylinder head gasket is sandwiched between the engine block and the cylinder head, which cannot be seen without engine disassembling. A leaking head gasket can allow hot exhaust gases to be pushed into a nearby water jacket and cause overheating issues. Similarly, coolant can be drawn into the cylinder during the intake stroke and burned each power stroke, resulting in a loss of coolant. While the head gasket cannot be inspected, inspection of several other components may help identify a leaking gasket.
- White exhaust smoke is a by-product of burned water/coolant. As coolant enters the combustion chamber and is burned, the coolant becomes a vapor that exits the exhaust as white smoke. This white exhaust is not to be confused with normal condensation that exits the tailpipe during initial engine start-up.
- Spark plugs can shows signs of a leaking head gasket. Removing the spark plugs and comparing each of them will often indicate which cylinder is leaking. Coolant can wash the spark plug electrode leaving it looking clean as compared to the golden brown/tan color of a normal burning spark plug. If you have a borescope at your disposal, looking through the spark plug hole at each piston crown can identify a leaking gasket as well.
- With the radiator cap removed, examining the coolant for bubbles with the engine running is a telltale sign of a head gasket leak.
- Checking the engine oil for coolant is another easy way to identify a leaking head gasket. Coolant mixed with oil will tends to be a milky white or coffee color.
- Depending on the severity of the leak, a compression test of all cylinder can help pinpoint the problem area. The cylinder at which the head gasket is leaking can sometimes have a lower compression reading. Compression readings should differ no more than 10% between cylinders.
In any case, a leaking head gasket should be treated immediately. Coolant can damage the cylinder walls and will eat away at bearings in the bottom-end of the engine, which will lead to additional repair costs.

Pro Tip
A cracked cylinder head or engine block can have many of the same symptoms as a blown head gasket.
Related Discussions
- Please Help! Overheating Mystery! - MustangForums.com
- V6 Mustang Overheating (Frustrated!)- MustangForums.com
- 3.8L Overheating & Most Everything Changed - MustangForums.com