Ford Mustang GT 1996-2004: Transmission Diagnostic Guide
With the right information, you have a good chance of determining and correcting your transmission's fault. Many components are used and must work simultaneously for smooth operation. Starting with the components that are easily accessed and quick to test eliminates the possibilities rather quickly.
This article applies to the Ford Mustang (1996-2004).
Ford offers both a manual and automatic transmission for the 1996-2004 Mustang. The manual transmission is known as the TR-3650. The automatic is known as the 4R70W. The 4R70W is used in many vehicles developed by Ford. Manual transmissions by design are less sophisticated than automatic transmissions. Automatic transmissions use fluid pressure to select gears and electronic sensors to decide which gear your Mustang should be in. Manual transmissions are mechanically operated with the force of your hand moving the gear shift.
Materials Needed
- Floor jack
- Jack stands
- Flashlight
- Line pressure gauge (Automatic only)
- Rubber gloves
- Safety glasses
- Service information pertaining to your transmission
This guide will cover both the automatic and manual transmissions. The manual transmission will be covered first. Have your Mustang scanned for OBD trouble codes. Most automotive parts stores will scan for free although a high quality aftermarket scan tool may be needed to display some transmission codes. If your overdrive light is flashing on your 4r70w, then a transmission fault is present. Have your vehicle inspected and scanned, otherwise transmission damage may occur.
Manual Transmission Diagnostic
Step 1 – Check the fluid level and condition
Refer to the related article below for fluid inspection. The fluid should not appear dark/black in color otherwise a fluid change is required. Look under the vehicle for external leaks. Common leak areas are where the transmission bolts to the engine (rear main seal), at the extension housing seal, and at the fill and drain plugs.
(Related Article: How to Change Manual Transmission Fluid - Mustangforums.com)
Step 2 – Check the clutch's operation
A misadjusted clutch can allow the clutch to drag against the flywheel or not fully engage the flywheel.
Lift the drive wheels (rear wheels) off the ground and place the transmission in first gear with the clutch pushed in. If the wheels move, the clutch is dragging against the flywheel. Verify your clutch pedal's travel is normal.

The clutch in your mustang is operated by a cable on some transmissions. Others are mounted directly to the transmission. A binding or stretched cable can create a similar problem. Visually inspect the cable at the clutch pedal and at the transmission for damage.
If your transmission shifts normally, continue with Step 3; otherwise, move to Step 4.
Step 3 – Determine the cause of your transmission noise
There are several different types of noises a manual transmission has been known to make. These are most commonly identified as growling, grinding and clicking. Read through the numbered list to see which applies to your transmission.
- Grinding noise - Other than the clutch issues mentioned in Step 3, a grinding noise may be caused by a worn synchronizer blocker ring or a binding shift rail. This noise will occur while attempting to shift. A less common cause of grinding noises is a misaligned bell housing. When the bell housing is out of alignment, the clutch can drag, preventing the synchronizers from matching the speed of the gears' dog teeth.
- Growling noise - If the noise occurs while driving down the road, it may be caused by worn bearings or gears. These bearings may be located on the main shaft, countershaft or input shaft. If the noise occurs in neutral with the clutch disengaged, it's likely the pilot bearing is worn. With the clutch engaged, a growling noise in neutral is indicative of a faulty input shaft front bearing or one of the countershaft bearings.
- Clicking noise - A clicking noise that occurs in any gear is most often caused by chipped gear teeth on the input shaft, main shaft and counter shaft. The clicking will increase with speed or may change with gear shifts.

Step 4 – Determine the cause of your hard shifting issue
Hard shifting is caused by incorrect operation of the moving parts outside or inside your transmission other than what has been covered in Step 2. These include the shifter, shift cables, shift rails, shift forks and synchronizers. Read through the numbered list below to determine the source of your hard shifting problem.
- The shift rails, synchronizers, and/or shift forks are binding. Try shifting the vehicle with the engine running and comparing the feel of the same shift with the engine off. There should be no difference if the synchronizers are working properly.
- The shift linkage is worn, the square portion of the shift lever is worn, and/or the detent system is sticking. This problem may be present if the transmission cannot shift into one or more gears.
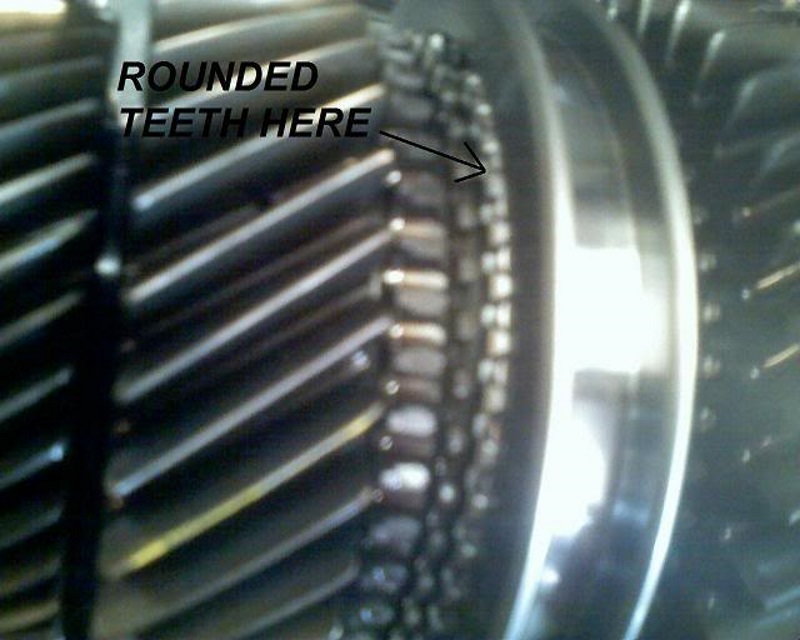
- The gear dog teeth are worn. This will require transmission dissasembly to inspect. The synchronizer sleeve will not mesh with the gear once the teeth are worn badly enough.
- If the transmission is stuck in one gear, there may be a stuck detent mechanism. A binding synchronizer or broken dog teeh may cause this as well. Try disconnecting the shift linkage from the transmission. Is the shifter moving freely? If so, a shift cable may be frozen or the linkage could be binding.
- Check the shift linkage, shift cable and shift boot if your transmission is popping out of gear. The shift boot will block the shifter's travel if it becomes loose, especially as the engine is accelerated and decelerated. Worn engine and transmission mounts may create excessive levels of movement, resulting in the same issue.
Automatic Transmission Diagnostic
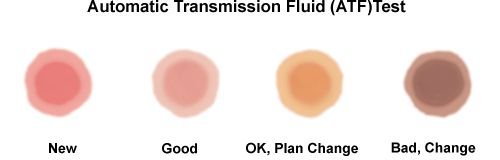
Step 1 – Check the fluid level and inspect the fluid condition
Refer to the related article below for checking the fluid level. The fluid color should not appear dark/black in color otherwise a fluid change is required.
(Related Article: How to Change Automatic Transmission Fluid - MustangForums.com)
Look under the vehicle for transmission fluid leaks. Look at the front, rear and sides of the transmission near the fill and drain plugs and well as the extension housing and torque converter housing. There is a vent tube that routes toward the top of the transmission. If fluid is found near here, then the transmission was overfilled or excessive amounts of pressure are building inside.
If your transmission's operation does not match the selected gear shift position, move to Step 4.
Step 2 – Perform a stall test
This is a simple test known as a "stall test" to verify the operation of many different transmission components. Stall testing is hard on the engine and transmission and can cause a borderline failing part to fail. You will want to place a fan in front of your Mustang to simulate cooling fan operation. Chock the front wheels if possible.
Start the engine and allow it to reach operating temperature. Depress the brake pedal and place the transmission into gear. Begin by testing reverse. You will test each gear range. Wait one minute between gears for cool down and place the transmission into neutral. While holding the brake pedal down firmly, increase the engine RPM to the stall speed (1,800-2,000) for the V6 and (2,200-2,400) for the V8. Hold the RPM's at this amount for a maximum of five seconds. Record the reading and compare it to specifications.
Engine RPM that is lower than specification indicates the torque converter is malfunctioning if the engine is in proper operating condition. Engine RPM that's high in all gears can indicate a faulty fluid pump, internal pressure leak, faulty pressure regulator, or a clogged filter. If the RPM's are high in only one gear, you'll need to research service information to determine which clutch/band may be slipping.

Step 3 – Perform a hydraulic pressure test
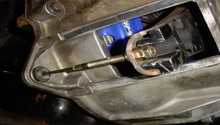
The 4R70W has multiple ports for line pressure readings. These ports exist for the forward clutch, direct clutch, intermediate clutch, EPC solenoid and line pressure. The ports are directly above the transmission pan. The line pressure is located on the driver's side. The others are on the passenger side. You'll need to research manufacturer specifications for pressure amounts. A local Ford dealer near you may provide these at no cost.
Generally, the testing involves installing a pressure gauge into the test port and raising the engine RPM's while actuating the corresponding gear/clutch with the gear shift.
Figure 6. The pressure ports on the driver's side.
Step 4 – Adjust the shift linkage
The shift linkage connects the gear shift to the manual valve on the transmission. The manual valve opens and closes passageways to select your desired gear.
A mis-adjusted shift linkage may allow the transmission to operate in neutral when reverse is selected, for example. If the transmission seems to operate normally in various positions, although they do not correspond to the gear shift order, this is most likely your problem.
Begin the adjustment procedure by putting the gear shift into the drive position. Raise and support the front of the vehicle with a floor jack and jack stands. Locate the cable to manual valve lever nut. Move the manual lever to drive by setting it to the most forward position, then move it back three detents. This will place the manual valve into the drive position. Tighten the cable nut until it's snug.
If issues exist beyond what is covered here, then you should take a look in the forums for more opinions. Ultimately, if you cannot replicate the problem during testing, it may be best to take your Mustang to a professional for diagnostic and repair.
Related Discussions
- Overdrive Light Blinking - MustangForums.com
- Mustang GT 4.6 Transmission Issue - MustangForums.com
- 4R70W Transmission Problems - MustangForums.com