Ford Mustang V6 1994-2014: Brake Diagnostic Guide
Here are some common brake system problems and what causes them to help you diagnose your stopping problems.
This article applies to the Ford Mustang V6 (1994-2014).
Brake problems can be worrying. As we all know, the braking system on your car is very important for the safe operation of your vehicle. Any time a brake problem develops, your anxiety usually starts to sky rocket.
The braking system on most road cars are simple hydraulic systems with basic components. Once you understand the purpose of every component and how they all work together, it makes diagnosing brake problems quite simple. Familiarizing yourself with the brake system on your car will go a long way.
Here are some common brake problems and common causes for these problems to help you more easily diagnose a similar issue you might be having in your own car.


Materials Needed
- Flashlight
- Tire pressure gauge
There are certain issues that can look like brake problems, but are actually caused by improper tire inflation or tires that are not in good condition. So before assuming you have a brake problem, it would be a good idea to double check the air pressure in your tires.
Step 1 – Vehicle pulls to one side during braking
Defective, Damaged, or Oil Contaminated Brake Pad on One Side
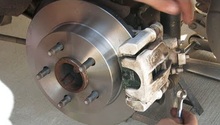
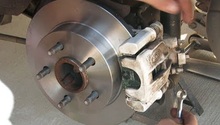
Inspect brake pads. Below is a picture of the brake inspection hole in the caliper where you can look through and inspect your brake pads.

Figure 2. The see-through point on the brake caliper.
Excessive Wear of Brake Pad Material or Disc on One Side
Inspect brake pads. Again, looking at the picture above, you can use the brake inspection hole in the caliper to inspect the brake pads and determine if they are excessively worn or not.
Loose or Disconnected Front Suspension Components
Inspect front suspension. A couple suspension components you are going to want to check are the tie rod ends, sway bar end link and bushings shown in the pictures below. Make sure to check for damage, torn boots, or loose fasteners.

Figure 3. Tie rod end ball joint. 
Figure 4. Sway bar end link and bushings.
Defective Front Brake Caliper Assembly
Remove caliper and inspect for stuck piston or damage.
Step 2 – Noise (high-pitched squeal)
Front Brake Pads Worn Out
This noise comes from the wear sensor rubbing against the disc, and you should replace them immediately. This is pretty much telling you that you should have replaced them a while ago. Failure to replace them soon after you hear it could eventually cause damage to your rotor if left for too long.
Glazed or Contaminated Pads
Inspect the pads by removing them and looking at the surface or face of the brake pad. They should not have any fluid on them or be completely glazed over.
Dirty or Scored Disc
Inspect the disc. You can do this by just removing the wheel and looking at the disc. The surface of the disc should have a uniform wear to it. Make sure to inspect both sides. If you see a gouge or scoring anywhere on the disc, this is not good.

Bent Support Plate or Heat Shield
The support plate or heat shield is what sits behind the brake rotor if you are looking at it from where the wheel sits against the hub. Road debris can come up and hit this piece, causing it to bend inward and start touching the brake rotor, which will make a good amount of noise as soon as the car starts moving.
Step 3 – Excessive brake pedal travel
Insufficient Fluid in Master Cylinder
Check the brake fluid reservoir to see if the brake fluid is at the required level. The fluid level should be between the "MAX" and "MIN" lines on the side of the reservoir. If it's low, remove the cap and fill with the correct type brake fluid to just below the MAX line.

Air in System
Bleed the brake system.
(Related Article: How to Bleed Your Brakes - MustangForums.com)
Defective Master Cylinder
There are seals inside the master cylinder that can deteriorate over time, as well as the wall of the cylinder. Deterioration can cause the master cylinder not to generate enough pressure as it should.
Step 4 – Excessive effort required to stop vehicle
Power Brake Booster Not Operating Properly
There is a brake booster check that you can perform as follows:
- With the brake fully depressed, start the engine. The pedal should move down a little when the engine starts.
- With the engine running, depress the brake pedal several times. The travel distance should not change.
- Depress the brake, stop the engine, and hold the pedal in for about 30 seconds. The pedal should neither sink nor rise.
- Restart the engine, run it for about a minute, and turn it off. Then firmly depress the brake several times. The pedal travel should decrease with each application.
- If your brakes do not operate as described above, then your brake booster is either in need of repair or has failed.
Excessively Worn Brake Pads
Inspect them by again using the inspection hole in the brake caliper.
One or More Caliper Pistons Seized or Sticking
Remove the caliper and brake pads, and try to compress the pistons in the caliper. If it is seized, it requires replacement.
Brake Pads Contaminated with Oil or Grease
If unusual fluids or greases get between the brake pad and the rotor, there will be reduced friction, which means less stopping power. Use brake clean and a scrub bush to clean the affected areas.
Worn or Damaged Master Cylinder or Caliper Assemblies
If you see leaks from either, it's likely that an internal seal has leaked, requiring either a rebuild kit or replacement for the affected items.
Related Discussions
- Anyone with Squealing Brake Problems - MustangForums.com
- 2011 5.0 Brake Problem - MustangForums.com
- Brake Problems, Need Advice - MustangForums.com
- Parking Brake Issues - MustangForums.com
- Brake Issue - MustangForums.com