Ford Mustang V6 and Mustang GT 1994-2004: How to Replace Front Wheel Bearings
Front wheel bearings are quite easy to replace. Continue reading to find out how.
This article applies to the Ford Mustang V6 and GT 4.6L V8 (1994-2004).
Wheel bearings are exactly what they sound like, bearings packed into the wheel hub that help the hub (and thus the wheel) rotate freely without friction. When the wheel bearings wear out or let go, friction increases exponentially and wears down other components related to the hub as well as wheels. Worn wheel bearings can create an annoying noise from the front end of the car. An easy test of wheel bearings is to grab the wheel at the "9" and "3" position, then shake. If the wheel and tire showcases excessive play or rattling, then the wheel bearings have likely gone bad.

Materials Needed
- Jack and jack stands
- Tools to remove the wheels
- Breaker bar
- 15mm and 36mm sockets
- Torque wrench (that can handle at least 255 lb/ft)
- Rubber mallet
- Flat head screwdriver
Step 1 – Jack front end of car and remove wheels
Jack the front end of your car up and put it on sturdy jack stands. Once elevated, remove the wheels.
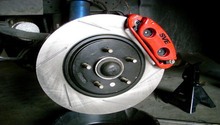
Step 2 – Remove the brakes
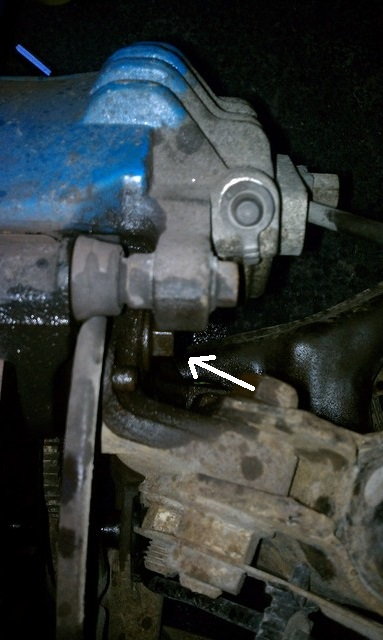
Unbolt and lift off the brake calipers (without unscrewing the brake line) on both sides of the car. The calipers are held in place by two 15mm bolts on the back side of the calipers. There are in total four bolts on each caliper. The bolts you should remove are the two inward most bolts.
Put a box on the ground and let the calipers rest on it to avoid letting the calipers hang in the brake hoses.
Step 3 – Remove wheel hub containing wheel bearing
With the brake calipers removed, the brake rotors can be simply pulled off by hand.

To gain access to the nut holding the hub assembly, use a flat head screwdriver to gently pry off the dust cover off the center wheel hub.

With the dust cover removed, the center nut holding the hub assembly is visible. Unscrew the nut in the center of the hub using a breaker bar and a 36mm socket.

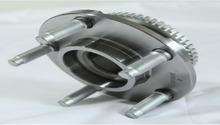
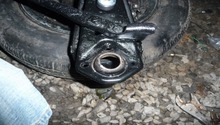
Now the entire hub assembly containing the wheel bearing can be removed.

Clean the spindle with a clean rag and apply a thin coat of grease to the spindle.
Step 4 – Reassemble
Put on the new hub assembly and tap it in place gently with a rubber mallet. Put on the center nut and tighten the nut to 253 ft/lbs using a torque wrench.
Reinstall the center dust cover, the brake rotor and the caliper in the reverse order they were removed. Use a rubber mallet to get the dust cover in place.
Pro Tip
When the brake calipers are off, it could happen that the brake pistons in the calipers are moving slightly out and making it impossible to reinstall the caliper over the brake rotor. In that case, put some thin wooden pieces inside the caliper on the brake pads and use a screwdriver to press the pistons into the caliper enough to be able to install the caliper. Don't use a screwdriver directly on the brake pads, since that can ruin them.
Featured Video: Wheel Bearing Replacement
Related Discussions
- Front Wheel Bearing - MustangForums.com
- Front Wheel Bearing - MustangForums.com
- Wheel Bearing Replacement - MustangForums.com
- Replace Front Wheel Bearing - MustangForums.com