How To: Painted radiator and fuse box covers
 03-16-2008, 07:27 PM
#1
2nd Gear Member
Thread Starter

Join Date: Mar 2007
Location: Greater Philadelphia area
Posts: 408
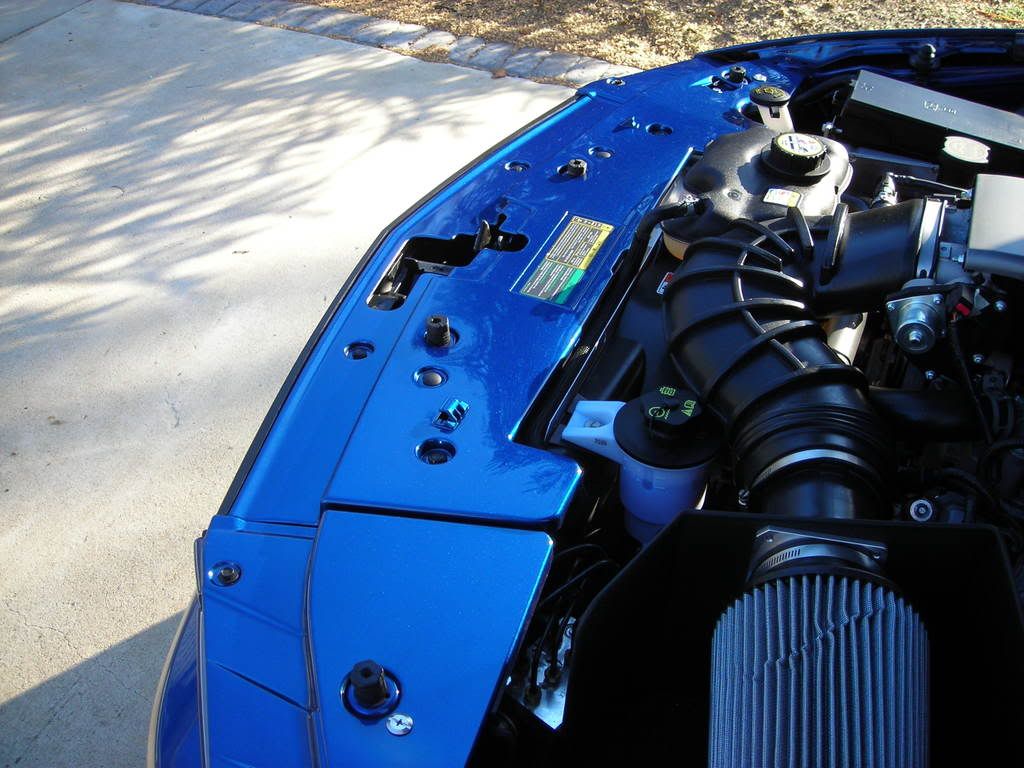
It's been a cold, but productive winter. I've made several appearance modifications to the car. One thing I wanted to do was to dress up the engine bay a little, specifically the radiator and fuse box covers, but not in chrome. I wanted a color-matched look. Here is how I did it for about $45.
Simple steps:
*Ordered 1 can adhesion promoter, 1 can basecoat (T8) and 1 can clearcoat from automotive touchup
*Remove radiator cover by pulling up on the 6 plastic pins and just unclip the fuse box cover.
*Peel off the green and yellow instruction label on the radiator cover. (Gently if you want to reapply it later.)
*Detach the red cable router gizmo from the fuse box cover and set aside.
*Wash both covers with soap and water, dry.
*In a clean, well lighted, well ventilated area:
Coat with Adhesion promoter (two light coats)
Coat with desired basecoat (3-4 lighter coats)
Coat with Clearcoat finish (3-4 lighter coats)
*Let dry at LEAST overnight before re-installing.
*Buff/polish after 30 days if desired
Tips:
*Don't pry the heads of the plastic pins up with a screwdriver. This can mar the rims of the wells in which they sit. You can use a 'paint can lid pry tool.' (don't know what else to call it.) Turn it vertical, hook the lip of the tool under the head of the pin and pull up.) If you ruin any of these you can pick up some at a dealership. I did buy a couple just in case prior to this. These are the same pushpins that secure the fenderwells, so you can use them for your clear front corner replacement!
*Be very careful if you use a spray can pistol grip (or don't use one) depending on the spray pattern of the paint you are using. The cans of paint that I used had a wide spray pattern and the paint got all over the pistol grip and dripped onto the one of the parts.
*'Well ventilated' and 'Warm temperature' are strongly encouraged.
*The radiator label is some type of plastic film, not paper, so you can easily remove and reuse if you like. Affix the label to something so that the glue does not dry out. (For example, I stuck mine to a plastic binder cover.) Of course you can trash it and leave it empty or put something there that you want. Maybe a label with your engine mods, photos, whatever.)
*You can paint the fusebox as you like: just the top or the top and the underside. You can easily mask off the underside of the fuse box cover if that is your choice. There is a diagram of the fuses there so I decided not to paint.
*I used virtually the whole can (95%) of Basecoat on these two pieces and I did not paint the underside of the fuse box cover. I definitely would have had enough to cover if I wanted to. I knew I was getting near the end of the can and gave an extra couple of Basecoat layers to use it up.
*Total time from removal to end of painting was about 5 hours. (Had to play some guitar hero with my son while we waited between the various coatings.)
Here are some pics of the 'after'. You probably know what the 'before' looks like. I did not have ideal lighting and if you know Tungsten Grey Metallic, you know it is a complex color that really shifts under different lighting conditions.
Have fun!
Painted fusebox cover:
http://i210.photobucket.com/albums/b...seboxcover.jpg
Painted Radiator cover:
http://i210.photobucket.com/albums/b...iatorcover.jpg
 03-18-2008, 05:22 PM
#5
3rd Gear Member

Join Date: Aug 2007
Location: Coatesville, PA
Posts: 932
ORIGINAL: jlaurens06gt
300gt:
have you considered carrying your white stripes onto your radiator and flanking covers? might look cool.
300gt:
have you considered carrying your white stripes onto your radiator and flanking covers? might look cool.
 03-18-2008, 11:32 PM
#7
6th Gear Member
Join Date: Jul 2006
Location: USA
Posts: 11,962
ORIGINAL: 300GT
arggh... stop putting ideas in my head! My wife already thinks I should be part owner in paintscratch.com with all of the money I've spent with them. But you're right, it might look cool...
ORIGINAL: jlaurens06gt
300gt:
have you considered carrying your white stripes onto your radiator and flanking covers? might look cool.
300gt:
have you considered carrying your white stripes onto your radiator and flanking covers? might look cool.


Thread
Thread Starter
Forum
Replies
Last Post