ANOTHER VERSION OF TRUNK LID LINER
 02-27-2010, 06:24 PM
#1
1st Gear Member
Thread Starter

Join Date: Nov 2009
Location: ohio
Posts: 75
In the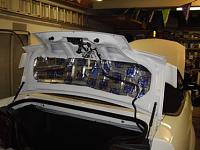
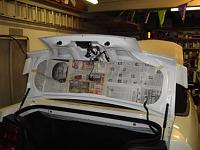
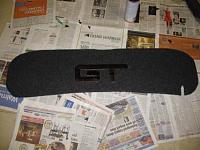
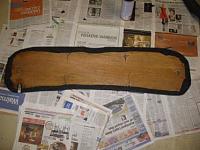
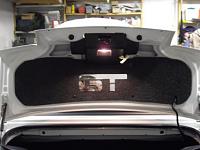 In the thread with DOMINATOR I said I would post my liner when done . Here are some pics . They were taken as I was almost done . Used 1/4" plywood , speaker box carpet , and Permatex spray adhesive . The GT was cut out of plastic mirror with the band saw.


 In the thread with DOMINATOR I said I would post my liner when done . Here are some pics . They were taken as I was almost done . Used 1/4" plywood , speaker box carpet , and Permatex spray adhesive . The GT was cut out of plastic mirror with the band saw.
 02-27-2010, 06:39 PM
#2
2nd Gear Member

Join Date: Jan 2007
Location:
Posts: 322
In theAttachment 19440
Attachment 19441
Attachment 19442
Attachment 19443
Attachment 19444 In the thread with DOMINATOR I said I would post my liner when done . Here are some pics . They were taken as I was almost done . Used 1/4" plywood , speaker box carpet , and Permatex spray adhesive . The GT was cut out of plastic mirror with the band saw.
02-27-2010, 08:21 PM
#4
Moderator
Join Date: May 2006
Location: Michigan again!
Posts: 8,575
Looks great, I don't have any pictures of the one I made while in progress, just the finished product. The bag on the left holds my SCT Xcal and some wrenches

I need to get something else on to balance things out I think. I have a tri bar that I kept from my 1965 Mustang that I am going to mount in the center.
I need to get something else on to balance things out I think. I have a tri bar that I kept from my 1965 Mustang that I am going to mount in the center.
02-28-2010, 10:55 AM
#5
6th Gear Member
Join Date: Jan 2007
Location: Southeast Virginia
Posts: 6,409
How did you attach the board to the deck lid? Where did you find the chrome plastic piece?
I bought some carpet and a thin piece of alumninum that I've been wanting (since two years ago) to do something like this.
How were you able to make the template? I know you made one out of newspaper....so did you just tape it on and traced the inside of the raised deck lid?
I bought some carpet and a thin piece of alumninum that I've been wanting (since two years ago) to do something like this.
How were you able to make the template? I know you made one out of newspaper....so did you just tape it on and traced the inside of the raised deck lid?
02-28-2010, 12:47 PM
#7
1st Gear Member
Thread Starter
Join Date: Nov 2009
Location: ohio
Posts: 75
I used the standard plastic push pin fasteners from auto zone{pic won't up load}. The GT was cut out of plastic mirror with the band saw. Down loaded the GT image off the internet and enlarged it. Use the permatex spray adhesive or a adhesive that comes out stringy. The light spray adhesive does not hold the carpet on.
02-28-2010, 02:46 PM
#8
3rd Gear Member
Join Date: Jun 2009
Location: CA
Posts: 750
Very nice Mustangqueen. I have thought about doing this also. I tried to do it a while back with cardboard and it kept falling and I got fed up and gave up. It would be nice if you could upload those pics to photobucket and then post them here so we could see them larger. Since I haven't seen one in person it's hard to judge what margins to follow, and what holes to use for the push pins (did you use existing or make new ones). I was also a bit too ambitious when I tried mine since I wanted it to cover up the open area part around the truck latch/rear brake light. That is harder to get it all in one piece. I may just get inspired and try it again. I have plenty of plywood skins around, just need the carpet, and that's easy enough to get.
02-28-2010, 08:18 PM
#9
1st Gear Member
Thread Starter
Join Date: Nov 2009
Location: ohio
Posts: 75
you need to make the pieces to cover by the latch seperate. I drilled the holes for the pins seperate . Donot try to make your pattern to large it will screw up the trunk seal. Here is a link if you want to buy one .http://www.granddesignmat.com/galleryconsole.htm# This is where the design came from . There are videos on you tube.
02-28-2010, 10:04 PM
#10
3rd Gear Member
Join Date: Jun 2009
Location: CA
Posts: 750
As Bugs Bunny used to say "You don't know me very good, do you?" If I can make it, I don't buy it. I'll check out the Youtube links to get a rough idea of how to do it. When I can find some time I may give it another crack.

