
RoushCharger install notes and pics!!!
 11-07-2010, 10:58 AM
#1
4th Gear Member
Thread Starter
Join Date: Apr 2008
Location: San Diego, CA
Posts: 1,486
I recently installed a RoushCharger (M90) on my 2008 Mustang GT, and thought I’d capture some of my findings. Hopefully it can help one of you guys. This was an awesome install, not difficult at all, and I enjoyed doing it myself. With the money you save, you can invest in tools. I think I spent around $500.00 in tools.
FYI: The workmanship and quality of the kit is excellent, but I have a few comments:
1. I would think that Roush should have required you to replace the o-rings (P/N W704593-S100) on the Coolant Pump when you re-install the modified Coolant Tube Heater assembly. Will be a real PITA if you had a leak after you installed all that stuff.
2. All references to M6 bolts were actually M8, the M16 bolt was M21 in my kit.
3. The template for the Inter-cooler pump was incorrect (Remember to clean off some paint off the inside fender well, to enable a good ground connection for the ground wire through the mounting bolt).
4. The bolt that mounts the rear alternator bracket calls out for a torque setting of 20-30nm (this is into the aluminum inter-cooler). I think it's too much, since all the other bolts that attaches to aluminum are torqued to 8-12nm.
5. Mounting the lower radiator hose onto the engine was the most difficult part of the job, I REALLY recommend heater hose clamp pliers. This tool worked great.
http://www.sears.com/shc/s/p_10153_1...00100600&aff=Y
6. The instructions require 20-30nm of torque on the retaining nuts that holds the inter-cooler radiator to the front bumper. That is too much, completely deforms the rubber grommets.
7. The material used in the front bumper is very soft, don't over-tighten any of the screws/bolts that attaches to that part.
9. You can install the throttle spacer to the Charger first, and then install the completed assembly on the inter-cooler. Just don’t tighten it down, cause you will need to lift it, to get the fuel rail and stud-bolts installed.
10. Cover the alternator in a plastic bag , tape down the ears to be removed and use a hacksaw to cut them off. This will keep all the metal filings out of the alternator.
EQUIPMENT AND SUPPLIES REQUIRED
• 1/4” and 3/8” Drive Ratchets with Extensions
• Metric and Standard Socket Sets (short and deep recommended) – mostly 8mm, 10mm and 13mm
Craftsman 17 pc. 6 pt. Metric Easy Read 1/4 in. Dr. Socket Wrench Set - $34.99
http://www.sears.com/shc/s/p_10153_1...&blockType=G16
• 1/2” Drive Ratchet or Breaker Bar
• Metric and Standard Wrench Sets - 10mm, 13mm, 15mm
• 3/8” Drive Torque Wrench (7-35 ft-lb range)
Craftsman Microtork Torque Wrench, 25-250 in. lbs., 3/8 in. Drive – $69.00
http://www.sears.com/shc/s/p_10153_1...1&blockType=G1
• Short Phillips-head Screwdriver
• Hex Key Set
Craftsman 13 pc. Standard Ball End Hex Key Set - $19.99
http://www.sears.com/shc/s/p_10153_1...2&blockType=G2
• 5/8” Fuel Line Removal Tool
Lisle AC/Fuel Line Disconnect Tool Set - $9.99
http://www.sears.com/shc/s/p_10153_1...&blockType=G17
• T-20 Torx Bit Screwdriver or Socket
GearWrench 1/4'' Drive Torx® Tamper Proof Bit Socket T-20 - $5.39
http://www.sears.com/shc/s/p_10153_1...&blockType=G15
• Soldering Iron and Solder
• Wire Crimpers “W” type for OEM-style wiring connectors
Techni-Tool Crimper/Cutter, 10-24/4-40 - $42.48 (P/N 758TT004)
https://webvia.techni-tool.com/VIA/v...IASEARCHRESULT
• 1/8”, 9/64”, and Ľ” Drill Bits and Drill motor
• Coolant (meeting G-05 specification) - (2gal, mixed it 50/50 with distilled water)
Zerex G-05 Antifreeze / Coolant
http://www.valvoline.com/products/br.../antifreeze/42
• 6” Scale, Tape Measure, or Other Measuring Device
• Brake Parts Cleaner
• Assembly Lubricant (White Lithium Grease or Petroleum Jelly) - Vasoline
• Electrical Tape - $30.00
The instructions call out Electrical Tape, but it gets sticky and comes loose when hot, so instead I opted for the real thing:
Wrap Tape, Wire Harness, 3/4 inch, non-adhesive, tape used to wrap wiring harnesses - P/N 913-1
Wrap Tape, Wire Harness, 1 1/4 inch, non-adhesive, tape used to wrap wiring harnesses - P/N 913-2
Black Tape, Black Cloth, 3/4 inch wide x 100ft long, used to terminate non-adhesive wiring tape – P/N913-4
Wire Loom Flexible Cover, 1/4 inch ID, split flex tube to hide the wires - C8965C-2
National Parts Depot
http://www.npdlink.com/
Select the Mustang Catalog, and look under "Paint, Tools and Accessories"
• Sharp Knife or Razor Blade
• Tie Straps (Zip Ties)
• Trim Pad Tool (for pushpin removal)
KD Tools Trim Pad Removing Tool - $9.99
http://www.sears.com/shc/s/p_10153_1...4&blockType=G4
• Fender Cover (2) – used two thick towels.
Last edited by Roy_R; 01-10-2011 at 12:18 PM.
 11-07-2010, 10:58 AM
#2
4th Gear Member
Thread Starter
Join Date: Apr 2008
Location: San Diego, CA
Posts: 1,486
Additional Tools
UView (UV 550000) - $102.00 (on-sale)
http://www.tooltopia.com/uview-550000.aspx
Craftsman 3 ton Service Jack - $69.00
http://www.sears.com/shc/s/p_10153_1...2&blockType=G2
Craftsman Professional 3 ton High Lift Jack Stands - $24.00
http://www.sears.com/shc/s/p_10153_1...1&blockType=G1
Bayco 25 Ft. 16/3 Trouble Light with Outlet and Push On/Off Switch – $12.97
http://www.homedepot.com/h_d1/N-5yc1...atalogId=10053
Cable Operated Hose Clamp Pliers -$39.99
http://www.sears.com/shc/s/p_10153_1...2&blockType=G2
Quick pull, sorry about the sound....you get the idea.
http://www.youtube.com/watch?v=ZEPrJ1mgygI
130mph run, just to get the cobwebs out of the exhaust pipe.
http://www.youtube.com/watch?v=h5-Gl6OM5Cs
Freaking thing looks so awesome, not sure if I want to drive it or mate with it???
Last edited by Roy_R; 11-07-2010 at 11:06 AM.
11-07-2010, 10:59 AM
#3
4th Gear Member
Thread Starter
Join Date: Apr 2008
Location: San Diego, CA
Posts: 1,486
Pictures
SlideShow of all the pics....
http://tinyurl.com/233cn5l
Before it all started…

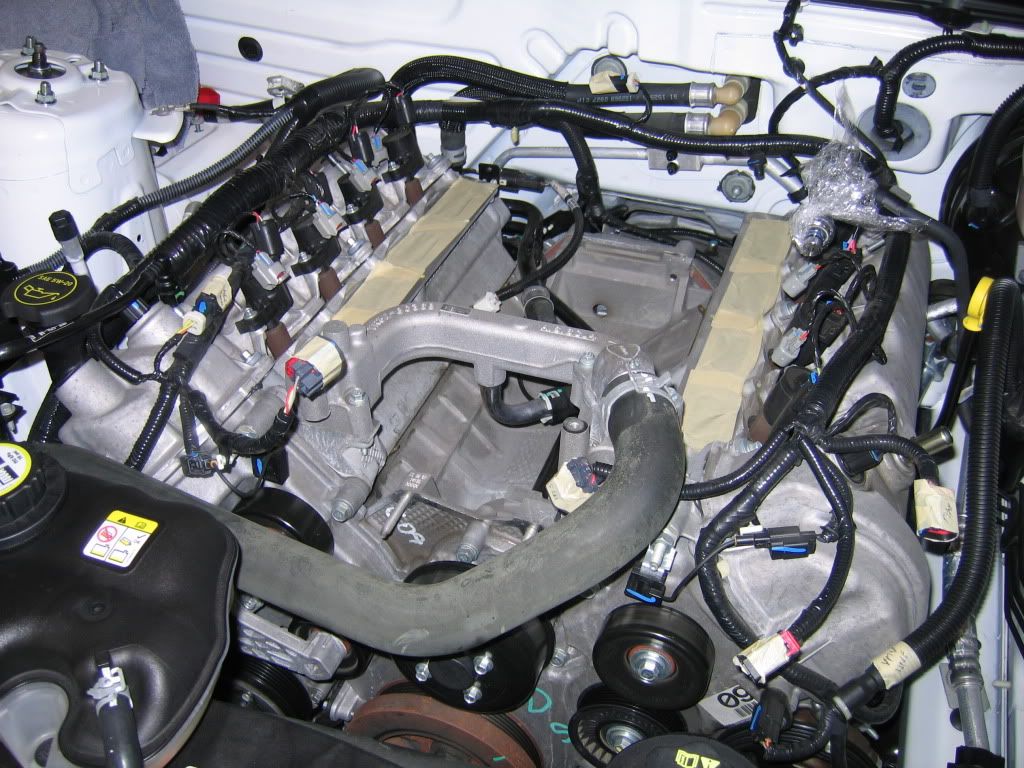
Intake removed…notice the buildup of the stuff from the PCV valve, will be installing an oil catch can.

Alternator removed
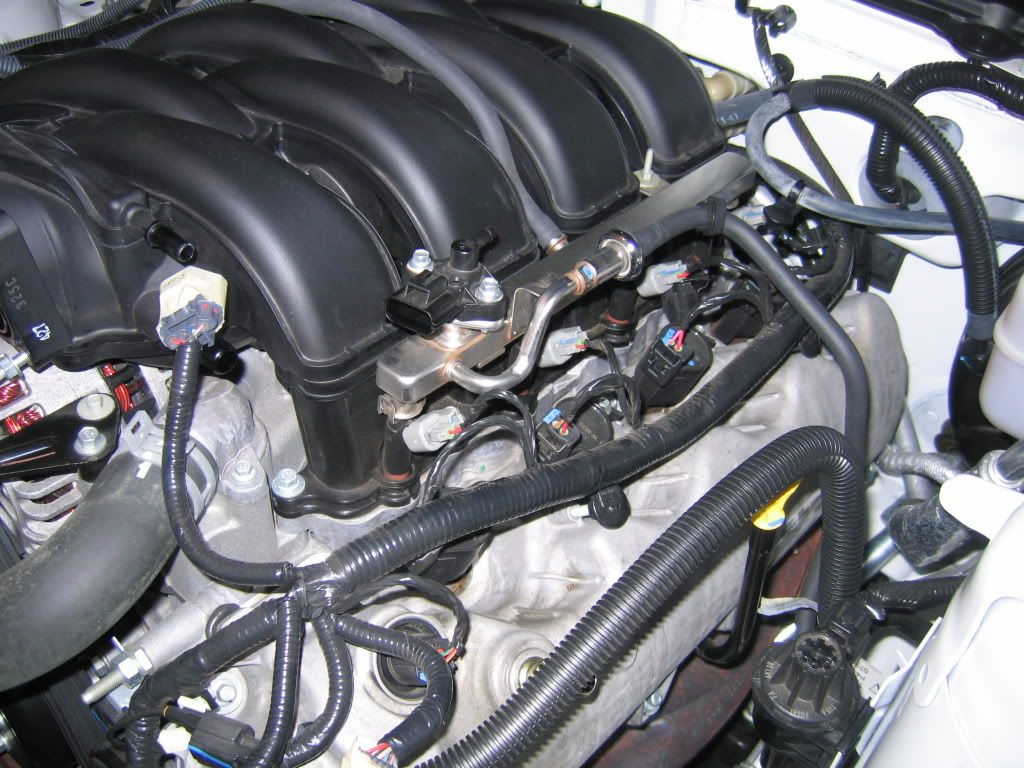
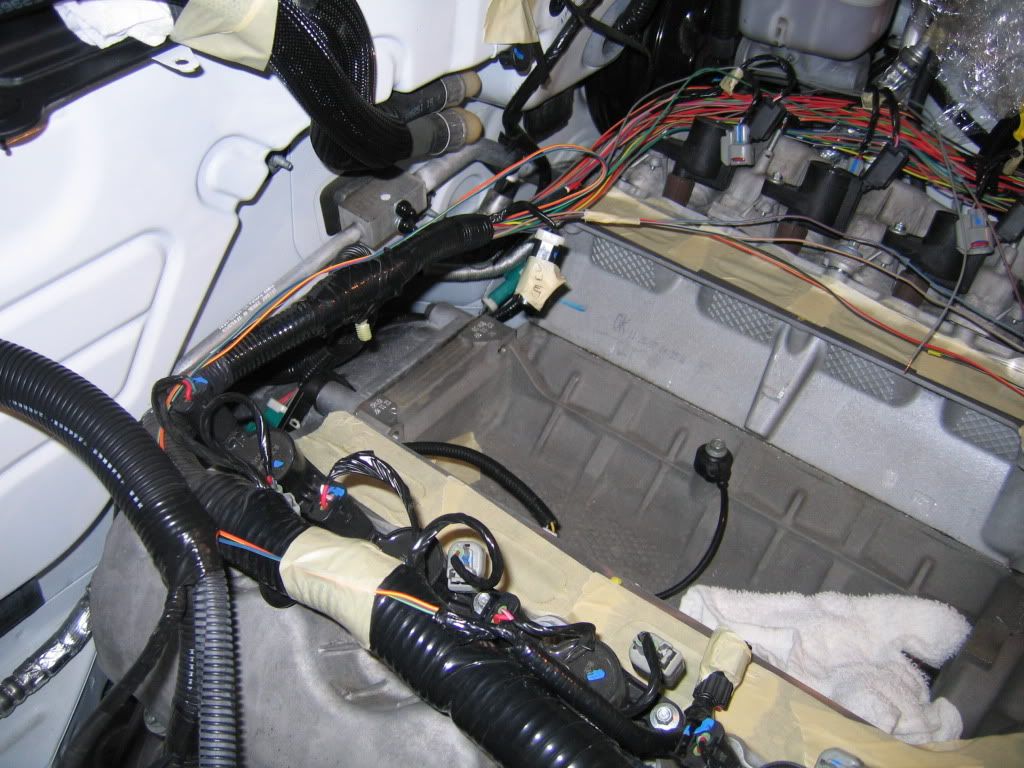
Relocating the MAF and ETC sensor connectors. Make sure the ETC wire is at least 6-10”, dry fit if you can. I made the wire too short and had to un-tape it to the number 4 cylinder in order to get it to fit.
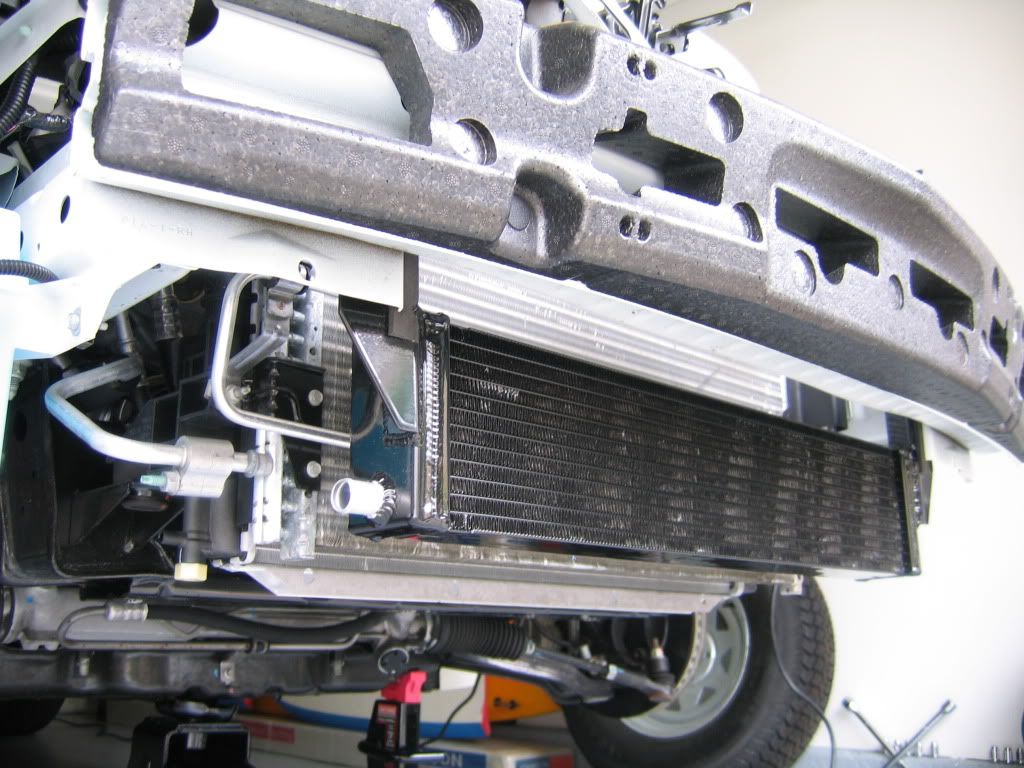
Inter-cooler radiator installed.
SlideShow of all the pics....
http://tinyurl.com/233cn5l
Before it all started…
Intake removed…notice the buildup of the stuff from the PCV valve, will be installing an oil catch can.
Alternator removed
Relocating the MAF and ETC sensor connectors. Make sure the ETC wire is at least 6-10”, dry fit if you can. I made the wire too short and had to un-tape it to the number 4 cylinder in order to get it to fit.
Inter-cooler radiator installed.
Last edited by Roy_R; 12-07-2010 at 10:58 PM.
11-07-2010, 11:00 AM
#4
4th Gear Member
Thread Starter
Join Date: Apr 2008
Location: San Diego, CA
Posts: 1,486
The instructions require 20-30nm of torque on the retaining nuts that holds the inter-cooler radiator to the front bumper. That is too much, completely deforms the rubber grommets.
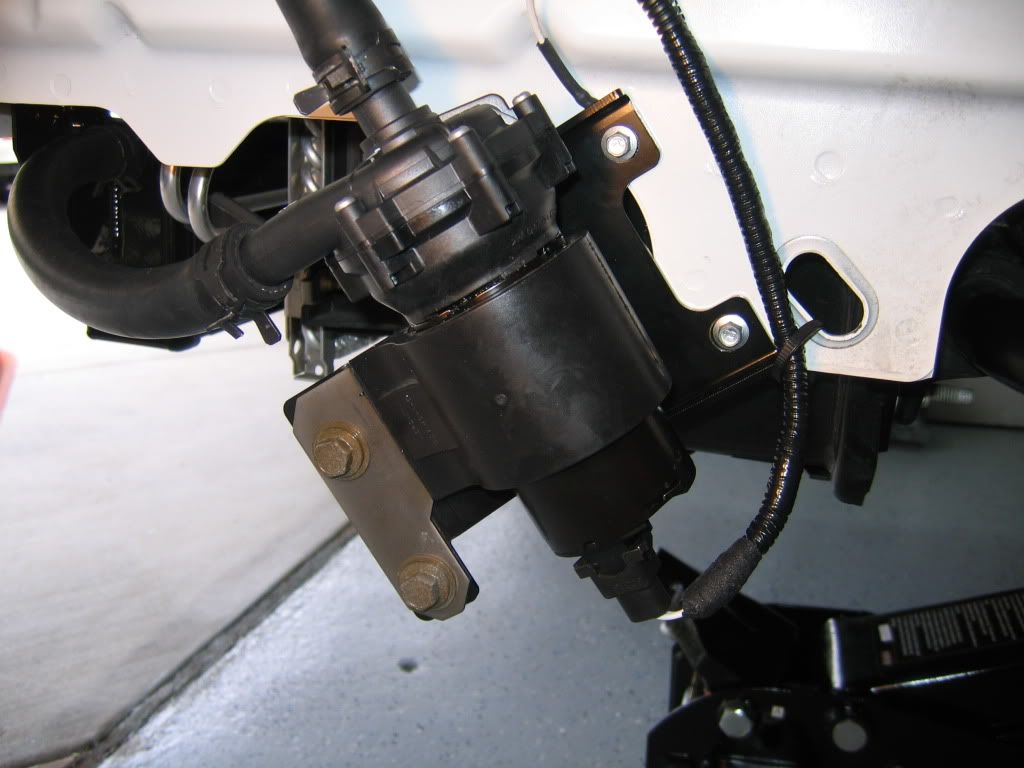
Inter-cooler pump installed - I later scrapped off some paint and installed the wire on the top side of the pump. The mounting bolt connects to the chassis electrically.
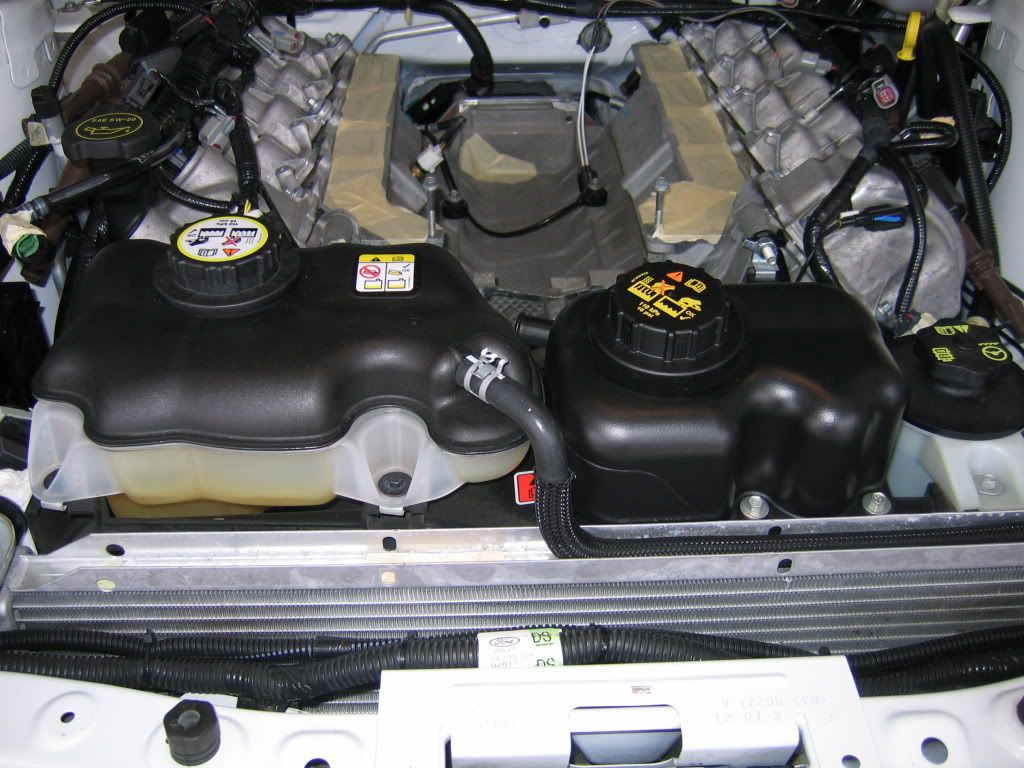
Reservoir installed.
Intercooler installed.
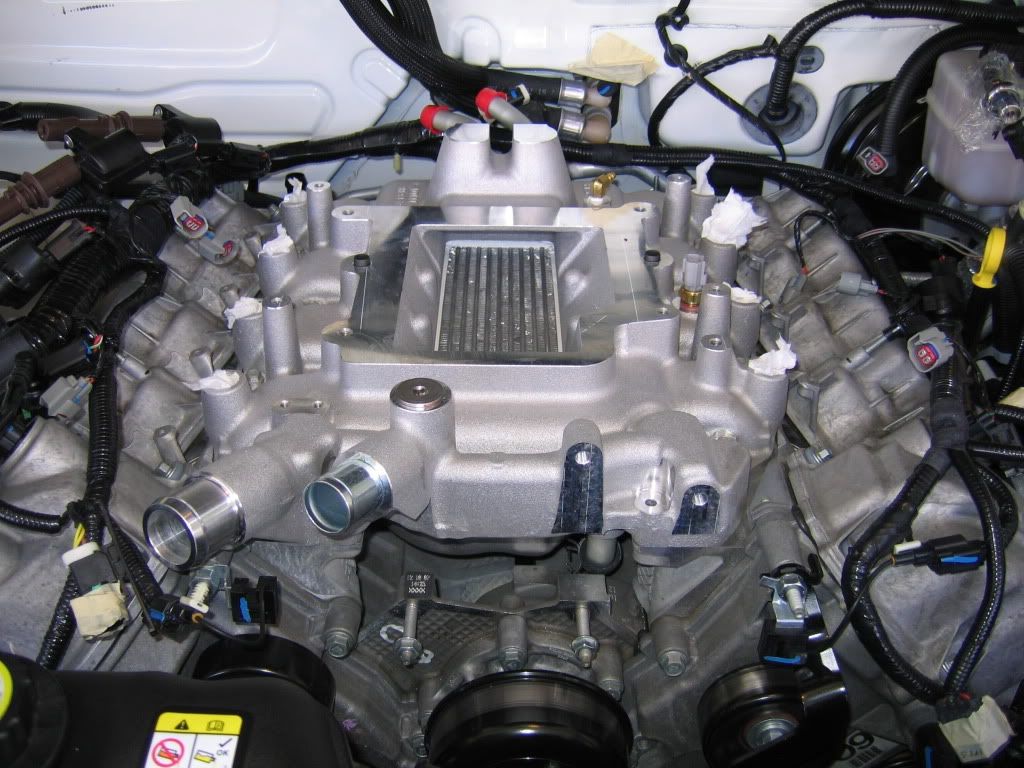
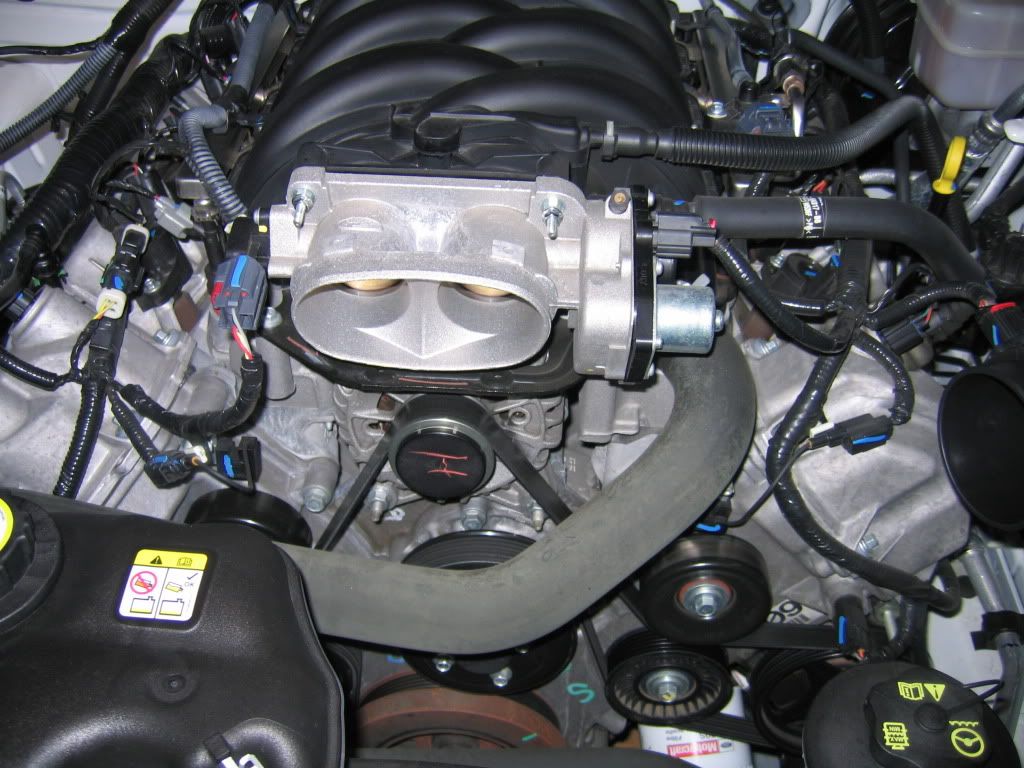
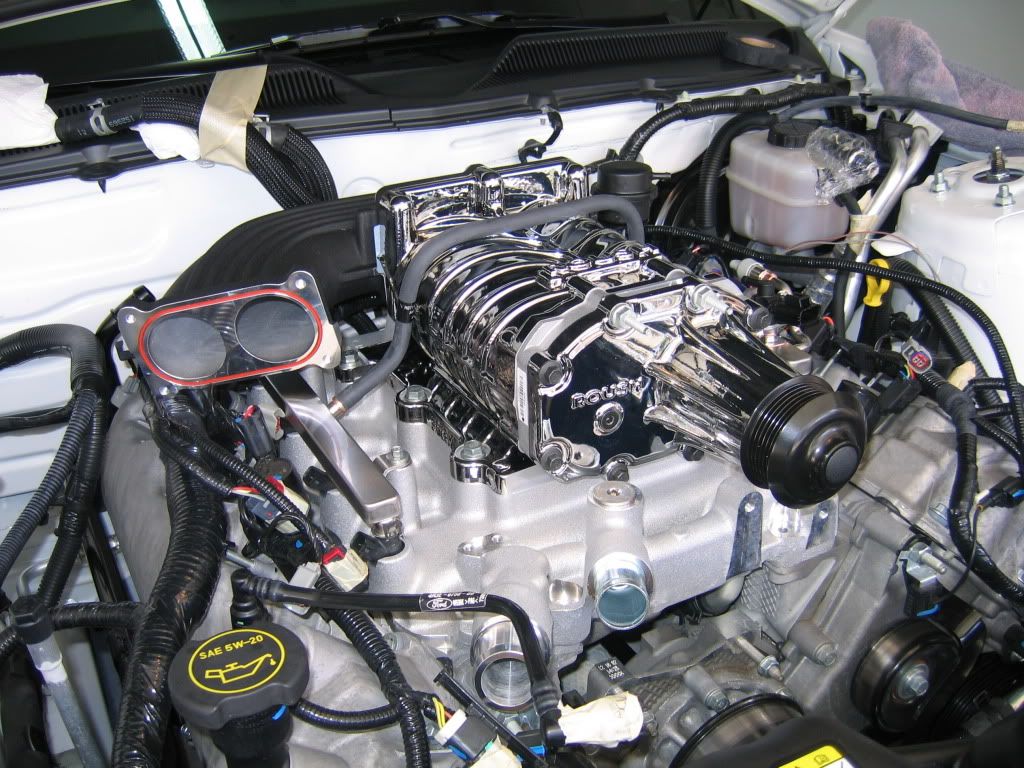
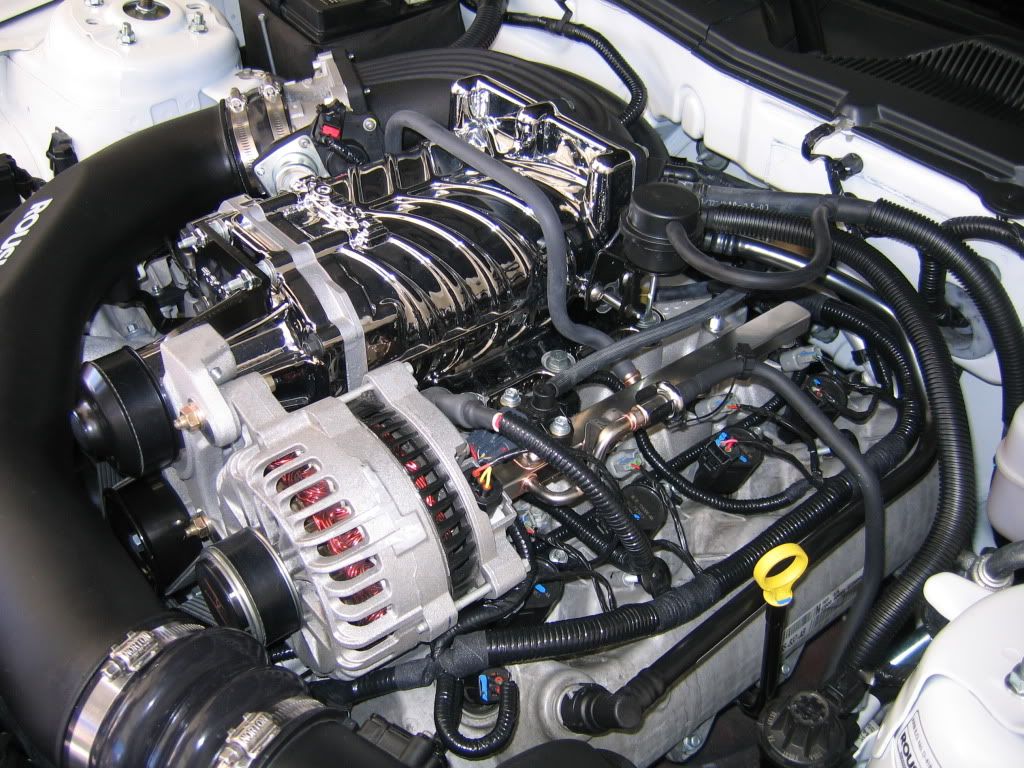
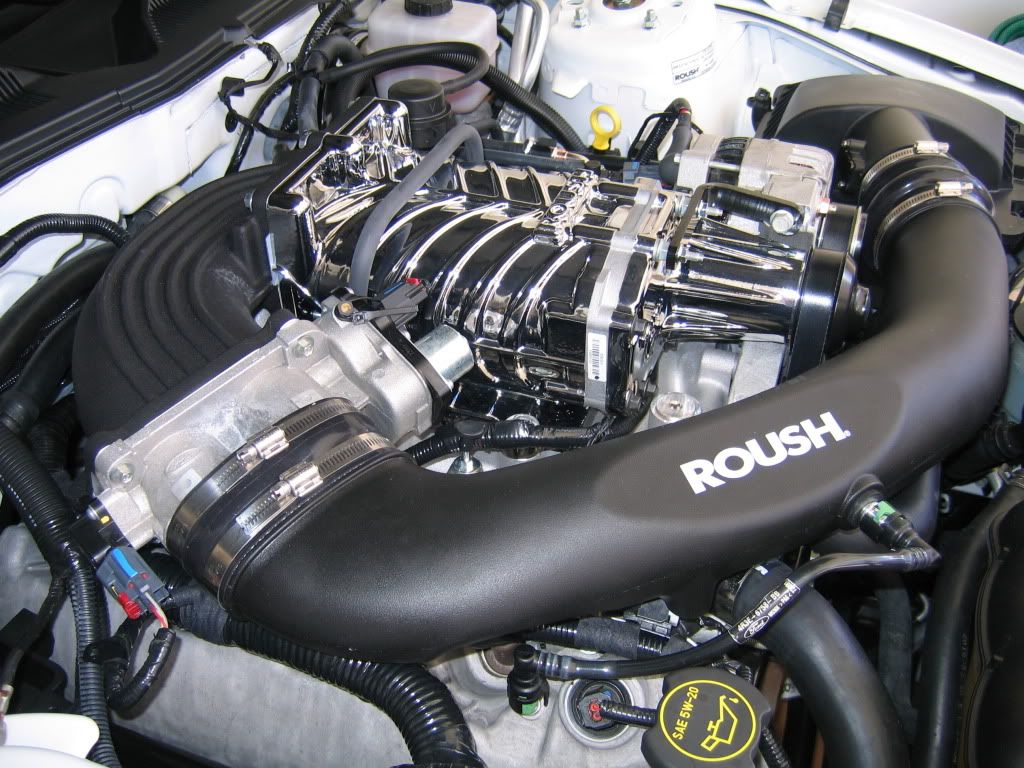
It’s time for the Charger.

Awesome!!!!! (Note: The bolts holding the fuel rail in place needs to be stud-bolts - to hold the wiring loom for the alternator).
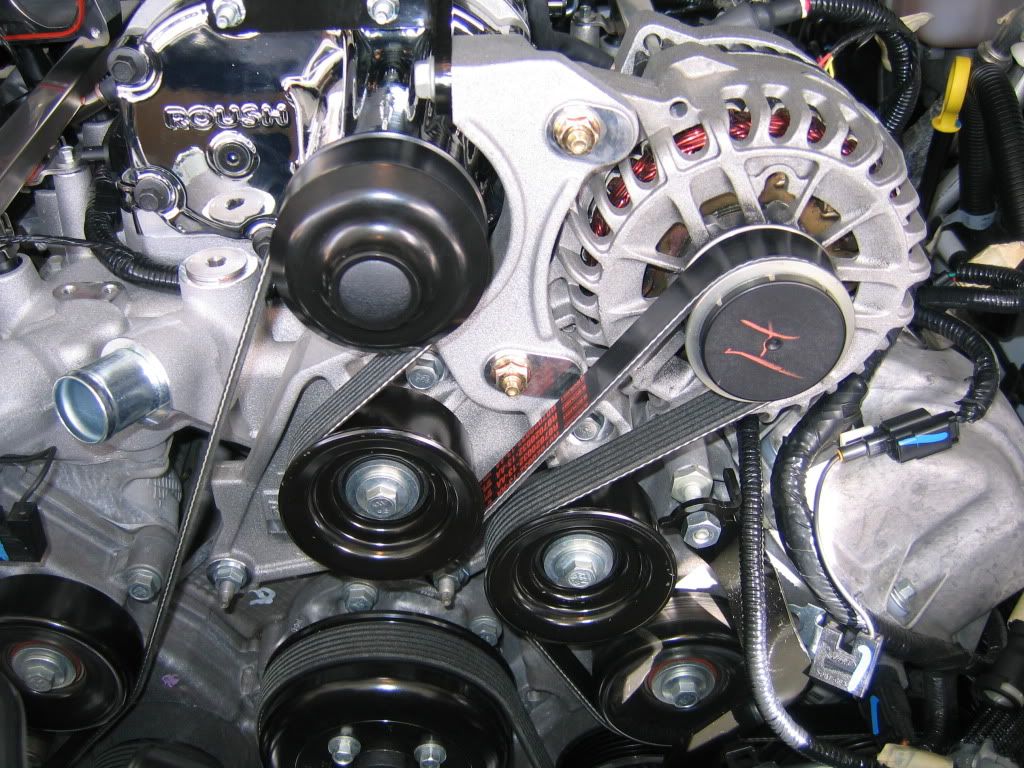
Alternator relocated and Serpentine belt installed.
Inter-cooler pump installed - I later scrapped off some paint and installed the wire on the top side of the pump. The mounting bolt connects to the chassis electrically.
Reservoir installed.
Intercooler installed.
It’s time for the Charger.
Awesome!!!!! (Note: The bolts holding the fuel rail in place needs to be stud-bolts - to hold the wiring loom for the alternator).
Alternator relocated and Serpentine belt installed.
Last edited by Roy_R; 11-08-2010 at 10:40 AM.
11-07-2010, 11:01 AM
#5
4th Gear Member
Thread Starter
Join Date: Apr 2008
Location: San Diego, CA
Posts: 1,486
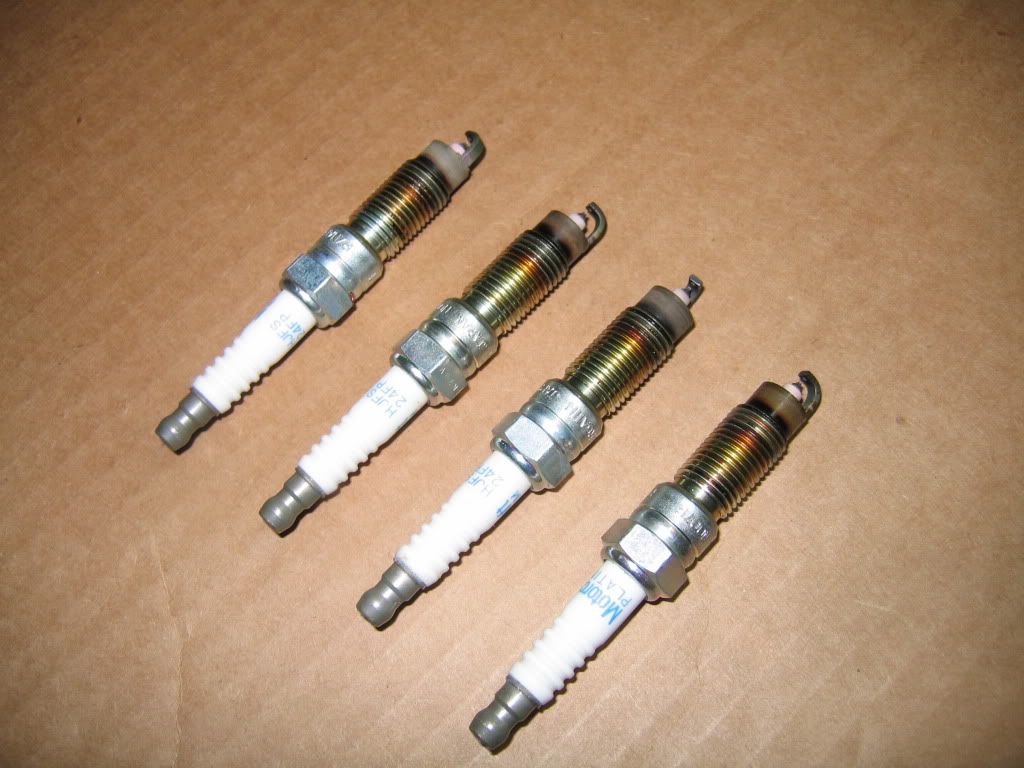
Stock spark-plugs re-used, I had the new style head and could not use the Autolite HT Revolution plugs.
My son making sure I do a good job on his future car….

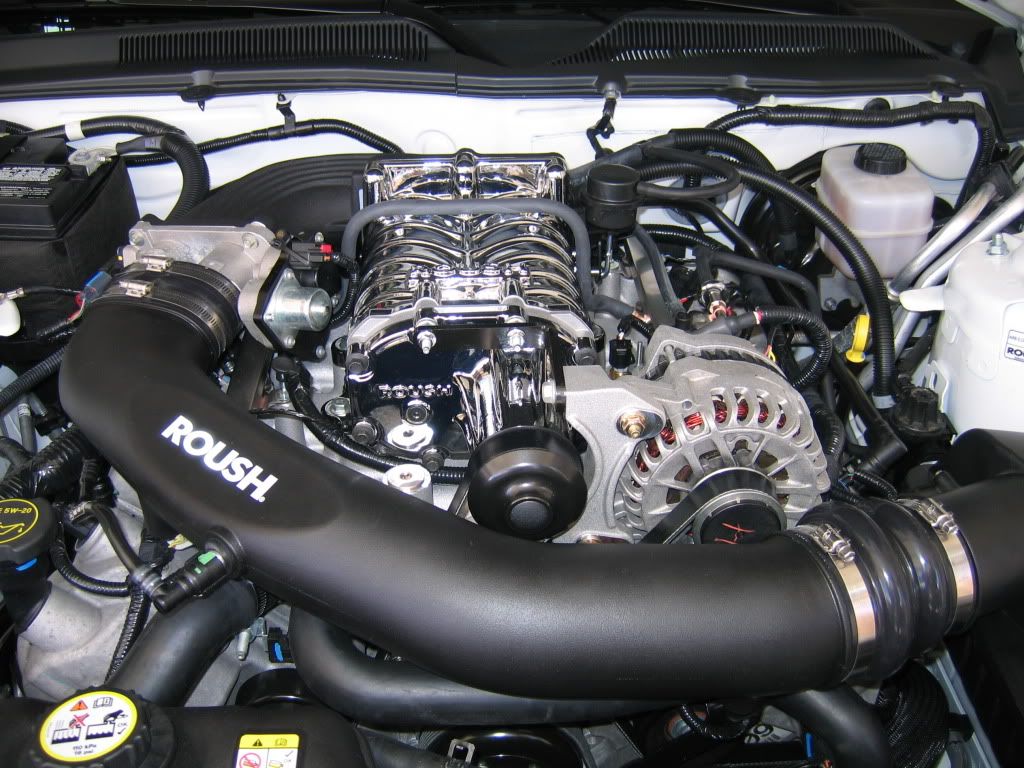
About time…
An finally…AFTER picture!
My son making sure I do a good job on his future car….
About time…
An finally…AFTER picture!


