

 10-22-2015, 05:29 PM
Last edit by: IB Advertising
See related guides and technical advice from our community experts:
Browse all: Ford Mustang Interior Guides
- Ford Mustang V6 2005-2014: How to Install Lighted Door Sill
Step by step instructions for do-it-yourself repairs.
Browse all: Ford Mustang Interior Guides

Lighted Door Sills.... Long and informative install with pics!
12-03-2009, 08:46 PM
#1
2nd Gear Member
Thread Starter
Join Date: Nov 2009
Location: MD
Posts: 377
Well I hope that this helps anyone that is on the edge or about to do this install.... really not too difficult and looks killer! 5/10 for difficulty with the hardest part being the splicing of the wires.
So I installed these today in my GT (non convertible), took just over an hour (including taking photos etc):
1. So what comes in the box?

You get the door sills x2 (Left / Right)
Zip ties x6
Wiring with lighting
Alcohol wipes x2
Instructions (Touch and go if you are not confident at this stuff)
2. Disconnect the Negative terminal from the battery. You will need an 8mm socket wrench.

3. The next step is to partially remove the passenger side A Pillar (you don't need to fully remove this). Start at the end furthest away from the dash and just grab it either side and give it a good tug and work your way forward.
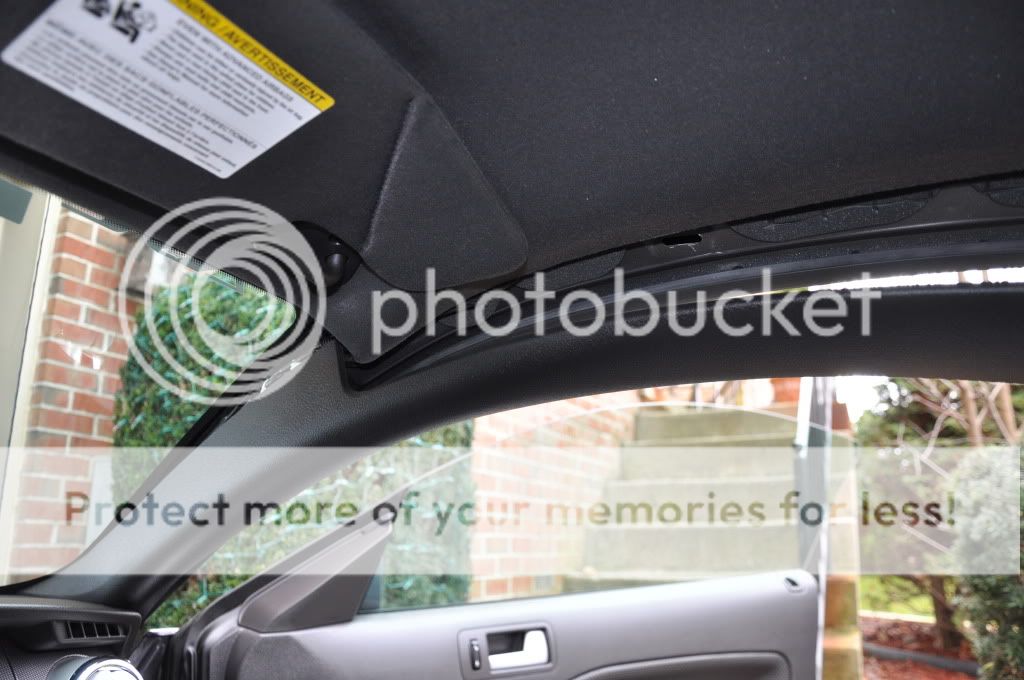
You should be able to see the cabling hidden behind the pillar, disconnect the wiring plug

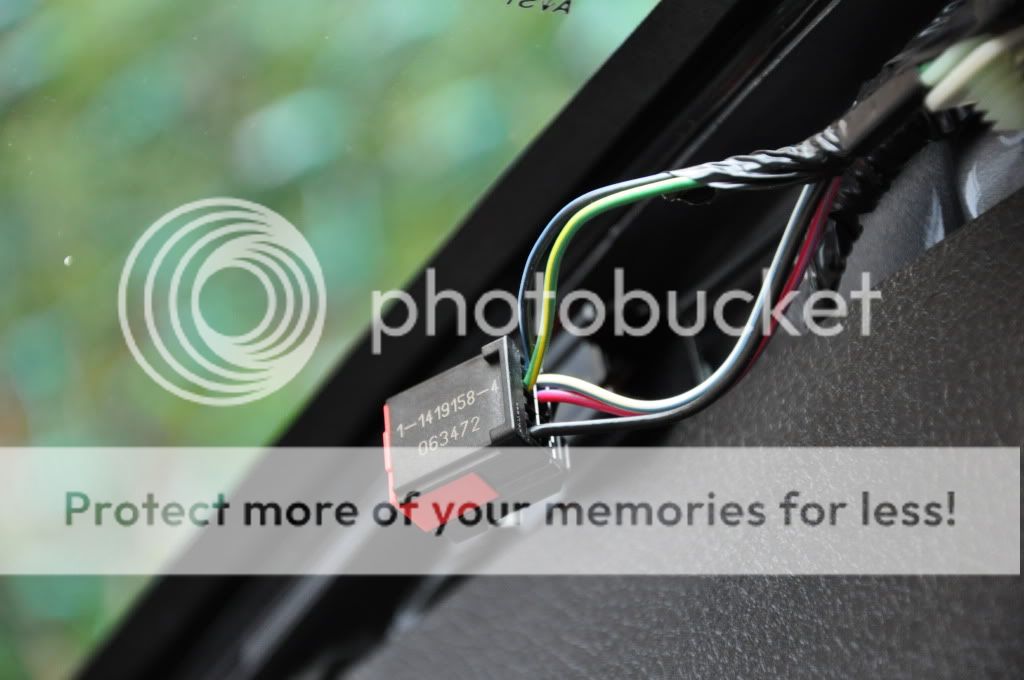
4. Now you will need to separate out the specific cables that you will need when you start to splice in the supplied cabling (Red and Black cables) in the kit. You need to find the "Black/Light Blue" and the "Yellow/Green"
The 2 at the top left!
5. Now comes the tricky part (well not really) - The Wiring! So we need to attach the supplied wires (Red / Black) into the current wiring ("Black/Light Blue" and the "Yellow/Green"). To do this I used splicing taps which are a little easier than cutting the wire cover off from one wire and soldering the new wire to it.
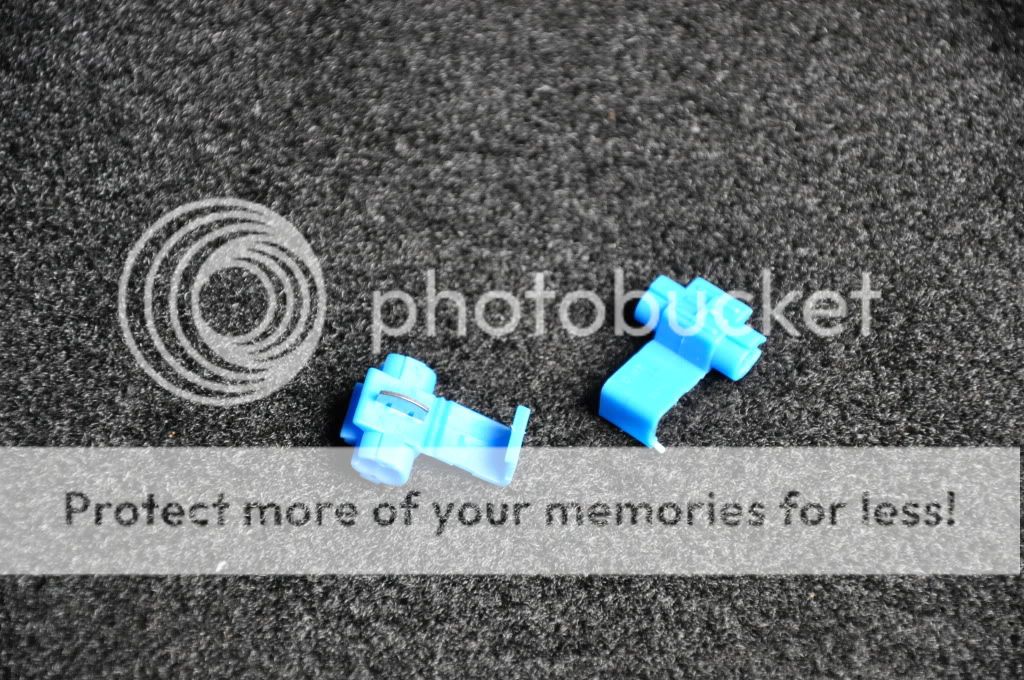
So you will need the Red wire (supplied) to connect to the Black/Blue (in car already) and the Black wire (supplied) to connect to the Yellow/Green:

Once happy, use electrical tape to wrap each connection individually, I then used a zip tie to tidy the cables and keep it out of the way. (Unfortunately you cannot tell if there is power running to the cables as the battery is disconnected.... you could always reconnect the battery to see if it all working at this stage and your connections are good.... don't forget to disconnect again when you continue)
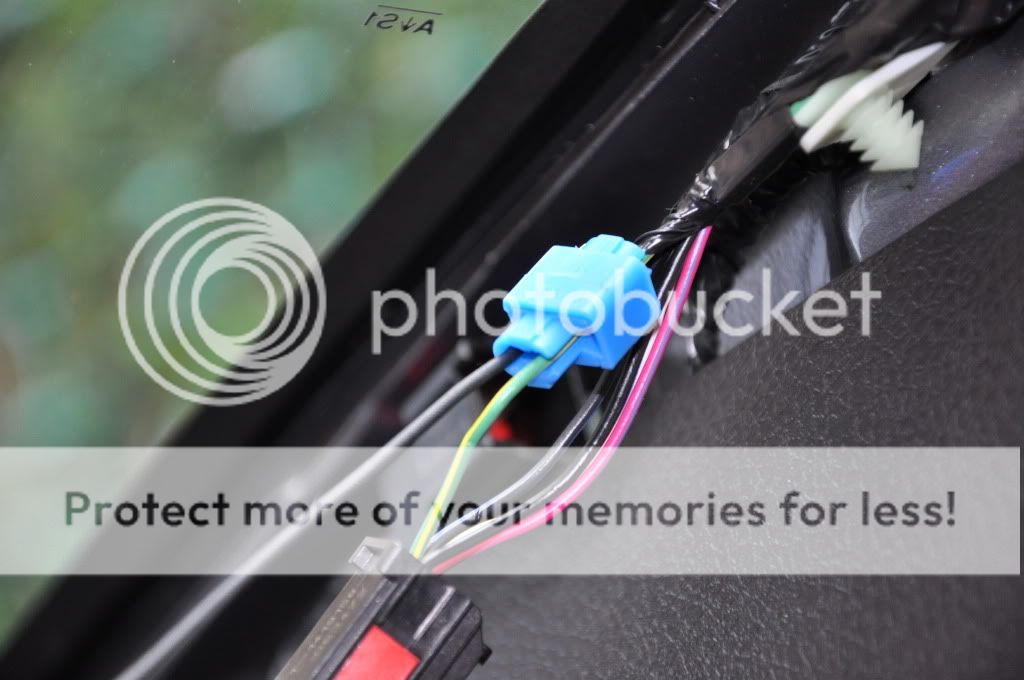
6. You should now have something that looks a little similar to this:
(I separated the wires so that I knew what I was working with.... the short cable stays on the passenger side and the longer cable I placed across to the drivers side)

7. Now remove the passenger door sill, again it is a grab and a quick pull up to make it release.... the clips are sturdy so you can use a bit of force.
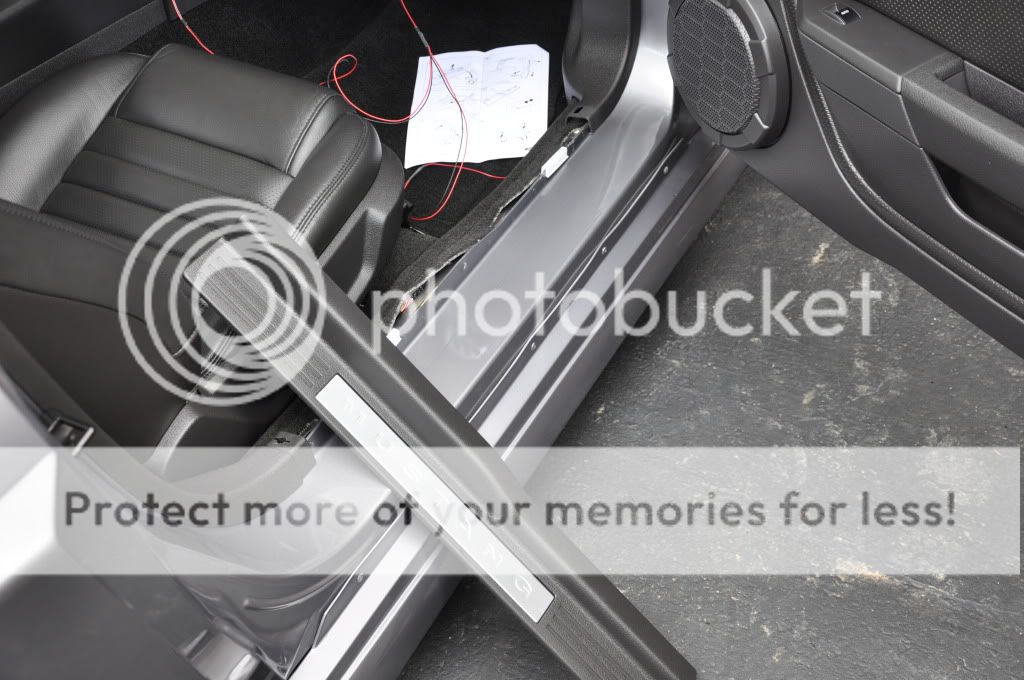
Here is the underside so you can see what you are dealing with:

8. Here you will need to remove (or pull forward) the passenger kick panel so that you can run the wires now towards the floor and along to where the new door sill will be.

I actually used some tape to keep the wire in place down the crease so that I didn't pinch anything when putting the panels back in place.... would be a shame to get this far and do something to ruin it all! This doesn't have to look tidy as it will all be hidden when the panels are put back in place.

9. Once happy with your wiring, you can replace the kick panel, leaving the wire that is to be wired to the drivers side free to be run across. You will now need to run the wire to the new passenger side door sill and connect it up ready for placement. Before you do this, rub the area where the M3 tape is going to stick with the alcohol rub and then fit the new door sill. Again be careful not to pinch any wires.
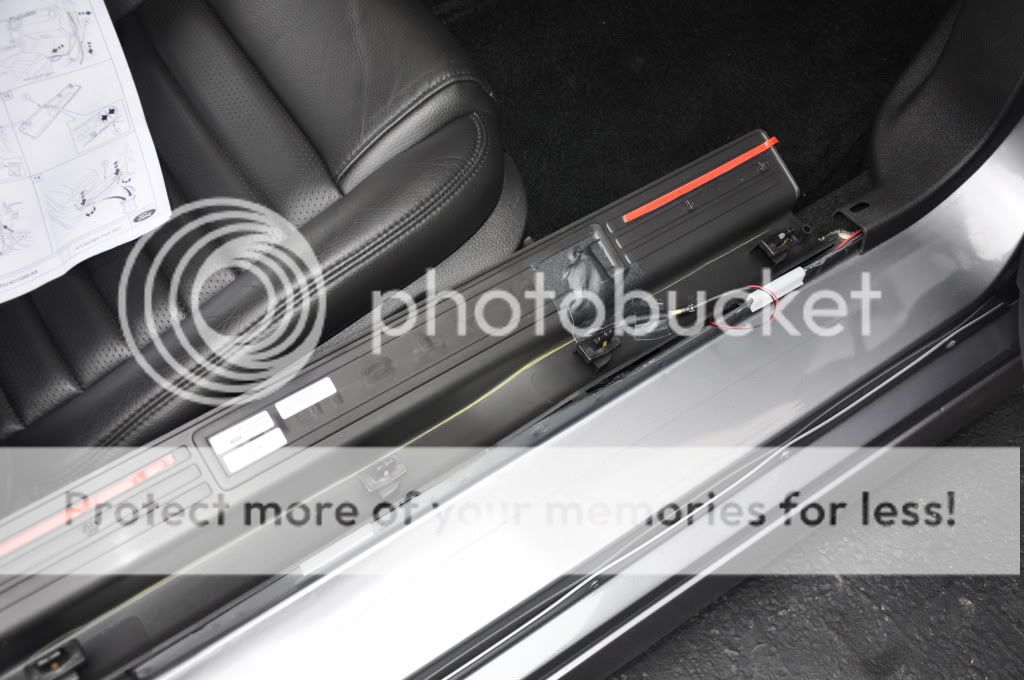
Once in place it should look like this:
You can now put the passenger A Pillar back to normal.
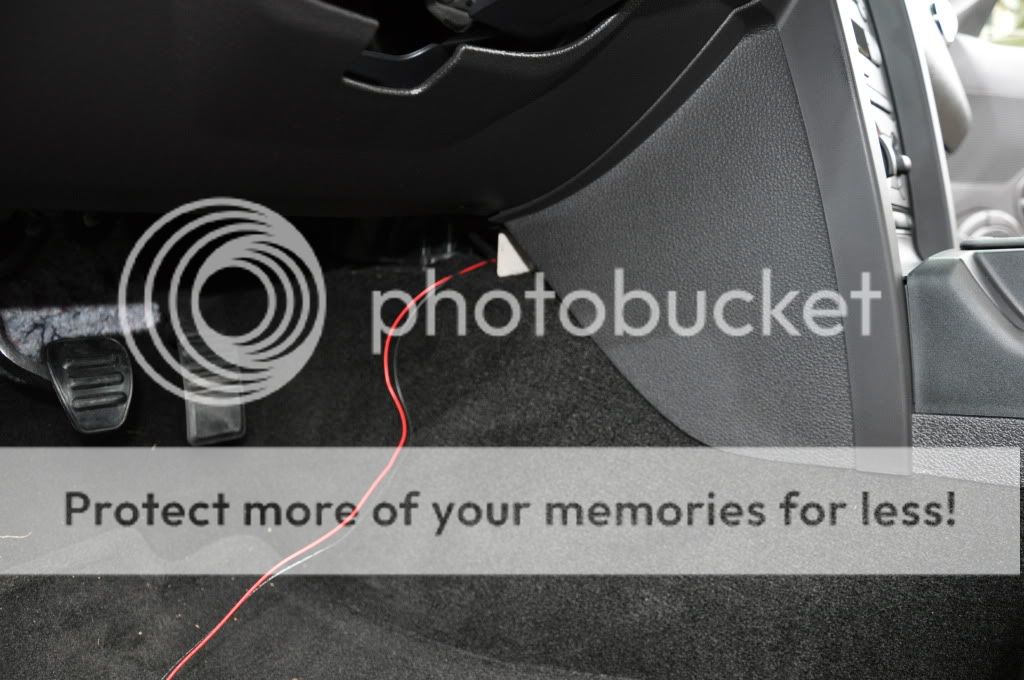
10. We now need to run the cable across to the drivers side. Use the zip ties supplied to attach the cable to current cable just behind/below the glove box. I attached the zip ties first but only loosely so they were hanging from the current car wires and then ran the new cable through them and then tightened them..... found this was an easier way to do it.

Once happy, cut back the excess plastic from the zip ties and then rotate them so that there are no sharp edges to catch on passengers legs.
CONT......
So I installed these today in my GT (non convertible), took just over an hour (including taking photos etc):
1. So what comes in the box?
You get the door sills x2 (Left / Right)
Zip ties x6
Wiring with lighting
Alcohol wipes x2
Instructions (Touch and go if you are not confident at this stuff)
2. Disconnect the Negative terminal from the battery. You will need an 8mm socket wrench.
3. The next step is to partially remove the passenger side A Pillar (you don't need to fully remove this). Start at the end furthest away from the dash and just grab it either side and give it a good tug and work your way forward.
You should be able to see the cabling hidden behind the pillar, disconnect the wiring plug
4. Now you will need to separate out the specific cables that you will need when you start to splice in the supplied cabling (Red and Black cables) in the kit. You need to find the "Black/Light Blue" and the "Yellow/Green"
The 2 at the top left!
5. Now comes the tricky part (well not really) - The Wiring! So we need to attach the supplied wires (Red / Black) into the current wiring ("Black/Light Blue" and the "Yellow/Green"). To do this I used splicing taps which are a little easier than cutting the wire cover off from one wire and soldering the new wire to it.
So you will need the Red wire (supplied) to connect to the Black/Blue (in car already) and the Black wire (supplied) to connect to the Yellow/Green:
Once happy, use electrical tape to wrap each connection individually, I then used a zip tie to tidy the cables and keep it out of the way. (Unfortunately you cannot tell if there is power running to the cables as the battery is disconnected.... you could always reconnect the battery to see if it all working at this stage and your connections are good.... don't forget to disconnect again when you continue)
6. You should now have something that looks a little similar to this:
(I separated the wires so that I knew what I was working with.... the short cable stays on the passenger side and the longer cable I placed across to the drivers side)
7. Now remove the passenger door sill, again it is a grab and a quick pull up to make it release.... the clips are sturdy so you can use a bit of force.
Here is the underside so you can see what you are dealing with:
8. Here you will need to remove (or pull forward) the passenger kick panel so that you can run the wires now towards the floor and along to where the new door sill will be.
I actually used some tape to keep the wire in place down the crease so that I didn't pinch anything when putting the panels back in place.... would be a shame to get this far and do something to ruin it all! This doesn't have to look tidy as it will all be hidden when the panels are put back in place.
9. Once happy with your wiring, you can replace the kick panel, leaving the wire that is to be wired to the drivers side free to be run across. You will now need to run the wire to the new passenger side door sill and connect it up ready for placement. Before you do this, rub the area where the M3 tape is going to stick with the alcohol rub and then fit the new door sill. Again be careful not to pinch any wires.
Once in place it should look like this:
You can now put the passenger A Pillar back to normal.
10. We now need to run the cable across to the drivers side. Use the zip ties supplied to attach the cable to current cable just behind/below the glove box. I attached the zip ties first but only loosely so they were hanging from the current car wires and then ran the new cable through them and then tightened them..... found this was an easier way to do it.
Once happy, cut back the excess plastic from the zip ties and then rotate them so that there are no sharp edges to catch on passengers legs.
CONT......
 12-03-2009, 08:47 PM
#2
2nd Gear Member
Thread Starter
Join Date: Nov 2009
Location: MD
Posts: 377
11. Run the cable through the gap in the center console... you should be able to see this clearly, as you can see straight through to the drivers side once through, it should look like this:
Again, zip tie the cable up to the existing cables in the car just under the steering wheel:

Once it is all pulled tight you should not be able to see any of the cable.
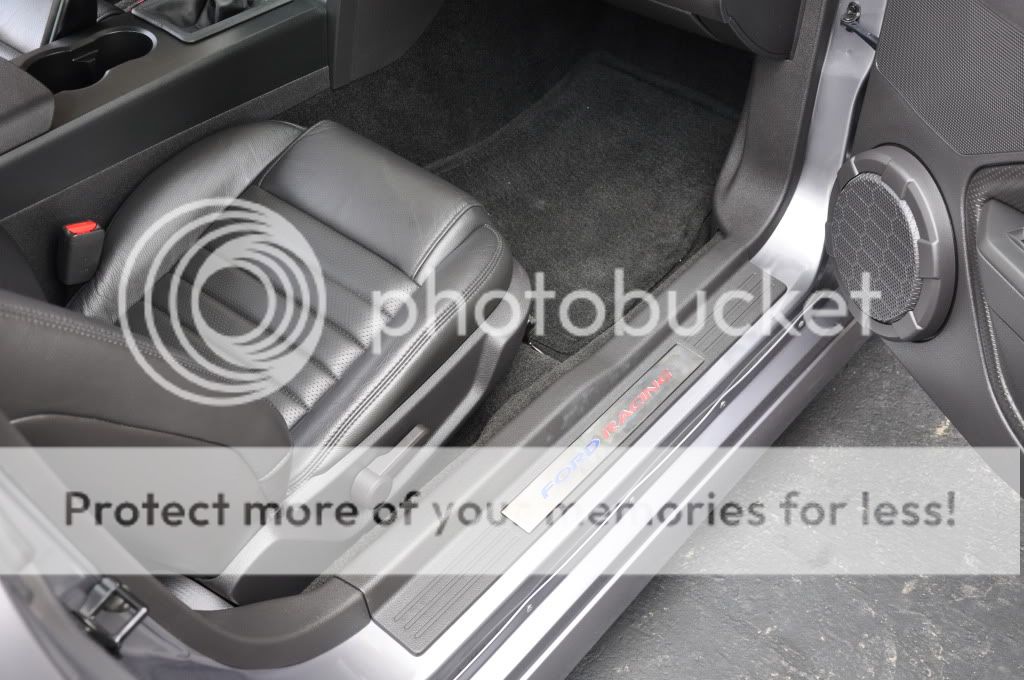
12. OK, so we are nearly there.... repeat the procedure for removing the drivers door sill as we did earlier with the passenger side,

run the new cable that we tidied down through the drivers kick panel and connect up to the new door sill. You will notice that there is an excess of cable, far more than required (better to have more rather than less!! ) so just use another zip tie and make this look good. You can tuck the excess in the kick panel. It should look like this:

13. Again, clean the area down with the alcohol rub and fit the new door sill being careful not to pinch any wires!!

Now connect up the battery terminal again!
All you have to do (like me) is sit back, be patient and wait for nightfall..... and reap the rewards for your hard work! This is how is looks once finished and at night.
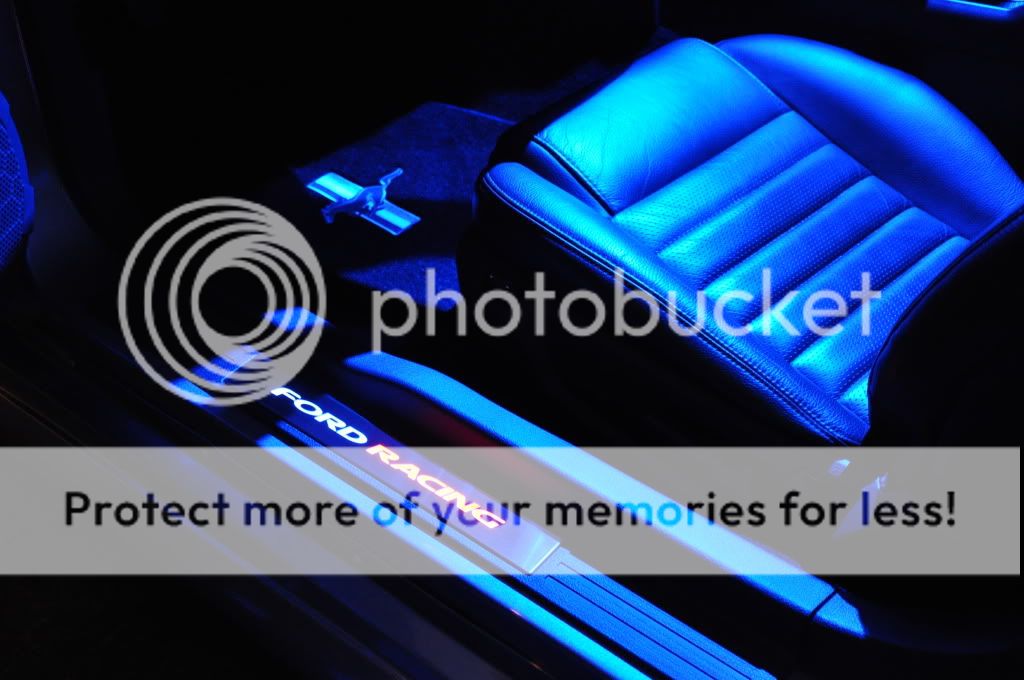

I hope this is of some use to anyone doing this install, and are as happy with the result as I was!
Happy driving!
ELMO
(This is just a helping guide, please don't hold me responsible if there are any errors or something goes wrong on your install)
Again, zip tie the cable up to the existing cables in the car just under the steering wheel:
Once it is all pulled tight you should not be able to see any of the cable.
12. OK, so we are nearly there.... repeat the procedure for removing the drivers door sill as we did earlier with the passenger side,
run the new cable that we tidied down through the drivers kick panel and connect up to the new door sill. You will notice that there is an excess of cable, far more than required (better to have more rather than less!! ) so just use another zip tie and make this look good. You can tuck the excess in the kick panel. It should look like this:
13. Again, clean the area down with the alcohol rub and fit the new door sill being careful not to pinch any wires!!
Now connect up the battery terminal again!
All you have to do (like me) is sit back, be patient and wait for nightfall..... and reap the rewards for your hard work! This is how is looks once finished and at night.
I hope this is of some use to anyone doing this install, and are as happy with the result as I was!
Happy driving!
ELMO
(This is just a helping guide, please don't hold me responsible if there are any errors or something goes wrong on your install)
Last edited by elmo3000; 12-03-2009 at 08:52 PM.
12-03-2009, 09:06 PM
#4
6th Gear Member
Sweet! I like the look but I have other mods that take precedence. But I'll put it on my list.
Have you done something with your interior lighting that it looks so blue or is it just the camera?
Have you done something with your interior lighting that it looks so blue or is it just the camera?
12-03-2009, 09:18 PM
#5
2nd Gear Member
Thread Starter
Join Date: Nov 2009
Location: MD
Posts: 377
Well, they give off enough light to read.... but who reads when you have a mustang..... DRIVE!! LOL (Nav not maps!)
12-03-2009, 09:41 PM
#6
4th Gear Member
Join Date: Mar 2007
Location: tennessee
Posts: 1,227
ive been eyeing this mod... excellent write up, sticky worthy for sure, if not, ill bookmark it.
it looks to me like they took some regular mustang door sills and put 2 leds underneath a "ford racing" plate on the top and sold it for almost 300 bucks...notice how when you have the "ford racing" sills upside down, they read "mustang" hmmm...
it looks to me like they took some regular mustang door sills and put 2 leds underneath a "ford racing" plate on the top and sold it for almost 300 bucks...notice how when you have the "ford racing" sills upside down, they read "mustang" hmmm...
12-03-2009, 09:54 PM
#8
2nd Gear Member
Thread Starter
Join Date: Nov 2009
Location: MD
Posts: 377
it looks to me like they took some regular mustang door sills and put 2 leds underneath a "ford racing" plate on the top and sold it for almost 300 bucks...notice how when you have the "ford racing" sills upside down, they read "mustang" hmmm...[/QUOTE]
I'm pretty sure that is exactly what they did.... I thought about custom making some, but my time and effort doing other things was more important. They are expensive.... but I love the look they give!
I'm pretty sure that is exactly what they did.... I thought about custom making some, but my time and effort doing other things was more important. They are expensive.... but I love the look they give!

