
Drain some brake fluid before replacing pads?
 12-06-2009, 11:53 AM
#1
2nd Gear Member
Thread Starter

Join Date: Sep 2006
Location: Long Island, New York
Posts: 185
Hi all, just want to clarify something - my repair manual (chilton) says I should drain about 1/2 the brake fluid before replacing the pads. I assume this is to allow the piston to be depressed so I can pull the pad out.
I replaced tons of brake pads in my auto mechanics classes in high school and we never drained fluid, we just used a tire iron to depress the piston. But that was 12 years ago so I'm not sure if it's the same. Maybe it's different for anti-lock brakes?
Anyway my plan was to go according to the manual and drain 1/2 the fluid and use a c clamp to depress the piston gently. Anyone have any other suggestions?
thanks
 12-06-2009, 11:58 AM
#2
Gentleman's Relish

Join Date: Feb 2005
Location: AZ
Posts: 13,090
Unless you added brake fluid as your pads wore down you should not need to drain any fluid out. You should loosen the cap though and put some rags around the master cylinder to catch any fluid that does happen to back out. There will probably be a little. (like a thimble full).
12-06-2009, 12:42 PM
#3
2nd Gear Member
Join Date: Nov 2009
Location: AZ
Posts: 465
I did not have to drain any fluid, I just popped the cap in case it over-flowed. If it does overflow, wipe up the spill as brake fluid is very corrosive to paint and plastics. Be sure to check the fluid level and replace the cap when you're done.
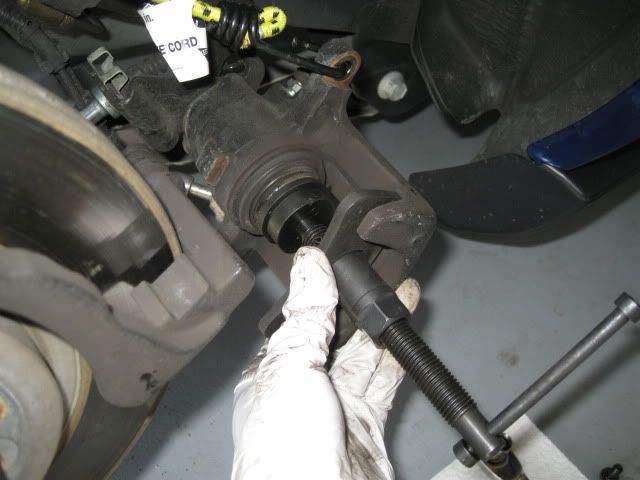
On the rear calipers, you CANNOT simply push in the piston with a C-clamp. The rear brake piston has to be turned in a clock-wise direction while applying forward pressure to compress the piston. The piston was a pain to turn even with the right tool. I purchased this tool from Harbor Freight for $20 and used the #5 adapter plate that comes with the kit. The adapter has two pins that fit into the notches on the face of the piston allowing you to turn it with the tool. Although I removed the entire caliper, I understand that you can remove the top bolt only (and perhaps loosen the bottom bolt) and flip the caliper back to replace the pads - might be more stable while compressing the piston than holding it like I did.
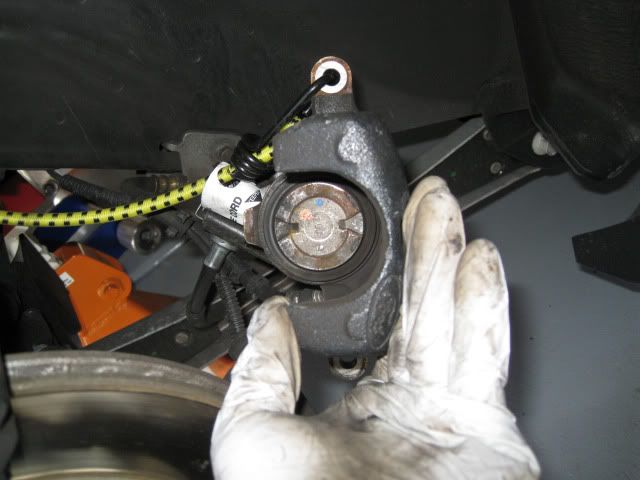
The notches on the face of the rear caliper piston needs to be oriented as shown here, prior to re-installing the caliper, so they can fit into the alignment pin on the backside of the inboard brake pad.
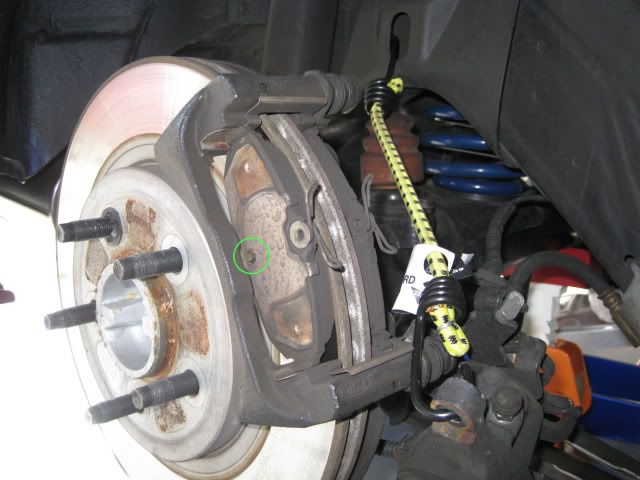
I circled the alignment pin on the outboard brake pad in the following picture.
Can't give you any advise on the front pads since I have Brembos on the front.
On the rear calipers, you CANNOT simply push in the piston with a C-clamp. The rear brake piston has to be turned in a clock-wise direction while applying forward pressure to compress the piston. The piston was a pain to turn even with the right tool. I purchased this tool from Harbor Freight for $20 and used the #5 adapter plate that comes with the kit. The adapter has two pins that fit into the notches on the face of the piston allowing you to turn it with the tool. Although I removed the entire caliper, I understand that you can remove the top bolt only (and perhaps loosen the bottom bolt) and flip the caliper back to replace the pads - might be more stable while compressing the piston than holding it like I did.
The notches on the face of the rear caliper piston needs to be oriented as shown here, prior to re-installing the caliper, so they can fit into the alignment pin on the backside of the inboard brake pad.
I circled the alignment pin on the outboard brake pad in the following picture.
Can't give you any advise on the front pads since I have Brembos on the front.
Last edited by 6-Speed; 12-06-2009 at 01:02 PM.
 12-06-2009, 10:50 PM
#6
5th Gear Member

Join Date: May 2005
Location: Tampa
Posts: 4,204
 12-07-2009, 12:15 AM
#7
1st Gear Member

Join Date: Aug 2009
Location: VA
Posts: 65
it is ALSO just good practice to simply flush the brake lines while you have the wheel off and have easy access to all the calipers, always good to keep fresh brake fluid in the system!
that's what I use as well when i changed pads on my previous car.
Thanks for posting those piston pics btw, looks like all my brake service tools I got for my previous car will all still be useful on my Mustang
12-07-2009, 08:23 AM
#8
2nd Gear Member
Thread Starter
Join Date: Sep 2006
Location: Long Island, New York
Posts: 185
thanks for the info all, I ended up just placing some rags around the master cylinder while the cap was off. Nothing overflowed though so it seemed fine. I didn't see the post about the bleeder screw, I would have done that if I had, because it was a bitch getting the piston to depress
On that note, I went to pep boys and they sold me that cube-like thing pictured above -- I don't know about you guys but it was a waste of time for me, it didn't fit properly in the notches on my piston. Plus, as I found out afterwards, you need to force our pistons down while turning them. This seemed nearly impossible with needlenose pliers, I know someone posted here that they did it easily with needlenose pliers, they either did something different or they're a hercules because I couldn't move that thing down a millimeter, even after turning the piston dozens of times.
So I ended up running to auto zone for the caliper tool, which worked perfectly and I finished the job in 20 minutes after that
