2010 painted lower mouldings

 03-25-2011, 09:37 PM
#2
2nd Gear Member

Join Date: Feb 2011
Location: Florida
Posts: 189
I just asked the same question.
https://mustangforums.com/forum/2005...aint-idea.html
I too would love to see it done. Hard to say how it would turn out being textured though.
excellent question btw....lol
https://mustangforums.com/forum/2005...aint-idea.html
I too would love to see it done. Hard to say how it would turn out being textured though.
excellent question btw....lol
03-25-2011, 10:46 PM
#3
3rd Gear Member
Join Date: May 2010
Location: Michigan
Posts: 645
The side molding and the grill frame can be painted easily as they are hard plastic. The front and rear valance on the other hand are soft rubber and the paint just doesn't want to stick to it. Very careful prep, special primer and paint flex agents have to be added and still the shop probably won't give you a warranty on the paint staying on. I think the rubber itself has flex agents that work to the surface after a while and the paint can't stick to that.
03-26-2011, 09:21 AM
#4
1st Gear Member

Join Date: Nov 2010
Location: LA
Posts: 59
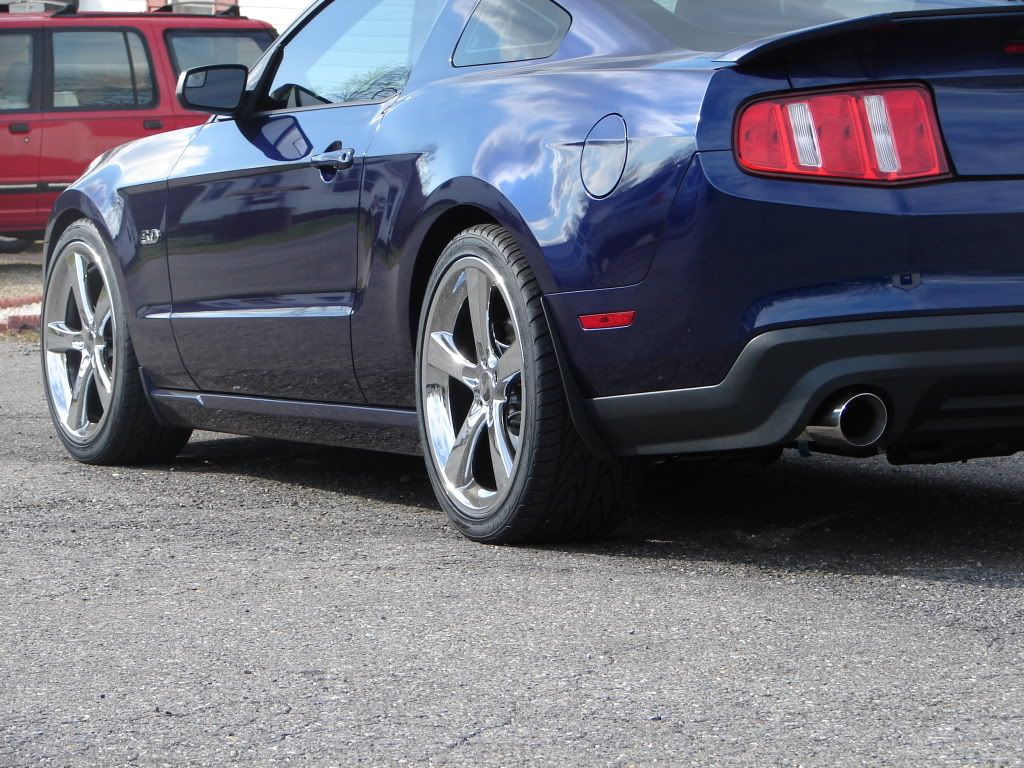
I just finished painting my rockers on my 2011 GT. I think it went very well. I wanted to do a photo tutorial with it but i didn't know how it was going to turn out and i was trying to finish it in a reasonable amount of time. Overall I'm very pleased with how they turned out. My car is Kona Blue and i painted the rockers matte black. I will list my steps here and the items I purchased and used. My thinking behind painting the rockers black versus the same color as the car is i have seen cars like ours with matching paint on the rockers and it really makes the car look bigger. I like the sleek look. Plus these parts are going to get banged up with road grit and other materials that the tires throw. Doing this is much easier to pull off and repair myself if they do get a little messed up, not to mention cheaper. Plus the painted rockers wash off much easier than the textured plastic. I also did not focus on completely smoothing the texture off the rockers. Also you have to be careful on the corner and where the plastic turns. these areas are very easy to over-sand. I used a rotary sander with the 160 grit because it was easier and faster. Everything else i hand sanded. After the sanding is done wash the rockers very well and let air dry. Apply the duplicolor adhesion promoter and follow the instructions on the can carefully. Once you go on with several coats of the filler primer you wont see the swirl marks. Just be sure to take it easy on those bends and corners when sanding the primer as they will easy over-sanded. I used Formula 409 between all stages of sanding, priming, and painting to remove any oil and grease or dust. I did this outside under my carport but if you can find a well ventilated place inside that would be much better. I worked with what i had. Apply several coats of paint, i basically used 1 can on each rocker and then let dry for at least an hour. I lightly wet sanded and then applied the 3rd can to both rockers. Careful when you are sanding the inside and outside corners of the plastic. You may want to let the paint dry for 2 hours depending on the humidity outside. The cans say 1 hour but i had some issues with the paint not being completely dry on the inside corners. Easily fixed and not noticeable but still annoying. Now i did all this for the reasons above and because i was installing Roush rocker splitters. And it turned out awesome, highly recommended! In the Rear before and after picture you can see the difference between the rockers and the rear valance which i will be painting this week now that I have seen how good the rockers turned out.
Items:
Sandpaper
160 grit for really roughing the parts up to start.
1000 grit wet/dry for smoothing up prior to painting.
1200 grit mirror fine for wet sanding the primer and between coats.
Duplicolor adhesion promoter
Duplicolor black trim paint (Autozone) 3 cans
Duplicolor filler sandable primer. 2 cans 3 will work better.
http://s1235.photobucket.com/albums/...eandAfter1.jpg
03-26-2011, 11:45 AM
#5
1st Gear Member
Join Date: Mar 2010
Location: Michigan
Posts: 89
I did mine last year and they've held up great. Here's the link to my thread.
https://mustangforums.com/forum/2010...s-painted.html
https://mustangforums.com/forum/2010...s-painted.html
03-26-2011, 11:57 AM
#6
3rd Gear Member
Thread Starter

Join Date: Nov 2009
Location: Decatur AL
Posts: 823
03-27-2011, 08:38 AM
#7
2nd Gear Member
Join Date: Feb 2011
Location: Florida
Posts: 189
I did mine last year and they've held up great. Here's the link to my thread.
https://mustangforums.com/forum/2010...s-painted.html
https://mustangforums.com/forum/2010...s-painted.html
I do love it though.
03-27-2011, 11:07 AM
#8
3rd Gear Member
Join Date: Mar 2010
Location: Clinton, Tennessee
Posts: 761
If you are painting it yourself, and this would go to all the plastic Molding, whether it be the rockers or the front and rear valances.
1) Scuff it with a Scotch Bright pad, a 600 grit would be OK, you do not need to sand it smooth.
2) Clean it with a little Auto Body Lacquer Thinner
3) Spray it with Adhesion Promoter.
4) Spray it with 2 or 3 coats of primer, you want it thick.
5) Wet sand it first with 220 Grit and then after with 600 grit
6) Seal it with a thin coat of primer and then the color and then clear it.
It is easier to sand the primer smooth than the plastic, and the primer is more forgiving.
I can get everything mentioned at my local Napa store, they can mix paint with reducer and flex agent for you also.
If you want it smoother than how it comes out, wet sand with 1200, then 2500 and 3500 if you can get it then polish with 3M Polishing compound.
My F150 rear window surround turned out awesome
03-28-2011, 05:08 AM
#9
1st Gear Member
Join Date: Mar 2010
Location: Michigan
Posts: 89
Swag, like I said its held up great so far. And Siber thats basicly the same way we did it, except instead of plain Scotch Bright I used a red scuff pad. Its more aggressive than regular Scotch Bright, its probably made by the same people though. Good luck