
 11-20-2015, 12:12 PM
Last edit by: IB Advertising
See related guides and technical advice from our community experts:
Browse all: Steering & Suspension Guides
- Ford Mustang Gt 1996 to 2004: How to Replace Struts and Shocks
Step by step instructions for do-it-yourself repairs
Browse all: Steering & Suspension Guides

TECH HOW TO: INSTALLING STRUTS/SHOCKS, UPPER/LOWER CA'S 94-04
03-19-2006, 11:34 AM
#1
Mustang Nazi
Thread Starter
Join Date: Sep 2004
Location: Texas, baby
Posts: 13,444
This write up is presented by Emann0007
Installing Shocks, Struts, Springs, Upper & Lower Control Arms on 1994-2004 Mustangs

Okay. The picture above is the Granatelli Motorsport Upper and Lower Control Arms and Monroe Sensitrack shocks and struts which I installed on my 1997 Mustang GT. The following instructions will walk you through the installation. Be aware that if you are installing lowering springs, this is a good time to do so as you will have to repeat most of these steps to install those as well. You might as well do it all at once. My springs are not pictured as I had installed those months before…
TOOLS REQUIRED:
1.) 10mm-19mm deep well sockets and (2) Ratchets. (You don’t need every measurement in this range, but you will use most of them, and I forget which exact ones you need)
2.) Wrenches sized 10-19mm.
3.) Two jack stands
4.) A floor jack
5.) A tire jack or second floor jack.
6.) An air wrench and appropriate deep well sockets. (See #1)
7.) A large pry bar or long heavy duty flathead screwdriver (only if you don’t have air tools)
8.) Grease for your rubber bushings on your new Upper and Lower Control Arms.
9.) Spring compressors (if you are installing your new lowering springs at this time…)
10.) A friend who can turn a wrench.
INSTALLATION:
From here on out I will refer to the Control Arms as “CA’s” to keep things simple. Remember to park on a level surface and set your parking brake! Let’s begin…
STEP 1: We will start with the front end of the car. Loosen the lug nuts and then use a floor jack to raise the car in the appropriate spot (if unsure, see your owners manual) and rest the car on a jack stand. Remove the wheel.
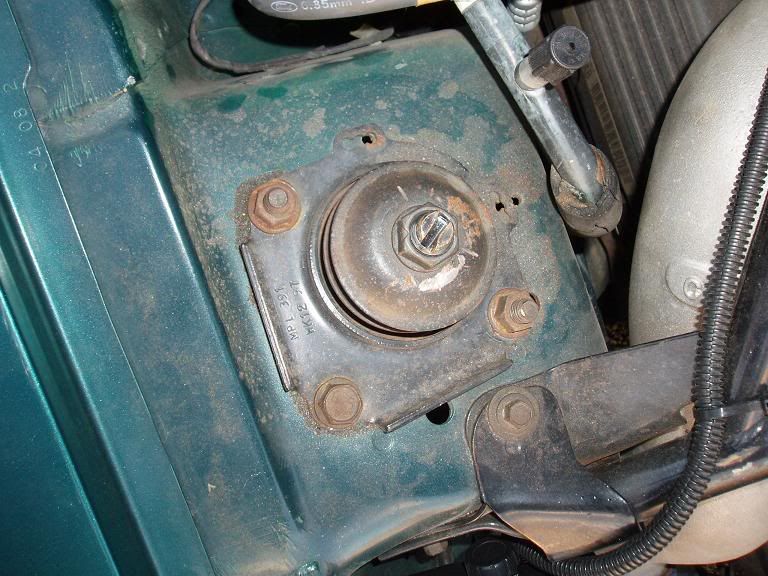
STEP 2: Open the hood and locate the “top nut” for the struts…
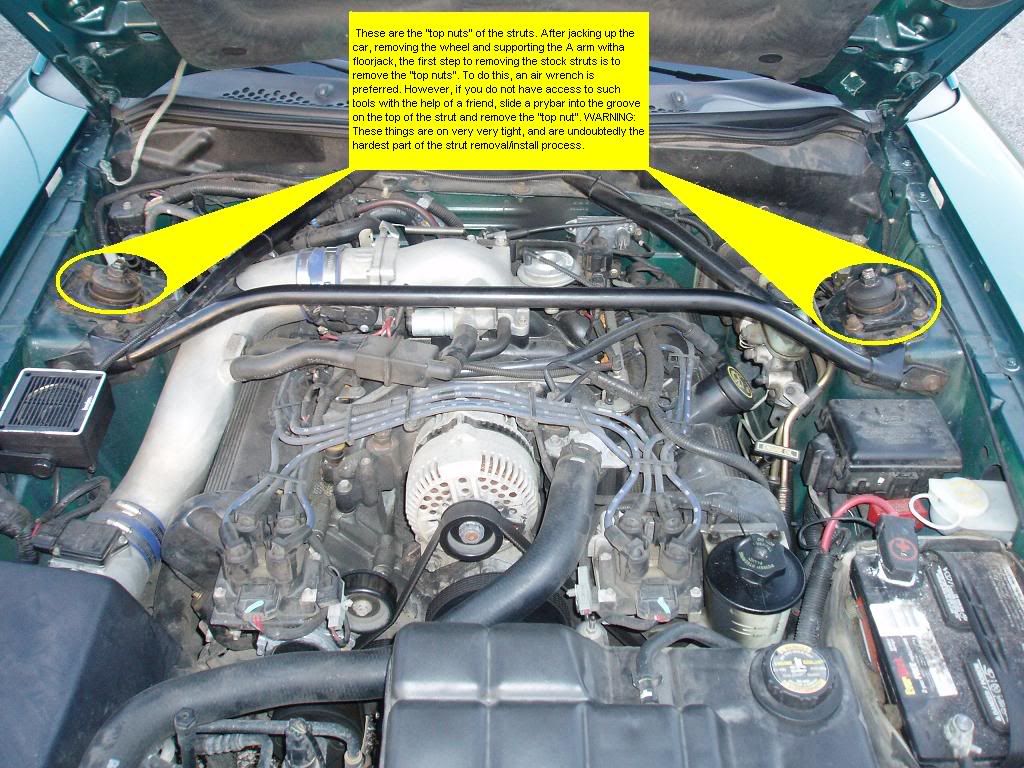
STEP 3: If you have air tools, simply remove the bolt. If you do not have access to air tools, this is where you will use your pry bar/heavy duty flathead screwdriver and your friend. Put the appropriate sized wrench on the nut and then slide the pry bar into the slot on the bolt and use it to hold the bolt still as you loosen the nut. This is undoubtedly the hardest part of the front end installation.
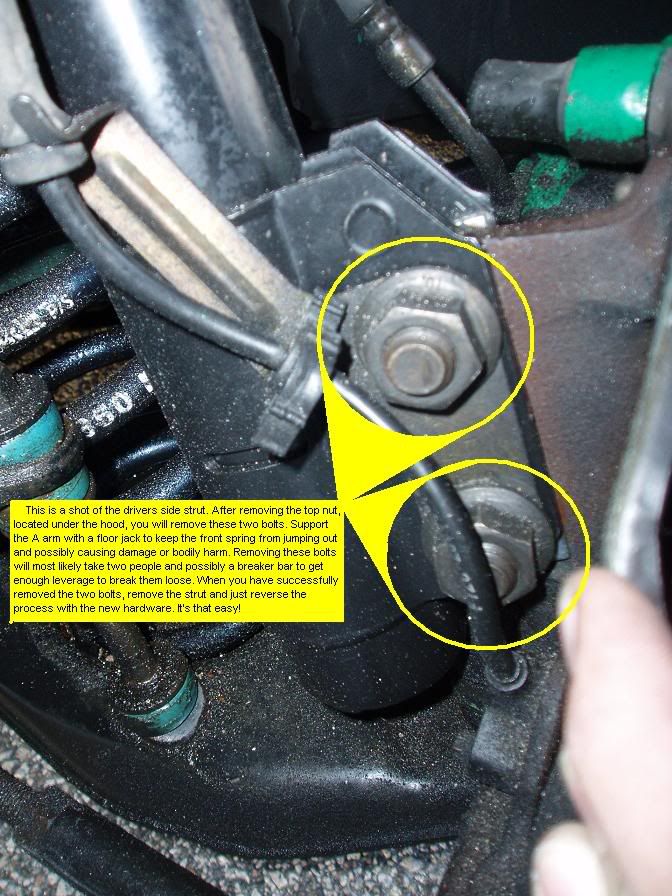
STEP 4: Once you have the top nut removed, you will move towards loosening the bottom two bolts that attach the strut to the steering knuckle. Support the A-arm with the floor jack, and remove the two bolts. You will need a wrench on one side and a ratchet on the other. Again, utilize your friend to break these bolts loose as they will be on very tight. Be sure to not let the caliper fall when you remove the bolts as this may damage your break line.
Now, if you are installing lowering springs, this would be the time to use the spring compressors to compress and remove the front springs. To do this, you may need to remove the entire brake caliper…. Replace the spring, and continue to step 5.
STEP 5: Once you have the bolts out, remove the strut by pulling it down through the fenderwell and reverse the process to install the new piece. To make things a little easier, I would suggest threading the “top nut” slightly to hold it in place as you reattach the two bottom bolts. Remember to use your new hardware, if supplied (depends on what aftermarket struts you are using).
STEP 6: Tighten down the “top nut” of the strut until the new bushings begin to depress.
STEP 7: Switch to the opposite side of the car and repeat steps 1-6. It should take you about ½ the time to do the second side. Make sure everything is TIGHT!!!!
INSTALLING THE REAR SHOCKS:
STEP 1: Loosen the lug nuts on both rear wheels and raise the car and place it on jack stands in front of the rear wheels. This is important as you will need them to be as out of the way as possible. Get the car up as high as you can so that you will be able to move comfortably underneath the car. Be sure to place a block/wedge of some kind in front of each front tire.
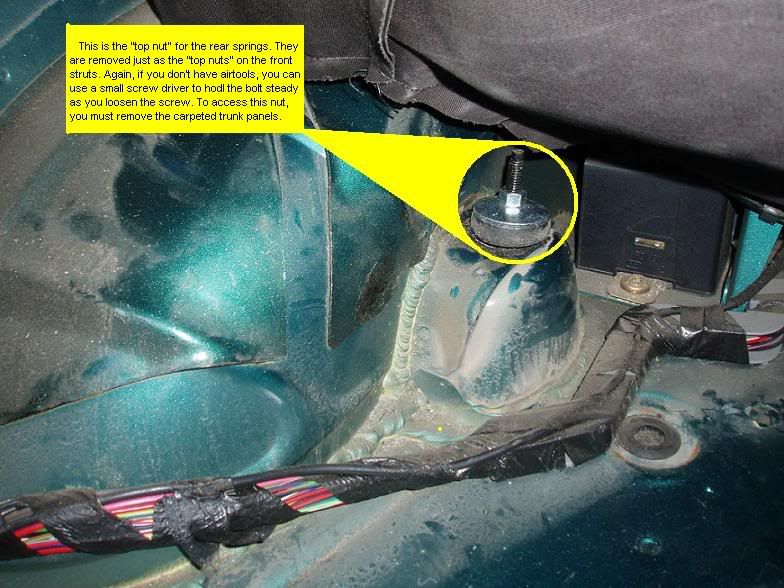
STEP 2: Loosen the “top nut” of the rear shocks by accessing them through the trunk. You will need to remove the carpeted panels in order to reach them, they should pop right out. This nut can be loosened by use of either air tools or by using the same method for the struts while using a small flathead screw driver in place of the pry bar.
STEP 3: Move to the bottom of the rear shocks and remove the bottom bolt which attaches the shock to the rear axel.

STEP 4: Remove the shock through the fender fenderwell (pulling towards the ground) and replace with the new shock. It is helpful to again have a friend assist and slightly thread the “top nut” of the shock and then simply reverse steps 1-3 to install the new shocks.
INSTALLATION OF THE UPPER CA’s:
STEP 1: Continuing with the car on jack stands, place the floor jack under the rear differential housing to support the axel. Remove the upper arm-to-rear axel bolt and nut. Pay attention to which way the bolt is pointing and replace the new hardware in the same direction (in steps 3&4).
STEP 2: Remove the upper arm-to-frame bolt and nut. Remove the stock arm. WARNING!!! You may need to remove your catback system in order to access the bolts for the upper CA’s…..


STEP 3: Position the arm-to-frame end of the new upper CA into the frame bracket and slide the bolt into place. Do not fully tighten it at this time. BE SURE AND GREASE THE BUSHINGS & USE YOUR NEW HARDWARE!
STEP 4: Bolt the arm-to-axel pivot point using the new hardware. Do not fully tighten it at this time. You may need to jack up the rear axel slightly to get the bolts to line up properly.
STEP 5: Repeat steps 1-4 to replace the other upper CA.
STEP 6: Once all the new nuts and bolts are in place (making sure they are facing the same way as the stock pieces), tighten everything up.
INSTALLATION OF THE LOWER CA’s:
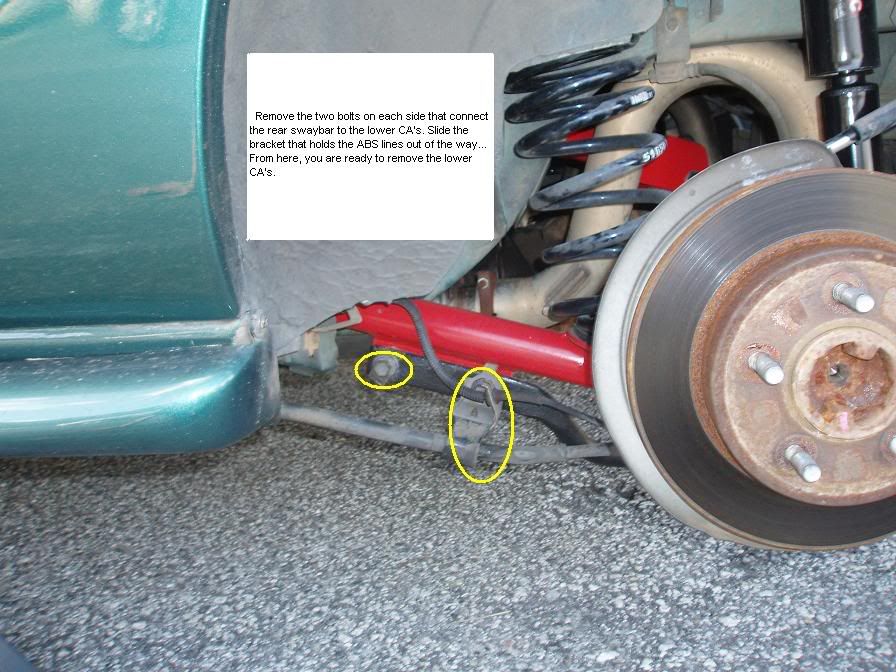
STEP 1: Continuing with the car on jack stands, remove the bolts that attach the rear sway bar to the lower control arms (two on each side). Set the rear sway bar aside.
STEP 2: Place a second floor jack or tire jack under the rear end of the lower CA and support its weight to ensure that the rear spring does not jump out possibly causing damage or bodily injury. You can again use spring compressors, but they are not necessary for the rear. Unbolt the rear bolt and lower the floor jack/lower CA until the spring fully extends.
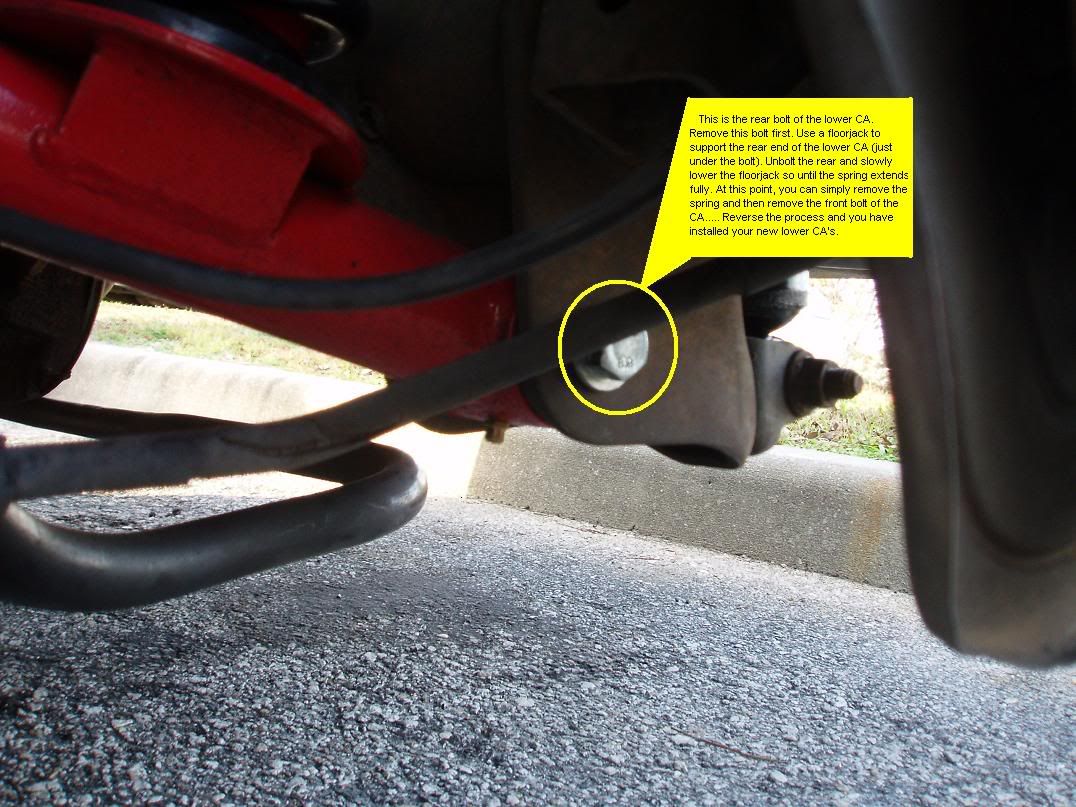
STEP 3: Remove the spring and then remove the front bolt on the lower CA. You will again need two ratchets with deep well sockets to get to these bolts.
STEP 4: Using your new l
Installing Shocks, Struts, Springs, Upper & Lower Control Arms on 1994-2004 Mustangs
Okay. The picture above is the Granatelli Motorsport Upper and Lower Control Arms and Monroe Sensitrack shocks and struts which I installed on my 1997 Mustang GT. The following instructions will walk you through the installation. Be aware that if you are installing lowering springs, this is a good time to do so as you will have to repeat most of these steps to install those as well. You might as well do it all at once. My springs are not pictured as I had installed those months before…
TOOLS REQUIRED:
1.) 10mm-19mm deep well sockets and (2) Ratchets. (You don’t need every measurement in this range, but you will use most of them, and I forget which exact ones you need)
2.) Wrenches sized 10-19mm.
3.) Two jack stands
4.) A floor jack
5.) A tire jack or second floor jack.
6.) An air wrench and appropriate deep well sockets. (See #1)
7.) A large pry bar or long heavy duty flathead screwdriver (only if you don’t have air tools)
8.) Grease for your rubber bushings on your new Upper and Lower Control Arms.
9.) Spring compressors (if you are installing your new lowering springs at this time…)
10.) A friend who can turn a wrench.
INSTALLATION:
From here on out I will refer to the Control Arms as “CA’s” to keep things simple. Remember to park on a level surface and set your parking brake! Let’s begin…
STEP 1: We will start with the front end of the car. Loosen the lug nuts and then use a floor jack to raise the car in the appropriate spot (if unsure, see your owners manual) and rest the car on a jack stand. Remove the wheel.
STEP 2: Open the hood and locate the “top nut” for the struts…
STEP 3: If you have air tools, simply remove the bolt. If you do not have access to air tools, this is where you will use your pry bar/heavy duty flathead screwdriver and your friend. Put the appropriate sized wrench on the nut and then slide the pry bar into the slot on the bolt and use it to hold the bolt still as you loosen the nut. This is undoubtedly the hardest part of the front end installation.
STEP 4: Once you have the top nut removed, you will move towards loosening the bottom two bolts that attach the strut to the steering knuckle. Support the A-arm with the floor jack, and remove the two bolts. You will need a wrench on one side and a ratchet on the other. Again, utilize your friend to break these bolts loose as they will be on very tight. Be sure to not let the caliper fall when you remove the bolts as this may damage your break line.
Now, if you are installing lowering springs, this would be the time to use the spring compressors to compress and remove the front springs. To do this, you may need to remove the entire brake caliper…. Replace the spring, and continue to step 5.
STEP 5: Once you have the bolts out, remove the strut by pulling it down through the fenderwell and reverse the process to install the new piece. To make things a little easier, I would suggest threading the “top nut” slightly to hold it in place as you reattach the two bottom bolts. Remember to use your new hardware, if supplied (depends on what aftermarket struts you are using).
STEP 6: Tighten down the “top nut” of the strut until the new bushings begin to depress.
STEP 7: Switch to the opposite side of the car and repeat steps 1-6. It should take you about ½ the time to do the second side. Make sure everything is TIGHT!!!!
INSTALLING THE REAR SHOCKS:
STEP 1: Loosen the lug nuts on both rear wheels and raise the car and place it on jack stands in front of the rear wheels. This is important as you will need them to be as out of the way as possible. Get the car up as high as you can so that you will be able to move comfortably underneath the car. Be sure to place a block/wedge of some kind in front of each front tire.
STEP 2: Loosen the “top nut” of the rear shocks by accessing them through the trunk. You will need to remove the carpeted panels in order to reach them, they should pop right out. This nut can be loosened by use of either air tools or by using the same method for the struts while using a small flathead screw driver in place of the pry bar.
STEP 3: Move to the bottom of the rear shocks and remove the bottom bolt which attaches the shock to the rear axel.
STEP 4: Remove the shock through the fender fenderwell (pulling towards the ground) and replace with the new shock. It is helpful to again have a friend assist and slightly thread the “top nut” of the shock and then simply reverse steps 1-3 to install the new shocks.
INSTALLATION OF THE UPPER CA’s:
STEP 1: Continuing with the car on jack stands, place the floor jack under the rear differential housing to support the axel. Remove the upper arm-to-rear axel bolt and nut. Pay attention to which way the bolt is pointing and replace the new hardware in the same direction (in steps 3&4).
STEP 2: Remove the upper arm-to-frame bolt and nut. Remove the stock arm. WARNING!!! You may need to remove your catback system in order to access the bolts for the upper CA’s…..
STEP 3: Position the arm-to-frame end of the new upper CA into the frame bracket and slide the bolt into place. Do not fully tighten it at this time. BE SURE AND GREASE THE BUSHINGS & USE YOUR NEW HARDWARE!
STEP 4: Bolt the arm-to-axel pivot point using the new hardware. Do not fully tighten it at this time. You may need to jack up the rear axel slightly to get the bolts to line up properly.
STEP 5: Repeat steps 1-4 to replace the other upper CA.
STEP 6: Once all the new nuts and bolts are in place (making sure they are facing the same way as the stock pieces), tighten everything up.
INSTALLATION OF THE LOWER CA’s:
STEP 1: Continuing with the car on jack stands, remove the bolts that attach the rear sway bar to the lower control arms (two on each side). Set the rear sway bar aside.
STEP 2: Place a second floor jack or tire jack under the rear end of the lower CA and support its weight to ensure that the rear spring does not jump out possibly causing damage or bodily injury. You can again use spring compressors, but they are not necessary for the rear. Unbolt the rear bolt and lower the floor jack/lower CA until the spring fully extends.
STEP 3: Remove the spring and then remove the front bolt on the lower CA. You will again need two ratchets with deep well sockets to get to these bolts.
STEP 4: Using your new l


Thread
Thread Starter
Forum
Replies
Last Post
mungodrums
5.0L GT S550 Tech
7
10-07-2015 04:01 AM
M3hunter
S197 Handling Section
0
09-05-2015 03:42 PM
