Vortech Supercharger rebuild write up
 02-15-2011, 08:59 PM
#1
4th Gear Member
Thread Starter
Join Date: Apr 2008
Location: mi
Posts: 1,087
i found this and ive never seen a write up on here so i thought id post it up...
also found this website too.its a rebuild on a V1 with some notes on the bottom about a v2. its a little bit different of a method than the one below.
http://www.starrland.com/Supercharge...%202-22-08.pdf
also found this website too.its a rebuild on a V1 with some notes on the bottom about a v2. its a little bit different of a method than the one below.
http://www.starrland.com/Supercharge...%202-22-08.pdf
Last edited by Blk003GT; 02-17-2011 at 03:45 PM.
 02-16-2011, 11:29 AM
#2
5th Gear Member
Join Date: May 2009
Location: kentucky
Posts: 2,241
ok... got my blower back together. Ill be posting the part numbers withing the next couple of days. Here are pics of me going back together with it, ill post them in reverse that way its like taking it apart and ill be thorough with describing it..... first things first. when you take your blower bracket off, you need to mark the 2 parts of the blower housing where the clamped allen head bolts hold it together that way you will know how to put the blower back together in the correct "clocked" position. I dont have any pictures of these clamps and allen head cap screws where they bolt the volute on but when you see them on your blower it will be self explanatory.
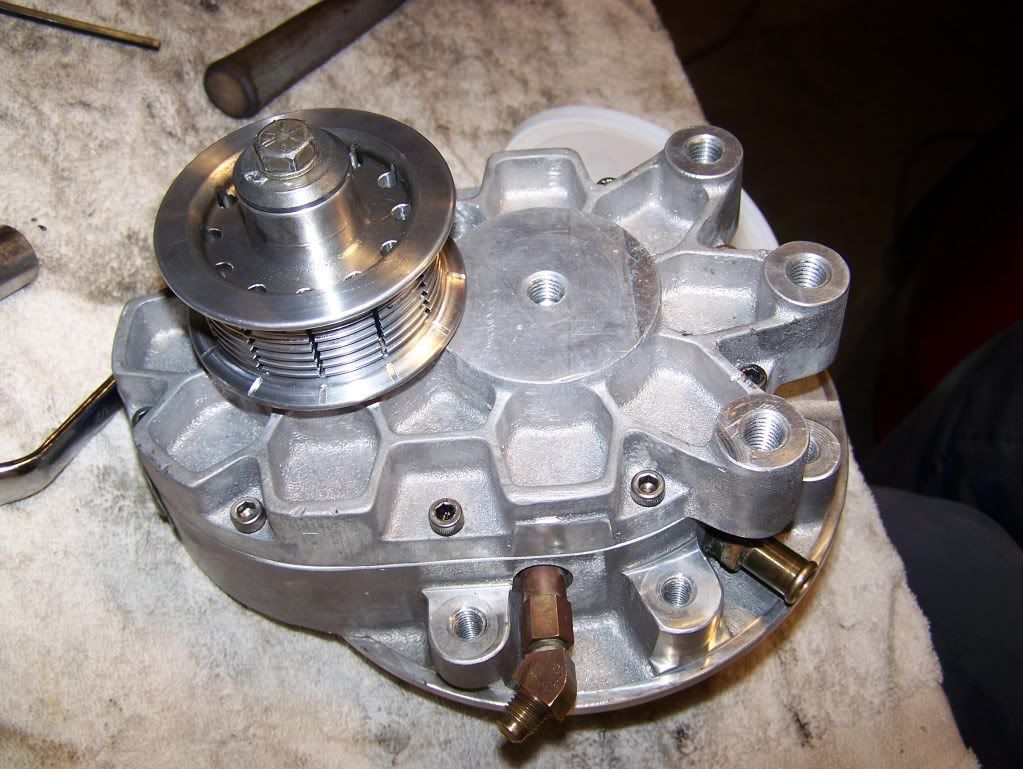
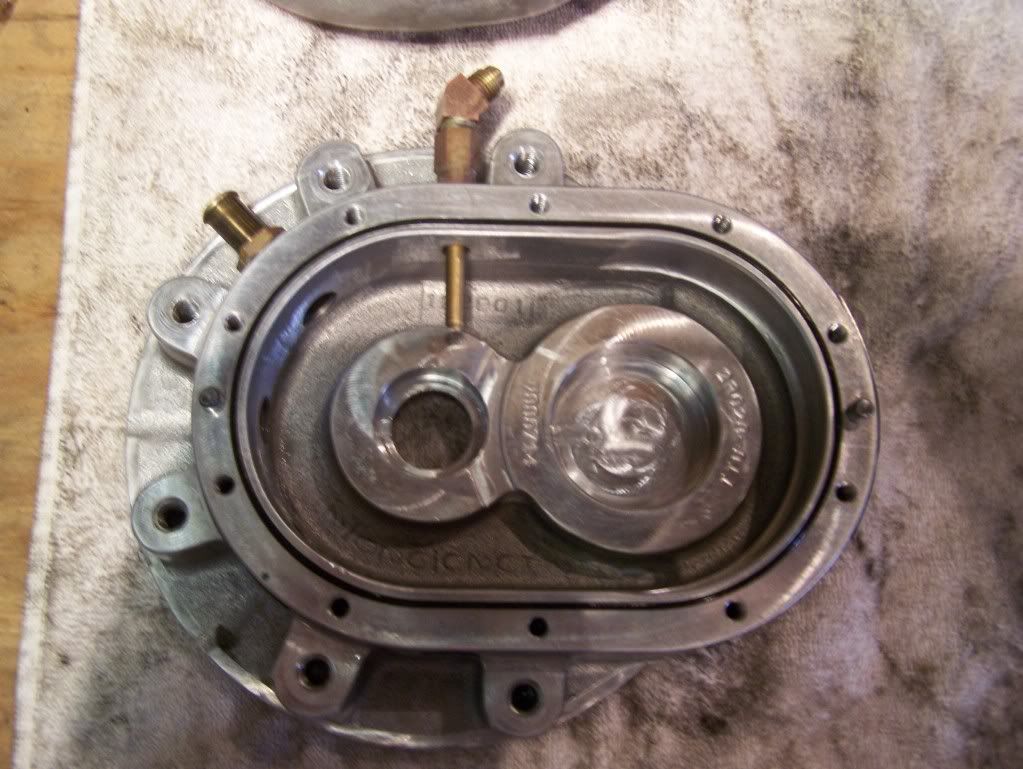
Here is a pic of the pulley side of the blower. I used an air impact to break the bolt loose holding the pulley on. after doing that i pulled the pulley off and took loose the 10 allen head cap screws that hold the first section of the blower housing off. I used a fiber hammer and bumped around the housing to break the seal loose and just pulled up on the housing as i bumped it and it eventually just slid off.
This image has been resized. Click this bar to view the full image.
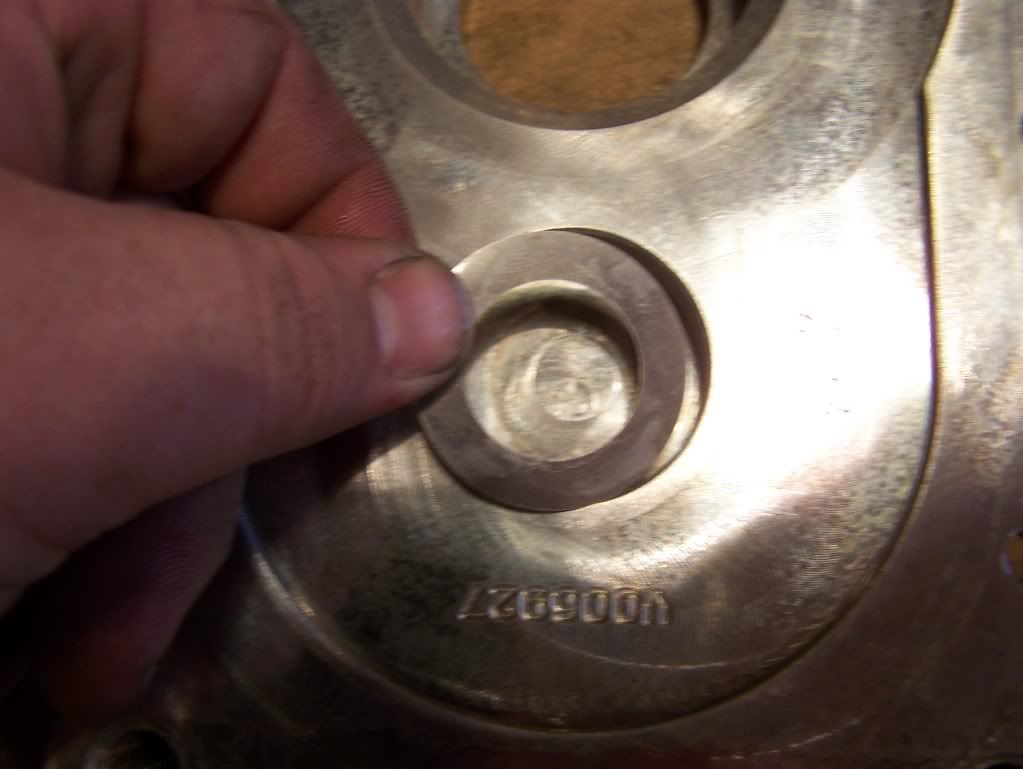
When you get the first part of the housing off, flip it over and the shaft seal will still be stuck in it, there will also probably be a very small washer/spacer stuck in the lip for the small bearing to go in, pull that out so you dont lose it.
This image has been resized. Click this bar to view the full image.
then, sitting on top of the first set of bearings will be the "thrust washers" i dont know the actual names for them but thats what i call them, they are to keep the shafts from walking any. pull these off and put them in a bucket with your bolts etc. btw, they are the wavy washers.
This image has been resized. Click this bar to view the full image.

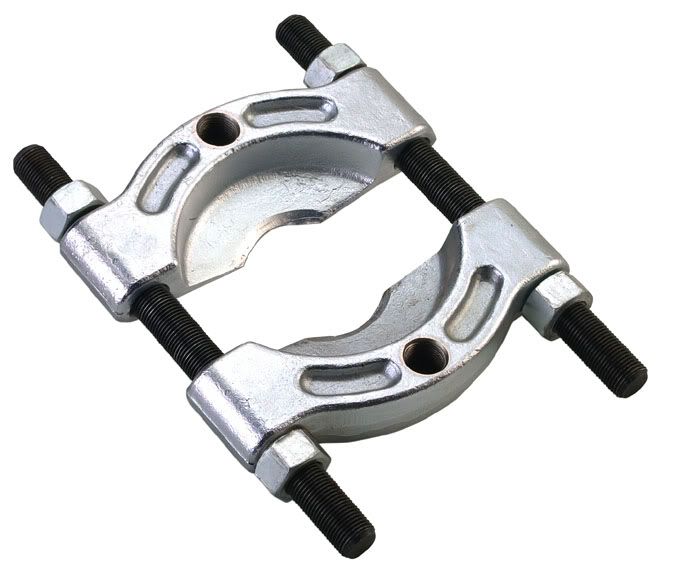
after you pull those washers off, you have to get the bearings off... i used this bearing puller to clamp on the back side of the bearings and then a regular crank pulley puller to clamp on to the bearing puller and it pulled the bearings off with no problem. This is an aem bearing puller. This will pull ALL of the bearings off of the shafts even though you might think that it wont fit between the gear and the bearing IT WILL.
This image has been resized. Click this bar to view the full image.
after i got the bearings off of the top of the large shaft and small shaft, i put the bolt with a big washer back in the end of the blower pulley shaft. I tightened it down, then used a hammer to hit up on the back side of the washer so it would drive the shaft out of the bearing that is in the housing. I dont have any pics of the bearing in the housing but after the large shaft is driven out, the bearing will still be stuck inside the housing in the large hole you see on the bottom of the next picture... I got this bearing out the same way you can get a pilot bearing out of a motor. I wet some toilet paper and stuffed it in the hole in the center of the bearing and used an old clutch alignment tool "you can probably cut off a wooden broom handle" and packed the toilet paper down inside the hole with a hammer. The more wet toilet paper you pack in there, it will eventually start pushing the bearing out.
This image has been resized. Click this bar to view the full image.
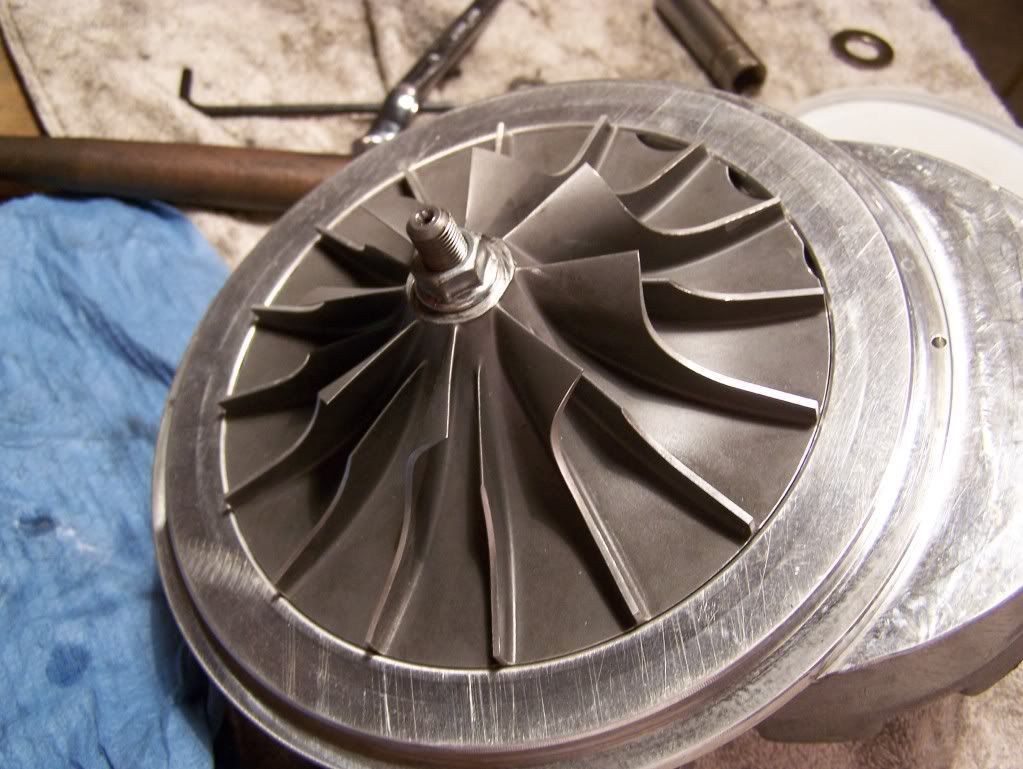
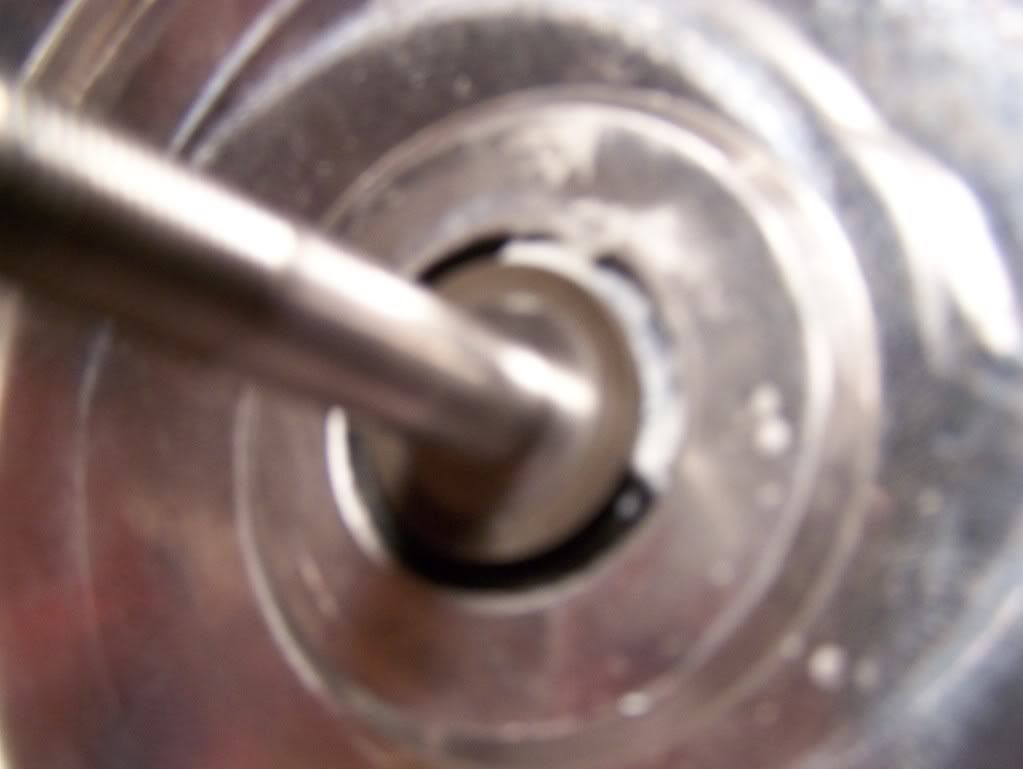
after that you need to take the impeller off... it takes a 9/16 socket to pull the nut off of the shaft. It is a regular right hand thread nut. back it off till it is flush with the end of the shaft. after that you drive the shaft out the back side, make sure you do not hit the impeller while doing this. you will eventually get to the point where you cant do this because the shaft will be flush with the impeller. all we did was move to the other side and clamped a crescent wrench around the small shaft on the back side of the gear, then we just hit out on the crescent wrench the same way we did on the bolt on the other shaft to pull it out of the housing...
This image has been resized. Click this bar to view the full image.
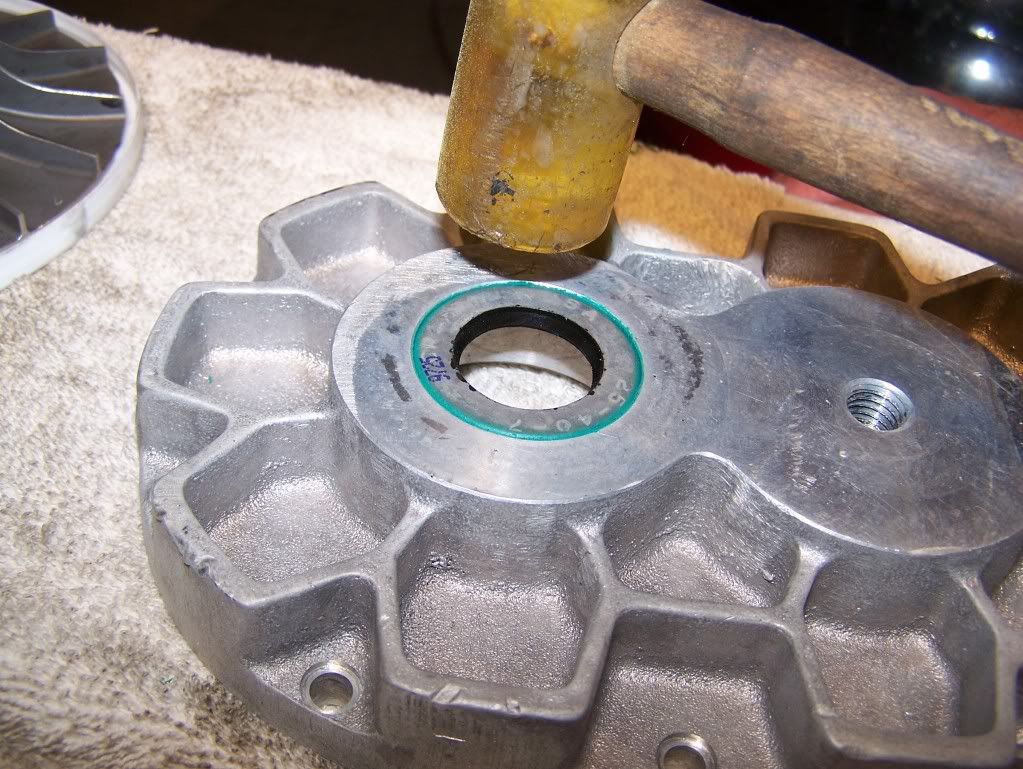
after you get the impeller off of the shaft there will be a washer and a very thin spacer, take those off. they will be up against a seal that has a metal case and plastic on the inside. take the shaft out of the housing. then, to get the seal out of the housing, put a socket on the back side "side that is all metal, the inside part of the housing" and drive it out toward the impeller side. after this you need to drive the seal out of the other part of the housing, it drives out to the outside of the housing.
After this, the bearing on the impeller side of the small gear will probably be stuck inside the casing. To get it out we just put a screwdriver or punch on the back side and just walked it around and drove the bearing out. Most of these bearings will probably come apart but do not worry about that.... after this just do all of the cleaning you want to do, i actually put mine out on a towel and filled a bucket up with dawn soap and scrubbed them with soap and water and dried them afterwards.
This image has been resized. Click this bar to view the full image.
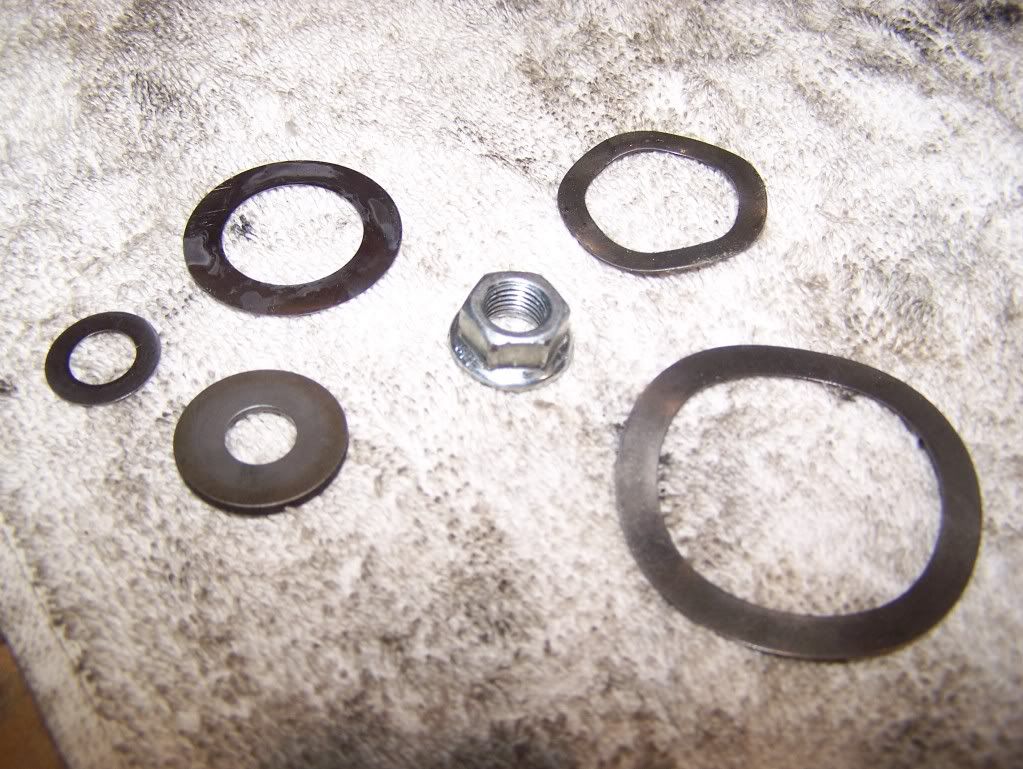
Here is a pic of all of the washers, and spacers that are inside the blower, and the nut that goes on the impeller shaft.
This image has been resized. Click this bar to view the full image.
after i got all of my bearings and all off of the 2 shafts, i put them in the freezer. When you get metal really cold, it shrinks. you can leave it in there till your bearings come in or whatever. This makes it so you dont have to take the shafts to a machine shop to have them pressed on. My bearings didnt quite just slide on the shafts because my 2 shafts were only in the freezer for about 2 hours. But, if they are left in there over a day the bearings will probably just slide on the shafts and when they heat back up they will seat properly.
When you are finished with this part, you can put your seals in. The large seal drives in from the outside as does the small seal. The small factory seal seals off on the washer whereas my new seal had a double lip on the inside of the seal and sealed off on the shaft. we used a socket to drive the seal in till it was flush with the outer edge of the housing.
Here is a pic of the new large seal being driven in.
This image has been resized. Click this bar to view the full image.
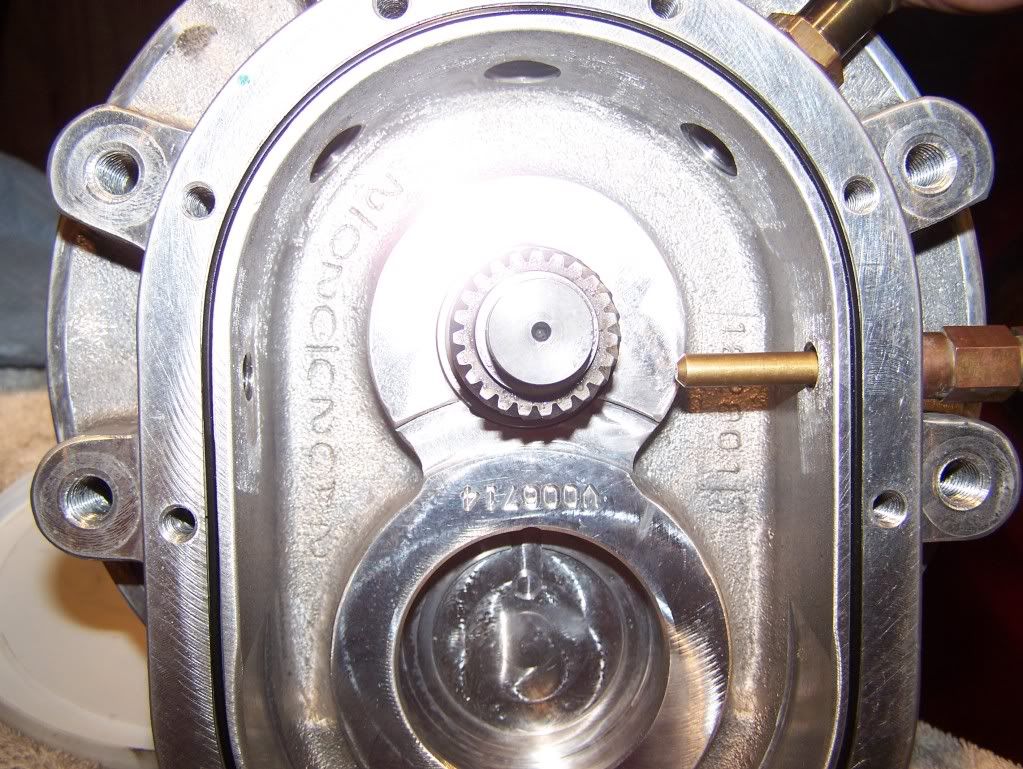
after you get the new seals in, you can put 1 small bearing and 1 big bearing in the side that the small shaft goes through. you can just drive these in with a fiber hammer. This is a pic of the part of the housing that you will be driving these bearings into.
This image has been resized. Click this bar to view the full image.
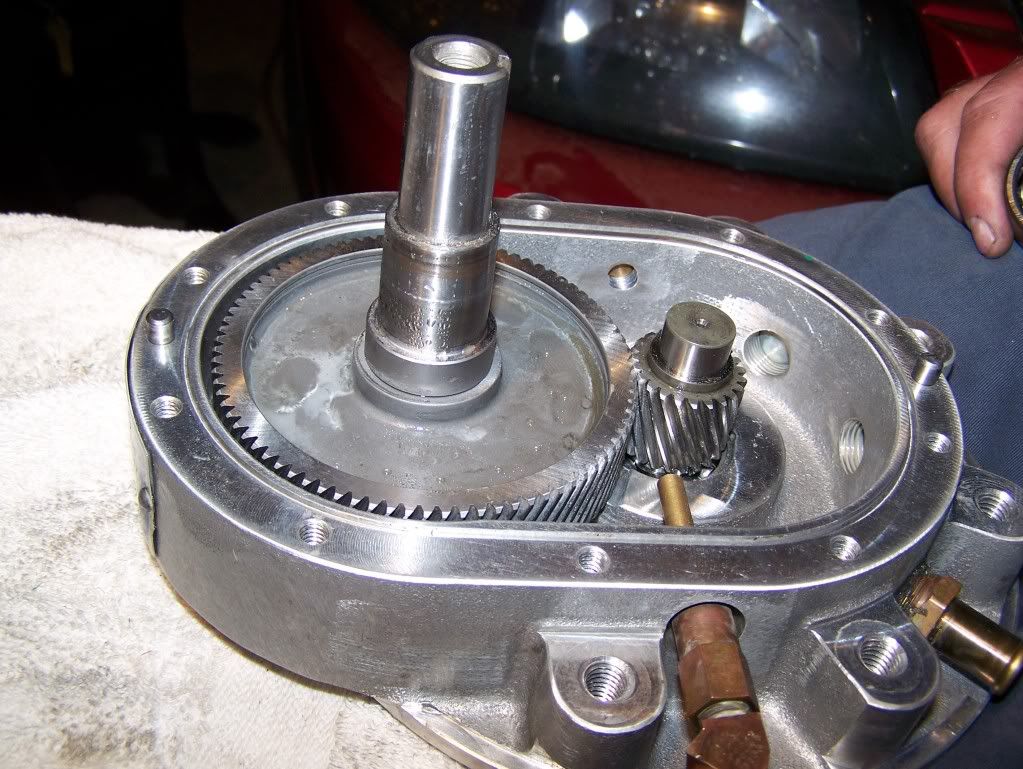
after you get those bearings in, you can drive the shafts down into those bearings. you can just use a fiber hammer and hit the shaft end to drive the shafts into the bearings. After you drive the shafts into the bearings this will be what it looks like.
This image has been resized. Click this bar to view the full image.
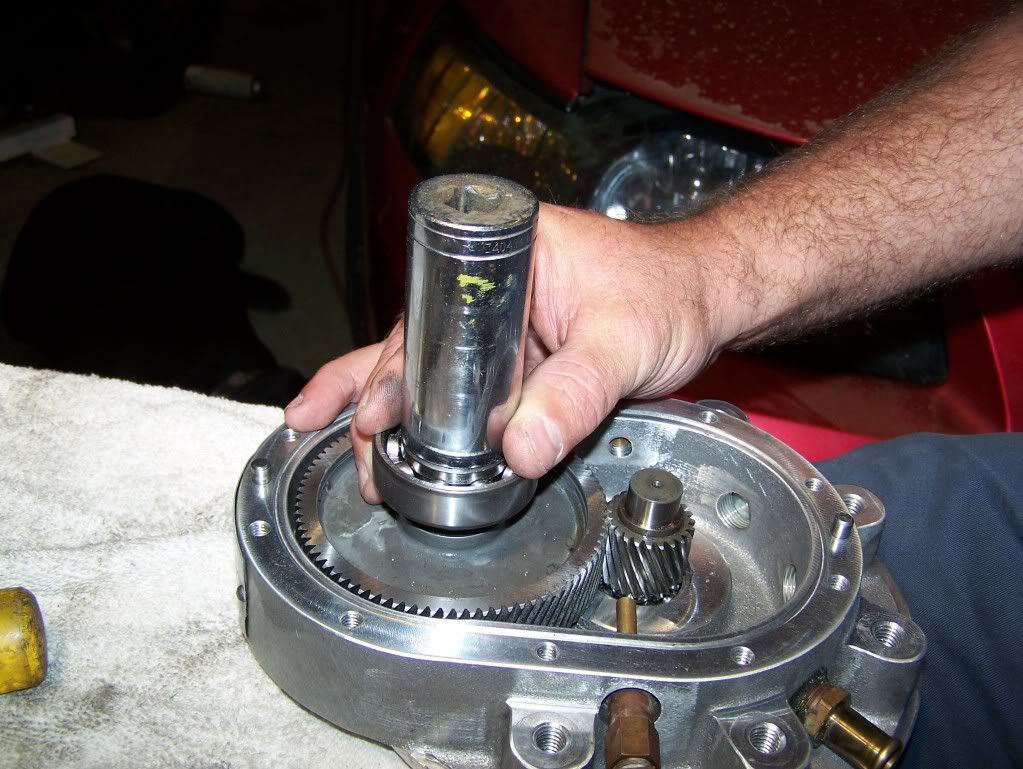
Then use a big socket to fit over the large shaft and against the inside race of the large bearing and drive it down on to the top of part of the large gear.
This image has been resized. Click this bar to view the full image.
after you seat that bearing all the way down, start on the small one. we just used a fiber hammer to drive it down on to the shaft. after you drive it all the way down, it will sit flush with the end of the shaft.
This image has been resized. Click this bar to view the full image.
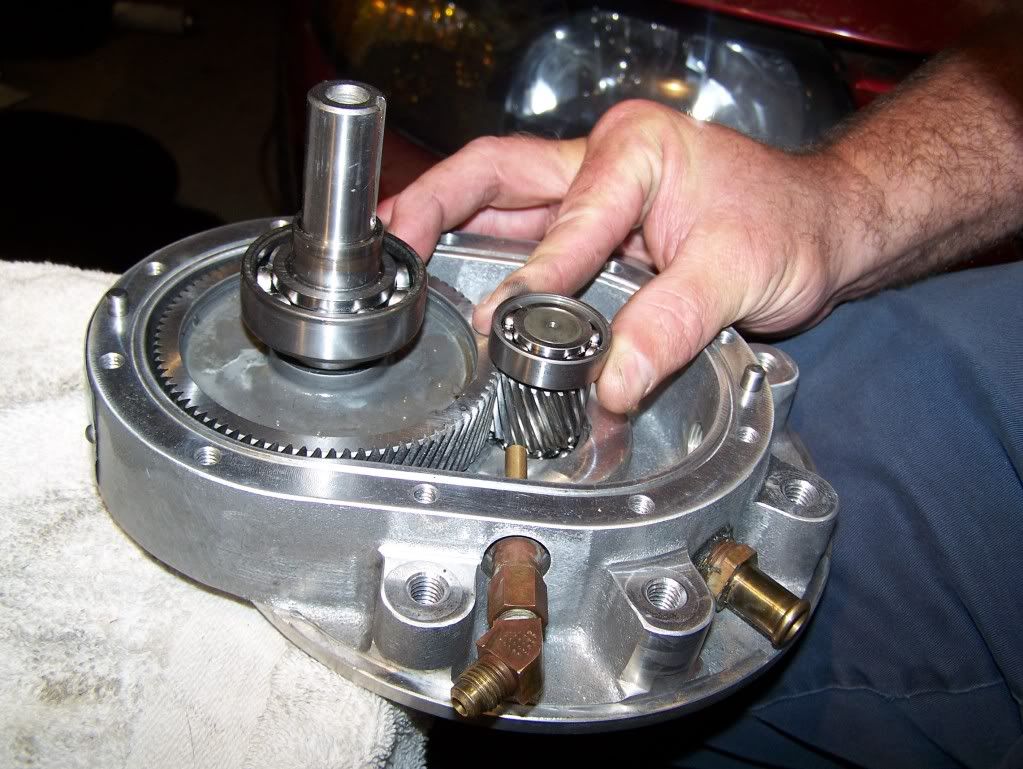
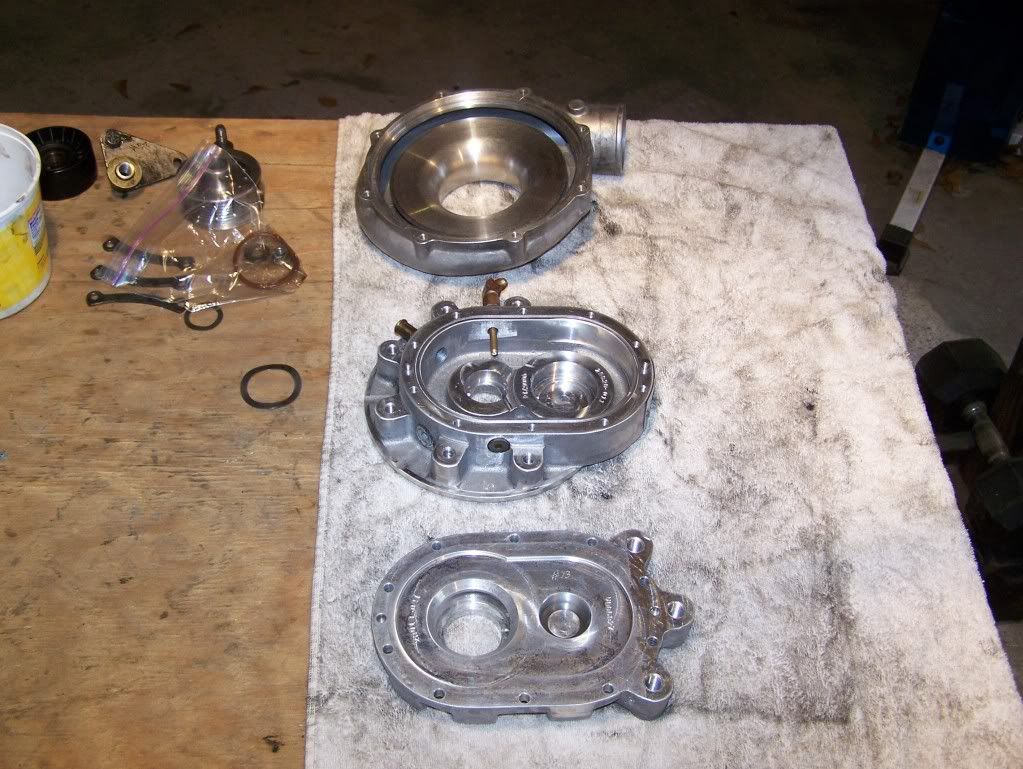
this is what it will look like after you get both of the bearings back on. They will not be even and they will be staggered because thats the way they have to go into the other housing.
This image has been resized. Click this bar to view the full image.
This is the way the "thrust" washers will end up being. You can leave the large one on the bearing like that. but the smaller one will need to be stuck inside the last housing that you will be driving down on the bearings. DO NOT forget the thin spacer. It goes into the other housing first, then the "thrust" washer, then the bearing on the end of the small shaft. The best way to get the thin spacer and the small "thrust" washer to stay in the other housing is to pack the hole full of grease and push both of them inside the grease and they will stay there while you drive the housing down. I sprayed all of the components, gears, and bearings on the inside of the housing with white lithium grease just to give them a little lubrication as it sits. "that is the white foam all over everything". do not forget to have your big o-rings in place before you try to put this thing back together or you will find out the hard way that you need them. after you bump the last part of the housing back on you can put the 10 allen head cap screws back in and tighten them down and slide your pulley back on and bolt it down.
Then, to get the impeller back on the shaft, put the washer on "chamfer facing the seal", then put the tiny thin spacer on, then the impeller on the shaft, then use a fiber hammer to bump it down on there until the impeller is flush with the shaft. Then find a washer that the shaft will go through but is no bigger than the surface of the impeller and use a socket to go against the washer and bump the impeller all the way down till the large side of the impeller is flush with the housing. The impeller does not slide on the shaft and it is pretty tough to get the impeller on the shaft so just be patient. Here is a pic of the washer and small spacer that goes on BEFORE the impeller does.
This image has been resized. Click this bar to view the full image.
after you get the impeller on, run the nut down and tighten it up "we used an air impact". then put your volute back on in the same spot that you marked it before you took it all apart, clamp it down, then put your blower bracket back on.... then you are good to go.... like i said, ill post pics of the boxes and part numbers of all of the bearings and seals that i used. I actually used a different high speed bearing than what vortech uses and ill explain why when i post the part numbers
Here is a pic of the pulley side of the blower. I used an air impact to break the bolt loose holding the pulley on. after doing that i pulled the pulley off and took loose the 10 allen head cap screws that hold the first section of the blower housing off. I used a fiber hammer and bumped around the housing to break the seal loose and just pulled up on the housing as i bumped it and it eventually just slid off.
This image has been resized. Click this bar to view the full image.
When you get the first part of the housing off, flip it over and the shaft seal will still be stuck in it, there will also probably be a very small washer/spacer stuck in the lip for the small bearing to go in, pull that out so you dont lose it.
This image has been resized. Click this bar to view the full image.
then, sitting on top of the first set of bearings will be the "thrust washers" i dont know the actual names for them but thats what i call them, they are to keep the shafts from walking any. pull these off and put them in a bucket with your bolts etc. btw, they are the wavy washers.
This image has been resized. Click this bar to view the full image.
after you pull those washers off, you have to get the bearings off... i used this bearing puller to clamp on the back side of the bearings and then a regular crank pulley puller to clamp on to the bearing puller and it pulled the bearings off with no problem. This is an aem bearing puller. This will pull ALL of the bearings off of the shafts even though you might think that it wont fit between the gear and the bearing IT WILL.
This image has been resized. Click this bar to view the full image.
after i got the bearings off of the top of the large shaft and small shaft, i put the bolt with a big washer back in the end of the blower pulley shaft. I tightened it down, then used a hammer to hit up on the back side of the washer so it would drive the shaft out of the bearing that is in the housing. I dont have any pics of the bearing in the housing but after the large shaft is driven out, the bearing will still be stuck inside the housing in the large hole you see on the bottom of the next picture... I got this bearing out the same way you can get a pilot bearing out of a motor. I wet some toilet paper and stuffed it in the hole in the center of the bearing and used an old clutch alignment tool "you can probably cut off a wooden broom handle" and packed the toilet paper down inside the hole with a hammer. The more wet toilet paper you pack in there, it will eventually start pushing the bearing out.
This image has been resized. Click this bar to view the full image.
after that you need to take the impeller off... it takes a 9/16 socket to pull the nut off of the shaft. It is a regular right hand thread nut. back it off till it is flush with the end of the shaft. after that you drive the shaft out the back side, make sure you do not hit the impeller while doing this. you will eventually get to the point where you cant do this because the shaft will be flush with the impeller. all we did was move to the other side and clamped a crescent wrench around the small shaft on the back side of the gear, then we just hit out on the crescent wrench the same way we did on the bolt on the other shaft to pull it out of the housing...
This image has been resized. Click this bar to view the full image.
after you get the impeller off of the shaft there will be a washer and a very thin spacer, take those off. they will be up against a seal that has a metal case and plastic on the inside. take the shaft out of the housing. then, to get the seal out of the housing, put a socket on the back side "side that is all metal, the inside part of the housing" and drive it out toward the impeller side. after this you need to drive the seal out of the other part of the housing, it drives out to the outside of the housing.
After this, the bearing on the impeller side of the small gear will probably be stuck inside the casing. To get it out we just put a screwdriver or punch on the back side and just walked it around and drove the bearing out. Most of these bearings will probably come apart but do not worry about that.... after this just do all of the cleaning you want to do, i actually put mine out on a towel and filled a bucket up with dawn soap and scrubbed them with soap and water and dried them afterwards.
This image has been resized. Click this bar to view the full image.
Here is a pic of all of the washers, and spacers that are inside the blower, and the nut that goes on the impeller shaft.
This image has been resized. Click this bar to view the full image.
after i got all of my bearings and all off of the 2 shafts, i put them in the freezer. When you get metal really cold, it shrinks. you can leave it in there till your bearings come in or whatever. This makes it so you dont have to take the shafts to a machine shop to have them pressed on. My bearings didnt quite just slide on the shafts because my 2 shafts were only in the freezer for about 2 hours. But, if they are left in there over a day the bearings will probably just slide on the shafts and when they heat back up they will seat properly.
When you are finished with this part, you can put your seals in. The large seal drives in from the outside as does the small seal. The small factory seal seals off on the washer whereas my new seal had a double lip on the inside of the seal and sealed off on the shaft. we used a socket to drive the seal in till it was flush with the outer edge of the housing.
Here is a pic of the new large seal being driven in.
This image has been resized. Click this bar to view the full image.
after you get the new seals in, you can put 1 small bearing and 1 big bearing in the side that the small shaft goes through. you can just drive these in with a fiber hammer. This is a pic of the part of the housing that you will be driving these bearings into.
This image has been resized. Click this bar to view the full image.
after you get those bearings in, you can drive the shafts down into those bearings. you can just use a fiber hammer and hit the shaft end to drive the shafts into the bearings. After you drive the shafts into the bearings this will be what it looks like.
This image has been resized. Click this bar to view the full image.
Then use a big socket to fit over the large shaft and against the inside race of the large bearing and drive it down on to the top of part of the large gear.
This image has been resized. Click this bar to view the full image.
after you seat that bearing all the way down, start on the small one. we just used a fiber hammer to drive it down on to the shaft. after you drive it all the way down, it will sit flush with the end of the shaft.
This image has been resized. Click this bar to view the full image.
this is what it will look like after you get both of the bearings back on. They will not be even and they will be staggered because thats the way they have to go into the other housing.
This image has been resized. Click this bar to view the full image.
This is the way the "thrust" washers will end up being. You can leave the large one on the bearing like that. but the smaller one will need to be stuck inside the last housing that you will be driving down on the bearings. DO NOT forget the thin spacer. It goes into the other housing first, then the "thrust" washer, then the bearing on the end of the small shaft. The best way to get the thin spacer and the small "thrust" washer to stay in the other housing is to pack the hole full of grease and push both of them inside the grease and they will stay there while you drive the housing down. I sprayed all of the components, gears, and bearings on the inside of the housing with white lithium grease just to give them a little lubrication as it sits. "that is the white foam all over everything". do not forget to have your big o-rings in place before you try to put this thing back together or you will find out the hard way that you need them. after you bump the last part of the housing back on you can put the 10 allen head cap screws back in and tighten them down and slide your pulley back on and bolt it down.
Then, to get the impeller back on the shaft, put the washer on "chamfer facing the seal", then put the tiny thin spacer on, then the impeller on the shaft, then use a fiber hammer to bump it down on there until the impeller is flush with the shaft. Then find a washer that the shaft will go through but is no bigger than the surface of the impeller and use a socket to go against the washer and bump the impeller all the way down till the large side of the impeller is flush with the housing. The impeller does not slide on the shaft and it is pretty tough to get the impeller on the shaft so just be patient. Here is a pic of the washer and small spacer that goes on BEFORE the impeller does.
This image has been resized. Click this bar to view the full image.
after you get the impeller on, run the nut down and tighten it up "we used an air impact". then put your volute back on in the same spot that you marked it before you took it all apart, clamp it down, then put your blower bracket back on.... then you are good to go.... like i said, ill post pics of the boxes and part numbers of all of the bearings and seals that i used. I actually used a different high speed bearing than what vortech uses and ill explain why when i post the part numbers


Thread
Thread Starter
Forum
Replies
Last Post
cstich08
4.6L V8 Technical Discussions
39
11-21-2011 12:45 AM
ShadowDrake
4.6L (1996-2004 Modular) Mustang
23
12-28-2010 05:02 PM
GaryBisiniere
5.0L (1979-1995) Mustang
14
10-26-2006 10:11 PM