clutch install


 05-08-2010, 09:07 PM
#2
4th Gear Member
Join Date: May 2009
Location: DFW, TX
Posts: 1,925
Put it on jacks. Remove the exhaust pipe. Remove the driveshaft with a catch pan under the tail shaft. Remove the starter, cuss Ford for the god damned mother ****ing starter bolts. Remove the shifter. Remove the the clutch cable from the clutch fork. Remove the electrical. Remove the bell housing bolts, cuss ford for the god damned mother ****ing top bolts. Remove the transmission.
05-08-2010, 11:06 PM
#3
TECH SAVANT
Join Date: Dec 2006
Location: Saint Augustine, FL
Posts: 10,938
Put it on jacks. Remove the exhaust pipe. Remove the driveshaft with a catch pan under the tail shaft. Remove the starter, cuss Ford for the god damned mother ****ing starter bolts. Remove the shifter. Remove the the clutch cable from the clutch fork. Remove the electrical. Remove the bell housing bolts, cuss ford for the god damned mother ****ing top bolts. Remove the transmission.
Oh, wait -- that comes when it's going back together...
05-08-2010, 11:48 PM
#4
5th Gear Member
Join Date: Dec 2007
Location: Houston, Tx
Posts: 2,112
From another member on another forum. His name is B0B
i decided to replace the clutch in my 01 GT, the throwout bearing was squeaking and the clutch chattered badly. so i ordered a spec stage 1 kit from american muscle and decided to tackle this project myself. i will give a basic walkthrough with some pictures to help guide your way! enjoy!
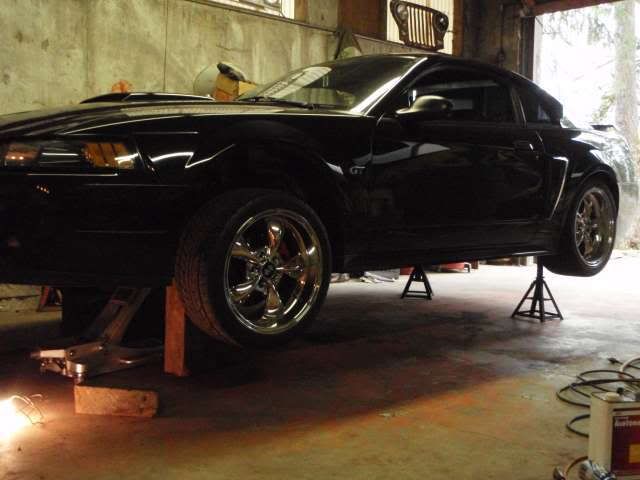
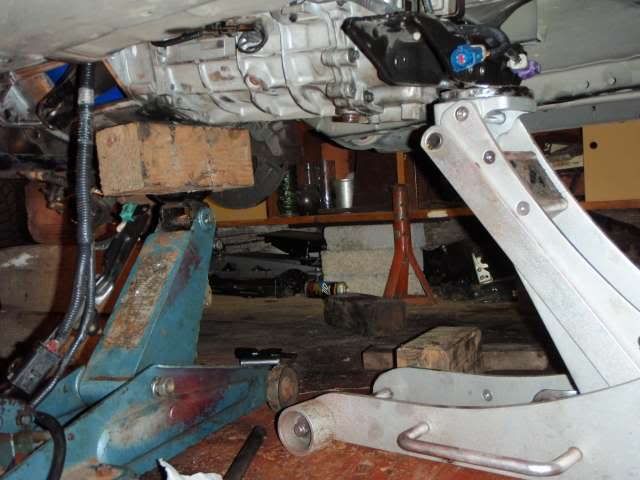
first, get your car supported as high as practical. if you dont have enough jackstands, wood blocks will also work.
next, remove your midpipe. the bolts holding the pipe to the catback are easy to remove. just let your catback hang it will be ok theres no need to support it with anything.
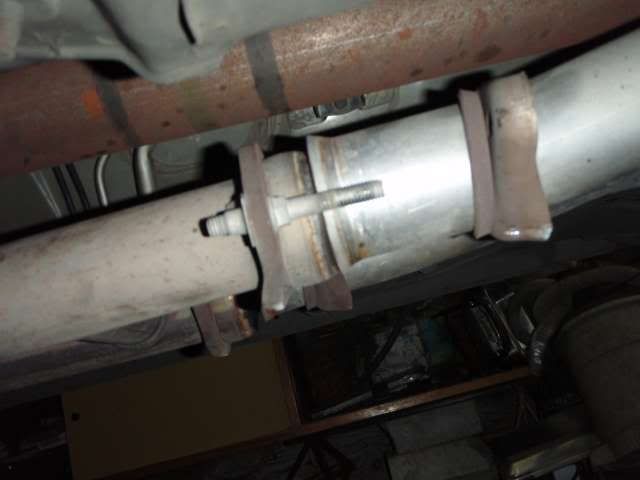
the bolts holding the midpipe to the manifold can be tricky to get to. you will need an extension and a swivel joint to reach them
be careful, that midpipe will fall down once you get the nuts off the exhaust manifold bolts! remove the four plugs for the o2 sensors and remove the pipe from underneath the car.
next, drain the transmission fluid. make sure you do this before you remove the driveline or else you'll have a mess to clean up!
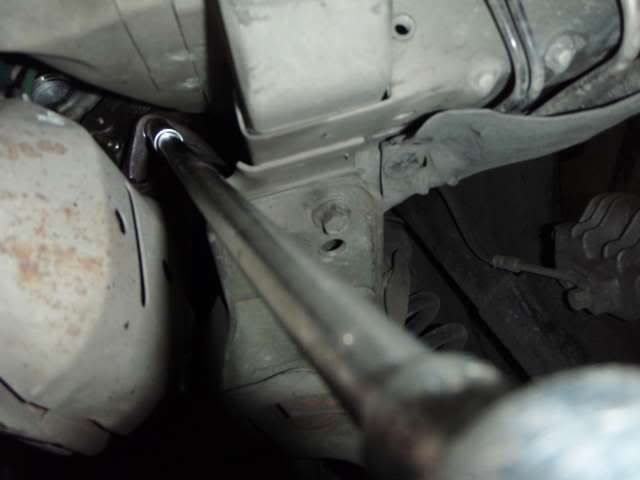
next step, remove the driveline. dont panic, the bolts look funky but they are just 16 point bolts and a normal 16 point socket will fit them. you might need a swivel joint to get to these as well
after you get the bolts off, let the rear of the driveline hang down and gently pull it from the rear of the transmission. it should slide out easily. once removed, set it aside but make sure you dont get the part that goes back into the tranny dirty.
up next, the starter. first disconnect the battery, then proceed. there are three bolts holding the starter on, the top one is tricky to reach. i got it off by using a 6 inch extension and 3/8 ratchet. the ratchet has room to turn in the small space in front of the starter.
you're getting there!
now its time to remove the shifter. remove the shifter **** and the shifter bezel. take the rubber inner boot off and then unbolt the shifter. this part is pretty self explainatory.
next step is the clutch cable. there is only one screw holding the shield onto the transmission. remove the screw and pull it back and it will pop off. there is a clip holding the clutch cable to the transmission housing that will have to be removed, and there is also a bracket on the clutch fork that will need to be loosened so you can remove the cable. this process is simple, dont sweat it!
now you're ready to start unbolting the transmission. leave the bottom two bolts (one on each side) until last, you will need them to hold the transmission in place for the next coulpe steps.
place a jack under the rear of the transmission and remove the four crossmember bolts from the frame, lower the jack SLOWLY and allow the engine to rock back on the mounts, this will make it much easier to reach the top two bolts of the bellhousing and also the two wiring harnesses you will need to unplug that are located on the top of the transmission.
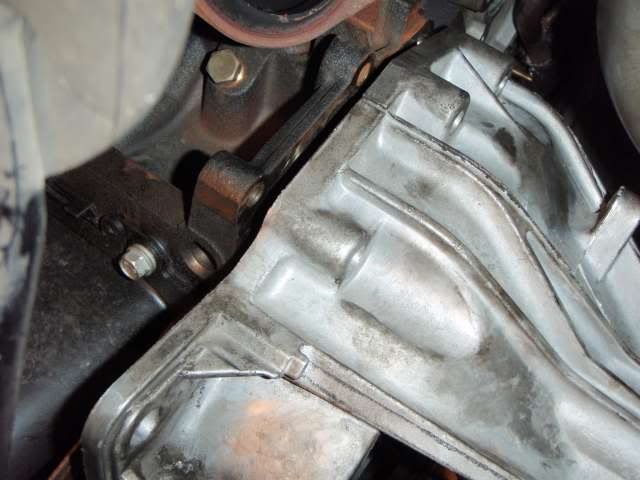
remove the bolts holding the transmission to the engine. they can be tricky to get to, you will have to experiment with different extensions and swivels to get the right angle. the top two are difficult to reach, i got them out using a two foot extension and a swivel. now you need to disconnect the two transmission wiring harnesses from the main harness. they are both located on the top of the bellhousing and you might be able to reach them from the bottom, but i got mine both disconnected from the top.
once you have all but the bottom two bolts removed, place the proper support under the transmission. i used two jacks in the process just to be safe. it would not be fun to drop your transmission on the ground and crack the case!
once supported, remove the last two bolts and slowly wiggle it free. it should pull straight back with a decent amount of convincing. lower the rear first and as its going down in the rear, pull it back to clear the input shaft from the pressure plate. once you get your transmission out, pull it aside where you can work on it.
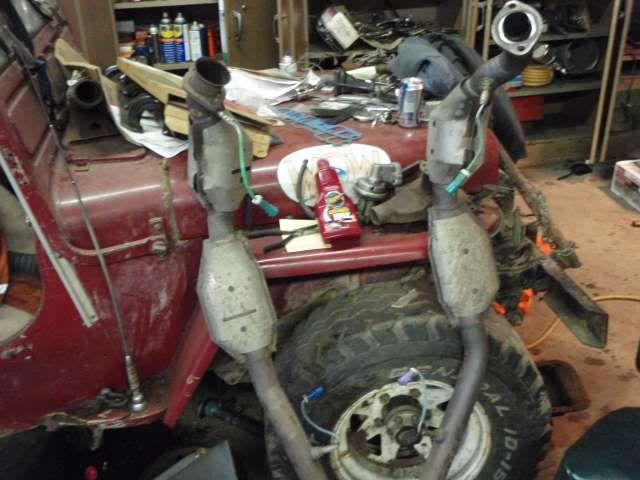
now, you need to remove the pressure plate and the flywheel. this is self explainatory, but be careful because it might fall off when you take the bolts out.
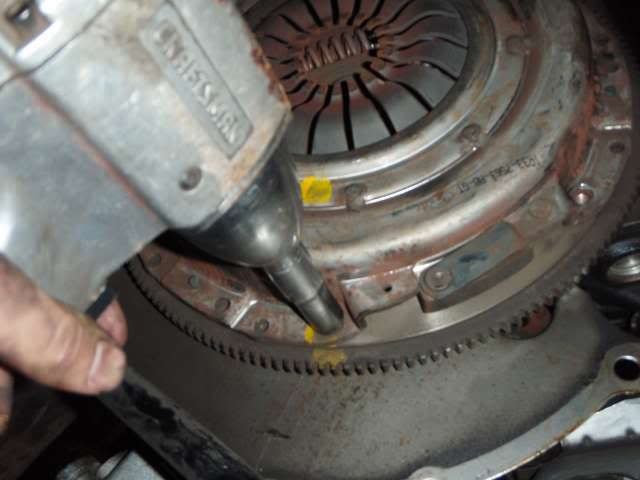
next you need to take off the flywheel. once you get all the bolts out, you might need to tap it loose with a mallet or use a screwdriver to pry it off the crankshaft. watch out because its heavy and it will likely fall off when it comes loose.
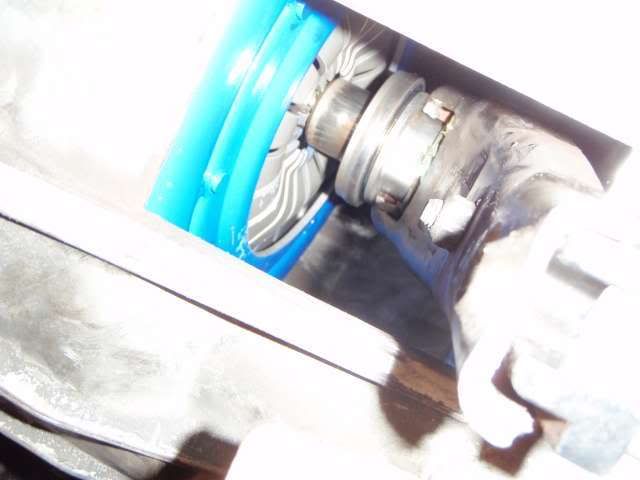
after you get the flywheel off, remove the old pilot bearing. this can be difficult and you best bet is to go to autozone and rent a pilot bearing puller. you will need a slide hammer too so if you dont have one you can also rent one at autozone.
you will need to take your flywheel and get it resurfaced. i wouldn't advise putting a new clutch in without doing so because it is likely to chatter!
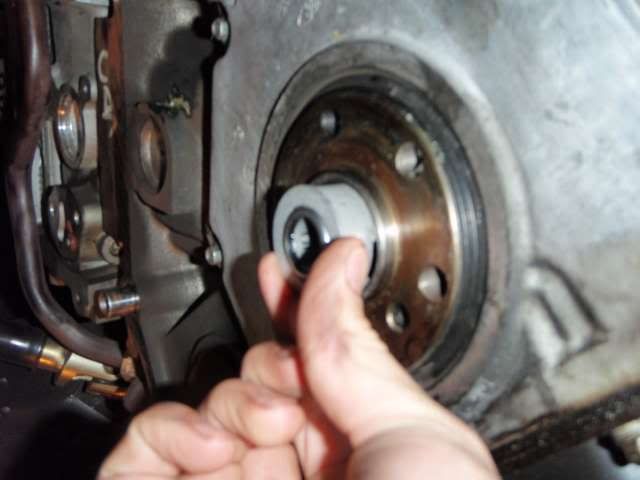
now, clean the hole out of the crankshaft and install the new pilot bearing. you will need to use a rubber mallet to hit it in because it fits tightly. make the side with the two notches on the pilot bearing goes in first, that way if you ever have to replace it again, the puller will have something to grab on to.
next, get your nicely resurfaced flywheel mounted and torqued to factory specifications (60lbs). dont forget to clean it off with a rag and some acetone when you're done to get all the grease off!
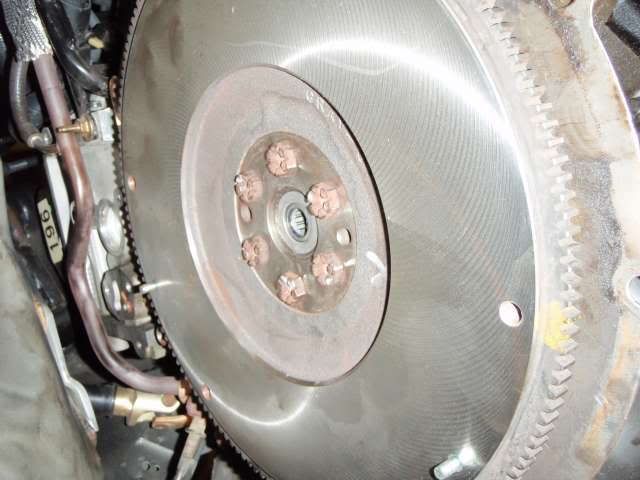
install clutch disc and pressure plate. make sure the disc is facing the right way or you'll have to do it all over again! use the supplied alignment tool with your kit and tighten it down to specifications. remove the tool once the pressure plate is tight.

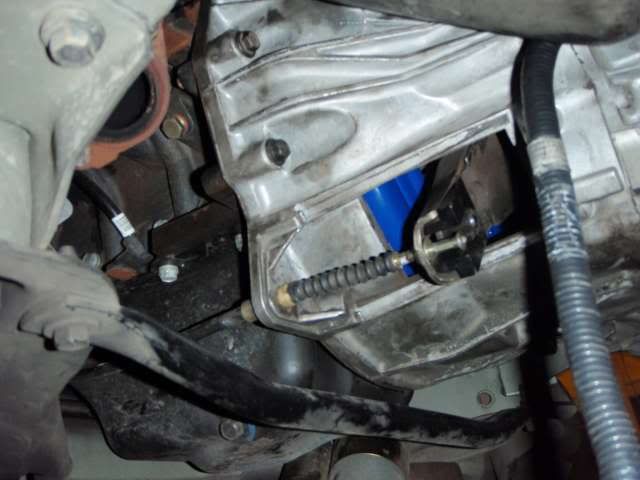
now do the new throwout bearing. its a good idea to lube the pivot point and the shaft to keep it operating smoothly and quietly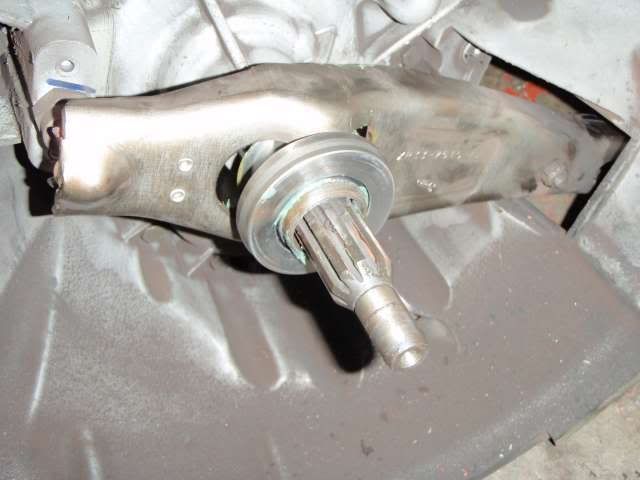
it is much easier to have a buddy help you, but using two jacks i managed to wrestle the transmission back into place
you will need to line up the input shaft with the pressure plate
at this point it may become difficult to get the rest of the way in. you will have to wiggle it back and forth to get the input shaft into the pilot bearing.
yes, its in!! before you get too excited, hook up your clutch cable and make sure the clutch feels ok and disengages. this way you know there wont be any surprises when you get everything else finished!
now the rest of the process is simple, just reverse the order in which you took things off and you're all set! dont forget to break in your clutch and refill the transmission fluid!
i decided to replace the clutch in my 01 GT, the throwout bearing was squeaking and the clutch chattered badly. so i ordered a spec stage 1 kit from american muscle and decided to tackle this project myself. i will give a basic walkthrough with some pictures to help guide your way! enjoy!
first, get your car supported as high as practical. if you dont have enough jackstands, wood blocks will also work.
next, remove your midpipe. the bolts holding the pipe to the catback are easy to remove. just let your catback hang it will be ok theres no need to support it with anything.
the bolts holding the midpipe to the manifold can be tricky to get to. you will need an extension and a swivel joint to reach them
be careful, that midpipe will fall down once you get the nuts off the exhaust manifold bolts! remove the four plugs for the o2 sensors and remove the pipe from underneath the car.
next, drain the transmission fluid. make sure you do this before you remove the driveline or else you'll have a mess to clean up!
next step, remove the driveline. dont panic, the bolts look funky but they are just 16 point bolts and a normal 16 point socket will fit them. you might need a swivel joint to get to these as well
after you get the bolts off, let the rear of the driveline hang down and gently pull it from the rear of the transmission. it should slide out easily. once removed, set it aside but make sure you dont get the part that goes back into the tranny dirty.
up next, the starter. first disconnect the battery, then proceed. there are three bolts holding the starter on, the top one is tricky to reach. i got it off by using a 6 inch extension and 3/8 ratchet. the ratchet has room to turn in the small space in front of the starter.
you're getting there!
now its time to remove the shifter. remove the shifter **** and the shifter bezel. take the rubber inner boot off and then unbolt the shifter. this part is pretty self explainatory.
next step is the clutch cable. there is only one screw holding the shield onto the transmission. remove the screw and pull it back and it will pop off. there is a clip holding the clutch cable to the transmission housing that will have to be removed, and there is also a bracket on the clutch fork that will need to be loosened so you can remove the cable. this process is simple, dont sweat it!
now you're ready to start unbolting the transmission. leave the bottom two bolts (one on each side) until last, you will need them to hold the transmission in place for the next coulpe steps.
place a jack under the rear of the transmission and remove the four crossmember bolts from the frame, lower the jack SLOWLY and allow the engine to rock back on the mounts, this will make it much easier to reach the top two bolts of the bellhousing and also the two wiring harnesses you will need to unplug that are located on the top of the transmission.
remove the bolts holding the transmission to the engine. they can be tricky to get to, you will have to experiment with different extensions and swivels to get the right angle. the top two are difficult to reach, i got them out using a two foot extension and a swivel. now you need to disconnect the two transmission wiring harnesses from the main harness. they are both located on the top of the bellhousing and you might be able to reach them from the bottom, but i got mine both disconnected from the top.
once you have all but the bottom two bolts removed, place the proper support under the transmission. i used two jacks in the process just to be safe. it would not be fun to drop your transmission on the ground and crack the case!
once supported, remove the last two bolts and slowly wiggle it free. it should pull straight back with a decent amount of convincing. lower the rear first and as its going down in the rear, pull it back to clear the input shaft from the pressure plate. once you get your transmission out, pull it aside where you can work on it.
now, you need to remove the pressure plate and the flywheel. this is self explainatory, but be careful because it might fall off when you take the bolts out.
next you need to take off the flywheel. once you get all the bolts out, you might need to tap it loose with a mallet or use a screwdriver to pry it off the crankshaft. watch out because its heavy and it will likely fall off when it comes loose.
after you get the flywheel off, remove the old pilot bearing. this can be difficult and you best bet is to go to autozone and rent a pilot bearing puller. you will need a slide hammer too so if you dont have one you can also rent one at autozone.
you will need to take your flywheel and get it resurfaced. i wouldn't advise putting a new clutch in without doing so because it is likely to chatter!
now, clean the hole out of the crankshaft and install the new pilot bearing. you will need to use a rubber mallet to hit it in because it fits tightly. make the side with the two notches on the pilot bearing goes in first, that way if you ever have to replace it again, the puller will have something to grab on to.
next, get your nicely resurfaced flywheel mounted and torqued to factory specifications (60lbs). dont forget to clean it off with a rag and some acetone when you're done to get all the grease off!
install clutch disc and pressure plate. make sure the disc is facing the right way or you'll have to do it all over again! use the supplied alignment tool with your kit and tighten it down to specifications. remove the tool once the pressure plate is tight.
now do the new throwout bearing. its a good idea to lube the pivot point and the shaft to keep it operating smoothly and quietly
it is much easier to have a buddy help you, but using two jacks i managed to wrestle the transmission back into place
you will need to line up the input shaft with the pressure plate
at this point it may become difficult to get the rest of the way in. you will have to wiggle it back and forth to get the input shaft into the pilot bearing.
yes, its in!! before you get too excited, hook up your clutch cable and make sure the clutch feels ok and disengages. this way you know there wont be any surprises when you get everything else finished!
now the rest of the process is simple, just reverse the order in which you took things off and you're all set! dont forget to break in your clutch and refill the transmission fluid!
05-09-2010, 12:21 AM
#5
4th Gear Member
Join Date: May 2009
Location: DFW, TX
Posts: 1,925
Oh yeah, coming back together is even more fun. Be sure to cuss ford for the top bell housing bolts again cause the little **** suckers never want to thread back in properly.
05-09-2010, 01:42 AM
#6
3rd Gear Member

Join Date: Jul 2009
Location: California
Posts: 875
From another member on another forum. His name is B0B
i decided to replace the clutch in my 01 GT, the throwout bearing was squeaking and the clutch chattered badly. so i ordered a spec stage 1 kit from american muscle and decided to tackle this project myself. i will give a basic walkthrough with some pictures to help guide your way! enjoy!
first, get your car supported as high as practical. if you dont have enough jackstands, wood blocks will also work.
next, remove your midpipe. the bolts holding the pipe to the catback are easy to remove. just let your catback hang it will be ok theres no need to support it with anything.
the bolts holding the midpipe to the manifold can be tricky to get to. you will need an extension and a swivel joint to reach them
be careful, that midpipe will fall down once you get the nuts off the exhaust manifold bolts! remove the four plugs for the o2 sensors and remove the pipe from underneath the car.
next, drain the transmission fluid. make sure you do this before you remove the driveline or else you'll have a mess to clean up!
next step, remove the driveline. dont panic, the bolts look funky but they are just 16 point bolts and a normal 16 point socket will fit them. you might need a swivel joint to get to these as well
after you get the bolts off, let the rear of the driveline hang down and gently pull it from the rear of the transmission. it should slide out easily. once removed, set it aside but make sure you dont get the part that goes back into the tranny dirty.
up next, the starter. first disconnect the battery, then proceed. there are three bolts holding the starter on, the top one is tricky to reach. i got it off by using a 6 inch extension and 3/8 ratchet. the ratchet has room to turn in the small space in front of the starter.
you're getting there!
now its time to remove the shifter. remove the shifter **** and the shifter bezel. take the rubber inner boot off and then unbolt the shifter. this part is pretty self explainatory.
next step is the clutch cable. there is only one screw holding the shield onto the transmission. remove the screw and pull it back and it will pop off. there is a clip holding the clutch cable to the transmission housing that will have to be removed, and there is also a bracket on the clutch fork that will need to be loosened so you can remove the cable. this process is simple, dont sweat it!
now you're ready to start unbolting the transmission. leave the bottom two bolts (one on each side) until last, you will need them to hold the transmission in place for the next coulpe steps.
place a jack under the rear of the transmission and remove the four crossmember bolts from the frame, lower the jack SLOWLY and allow the engine to rock back on the mounts, this will make it much easier to reach the top two bolts of the bellhousing and also the two wiring harnesses you will need to unplug that are located on the top of the transmission.
remove the bolts holding the transmission to the engine. they can be tricky to get to, you will have to experiment with different extensions and swivels to get the right angle. the top two are difficult to reach, i got them out using a two foot extension and a swivel. now you need to disconnect the two transmission wiring harnesses from the main harness. they are both located on the top of the bellhousing and you might be able to reach them from the bottom, but i got mine both disconnected from the top.
once you have all but the bottom two bolts removed, place the proper support under the transmission. i used two jacks in the process just to be safe. it would not be fun to drop your transmission on the ground and crack the case!
once supported, remove the last two bolts and slowly wiggle it free. it should pull straight back with a decent amount of convincing. lower the rear first and as its going down in the rear, pull it back to clear the input shaft from the pressure plate. once you get your transmission out, pull it aside where you can work on it.
now, you need to remove the pressure plate and the flywheel. this is self explainatory, but be careful because it might fall off when you take the bolts out.
next you need to take off the flywheel. once you get all the bolts out, you might need to tap it loose with a mallet or use a screwdriver to pry it off the crankshaft. watch out because its heavy and it will likely fall off when it comes loose.
after you get the flywheel off, remove the old pilot bearing. this can be difficult and you best bet is to go to autozone and rent a pilot bearing puller. you will need a slide hammer too so if you dont have one you can also rent one at autozone.
you will need to take your flywheel and get it resurfaced. i wouldn't advise putting a new clutch in without doing so because it is likely to chatter!
now, clean the hole out of the crankshaft and install the new pilot bearing. you will need to use a rubber mallet to hit it in because it fits tightly. make the side with the two notches on the pilot bearing goes in first, that way if you ever have to replace it again, the puller will have something to grab on to.
next, get your nicely resurfaced flywheel mounted and torqued to factory specifications (60lbs). dont forget to clean it off with a rag and some acetone when you're done to get all the grease off!
install clutch disc and pressure plate. make sure the disc is facing the right way or you'll have to do it all over again! use the supplied alignment tool with your kit and tighten it down to specifications. remove the tool once the pressure plate is tight.
now do the new throwout bearing. its a good idea to lube the pivot point and the shaft to keep it operating smoothly and quietly
it is much easier to have a buddy help you, but using two jacks i managed to wrestle the transmission back into place
you will need to line up the input shaft with the pressure plate
at this point it may become difficult to get the rest of the way in. you will have to wiggle it back and forth to get the input shaft into the pilot bearing.
yes, its in!! before you get too excited, hook up your clutch cable and make sure the clutch feels ok and disengages. this way you know there wont be any surprises when you get everything else finished!
now the rest of the process is simple, just reverse the order in which you took things off and you're all set! dont forget to break in your clutch and refill the transmission fluid!
05-09-2010, 06:22 PM
#7
Join Date: May 2009
Location: New Jersey
Posts: 20
great walkthrough gtracer. I have a couple questions referring to installing a clutch. First of all, i have short tube headers (i know, i should've gotten long tube's =/ ).. will these make it more difficult to install a clutch since the transmission needs to be dropped? Also, i know it varies of course, but whats the normal rate for this installation? Thanks
05-09-2010, 06:42 PM
#8
5th Gear Member
Join Date: Dec 2007
Location: Houston, Tx
Posts: 2,112
I didn't write the install as stated in the very first sentence. As a matter of fact my car is an automatic. "short tubes" are the same length as stock manifold and I do not believe will result in a harder install.

Thread
Thread Starter
Forum
Replies
Last Post
Boostaddict
Lethal Performance
2
09-08-2015 09:56 PM