Cool it! Upgrading the Kenne Bell Intercooler
 04-05-2008, 10:55 PM
#1
4th Gear Member
Thread Starter
Join Date: Feb 2007
Location: Illinois
Posts: 1,726
We all know the Kenne Bell twin-screws run hot. You can basically fry an egg on one after you push 10 or 11 PSI through one. They retain heat because they are made from a solid piece of billet. It is great for keeping a true bore for the screws but it tends to retain heat more than a cast unit. I decided to get my Kenne Bell as cool as possible. So the plan was to upgrade the intercooler system.
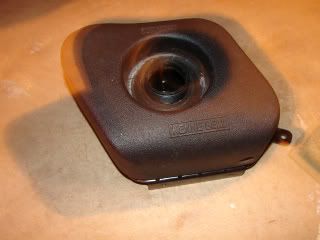
First up was upgrading the intercooler tank. This is the Kenne Bell intercooler tank. It holds about a quart:
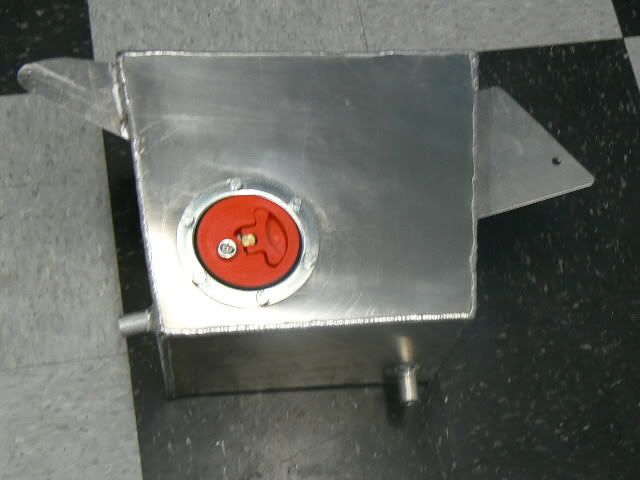
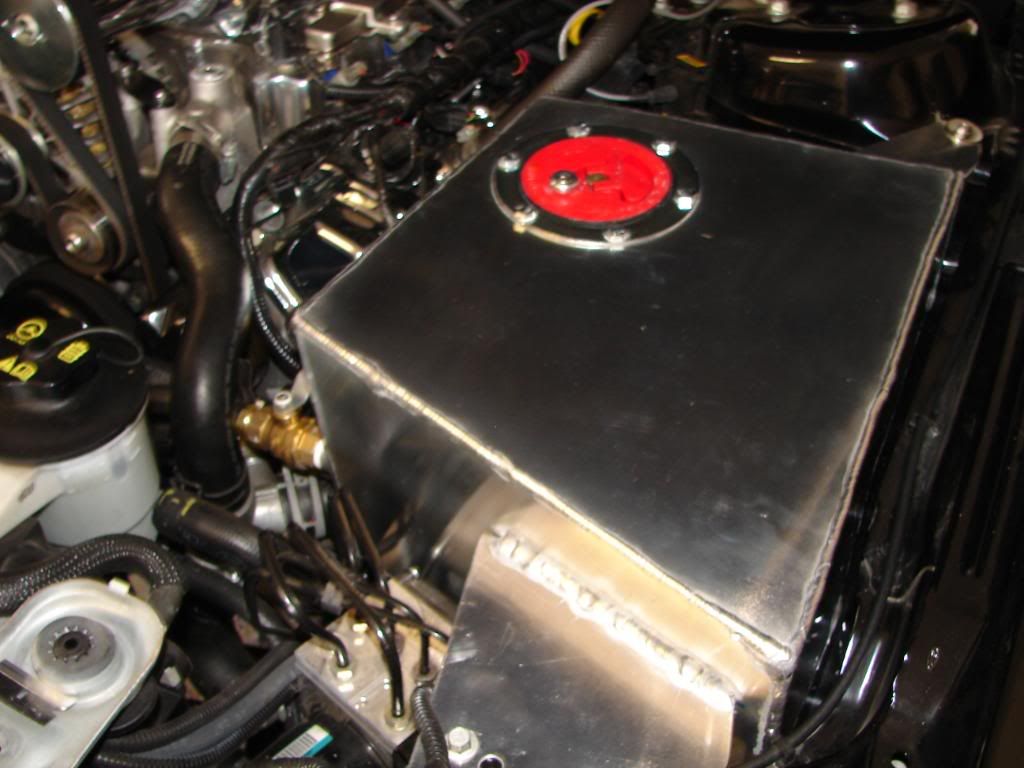
This is the custom tank Adam at Spankin' Time built It holds over 3 gallons:
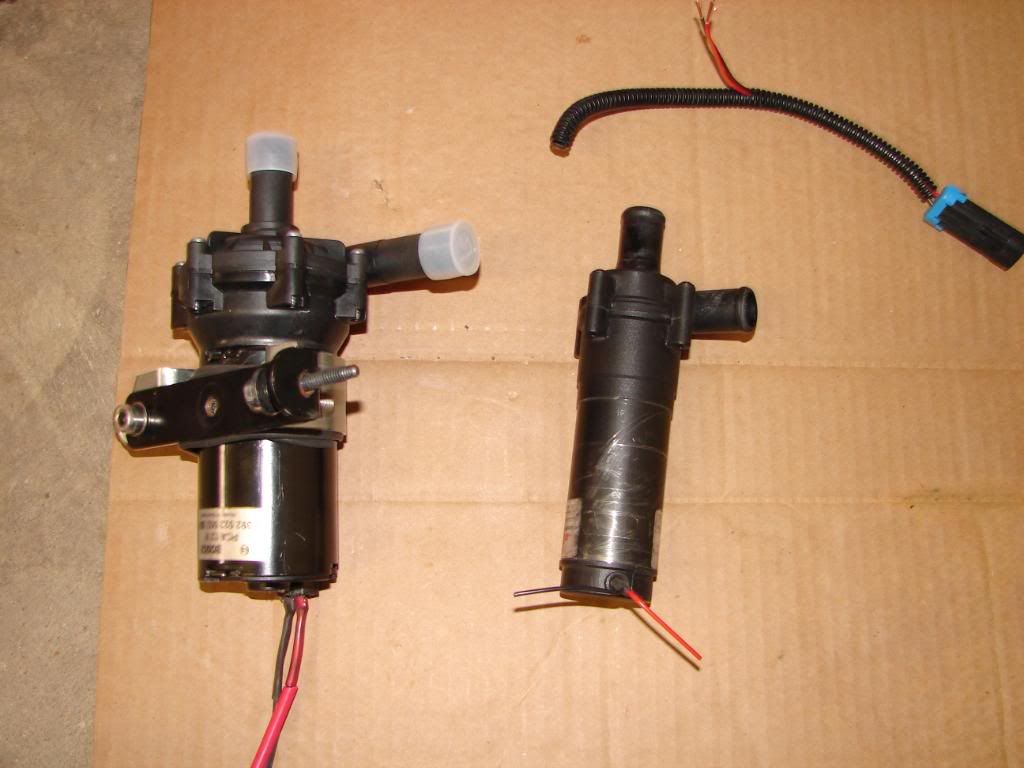
Next up was the intercooler pump. I found one for an F-150 Lightning made by Bosch for a great price. No wiring though. Here is the Lightning pump next to the Kenne Bell pump.
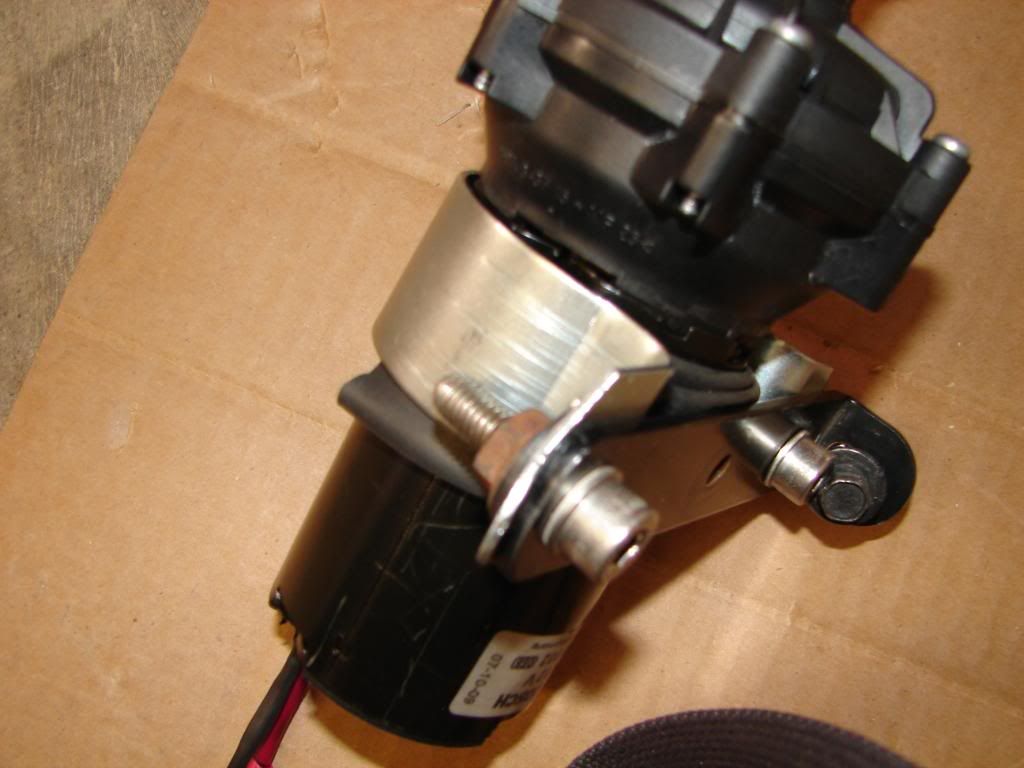
I fabricated a bracket out of a 69 Chevy ignition coil bracket. I used piece of 1.25" bicycle intertube as rubber insulater underneath the bracket to prevent vibrations. TheKB pump fit between the heat exchanger and the A/C condenser. The Lightning pump was too big to go there. So I fabricated this bracket to mount it alongside the bumper beam.Next, I needed to wire it so I cut off the plastic plug insulation and soldered on some wires. Then I shrink tubed it. I cut off the Kenne Bell pigtail and soldered that on and shrink tubed it.

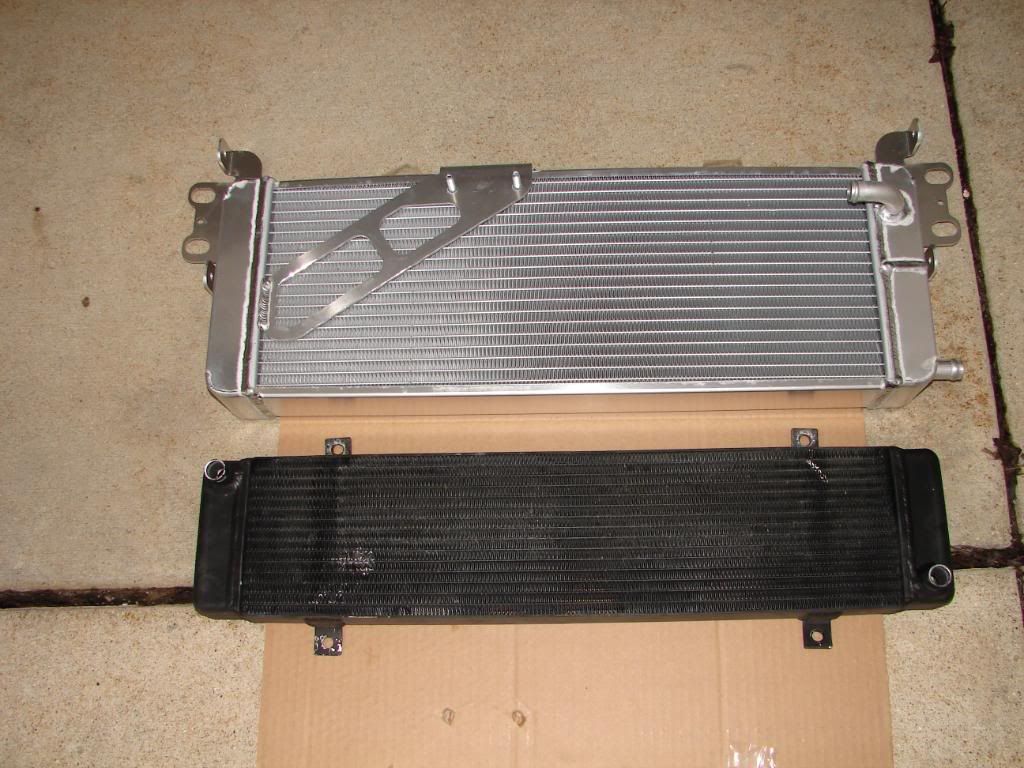
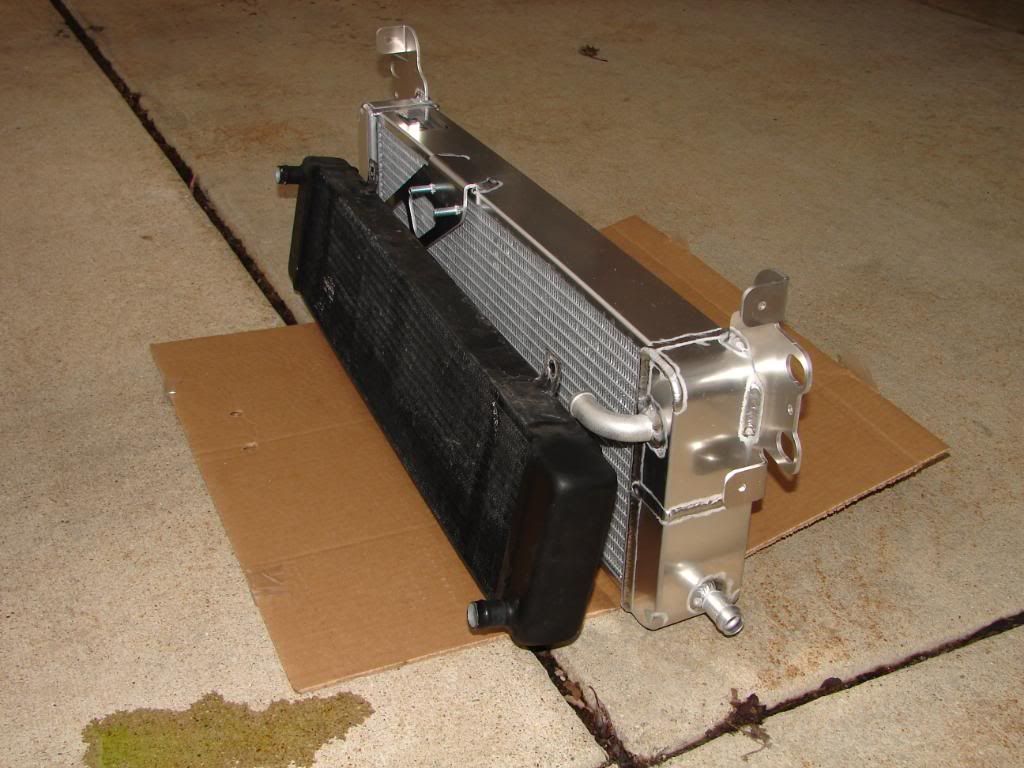
Last was the Heat exchanger. I researched all the heat exchangers available and this was the biggest baddest one I could find. It is an AFCO Pro Double-pass for a GT500. Compare the Kenne bell heta exchanger for the AFCO unit. This AFCO has over twice the surface area of the stock KB heat exchanger:
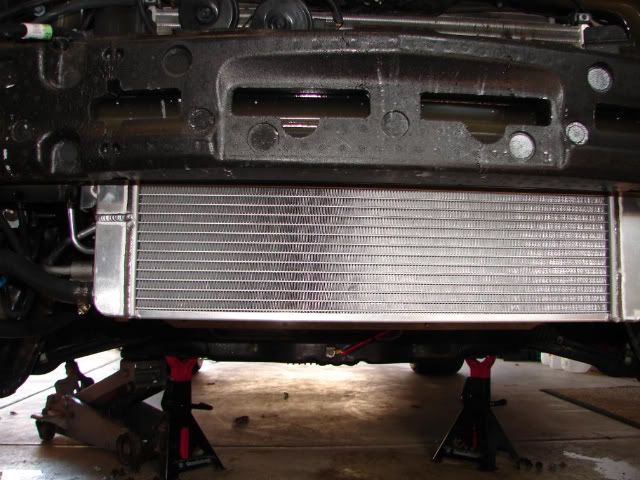
Here is the AFCO mounted up in the bumper.
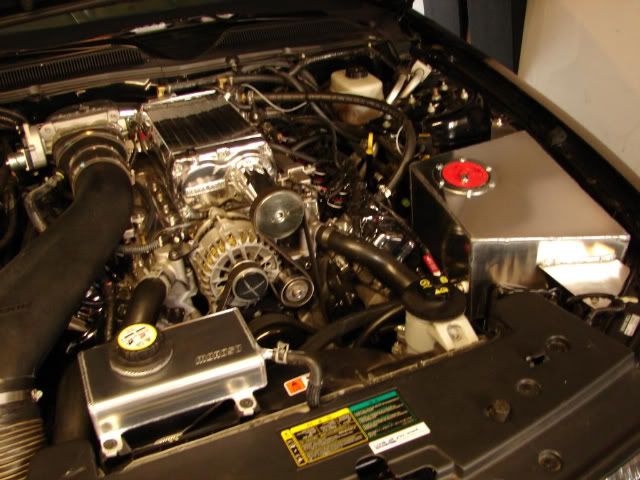
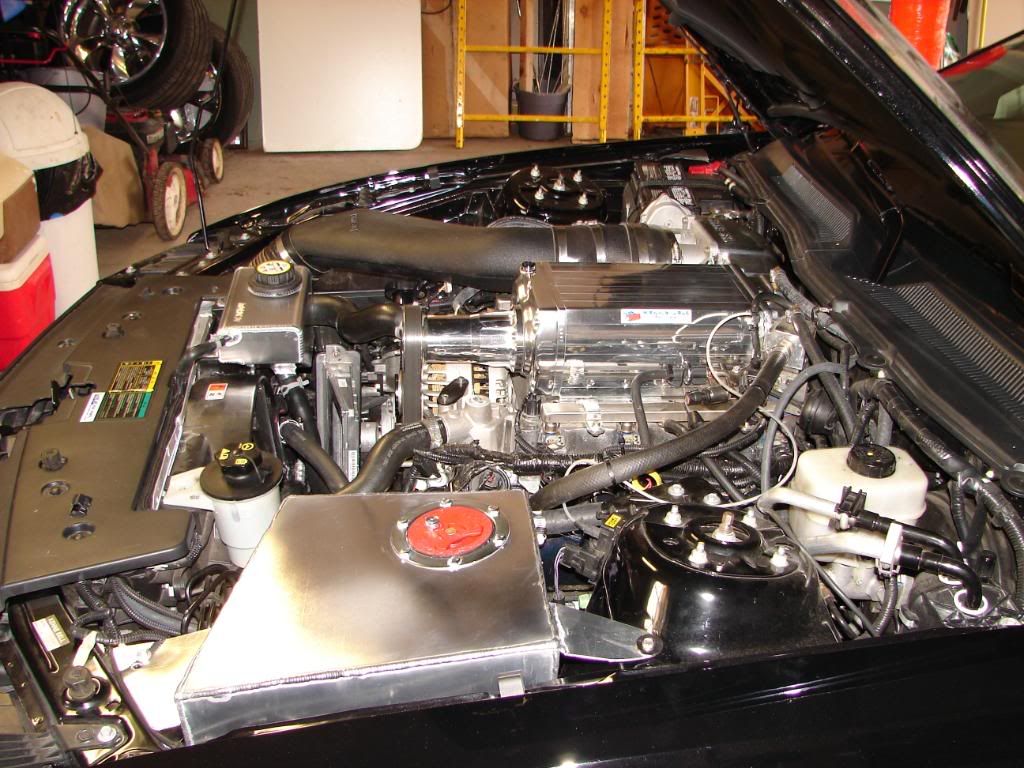
Here is the finished project:
I'll be testing this new setup out next week at the track. Now I'm tired, I have been gearing on this all day.
First up was upgrading the intercooler tank. This is the Kenne Bell intercooler tank. It holds about a quart:
This is the custom tank Adam at Spankin' Time built It holds over 3 gallons:
Next up was the intercooler pump. I found one for an F-150 Lightning made by Bosch for a great price. No wiring though. Here is the Lightning pump next to the Kenne Bell pump.
I fabricated a bracket out of a 69 Chevy ignition coil bracket. I used piece of 1.25" bicycle intertube as rubber insulater underneath the bracket to prevent vibrations. TheKB pump fit between the heat exchanger and the A/C condenser. The Lightning pump was too big to go there. So I fabricated this bracket to mount it alongside the bumper beam.Next, I needed to wire it so I cut off the plastic plug insulation and soldered on some wires. Then I shrink tubed it. I cut off the Kenne Bell pigtail and soldered that on and shrink tubed it.
Last was the Heat exchanger. I researched all the heat exchangers available and this was the biggest baddest one I could find. It is an AFCO Pro Double-pass for a GT500. Compare the Kenne bell heta exchanger for the AFCO unit. This AFCO has over twice the surface area of the stock KB heat exchanger:
Here is the AFCO mounted up in the bumper.
Here is the finished project:
I'll be testing this new setup out next week at the track. Now I'm tired, I have been gearing on this all day.

 04-07-2008, 12:38 AM
#6
5th Gear Member

Join Date: May 2005
Location: NY
Posts: 2,518
ORIGINAL: zkiller
I am at 11 PSI and slightly over 500RWHP on STOCK block so even more important to keep Inloet air temperatures down.
I am at 11 PSI and slightly over 500RWHP on STOCK block so even more important to keep Inloet air temperatures down.
04-07-2008, 05:48 AM
#7

Join Date: May 2005
Posts: 19
Great write up and info and pics! How much coolant did you end up putting back in? I think when I filled mine up, the whole thing only held about a gallon, but I didn't really measure it. So you're probably about 4 times that by now. Interested to see wha the IAT's look like. Mine typically runs around 132 driving around town, but when I get on it, it shoots higher pretty quick. What mix of coolant/water are your running? A little water wetter too perhaps? When it warms up, I may dilute mine down a bit more, water trasnfers heat better.
Did you have to replace/extend any of the hoses, or did the heat exchanger in/outlets match up close to the same position? No big deal to swap them out, just wondering. And does the heat exchanger extend down below the front bumper?
And I assume you got rid of the winshield wiper res all together? Daily driver? I suppose I could live without it, or find somewere else for a bottle.
The polished tank looks great with the Moroso tank and polished KB. Nice work, great idea. Looking forward to how cool it stays.
04-07-2008, 08:08 AM
#8
4th Gear Member
Thread Starter
Join Date: Feb 2007
Location: Illinois
Posts: 1,726
I expect my stock block to last as long as it lasts. It has lasted two years and hopefully will make it another two but we shall see. I have spoken to some of the top tuners and they all agree that these motors are fine at this power level as long as you don't over-rev them and as long as you don't get even the slightest detonation. I have a dyno tune with the air fuel at 11.5 thanks to Brent,I run 100 octane fuel all the time and I have my shift points set at 6100 RPM. There are no guarantees in life but hopefully this will help the rods to survive.
Here is some additional technical information:
The AFCO GT500 heat exchanger holds about 1.5 gallons. It has the largest surface area of the big exchangers. I liked the Gord Ford but it was a little stubby because it was designed for the 03-04 Cobras. That and the Steeda are both single pass units.
This AFCO will bolt right up to your bumper because the steel support is the same in the GT and the GT500. The Kenne Bell exchanger had the inlet on the passenger's side bottom. It had the outlet on the driver's side top. The AFCO has both inlet/outlet on the passenger side. This is actually a better setup because you dont have to run long 3/4" lines across the back of the exchanger which might block some air flow.
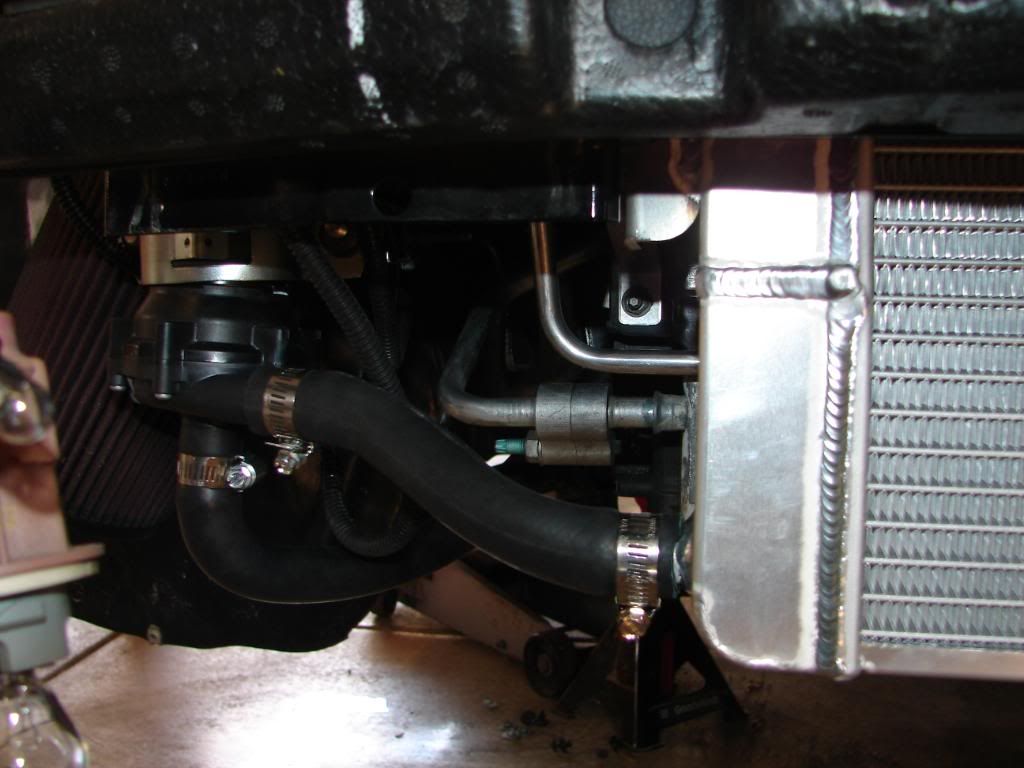
I was able to re-engineer the plumbing with 3 feet of 3/4" hose, one 3/4" coupler and a 3/4" 90 degree elbow. The Lightning pump is now mounted next to the bumper support and this location only require hose lengths of about 6"-8" and leaves the exchanger unobstructed and open for air flow.
I kept the Kenne Bell design of using the bottom outlet as the inlet instead of filling the heat exchanger from the top. The idea is that you want the coolant to spend as much time in the heat exchanger as possible to lower the temperatures. Even using the bottom as the inlet the coolant flow with this pump is great. You can see it is straight shot in to the exchanger from the pump.
I saw some discussion of this idea in one of Don_w's threads when he did his exchanger upgrade to a Gord's Ford Exchanger. I am using the same plan to fill from the bottom.
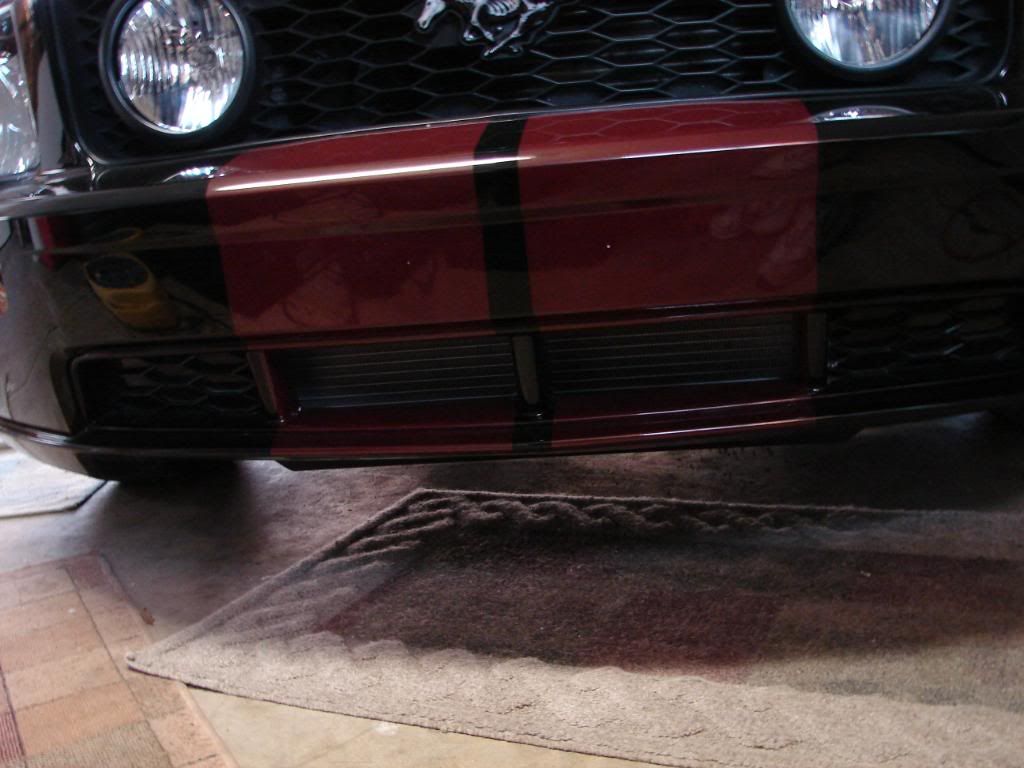
I had to sacrifice the windhield washer reservois to mount the ice box/intercoller tank. I never used the washers anyways and the KB windshield reservoir was a joke. However I did re-task the bracket from the washer res to use with the Chevy coil bracket as a mount for the Bosch Lightning pump. The heat exchanger does not extend below the front bumper. Here is a picture of the front with the bumper cover on.

I am running distilled water and about 10% coolant with some Water Wetter right now. At the track I will run ice, distilled water and water wetter. I will use 30%-40% coolant during regular use but will not run coolant with the ice. Adam included a 1/2" ball valve drain on the tank. I ran some 1/2" hose from the drain out to the bottom of the fromt bumper near the driver's corner so I can drain and re-ice at the track.
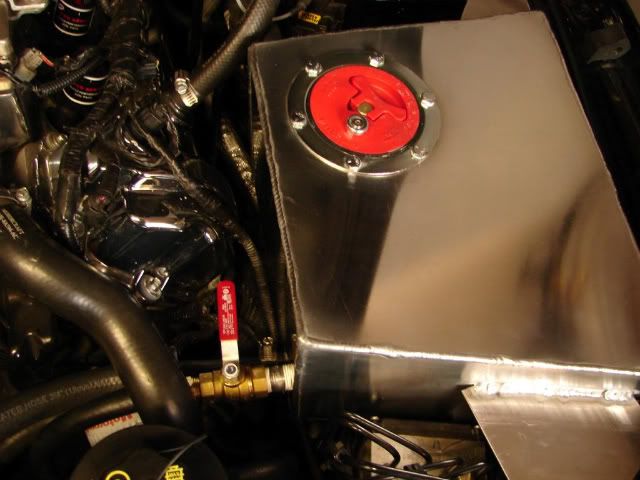
The ice box was not professionally polished but I gave it a little hand polish with some billett polish so it would match the blower. The cool thing is you can remove the fuel door and watch the return line just pumping away so the flow looks really good.
The coolant temperature seem lower from my initial testing and will have good information on this in a week or so.
The Bosch Lightning pump is 149-160 dollars everywhere but Blue Oval Industries sells it for 89.00 on their Ebay store. They sell the pigtail that you can use to wire it for 19.00 but I did not know I needed that when I purchased the pump. I ended up using the KB pigtail and just soldered it to the pins of the pump - it took five minutes to do and saved me 19.00 for a silly plug.
Here is some additional technical information:
The AFCO GT500 heat exchanger holds about 1.5 gallons. It has the largest surface area of the big exchangers. I liked the Gord Ford but it was a little stubby because it was designed for the 03-04 Cobras. That and the Steeda are both single pass units.
This AFCO will bolt right up to your bumper because the steel support is the same in the GT and the GT500. The Kenne Bell exchanger had the inlet on the passenger's side bottom. It had the outlet on the driver's side top. The AFCO has both inlet/outlet on the passenger side. This is actually a better setup because you dont have to run long 3/4" lines across the back of the exchanger which might block some air flow.
I was able to re-engineer the plumbing with 3 feet of 3/4" hose, one 3/4" coupler and a 3/4" 90 degree elbow. The Lightning pump is now mounted next to the bumper support and this location only require hose lengths of about 6"-8" and leaves the exchanger unobstructed and open for air flow.
I kept the Kenne Bell design of using the bottom outlet as the inlet instead of filling the heat exchanger from the top. The idea is that you want the coolant to spend as much time in the heat exchanger as possible to lower the temperatures. Even using the bottom as the inlet the coolant flow with this pump is great. You can see it is straight shot in to the exchanger from the pump.
I saw some discussion of this idea in one of Don_w's threads when he did his exchanger upgrade to a Gord's Ford Exchanger. I am using the same plan to fill from the bottom.
I had to sacrifice the windhield washer reservois to mount the ice box/intercoller tank. I never used the washers anyways and the KB windshield reservoir was a joke. However I did re-task the bracket from the washer res to use with the Chevy coil bracket as a mount for the Bosch Lightning pump. The heat exchanger does not extend below the front bumper. Here is a picture of the front with the bumper cover on.
I am running distilled water and about 10% coolant with some Water Wetter right now. At the track I will run ice, distilled water and water wetter. I will use 30%-40% coolant during regular use but will not run coolant with the ice. Adam included a 1/2" ball valve drain on the tank. I ran some 1/2" hose from the drain out to the bottom of the fromt bumper near the driver's corner so I can drain and re-ice at the track.
The ice box was not professionally polished but I gave it a little hand polish with some billett polish so it would match the blower. The cool thing is you can remove the fuel door and watch the return line just pumping away so the flow looks really good.
The coolant temperature seem lower from my initial testing and will have good information on this in a week or so.
The Bosch Lightning pump is 149-160 dollars everywhere but Blue Oval Industries sells it for 89.00 on their Ebay store. They sell the pigtail that you can use to wire it for 19.00 but I did not know I needed that when I purchased the pump. I ended up using the KB pigtail and just soldered it to the pins of the pump - it took five minutes to do and saved me 19.00 for a silly plug.

