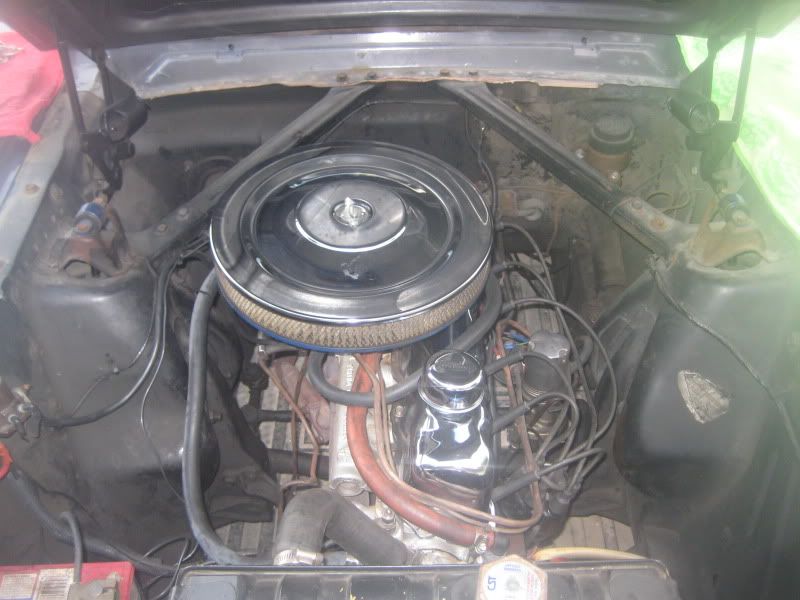
Here's a picture of my engine bay, where is yours?

 08-14-2009, 10:40 AM
#292
2nd Gear Member
Join Date: Nov 2008
Location: Ca
Posts: 245
It was a Mallory Coil. When i got the car it had been parked since the late 70's. The ironic thing is the guy basically rebuilt the car (a T code 6 cylinder) with all the parts from his V8 car. He had pretty much just finished it, rebuilt motor, trans etc then lost interest and parked it.
The cool yester-year hot rod parts were the Mallory Coil, the clear distributor cap, and the chrome remote fuel filter. He had a Morroso (correct spelling?) air cleaner, some nice valve covers and some really nice vent caps on the motor too.
Also included was a nice export brace and the entire engine bay had been painted with black Emeron (correct spelling?)paint.
So I pretty much just cleaned the bay and it shines like crazy. I also painted the block black (like a 65 should be) and ran a lot of the parts he had. Same motor and basic parts except for the ignition and the pretty stuff. So far 700 miles and it doesnt leak a drop!
Thanks for lookin Ryan aka Oak
08-15-2009, 05:36 AM
#293
5th Gear Member
Join Date: Dec 2008
Location: Texas
Posts: 4,462
Thats cool. I alway enjoy seeing vintage hot rod parts. I wish I could get a clear distributor cap and wires for my car, but I have a pertronix billet distributor with electronic ignition, so it takes a special cap. I don't think others will fit. I've also been told that the clear spark plug wires are not a good idea.


 08-28-2009, 03:03 PM
#297
4th Gear Member
Join Date: Aug 2008
Location: Seattle, WA
Posts: 1,233
Well I recently had the head rebuilt so it made cleaning and painting it a bit easier. First I started with some Engine Brite cleaner and degreaser and sprayed it on then rinsed it off in my driveway. Made sure to cover things like distributor, starter solenoid and the alternator.
Next I took some Simple Green and wiped down all the walls and stuff with paper towels. Then sanded down the walls and bought some Krylon semi-flat black paint and sprayed the walls. This required removing my old decals for replacement and detaching the wiring straps from the walls so I could spray behind them.
Your engine itself looks pretty clean though.
08-28-2009, 03:20 PM
#298

Join Date: Aug 2009
Location: Texas
Posts: 24
Well I recently had the head rebuilt so it made cleaning and painting it a bit easier. First I started with some Engine Brite cleaner and degreaser and sprayed it on then rinsed it off in my driveway. Made sure to cover things like distributor, starter solenoid and the alternator.
Next I took some Simple Green and wiped down all the walls and stuff with paper towels. Then sanded down the walls and bought some Krylon semi-flat black paint and sprayed the walls. This required removing my old decals for replacement and detaching the wiring straps from the walls so I could spray behind them.
Your engine itself looks pretty clean though.
Next I took some Simple Green and wiped down all the walls and stuff with paper towels. Then sanded down the walls and bought some Krylon semi-flat black paint and sprayed the walls. This required removing my old decals for replacement and detaching the wiring straps from the walls so I could spray behind them.
Your engine itself looks pretty clean though.
08-29-2009, 08:51 PM
#299
5th Gear Member
Join Date: Jul 2006
Location: San Diego, CA
Posts: 2,990
that does look very nice canary. What is that thing hanging from the driver side shock tower brace? it almost looks like a horn but you have the two horns up front...
I am sort of jealous of all the work space you have in there with the I6, changing plugs, starter, or anything must be a piece of cake!
I am sort of jealous of all the work space you have in there with the I6, changing plugs, starter, or anything must be a piece of cake!
08-29-2009, 09:09 PM
#300
4th Gear Member
Join Date: Aug 2008
Location: Seattle, WA
Posts: 1,233
Oh it is a piece of cake! I absolutely love working in this engine bay. I look at my 94 5.0 and almost faint at the daunting task of changing plugs or something. One major problem is all the air conditioning hoses that run around under that hood.
That is actually a horn that my dad installed a long time ago. It makes a horse's "neigh" sound when you push a button on the side of the steering column. Kind of cool, but not original of course :\
That is actually a horn that my dad installed a long time ago. It makes a horse's "neigh" sound when you push a button on the side of the steering column. Kind of cool, but not original of course :\