LC-1 wideband How to
 07-13-2012, 04:46 PM
#1
6th Gear Member
Thread Starter

Join Date: Sep 2006
Location: Gainesville, FL
Posts: 11,278
I couldn't find any good how to's about install widebands, so I took a few pics of what I did. Basically I was just looking for ideas about where to connect the grounds.

I ran the cables through the shifter boot. This seemed like the easiest and fastest route to the gauge. I also put the wideband in the drivers side rear o2 spot, so it was right there.
Pull the shifter boot up, along with the rubber boot. Now lower a piece of electrical wire down through the hole. Tire the wire around the lc-1 cables and pull them up through the shifter hole. I just punched a hole in the rubber boot with a screw driver and pushed all the wires and two serial cables through.
I ran a power wire from the passenger side fuse panel. Solder that to the red power wire of the lc-1. There are an infinite number of wires you could use that are switched 12v, but I choose to go straight to the fuse box.

Grounds, this is where I wasn't sure, but the two large bolts behind the inboard drivers side kick panel seem to be doing the trick.
Grounded to these two bolts are the blue and white (signal ground and heater ground or some crap like that) wires from the lc1 and the black calibration wire which runs through the momentary push button and then to ground.
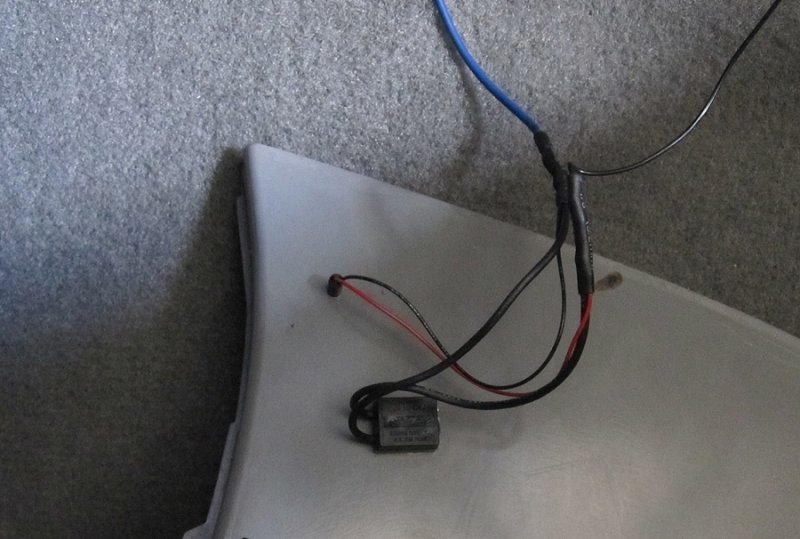
run the black calibration ground wire from the lc-1 to one of the push button wires and the red led wire. Solder these three wires together. Then solder the other push button wire to the black led wire and the blue ground wire connected to the bolt in the pic.
While I'm on the subject, solder all connections and get some lead solder, it won't kill you and flows better than any lead free i've tried.

I zip tied the lc-1 control to the stock o2 sensor wires connected to the transmission and zip tied the cable, coming out of the shifter boot, to the shifter brace. just make sure it's not flopping around in the transmission tunnel, because the drive shaft is right there.
The calibration instructions are pretty self explanatory in the instructions. Turn the key on and wait 20 seconds, the led will blink, then becom solid. Turn key off and wait 20 seconds. Now connect the wide band sensor, but do not install it in the bung. Remove the plastic cap. Turn key on and wait for a solid led light, then hold button for 30 seconds.

I had all ready made a whole for another switch, so I reused it and drilled a 5/32 inch hole for the led.

I've read countless posts about putting the sensor before the cats, countless. I may eventually do just that either by taking the h pipe to a shop or using the weldless bung that's available. I just wanted to see what kind of readings I'd get in the cat. At idle or cruise I get a steady 14.3-14.4, it's rock solid. Wide open throttle I'm getting 11.0-11.4, with the occasional 10.9, but mostly stays around 11.2.
I have the lc-1's brown wire connected to my green wire from the aeroforce interceptor gauge. Using it as my wide band gauge. I used slope of 3 and intercept of 7.4 to configured the interceptor gauge. I found these settings using google.
I ran the cables through the shifter boot. This seemed like the easiest and fastest route to the gauge. I also put the wideband in the drivers side rear o2 spot, so it was right there.
Pull the shifter boot up, along with the rubber boot. Now lower a piece of electrical wire down through the hole. Tire the wire around the lc-1 cables and pull them up through the shifter hole. I just punched a hole in the rubber boot with a screw driver and pushed all the wires and two serial cables through.
I ran a power wire from the passenger side fuse panel. Solder that to the red power wire of the lc-1. There are an infinite number of wires you could use that are switched 12v, but I choose to go straight to the fuse box.
Grounds, this is where I wasn't sure, but the two large bolts behind the inboard drivers side kick panel seem to be doing the trick.
Grounded to these two bolts are the blue and white (signal ground and heater ground or some crap like that) wires from the lc1 and the black calibration wire which runs through the momentary push button and then to ground.
run the black calibration ground wire from the lc-1 to one of the push button wires and the red led wire. Solder these three wires together. Then solder the other push button wire to the black led wire and the blue ground wire connected to the bolt in the pic.
While I'm on the subject, solder all connections and get some lead solder, it won't kill you and flows better than any lead free i've tried.
I zip tied the lc-1 control to the stock o2 sensor wires connected to the transmission and zip tied the cable, coming out of the shifter boot, to the shifter brace. just make sure it's not flopping around in the transmission tunnel, because the drive shaft is right there.
The calibration instructions are pretty self explanatory in the instructions. Turn the key on and wait 20 seconds, the led will blink, then becom solid. Turn key off and wait 20 seconds. Now connect the wide band sensor, but do not install it in the bung. Remove the plastic cap. Turn key on and wait for a solid led light, then hold button for 30 seconds.
I had all ready made a whole for another switch, so I reused it and drilled a 5/32 inch hole for the led.
I've read countless posts about putting the sensor before the cats, countless. I may eventually do just that either by taking the h pipe to a shop or using the weldless bung that's available. I just wanted to see what kind of readings I'd get in the cat. At idle or cruise I get a steady 14.3-14.4, it's rock solid. Wide open throttle I'm getting 11.0-11.4, with the occasional 10.9, but mostly stays around 11.2.
I have the lc-1's brown wire connected to my green wire from the aeroforce interceptor gauge. Using it as my wide band gauge. I used slope of 3 and intercept of 7.4 to configured the interceptor gauge. I found these settings using google.
Last edited by moosestang; 07-13-2012 at 04:49 PM.
 07-14-2012, 04:32 PM
#3
6th Gear Member
Thread Starter
Join Date: Sep 2006
Location: Gainesville, FL
Posts: 11,278
It's definitely nice to see. I may order an offroad H pipe from brenspeed, with a new tune, just to see how the other half lives. I doubt I'd run it that way full time though.
Now to take it back to the dyno. I also want to put the whipple tune back in and see what A/F it shows. I know what it showed on my dyno, but I don't remember where they put the sensor.
Now to take it back to the dyno. I also want to put the whipple tune back in and see what A/F it shows. I know what it showed on my dyno, but I don't remember where they put the sensor.
07-15-2012, 11:56 AM
#4
3rd Gear Member
Join Date: Jun 2006
Location: Providence Forge, VA
Posts: 750
You should have paid more attention to the write ups on placement. For the wide band to be accurate it needs to be installed before the cats. The reactions in the cats affect the A/F and unless the sensor is designed for after cat placement, like the sniffer units some dyno tuners use, the the A/F ratio is not accurate. Have a bung welded in front of the cats and install it there.
Earl
Earl
07-15-2012, 01:42 PM
#5
6th Gear Member
Thread Starter
Join Date: Sep 2006
Location: Gainesville, FL
Posts: 11,278
You should have paid more attention to the write ups on placement. For the wide band to be accurate it needs to be installed before the cats. The reactions in the cats affect the A/F and unless the sensor is designed for after cat placement, like the sniffer units some dyno tuners use, the the A/F ratio is not accurate. Have a bung welded in front of the cats and install it there.
Earl
Earl
I plan to place it before the cats and prove that the difference is nominal, .1 afr difference is what Justin said, I believe. I'll try to find that post again.
Also the rear 02 sensors are in the middle of the stock cat, not after it, so the exhaust is only passing through the first brick. There's a hollow point in the middle and I assume another honecomb after that. A tailpipe sniffer will have an even different reading.

Last edited by moosestang; 07-15-2012 at 03:17 PM.
07-15-2012, 02:33 PM
#6
6th Gear Member
Thread Starter
Join Date: Sep 2006
Location: Gainesville, FL
Posts: 11,278
I'm not aware of any difference in a tail pipe sniffer wide band sensor or one used before the cat. The sensors are the same, they may have a formula to recalculate the readings.
Here's a post on f150online about pre-cat/post cat placement.
Everyone has an opinion on this, which is why we've done the testing that we have and continue to do...........
1.) When doing a permanent install of any wideband on a vehicle, weld the bung in before the cats - the sensor will last longer, and you don't have to worry about being familiar with the initial spike - I.E., pattern of dispersal of the stored oxygen from the cats when initially going thru the transition from idle to heavy throttle.
2.) Once the stored oxygen has been dispersed from the cats, with good equipment there is little difference in lambda readings pre or post cat - now of course there are going to be those with all kinds of opinions who are going to crap all over that, and I really don't care - let 'em. That is why we test. We have in fact tested this difference numerous times using just about anything from Horiba meters to low-cost LM-1's to you name it - and found, with fresh and/or calibrated (in the case of the LM-1, a very nice feature) sensors, that the difference is minimal on pump gasoline.
The primary problem comes from those who do not maintain their air pumps on dyno's like Dynojet's for example - which require a change of the air filter every 8 hours, and replacement of the reed valve every 60-90 days, depending on level of activity and what they have been exposed to - we don't use those air pumps. Many times we have seen our customers send in a dyno "reading" showing 18:1 A/F's, and then we dyno that same vehicle 2 hours later on the same fuel and find that it's a nice save 12.3:1, for example - due to things like a broken or damaged reed valve in the air pump.
Another issue comes in when using different fuels, where the stoich point is not known and/or cannot be entered.
Something I like about the low-cost LM-1 is that it's the only one we see that properly allows ongoing recalibration of the sensor, instead of just depending on those "self-calibrating" sensors that are basically trimmed to a standardized value - and if they always ran at stoich, that would be fine, but when these sensors are routinely subjected to significantly richer than stoich A/F (lambda) values, not being able to recalibrate the sensor as the LM-1 does potentially present a problem.
Another point - "tailpipe sniffing" - for years we told people to *never* do that, simply because we were not happy with any of the existing clamp designs at the time, as many of us know how the speed of air gets slower the closer you sample to the wall of the exhaust tubing, etc., etc. We do find that the LM-1's tailpipe clamp works well, and once again, in testing, (and we always recalibrate the LM-1 each time we use it when using an LM-1 in testing), we find little difference to a reading pre-cat versus the LM-1's reading up the tailpipe once the hammer is down, so to speak. Of course, we frequently replace sensors as well.
Everyone has their own preferences - when we do it, in our environment, with our experience & methods, we get good results - whatever anyone else has to do to get results they feel comfortable with is purely up to them - I'm not about to take on any debate on this, everyone needs to do whatever makes them happy. And any customers of ours who have concerns about this are welcome to call us to go over this.
__________________
Mike Troyer
Obviously pre-cat position is what the manual says is optimal placement and I'm not challenging that one bit. People that claim any readings taking after the cat is useless, well, I have to challenge that broad, ignorant statement.
07-15-2012, 04:08 PM
#7
6th Gear Member
Join Date: May 2006
Location: Nicely done
Posts: 11,881
agreed, placement precat is obviously going to give the most
accurate numbers. this kind of placement is for WOT testing,
when an easy, temporary installation is desired.
this is also how i do it when i'm playing with my custom tunes, i
remove the wideband 02 during normal operation (which is most
of the time).
accurate numbers. this kind of placement is for WOT testing,
when an easy, temporary installation is desired.
this is also how i do it when i'm playing with my custom tunes, i
remove the wideband 02 during normal operation (which is most
of the time).
07-18-2012, 06:41 PM
#9
6th Gear Member
Thread Starter
Join Date: Sep 2006
Location: Gainesville, FL
Posts: 11,278
Did you ever use it with the whipple tune? The numbers I quoted above were a brenspeed tune. I loaded the whipple tune today and did a few WOT pulls. It hit 9.9:1 for a split second and then 10.2-10.5 for the rest of the log! I knew the tune was rich, but damn!
07-18-2012, 07:16 PM
#10
6th Gear Member
Join Date: Jul 2007
Location: Honolulu, HI
Posts: 6,130
actually i didn't even get the Whipple tune. i chose to get a rebate when i ordered the SC in place of the procal tuner, since i already had the SCT tuner. they discounted me about $250 without the tuner.
i got a VMP tune instead. and a local dyno tune.
but wow, that is a really rich tune!
I've heard of some stock GT500's a/f in the 10 range too.
i got a VMP tune instead. and a local dyno tune.
but wow, that is a really rich tune!
I've heard of some stock GT500's a/f in the 10 range too.

