4.0L V6 to 4.6L V8 swap how-to - 2005-2010
 07-16-2015, 01:21 AM
#1
5th Gear Member
Thread Starter
Join Date: May 2007
Location: Central Texas
Posts: 2,388
(this is a copy of my writeup from How to Do 4.0 to V8 swap - on Mustang Collective)
This thread is intended to be a comprehensive how-to on doing a 4.0L V6 to V8 swap, including 4.6 and 5.4 V8s. Everyone is encouraged to contribute, add photos, and tips and tricks. I'll try to keep it organized and summarized in this first thread.
Since you've done your research ahead of time and read this and other threads, you should be armed with the knowledge you need. A swap is not that difficult, and each swap is a little different .But you always run into things that cause some sort of problem. You'll need to be able to solve such problems with some ingenuity at times.
Prerequisites
Before (or during or soon after) an engine swap, the car should have the 7.5" rear end swapped to an 8.8" rear end. You can leave the 7.5" in the car, but it is not strong enough, in most cases, to hold up to your foot + the power of a V8.
If you already have a 8.8 installed, you're in good shape. If not, before swapping in a 8.8, consider your driveshaft options for the V8 swap. The GT and GT500 8.8 rear ends use a different pinion flange for connecting to the driveshaft (6 bolts) compared to the 4-bolt v6 driveshafts. Do your research on rear end conversions ahead of time and know what driveshaft changes you'll need, if any. For example, if you install a 8.8 and change the pinion flange to the "'03 cobra flange", you'll be able to bolt up your current V6 driveshaft to the 8.8, and especially if you have an automatic, use the same driveshaft with your v8 swap. But you would not want to use a stock V6 driveshaft with a V8, they are not strong enough at higher speeds.
As far as suspension, you can use your existing V6 suspension. The V8 engine does not weigh much more than the V6 engine. The GT/V8 suspension is a little firmer up front and is intended for a little better handling, whereas the V6 stock suspension is a little softer. If you have an aftermarket suspension already installed, you do not need to change anything. If you have stock v6 suspension, you could simply obtain a set of front springs and replace them, to help firm up the front. Note that the rear springs are the same on a V6 and GT, so you do not need to upgrade them.
Brakes: upgrading the front brakes is not required, but for better stopping, upgrading to GT front brake rotors is a good modification as well. You need the rotors and brake caliper brackets; everything else is re-usable. However, if you are using stock brake pads, it is a good idea to upgrade to better pads at the same time. Again as in the suspension, the back stock brakes on a V6 are the same as the stock rear brakes on a GT.
PCM and Engine Harness Compatibility
The engine being installed must have a proper engine harness that is compatible with the PCM, and the PCM must be compatible with the other wiring and systems in your car. Also, there are different wiring harnesses and PCMs for manual vs. automatic transmission setups.
The year-model of the engine and its accessories are not that critical. You can use any engine between 2005-2010 and put it in any 2005-2010 car. For example, I'm using a 2009 engine in my 2005. There may, however, be a few minor differences in some of the connectors, as described below.
Changes occurred in both harnesses and PCMs over the years (2005-2010), so understanding and getting the proper parts is crucial for a successful swap. You MUST use a PCM that is compatible with the year model of your car, unless you want to make a lot of wiring changes all over the place. The easiest way to avoid problems is to make sure you get a proper PCM, ideally, one that is the same model year as your car.
2005-2006: The PCMs are interchangeable. The engine wiring harness is the same except for connector C110, the black-plastic 12-pin power connector near the BEC. In 2005, this was square, whereas in 2006 and later, this is rectangular.
In 2007 things changed dramatically. While the engine harness is the same on the engine-side of things, numerous changes were made to pin locations in the PCM as well as to some power distribution circuits. This means that a 2005/2006 engine harness is NOT compatible with a 2007+ PCM, and vice-versa.
2007-2010: The PCMs and wiring harnesses are interchangeable. A few connections may vary over the years, including the a/c compressor connector and the two noise suppressors (the square-black thingies bolted to the front of the timing cover with one wire going to the harness; these can be directly-spliced into your harness if you can't get the needed connectors).
Parts Needed
In addition to the engine, you will need:
- transmission (the v6 transmissions will not bolt up to a v8 block)
- driveshaft (if you have a manual) - note that the automatic driveshaft lengths for a v6 and 4.6L v8 are the same.
Connecting lines/hoses:
- fuel supply line (connects the fuel rail to the fuel supply line coming in under the fender under the brake booster)
- power steering steel line that connects the power steering pump to the steering rack (although, some people have bend the V6 line and made it fit, which you can do if you have a good line bender)
- upper radiator hose
- lower radiator hose(s) - this depends on the year model of the replacement engine and which coolant crossover is used. For 2007 and later, the bottom hose is a "T", much like the V6 hose, and you'll need the entire T. For 2005 and 2006 motors, the thermostat is contained in a separate housing that makes up the "T", where hoses go to the block, crossover, radiator, and degas bottle (coolant reservoir).
- heater hoses at the firewall (some people have used the V6 hoses, cutting them to fit)
- air conditioning lines from the compressor (there's 2 of them). If using used lines, get new green o-rings for the connections.
Liquids and Sealants:
- Antifreeze and water
- Oil and filter
- Mercon V ATF fluid - for power steering and if you have an auto trans
- Blue loctite
Before Getting Started
Working on a car can be dangerous. Always do everything with safety in mind. When working under a car, always use jackstands, ideally with some redundancy with additional stands; never trust a jack by itself! The spare-tire scissor jacks can be very dangerous as can (especially) hydraulic jacks which can unexpectedly fail.
Keep the wheels chocked on both sides to prevent vehicle movement.
Wear eye protection to keep things from falling in your eye, especially when working above.
Something some of you may do without thinking about, when loosing or tightening bolts and nuts, pull/push with gradual and steady motion. Do not jerk with your arm to break something loose. You can damage tissue and injure yourself.
Use the proper tools in a proper manner, not only to make the job easier, but also to prevent slippage and injury.
Speaking of tools, you'll need the following:
- Metric sockets and wrenches; 8,10,13, and 15 mm are most of what you need. 18mm will be needed for transmission cross-member bolts, and 12point 12mm socket and/or box end wrench is needed for driveshaft bolts. 3/8" drive wratchet and breaker bar are generally sufficient. For 8mm, I like to use 1/4" drive when possible. For 18mm I like to use 18mm.
- Various length extensions and universal for socket wrenches
- Adjustable (Crescent) wrench, 10" or 12" long
- Pliers for hose clamp removal
- A few sizes of flat screwdrivers for prying, a smaller one for helping to disconnect some connectors
- Line disconnect tools to disconnect fuel line and a/c lines
- Hoist and chains, preferably with an engine leveler
- Jack(s) to rase car and to support transmission
Last-Minute Hints and Tips
Now that you're ready to start, here's a couple other hints to save you some aggravation!
Before disconnecting the battery:
- lower both windows just a little bit so they can open and close without interfering with the seal. Do this only if there is no chance of rain or other unwanted things getting in the car. Once the battery is disconnected, you wont get the auto roll-down/roll-up working. If you forget to do this, you can still carefully open the door, and then press in on the top of the glass gently when closing the door.
- if you have an automatic, put the shifter in neutral! Or at the very least, take it out of park. Yes the key will have to stay in the ignition, so take necessary precautions to protect the key. If you can't leave the gear selector in neutral, do not disconnect the battery until the driveshaft has been removed and you've put the gear selector back into park and removed the key.
Take a couple pics; your car will never be the same as it is right now :superkewl:
Removing the V6
Now let's get to it, take out the parts we no longer want.
The order of things here is not generally important; use common sense to get it all done.
Depending on your hoist setup, you may need to (or desire to) remove the hood. Do that first and get it out of the way. Hood removal works best with two or three people. When removed, set it aside so as to not damage it. The back ends are somewhat pointed and can get scraped easily on the floor if you stand it up, so use something soft to set it on.
1. If you have an automatic transmission, put the shifter in neutral, and turn the key off. You'll have to leave the key in the ignition. Remove other keys for your security and protection.
2. Disconnect the battery cables. Negative first, then positive. You'll be replacing the entire battery cable.
3. Drain the radiator coolant. Use proper collection and disposal practices. Keep the fluid away from pets.
4. Depressurize the a/c system. Preferably use a freon collection system to capture the freon and to slowly depressurize the system to prevent damage. If you opt to use a non-environmental friendly approach, you can discharge the a/c system as follows. Loosen the 1 bolt on the line connected to the condenser (driver side at the radiator), just enough so the pressure starts to escape. Let the hissing go on for awhile so it slowly discharges the system. You can also use a gauge to do this, but gauges get in the way quickly at this stage.
While the above are draining, I like to crawl under the car and tackle the items there. If you have help, one can be working on these, and someone else on top-side items.
5. Raise the rear end so the wheels are off the ground. Recheck the front wheels to make sure they are chocked both front and back.
6. Disconnect the driveshaft. If you have an automatic with an aftermarket driveshaft and you are re-using the driveshaft, you do not have to disconnect it from the rear end, just from the transmission. For all others, remove the driveshaft completely.
You MUST use 12-point 12mm tools. If possible use an impact driver or, if not available, a box-end wrench. The 4 bolts on each end are tight with loctite. You'll have to break them loose. I typically will use a long pry-bar or but flat screwdriver wedged within the u-joint, wedged to the floor, to keep the driveshaft from rotating.
To get to all 4 bolts, you'll need to rotate the driveshaft, hence the need for the transmission to be in neutral and the rear end raised.
7. Once the driveshaft is removed. I recommend lowering the rear end and raising the car from the front to perform the remaining under-car items.
8. Unplug/disconnect and optionally remove the oxygen sensors under the car. Press down on the flat tab while pulling the two ends apart.
9. Disconnect and remove the exhaust running from the mid-pipes to the motor. Unbolt the pipes from the exhaust manifolds, using 15mm deep sockets to remove the 2 nuts on each side. It helps to use power blaster, wd40, or similar to help make nut removal easier. The nuts will be tight and or stuck. Disconnect or cut the pipes and remove the pipes.
In some cases the stud will strip and/or break. If something like this happens and you cannot get the pipe separated, you may need to remove the exhaust manifold from the engine and pull it to the side ('someone' had to do this once!)
10. Disconnect the shifter linkage.
For an automatic, remove the 2 or 3 bolts on the front driver side of the transmission that holds down the shifter cable, use 13 mm wrench/socket. Separate the shifter cable from the transmission linkage by prying it away with a flay screwdriver. It will pop off.
11. For a manual transmission, disconnect the clutch cable.
12. For an automatic transmission, disconnect the 2 cooler lines on the passenger side. Use two wrenches, one to hold the nut at the transmission, one to loosen and turn the flare nut on the line. Failure to use two wrenches will likely result in damage to the line when the flare nut does not break loose and you twist the steel line and destroy it. Catch the fluid that will run out in a drain pan or container.
13. Using a jack under the transmission pan, support the transmission so that it cannot fall.
14. Remove the two nuts from the center of the transmission crossmember. I highly recommend to also remove the center bolt holding the support isolator so that it does not get in the way during removal. At this point you should be able to raise the transmission a little to take the pressure off the crossmember.
15. Remove the 4 crossmember bolts, using 18mm tools. Watch and make sure the transmission is not sitting on the crossmember; adjust as needed.
(HINT: make a mark on the crossmember indicating the current bottom-side of the crossmember, as you will need to flip it over when reinstalling it.)
Now back to engine bay items.
(If you haven't done so already, remove the air intake box and hose)
16. Remove the upper and lower radiator hoses. Disconnect the lower hose from the degas / coolant bottle, then the radiator and engine. To get to the lower radiator clamp, you may need to access it from under the car on the driver side.
17. Remove the degas bottle from the fan shroud; it is held down with 2 8mm bolts. Disconnect the small top side hose before removing.
18. Remove the power steering fluid reservoir from the fan shroud, held in place with 1 8mm bolt. You might as well disconnect the large power steering hose from the reservoir, capturing the fluid as much as possible. The lower hose can stay connected or you can remove it as well to get the reservoir out of the way.
19. Remove the engine drive belt.
20A. Remove the coil pack and spark plug wires. The coil pack is held to the side of the motor with a 15mm bolt and a 10mm bolt, and to the intake manifold with two 8mm bolts on top. Unplug the power connector from the coil pack.
20. Disconnect the wires and hoses to the intake manifold, throttle body (both sides), egr module (wires only, no need to disconnect the vacuum hoses to the egr), and fuel rail pressure sensor wire and vacuum.
Be careful with the FRPS as to not break the vacuum line port on the sensor when removing the vacuum hose.
Be careful with any connectors with the red locking tabs: slide them away from the connector first to unlock them, then remove the connector by pressing the hold-down tab and pulling gently.
Pull-back on the green tab sticking out of the PCV and ventilation hoses to remove them.
For the brake booster vacuum, use a set of pliers on the back-most clamp and pull the hose off the manifold.
21. Disconnect the EGR exhaust pipe from the EGR module. I like to use an adjustable wrench to break it loose.
22. Remove the intake manifold. You'll need a torx bit to loosen the 8 (or 10?) bolts. The bolts stay with the manifold, so just loosen them until they pull up with your fingers but dont pull them out of the manifold. With the manifold out of the way, seal the intake ports to keep anything (and any tools!) from falling into the motor.

23. Disconnect the fuel line at the fuel rail. The red tab can be a little tricky, but it has a part that snaps open (by gently prying it up), then push the clip down through the hose to the other side. That gets the clip out of the way and the hose can be easily pulled off the fuel rail connector.
(NOTE: You can optionally disconnect the fuel line at the driver-side fender instead, but that is harder to get to and harder to disconnect at this time).
24. Disconnect the 2 heater hoses by the passenger side valve cover. You can optionally disconnect them from the firewall, but they can be a pita to get loose, so it's easier to get those out when the engine is out.
25. Disconnect the power steering steel line that runs from the p/s pump to the steering rack. Unplug the sensor connector wire. Remove the 8mm bolt holding the steel line to the frame of the car. Loosen the hold-down bracket at the steering column and pull it out of the way, pull up and out on the line to remove it. (cover the opening to the rack to prevent debris from falling in).
26. If the a/c system is discharged, disconnect the line at the condenser (by the radiator), and disconnect the large line running to the driver side fender by the brake reservoir. You only need to disconnect the line running to the compressor. Use a line disconnect tool to compress the spring out of the way and gently. Disconnect the pressure sensor wire near the condenser end.
27. At this point, the power steering and a/c lines should be disconnected from the car. I like to remove the entire a/c and p/s together completely by removing the 3 bolts and 1 nut holding in the big mounting bracket that holds them in place. Use 15mm to remove the 3 big long bolts and the 1 nut, then slide the bracket off the remaining stud, with a/c and p/s as one unit, and remove from engine bay. Be careful not to scratch anything, and it is a little heavy as well.
By now, the driver side should look a little nekid. Time to make the passenger side the same.
28. Remove the idler tensioner.
29. Remove the alternator. Disconnect the big wire to it (13mm) and unplug the 3-wire connector.
30. Remove the mounting bracket that holds the alternator, it has 3 15mm bolts.

31. Disconnect the cooling fan power connector, located on the front passenger side of the fan shroud.
32. Remove the fan shroud as follows. Remove the two 8mm bolts holding the fan shroud to the radiator, one on each side. The fan shroud should lift up and out of the bottom holding slats on the radiator.
*** BE SURE TO USE SOME HEAVY CARDBOARD OR PLYWOOD BETWEEN THE RADIATOR AND ENGINE TO PROTECT THE RADIATOR! When removing and installing the motors, the crank pulley can come into contact and damage the radiator.
33. Disconnect the small ground strap at the rear of the engine on driver use. It is secured to the top of the head with a 8 or 10 mm bolt. Pull it out of the way so it does not get damaged; you'll reconnect it to the replacement engine.
34. Disconnect the battery cable from the BEC by removing the bolt holding the big red wire to it at the back of the BEC, and unplugging the starter wire connector at the passenger side shock tower.
35. Disconnect the power plug to the engine wiring harness, near the PCM.
36. Disconnect the 3 connectors from the PCM, and remove the PCM. Lift up on the gray hold-down levers to disconnect.
37. Remove the engine harness connector at the back of the BEC as follows. On the front and back of the BEC, release the bottom black locking tabs by gently pulling them away a little bit from the bec, then raise the entire box up some. Remove the bec cover, loosen the back-most stud bolt in the middle of the fuses and relays, using a 7mm socket. Do not pull it out, just loosen it a few turns. From the bottom of the bec, grab the green connector block from both sides and pull it a little from the bec; you'll feel it move. Then loosen the stud more to completely release it, pull down more on the connector block and separate it from the bec.
38. Remove the two motor mount nuts, one on each side.
Time to connect to chains and pull the motor! So far everything has been assuming you'll pull both the engine and transmission out together at the same time. Many have done the swap that way.
I like to connect a chain link to the front of the block where the mounting brackets were located, on both sides (driver and passenger), and make that a front 'Loop'. For the back, I like to connect a longer chain to transmission tabs, using 3/8" or 7/16" grade 8 bolts and nuts and washers. Then an engine leveler across the 2 chains.
Raise the engine and trans together at a 45* angle. Make sure the trans can slide on the floor or you push the car back or however you do it. be careful of clearing the radiator, and be careful of the cowl plastic covering with the rear chain and leveler.
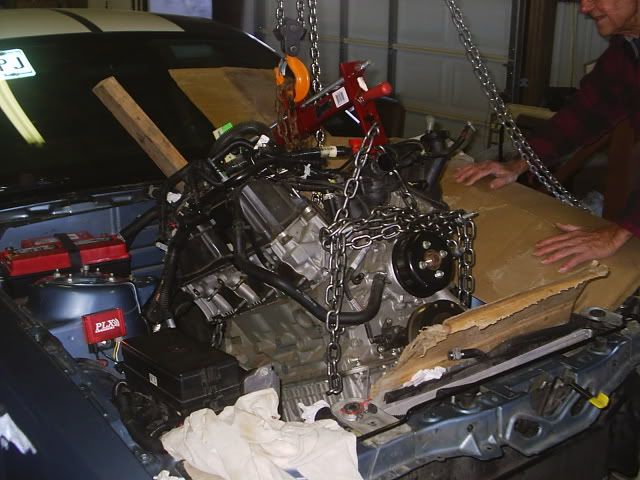
Once the engine and trans out, have a "cold refreshment", take pics, etc.

This thread is intended to be a comprehensive how-to on doing a 4.0L V6 to V8 swap, including 4.6 and 5.4 V8s. Everyone is encouraged to contribute, add photos, and tips and tricks. I'll try to keep it organized and summarized in this first thread.
Since you've done your research ahead of time and read this and other threads, you should be armed with the knowledge you need. A swap is not that difficult, and each swap is a little different .But you always run into things that cause some sort of problem. You'll need to be able to solve such problems with some ingenuity at times.
Prerequisites
Before (or during or soon after) an engine swap, the car should have the 7.5" rear end swapped to an 8.8" rear end. You can leave the 7.5" in the car, but it is not strong enough, in most cases, to hold up to your foot + the power of a V8.
If you already have a 8.8 installed, you're in good shape. If not, before swapping in a 8.8, consider your driveshaft options for the V8 swap. The GT and GT500 8.8 rear ends use a different pinion flange for connecting to the driveshaft (6 bolts) compared to the 4-bolt v6 driveshafts. Do your research on rear end conversions ahead of time and know what driveshaft changes you'll need, if any. For example, if you install a 8.8 and change the pinion flange to the "'03 cobra flange", you'll be able to bolt up your current V6 driveshaft to the 8.8, and especially if you have an automatic, use the same driveshaft with your v8 swap. But you would not want to use a stock V6 driveshaft with a V8, they are not strong enough at higher speeds.
As far as suspension, you can use your existing V6 suspension. The V8 engine does not weigh much more than the V6 engine. The GT/V8 suspension is a little firmer up front and is intended for a little better handling, whereas the V6 stock suspension is a little softer. If you have an aftermarket suspension already installed, you do not need to change anything. If you have stock v6 suspension, you could simply obtain a set of front springs and replace them, to help firm up the front. Note that the rear springs are the same on a V6 and GT, so you do not need to upgrade them.
Brakes: upgrading the front brakes is not required, but for better stopping, upgrading to GT front brake rotors is a good modification as well. You need the rotors and brake caliper brackets; everything else is re-usable. However, if you are using stock brake pads, it is a good idea to upgrade to better pads at the same time. Again as in the suspension, the back stock brakes on a V6 are the same as the stock rear brakes on a GT.
PCM and Engine Harness Compatibility
The engine being installed must have a proper engine harness that is compatible with the PCM, and the PCM must be compatible with the other wiring and systems in your car. Also, there are different wiring harnesses and PCMs for manual vs. automatic transmission setups.
The year-model of the engine and its accessories are not that critical. You can use any engine between 2005-2010 and put it in any 2005-2010 car. For example, I'm using a 2009 engine in my 2005. There may, however, be a few minor differences in some of the connectors, as described below.
Changes occurred in both harnesses and PCMs over the years (2005-2010), so understanding and getting the proper parts is crucial for a successful swap. You MUST use a PCM that is compatible with the year model of your car, unless you want to make a lot of wiring changes all over the place. The easiest way to avoid problems is to make sure you get a proper PCM, ideally, one that is the same model year as your car.
2005-2006: The PCMs are interchangeable. The engine wiring harness is the same except for connector C110, the black-plastic 12-pin power connector near the BEC. In 2005, this was square, whereas in 2006 and later, this is rectangular.
In 2007 things changed dramatically. While the engine harness is the same on the engine-side of things, numerous changes were made to pin locations in the PCM as well as to some power distribution circuits. This means that a 2005/2006 engine harness is NOT compatible with a 2007+ PCM, and vice-versa.
2007-2010: The PCMs and wiring harnesses are interchangeable. A few connections may vary over the years, including the a/c compressor connector and the two noise suppressors (the square-black thingies bolted to the front of the timing cover with one wire going to the harness; these can be directly-spliced into your harness if you can't get the needed connectors).
Parts Needed
In addition to the engine, you will need:
- transmission (the v6 transmissions will not bolt up to a v8 block)
- driveshaft (if you have a manual) - note that the automatic driveshaft lengths for a v6 and 4.6L v8 are the same.
Connecting lines/hoses:
- fuel supply line (connects the fuel rail to the fuel supply line coming in under the fender under the brake booster)
- power steering steel line that connects the power steering pump to the steering rack (although, some people have bend the V6 line and made it fit, which you can do if you have a good line bender)
- upper radiator hose
- lower radiator hose(s) - this depends on the year model of the replacement engine and which coolant crossover is used. For 2007 and later, the bottom hose is a "T", much like the V6 hose, and you'll need the entire T. For 2005 and 2006 motors, the thermostat is contained in a separate housing that makes up the "T", where hoses go to the block, crossover, radiator, and degas bottle (coolant reservoir).
- heater hoses at the firewall (some people have used the V6 hoses, cutting them to fit)
- air conditioning lines from the compressor (there's 2 of them). If using used lines, get new green o-rings for the connections.
Liquids and Sealants:
- Antifreeze and water
- Oil and filter
- Mercon V ATF fluid - for power steering and if you have an auto trans
- Blue loctite
Before Getting Started
Working on a car can be dangerous. Always do everything with safety in mind. When working under a car, always use jackstands, ideally with some redundancy with additional stands; never trust a jack by itself! The spare-tire scissor jacks can be very dangerous as can (especially) hydraulic jacks which can unexpectedly fail.
Keep the wheels chocked on both sides to prevent vehicle movement.
Wear eye protection to keep things from falling in your eye, especially when working above.
Something some of you may do without thinking about, when loosing or tightening bolts and nuts, pull/push with gradual and steady motion. Do not jerk with your arm to break something loose. You can damage tissue and injure yourself.
Use the proper tools in a proper manner, not only to make the job easier, but also to prevent slippage and injury.
Speaking of tools, you'll need the following:
- Metric sockets and wrenches; 8,10,13, and 15 mm are most of what you need. 18mm will be needed for transmission cross-member bolts, and 12point 12mm socket and/or box end wrench is needed for driveshaft bolts. 3/8" drive wratchet and breaker bar are generally sufficient. For 8mm, I like to use 1/4" drive when possible. For 18mm I like to use 18mm.
- Various length extensions and universal for socket wrenches
- Adjustable (Crescent) wrench, 10" or 12" long
- Pliers for hose clamp removal
- A few sizes of flat screwdrivers for prying, a smaller one for helping to disconnect some connectors
- Line disconnect tools to disconnect fuel line and a/c lines
- Hoist and chains, preferably with an engine leveler
- Jack(s) to rase car and to support transmission
Last-Minute Hints and Tips
Now that you're ready to start, here's a couple other hints to save you some aggravation!
Before disconnecting the battery:
- lower both windows just a little bit so they can open and close without interfering with the seal. Do this only if there is no chance of rain or other unwanted things getting in the car. Once the battery is disconnected, you wont get the auto roll-down/roll-up working. If you forget to do this, you can still carefully open the door, and then press in on the top of the glass gently when closing the door.
- if you have an automatic, put the shifter in neutral! Or at the very least, take it out of park. Yes the key will have to stay in the ignition, so take necessary precautions to protect the key. If you can't leave the gear selector in neutral, do not disconnect the battery until the driveshaft has been removed and you've put the gear selector back into park and removed the key.
Take a couple pics; your car will never be the same as it is right now :superkewl:
Removing the V6
Now let's get to it, take out the parts we no longer want.
The order of things here is not generally important; use common sense to get it all done.
Depending on your hoist setup, you may need to (or desire to) remove the hood. Do that first and get it out of the way. Hood removal works best with two or three people. When removed, set it aside so as to not damage it. The back ends are somewhat pointed and can get scraped easily on the floor if you stand it up, so use something soft to set it on.
1. If you have an automatic transmission, put the shifter in neutral, and turn the key off. You'll have to leave the key in the ignition. Remove other keys for your security and protection.
2. Disconnect the battery cables. Negative first, then positive. You'll be replacing the entire battery cable.
3. Drain the radiator coolant. Use proper collection and disposal practices. Keep the fluid away from pets.
4. Depressurize the a/c system. Preferably use a freon collection system to capture the freon and to slowly depressurize the system to prevent damage. If you opt to use a non-environmental friendly approach, you can discharge the a/c system as follows. Loosen the 1 bolt on the line connected to the condenser (driver side at the radiator), just enough so the pressure starts to escape. Let the hissing go on for awhile so it slowly discharges the system. You can also use a gauge to do this, but gauges get in the way quickly at this stage.
While the above are draining, I like to crawl under the car and tackle the items there. If you have help, one can be working on these, and someone else on top-side items.
5. Raise the rear end so the wheels are off the ground. Recheck the front wheels to make sure they are chocked both front and back.
6. Disconnect the driveshaft. If you have an automatic with an aftermarket driveshaft and you are re-using the driveshaft, you do not have to disconnect it from the rear end, just from the transmission. For all others, remove the driveshaft completely.
You MUST use 12-point 12mm tools. If possible use an impact driver or, if not available, a box-end wrench. The 4 bolts on each end are tight with loctite. You'll have to break them loose. I typically will use a long pry-bar or but flat screwdriver wedged within the u-joint, wedged to the floor, to keep the driveshaft from rotating.
To get to all 4 bolts, you'll need to rotate the driveshaft, hence the need for the transmission to be in neutral and the rear end raised.
7. Once the driveshaft is removed. I recommend lowering the rear end and raising the car from the front to perform the remaining under-car items.
8. Unplug/disconnect and optionally remove the oxygen sensors under the car. Press down on the flat tab while pulling the two ends apart.
9. Disconnect and remove the exhaust running from the mid-pipes to the motor. Unbolt the pipes from the exhaust manifolds, using 15mm deep sockets to remove the 2 nuts on each side. It helps to use power blaster, wd40, or similar to help make nut removal easier. The nuts will be tight and or stuck. Disconnect or cut the pipes and remove the pipes.
In some cases the stud will strip and/or break. If something like this happens and you cannot get the pipe separated, you may need to remove the exhaust manifold from the engine and pull it to the side ('someone' had to do this once!)
10. Disconnect the shifter linkage.
For an automatic, remove the 2 or 3 bolts on the front driver side of the transmission that holds down the shifter cable, use 13 mm wrench/socket. Separate the shifter cable from the transmission linkage by prying it away with a flay screwdriver. It will pop off.
11. For a manual transmission, disconnect the clutch cable.
12. For an automatic transmission, disconnect the 2 cooler lines on the passenger side. Use two wrenches, one to hold the nut at the transmission, one to loosen and turn the flare nut on the line. Failure to use two wrenches will likely result in damage to the line when the flare nut does not break loose and you twist the steel line and destroy it. Catch the fluid that will run out in a drain pan or container.
13. Using a jack under the transmission pan, support the transmission so that it cannot fall.
14. Remove the two nuts from the center of the transmission crossmember. I highly recommend to also remove the center bolt holding the support isolator so that it does not get in the way during removal. At this point you should be able to raise the transmission a little to take the pressure off the crossmember.
15. Remove the 4 crossmember bolts, using 18mm tools. Watch and make sure the transmission is not sitting on the crossmember; adjust as needed.
(HINT: make a mark on the crossmember indicating the current bottom-side of the crossmember, as you will need to flip it over when reinstalling it.)
Now back to engine bay items.
(If you haven't done so already, remove the air intake box and hose)
16. Remove the upper and lower radiator hoses. Disconnect the lower hose from the degas / coolant bottle, then the radiator and engine. To get to the lower radiator clamp, you may need to access it from under the car on the driver side.
17. Remove the degas bottle from the fan shroud; it is held down with 2 8mm bolts. Disconnect the small top side hose before removing.
18. Remove the power steering fluid reservoir from the fan shroud, held in place with 1 8mm bolt. You might as well disconnect the large power steering hose from the reservoir, capturing the fluid as much as possible. The lower hose can stay connected or you can remove it as well to get the reservoir out of the way.
19. Remove the engine drive belt.
20A. Remove the coil pack and spark plug wires. The coil pack is held to the side of the motor with a 15mm bolt and a 10mm bolt, and to the intake manifold with two 8mm bolts on top. Unplug the power connector from the coil pack.
20. Disconnect the wires and hoses to the intake manifold, throttle body (both sides), egr module (wires only, no need to disconnect the vacuum hoses to the egr), and fuel rail pressure sensor wire and vacuum.
Be careful with the FRPS as to not break the vacuum line port on the sensor when removing the vacuum hose.
Be careful with any connectors with the red locking tabs: slide them away from the connector first to unlock them, then remove the connector by pressing the hold-down tab and pulling gently.
Pull-back on the green tab sticking out of the PCV and ventilation hoses to remove them.
For the brake booster vacuum, use a set of pliers on the back-most clamp and pull the hose off the manifold.
21. Disconnect the EGR exhaust pipe from the EGR module. I like to use an adjustable wrench to break it loose.
22. Remove the intake manifold. You'll need a torx bit to loosen the 8 (or 10?) bolts. The bolts stay with the manifold, so just loosen them until they pull up with your fingers but dont pull them out of the manifold. With the manifold out of the way, seal the intake ports to keep anything (and any tools!) from falling into the motor.
23. Disconnect the fuel line at the fuel rail. The red tab can be a little tricky, but it has a part that snaps open (by gently prying it up), then push the clip down through the hose to the other side. That gets the clip out of the way and the hose can be easily pulled off the fuel rail connector.
(NOTE: You can optionally disconnect the fuel line at the driver-side fender instead, but that is harder to get to and harder to disconnect at this time).
24. Disconnect the 2 heater hoses by the passenger side valve cover. You can optionally disconnect them from the firewall, but they can be a pita to get loose, so it's easier to get those out when the engine is out.
25. Disconnect the power steering steel line that runs from the p/s pump to the steering rack. Unplug the sensor connector wire. Remove the 8mm bolt holding the steel line to the frame of the car. Loosen the hold-down bracket at the steering column and pull it out of the way, pull up and out on the line to remove it. (cover the opening to the rack to prevent debris from falling in).
26. If the a/c system is discharged, disconnect the line at the condenser (by the radiator), and disconnect the large line running to the driver side fender by the brake reservoir. You only need to disconnect the line running to the compressor. Use a line disconnect tool to compress the spring out of the way and gently. Disconnect the pressure sensor wire near the condenser end.
27. At this point, the power steering and a/c lines should be disconnected from the car. I like to remove the entire a/c and p/s together completely by removing the 3 bolts and 1 nut holding in the big mounting bracket that holds them in place. Use 15mm to remove the 3 big long bolts and the 1 nut, then slide the bracket off the remaining stud, with a/c and p/s as one unit, and remove from engine bay. Be careful not to scratch anything, and it is a little heavy as well.
By now, the driver side should look a little nekid. Time to make the passenger side the same.
28. Remove the idler tensioner.
29. Remove the alternator. Disconnect the big wire to it (13mm) and unplug the 3-wire connector.
30. Remove the mounting bracket that holds the alternator, it has 3 15mm bolts.
31. Disconnect the cooling fan power connector, located on the front passenger side of the fan shroud.
32. Remove the fan shroud as follows. Remove the two 8mm bolts holding the fan shroud to the radiator, one on each side. The fan shroud should lift up and out of the bottom holding slats on the radiator.
*** BE SURE TO USE SOME HEAVY CARDBOARD OR PLYWOOD BETWEEN THE RADIATOR AND ENGINE TO PROTECT THE RADIATOR! When removing and installing the motors, the crank pulley can come into contact and damage the radiator.
33. Disconnect the small ground strap at the rear of the engine on driver use. It is secured to the top of the head with a 8 or 10 mm bolt. Pull it out of the way so it does not get damaged; you'll reconnect it to the replacement engine.
34. Disconnect the battery cable from the BEC by removing the bolt holding the big red wire to it at the back of the BEC, and unplugging the starter wire connector at the passenger side shock tower.
35. Disconnect the power plug to the engine wiring harness, near the PCM.
36. Disconnect the 3 connectors from the PCM, and remove the PCM. Lift up on the gray hold-down levers to disconnect.
37. Remove the engine harness connector at the back of the BEC as follows. On the front and back of the BEC, release the bottom black locking tabs by gently pulling them away a little bit from the bec, then raise the entire box up some. Remove the bec cover, loosen the back-most stud bolt in the middle of the fuses and relays, using a 7mm socket. Do not pull it out, just loosen it a few turns. From the bottom of the bec, grab the green connector block from both sides and pull it a little from the bec; you'll feel it move. Then loosen the stud more to completely release it, pull down more on the connector block and separate it from the bec.
38. Remove the two motor mount nuts, one on each side.
Time to connect to chains and pull the motor! So far everything has been assuming you'll pull both the engine and transmission out together at the same time. Many have done the swap that way.
I like to connect a chain link to the front of the block where the mounting brackets were located, on both sides (driver and passenger), and make that a front 'Loop'. For the back, I like to connect a longer chain to transmission tabs, using 3/8" or 7/16" grade 8 bolts and nuts and washers. Then an engine leveler across the 2 chains.
Raise the engine and trans together at a 45* angle. Make sure the trans can slide on the floor or you push the car back or however you do it. be careful of clearing the radiator, and be careful of the cowl plastic covering with the rear chain and leveler.
Once the engine and trans out, have a "cold refreshment", take pics, etc.
 07-16-2015, 01:22 AM
#2
5th Gear Member
Thread Starter
Join Date: May 2007
Location: Central Texas
Posts: 2,388
Next, get your new power plant in the car.
Before Installing the V8
With the engine out, you'll want to do a few things NOW.
1. Remove the V6 fuel line from the side steel line. Use a fuel line disconnect tool.
2. Remove the v6 heater hoses from the firewall unless you plan to reuse them. This can be a challenge, as there are 2 large clips that the hose snaps into for easy installation, but pita removal. I use 2 small flat screwdrivers to pry the clip tabs down and pull the hose end out, then remove the clip once the hose is off.
3. Run/route the V8 a/c lines. Connect the longer one to where the v6 one was removed near the brake fluid reservoir. The hose to the condenser can be added later, but it's far easier to do it now as well. Use some of the green oil from the v6 lines to lube the o-rings on the replacement lines before installing them. Reinstall the retaining clip on the connector by the brake reservoir. Do not overtighten the bolt to the condenser. Secure the lines to the frame with zipties or with factory snap hold-down thingy.
4. Clean up any mess, touch up any paint, etc.
5. Install the V8 PCM, or you can do this later.
If you are contemplating doing a k-member swap, NOW is the perfect time to do it!
If you are changing (upgrading) motor mounts, replace them now.
Prepping the V8 and Transmission
I prefer to drop in the motor and transmission together as one unit, because it is far easier to connect them together and to run and connect the engine wiring harness when they are out of the car.
If they are already together, you can skip this part of the installation.
For an automatic, be sure the flexplate is installed on the motor.
Install the torque converter into the transmisison. Make sure it goes in 3 different 'clicks' or steps; rotate the converter between each click to get it all the way in. When installed properly, if you run a straight edge across the face of the bellhousing, the converter body or plate will be about 1" from the bellhousing front. The center '****' of the converter is slightly within the bellhousing, by maybe 1/4".
Carefully connect the transmission and engine together. They should go together easily. It can help to put a little grease on the guide dowel pins.
If using the stock torque converter with adapter or a torque converter with studs, make sure the converter studs go into the holes in the flexplate.
WARNING: DO NOT secure the torque converter to the flexplate until the transmission is FULLY SEATED against the engine! You'll pull the converter out of position and damage the transmission pump. Unfortunately, it has happened here.
Snug the trans to the motor. If using an automatic transmission, make sure there is a little space between the flexplate and converter front or front of the adatper plate; 1/8" is typical.
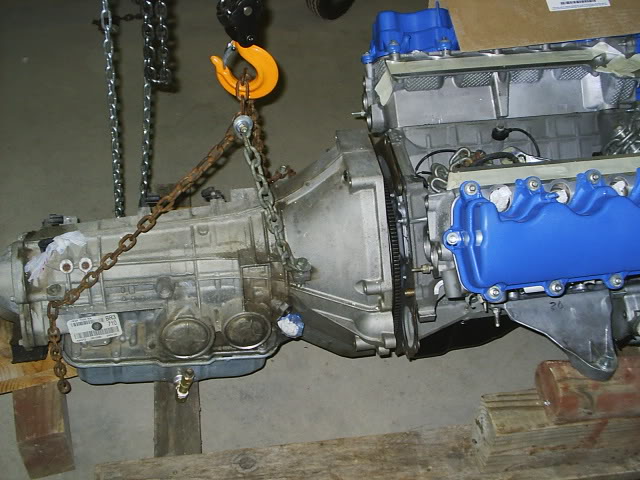
Install the 4 torque converter nuts or bolts to secure the converter to the flex plate. Use blue loctite on the nuts or bolts. I think I torqued them to 30 ft-lbs. When the converter is secured, rotate the engine at least one full revolution to make sure there is no binding. The compression of the motor will make it difficult at times.
Install the rubber seal plug back into the access hole on the engine (lower driver side).
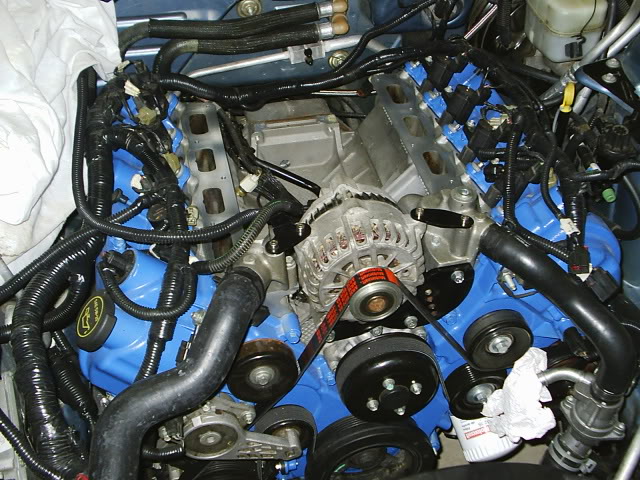
Install all front accessories, including a/c and p/s, water pump pulley, and idler pulleys. I opt to install the alternator separately and lift the motor by the alternator bolts, while others lift by the heads. If you lift by the heads, you can install the alternator and belt ahead of time.
Install/connect the engine wiring harness, connecting all things you can, including any transmission connections.
Be careful at the back of the motor, as the IMRC plug and knock sensor plugs are the same, shaped round like for an O2 sensor. The plug with 3 wires goes to the knock sensors; the plug with 4 wires and one of them being red go to the IMRC motor (if you have delete plates, you wont have the IMRC and should tape-over the connector); you wont be able to connect the IMRC until after the motor is installed and the intake manifold is installed.
If not using headers, stock exhaust manifolds should be installed now if they are not already on the motor, using new gaskets
TIP: If you are going to be installing long-tube headers, do not install the headers until the motor and trans are in the car. This applies to American Racing Headers and possibly others.
Make sure the motor mount support brackets are attached to the engine, which they should be already anyways.
Note that the intake manifold and fuel rails must wait until the motor is installed.
Installing the V8
Now getting to the real fun. Lower the motor and transmission into the car. Use the reversed process as you used when removing the V6. Be careful of the transmission end so it does not drag on the ground or floor. Carefully and slowly guide the assembly into position. The oil pan may tend to hang/bind on the front of the K-member, so watch out for that.
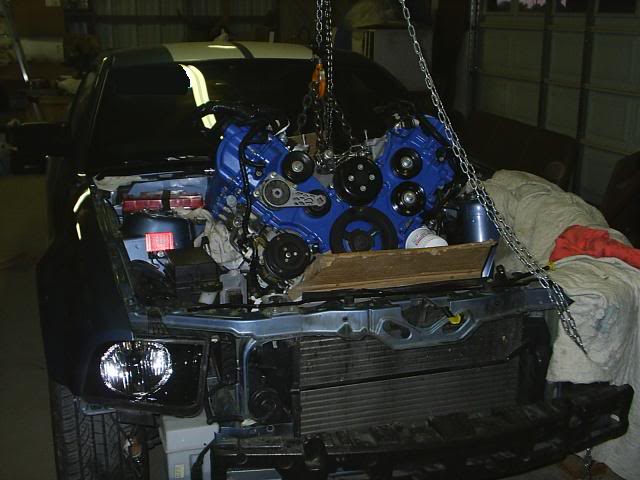
Work the motor into place, onto the side mounts. Get the mounts onto the stock mount studs, or if using aftermarket mounts, get bolts into place, but do not tighten anything yet.
Center the engine on the motor mounts; watch out for this, because you can easily shift the motor too far to one side on the motor mounts. A large pry bar can help you get it centered, before the motor is fully resting on the mounts.
Get the transmission at roughly the proper height as well, FLIP OVER THE CROSSMEMBER, and install it to the car. Lower the transmission onto the mount and secure the mounting bolts.
Now install and tighten the motor mount nuts or bolts.
TIP: If using headers and aftermarket motor mounts, including an aftermarket K-member, you may need to reverse the orientation of the motor bolt on the passenger side. For my American Racing headers and BMR K-member, I had to run the bolt UP from the bottom and secure the nut from the top side, whereas on the driver side, the bolt was run down from the top with nut on the bottom.
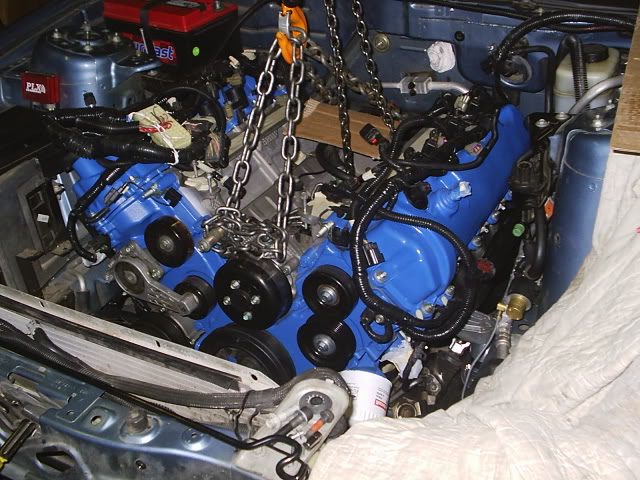
If you will be installing long tube headers, install them now if you haven't already installed them. Sometimes it is easier to install the headers while the motor is still held by the chains/lift, in case you need to remove one of the motor mount brackets.
With the motor and trans sitting solidly in place, remove the chains and lift.
Connect the heater hoses to the steel heater lines at the back of the block, passenger side. Note that there is a "bolt from hell" on the back of the head that holds the coolant lines to the block (the lines run in the intake manifold valley). Install clamps on the hoses.
Connect the small ground strap from near the master cylinder to the back of the head, using a 10mm wrench.
Check to make sure, but there should already be a large ground on the passenger side, the battery cable ground to one of the motor mount bracket studs; make sure that's there.
Install the V8 pcm if not already done.
Connect the a/c lines to the compressor. Put a little of the green oil on the o-rings on the lines. Snap them into place, and install the safety retaining clips. (Tip: if using used lines, install new green o-rings on the lines first.)
Connect the power steering steel line to the steering shaft. Install the power steering reservoir hoses.
Install the radiator fan shroud, and reconnect the fan wiring plug.
Install the coolant crossover (if not already on the engine).
Install the alternator if not already installed.
Install the lower radiator T hose, connecting to bottom of radiator. For 05/06,
install the thermostat housing and hoses.
The hose that runs up to the degas bottle can be connected when the bottle is reinstalled later.
Connect the a/c pressure sensor connector to the a/c line, driver front near radiator.
Install the drive belt. Make sure it clears the radiator hose near the power steering pulley.
Connect the wiring harness to the PCM, plugging in the 2 connectors. Use the levers on the connectors to pull the connectors into their locked positions.
Connect the square or rectangular power connector to the engine harness.
Install the BEC connector to the bottom of the BEC. Position the connector to the bottom of the BEC, press gently into place, tighten part-way on the top retaining bolt, which will pull the connector part-way on, then from the bottom, push the connector into the bottom of the bec; you'll feel it snap into place all the way. Snug the top bolt to secure the connector.
(Note that if you only try to pull up the connector using the top bolt, it wont seat properly. It is a 2-step process to get it properly seated.)
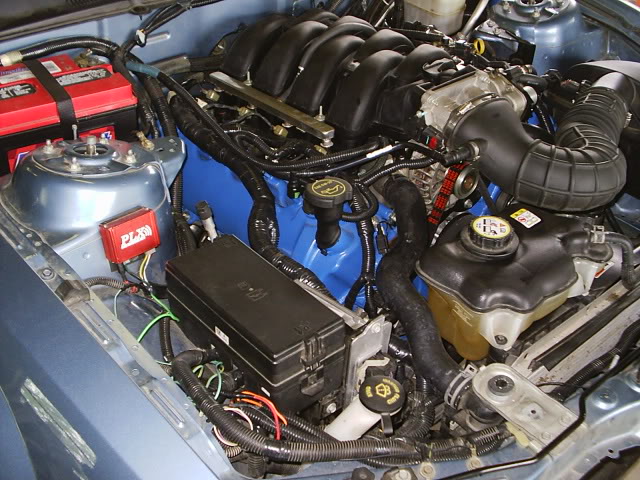
Install the top radiator hose and degas bottle, connect the lower hose on the bottle to the T to the bottom hose or t-stat, and the top small hose on the bottle as it was on the V6.
Remove any tape on the intake ports. Clean the ports to remove any residue and oil. You want the ports clean and dry.
Connect the brake booster vacuum hose to the back of the intake manifold.
Install the intake manifold; check the gaskets on the manifold, make sure they are all there and they are clean; install new ones as needed.
Secure the manifold with 10 bolts; the one that is a stud goes on the driver side back corner. Torque them to 89 INCH-lbs (roughly 9 ft-lbs).
Install the fuel rails and injectors. Put some oil on the injector o-rings, push them into place into the intake manifold. Secure to the manifold with the original 4 studs, 2 on each side.
Connect the fuel line to the fuel rail; BE SURE TO INSTALL THE SAFETY CLIP, otherwise the line WILL pop out under pressure.
The other end of the fuel hose should already be connected to the fuel line at the fender, but if not, connect it there, too, by pushing it solidly onto the line.
Install the COPs onto the spark plugs. Secure each with its bolt, snugged down (torque spec is 89 inch pounds).
Connect wiring harness connectors to the fuel injectors and COPs.
Connect Fuel Rail Pressure Sensor connector.
Connect vacuum line from fuel pressure connector to T in brake hose line.
Connect wiring harness connectors to throttle body (both sides). Push in the red retainers to lock into place. (If throttle body is not attached to intake manifold, install it and connect the wires.)
Connect driver-side valve cover hose to lower-front intake manifold port. NOTE: AN INLINE FILTER SHOULD BE USED HERE TO KEEP OIL OUT OF THE ENGINE. That can be added later as needed.
Connect evap vacuum line to top front driver side port of intake manifold.
Install intake air pipe and filter.
Connect passenger-side valve cover vent to intake pipe.
Now move to under the car. Connect shifter (manual trans) or shift cable (automatic trans). Install auto trans cooling lines, using 2 wrenches on the retaining nuts.
Connect driveshaft; use loctite on the bolts.
Install exhaust. Install and connect O2 sensors, especially the front ones.
Fill car with coolant.
Fill/replace power steering fluid.
For manual trans, full brake reservoir and prime/bleed the clutch (you can slowly press/release the pedal up to 100 times to build pressure); top off the brake fluid often.
For auto trans, add initial fluid (you'll need to add more fluid before driving once engine warms up).
Evacuate and charge the a/c system. Hint: if you have the vaccum pump, hook it up before now to have it drawing down the system so that by now, you can simply add the freon and oil.
Lastly, connect the battery, positive post first of course.
Load your startup tune. Crank it up!
Before Installing the V8
With the engine out, you'll want to do a few things NOW.
1. Remove the V6 fuel line from the side steel line. Use a fuel line disconnect tool.
2. Remove the v6 heater hoses from the firewall unless you plan to reuse them. This can be a challenge, as there are 2 large clips that the hose snaps into for easy installation, but pita removal. I use 2 small flat screwdrivers to pry the clip tabs down and pull the hose end out, then remove the clip once the hose is off.
3. Run/route the V8 a/c lines. Connect the longer one to where the v6 one was removed near the brake fluid reservoir. The hose to the condenser can be added later, but it's far easier to do it now as well. Use some of the green oil from the v6 lines to lube the o-rings on the replacement lines before installing them. Reinstall the retaining clip on the connector by the brake reservoir. Do not overtighten the bolt to the condenser. Secure the lines to the frame with zipties or with factory snap hold-down thingy.
4. Clean up any mess, touch up any paint, etc.
5. Install the V8 PCM, or you can do this later.
If you are contemplating doing a k-member swap, NOW is the perfect time to do it!
If you are changing (upgrading) motor mounts, replace them now.
Prepping the V8 and Transmission
I prefer to drop in the motor and transmission together as one unit, because it is far easier to connect them together and to run and connect the engine wiring harness when they are out of the car.
If they are already together, you can skip this part of the installation.
For an automatic, be sure the flexplate is installed on the motor.
Install the torque converter into the transmisison. Make sure it goes in 3 different 'clicks' or steps; rotate the converter between each click to get it all the way in. When installed properly, if you run a straight edge across the face of the bellhousing, the converter body or plate will be about 1" from the bellhousing front. The center '****' of the converter is slightly within the bellhousing, by maybe 1/4".
Carefully connect the transmission and engine together. They should go together easily. It can help to put a little grease on the guide dowel pins.
If using the stock torque converter with adapter or a torque converter with studs, make sure the converter studs go into the holes in the flexplate.
WARNING: DO NOT secure the torque converter to the flexplate until the transmission is FULLY SEATED against the engine! You'll pull the converter out of position and damage the transmission pump. Unfortunately, it has happened here.
Snug the trans to the motor. If using an automatic transmission, make sure there is a little space between the flexplate and converter front or front of the adatper plate; 1/8" is typical.
Install the 4 torque converter nuts or bolts to secure the converter to the flex plate. Use blue loctite on the nuts or bolts. I think I torqued them to 30 ft-lbs. When the converter is secured, rotate the engine at least one full revolution to make sure there is no binding. The compression of the motor will make it difficult at times.
Install the rubber seal plug back into the access hole on the engine (lower driver side).
Install all front accessories, including a/c and p/s, water pump pulley, and idler pulleys. I opt to install the alternator separately and lift the motor by the alternator bolts, while others lift by the heads. If you lift by the heads, you can install the alternator and belt ahead of time.
Install/connect the engine wiring harness, connecting all things you can, including any transmission connections.
Be careful at the back of the motor, as the IMRC plug and knock sensor plugs are the same, shaped round like for an O2 sensor. The plug with 3 wires goes to the knock sensors; the plug with 4 wires and one of them being red go to the IMRC motor (if you have delete plates, you wont have the IMRC and should tape-over the connector); you wont be able to connect the IMRC until after the motor is installed and the intake manifold is installed.
If not using headers, stock exhaust manifolds should be installed now if they are not already on the motor, using new gaskets
TIP: If you are going to be installing long-tube headers, do not install the headers until the motor and trans are in the car. This applies to American Racing Headers and possibly others.
Make sure the motor mount support brackets are attached to the engine, which they should be already anyways.
Note that the intake manifold and fuel rails must wait until the motor is installed.
Installing the V8
Now getting to the real fun. Lower the motor and transmission into the car. Use the reversed process as you used when removing the V6. Be careful of the transmission end so it does not drag on the ground or floor. Carefully and slowly guide the assembly into position. The oil pan may tend to hang/bind on the front of the K-member, so watch out for that.
Work the motor into place, onto the side mounts. Get the mounts onto the stock mount studs, or if using aftermarket mounts, get bolts into place, but do not tighten anything yet.
Center the engine on the motor mounts; watch out for this, because you can easily shift the motor too far to one side on the motor mounts. A large pry bar can help you get it centered, before the motor is fully resting on the mounts.
Get the transmission at roughly the proper height as well, FLIP OVER THE CROSSMEMBER, and install it to the car. Lower the transmission onto the mount and secure the mounting bolts.
Now install and tighten the motor mount nuts or bolts.
TIP: If using headers and aftermarket motor mounts, including an aftermarket K-member, you may need to reverse the orientation of the motor bolt on the passenger side. For my American Racing headers and BMR K-member, I had to run the bolt UP from the bottom and secure the nut from the top side, whereas on the driver side, the bolt was run down from the top with nut on the bottom.
If you will be installing long tube headers, install them now if you haven't already installed them. Sometimes it is easier to install the headers while the motor is still held by the chains/lift, in case you need to remove one of the motor mount brackets.
With the motor and trans sitting solidly in place, remove the chains and lift.
Connect the heater hoses to the steel heater lines at the back of the block, passenger side. Note that there is a "bolt from hell" on the back of the head that holds the coolant lines to the block (the lines run in the intake manifold valley). Install clamps on the hoses.
Connect the small ground strap from near the master cylinder to the back of the head, using a 10mm wrench.
Check to make sure, but there should already be a large ground on the passenger side, the battery cable ground to one of the motor mount bracket studs; make sure that's there.
Install the V8 pcm if not already done.
Connect the a/c lines to the compressor. Put a little of the green oil on the o-rings on the lines. Snap them into place, and install the safety retaining clips. (Tip: if using used lines, install new green o-rings on the lines first.)
Connect the power steering steel line to the steering shaft. Install the power steering reservoir hoses.
Install the radiator fan shroud, and reconnect the fan wiring plug.
Install the coolant crossover (if not already on the engine).
Install the alternator if not already installed.
Install the lower radiator T hose, connecting to bottom of radiator. For 05/06,
install the thermostat housing and hoses.
The hose that runs up to the degas bottle can be connected when the bottle is reinstalled later.
Connect the a/c pressure sensor connector to the a/c line, driver front near radiator.
Install the drive belt. Make sure it clears the radiator hose near the power steering pulley.
Connect the wiring harness to the PCM, plugging in the 2 connectors. Use the levers on the connectors to pull the connectors into their locked positions.
Connect the square or rectangular power connector to the engine harness.
Install the BEC connector to the bottom of the BEC. Position the connector to the bottom of the BEC, press gently into place, tighten part-way on the top retaining bolt, which will pull the connector part-way on, then from the bottom, push the connector into the bottom of the bec; you'll feel it snap into place all the way. Snug the top bolt to secure the connector.
(Note that if you only try to pull up the connector using the top bolt, it wont seat properly. It is a 2-step process to get it properly seated.)
Install the top radiator hose and degas bottle, connect the lower hose on the bottle to the T to the bottom hose or t-stat, and the top small hose on the bottle as it was on the V6.
Remove any tape on the intake ports. Clean the ports to remove any residue and oil. You want the ports clean and dry.
Connect the brake booster vacuum hose to the back of the intake manifold.
Install the intake manifold; check the gaskets on the manifold, make sure they are all there and they are clean; install new ones as needed.
Secure the manifold with 10 bolts; the one that is a stud goes on the driver side back corner. Torque them to 89 INCH-lbs (roughly 9 ft-lbs).
Install the fuel rails and injectors. Put some oil on the injector o-rings, push them into place into the intake manifold. Secure to the manifold with the original 4 studs, 2 on each side.
Connect the fuel line to the fuel rail; BE SURE TO INSTALL THE SAFETY CLIP, otherwise the line WILL pop out under pressure.
The other end of the fuel hose should already be connected to the fuel line at the fender, but if not, connect it there, too, by pushing it solidly onto the line.
Install the COPs onto the spark plugs. Secure each with its bolt, snugged down (torque spec is 89 inch pounds).
Connect wiring harness connectors to the fuel injectors and COPs.
Connect Fuel Rail Pressure Sensor connector.
Connect vacuum line from fuel pressure connector to T in brake hose line.
Connect wiring harness connectors to throttle body (both sides). Push in the red retainers to lock into place. (If throttle body is not attached to intake manifold, install it and connect the wires.)
Connect driver-side valve cover hose to lower-front intake manifold port. NOTE: AN INLINE FILTER SHOULD BE USED HERE TO KEEP OIL OUT OF THE ENGINE. That can be added later as needed.
Connect evap vacuum line to top front driver side port of intake manifold.
Install intake air pipe and filter.
Connect passenger-side valve cover vent to intake pipe.
Now move to under the car. Connect shifter (manual trans) or shift cable (automatic trans). Install auto trans cooling lines, using 2 wrenches on the retaining nuts.
Connect driveshaft; use loctite on the bolts.
Install exhaust. Install and connect O2 sensors, especially the front ones.
Fill car with coolant.
Fill/replace power steering fluid.
For manual trans, full brake reservoir and prime/bleed the clutch (you can slowly press/release the pedal up to 100 times to build pressure); top off the brake fluid often.
For auto trans, add initial fluid (you'll need to add more fluid before driving once engine warms up).
Evacuate and charge the a/c system. Hint: if you have the vaccum pump, hook it up before now to have it drawing down the system so that by now, you can simply add the freon and oil.
Lastly, connect the battery, positive post first of course.
Load your startup tune. Crank it up!
09-30-2015, 12:13 AM
#3

Join Date: Sep 2015
Location: ohio
Posts: 1
I have a 06 4.0 v6 premium.already switched exhaust and upgraded to 8.8 rear end.I think I may access to a 07 gt pcm wiring harness engine transmission and whole drive train.I was wondering what kind of problems I will come across if I use a 07 pcm and harness?I want the wiring as simple as possible
 05-10-2016, 07:56 PM
#5
1st Gear Member

Join Date: Apr 2016
Location: Georgia
Posts: 100
Great write up on swap! I will be buying a 2007 v6 in the near future to do this swap to and hopefully if I get stuck along the way I could contact you for help.I have a 2007 GT/CS currently but use it way to much to turn it into a full on build to just use for fun.I want to do the swap and build a camaro crushing machine although my 07 has done pretty good at that even being slightly modified. Lol!
 03-28-2018, 04:12 PM
#8
Moderator
Join Date: May 2006
Location: Michigan again!
Posts: 8,579
So are you saying that you swapped the 4.6 in place of the 4.0 but didn't replace the PCM/ECM? Or if you did, that you didn't reprogram it so that the PATS was disabled?
03-28-2018, 09:26 PM
#9

Join Date: Mar 2018
Location: Missouri
Posts: 7
Next, get your new power plant in the car.
Before Installing the V8
With the engine out, you'll want to do a few things NOW.
1. Remove the V6 fuel line from the side steel line. Use a fuel line disconnect tool.
2. Remove the v6 heater hoses from the firewall unless you plan to reuse them. This can be a challenge, as there are 2 large clips that the hose snaps into for easy installation, but pita removal. I use 2 small flat screwdrivers to pry the clip tabs down and pull the hose end out, then remove the clip once the hose is off.
3. Run/route the V8 a/c lines. Connect the longer one to where the v6 one was removed near the brake fluid reservoir. The hose to the condenser can be added later, but it's far easier to do it now as well. Use some of the green oil from the v6 lines to lube the o-rings on the replacement lines before installing them. Reinstall the retaining clip on the connector by the brake reservoir. Do not overtighten the bolt to the condenser. Secure the lines to the frame with zipties or with factory snap hold-down thingy.
4. Clean up any mess, touch up any paint, etc.
5. Install the V8 PCM, or you can do this later.
If you are contemplating doing a k-member swap, NOW is the perfect time to do it!
If you are changing (upgrading) motor mounts, replace them now.
Prepping the V8 and Transmission
I prefer to drop in the motor and transmission together as one unit, because it is far easier to connect them together and to run and connect the engine wiring harness when they are out of the car.
If they are already together, you can skip this part of the installation.
For an automatic, be sure the flexplate is installed on the motor.
Install the torque converter into the transmisison. Make sure it goes in 3 different 'clicks' or steps; rotate the converter between each click to get it all the way in. When installed properly, if you run a straight edge across the face of the bellhousing, the converter body or plate will be about 1" from the bellhousing front. The center '****' of the converter is slightly within the bellhousing, by maybe 1/4".
Attachment 47788
Carefully connect the transmission and engine together. They should go together easily. It can help to put a little grease on the guide dowel pins.
If using the stock torque converter with adapter or a torque converter with studs, make sure the converter studs go into the holes in the flexplate.
WARNING: DO NOT secure the torque converter to the flexplate until the transmission is FULLY SEATED against the engine! You'll pull the converter out of position and damage the transmission pump. Unfortunately, it has happened here.
Snug the trans to the motor. If using an automatic transmission, make sure there is a little space between the flexplate and converter front or front of the adatper plate; 1/8" is typical.
Attachment 47789
Install the 4 torque converter nuts or bolts to secure the converter to the flex plate. Use blue loctite on the nuts or bolts. I think I torqued them to 30 ft-lbs. When the converter is secured, rotate the engine at least one full revolution to make sure there is no binding. The compression of the motor will make it difficult at times.
Install the rubber seal plug back into the access hole on the engine (lower driver side).
Install all front accessories, including a/c and p/s, water pump pulley, and idler pulleys. I opt to install the alternator separately and lift the motor by the alternator bolts, while others lift by the heads. If you lift by the heads, you can install the alternator and belt ahead of time.
Install/connect the engine wiring harness, connecting all things you can, including any transmission connections.
Be careful at the back of the motor, as the IMRC plug and knock sensor plugs are the same, shaped round like for an O2 sensor. The plug with 3 wires goes to the knock sensors; the plug with 4 wires and one of them being red go to the IMRC motor (if you have delete plates, you wont have the IMRC and should tape-over the connector); you wont be able to connect the IMRC until after the motor is installed and the intake manifold is installed.
If not using headers, stock exhaust manifolds should be installed now if they are not already on the motor, using new gaskets
TIP: If you are going to be installing long-tube headers, do not install the headers until the motor and trans are in the car. This applies to American Racing Headers and possibly others.
Make sure the motor mount support brackets are attached to the engine, which they should be already anyways.
Note that the intake manifold and fuel rails must wait until the motor is installed.
Installing the V8
Now getting to the real fun. Lower the motor and transmission into the car. Use the reversed process as you used when removing the V6. Be careful of the transmission end so it does not drag on the ground or floor. Carefully and slowly guide the assembly into position. The oil pan may tend to hang/bind on the front of the K-member, so watch out for that.
Attachment 47790
Work the motor into place, onto the side mounts. Get the mounts onto the stock mount studs, or if using aftermarket mounts, get bolts into place, but do not tighten anything yet.
Center the engine on the motor mounts; watch out for this, because you can easily shift the motor too far to one side on the motor mounts. A large pry bar can help you get it centered, before the motor is fully resting on the mounts.
Get the transmission at roughly the proper height as well, FLIP OVER THE CROSSMEMBER, and install it to the car. Lower the transmission onto the mount and secure the mounting bolts.
Now install and tighten the motor mount nuts or bolts.
TIP: If using headers and aftermarket motor mounts, including an aftermarket K-member, you may need to reverse the orientation of the motor bolt on the passenger side. For my American Racing headers and BMR K-member, I had to run the bolt UP from the bottom and secure the nut from the top side, whereas on the driver side, the bolt was run down from the top with nut on the bottom.
Attachment 47791
If you will be installing long tube headers, install them now if you haven't already installed them. Sometimes it is easier to install the headers while the motor is still held by the chains/lift, in case you need to remove one of the motor mount brackets.
With the motor and trans sitting solidly in place, remove the chains and lift.
Connect the heater hoses to the steel heater lines at the back of the block, passenger side. Note that there is a "bolt from hell" on the back of the head that holds the coolant lines to the block (the lines run in the intake manifold valley). Install clamps on the hoses.
Connect the small ground strap from near the master cylinder to the back of the head, using a 10mm wrench.
Check to make sure, but there should already be a large ground on the passenger side, the battery cable ground to one of the motor mount bracket studs; make sure that's there.
Install the V8 pcm if not already done.
Connect the a/c lines to the compressor. Put a little of the green oil on the o-rings on the lines. Snap them into place, and install the safety retaining clips. (Tip: if using used lines, install new green o-rings on the lines first.)
Connect the power steering steel line to the steering shaft. Install the power steering reservoir hoses.
Install the radiator fan shroud, and reconnect the fan wiring plug.
Install the coolant crossover (if not already on the engine).
Install the alternator if not already installed.
Install the lower radiator T hose, connecting to bottom of radiator. For 05/06,
install the thermostat housing and hoses.
The hose that runs up to the degas bottle can be connected when the bottle is reinstalled later.
Connect the a/c pressure sensor connector to the a/c line, driver front near radiator.
Install the drive belt. Make sure it clears the radiator hose near the power steering pulley.
Connect the wiring harness to the PCM, plugging in the 2 connectors. Use the levers on the connectors to pull the connectors into their locked positions.
Connect the square or rectangular power connector to the engine harness.
Install the BEC connector to the bottom of the BEC. Position the connector to the bottom of the BEC, press gently into place, tighten part-way on the top retaining bolt, which will pull the connector part-way on, then from the bottom, push the connector into the bottom of the bec; you'll feel it snap into place all the way. Snug the top bolt to secure the connector.
(Note that if you only try to pull up the connector using the top bolt, it wont seat properly. It is a 2-step process to get it properly seated.)
Install the top radiator hose and degas bottle, connect the lower hose on the bottle to the T to the bottom hose or t-stat, and the top small hose on the bottle as it was on the V6.
Remove any tape on the intake ports. Clean the ports to remove any residue and oil. You want the ports clean and dry.
Attachment 47792
Connect the brake booster vacuum hose to the back of the intake manifold.
Install the intake manifold; check the gaskets on the manifold, make sure they are all there and they are clean; install new ones as needed.
Secure the manifold with 10 bolts; the one that is a stud goes on the driver side back corner. Torque them to 89 INCH-lbs (roughly 9 ft-lbs).
Install the fuel rails and injectors. Put some oil on the injector o-rings, push them into place into the intake manifold. Secure to the manifold with the original 4 studs, 2 on each side.
Connect the fuel line to the fuel rail; BE SURE TO INSTALL THE SAFETY CLIP, otherwise the line WILL pop out under pressure.
The other end of the fuel hose should already be connected to the fuel line at the fender, but if not, connect it there, too, by pushing it solidly onto the line.
Install the COPs onto the spark plugs. Secure each with its bolt, snugged down (torque spec is 89 inch pounds).
Connect wiring harness connectors to the fuel injectors and COPs.
Connect Fuel Rail Pressure Sensor connector.
Connect vacuum line from fuel pressure connector to T in brake hose line.
Connect wiring harness connectors to throttle body (both sides). Push in the red retainers to lock into place. (If throttle body is not attached to intake manifold, install it and connect the wires.)
Connect driver-side valve cover hose to lower-front intake manifold port. NOTE: AN INLINE FILTER SHOULD BE USED HERE TO KEEP OIL OUT OF THE ENGINE. That can be added later as needed.
Connect evap vacuum line to top front driver side port of intake manifold.
Install intake air pipe and filter.
Connect passenger-side valve cover vent to intake pipe.
Attachment 47793
Now move to under the car. Connect shifter (manual trans) or shift cable (automatic trans). Install auto trans cooling lines, using 2 wrenches on the retaining nuts.
Connect driveshaft; use loctite on the bolts.
Install exhaust. Install and connect O2 sensors, especially the front ones.
Fill car with coolant.
Fill/replace power steering fluid.
For manual trans, full brake reservoir and prime/bleed the clutch (you can slowly press/release the pedal up to 100 times to build pressure); top off the brake fluid often.
For auto trans, add initial fluid (you'll need to add more fluid before driving once engine warms up).
Evacuate and charge the a/c system. Hint: if you have the vaccum pump, hook it up before now to have it drawing down the system so that by now, you can simply add the freon and oil.
Lastly, connect the battery, positive post first of course.
Load your startup tune. Crank it up!
my car won't start I need help!
03-28-2018, 09:30 PM
#10
Join Date: Mar 2018
Location: Missouri
Posts: 7
Yes I switched everything over the computer and yes I did the 4.0 to 4.6 swap but for some reason it just cranks. And bystart up tune will my bama tune work if I upload it sorry I'm new to this forum don't know how to work it yet.