99-04 M112 Supercharger Installation
 07-10-2011, 04:05 AM
#1
5th Gear Member
Thread Starter
Join Date: Jan 2008
Location: Canada
Posts: 3,306
This is a guide for those of you that want to put an M112 onto your 3.8 or 4.2L V6. This was put on a 99 so some things will be different for 01-04.
Needed:
Eaton M112
Adapter plate(available from mysteed)
39# injectors
90mm Lightning MAF
CAI for a 03/04 Cobra
255 or 310lph fuel pump
IAT sensor and pigtail
NGK TR6 plugs
Idler pulley and mounting hardware
Serpentine Belt
Gauges (wideband AFR, Boost)
01-04 throttle cable
RTV gasket maker
Supercharger oil
Gaskets
Socket set and ratchet
Wrench set
Tap and die set
Drill and assorted bits
Assorted pliers
Wire crimper
Extra wire, vaccum hoses, wire loomm etc
Assorted nuts, bolts and washers
Part numbers:
Supercharger oil - Xl-4 - Ford
IAT sensor - 9C1Z-12A697-B - Ford
IAT pigtail - 3U2Z-14S411-JZA - Ford
TB gasket - F7LZ-9E936-AA - Ford
Plenum gasket - 9L437 - Ford
M112 gasket - 9H486 - Ford
First off removed the hood
Proceed to disconnect the negative cable on the battery. Removed air intake and all connectors, hoses, etc associated with the upper intake.

Now with that completed, you can remove the upper intake.
Put some duct tape over the intake runners or stuff paper towel in them like I did. Remove the 4 bolts that hold the fuel rail down. Clean the dirt/grime around the injectors and firmly pull the fuel rail upwards.
Now remove the clips holding the fuel injectors onto the rail. Once that is complete, you can replace the injectors and reuse the clips.

Put the fuel rail back into its place and push down until all injectors are seated. Tighten the 4 bolts. Now would be a good time to remove and replace your spark plugs.
Now you can test fit the adapter plate for clearance. The only place you will have clearance issues is the front of the fuel rail and the fuel pressure regulator on the drivers side. You need to put the IAT sensor at the front of the adapter plate and the rail gets in the way... Nothing a small prybar and some patience cant fix. Dont forget to put a new gasket under the adapter plate.
I used a 5/8" tap for the IAT sensor but it was too small. The way I got the threads in is a little hairy(random pipe reducer).
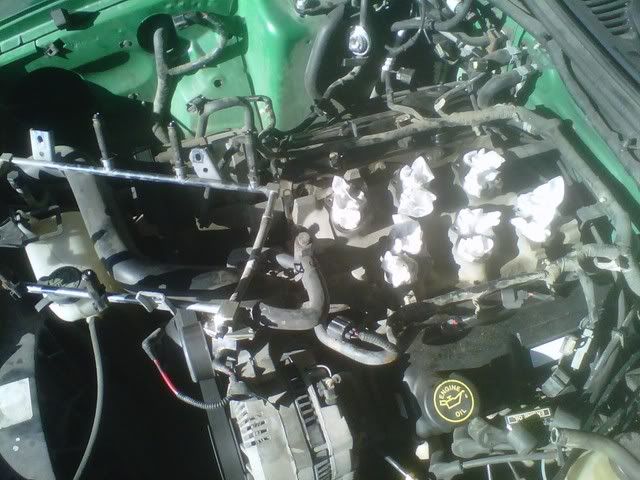
With all that buttoned down, you can start on the alignment of the M112. You will need to pry the coolant crossover/bleeder line to clear the snout of the M112. Just do the same thing with the fuel rail, pry it little by little.
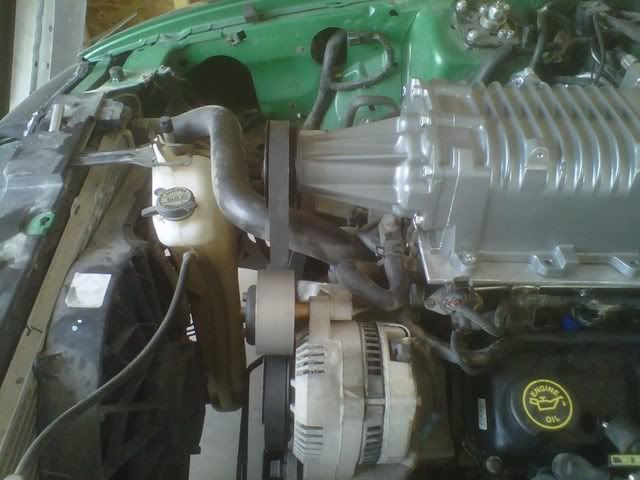
I didnt have my new belt yet so just use to old one and wrap it around the snout and 2 idlers. You can also see the idler I added. Just a spacer on the back side and a washer on the front, then I found a bolt long enough to work.
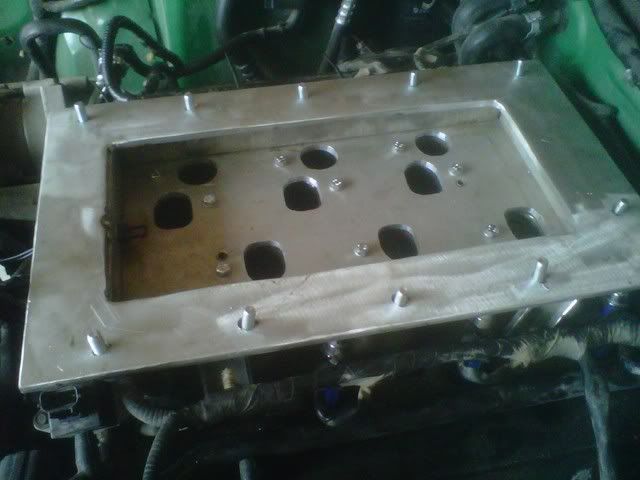
**** FOR THOSE OF YOU THAT HAVE TO DRILL YOUR PLATE *****
You can do it 1 of 2 ways, the dumb way or the smart way.
I did it the dumb way. I got the belt alignment completed then grabbed a sharpie marker and marked all the holes on the adapter plate. Drilled the holes and found out that only the front 2 holes lined up.... *anger face* Well I put the bolts in the front 2 holes and tightened them, then proceeded to drill each hole again... VERY CAREFULLY since the fuel rail is right below where your drilling.
The smart way would be to drill the front 2 holes, tighten the bolts and then drill the rest.
Now you can grab the M112 and apply a bead of RTV along the bottom of case. *I ran a bead of RTV and the metal gasket for the M112, but you can get away with just RTV* Place the M112 on the adapter and snug up the nuts/bolts. DONT TIGHTEN FULLY for at least an hour, let the RTV set up.
Needed:
Eaton M112
Adapter plate(available from mysteed)
39# injectors
90mm Lightning MAF
CAI for a 03/04 Cobra
255 or 310lph fuel pump
IAT sensor and pigtail
NGK TR6 plugs
Idler pulley and mounting hardware
Serpentine Belt
Gauges (wideband AFR, Boost)
01-04 throttle cable
RTV gasket maker
Supercharger oil
Gaskets
Socket set and ratchet
Wrench set
Tap and die set
Drill and assorted bits
Assorted pliers
Wire crimper
Extra wire, vaccum hoses, wire loomm etc
Assorted nuts, bolts and washers
Part numbers:
Supercharger oil - Xl-4 - Ford
IAT sensor - 9C1Z-12A697-B - Ford
IAT pigtail - 3U2Z-14S411-JZA - Ford
TB gasket - F7LZ-9E936-AA - Ford
Plenum gasket - 9L437 - Ford
M112 gasket - 9H486 - Ford
First off removed the hood
Proceed to disconnect the negative cable on the battery. Removed air intake and all connectors, hoses, etc associated with the upper intake.
Now with that completed, you can remove the upper intake.
Put some duct tape over the intake runners or stuff paper towel in them like I did. Remove the 4 bolts that hold the fuel rail down. Clean the dirt/grime around the injectors and firmly pull the fuel rail upwards.
Now remove the clips holding the fuel injectors onto the rail. Once that is complete, you can replace the injectors and reuse the clips.
Put the fuel rail back into its place and push down until all injectors are seated. Tighten the 4 bolts. Now would be a good time to remove and replace your spark plugs.
Now you can test fit the adapter plate for clearance. The only place you will have clearance issues is the front of the fuel rail and the fuel pressure regulator on the drivers side. You need to put the IAT sensor at the front of the adapter plate and the rail gets in the way... Nothing a small prybar and some patience cant fix. Dont forget to put a new gasket under the adapter plate.
I used a 5/8" tap for the IAT sensor but it was too small. The way I got the threads in is a little hairy(random pipe reducer).
With all that buttoned down, you can start on the alignment of the M112. You will need to pry the coolant crossover/bleeder line to clear the snout of the M112. Just do the same thing with the fuel rail, pry it little by little.
I didnt have my new belt yet so just use to old one and wrap it around the snout and 2 idlers. You can also see the idler I added. Just a spacer on the back side and a washer on the front, then I found a bolt long enough to work.
**** FOR THOSE OF YOU THAT HAVE TO DRILL YOUR PLATE *****
You can do it 1 of 2 ways, the dumb way or the smart way.
I did it the dumb way. I got the belt alignment completed then grabbed a sharpie marker and marked all the holes on the adapter plate. Drilled the holes and found out that only the front 2 holes lined up.... *anger face* Well I put the bolts in the front 2 holes and tightened them, then proceeded to drill each hole again... VERY CAREFULLY since the fuel rail is right below where your drilling.
The smart way would be to drill the front 2 holes, tighten the bolts and then drill the rest.
Now you can grab the M112 and apply a bead of RTV along the bottom of case. *I ran a bead of RTV and the metal gasket for the M112, but you can get away with just RTV* Place the M112 on the adapter and snug up the nuts/bolts. DONT TIGHTEN FULLY for at least an hour, let the RTV set up.
Last edited by Fink; 07-10-2011 at 10:18 AM.
 07-10-2011, 10:55 AM
#2
5th Gear Member
Thread Starter
Join Date: Jan 2008
Location: Canada
Posts: 3,306
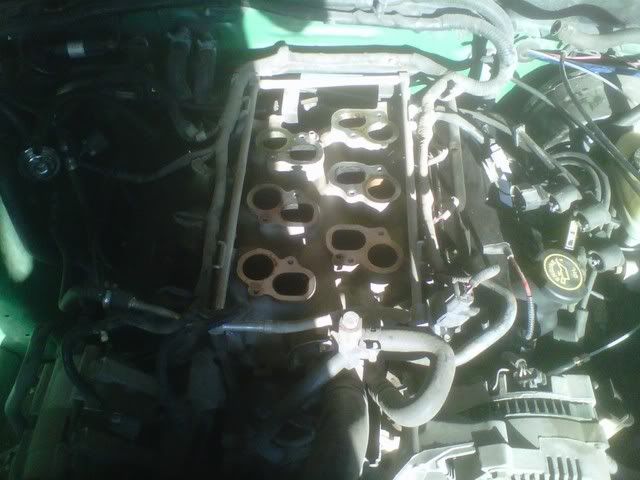
While you are waiting for the RTV to set up, take a break or continue on. I would start with the TB and plenum. *If you are relocating your IAC, do that before the TB/Plenum* I did not relocate my IAC so I installed it on the plenum. Put on the CAI and MAF. Hook up/lengthen any connectors that you can at this time.
I had to lengthen my IAC connector and add some wire to the IAT2 sensor pigtail. The IAT2 sensor gets spliced into the existing IAT sensor pigtail. If you have a 01-04 the wires for the IAT are with the MAF harness.
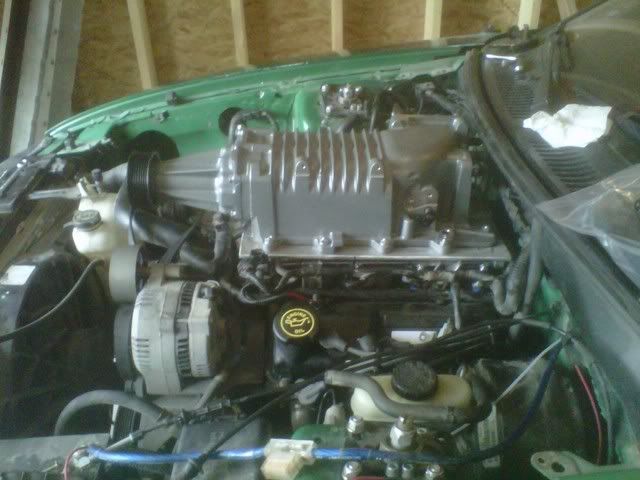
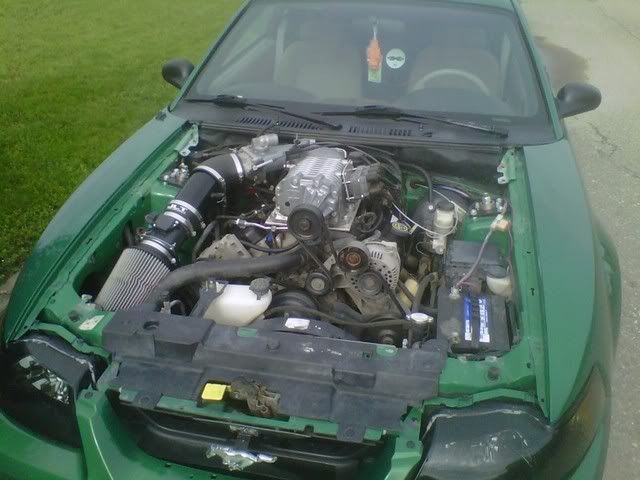
Now you can go back and tighten the bolts on the M112. You should have an engine that looks like this.

Now we can move to the other side. I mounted my coil pack on the case of the M112, I bought the M112 with the mounting bracket with it so I figured I might as well use it. Few nuts and bolts and it was mounted. I still need to get some brake line and make spacers so it sits straight, but it works.
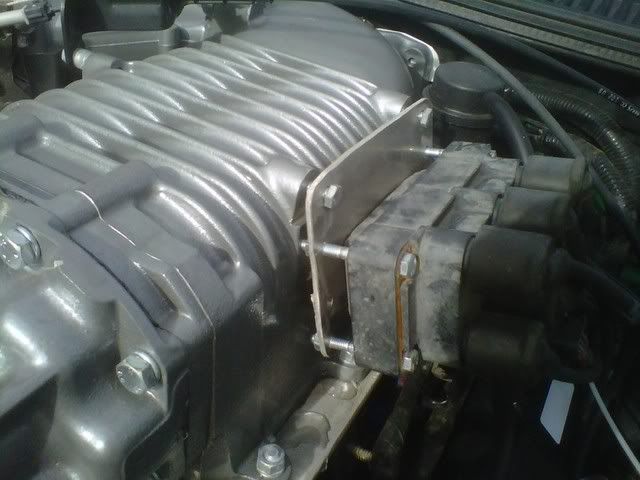
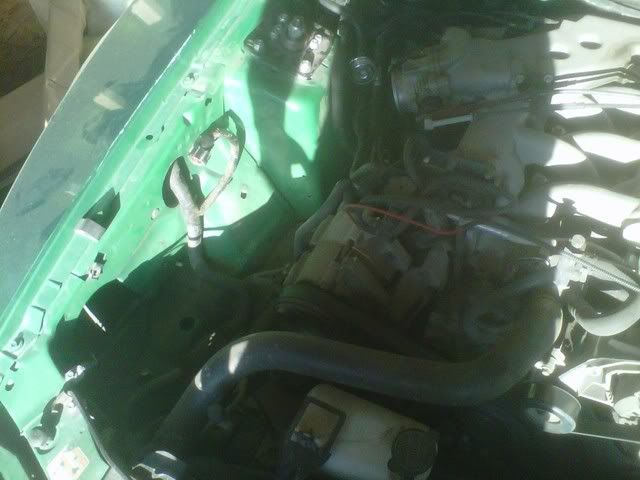
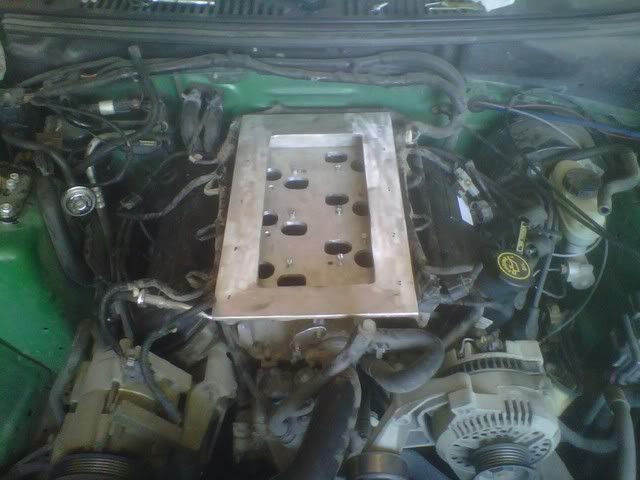
You can mount the boost bypass actuator now. Nothing hard about it, just make sure the arm is touching the stop. You will also see the block off plate I made for the IAT sensor hole that the Cobra's use, and the temporary EGR block off until the one I ordered comes in.
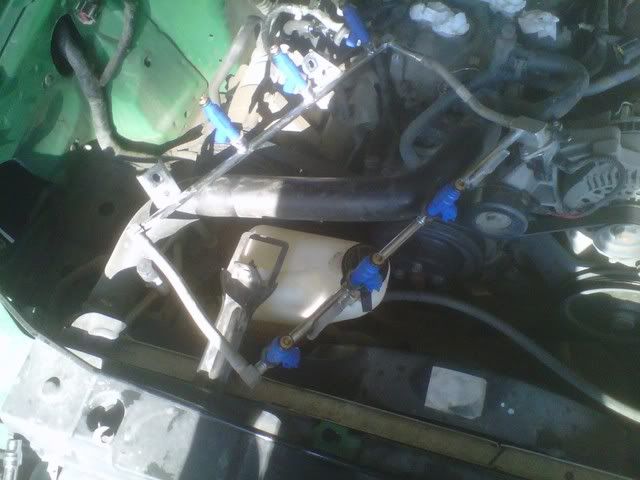
Now you can run your vac lines. Here is a diagram:
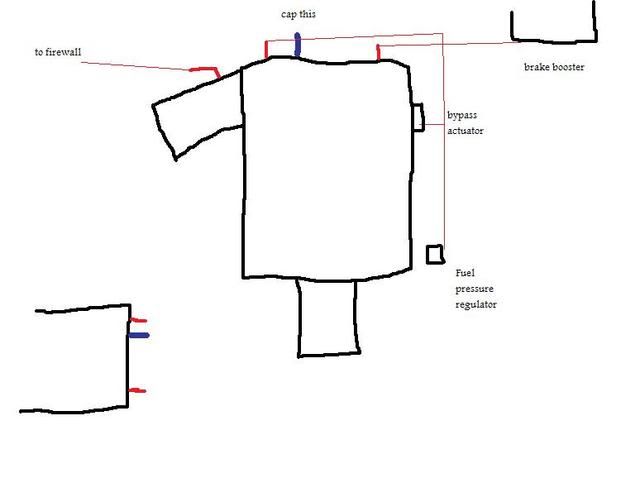
The line that runs from the plenum to the firewall, is the line that hooks up directly under the TB on the stock upper. Only 1 nipple on the bypass actuator needs to have a line ran to it, the other is left uncapped.
There is this on the passenger side, 2 lines going to a T with a short piece of hose on it(hooks up behind IAC on stock upper). I just ran a line from the one open end to the nipple on the CAI
With all the vac lines routed, you can now put on the new serpentine belt. Since I used the stock crank pulley and stock 3.65 pulley on the M112, I needed a 119" belt. Add oil to the M112 snout, if you need to. If you havent done so already, replace your throttle cable(99-00's only). Double, triple, quadruple check EVERYTHING.
***** I am not including a fuel pump install write up, so you will have to find one to install the fuel pump **** << *cough* Haynes manual *cough*
If everything is "flanged up", it would now be a good time to reconnect the battery and load up your base line tune. Fire it up and see how she sounds/runs.
I had to lengthen my IAC connector and add some wire to the IAT2 sensor pigtail. The IAT2 sensor gets spliced into the existing IAT sensor pigtail. If you have a 01-04 the wires for the IAT are with the MAF harness.
Now you can go back and tighten the bolts on the M112. You should have an engine that looks like this.
Now we can move to the other side. I mounted my coil pack on the case of the M112, I bought the M112 with the mounting bracket with it so I figured I might as well use it. Few nuts and bolts and it was mounted. I still need to get some brake line and make spacers so it sits straight, but it works.
You can mount the boost bypass actuator now. Nothing hard about it, just make sure the arm is touching the stop. You will also see the block off plate I made for the IAT sensor hole that the Cobra's use, and the temporary EGR block off until the one I ordered comes in.
Now you can run your vac lines. Here is a diagram:
The line that runs from the plenum to the firewall, is the line that hooks up directly under the TB on the stock upper. Only 1 nipple on the bypass actuator needs to have a line ran to it, the other is left uncapped.
There is this on the passenger side, 2 lines going to a T with a short piece of hose on it(hooks up behind IAC on stock upper). I just ran a line from the one open end to the nipple on the CAI
With all the vac lines routed, you can now put on the new serpentine belt. Since I used the stock crank pulley and stock 3.65 pulley on the M112, I needed a 119" belt. Add oil to the M112 snout, if you need to. If you havent done so already, replace your throttle cable(99-00's only). Double, triple, quadruple check EVERYTHING.
***** I am not including a fuel pump install write up, so you will have to find one to install the fuel pump **** << *cough* Haynes manual *cough*
If everything is "flanged up", it would now be a good time to reconnect the battery and load up your base line tune. Fire it up and see how she sounds/runs.
Last edited by Fink; 07-10-2011 at 10:58 AM.
07-10-2011, 11:16 PM
#3
5th Gear Member
Thread Starter
Join Date: Jan 2008
Location: Canada
Posts: 3,306
Installation time all depends on how fast you want to work. It took me 3 days of about 8 hrs total work time, mind you, I was working on the rear end as well.
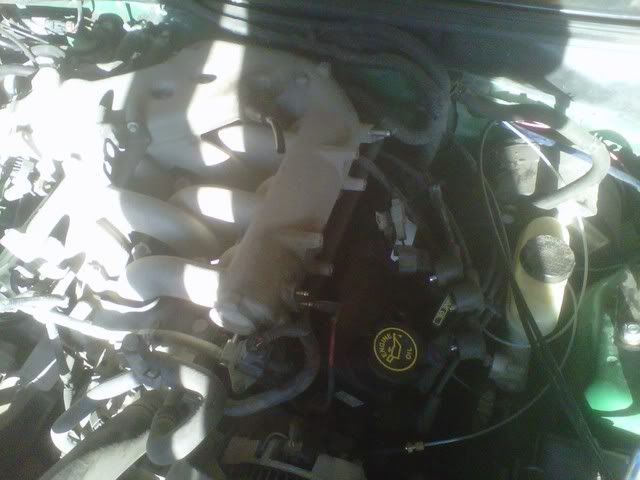
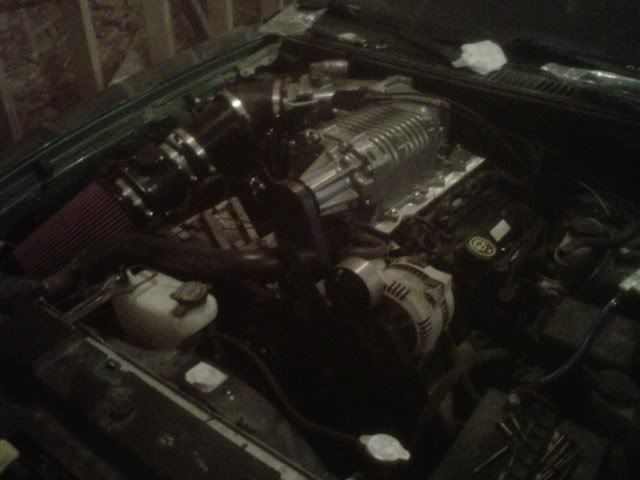
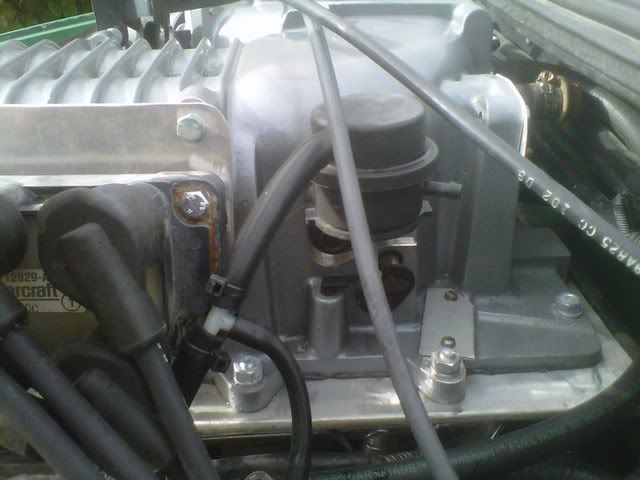
The T fitting you see in this pic is how I hooked my boost gauge up.
And I know the coil pack looks out of place, but I was sick of looking at all these parts, so I threw the M112 on. I was gonna save it for the 4.2 but couldnt resist.
The T fitting you see in this pic is how I hooked my boost gauge up.
And I know the coil pack looks out of place, but I was sick of looking at all these parts, so I threw the M112 on. I was gonna save it for the 4.2 but couldnt resist.
Last edited by Fink; 07-10-2011 at 11:19 PM.
07-11-2011, 08:01 PM
#4
5th Gear Member
Thread Starter
Join Date: Jan 2008
Location: Canada
Posts: 3,306
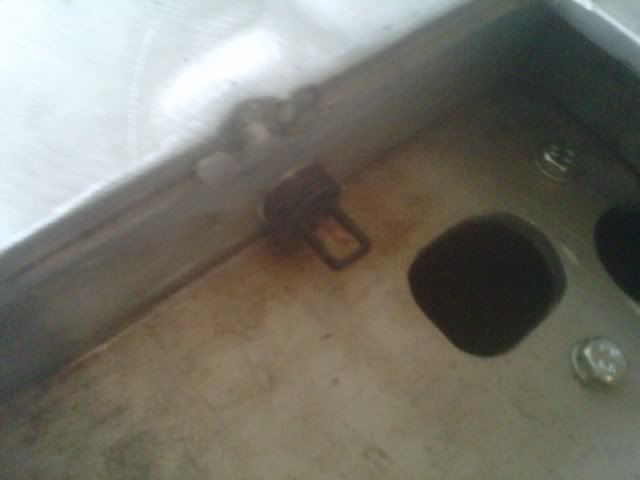
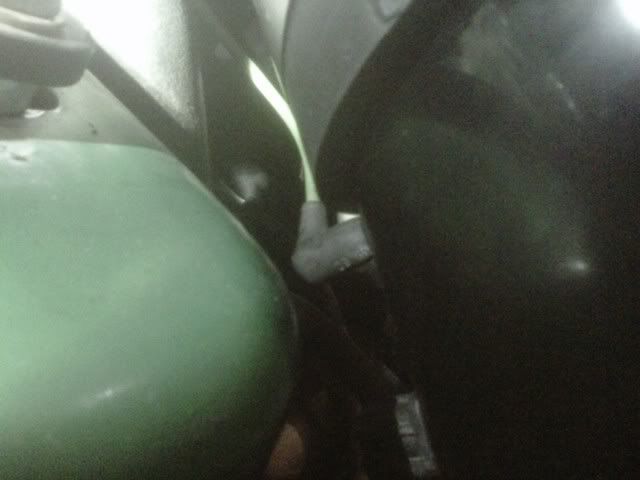
 .... How come you didn't keep the IAT sensor Eaton location??
If it works for Alex's build, then go that route. You could also use that hole for the boost gauge or T into a vac line like I did.

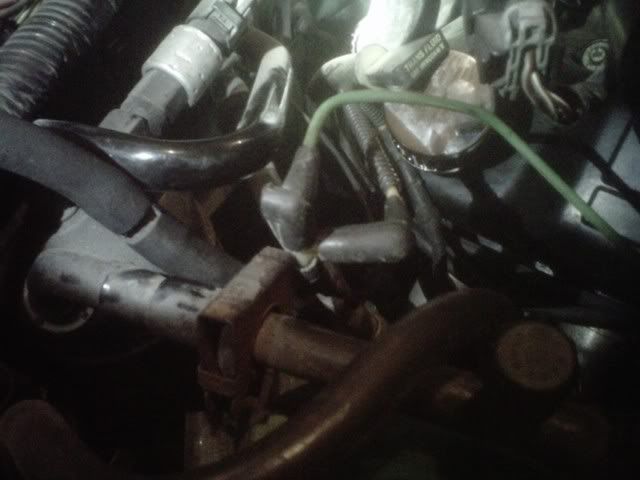
heres the hole.
Last edited by Fink; 07-11-2011 at 08:17 PM.

Thread
Thread Starter
Forum
Replies
Last Post
Galactic
Archive - Mustangs For Sale
10
04-29-2019 02:56 PM
Luke9222
4.6L General Discussion
19
10-22-2015 11:55 PM
ernesto-619
Mustang News, Concepts, Rumors & Discussion
0
09-10-2015 01:32 AM
MustangForums Editor
GT S197 General Discussion
1
09-03-2015 07:14 PM

