

 10-22-2015, 06:52 PM
Last edit by: IB Advertising
See related guides and technical advice from our community experts:
Browse all: Ford Mustang Interior Guides
- Ford Mustang V6 2005-2014: Why is My Dash Clicking?
Step by step instructions for do-it-yourself repairs.
Browse all: Ford Mustang Interior Guides

Clicking noise under dash: Defrost door actuator
01-02-2015, 04:42 PM
#1
5th Gear Member
Thread Starter
Join Date: Sep 2007
Location: Nor Cali
Posts: 2,059
A clicking noise started under my dash about two weeks ago. It would happen when the ignition key is turned to the on position or when the climate control mode selector was turned from the off position to vent/floor, vent or max a/c. Anything to the right of the off position didn't make the noise. I discovered from Googling that it was one of my blend door actuators. It turned out to be one of the most difficult to reach which is the defrost door actuator located up high behind the passenger air bag. I knew it was the right one because I could feel it clicking when reaching my hand under the dash to search for it. I ordered a new one from http://www.ebay.com/itm/321605517324?_trksid=p2059210.m2749.l2649&ssPageName=STRK%3AMEBIDX%3AIT for $15.51 w/free shipping. You can also get one at Rockauto.
I was able to replace the actuator today. It took about an hour. I disconnected the battery just in case since I was working near the air bag assembly. There's only two 8mm hex screws. There's limited space to work so if you have chubby hands you might want to have someone else do it for you or you'll be shouting expletives at your car. lol
Some pics...
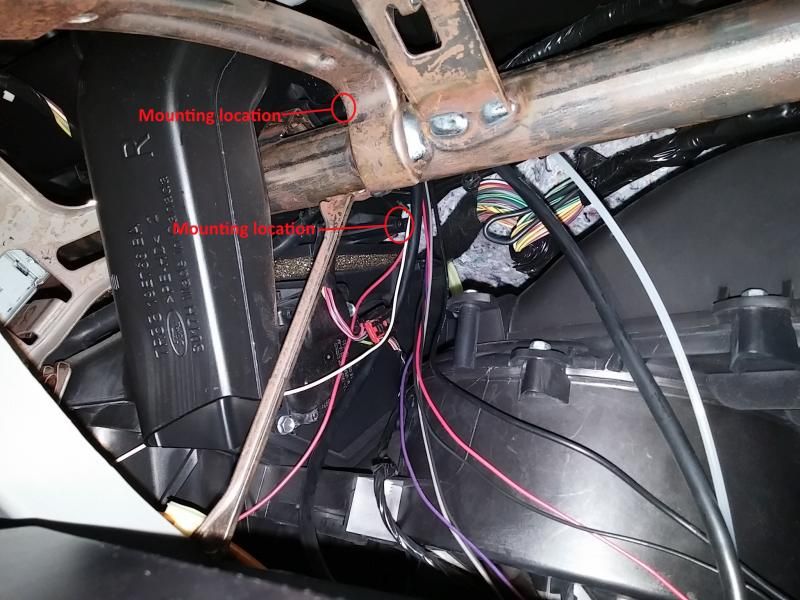
After I removed the actuator. You'll need to lower the glove box door to get to this area. There's an arm that operates the defrost vent located between the two mounting locations. Reach up in there and feel for it. Make sure it's in the forward postion (Pointing towards front of car) before installing the new unit. The arm on the actuator links with this vent arm.

Disassembled the bad actuator
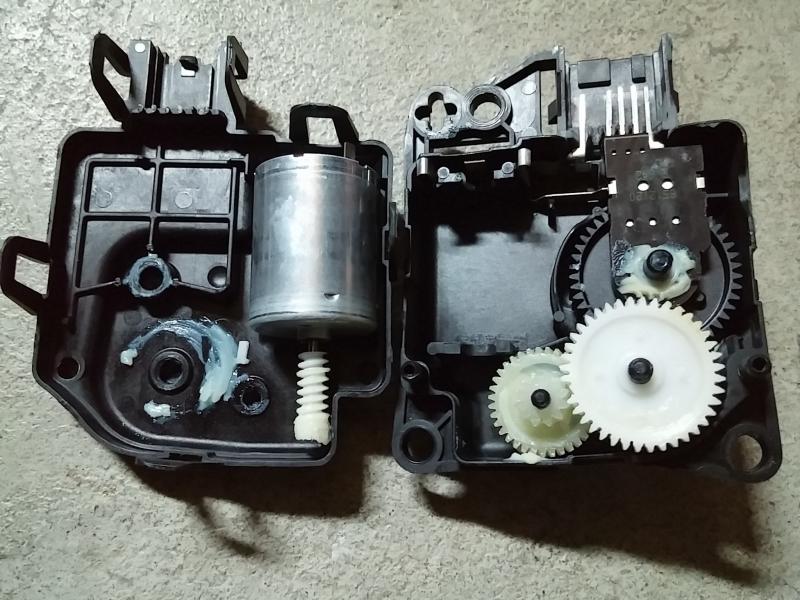
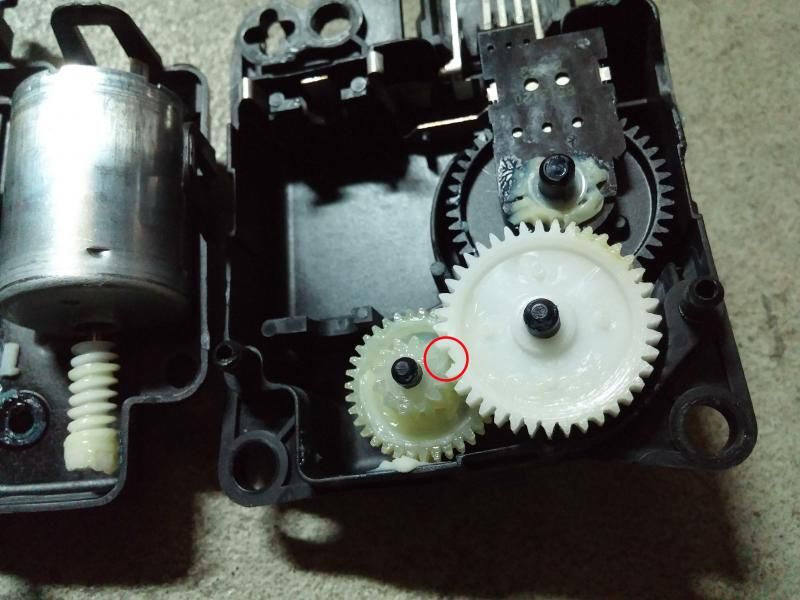
Broken tooth
Removal instructions
http://iihs.net/fsm/?dir=336&viewfil...ost%20Door.pdf
HAPPY NEW YEAR!!!
I was able to replace the actuator today. It took about an hour. I disconnected the battery just in case since I was working near the air bag assembly. There's only two 8mm hex screws. There's limited space to work so if you have chubby hands you might want to have someone else do it for you or you'll be shouting expletives at your car. lol
Some pics...
After I removed the actuator. You'll need to lower the glove box door to get to this area. There's an arm that operates the defrost vent located between the two mounting locations. Reach up in there and feel for it. Make sure it's in the forward postion (Pointing towards front of car) before installing the new unit. The arm on the actuator links with this vent arm.

Disassembled the bad actuator

Broken tooth

Removal instructions
http://iihs.net/fsm/?dir=336&viewfil...ost%20Door.pdf
HAPPY NEW YEAR!!!
Last edited by 2007CalSpec; 01-03-2015 at 02:25 AM.
 01-02-2015, 11:31 PM
#4

Join Date: Jan 2015
Location: Arizona
Posts: 1
I replaced two actuators this week on my son's 2007 Mustang GT. The one on the passanger side was a little rough but the one on the drivers side was a pain in the ***! the top screw is almost impossible to get to with a socket, or any wrench for that matter. I took out the instrument cluster and stuck a wedge between the metal support bar and the vent duct. With the wedge pushing up on the vent duct I was able to get a small socket on the top screw(bolt). I layed on my back and put my right arm over the backside of the steering shft which helped a lot too. Disconnect the wire to the brake pedal too, that helps, so it's out of your way. Bring your patience too, it takes a while to get that screw out one click on the ratchet at a time, lol.
01-03-2015, 11:49 AM
#5
5th Gear Member
Thread Starter
Join Date: Sep 2007
Location: Nor Cali
Posts: 2,059
I replaced two actuators this week on my son's 2007 Mustang GT. The one on the passanger side was a little rough but the one on the drivers side was a pain in the ***! the top screw is almost impossible to get to with a socket, or any wrench for that matter. I took out the instrument cluster and stuck a wedge between the metal support bar and the vent duct. With the wedge pushing up on the vent duct I was able to get a small socket on the top screw(bolt). I layed on my back and put my right arm over the backside of the steering shft which helped a lot too. Disconnect the wire to the brake pedal too, that helps, so it's out of your way. Bring your patience too, it takes a while to get that screw out one click on the ratchet at a time, lol.
01-06-2015, 09:43 AM
#6
1st Gear Member

Join Date: Apr 2007
Posts: 83
I replaced the same actuator as the OP last year. Now it sounds like I have several clicking. Does anyone know how many total actuators there are and the associated part numbers? (616A & 616B?) I think there are three but am not sure. I am thinking I will just replace them all and be done with it for a little while anyway.
Jon
Jon
01-06-2015, 10:01 AM
#7
Gentleman's Relish

Join Date: Feb 2005
Location: AZ
Posts: 13,090
There are Four actuators, left and right side of the center stack up high behind the dash (left/driver controls from panel to floor, right/passenger controls panel to defrost vents), center stack down by your feet right side controls the temperature (temperature blend door), and a fourth one by the blower motor (under the dash) that controls the recirculation.
To everyone complaining about how hard these are to replace...just be glad you don't own a GM vehicle.
You have to remove the dash to replace many of them and in order to remove the dash, the center console and passenger air bag also have to come out.
Also, you guys should be doing the actuator motor calibration procedure after you replace an actuator to avoid messing up your newly replaced motor(s)....
::The purpose of the module actuator position calibration is to allow the HVAC module to reinitialize and calibrate the actuator stop points. To carry out calibration, carry out the following steps.
1.Remove Smart Junction Box (SJB) fuse 10 and 12 for at least one minute.
2. Turn the ignition switch to the ON position, the HVAC module will initialize and calibrate the actuators. Calibration of the actuators will take approximately 30 seconds.
3. Remove the key
4.Reinstall SJB fuse 10 and 12.
5. Turn the ignition switch to the ON position and wait 30 seconds before verifying correct actuator operation.
I did this when my vents got stuck on defrost one morning. They would not adjust to any other setting and there were no clicks. Fixed it after the second try.
Last edited by Derf00; 09-16-2016 at 02:22 PM. Reason: Fixed number and location of each.
01-06-2015, 10:02 PM
#8
5th Gear Member
Thread Starter
Join Date: Sep 2007
Location: Nor Cali
Posts: 2,059
There are three actuators, Blend door, Defrost, and I forget the third one. To everyone complaining about how hard these are to replace...just be glad you don't own a GM vehicle.
You have to remove the dash to replace many of them and in order to remove the dash, the center console and passenger air bag also have to come out.
Also, you guys should be doing the actuator motor calibration procedure after you replace an actuator to avoid messing up your newly replaced motor(s)....
::The purpose of the module actuator position calibration is to allow the HVAC module to reinitialize and calibrate the actuator stop points. To carry out calibration, carry out the following steps.
1.Remove Smart Junction Box (SJB) fuse 10 and 12 for at least one minute.
2. Turn the ignition switch to the ON position, the HVAC module will initialize and calibrate the actuators. Calibration of the actuators will take approximately 30 seconds.
3. Remove the key
4.Reinstall SJB fuse 10 and 12.
5. Turn the ignition switch to the ON position and wait 30 seconds before verifying correct actuator operation.
I did this when my vents got stuck on defrost one morning. They would not adjust to any other setting and there were no clicks. Fixed it after the second try.
10-28-2015, 12:56 AM
#9

Join Date: Apr 2015
Location: California
Posts: 2
A clicking noise started under my dash about two weeks ago. It would happen when the ignition key is turned to the on position or when the climate control mode selector was turned from the off position to vent/floor, vent or max a/c. Anything to the right of the off position didn't make the noise. I discovered from Googling that it was one of my blend door actuators. It turned out to be one of the most difficult to reach which is the defrost door actuator located up high behind the passenger air bag. I knew it was the right one because I could feel it clicking when reaching my hand under the dash to search for it. I ordered a new one from Ebay for $15.51 w/free shipping. You can also get one at Rockauto.
I was able to replace the actuator today. It took about an hour. I disconnected the battery just in case since I was working near the air bag assembly. There's only two 8mm hex screws. There's limited space to work so if you have chubby hands you might want to have someone else do it for you or you'll be shouting expletives at your car. lol
Some pics...
After I removed the actuator. You'll need to lower the glove box door to get to this area. There's an arm that operates the defrost vent located between the two mounting locations. Reach up in there and feel for it. Make sure it's in the forward postion (Pointing towards front of car) before installing the new unit. The arm on the actuator links with this vent arm.
Disassembled the bad actuator

Broken tooth
Removal instructions
http://iihs.net/fsm/?dir=336&viewfil...ost%20Door.pdf
HAPPY NEW YEAR!!!
I was able to replace the actuator today. It took about an hour. I disconnected the battery just in case since I was working near the air bag assembly. There's only two 8mm hex screws. There's limited space to work so if you have chubby hands you might want to have someone else do it for you or you'll be shouting expletives at your car. lol
Some pics...
After I removed the actuator. You'll need to lower the glove box door to get to this area. There's an arm that operates the defrost vent located between the two mounting locations. Reach up in there and feel for it. Make sure it's in the forward postion (Pointing towards front of car) before installing the new unit. The arm on the actuator links with this vent arm.
Disassembled the bad actuator
Broken tooth
Removal instructions
http://iihs.net/fsm/?dir=336&viewfil...ost%20Door.pdf
HAPPY NEW YEAR!!!