13" Cobra Brakes Writeup
 09-29-2010, 03:10 AM
#1

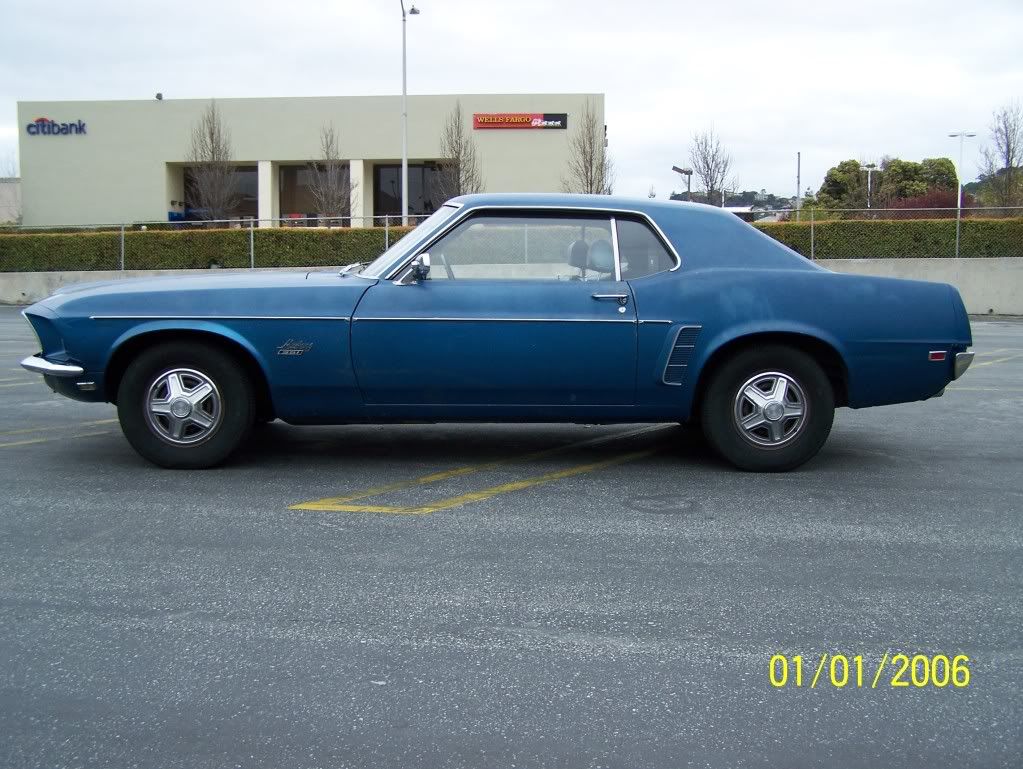
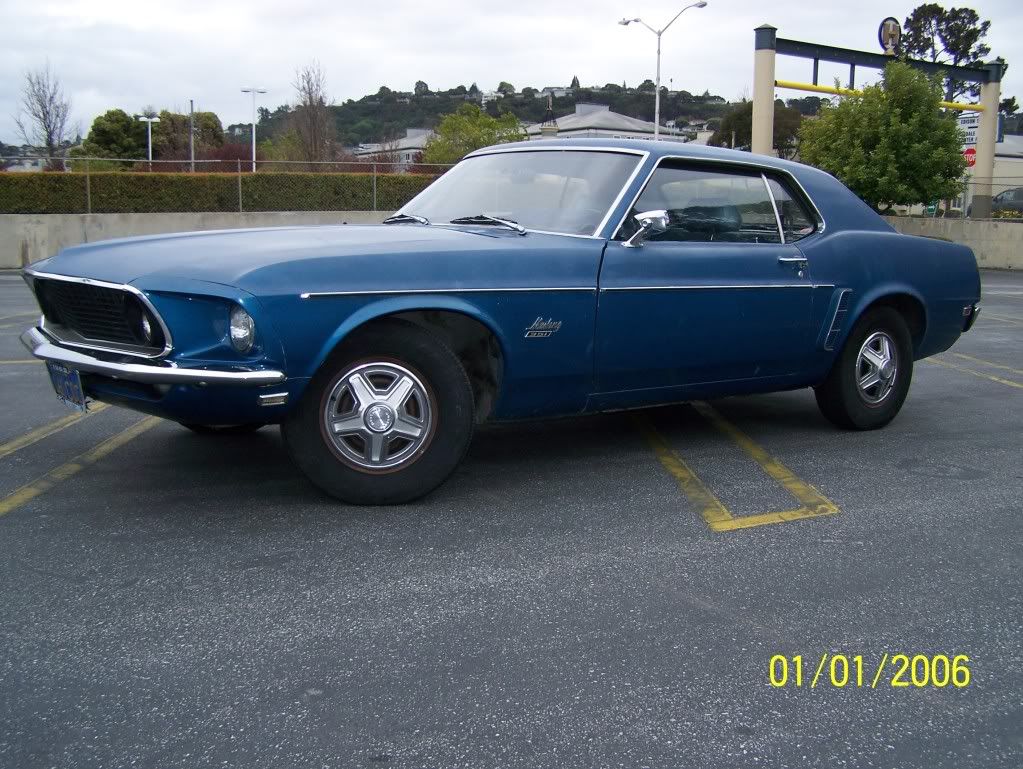
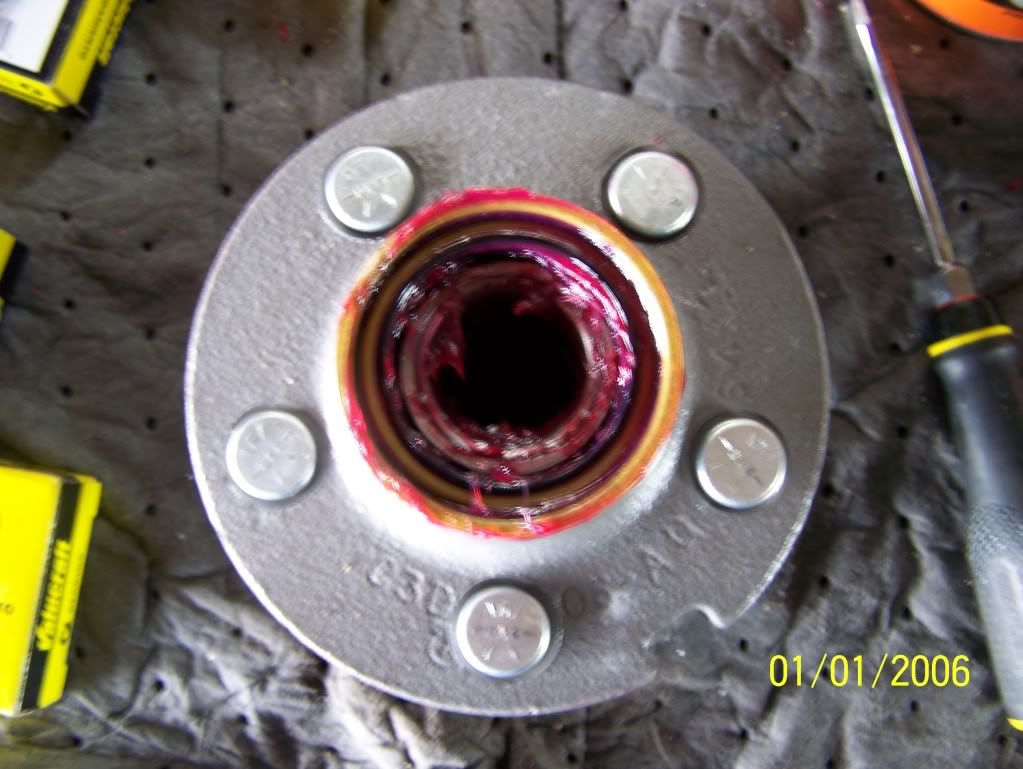
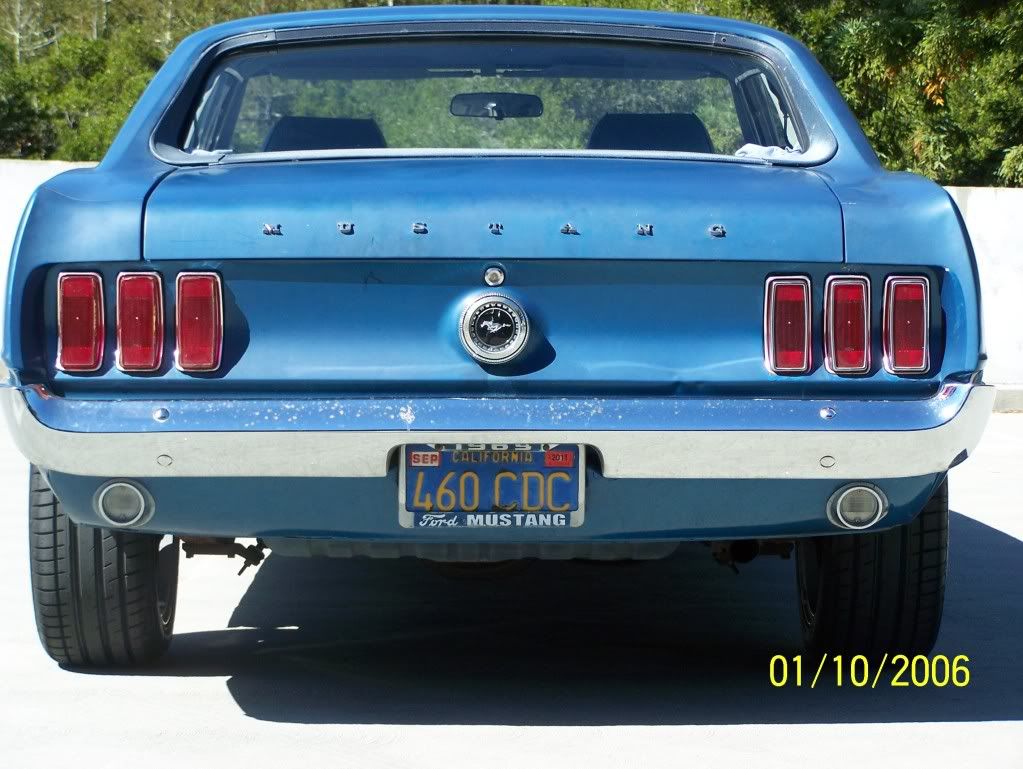
Here it is! My first official write up. As the title says, I did the 13" cobra brake conversion for my 1969 coupe. I'll start from the beginning and work my way towards the end. So I purchased the kit from StreetorTrack.com, and with the options I selected the total for the conversion was a little under $1200. I got all the bracketry, the calipers, solid rotors, all hardware, new master cylinder, bearing grease, flex lines, all bearings, new hubs, everything you think looks new in the pictures is. Here are the "Before" pics
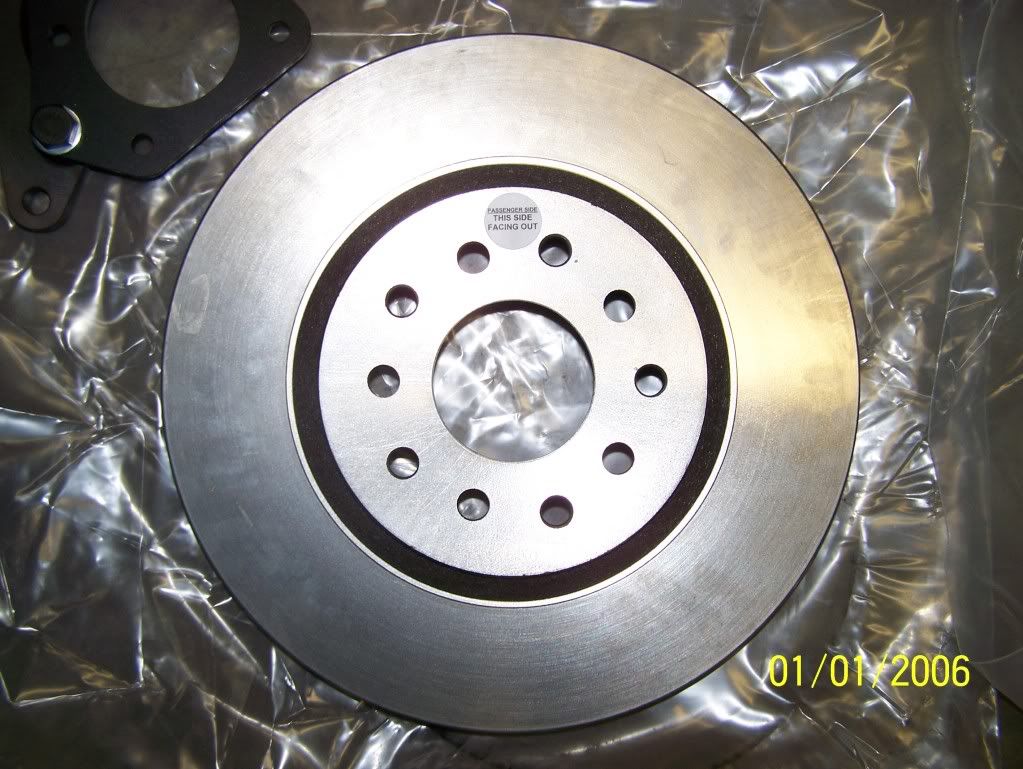
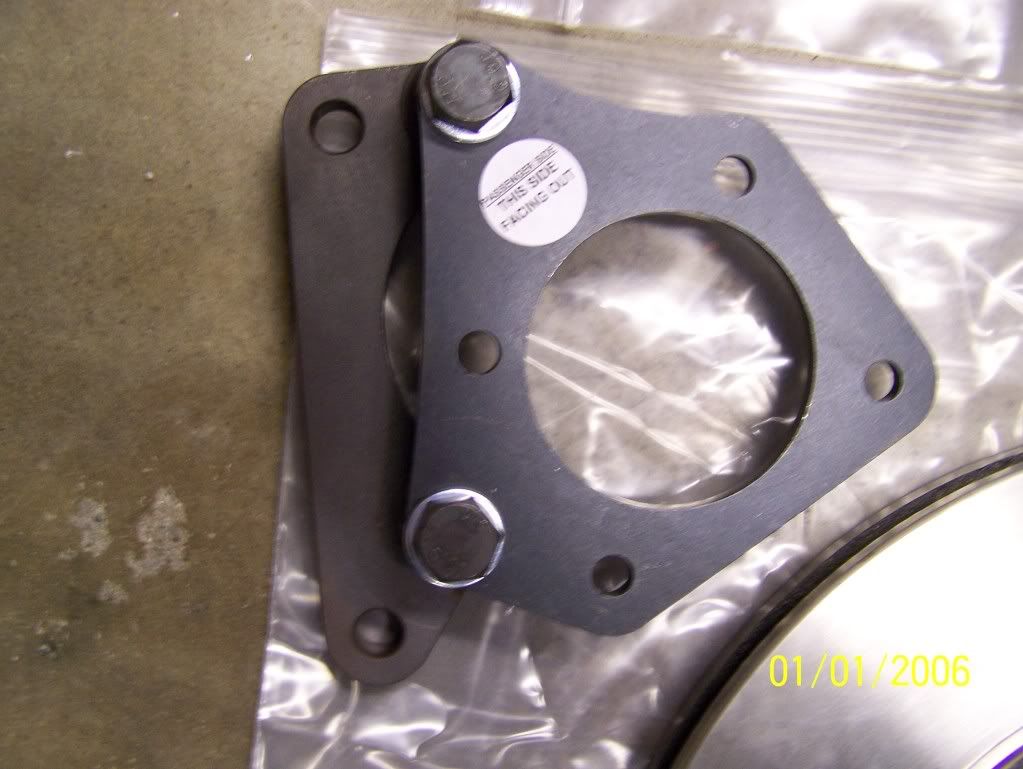
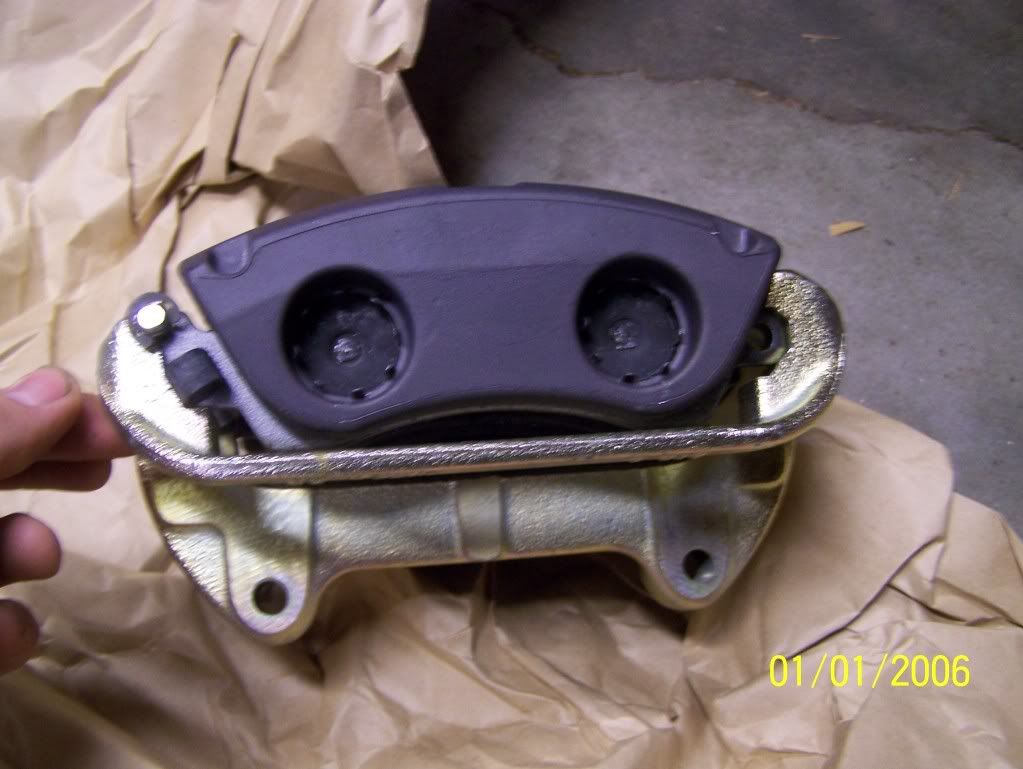
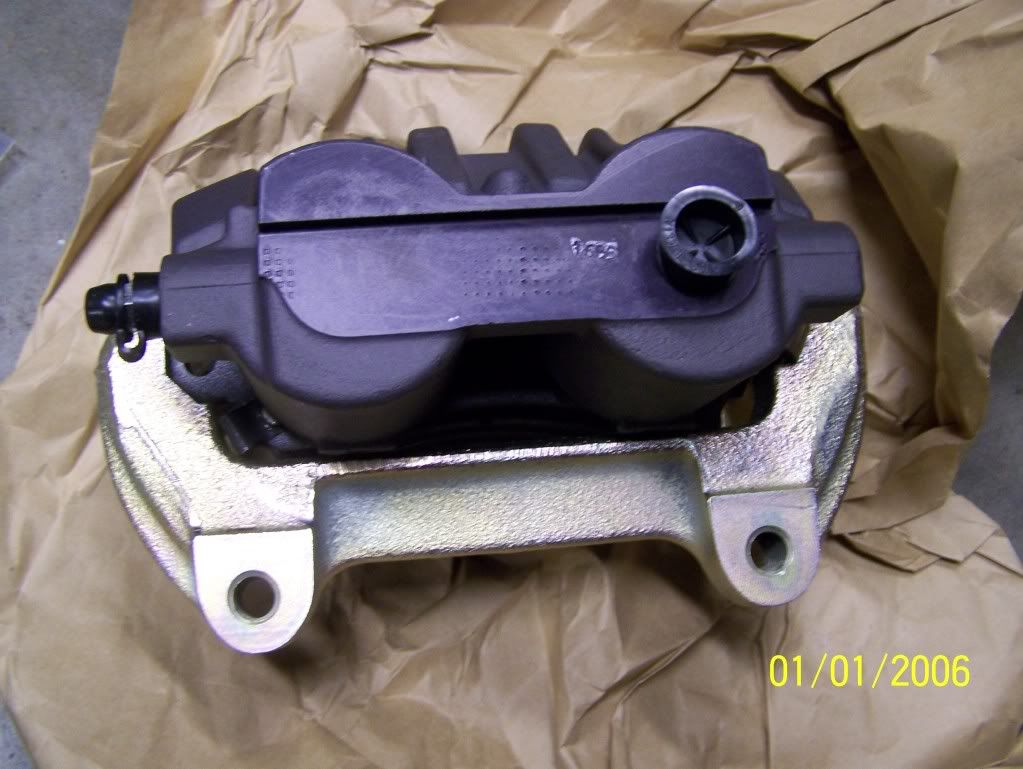
Here is pictures of the parts (for a picture of the hubs look on)
Ok so the install begins with you taking off all the old brake components. This includes removing all the drum components, as well as the hard lines from the master cylinder to the distribution block. This was all very easy, with two exceptions. By far the most frustrating thing with this part was loosening the old fittings where the hard lines meet the flex lines. One came off with a good tug, but (like always) the other side wouldn't budge even after dousing it with penetrating grease and having someone help. The factory brackets which hold the hard line to flex line fittings are made out of really soft metal, and they bend really easily so that doesn't help either. Luckily my pops uses his hands for a living, and he suggested heating it up with a torch. After heating up the old fittings for 30 seconds-ish they came right out. NOTE: I would suggest doing this ahead of time even before you try loosening them, that way you do not risk rounding the fitting on the original hard line. I didn't round mine (thank goodness) but the one side didn't look pretty after finally getting it out.
The next "problem" I encountered with the removal of old brake components was when I tried removing the old brake rod out of the master cylinder. So I took off the original master cylinder, but the bulb on the rod (which is inside of the piston assembly) was holding it in. Other brake rods that I have seen just fit inside the master cylinder and come out with the removal of a clip, or sometimes the brake rod just comes out when you pull the master cylinder away from the firewall. So I detached the brake rod from underneath the dash NOTE ay attention to how the brake switch and everything is mounted, this will save you the time of having to look it up later. There is a clip thingy that holds everything on the brake pedal assembly. Once you have the rod off the pedal assembly, the master cylinder can be removed from the hood area. This is where I started to worry a bit. So first I had to remove the piston assembly from the master cylinder body, which was easy.
After that, I could see that the brake rod was not held in by a clip like I was expecting. Ford as well as many other auto manufacturers produced master cylinders which have a clip holding the brake rod on at the side closest to the mounting tabs, mine did not, trust me. So after 20 minutes of dremeling (very carefully of course) and tapping I could see that at the very end of the piston assembly the metal casing was formed to hold the "bulb" of the brake rod in. There was a tiny clip in this section, and it technically does hold the brake rod in the master cylinder. However, the tolerance around the brake rod is FAR too tiny to be able to reach this clip without first cutting the whole piston assembly open. Not designed to ever be removed. At this point I was worried because there was no mention of having to do this in the instructions, so I was thinking the brake rod would be the wrong length for the new master cylinder. The bulb of the rod did however fit perfectly inside the master cylinder.
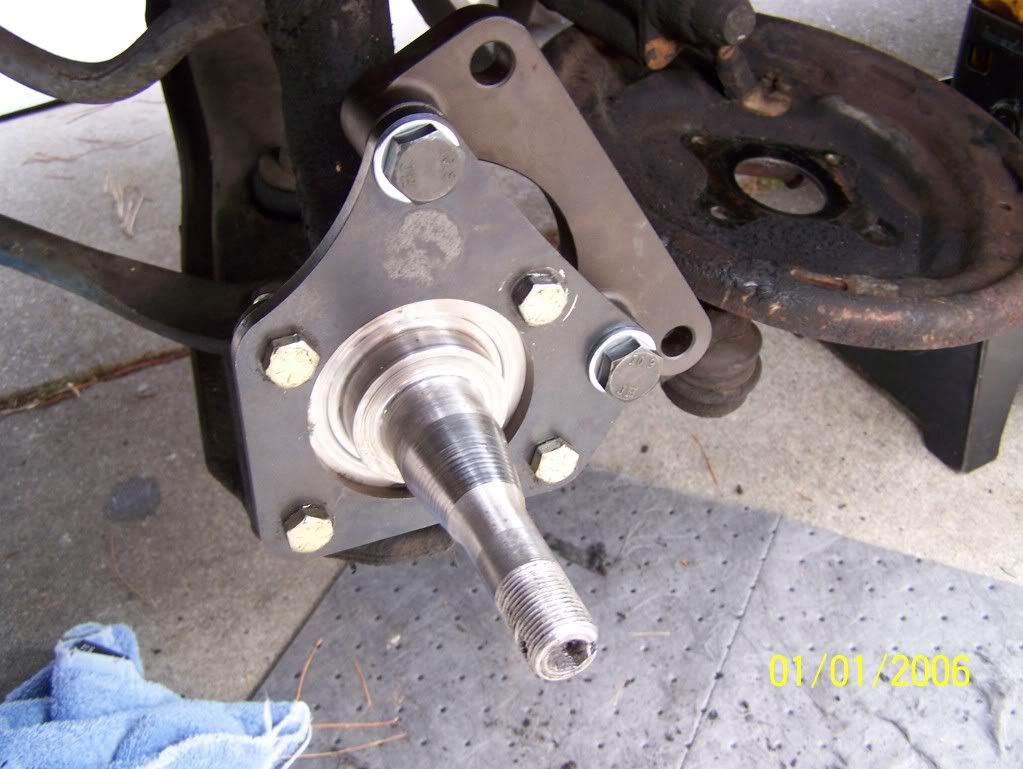
Next I cleaned the spindle mounting surface with a wire brush, and began mounting the brackets included in the kit. This is as straightforward as it comes, but I ran into a very time consuming problem. I finger tightened all the bolts/nuts on the driver's side, then instantly began using a torque wrench set at the proper lb/ft (can't remember what it is off hand right now) and 3 out of 4 bolts went in perfectly. One bolt stripped without ever even tightening at all. I have never seen a large size bolt strip so easily before undertaking this project. I still cannot believe this happened ESPECIALLY when I was being smart and using the torque wrench right away. I would be lying if I said I wasn't questioning my purchase at this point. So again out came the dremel to destroy the nut (and the bolt in the process). After working on that for what seemed like forever, going to the hardware store to get a replacement nut, bolt, and washer (I added the washer because the original nuts were the self-gripping type, and the replacement was not) I had all the bracketry installed.
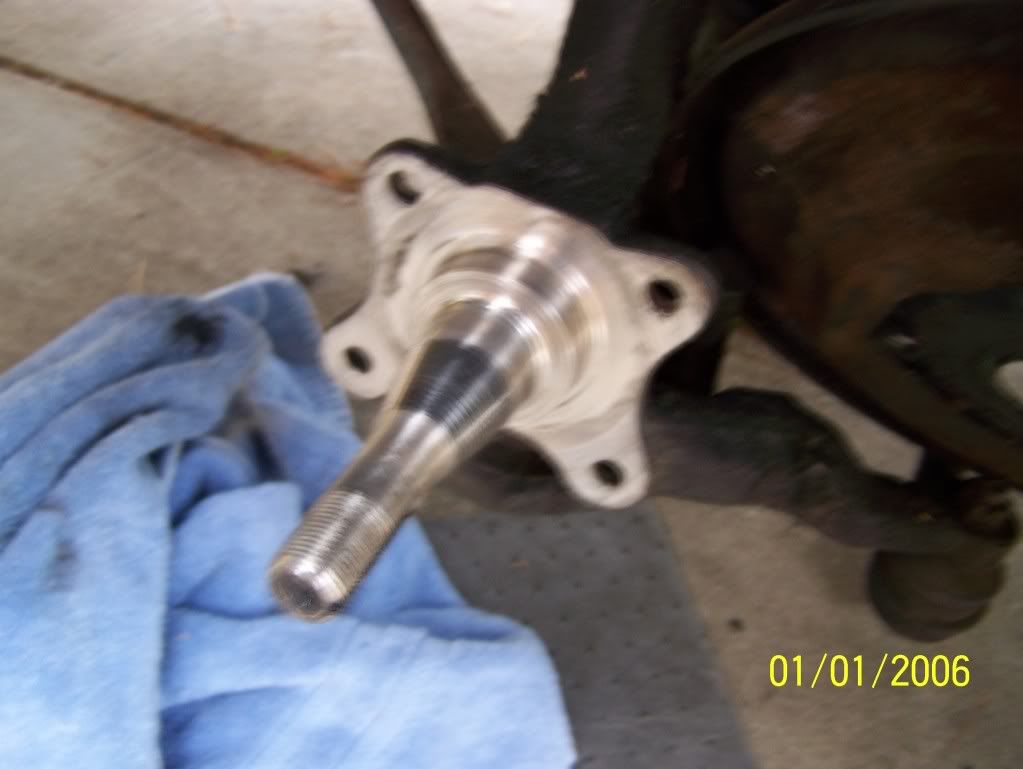
This is where I packed the bearings with grease, put them into the hubs, and hammered the seals in carefully using a wood 2x4 between the hub and the mallet. Then i carefully pushed the hubs onto the spindles, making sure they were fully seated properly, and tightening them just right (1/4 turn counter clockwise from where the castle nut stopped). After doing this to both sides, I slid on the hub centric adaper shim onto the hub, and slid the rotors on.
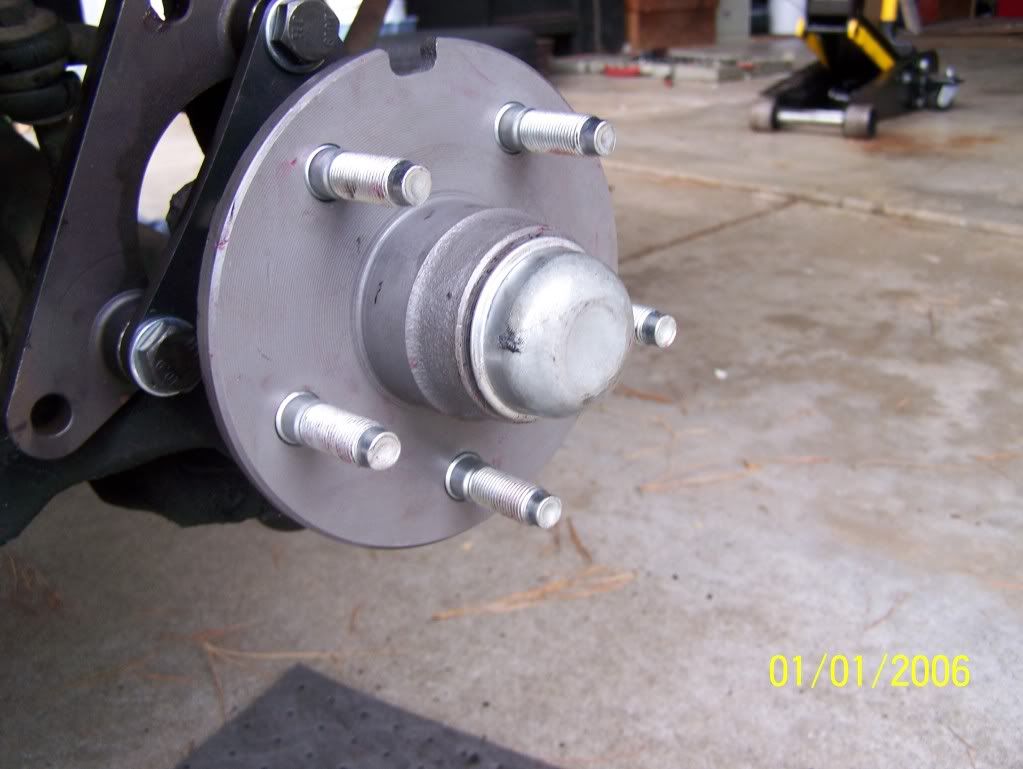

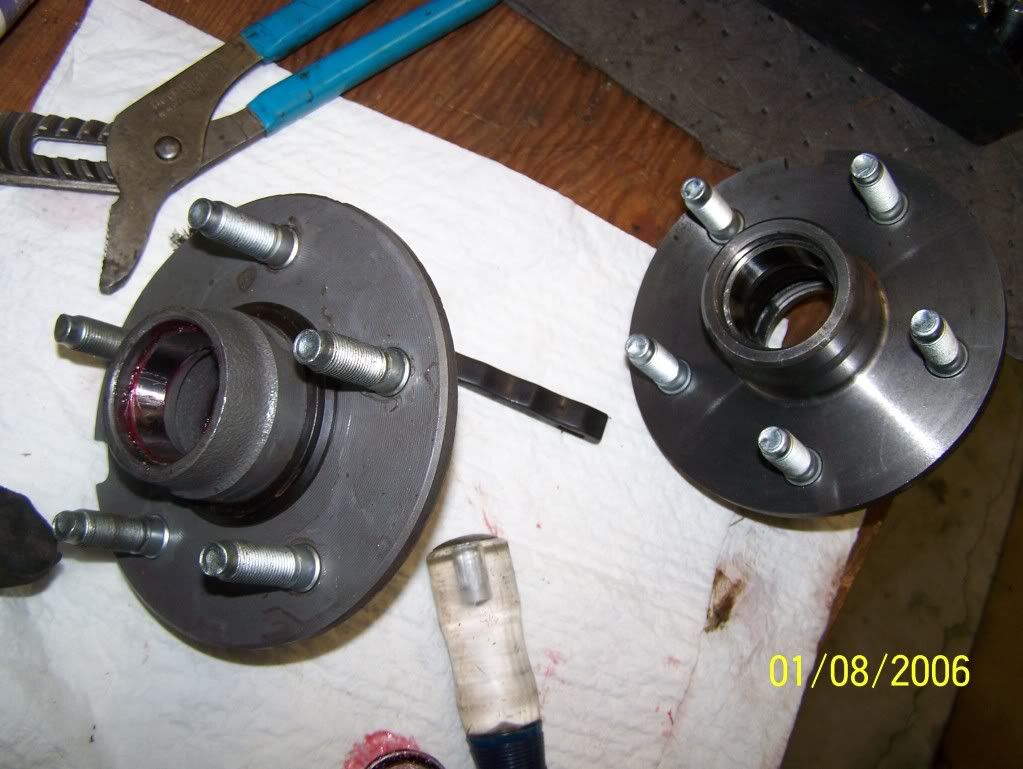
The installation of the calipers was next. To get them to fit over the rotors, I had to push the pads inward with my fingers to make space. Torqued them to spec, and done. This step was really easy, but here is where I ran into another big problem. While I was installing the passenger side caliper, my hand slipped and my elbow knocked one of the wheel studs out of the hub. I knew this was a huge problem instantly. On the same hub, one other wheel stud came out after giving it a firm bop with a rubber mallet. Wheel studs are not just supposed to pop out like that. Defective hub. I gave Shaun at StreetorTrack a call, and he instantly began piecing together a new hub to send out to me free of charge. This delayed my progress ALOT, for obvious reasons (waiting for the replacement to arrive). The new one came a few days later, but I wasn't able to continue working on the car til 7 days after I discovered that my hub was defective.
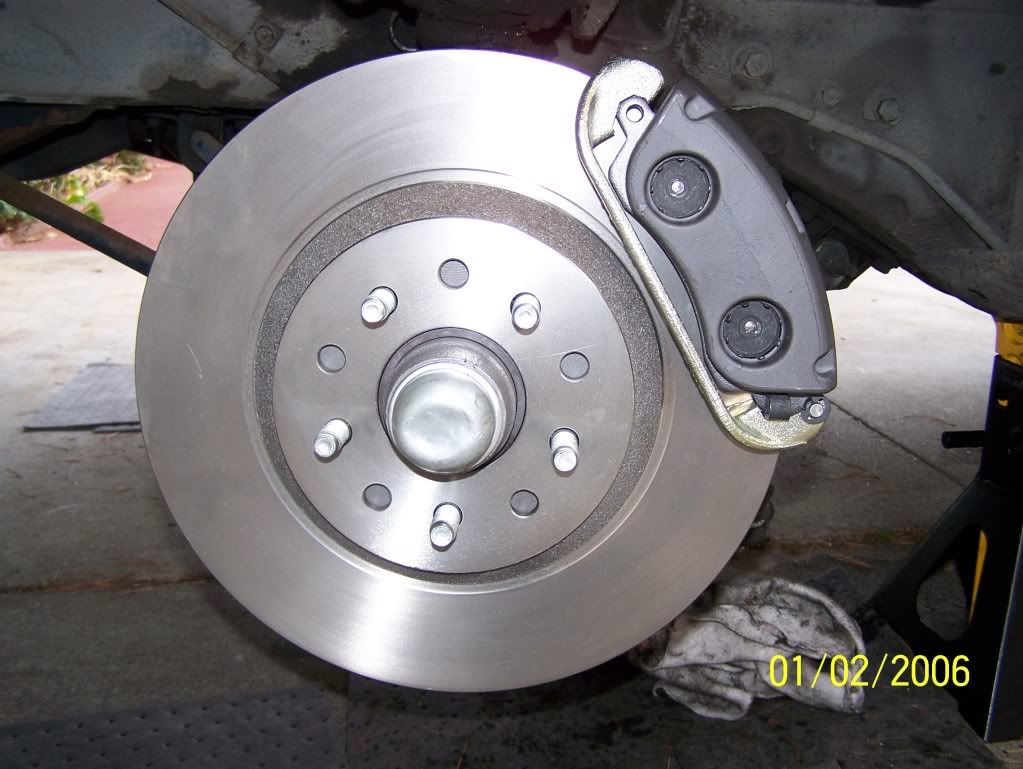
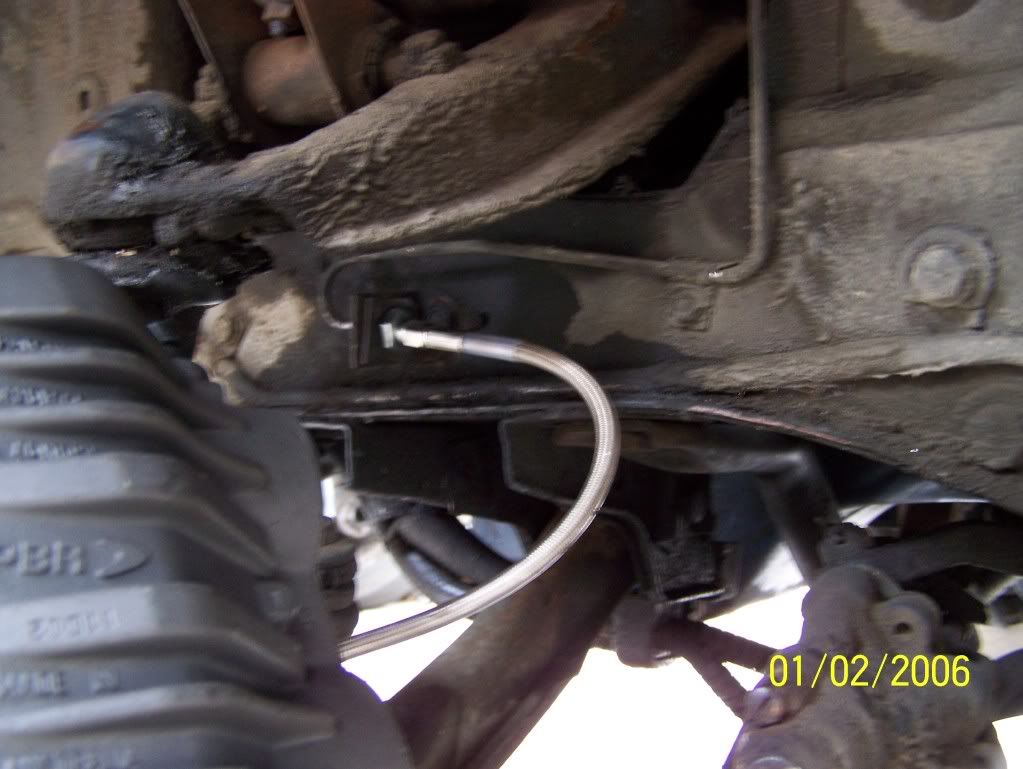
When the new hub came, it appeared different so I called Shaun again and he said that the replacement was the newer style hub. Same dimensions and everything, but different edges/coloring. Then I installed the replacement hub, hub centric adapter, rotor, caliper, and flex lines to both sides (using included banjo bolts+washers). After bench bleeding the master cylinder, I went ahead and bolted it up to the firewall, installed the brake rod from underneath the dash, reconnected the brake switch and plastic washers, then I tested to make sure the brake rod cannot come out of the master cylinder from upward travel of the brake pedal. All seemed right.
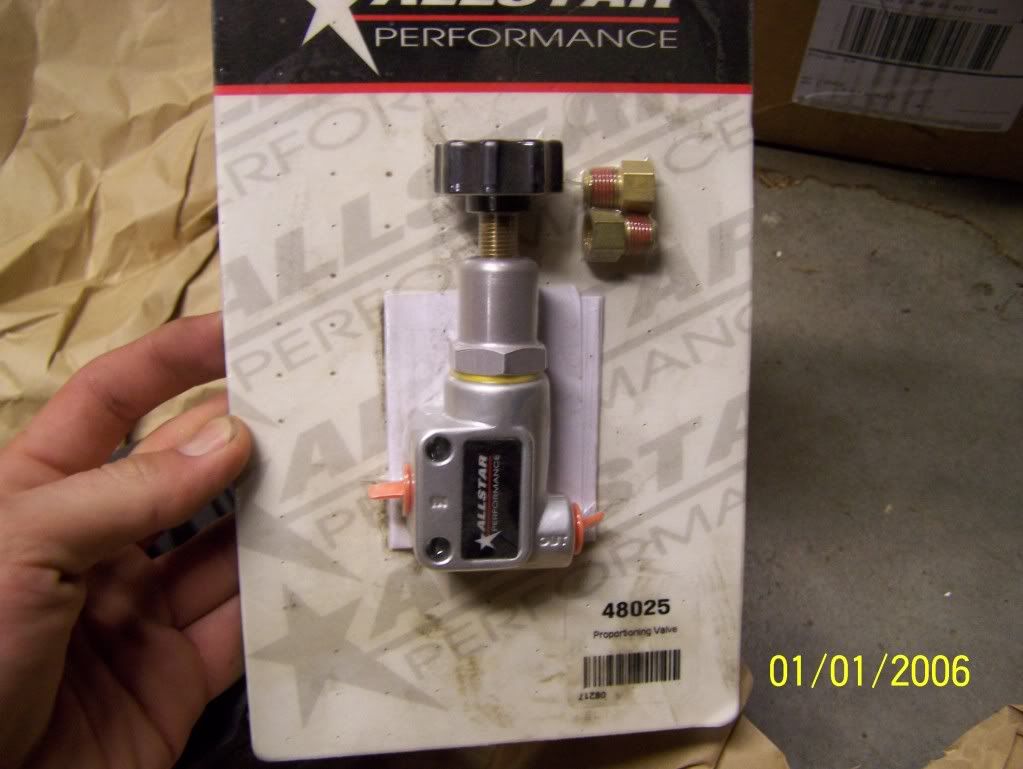
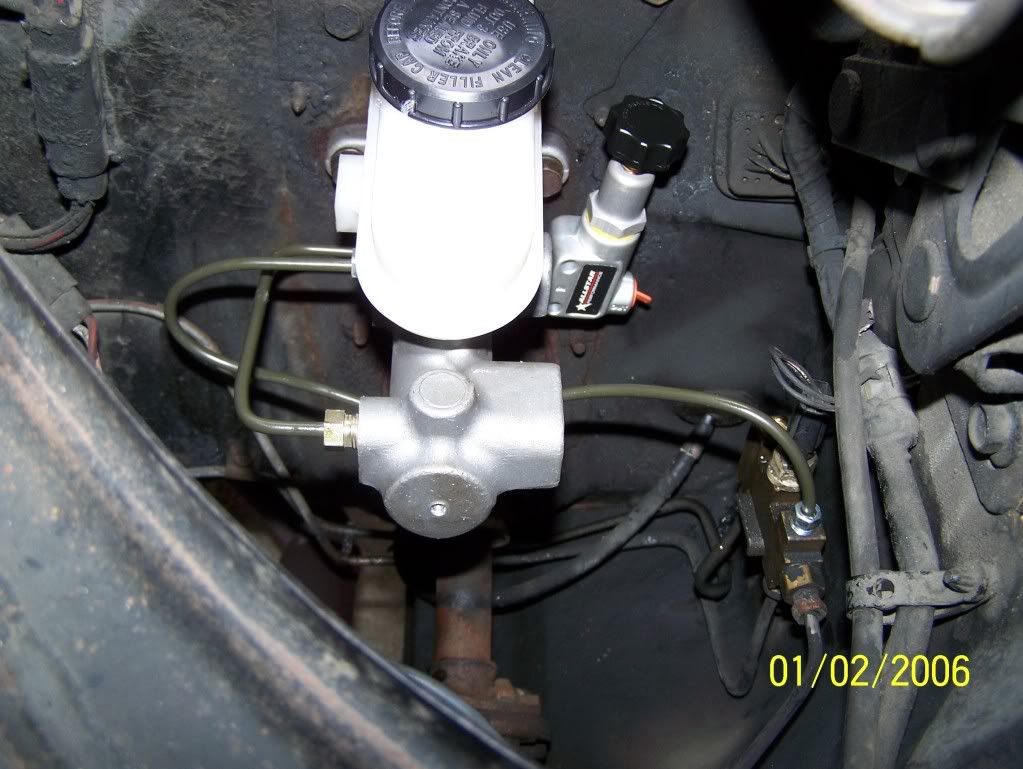
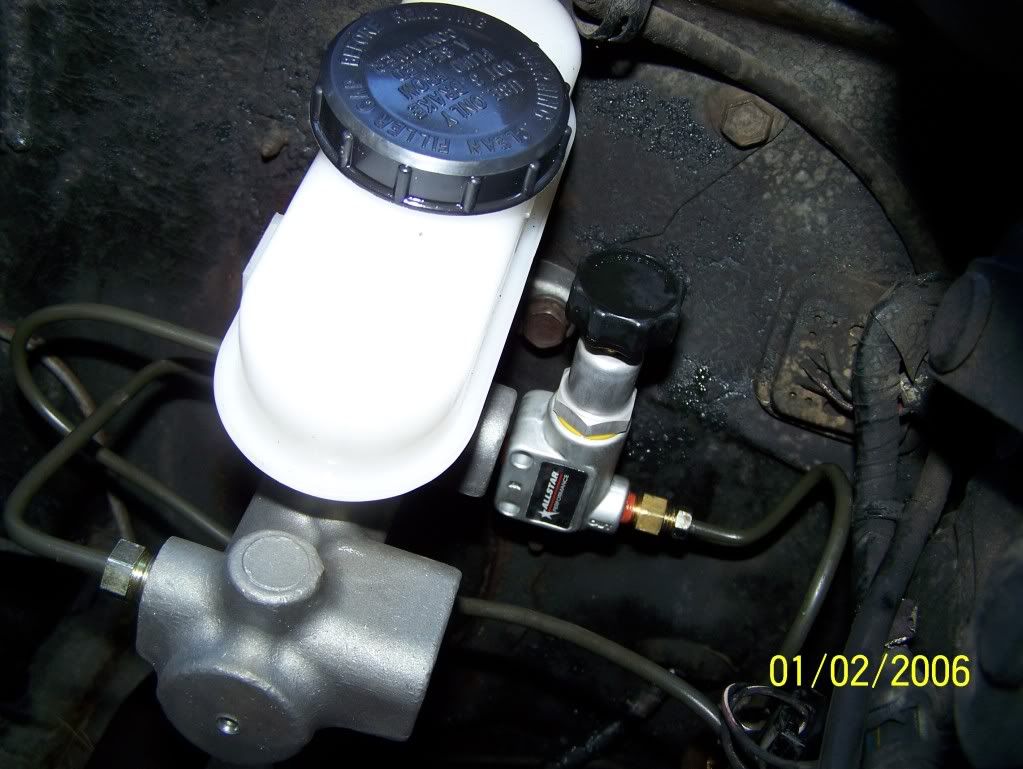
Here is where I had to make compromise. To have the brake light warning switch work properly, the proportioning valve needs to be installed on the rear brake line after the distribution block. Problem I had with this was that it would require modification to the OE hard brake line (another can of worms I could not open because I needed the car to at least be movable asap) so long story short, I installed the proportioning valve between the master cylinder and the distribution block. Yea yea I know let the bashing begin. The bright side of doing it this way is that its somewhat asthetically pleasing. NOTE: In the future I will modify the hard lines to the correct way, but since the distribution block does not do any type of proportioning itself my method is safe (and I check for leaks regularly just in case).
I won't waste anyones time about bleeding the brakes, I just used the tried and tested 2 person method of pumping the pedal.
Next I followed the bedding in procedure for the brakes (not easy to do in a city that has traffic enforcement days during the week), and I have still been adjusting the proportioning valve since, with better and better braking results each time. And don't forget to check for leaks! Right away the car stopped better, but not necessarily in the way I expected. The pedal effort is still pretty darn high, but the benefit is seen during hard braking about half way through the stop. What I mean by this is the following: The brakes seem about the same during threshold braking from 60mph to 35 mph as they did with the drums, however it is when you are threshold braking from 60mph to 7mph that the difference is seen. The drums used to fade from heat mid-stop for me, requiring me to pump them, this is no longer an issue with the discs. The absence of having to pump the brakes makes a huge difference. I still want to do the bedding in procedure again, to transfer more pad material to the rotors, but no doubt the stopping is better than the car previously. To those interested in similar kits, I would not expect the pedal effort to be much/at all lower. However the braking will be better = safer car = worth doing.
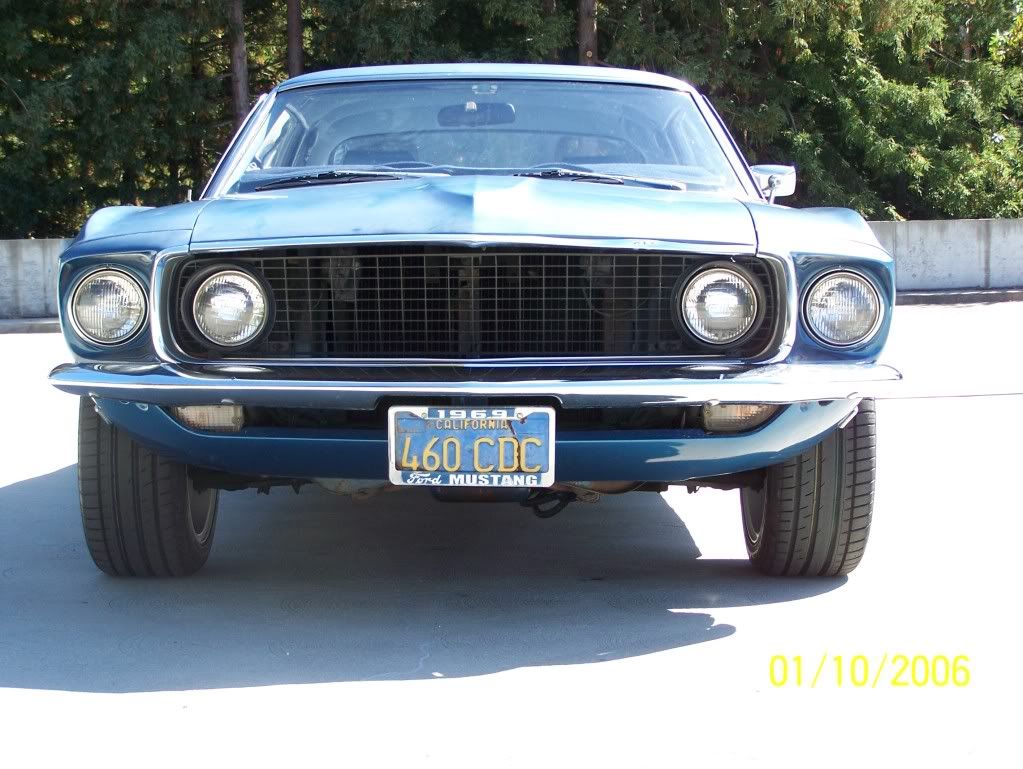
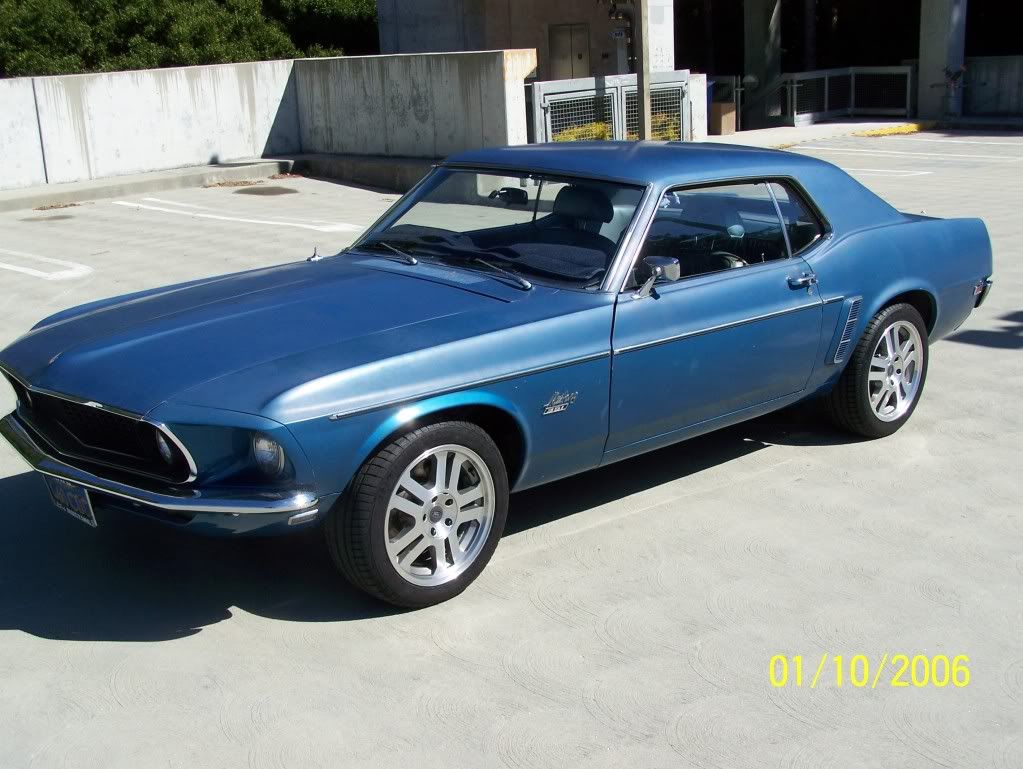
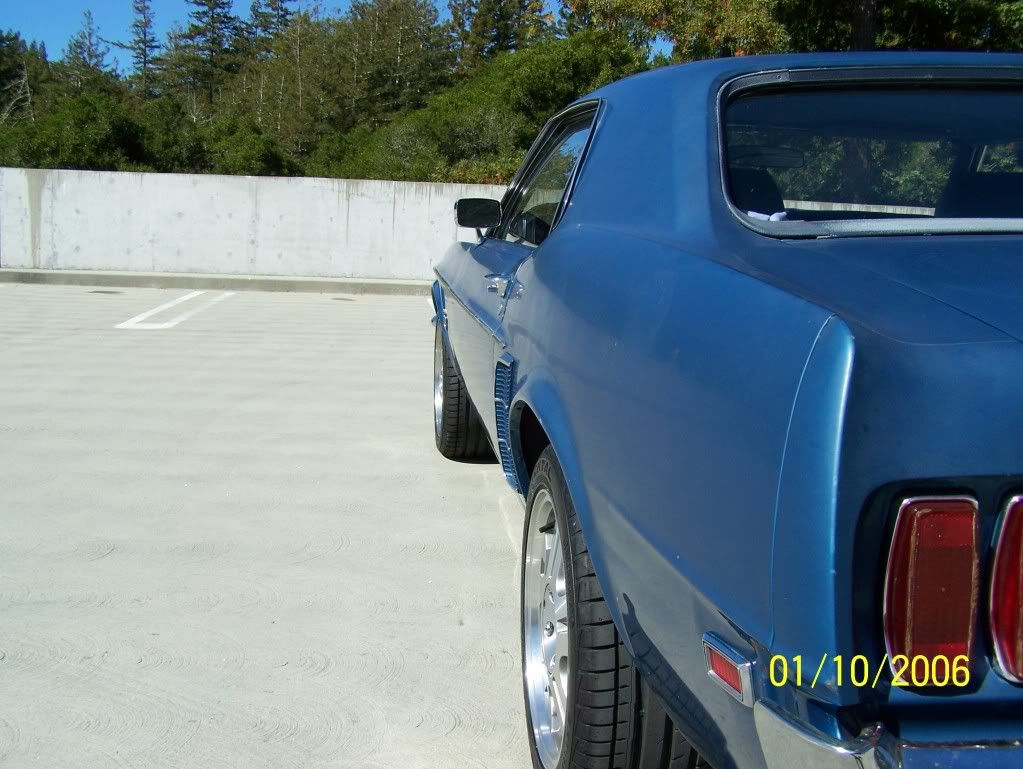
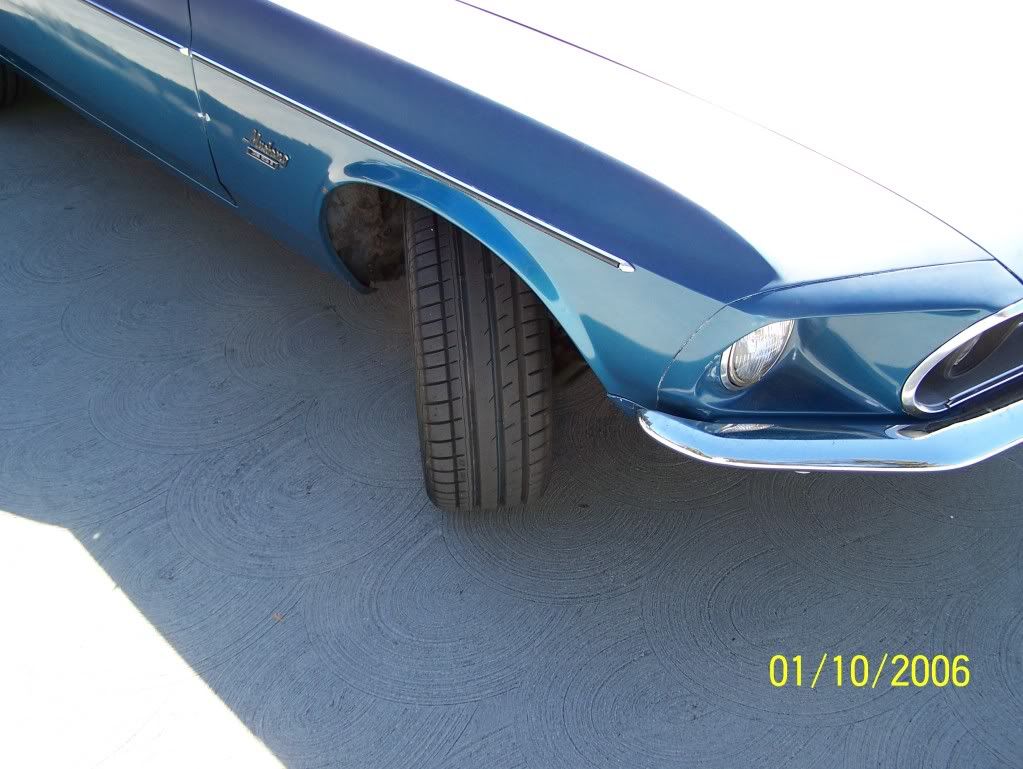
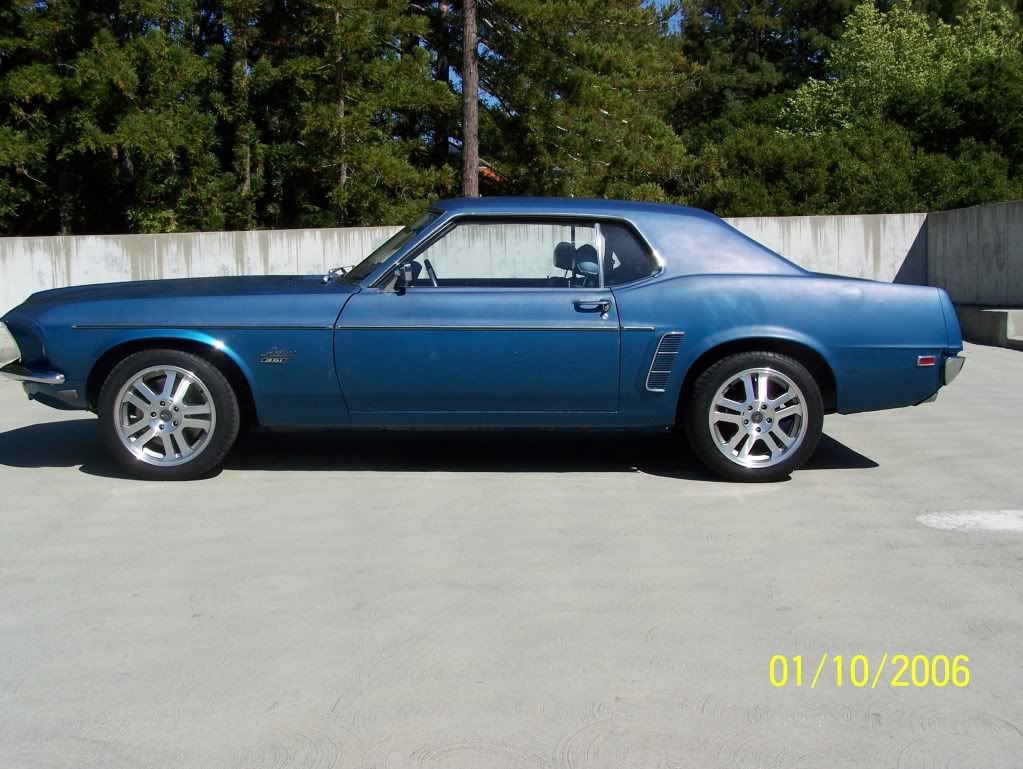
And here she is after all the work was done

Here is pictures of the parts (for a picture of the hubs look on)
Ok so the install begins with you taking off all the old brake components. This includes removing all the drum components, as well as the hard lines from the master cylinder to the distribution block. This was all very easy, with two exceptions. By far the most frustrating thing with this part was loosening the old fittings where the hard lines meet the flex lines. One came off with a good tug, but (like always) the other side wouldn't budge even after dousing it with penetrating grease and having someone help. The factory brackets which hold the hard line to flex line fittings are made out of really soft metal, and they bend really easily so that doesn't help either. Luckily my pops uses his hands for a living, and he suggested heating it up with a torch. After heating up the old fittings for 30 seconds-ish they came right out. NOTE: I would suggest doing this ahead of time even before you try loosening them, that way you do not risk rounding the fitting on the original hard line. I didn't round mine (thank goodness) but the one side didn't look pretty after finally getting it out.
The next "problem" I encountered with the removal of old brake components was when I tried removing the old brake rod out of the master cylinder. So I took off the original master cylinder, but the bulb on the rod (which is inside of the piston assembly) was holding it in. Other brake rods that I have seen just fit inside the master cylinder and come out with the removal of a clip, or sometimes the brake rod just comes out when you pull the master cylinder away from the firewall. So I detached the brake rod from underneath the dash NOTE
ay attention to how the brake switch and everything is mounted, this will save you the time of having to look it up later. There is a clip thingy that holds everything on the brake pedal assembly. Once you have the rod off the pedal assembly, the master cylinder can be removed from the hood area. This is where I started to worry a bit. So first I had to remove the piston assembly from the master cylinder body, which was easy.After that, I could see that the brake rod was not held in by a clip like I was expecting. Ford as well as many other auto manufacturers produced master cylinders which have a clip holding the brake rod on at the side closest to the mounting tabs, mine did not, trust me. So after 20 minutes of dremeling (very carefully of course) and tapping I could see that at the very end of the piston assembly the metal casing was formed to hold the "bulb" of the brake rod in. There was a tiny clip in this section, and it technically does hold the brake rod in the master cylinder. However, the tolerance around the brake rod is FAR too tiny to be able to reach this clip without first cutting the whole piston assembly open. Not designed to ever be removed. At this point I was worried because there was no mention of having to do this in the instructions, so I was thinking the brake rod would be the wrong length for the new master cylinder. The bulb of the rod did however fit perfectly inside the master cylinder.
Next I cleaned the spindle mounting surface with a wire brush, and began mounting the brackets included in the kit. This is as straightforward as it comes, but I ran into a very time consuming problem. I finger tightened all the bolts/nuts on the driver's side, then instantly began using a torque wrench set at the proper lb/ft (can't remember what it is off hand right now) and 3 out of 4 bolts went in perfectly. One bolt stripped without ever even tightening at all. I have never seen a large size bolt strip so easily before undertaking this project. I still cannot believe this happened ESPECIALLY when I was being smart and using the torque wrench right away. I would be lying if I said I wasn't questioning my purchase at this point. So again out came the dremel to destroy the nut (and the bolt in the process). After working on that for what seemed like forever, going to the hardware store to get a replacement nut, bolt, and washer (I added the washer because the original nuts were the self-gripping type, and the replacement was not) I had all the bracketry installed.
This is where I packed the bearings with grease, put them into the hubs, and hammered the seals in carefully using a wood 2x4 between the hub and the mallet. Then i carefully pushed the hubs onto the spindles, making sure they were fully seated properly, and tightening them just right (1/4 turn counter clockwise from where the castle nut stopped). After doing this to both sides, I slid on the hub centric adaper shim onto the hub, and slid the rotors on.
The installation of the calipers was next. To get them to fit over the rotors, I had to push the pads inward with my fingers to make space. Torqued them to spec, and done. This step was really easy, but here is where I ran into another big problem. While I was installing the passenger side caliper, my hand slipped and my elbow knocked one of the wheel studs out of the hub. I knew this was a huge problem instantly. On the same hub, one other wheel stud came out after giving it a firm bop with a rubber mallet. Wheel studs are not just supposed to pop out like that. Defective hub. I gave Shaun at StreetorTrack a call, and he instantly began piecing together a new hub to send out to me free of charge. This delayed my progress ALOT, for obvious reasons (waiting for the replacement to arrive). The new one came a few days later, but I wasn't able to continue working on the car til 7 days after I discovered that my hub was defective.
When the new hub came, it appeared different so I called Shaun again and he said that the replacement was the newer style hub. Same dimensions and everything, but different edges/coloring. Then I installed the replacement hub, hub centric adapter, rotor, caliper, and flex lines to both sides (using included banjo bolts+washers). After bench bleeding the master cylinder, I went ahead and bolted it up to the firewall, installed the brake rod from underneath the dash, reconnected the brake switch and plastic washers, then I tested to make sure the brake rod cannot come out of the master cylinder from upward travel of the brake pedal. All seemed right.
Here is where I had to make compromise. To have the brake light warning switch work properly, the proportioning valve needs to be installed on the rear brake line after the distribution block. Problem I had with this was that it would require modification to the OE hard brake line (another can of worms I could not open because I needed the car to at least be movable asap) so long story short, I installed the proportioning valve between the master cylinder and the distribution block. Yea yea I know let the bashing begin. The bright side of doing it this way is that its somewhat asthetically pleasing. NOTE: In the future I will modify the hard lines to the correct way, but since the distribution block does not do any type of proportioning itself my method is safe (and I check for leaks regularly just in case).
I won't waste anyones time about bleeding the brakes, I just used the tried and tested 2 person method of pumping the pedal.
Next I followed the bedding in procedure for the brakes (not easy to do in a city that has traffic enforcement days during the week), and I have still been adjusting the proportioning valve since, with better and better braking results each time. And don't forget to check for leaks! Right away the car stopped better, but not necessarily in the way I expected. The pedal effort is still pretty darn high, but the benefit is seen during hard braking about half way through the stop. What I mean by this is the following: The brakes seem about the same during threshold braking from 60mph to 35 mph as they did with the drums, however it is when you are threshold braking from 60mph to 7mph that the difference is seen. The drums used to fade from heat mid-stop for me, requiring me to pump them, this is no longer an issue with the discs. The absence of having to pump the brakes makes a huge difference. I still want to do the bedding in procedure again, to transfer more pad material to the rotors, but no doubt the stopping is better than the car previously. To those interested in similar kits, I would not expect the pedal effort to be much/at all lower. However the braking will be better = safer car = worth doing.
And here she is after all the work was done
 09-29-2010, 03:18 AM
#2
Realized I didn't put a picture of the hard lines all done:
Also here are a few afterthoughts:
1) bearings were made in China (uuugh)
2) kit came with black tubing, NOT clear like it said (this would have saved me a trip to the hardware store)
3) hardware could be better apparently
4) customer service very good (thanks Shaun)
5) parts themselves seem to be good quality
6) ignore the dates in the pictures, forgot to reset camera
09-29-2010, 03:23 AM
#3
5th Gear Member
Join Date: Jul 2006
Location: San Diego, CA
Posts: 2,990
nice write up, everything looks good, i love the rims. The only thing I'm not too fond of is the plastic master cylinder, but i'm sure it's fine, just cosmetic 
To improve pedal effort you are going to have to add a power booster. Adding disc's doesn't change the fact that they are still manual brakes, it's just that the manual brakes are now better, so therefore the pedal effort seems slightly decreased. But to get it to act like a new car with that easy pedal "squish" or whatever you want to call you it you definitely need a power brake booster (which should not be hard to add to your setup)
To improve pedal effort you are going to have to add a power booster. Adding disc's doesn't change the fact that they are still manual brakes, it's just that the manual brakes are now better, so therefore the pedal effort seems slightly decreased. But to get it to act like a new car with that easy pedal "squish" or whatever you want to call you it you definitely need a power brake booster (which should not be hard to add to your setup)
 09-29-2010, 12:06 PM
#5
@4reboy: I knew the pedal effort wouldn't be like it easy with power brakes cars, I just thought for the equivalent amount of braking the discs would require less effort than the drums. Thanks, I like the rims too! The only thing I'm worried about with all the changes I have done to the car is the rear wheel spacers (adapters for you perfectionists). The wheel studs in the axle are not very long, and the lug nuts for the rear wheel spacers don't thread on nearly as much as I would like them to. Anyone have any suggestions? I was thinking that getting new lug nuts with 60 degree cones might thread on a little more.
@andrewmp6: yea I'm not exactly excited that the bearings are chinese
@andrewmp6: yea I'm not exactly excited that the bearings are chinese
09-29-2010, 07:34 PM
#6
6th Gear Member

Join Date: Aug 2007
Location: Elk Grove, CA
Posts: 5,896
Umm....get rid of the lock washers, non-locking nuts, and metric bolts on those brackets. They work in some instances, but I would not trust those in that application. Besides which, why do you want metric hardware on your car? Get yourself some good SAE fine thread grade 8 bolts and matching lock nuts and you'll be set to go.
09-29-2010, 09:48 PM
#7
@Starfury If I remember correctly the only metric bolts were the ones for mounting the calipers to the brackets. Regardless, how did you know that? I am a little confused about what you meant by your reply.
 I still think those rims and that color just go perfect together.
10-02-2010, 11:26 AM
I still think those rims and that color just go perfect together.
10-02-2010, 11:26 AM
#10
6th Gear Member
Join Date: Aug 2007
Location: Elk Grove, CA
Posts: 5,896
The '10.9' on the bolt heads gives it away. That's a metric strength rating. Standard ratings use radiating lines on the bolt heads.
Lock washers do not work as well as proper grade 8 locking nuts in that situation.
Lock washers do not work as well as proper grade 8 locking nuts in that situation.