
Raptor Install..56K Beware!! Tons o Pics
 04-01-2007, 01:34 AM
#1
5th Gear Member
Thread Starter
Join Date: Feb 2005
Location: Anaheim, California
Posts: 4,205
Well since my shifter won't be here until Monday, I figured I'd do the Raptor install today. I went with a different location from the AC vent install....For the seasoned veterans here, alot of these pics are probably redundant, but hopefully will be able to help some of the newbies......
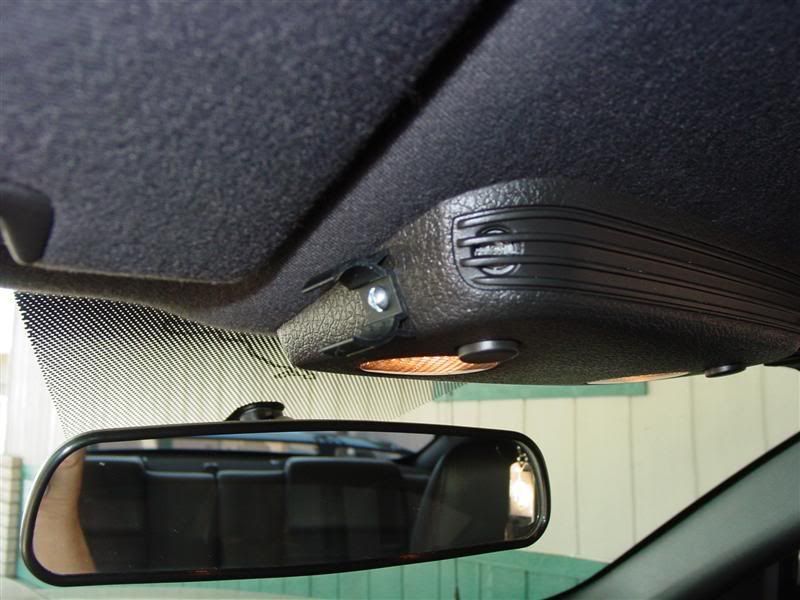
I went with an install on the overhead console. The console pulls straight down, and is held in place with the two clips you can see below.
The console is then easily removed by disconnecting the grey power connector in the center.
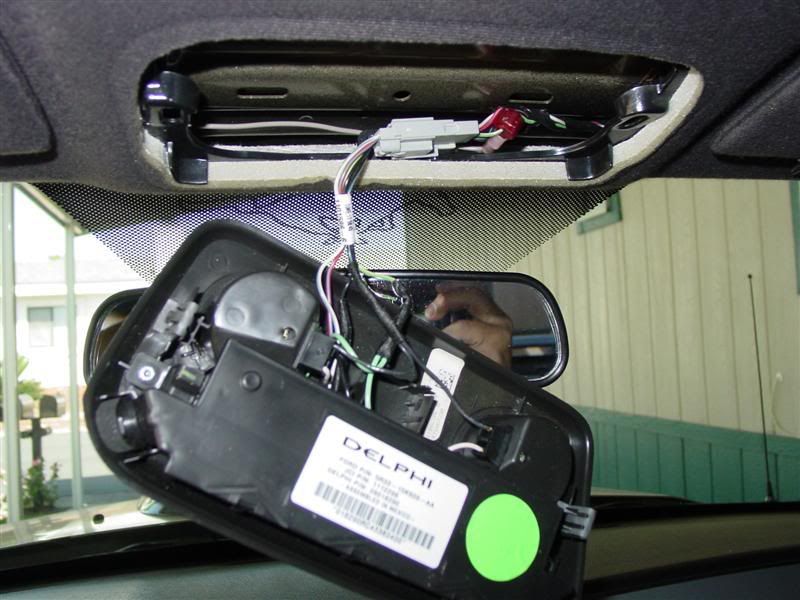
The console is easily drilled, and the supplied clip is then bolted onto the overhead console.
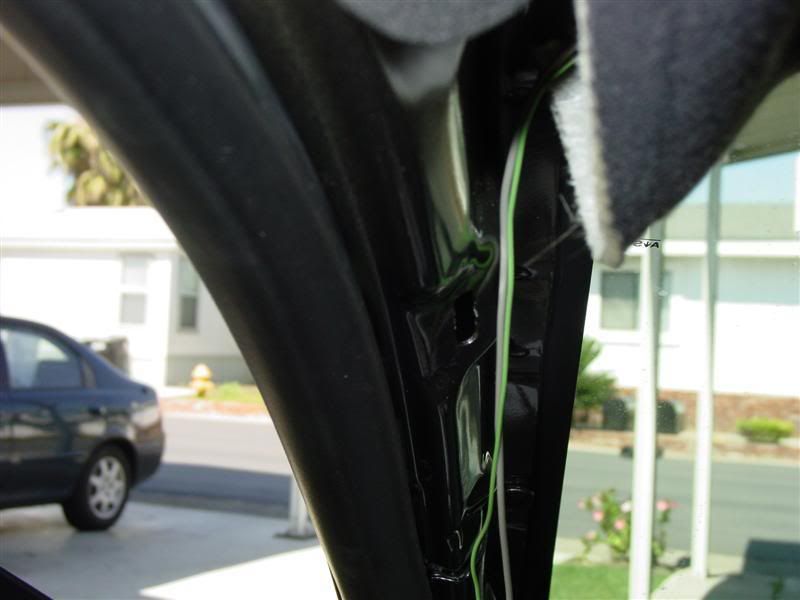
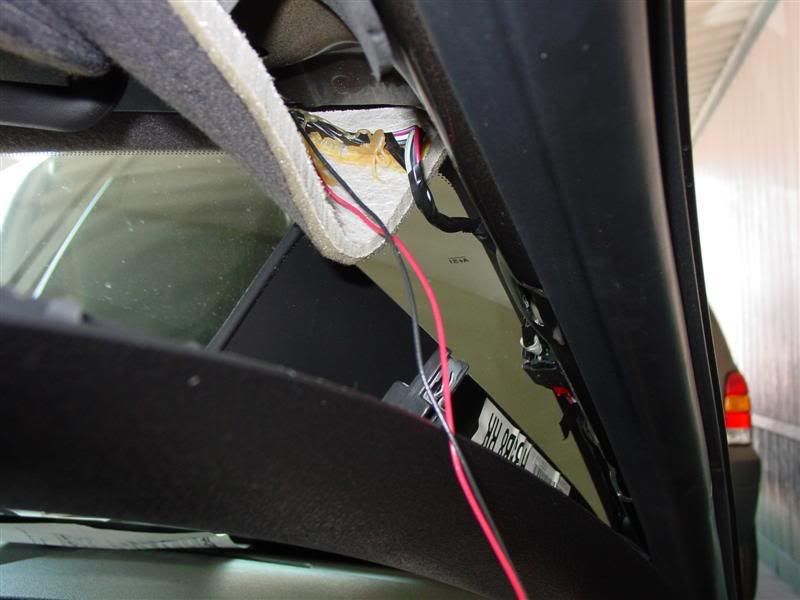
The bundled wire from the Raptor is then routed above the head liner, toward the windshield.
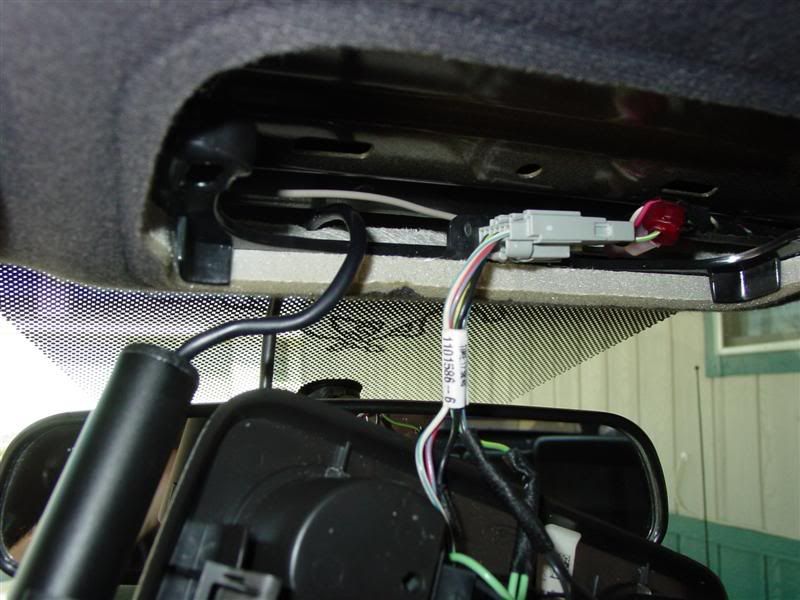
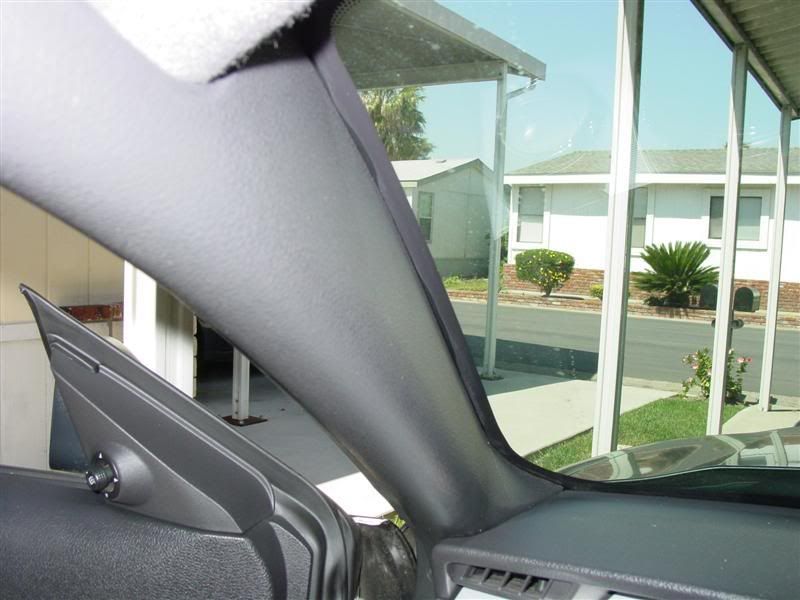
With the A Pillar trim removed, it's an easy shot above the head liner, to the driver's side of the car.
The grey wire is an existing wire for the overhead console. The green wire is from the Raptor. Just route both wires together.

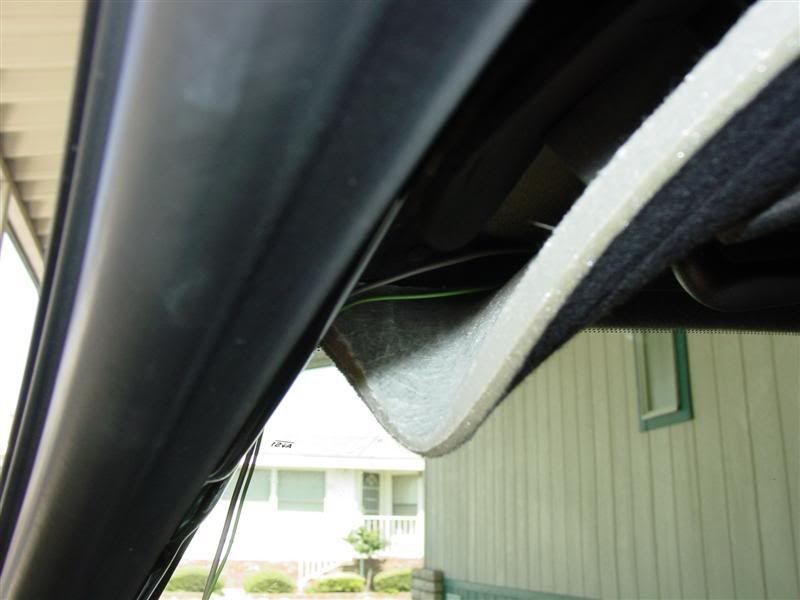
I put a piece of electrical tape, as seen below, just to secure the wires for the re-installation of the A Pillar trim piece.
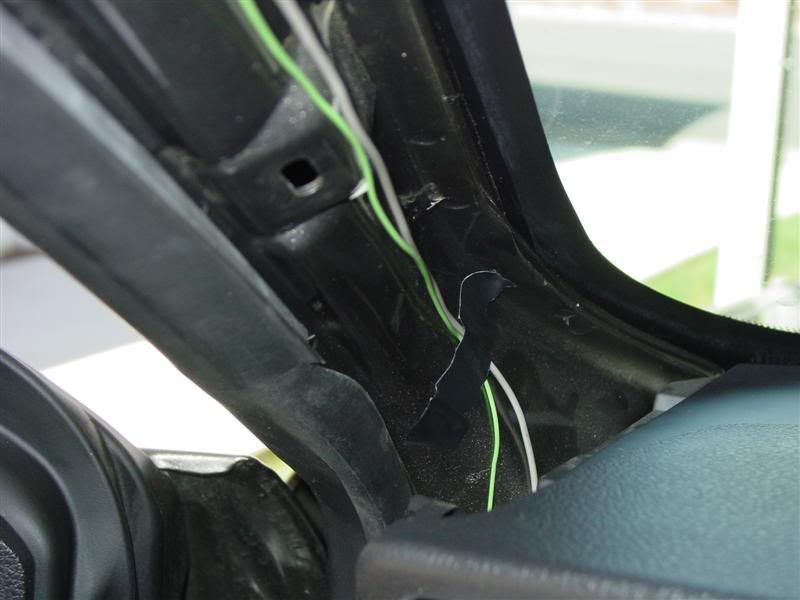
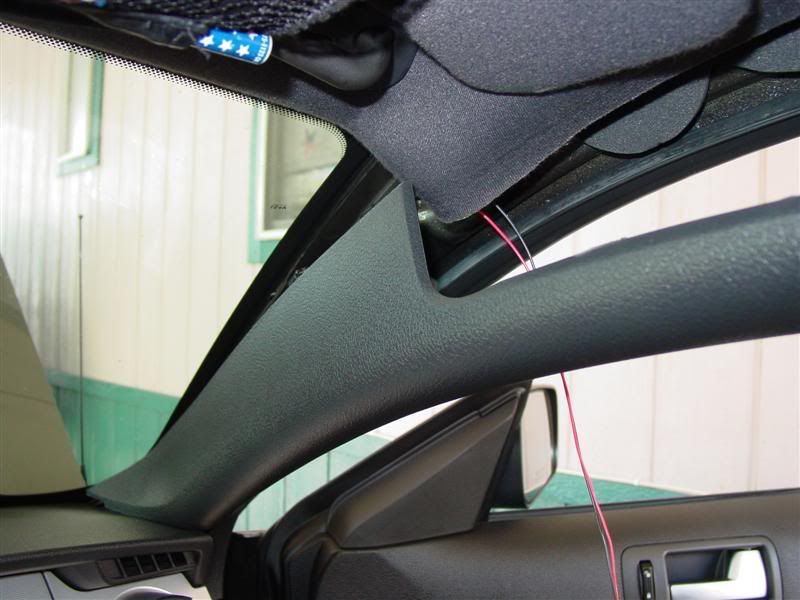
The wires then run down toward the kick panel, behind the trim piece.
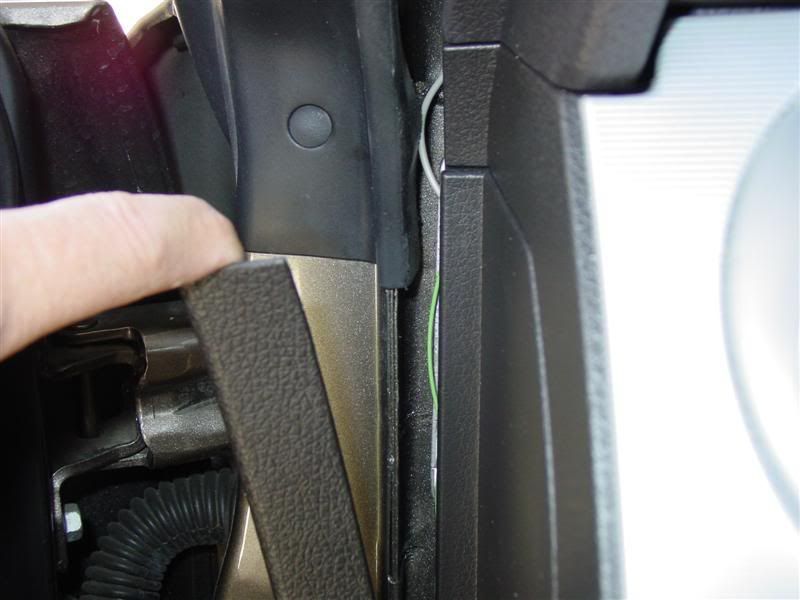
When re-installing the A Pillar trim piece, BE VERY CAREFUL to get these two notched pieces in the slots they are supposed to align
with. I had to push one of the two pieces over with a screwdriver to get them to align properly.
The trim piece can now be re-installed.
The green wire from the Raptor should now be exiting from behind the drivers side kick panel. Please excuse the filthy floor...[:@][:@].
Tomorrow is detail day.......

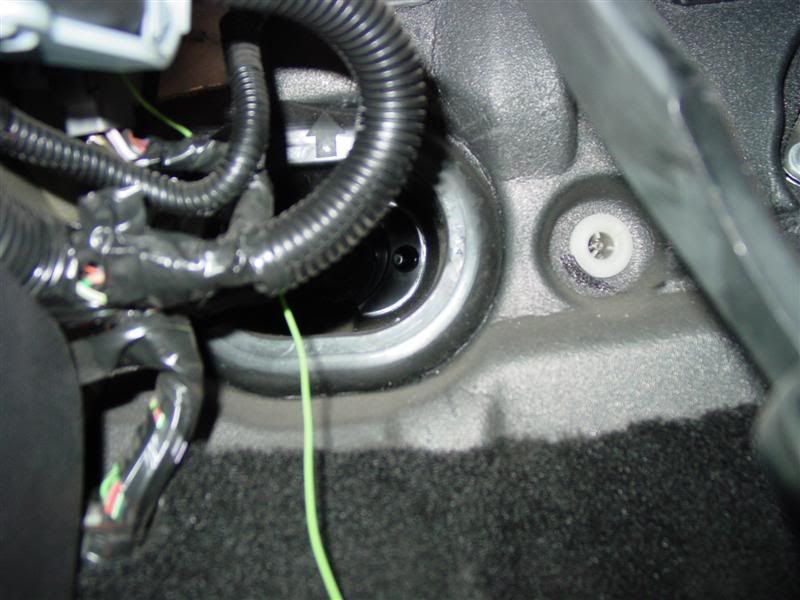
Just above the carpet line, behind the clutch pedal, you will see this rubber grommet. As you can see, on the right side of the grommet
is an indentation. I pushed through this indentation with a straightened piece of wire coat hanger.
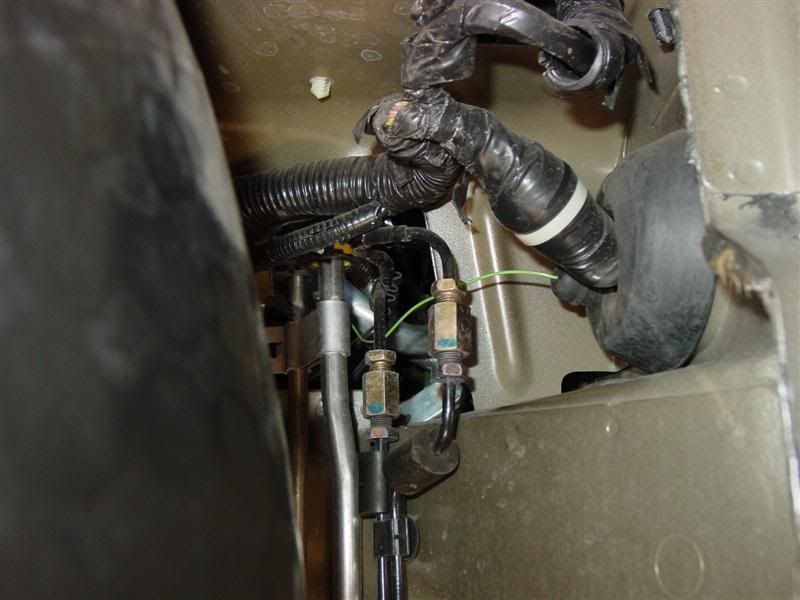
This is that same grommet, from the other side. NOTE!! You need to remove about 4 fasteners from the front wheel fender liner,
peel it toward the front of the car, to access this side of the grommet.......You can then just feed the wire through several openings, into
the engine bay.
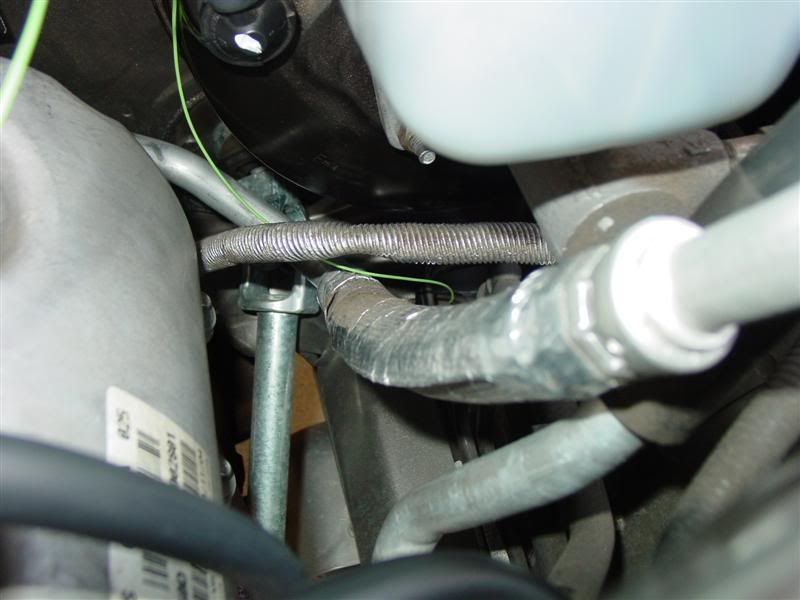
This is where the wire comes up into the engine bay, following the above step. At this point, I stopped under the hood, and proceeded
to the passenger side interior of the car.
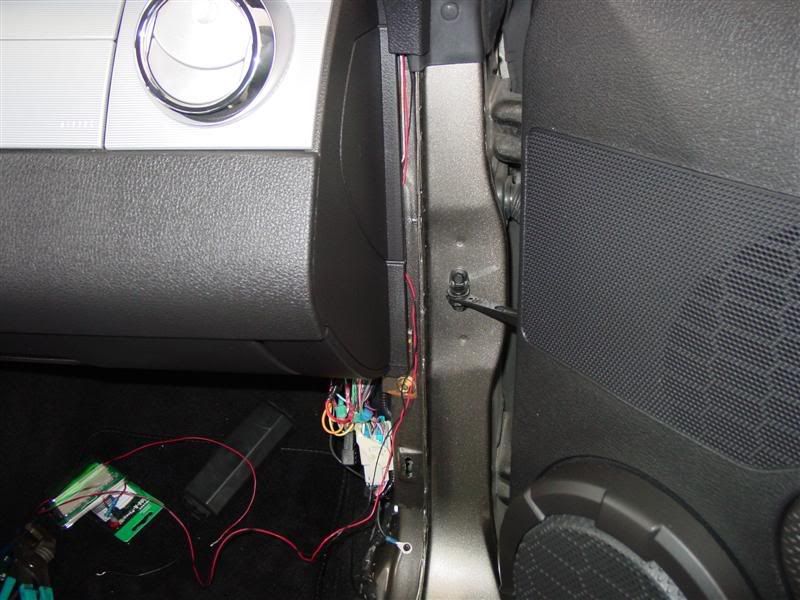
Just like on the driver's side, by removing the A Piller trim piece, the remaining two wires from the Raptor are easily fed from the console
area, over to the passenger side.
On the passenger side, I did not remove the A Pillar trim all the way, as there was plenty of room to route the wires toward the passenger
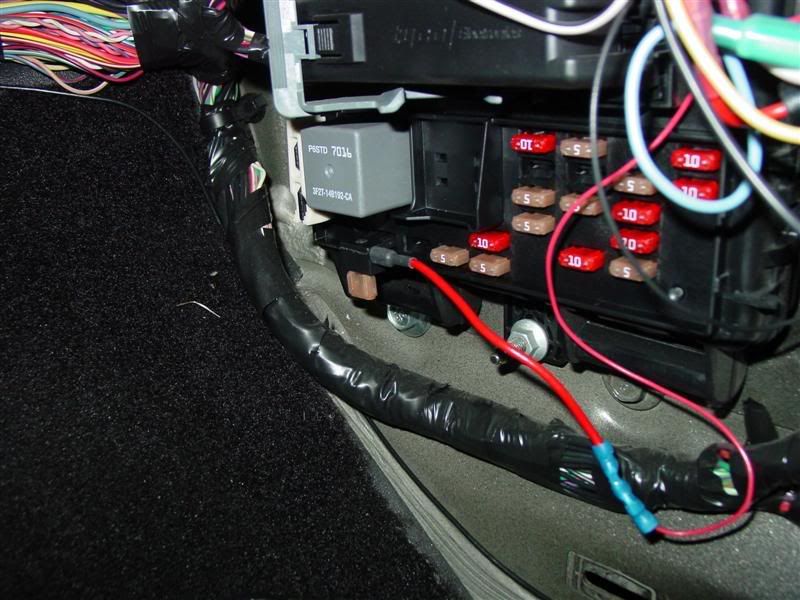
side kick panel, and to the fuse box.
The passenger side kick panel trim piece is removed, which gives you final access for routing the two wires, along with exposing the fuse box
behind the passenger kick panel.
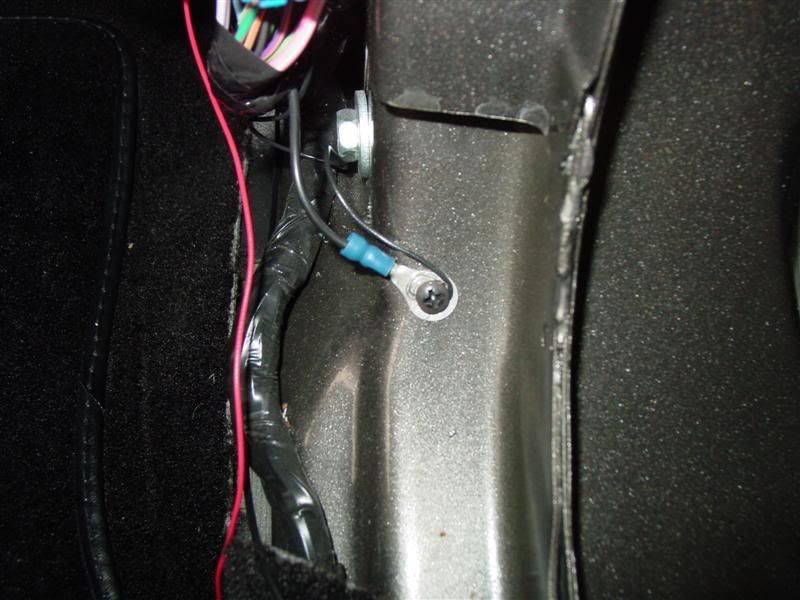
The power and ground wires from the Raptor are routed to the fuse box area. Note the existing ground screw.
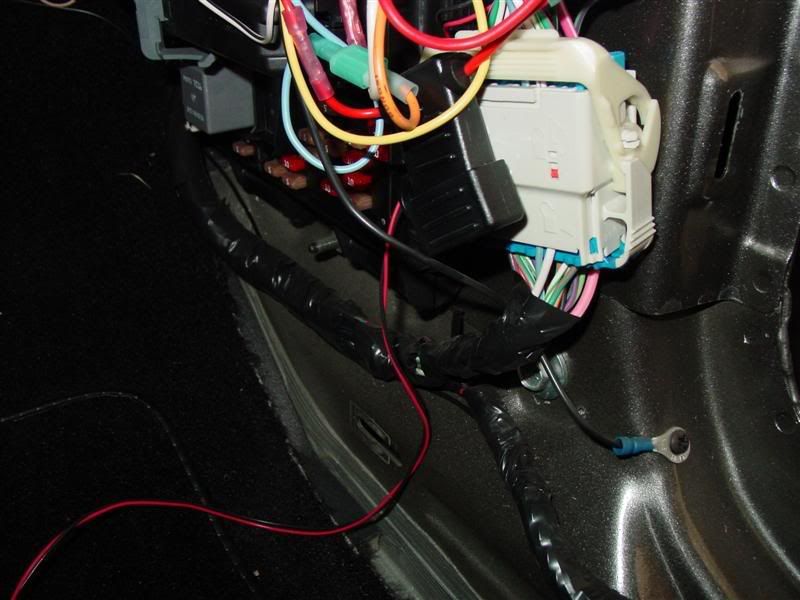
The ground wire from the Raptor is connected, along with the existing ground wire.
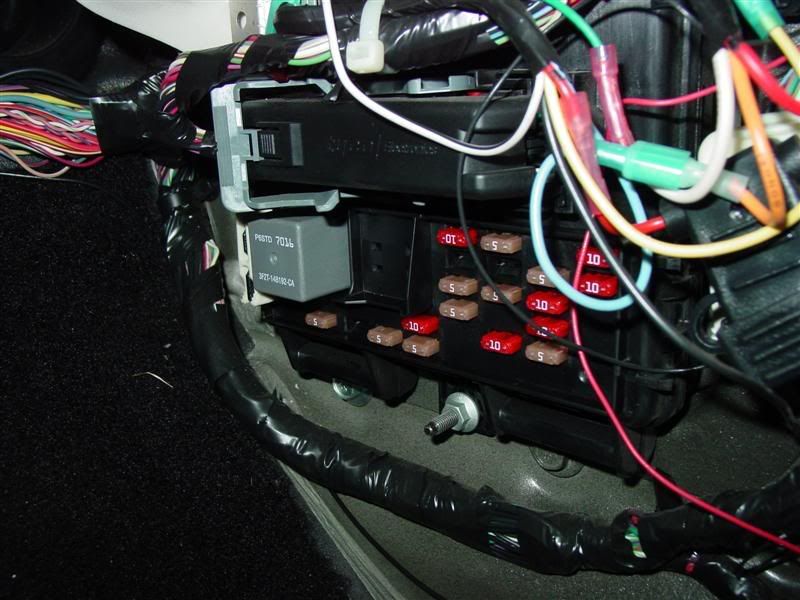
This is the fuse panel on the passenger side. I opted to use the 5 amp fuse locationnumber 14.
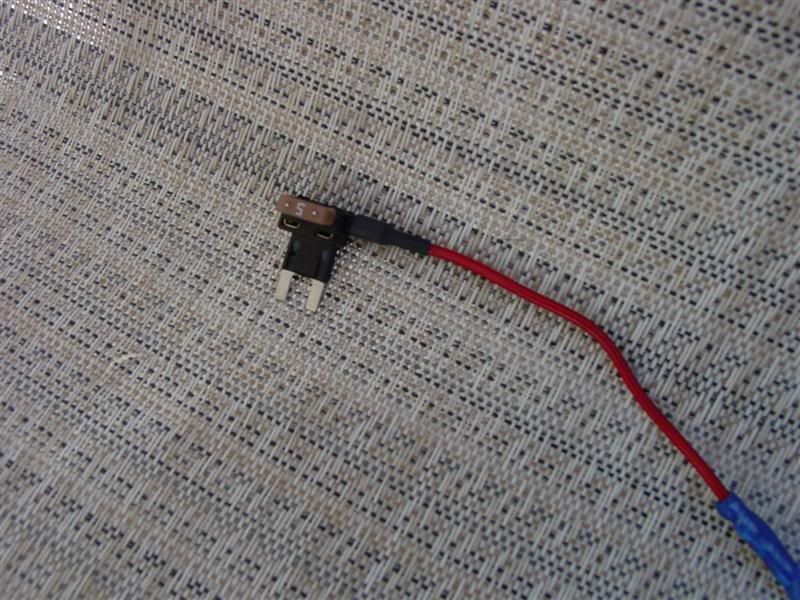
This is the Add - a - Circuit I used for tapping into the fuse panel for the power. NOTE!! I assumed the Mustang had standard size
fuses. I was wrong. The Mustang actually has the "mini" fuses, not the full sized ATO fuses. The Add - a - Circuits are available in both
sizes. If anyone needs a full sized one, let me know.....[:@][:@][:@]

Same Add - a - Circuit, with the original 5 amp fuse removed from the fuse box, and inserted into the adaptor. Eventually, you will put two
fuses in the adaptor. One is for your added accessory, the Raptor, and one is for the existing fused location......
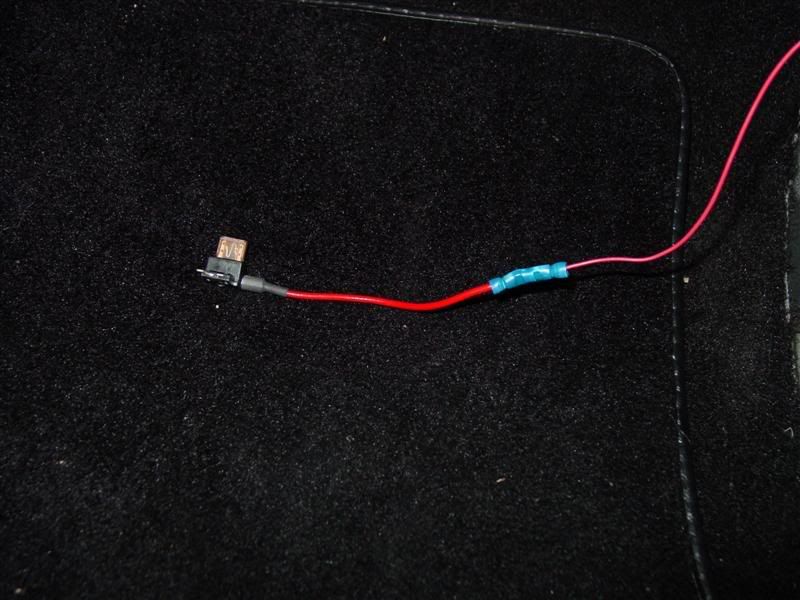
Here is the Add - a - Circuit with the power wire from the Raptor connected, ready to re-install into the fuse panel.
This is what it looks like afer re-installing into the fuse panel. Edit....Actually used fuse number 14.
With the fuse box cover re-installed. NOTE...I had to cut a notch in the bottom of the fuse box cover to accomodate the now downward
facing fuses. I also needed to cut a notch on the right end, to accomodate the power wire entering the fuse box area.
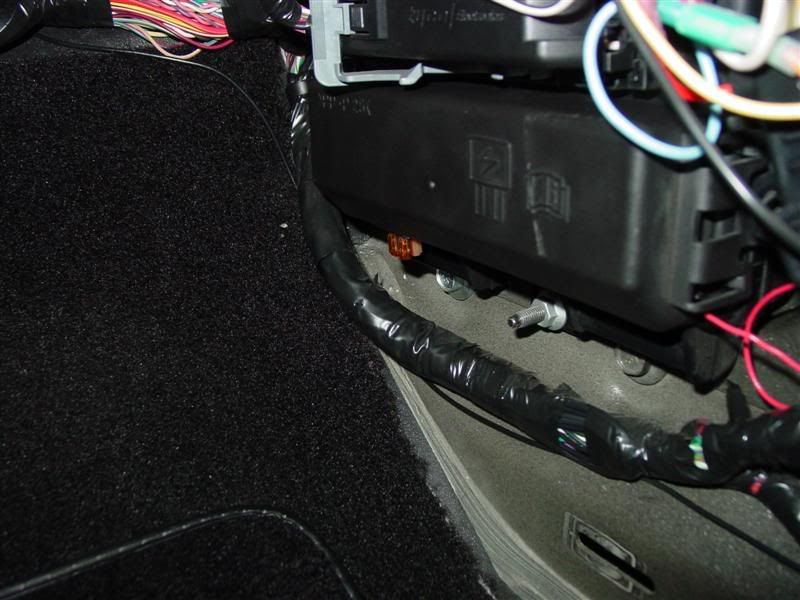
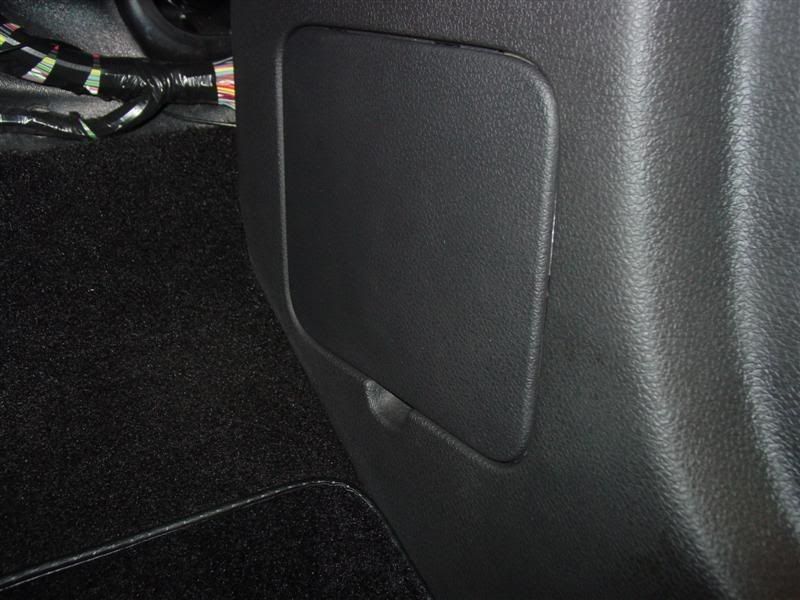
Kick panel, as well as access cover re-installed.
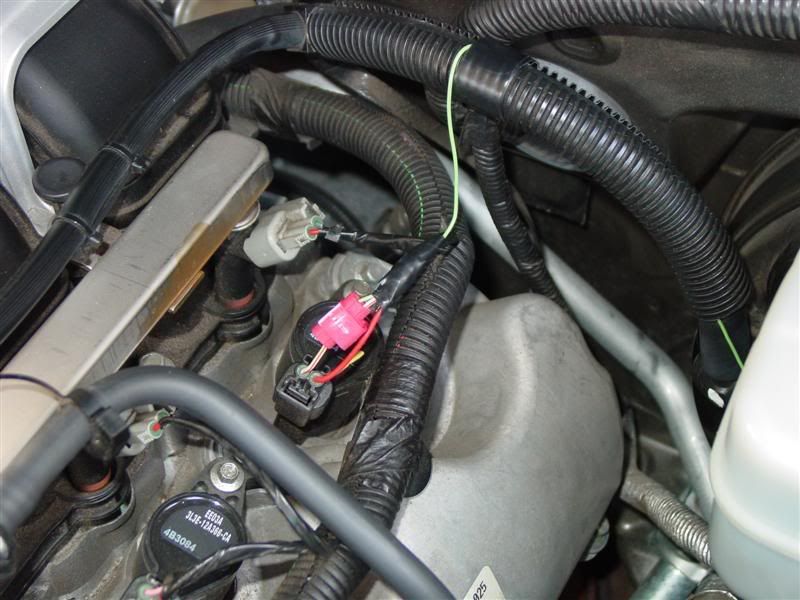
Now I returned to under the hood, and used the red wire piggy back splice, and connected to the cylinder on the driver's side, closest
to the firewall. All cylinder's have a common colored wire, (Red) make sure you use THE OTHER wire, in this case white with red
stripe.
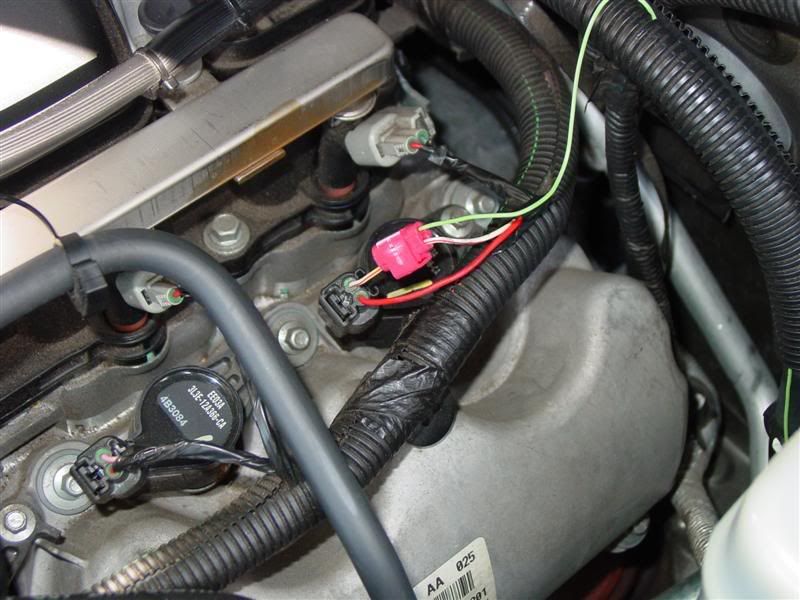
Re-taped and cleaned up the underhood connection.
Follow the instructions with the Raptor, and set the dip-switches to corrospond to reading from one cylinder only. I believe it was all three
dip-switches up, but verify in the included instructions.....Also, set the two RPM dials to your selected shift RPM.
[IMG]http://img.photobucket.com
I went with an install on the overhead console. The console pulls straight down, and is held in place with the two clips you can see below.
The console is then easily removed by disconnecting the grey power connector in the center.
The console is easily drilled, and the supplied clip is then bolted onto the overhead console.
The bundled wire from the Raptor is then routed above the head liner, toward the windshield.
With the A Pillar trim removed, it's an easy shot above the head liner, to the driver's side of the car.
The grey wire is an existing wire for the overhead console. The green wire is from the Raptor. Just route both wires together.
I put a piece of electrical tape, as seen below, just to secure the wires for the re-installation of the A Pillar trim piece.
The wires then run down toward the kick panel, behind the trim piece.
When re-installing the A Pillar trim piece, BE VERY CAREFUL to get these two notched pieces in the slots they are supposed to align
with. I had to push one of the two pieces over with a screwdriver to get them to align properly.
The trim piece can now be re-installed.
The green wire from the Raptor should now be exiting from behind the drivers side kick panel. Please excuse the filthy floor...[:@][:@].
Tomorrow is detail day.......
Just above the carpet line, behind the clutch pedal, you will see this rubber grommet. As you can see, on the right side of the grommet
is an indentation. I pushed through this indentation with a straightened piece of wire coat hanger.
This is that same grommet, from the other side. NOTE!! You need to remove about 4 fasteners from the front wheel fender liner,
peel it toward the front of the car, to access this side of the grommet.......You can then just feed the wire through several openings, into
the engine bay.
This is where the wire comes up into the engine bay, following the above step. At this point, I stopped under the hood, and proceeded
to the passenger side interior of the car.
Just like on the driver's side, by removing the A Piller trim piece, the remaining two wires from the Raptor are easily fed from the console
area, over to the passenger side.
On the passenger side, I did not remove the A Pillar trim all the way, as there was plenty of room to route the wires toward the passenger
side kick panel, and to the fuse box.
The passenger side kick panel trim piece is removed, which gives you final access for routing the two wires, along with exposing the fuse box
behind the passenger kick panel.
The power and ground wires from the Raptor are routed to the fuse box area. Note the existing ground screw.
The ground wire from the Raptor is connected, along with the existing ground wire.
This is the fuse panel on the passenger side. I opted to use the 5 amp fuse locationnumber 14.
This is the Add - a - Circuit I used for tapping into the fuse panel for the power. NOTE!! I assumed the Mustang had standard size
fuses. I was wrong. The Mustang actually has the "mini" fuses, not the full sized ATO fuses. The Add - a - Circuits are available in both
sizes. If anyone needs a full sized one, let me know.....[:@][:@][:@]
Same Add - a - Circuit, with the original 5 amp fuse removed from the fuse box, and inserted into the adaptor. Eventually, you will put two
fuses in the adaptor. One is for your added accessory, the Raptor, and one is for the existing fused location......
Here is the Add - a - Circuit with the power wire from the Raptor connected, ready to re-install into the fuse panel.
This is what it looks like afer re-installing into the fuse panel. Edit....Actually used fuse number 14.
With the fuse box cover re-installed. NOTE...I had to cut a notch in the bottom of the fuse box cover to accomodate the now downward
facing fuses. I also needed to cut a notch on the right end, to accomodate the power wire entering the fuse box area.
Kick panel, as well as access cover re-installed.
Now I returned to under the hood, and used the red wire piggy back splice, and connected to the cylinder on the driver's side, closest
to the firewall. All cylinder's have a common colored wire, (Red) make sure you use THE OTHER wire, in this case white with red
stripe.
Re-taped and cleaned up the underhood connection.
Follow the instructions with the Raptor, and set the dip-switches to corrospond to reading from one cylinder only. I believe it was all three
dip-switches up, but verify in the included instructions.....Also, set the two RPM dials to your selected shift RPM.
[IMG]http://img.photobucket.com
 04-01-2007, 02:53 AM
#2
I ♥ Acer

Join Date: Feb 2005
Location: Texas
Posts: 3,225
Looks good. Only thing I would have done differently is I would have went to the PCM wiring instead of the COP wiring. But that is because I am just funny about clamping a wire on to one of the COP wires ( this phobia of the COP wire breaking after time ). Nice idea on the overhead console. Looks good.
 04-01-2007, 06:26 AM
#5
2nd Gear Member

Join Date: Dec 2006
Location:
Posts: 255
Forgive my ignorance, but what is Raptor? What does it do?
ORIGINAL: mlcrycc
Well since my shifter won't be here until Monday, I figured I'd do the Raptor install today.

Well since my shifter won't be here until Monday, I figured I'd do the Raptor install today.
04-01-2007, 06:35 AM
#6
4th Gear Member

Join Date: Nov 2006
Location:
Posts: 1,295
ORIGINAL: NewMustang
Forgive my ignorance, but what is Raptor? What does it do?
Forgive my ignorance, but what is Raptor? What does it do?
http://www.raptorperformance.com/


