
Cleaning the engine bay.


5th Gear Member
Joined: Sep 2006
Posts: 3,302
From: Northernish Eastish Central Texas
When I had the motor out, I used EasyOff Oven Cleaner coat and rice, then a couple of boxes of SOS pads and water, then simple green and steel wool.
After cleaning, I painted with Rustoloem Satin Black (Number 7777).
http://www.midnightdsigns.com/Mustan...DSC00139-1.JPG
As for unruly spark plug wires, use the right angle top type and use zip ties to keep in place.
After cleaning, I painted with Rustoloem Satin Black (Number 7777).
http://www.midnightdsigns.com/Mustan...DSC00139-1.JPG
As for unruly spark plug wires, use the right angle top type and use zip ties to keep in place.

Thread Starter
2nd Gear Member
Joined: Aug 2007
Posts: 384
From: Texas
http://i245.photobucket.com/albums/g...g/IMG_1404.jpg
Like I said,,, the stripper works great for folks who want to take a 2, 3, or 4 step process and roll it into one step.... Never mind degreaser, cleaning, sanding, stripping, etc.
Ok, so you still have to sand after you get the paint off, and the stuff burns like hell when it gets on your skin,,, but it is fast and relativly easy....
http://i245.photobucket.com/albums/g...g/IMG_1408.jpg
http://i245.photobucket.com/albums/g...g/IMG_1416.jpg
6th Gear Member
Joined: Jan 2007
Posts: 5,469
From: AR
I like the wires pretty much unseen as well, but we used a different aproach for that. I ran the wires low along the frame rails, around behind the engine etc. the wires are all but invisible except for the solenoid placement and the fan controler both were a comprimise of sorts, I could have made this stuff all but disapear also but due to other considerations I left the solenoid in the stock location and mounted the fan controler low on the inside radiator support.
http://i245.photobucket.com/albums/g...g/IMG_0013.jpg
http://s245.photobucket.com/albums/g...Picture008.jpg
http://i245.photobucket.com/albums/g...g/IMG_0013.jpg
http://s245.photobucket.com/albums/g...Picture008.jpg
6th Gear Member
Joined: Jan 2007
Posts: 5,469
From: AR
A gallon is way more than enough, yea the picture you see of the bare metal firewall was a result of the stripper and a probably a little scrubbing with a scuff pad.
Both the Aircraft Remover and a few scuff pads are available from an auto paint store and possibly some better hardware or house paint stores. It will retail for about $25.00 a gallon.
You brush it on, let it bubble and lift the paint, (from about 5 to 30 mins depending on temperature), and then scrape it off, clean it up, re-apply to get off any problem areas that may not have completely peeled the first time, (around bolt heads etc.).
The stripper neutralizes with soap and water. There are two varieties of Aircraft Remover, eviro safe and regular, the regular works much better, and IMO the regular stuff is safe enough for adults. Wear gloves and goggles and leave the hose run close by. I have used gallons of the stuff.
The under-hood paint on the 66 responded very, very well to the stripper, better than anywhere else I have ever used it. It was "instant gratification" when we used it...

3rd Gear Member
Joined: May 2006
Posts: 622
From:
You can get simple green is just about any auto supply store. I think they have it at home depot as well. Its concentrated, so you can dilute. However, I just hose of the engine compartment (make sure you put a plastic bag over the distyributot and carb and block any holes in the fire wall.) then spray the simple green on straight (not diluted) let sit for a few minutes, go to town with a stiff bristle brush then hose off. Repeat where neccessary. You will prob. have to do some scraping in the nook and corners etc. to get the built up stuff out. It is going to take some elbow grease, but a lot safer than the aircraft stripper.
Keep in mind, while the simple green is non toxic, all the dirt, oil, and grime that you will be washin off is not the healthiest stuff in and of itself. I you have one of those do it your self car washes in the neighborhood, I would do it there. Otherwise, your driveway os going to be a mess. Alos, I don't know if you will be removing your radiator, but if you are, be careful of the radiator fluid. It is highly toxic and kills animals dead just from a couple of licks.
Good luck.
4th Gear Member
Joined: Sep 2008
Posts: 1,839
From: Connecticut
My wife stripped the headlight buckets on my 1970 convertible and did an excellent job with aircraft stripper. Later in casual conversation, I mentioned to her father that she was a great stripper. He hasn't liked me ever since.
Thread Starter
2nd Gear Member
Joined: Aug 2007
Posts: 384
From: Texas
Ok I took off the fenders and hood, had a little trouble with the passengers fender but finally got it off. Now I am disconecting the motor and trans and I have a piece of metal that I can figure out how to remove it. It is the metal that moves the clutch sorry don't know the exact name for it. heres a pic hopefully it will help.
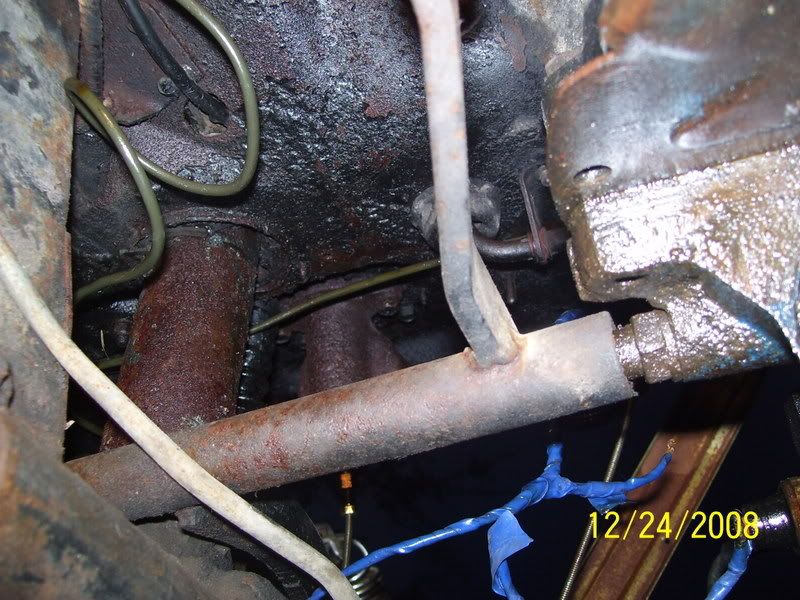
It seems like it only mores left or right but not enough to remove it.
It seems like it only mores left or right but not enough to remove it.

Joined: Dec 2008
Posts: 26
From: Pennsylvania
JMD that engine bay is beautiful man! I cant wait to get the Christmas presents out of my shop area and move my 68 in! I already got the fenders and engine out. I would like to see mine as nice as yours. BTW whats the lower section of your bay painted with i see the upper is the same as the exterior. kinda looks like bed liner material cant tell but its cool looking. NICE!

Banned
Joined: May 2008
Posts: 1,049
From: Maryland
i think it is bedliner, he has the whole thing explained right...... here
https://mustangforums.com/forum/3566084-post10.html
https://mustangforums.com/forum/3566084-post10.html