

 Oct 27, 2015, 10:37 AM
Last edit by: IB Advertising
See related guides and technical advice from our community experts:
Browse all: Lighting
- Ford Mustang V6 and Mustang GT 1994-2004: How to Install HID Headlights
Step by step instructions for do-it-yourself repairs.
Browse all: Lighting

DIY HID INSTALL on a 2007 V6

Thread Starter
2nd Gear Member
Joined: Nov 2007
Posts: 331
From: Tampa, FL
I had to dig around on the internet to find out what HID kit would be the best bang for the buck. It took me forever comparing kits and getting feedback from others who had purchased different systems. So I decided to condense my research; if you are looking for a BI-Xenon kit or even a single kit buy this kit. Even though it’s one of the cheapest kits available, its quality is exceptional, especially for the price. You can order the kit off of eBay for $130.(newhalogen bulbs $45)The sellers name is FLASHPLUS[/b] and their feedback score is pretty high up there. You can order the single beam kits as well if your heart so desires. I will probably install a kit for my fog lights eventually. The company is based out of china, but they have another website – www.vvme.com. You can order from there directly but it’s faster and easier to order off of eBay. Fast shipping reports from almost everyone. I ordered the H13-3 6000K bulb. The 8000K is too blue and not enough light is produced. The 6000K is a nice coolblue color and isn't as bright as the 4000K bulb.
Everything about the kit is A+ in my book, except one thing (which is easily fixable).
So without further ado: the installation of a HID kit on a 2007 Mustang V6.
Tools needed:
Flat head screw driver
Electrical tape
3M double sided foam outdoor tape (normally grey in color with red backing)
Ratchet
8mm socket
Qty 3: Red quick wire taps
Knife / Razor
[ul][/ul]
Step 1:
Open the box and check the contents.


Apart from what the picture shows, there should be 3 screws (not needed) and 2 black metal frames that are clipped to the back of the ballasts. (not needed)
Step 2[/b]:
Disconnect the negative terminal from the battery.
Step 3[/b]:[/b]
Remove the factory headlight bulbs.
Step 4[/b]:
REMOVE the red rubber gasket from the OEM bulb. Place that gasket ONTOP of the HID bulbs own red gasket. You need to do this so the HID bulb will fit snuggly into the headlight housing. If you are keeping the stock bulbs place them in a safe location

Step 5:[/b]
Remove the black plastic radiator cover from the front of the engine bay. This is done by removing the 6 black rivets on top.

After you remove these push-in black rivets you can lift the whole black radiator guard up and place it out of the way.
Step 6[/b]:
The HID bulbs have 3 connections that have to be made. A black wire, a red wire, and a third wire. Go ahead and put the bulbs into the headlight housing. There is some with lettering on the bulbs that say LOCK and UNLOCK. Turn them to the lock position. The wires that are coming out of the bulb will be near the frame of the car (closest to the ground).
If you are installing the BI Xenon bulbs, do not tighten them in all the way (past the lock position). They need to be loose so they have room for the bulbs to angle up when you turn on your high beams. The ceramic anode WILL NOT be at the 6 o’clock position. It will be cocked inward slightly. The bulb will also “feel” a little lose in the headlamp socket.

This picture is the passenger side.

Step 7[/b]:
Lay out the components as follows.
Place one ballast on the driver’s side – Remove the black mounting bracket from ballasts. Double sided tape (which will be applied later) will hold them in place forever.
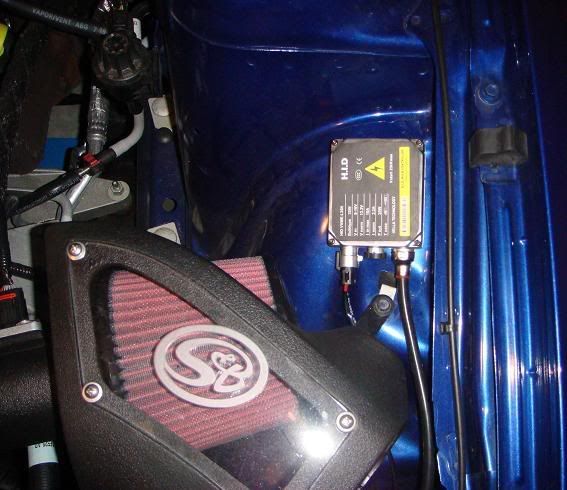
Place one ballast AND the relay on the passenger side. The relay is to the left of the ballast.
[ul][/ul]

[ul][*]
Stretch out the power cord and the other wires to there proper locations. Hiding them where you like.[/align]The 2 grounding wires for the ballasts – I used one of the bolts that hold the fuse block in place (you can see it in the picture above) for the passenger side. For the drivers side I used the bolt that the air box sits on.[/ul]

Step 8[/b]:
Here is the problem. This kit is designed for use with other cars. The headlight adaptor doesn’t fit.


The solution is to cut the HID headlight harness off.

Then strip, DO NOT CUT the wires on the OEM harness.

Now attach the wires together.
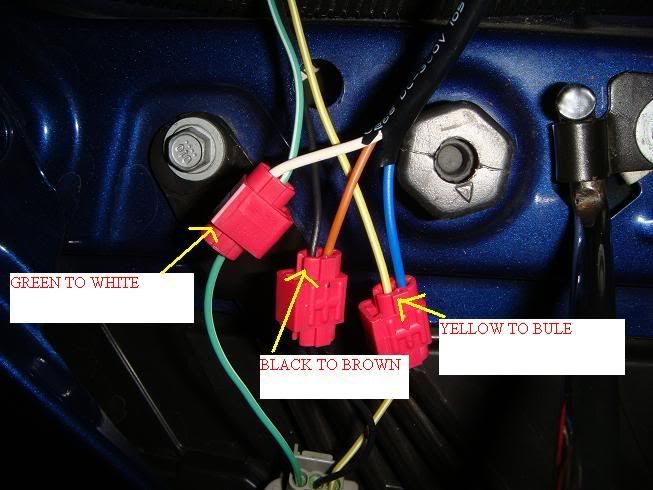
FYI:
Green is Low beam
Yellow is High Beam
Black is Ground
After you secure the wire taps, wrap them in electricians tape. I do just to help keep everything together.
Step 9[/b]:
Then connect all the wires up.
· Attach the power cable to the ballast on both sides.
· Connect all three wires for the headlight bulbs.
· Connect the MAIN power wire to the battery last[/b].
Now everything should be hooked up and no bare wire should be showing any where.
Step 10[/b]:
Connect your negative cable back to your battery (do not tighten).
Turn the headlights on; you don’t have to turn the car on. They should come on and you should hear an electrical buzzing sound coming from each of the ballasts. If they come on, turn them off and tighten up the battery cable. Make su
Everything about the kit is A+ in my book, except one thing (which is easily fixable).
So without further ado: the installation of a HID kit on a 2007 Mustang V6.
Tools needed:
Flat head screw driver
Electrical tape
3M double sided foam outdoor tape (normally grey in color with red backing)
Ratchet
8mm socket
Qty 3: Red quick wire taps
Knife / Razor
[ul][/ul]
Step 1:
Open the box and check the contents.
Apart from what the picture shows, there should be 3 screws (not needed) and 2 black metal frames that are clipped to the back of the ballasts. (not needed)
Step 2[/b]:
Disconnect the negative terminal from the battery.
Step 3[/b]:[/b]
Remove the factory headlight bulbs.
Step 4[/b]:
REMOVE the red rubber gasket from the OEM bulb. Place that gasket ONTOP of the HID bulbs own red gasket. You need to do this so the HID bulb will fit snuggly into the headlight housing. If you are keeping the stock bulbs place them in a safe location
Step 5:[/b]
Remove the black plastic radiator cover from the front of the engine bay. This is done by removing the 6 black rivets on top.
After you remove these push-in black rivets you can lift the whole black radiator guard up and place it out of the way.
Step 6[/b]:
The HID bulbs have 3 connections that have to be made. A black wire, a red wire, and a third wire. Go ahead and put the bulbs into the headlight housing. There is some with lettering on the bulbs that say LOCK and UNLOCK. Turn them to the lock position. The wires that are coming out of the bulb will be near the frame of the car (closest to the ground).
If you are installing the BI Xenon bulbs, do not tighten them in all the way (past the lock position). They need to be loose so they have room for the bulbs to angle up when you turn on your high beams. The ceramic anode WILL NOT be at the 6 o’clock position. It will be cocked inward slightly. The bulb will also “feel” a little lose in the headlamp socket.
This picture is the passenger side.
Step 7[/b]:
Lay out the components as follows.
Place one ballast on the driver’s side – Remove the black mounting bracket from ballasts. Double sided tape (which will be applied later) will hold them in place forever.
Place one ballast AND the relay on the passenger side. The relay is to the left of the ballast.
[ul][/ul]
[ul][*]
Stretch out the power cord and the other wires to there proper locations. Hiding them where you like.[/align]The 2 grounding wires for the ballasts – I used one of the bolts that hold the fuse block in place (you can see it in the picture above) for the passenger side. For the drivers side I used the bolt that the air box sits on.[/ul]
Step 8[/b]:
Here is the problem. This kit is designed for use with other cars. The headlight adaptor doesn’t fit.
The solution is to cut the HID headlight harness off.
Then strip, DO NOT CUT the wires on the OEM harness.
Now attach the wires together.
FYI:
Green is Low beam
Yellow is High Beam
Black is Ground
After you secure the wire taps, wrap them in electricians tape. I do just to help keep everything together.
Step 9[/b]:
Then connect all the wires up.
· Attach the power cable to the ballast on both sides.
· Connect all three wires for the headlight bulbs.
· Connect the MAIN power wire to the battery last[/b].
Now everything should be hooked up and no bare wire should be showing any where.
Step 10[/b]:
Connect your negative cable back to your battery (do not tighten).
Turn the headlights on; you don’t have to turn the car on. They should come on and you should hear an electrical buzzing sound coming from each of the ballasts. If they come on, turn them off and tighten up the battery cable. Make su

3rd Gear Member
Joined: Nov 2005
Posts: 701
From:
Very nice write up and pictures. It seems a lot of people are doing these HID upgrades where they just drop them into the stock housings. I know on other vehicles people have had problems with wiring melting because it's too much current for the stock wires and problems with discoloration and sometimes melting of the housing because the HID bulbs get too hot. It will be nice to hear the reports after people have had them installed for a year to see how they're holding up. I hope it is good because it's much better than spending $800 - $1,000 for them. -Joe
Thread Starter
2nd Gear Member
Joined: Nov 2007
Posts: 331
From: Tampa, FL
ORIGINAL: djmac95
Kdr you are a god among men! I have the VVME kit and I've been looking for a writeup like this for weeks. Thanks!
Kdr you are a god among men! I have the VVME kit and I've been looking for a writeup like this for weeks. Thanks!
Jbailer - With all the research thatI did and the copious amounts of others with this same kit there havn't been any problems as of yet, but only time will tell. The wattage that is drawn from the HID system is only 35 watts vs the 55 watt stock bulbs. I was worried about the headlight housing melting as well but it hasn't "felt" any hotter than it did with the halogen bulbs. For a savings of $500+I am willing to take that chance

3rd Gear Member
Joined: Nov 2005
Posts: 701
From:
ORIGINAL: kdrshocker
Jbailer - With all the research thatI did and the copious amounts of others with this same kit there havn't been any problems as of yet, but only time will tell. The wattage that is drawn from the HID system is only 35 watts vs the 55 watt stock bulbs. I was worried about the headlight housing melting as well but it hasn't "felt" any hotter than it did with the halogen bulbs. For a savings of $500+I am willing to take that chance
Jbailer - With all the research thatI did and the copious amounts of others with this same kit there havn't been any problems as of yet, but only time will tell. The wattage that is drawn from the HID system is only 35 watts vs the 55 watt stock bulbs. I was worried about the headlight housing melting as well but it hasn't "felt" any hotter than it did with the halogen bulbs. For a savings of $500+I am willing to take that chance
Thread Starter
2nd Gear Member
Joined: Nov 2007
Posts: 331
From: Tampa, FL
That is true. Most people aim there headlights up way to high in the first place, so when they put HIDs in itsoncoming traffics worst nightmare. Plus the 07 housings don't have the diffuser on the end of the housing like the 05s and 06s. Before I put my bulbs in I marked where my cut off line was on a wall 25 feet out. After I put the HIDs in I put the car in the same spot to measure the alignment and the cut off line was almost in the same spot. The flare on the driver’s side is a little higher after the fact though. I have been driving around for 2 weeks now and haven’t been flashed at yet. I haven’t seen my light beam go above anyone's door seam either. I'll keep you posted if someone flashes me. (With their headlights)
5th Gear Member
Joined: Jun 2005
Posts: 3,319
From:
I'm just about ready to go HID. I am looking at the Retro-Solutions.com kit (Bi-Xenon). I, too, am going with the 6000K bulbs. I am trying to decide between the 35W and the 55W kit. When you mention "diffuser", are you talking about the little black thing over the tip of the bulb in my '06? I assume you like the HID light.
