
Gauges, and other things installed..


Thread Starter
2nd Gear Member
Joined: Sep 2007
Posts: 224
From:
Ok guys.. I still have a couple loose ends to tie up to finish the instalation of the gauges in my car. But here is the write up of all the info I aquired while doing it!
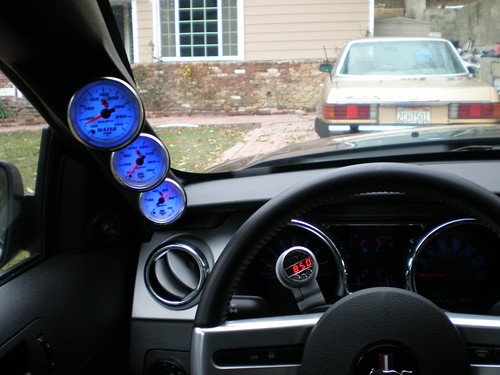
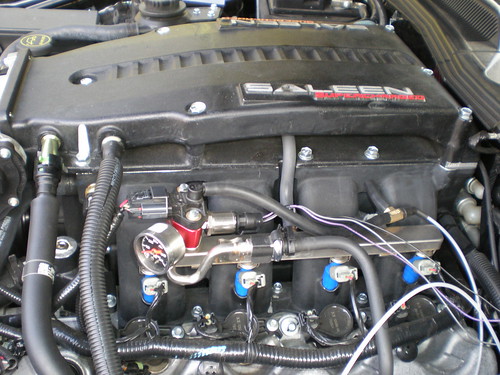
First a couple pictures of the final intstall..
Here we have the 3 gauges on the pillar.. in hindsight I probably would have gone with individual gauge pods that screw to the stock pillar.. wasnt a big fan of the autometer piece the way it just tries to squeze in on top.. made it REALLY hard to put back on. I used all Autometer C2 gauges purchased from Leo at LTM Global (who I think is going to be a sponsor here soon. The service I recieved from Leo was amazing.. and I will get more into that as I describe the things I went thru on the install. The only gauge that isnt autometer is the Air/Fuel ratio gauge. I went with Innovative because they have a full networked sensor system with logging (also which I will get more into later)
On the top is water temp, middle is oil temp, then bottom is oil pressure.. On the steering colum you can see the autometer digital tach with shift light.
you can also see the awesome dent I put in the oil temp gauge.. lesson learned, dont drop the gauges!
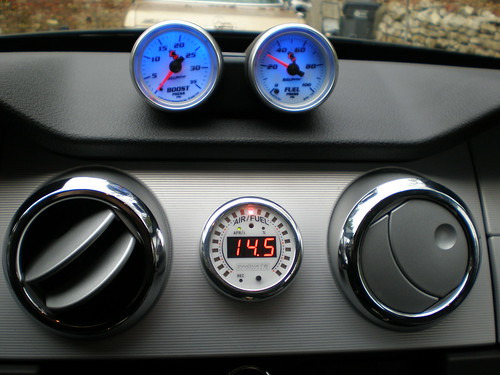
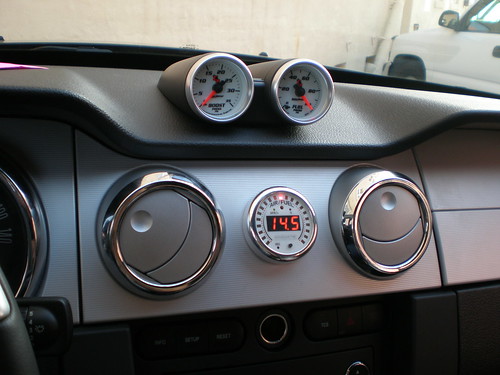
Here you can see the mechanical boost gauge on the left, and the electronic fuel pressure on the right. Center dash is the Innovative A/F gauge.. The bezel on it matches the air vents almost perfectly, thats part of the reason I decided to put it there.. it looks almost 100% stock like that!
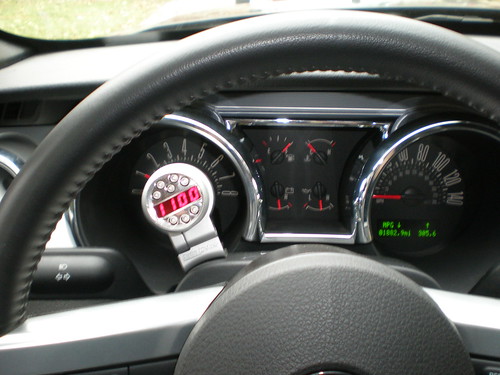
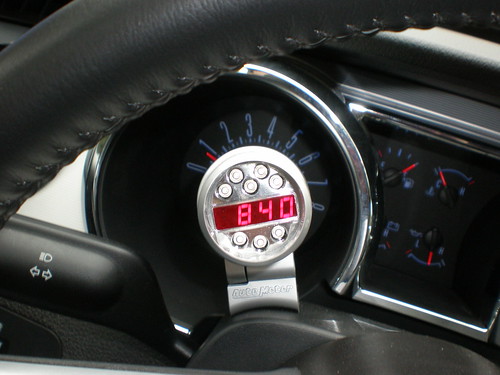
Here is a issolated shot of the tach, it couldnt have been a more perfect place to put it if you ask me.. This is pretty much my POV and you can see that you can still read the stock tach also. If any warning lights come on, you have to kinda look around the tach, but thats no big deal.
I am going to be posting the rest of the instructions here.. its just going to take time to type it all out so bear with me
First a couple pictures of the final intstall..
Here we have the 3 gauges on the pillar.. in hindsight I probably would have gone with individual gauge pods that screw to the stock pillar.. wasnt a big fan of the autometer piece the way it just tries to squeze in on top.. made it REALLY hard to put back on. I used all Autometer C2 gauges purchased from Leo at LTM Global (who I think is going to be a sponsor here soon. The service I recieved from Leo was amazing.. and I will get more into that as I describe the things I went thru on the install. The only gauge that isnt autometer is the Air/Fuel ratio gauge. I went with Innovative because they have a full networked sensor system with logging (also which I will get more into later)
On the top is water temp, middle is oil temp, then bottom is oil pressure.. On the steering colum you can see the autometer digital tach with shift light.
you can also see the awesome dent I put in the oil temp gauge.. lesson learned, dont drop the gauges!
Here you can see the mechanical boost gauge on the left, and the electronic fuel pressure on the right. Center dash is the Innovative A/F gauge.. The bezel on it matches the air vents almost perfectly, thats part of the reason I decided to put it there.. it looks almost 100% stock like that!
Here is a issolated shot of the tach, it couldnt have been a more perfect place to put it if you ask me.. This is pretty much my POV and you can see that you can still read the stock tach also. If any warning lights come on, you have to kinda look around the tach, but thats no big deal.
I am going to be posting the rest of the instructions here.. its just going to take time to type it all out so bear with me
Thread Starter
2nd Gear Member
Joined: Sep 2007
Posts: 224
From:
First, I will go with the simple things..
Tach.
You need to install a "tach adapter" for our cars to get a regular tach signal. I tach adapter I went with was from autometer and was about $80..
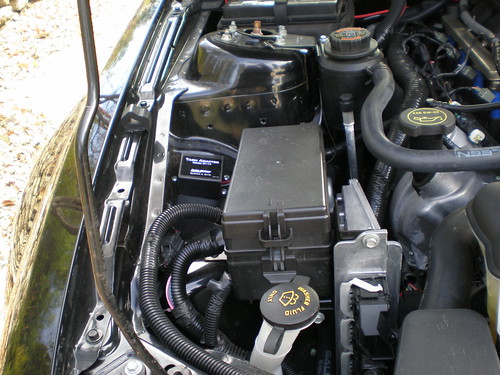
Auto Meter 9117 - Auto Meter Tach Adapter for DIS Ignition Systemsyou can see it here to the left of the fuse box. Its kinda a pain in the *** to install because you have to take your fuse box apart to get to the leads you need to tap into. The instructions are fairly straight forward. Find the correct leads and splice into them.. yes it was scary taking apart my fuse box and cutting wires, but it all worked out the first time.. I thought I took pictures of this process but I cant seem to locate them
here is the final install tho. You can see the tachadapter sitting just to the left of the fuse box there.
that was simple enough really, took about an hour cause I was worried about cutting the wires
You then run the wires thru the firewall.. which at first proved to be very difficult to find WHERE to go thru. I figured the spot to go thru is where ford goes thru. Its in thedriver side fender well. Just use a philips on the 4 fasteners inside the fender well, you turn them a quarter to a half turn and they release. You then just pull them out and remove the piece that gaurds the firewall. You'll see a huge gromet there with big bundles of wires coming thru. I just cut a little slit in it and started pushing wires thru, when i am all done I am going to seal it back up with some silicon. I think I have pictures of this also, but its in the group of pictures that I cant locate as of yet.. I will update if I find them.
Anyways, once you have the wires inside the car, you just connect the approriate wires to the tach and its done.. worked like a charm!
you can see the tach fits the contour of the steering colum almost perfect.. it would fit perfect if I moved it a little to the left, but then it wouldnt have been centered in the stock tach like it is..
Tach.
You need to install a "tach adapter" for our cars to get a regular tach signal. I tach adapter I went with was from autometer and was about $80..
Auto Meter 9117 - Auto Meter Tach Adapter for DIS Ignition Systemsyou can see it here to the left of the fuse box. Its kinda a pain in the *** to install because you have to take your fuse box apart to get to the leads you need to tap into. The instructions are fairly straight forward. Find the correct leads and splice into them.. yes it was scary taking apart my fuse box and cutting wires, but it all worked out the first time.. I thought I took pictures of this process but I cant seem to locate them
here is the final install tho. You can see the tachadapter sitting just to the left of the fuse box there.
that was simple enough really, took about an hour cause I was worried about cutting the wires
You then run the wires thru the firewall.. which at first proved to be very difficult to find WHERE to go thru. I figured the spot to go thru is where ford goes thru. Its in thedriver side fender well. Just use a philips on the 4 fasteners inside the fender well, you turn them a quarter to a half turn and they release. You then just pull them out and remove the piece that gaurds the firewall. You'll see a huge gromet there with big bundles of wires coming thru. I just cut a little slit in it and started pushing wires thru, when i am all done I am going to seal it back up with some silicon. I think I have pictures of this also, but its in the group of pictures that I cant locate as of yet.. I will update if I find them.
Anyways, once you have the wires inside the car, you just connect the approriate wires to the tach and its done.. worked like a charm!
you can see the tach fits the contour of the steering colum almost perfect.. it would fit perfect if I moved it a little to the left, but then it wouldnt have been centered in the stock tach like it is..
Thread Starter
2nd Gear Member
Joined: Sep 2007
Posts: 224
From:
Mechanical boost gauge..
This was a simple install that was a little difficult cause I didnt have anyone helping me.
The nylon tubing comes coiled up, and likes to stay that way. While pulling it thru the firewall I put a couple kinks in it which created leaks, therfore I didnt get any response on the boost gauge So I hade to purchase another nylon tube and was MUCH more carefull running it this time.
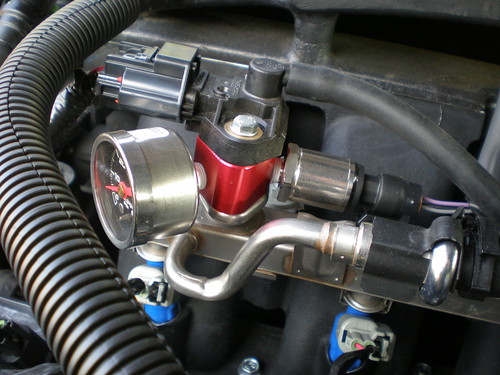
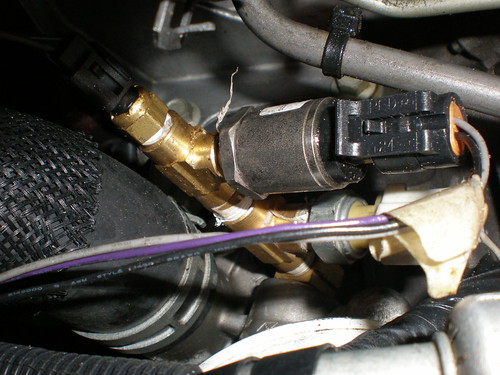
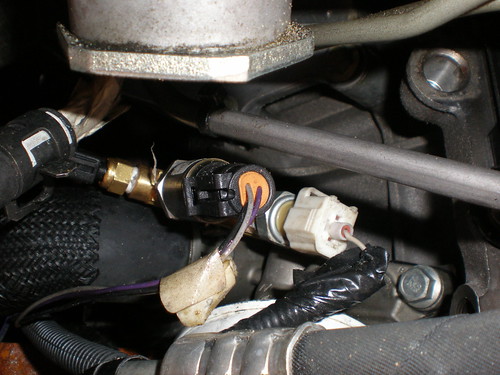
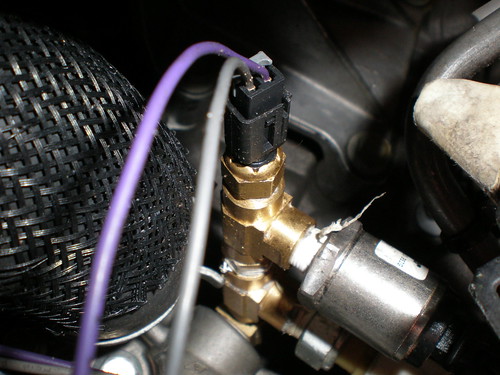
here is where I tapped into the vacume line. I went with this brass fitting that I found because the one that comes with the gauge was way to small to fit in the vacume line.
the rest is very straight forward, just run the line to the gauge and connect it. Make sure you use teflon tape wherever there needs to be a seal.
This was a simple install that was a little difficult cause I didnt have anyone helping me.
The nylon tubing comes coiled up, and likes to stay that way. While pulling it thru the firewall I put a couple kinks in it which created leaks, therfore I didnt get any response on the boost gauge
So I hade to purchase another nylon tube and was MUCH more carefull running it this time.here is where I tapped into the vacume line. I went with this brass fitting that I found because the one that comes with the gauge was way to small to fit in the vacume line.
the rest is very straight forward, just run the line to the gauge and connect it. Make sure you use teflon tape wherever there needs to be a seal.
Thread Starter
2nd Gear Member
Joined: Sep 2007
Posts: 224
From:
Fuel pressure gauge..
This one was kinda a pain, not to install, but for other reasons.
You need an adapter to install this gauge also.
This one cost me about $80, which is rediculous because its jsut a simple block of machined aluminum.
You are going to hear "in hind sight" a lot because this was a huge learning process lol
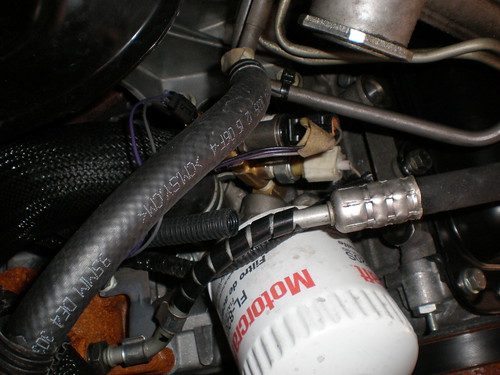
so, in hind sight, I would have picked a different one based on color alone. I got this one because I liked that it had 2 ports on it, and even came with the mechanical pressure gauge you see mounted to it. When I open my hood people tend to gravitate to that gauge. Anyways on the right of it you see the fuel pressure seding unit from the autometer gauge.
The procedure I went thru was this.
Remove the fuel delivery line, make sure you have plenty of paper towels handy, and your engine is cool! I didnt have enough paper towels ready and had to spend a lot of time soaking up the fuel that poured out when I popped off that line. I recomend just jamming paper towels all around the area, specially in the the valleys between the intake tubes.
Remove the stock piece from the fuel rail by removing the two bolts (8mm I THINK, I should have written all this down when I was done that day)
Insert the addapter and bolt it all back together. I believe the bolts needed to be tightened to 8ft lbs, and for the life of me I couldnt find a torque wrench that would go that low. I ended up finding one online.. so I basicly tightened it to close to what I thought was 8ft lbs, then re did it when I got the torque wrench.. I was damn close to 8ft lbs lol
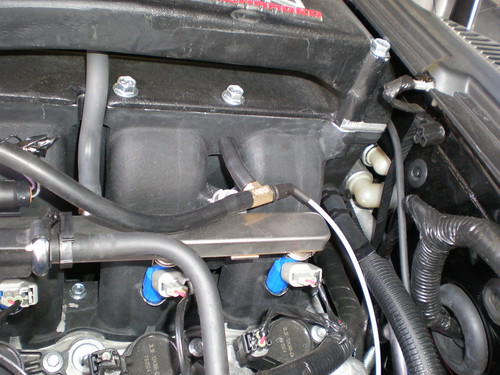
Here you can see the fuel pressure adaptrer and the place where i tapped the vacume line.
I still have the wires exposed there.. After I first installed it, I put all the wires in those plastic looms. After I ran the wires to the gauges, the fuel pressure gauge would just stay pinned at 100 PSI! I tested the gauge with my multimeter and it seemed fine, pluged another sensor into it and it read correctly. I then tested the wires and saw that the sensor was sending a constant 4.75 volts, which is equivilent to 100 PSI. I figured the sending unit was bad. I talked to Leo at LTM Global and he was more than helpfull in getting me a replacement sending unit right away (its actually way more involved than that.. because I made another mistake and needed something else replaced, and Leo was right there to help) Anyways, he got me the replacement and the gauge still didnt work!!
Turns out there was a short in the wiring harnes! The on thing I didnt think would be bad. The replacement Leo got me had a wiring harness also since it was a whole new gauge with everything, I put that one in and it all worked finally!
This one was kinda a pain, not to install, but for other reasons.
You need an adapter to install this gauge also.
This one cost me about $80, which is rediculous because its jsut a simple block of machined aluminum.
You are going to hear "in hind sight" a lot because this was a huge learning process lol
so, in hind sight, I would have picked a different one based on color alone. I got this one because I liked that it had 2 ports on it, and even came with the mechanical pressure gauge you see mounted to it. When I open my hood people tend to gravitate to that gauge. Anyways on the right of it you see the fuel pressure seding unit from the autometer gauge.
The procedure I went thru was this.
Remove the fuel delivery line, make sure you have plenty of paper towels handy, and your engine is cool! I didnt have enough paper towels ready and had to spend a lot of time soaking up the fuel that poured out when I popped off that line. I recomend just jamming paper towels all around the area, specially in the the valleys between the intake tubes.
Remove the stock piece from the fuel rail by removing the two bolts (8mm I THINK, I should have written all this down when I was done that day)
Insert the addapter and bolt it all back together. I believe the bolts needed to be tightened to 8ft lbs, and for the life of me I couldnt find a torque wrench that would go that low. I ended up finding one online.. so I basicly tightened it to close to what I thought was 8ft lbs, then re did it when I got the torque wrench.. I was damn close to 8ft lbs lol
Here you can see the fuel pressure adaptrer and the place where i tapped the vacume line.
I still have the wires exposed there.. After I first installed it, I put all the wires in those plastic looms. After I ran the wires to the gauges, the fuel pressure gauge would just stay pinned at 100 PSI! I tested the gauge with my multimeter and it seemed fine, pluged another sensor into it and it read correctly. I then tested the wires and saw that the sensor was sending a constant 4.75 volts, which is equivilent to 100 PSI. I figured the sending unit was bad. I talked to Leo at LTM Global and he was more than helpfull in getting me a replacement sending unit right away (its actually way more involved than that.. because I made another mistake and needed something else replaced, and Leo was right there to help) Anyways, he got me the replacement and the gauge still didnt work!!
Turns out there was a short in the wiring harnes! The on thing I didnt think would be bad. The replacement Leo got me had a wiring harness also since it was a whole new gauge with everything, I put that one in and it all worked finally!
Thread Starter
2nd Gear Member
Joined: Sep 2007
Posts: 224
From:
Oil pressure and Temp..
These were the two hardest!
There is so little room under there to instlall the sensor units!
Heres an idea of where it goes..
First thing you do is remove the stock oil sending unit. I used a lug nut socket, I dont remember the size but it worked perfect.
IMPORTANT! Have something ready to catch the oil that comes out when you remove the unit! It will pour a couple cups out.
With all the research I did, I found there are a couple different ways to do this. One method is to use a "sandwich adapter" which goes between the oil filter and the motor. I purchased one, and after examining it, it looke like the oil flow would have been to restricted for my likes. There was one company out there that I saw that designed one specifically to install gauge sensors.. but it was expensive. With hind sight again, I would have bought that adapter.
I went to home depot after examining the sandwich adapter to buy brass fittings to make my own adapter. I read a thread on here where the guy did it. So I went and just bought a ton of all different adapters and sizes (sure I have some left over but it was worth having the extras so I didnt have to borrow a car to go get one if I didnt have it!) I spent atleast an hour trying to find a configuration of the fittings that would work. Its a pain because you have to put them in one at time.. there isnt enough room down there to but the whole thing together then just install it. I read also that I should use the liquid teflon, so I did. The first configuration I put together, did not work. I started the car up and had a leak! I knew which one it was because there was one that I couldnt get enough torque on to get it to spin all the way around so I could get to the place where I needed to put the next fitting.
So I go back under the car and removed the whole thing, and start over. I found a new configuration (yes, its like a crazy puzzle). I put it all back together the new way, and started the car.. no visible leaks!! YAY!!!
After a couple days, the temp reading on the oil temp gauge stops working.. WTF I think..
I get back under the car and sure enough.. there was a leak, a small one, but enough to get oil all over the connection for the temp gauge. I then proceed to take the whole thing apart agian!! I spend about 2 hours this time.. really testing differnt ways to put the fitting together to that I can tighten each one. I also switch to the teflon tape, not the liquid teflon.. I think that was a big issuese. Got it all put back together and BAM, again.. no visible leaks!! I drive it for the week and check it again, no more leaks!! BUT, the gauge still isnt reading the temp lol, so next I have to find out if its the sensor or the wires.. havnt had a chance to do that yet!!
Here is the final configuration I went with..
On the left you can see the oil temp sending unit.. then in the middle is the oil pressure sending unit, then the right is the stock sending unit.
another view
as you can see there is very little room.. and I have big hands
Thread Starter
2nd Gear Member
Joined: Sep 2007
Posts: 224
From:
ORIGINAL: onederful100
looks nice. i just got a innovate A/F too, different model tho, havent installed yet. but yours looks great!
looks nice. i just got a innovate A/F too, different model tho, havent installed yet. but yours looks great!
And that brings me to its install phase
Thread Starter
2nd Gear Member
Joined: Sep 2007
Posts: 224
From:
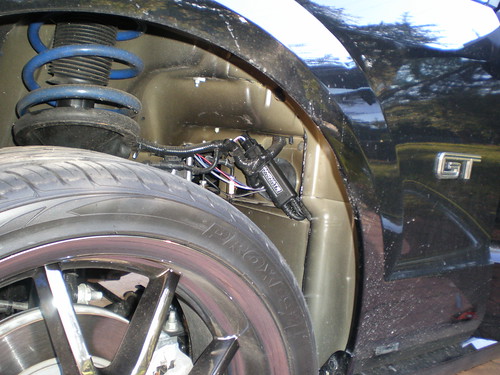
Ok I found the pictures of teh firewall and where I went thru it..
And here is the innovative A/F meter install..
This system is rather involved.. Just for the A/F you have, the wideband oxygen sensor, the sensor control box, and the gauge itself.
The BEST thing about the Innovative one, is they make a lot of other items too. All the sensors they make are connected thru a serial network!! I am a computer nerd, to to me that makes it really cool To add other sensors, you just need to plug them in the network. More on that later.
Here is where I went thru the firewall, and you can see the sensor control box.
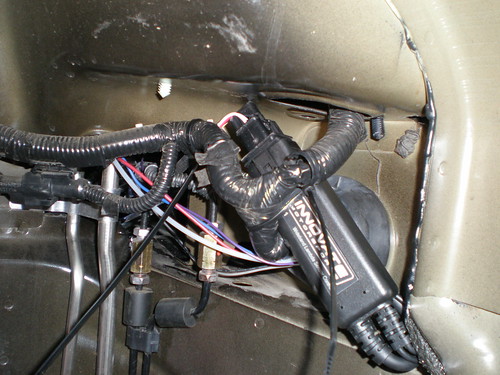
closeup before I zip tied it up nice and tight..
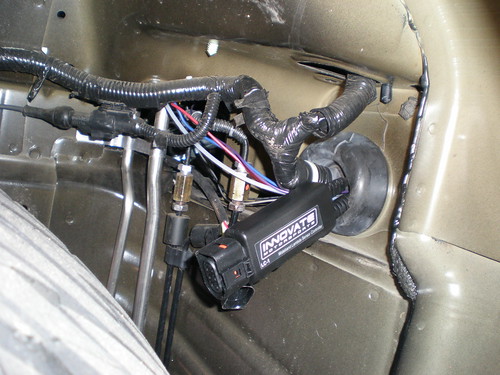
and it all zip tied up..
You also have to have the sensor installed in your exhaust. It comes with a "bung" that has a plug, so you just take that bung to a muffler shop and for aabout $70 they will drill the hole and weld the bung on there. At first you plug it with the plug, cause you need to have the sensor powered at all times when the car is running.. if it isnt you will permanently damage the sensor. So I get under the car and go to screw the sensor in after I mounted the sensor box and gauge.. and the guys at the muffler shop didnt get the bung lined up with the hole!!! I was livid to say the least! Anyways.. I got out the dremel and luckily had a grinding stone that was almost the exact diameter as the hole. I put it in the hole then turned it on (because I didnt want to screw up the threads on the bung). The dremel made short work of the exhaust pipe, I was VERY suprised. It was all of a couple seconds and the dremel ate away the part of the pipe that was in the way. I then screwed in the sensor and connected it to the sensor control box.
Next post is on installing the gauge itself..
And here is the innovative A/F meter install..
This system is rather involved.. Just for the A/F you have, the wideband oxygen sensor, the sensor control box, and the gauge itself.
The BEST thing about the Innovative one, is they make a lot of other items too. All the sensors they make are connected thru a serial network!! I am a computer nerd, to to me that makes it really cool
To add other sensors, you just need to plug them in the network. More on that later.Here is where I went thru the firewall, and you can see the sensor control box.
closeup before I zip tied it up nice and tight..
and it all zip tied up..
You also have to have the sensor installed in your exhaust. It comes with a "bung" that has a plug, so you just take that bung to a muffler shop and for aabout $70 they will drill the hole and weld the bung on there. At first you plug it with the plug, cause you need to have the sensor powered at all times when the car is running.. if it isnt you will permanently damage the sensor. So I get under the car and go to screw the sensor in after I mounted the sensor box and gauge.. and the guys at the muffler shop didnt get the bung lined up with the hole!!! I was livid to say the least! Anyways.. I got out the dremel and luckily had a grinding stone that was almost the exact diameter as the hole. I put it in the hole then turned it on (because I didnt want to screw up the threads on the bung). The dremel made short work of the exhaust pipe, I was VERY suprised. It was all of a couple seconds and the dremel ate away the part of the pipe that was in the way. I then screwed in the sensor and connected it to the sensor control box.
Next post is on installing the gauge itself..
Thread Starter
2nd Gear Member
Joined: Sep 2007
Posts: 224
From:
I put this info in another thread but will put it in here also just to consolidate it all..
This was NERVE WRACKING!! This is my very first ever, brand new off the lot car.
I am sure you guys have heard this before.. but measure twice, cut once.. I measured three or four times lol
The mark on the left was just to get height..
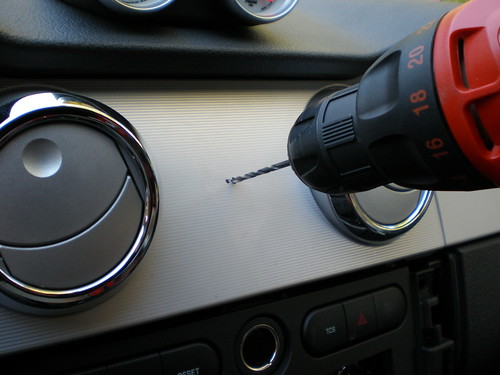
pilot hole drilled
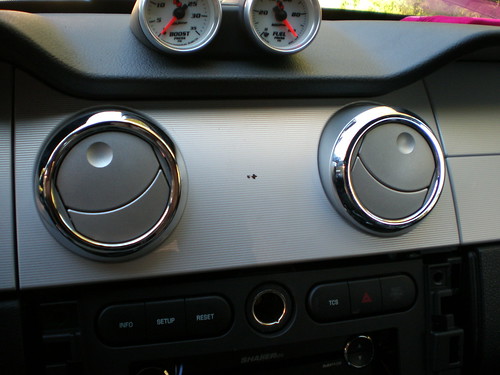
this part REALLY scared the crap outta me..
Also, I left it mounted in hopes that I could just install it without taking off the center piece. In order to screw the gauge in, you do need to take off the center piece, which is easier than it sounds. It was VERY easy however to drill the hole with the piece mounted because it didnt move at all
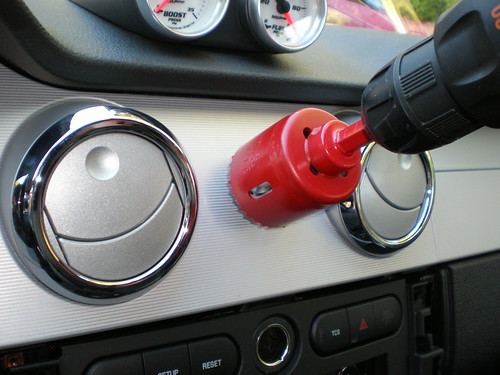
and drilled out!!
gauge installed!
Now I could NOT have done this without the help of peope on here. There was one guy that helped in my other thread, I believe his name was SAWYER. He posted a lot of instuctions on this process and made me confident in doing it.. and I am really happy I did.. the innovative gauge in the middle looks awesome to me!
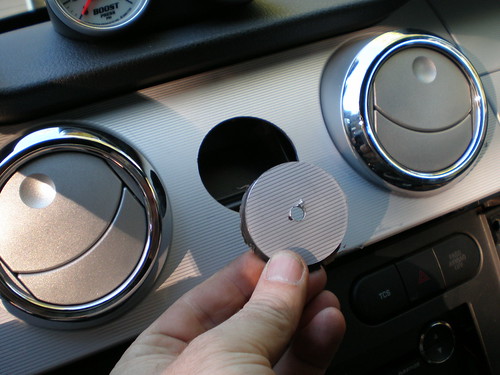
So to do the final mounting of the gauge.. you need to remove the center piece. And it really does sound harder than it is!
Remove the negative battery terminal!! you have to remove the passenger side airbag to get the center piece removed.
Remove 4 bolts holding the glove box.
Remove the connector on the airbag
Remove 2 bolts hold the airbag
push around the edge of the airbags panel..push from the inside! I pulled on the panel and now it doesnt line up exactly with the rest of the dash.. when I am 100% done with all the installs I am going to look into replacing that piece.
Remove the airbag which then gives you access to the 2 bolts on the right holding the center panel down.
Remove the main gauge bezels by just grabbing onto them and pulling.
That exposes the two bolts on the left.
Remove all 4 bolts and pull the center piece off.
Mount gauge
reverse process to put it all back together.
The first time I did it, it took a while.. but when I finally had all the information I needed, I could take out the center panel in 10 minutes.
This was NERVE WRACKING!! This is my very first ever, brand new off the lot car.
I am sure you guys have heard this before.. but measure twice, cut once.. I measured three or four times lol
The mark on the left was just to get height..
pilot hole drilled
this part REALLY scared the crap outta me..
Also, I left it mounted in hopes that I could just install it without taking off the center piece. In order to screw the gauge in, you do need to take off the center piece, which is easier than it sounds. It was VERY easy however to drill the hole with the piece mounted because it didnt move at all
and drilled out!!
gauge installed!
Now I could NOT have done this without the help of peope on here. There was one guy that helped in my other thread, I believe his name was SAWYER. He posted a lot of instuctions on this process and made me confident in doing it.. and I am really happy I did.. the innovative gauge in the middle looks awesome to me!
So to do the final mounting of the gauge.. you need to remove the center piece. And it really does sound harder than it is!
Remove the negative battery terminal!! you have to remove the passenger side airbag to get the center piece removed.
Remove 4 bolts holding the glove box.
Remove the connector on the airbag
Remove 2 bolts hold the airbag
push around the edge of the airbags panel..push from the inside! I pulled on the panel and now it doesnt line up exactly with the rest of the dash.. when I am 100% done with all the installs I am going to look into replacing that piece.
Remove the airbag which then gives you access to the 2 bolts on the right holding the center panel down.
Remove the main gauge bezels by just grabbing onto them and pulling.
That exposes the two bolts on the left.
Remove all 4 bolts and pull the center piece off.
Mount gauge
reverse process to put it all back together.
The first time I did it, it took a while.. but when I finally had all the information I needed, I could take out the center panel in 10 minutes.
Thread Starter
2nd Gear Member
Joined: Sep 2007
Posts: 224
From:
The next part of the innovative system is the LMA-3

Its got built in sensors, or you can pipe in any 5V based sensor for it to log and display.
In the center of it there is a 3 bar MAP sensor that can be configured for boost, so I spliced into my nylon tube and ran it to the LMA-3.
I also spliced into my tach signal from the tach adapter,and the signal from the fuel pressure gauge, and put them into two of the sensor inputs.
The last 2 sensor inputs can be configured for G forces, both side force and accelartion forces.
To install this I just unplugged one wire (more like a plug from some headphones) and plugged them into this between the gauge and the A/F sensor control box.
At the very end of the chain is this little guy..

Its a bluetooth adapter!! So I dont even have to manually plug in the computer.. my little sony UMPC connects to the gauge system wirelessly and can then display anything the sensors are seeing, and log it in real time!
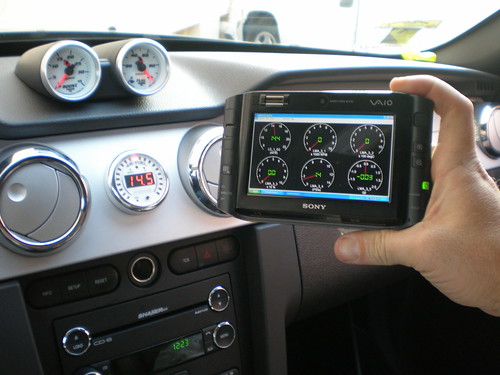
The log files are directly compatible with diablo sports line of tuners also so you can hand your log files to a tuner and he can give you a custum tune for a Diable sport tuner easily (from what I understand, I dont have the tuner yet cause I am waiting on the new one thats coming out soon)
Its got built in sensors, or you can pipe in any 5V based sensor for it to log and display.
In the center of it there is a 3 bar MAP sensor that can be configured for boost, so I spliced into my nylon tube and ran it to the LMA-3.
I also spliced into my tach signal from the tach adapter,and the signal from the fuel pressure gauge, and put them into two of the sensor inputs.
The last 2 sensor inputs can be configured for G forces, both side force and accelartion forces.
To install this I just unplugged one wire (more like a plug from some headphones) and plugged them into this between the gauge and the A/F sensor control box.
At the very end of the chain is this little guy..
Its a bluetooth adapter!! So I dont even have to manually plug in the computer.. my little sony UMPC connects to the gauge system wirelessly and can then display anything the sensors are seeing, and log it in real time!
The log files are directly compatible with diablo sports line of tuners also so you can hand your log files to a tuner and he can give you a custum tune for a Diable sport tuner easily (from what I understand, I dont have the tuner yet cause I am waiting on the new one thats coming out soon)