

 Nov 20, 2015, 12:12 PM
Last edit by: IB Advertising
See related guides and technical advice from our community experts:
Browse all: Steering & Suspension Guides
- Ford Mustang Gt 1996 to 2004: How to Replace Struts and Shocks
Step by step instructions for do-it-yourself repairs
Browse all: Steering & Suspension Guides

How To: UPR Coil Over Install WITH PICS
Thread Starter
5th Gear Member
Joined: Sep 2006
Posts: 4,039
From: CA
As some of you know, I have just got my kit in the mail this week. Since I've have never seen a good one, I figured I'd do a little write up for the coil-over install. So here goes. We'll start out with the back.
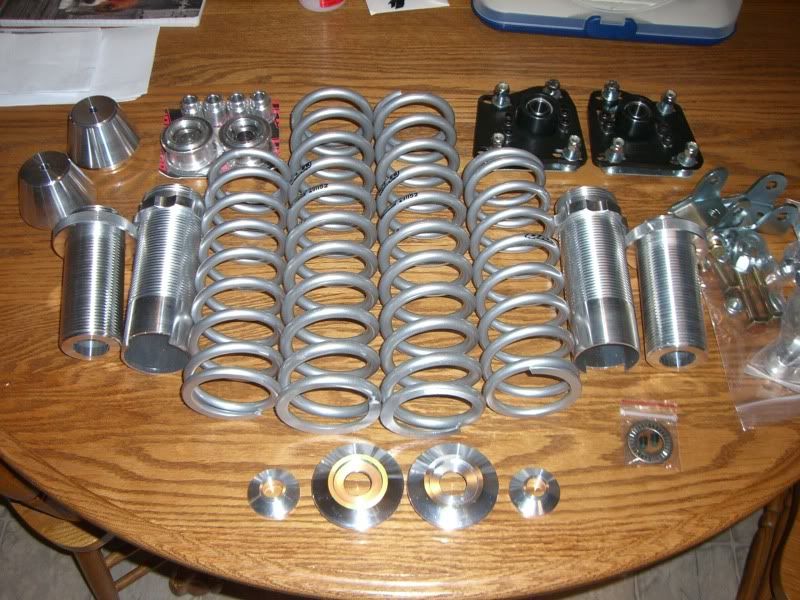
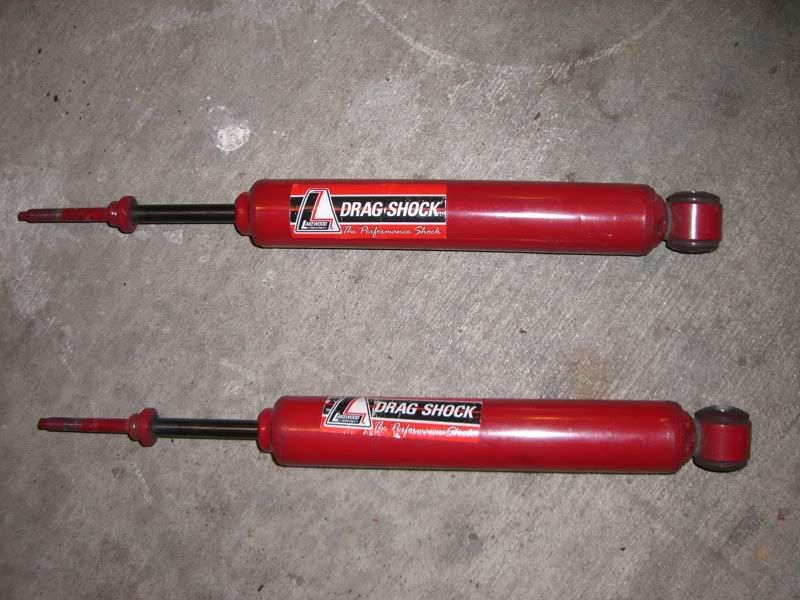
Here's the kit in all it's glory
First, find a good place with plenty of space for the install.
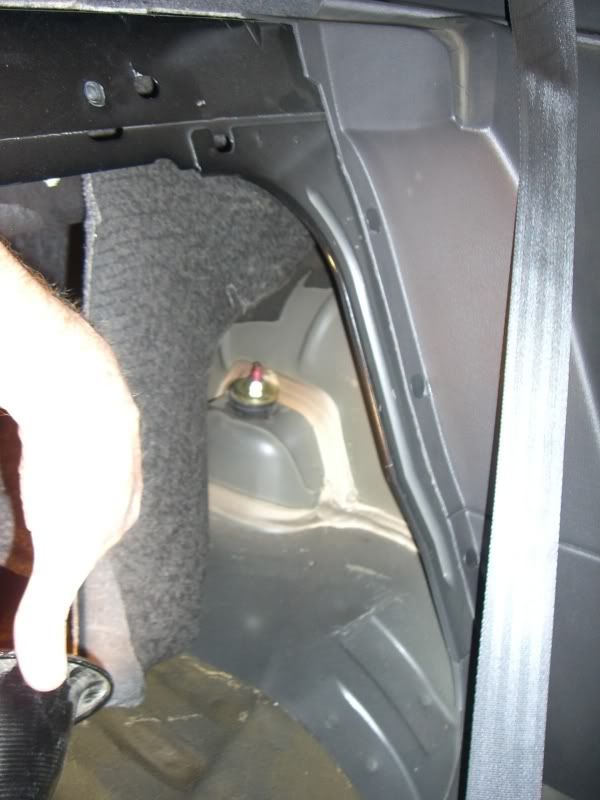
Put both front seats as far forward as possible so you'll have space to work in the back seat. Fold the rear seats down to gain access to the trunk and rear top shock mounts. Pull the trunk liner on either side towards the center of the car to expose the top shock mounts.
Remove the top shock mount nut and bushings from both the passenger and driver's side rear shocks. Do this with the weight of the vehicle on the wheels to remove pressure from the top shock mounts.

Now the rear end of the vehicle can be raised and supported by jack stands. Place the jack stands under the side-rear jacking points or SFCs if installed. Note: If the car is supported by jack stands under the axle, the suspension will still be under a load, and you will not be able to remove the rear springs.
Remove the rear wheels/tires.
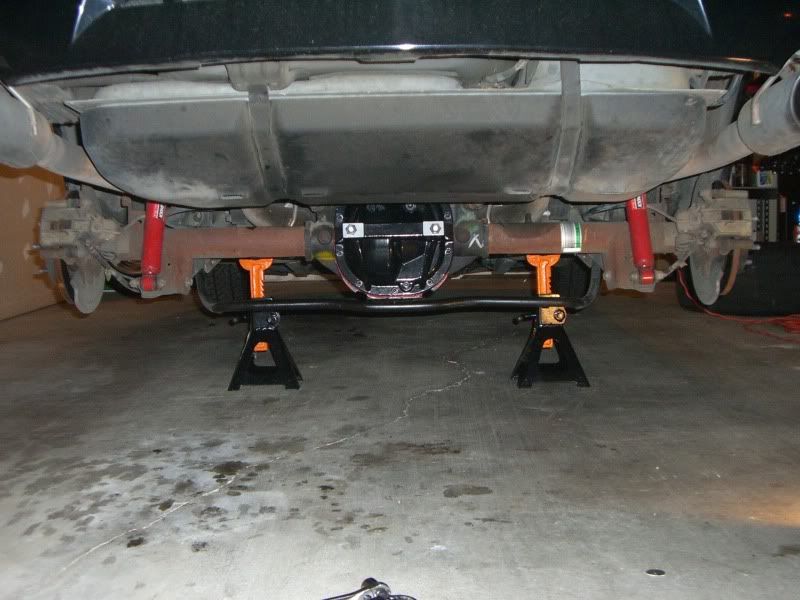
Remove the bolts passing through the bottom of the shocks that are holding them in place and remove the rear shocks from the vehicle.

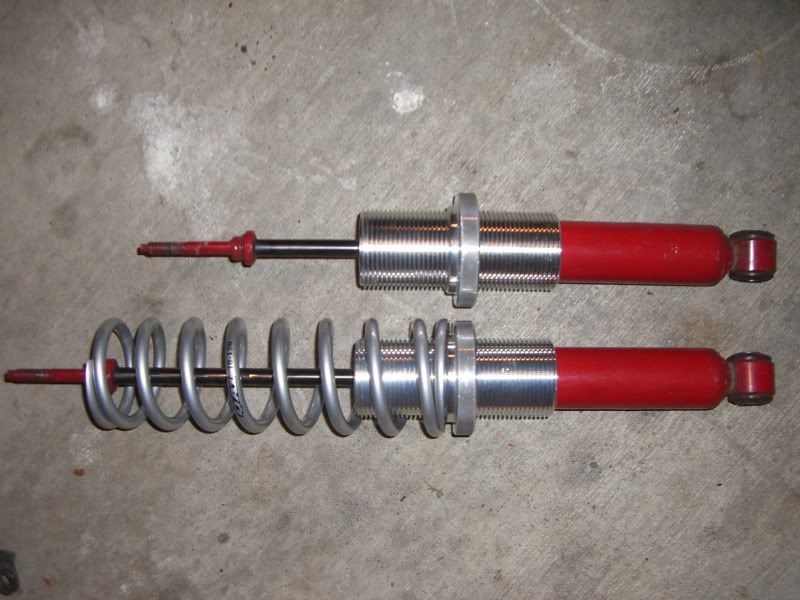
From the side of the car, you can see the rear coil spring.
If the car is already lower as mine was, with the suspension in its current relaxed and extended state, the spring can be easily removed from the side. It may take a bit of twisting, but it will come out without too much trouble. (with stock height springs, you may have to disconnect the lower control arms to remove the coil springs)

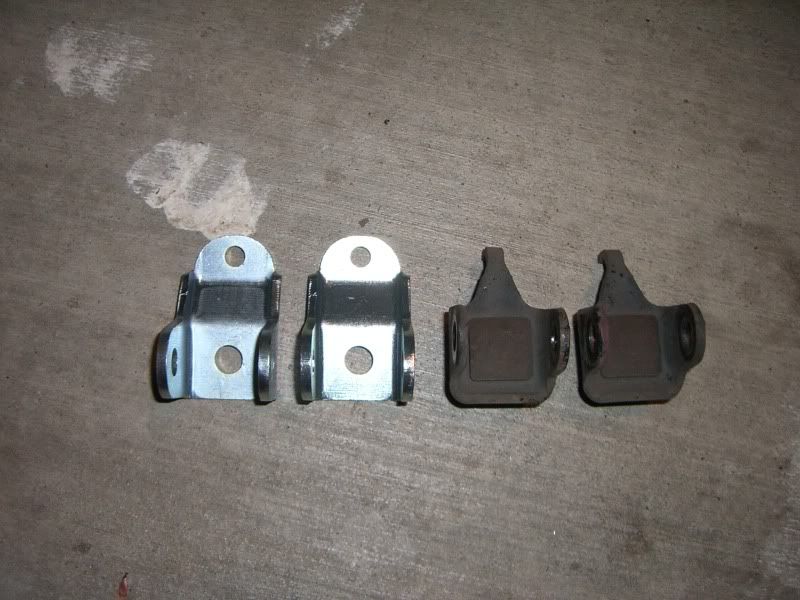
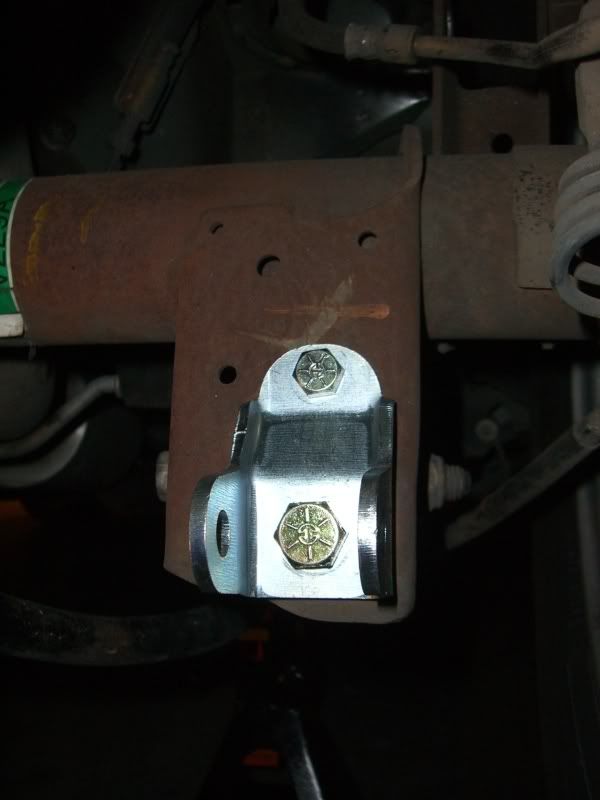
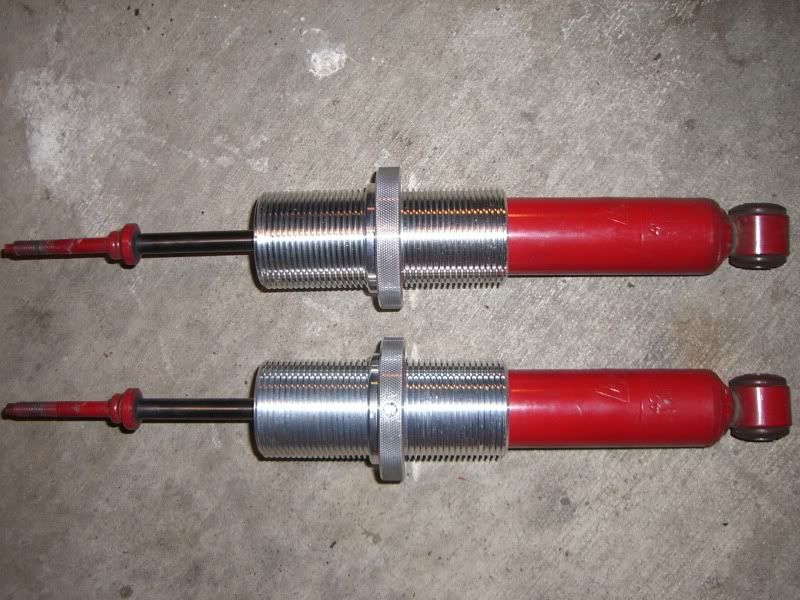
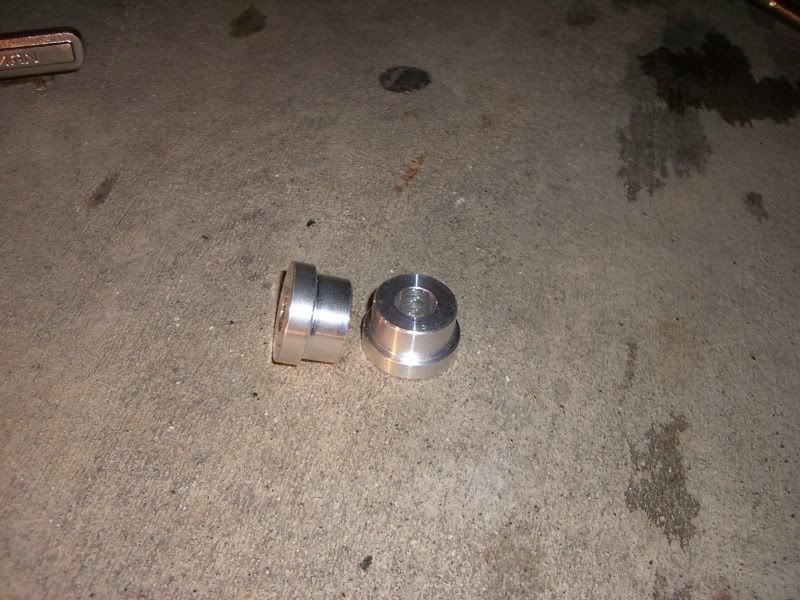
With a 21mm box end wrench or ratchet wrench, remove the nut that hold the lower shock mounts to the axle housing, and remove the lower shock mounts. The factory lower shock mounts nee to be replaced when converting to a coil-over setup. The stock mounts are not designed to support the full burden of the car's weight.

Here is a couple shots comparing the new with the old. You can clearly see the difference in strength between the new and old shock mounts.
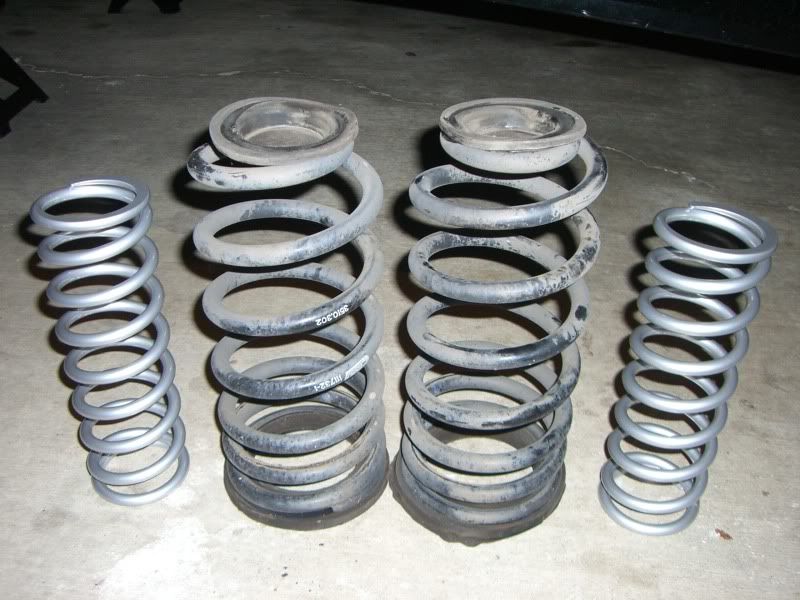
It's easy to see judging from the overall thickness and size of the coils why there is some weight loss associated with converting to a coil-over setup.
Back to the shock mounts. The new mounts come supplied with Grade-8 mounting hardware, but the top mounting hole needs to be widened just a hair to make room for the new 3/8" bolts. The hole in question is the center oblong shaped one.
Using a drill with a 3/8" bit, ream out the center of the bolt hole. It doesn't take much at all since the hole is just under 3/8" already.
Now install the new shock mounts with the supplied hardware. Make sure to have the bolts facing forward as in the following pic. If they are reversed with the nuts towards the rear of the car, you will have clearance issues with the bottom portion of the shock.
Now, remove the rubber bushngs from the bottom of the shocks. These will be replaced with billet aluminum bushings supplied with the kit. I found this easiest to do by spraying the bushings with some PB blaster or liquid wrench and tapping the bushings out with an appropriate sized socket. You must first tap out the small metal center piece before the rubber bushing will come out.
Here's the kit in all it's glory
First, find a good place with plenty of space for the install.
Put both front seats as far forward as possible so you'll have space to work in the back seat. Fold the rear seats down to gain access to the trunk and rear top shock mounts. Pull the trunk liner on either side towards the center of the car to expose the top shock mounts.
Remove the top shock mount nut and bushings from both the passenger and driver's side rear shocks. Do this with the weight of the vehicle on the wheels to remove pressure from the top shock mounts.
Now the rear end of the vehicle can be raised and supported by jack stands. Place the jack stands under the side-rear jacking points or SFCs if installed. Note: If the car is supported by jack stands under the axle, the suspension will still be under a load, and you will not be able to remove the rear springs.
Remove the rear wheels/tires.
Remove the bolts passing through the bottom of the shocks that are holding them in place and remove the rear shocks from the vehicle.
From the side of the car, you can see the rear coil spring.
If the car is already lower as mine was, with the suspension in its current relaxed and extended state, the spring can be easily removed from the side. It may take a bit of twisting, but it will come out without too much trouble. (with stock height springs, you may have to disconnect the lower control arms to remove the coil springs)
With a 21mm box end wrench or ratchet wrench, remove the nut that hold the lower shock mounts to the axle housing, and remove the lower shock mounts. The factory lower shock mounts nee to be replaced when converting to a coil-over setup. The stock mounts are not designed to support the full burden of the car's weight.
Here is a couple shots comparing the new with the old. You can clearly see the difference in strength between the new and old shock mounts.
It's easy to see judging from the overall thickness and size of the coils why there is some weight loss associated with converting to a coil-over setup.
Back to the shock mounts. The new mounts come supplied with Grade-8 mounting hardware, but the top mounting hole needs to be widened just a hair to make room for the new 3/8" bolts. The hole in question is the center oblong shaped one.
Using a drill with a 3/8" bit, ream out the center of the bolt hole. It doesn't take much at all since the hole is just under 3/8" already.
Now install the new shock mounts with the supplied hardware. Make sure to have the bolts facing forward as in the following pic. If they are reversed with the nuts towards the rear of the car, you will have clearance issues with the bottom portion of the shock.
Now, remove the rubber bushngs from the bottom of the shocks. These will be replaced with billet aluminum bushings supplied with the kit. I found this easiest to do by spraying the bushings with some PB blaster or liquid wrench and tapping the bushings out with an appropriate sized socket. You must first tap out the small metal center piece before the rubber bushing will come out.
Last edited by tbirdscwd; Apr 25, 2010 at 04:48 PM.
Thread Starter
5th Gear Member
Joined: Sep 2006
Posts: 4,039
From: CA
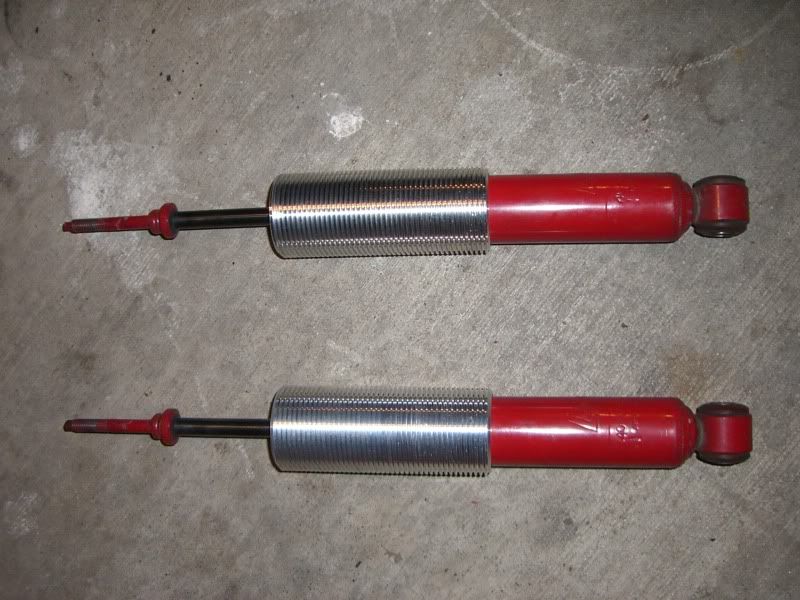
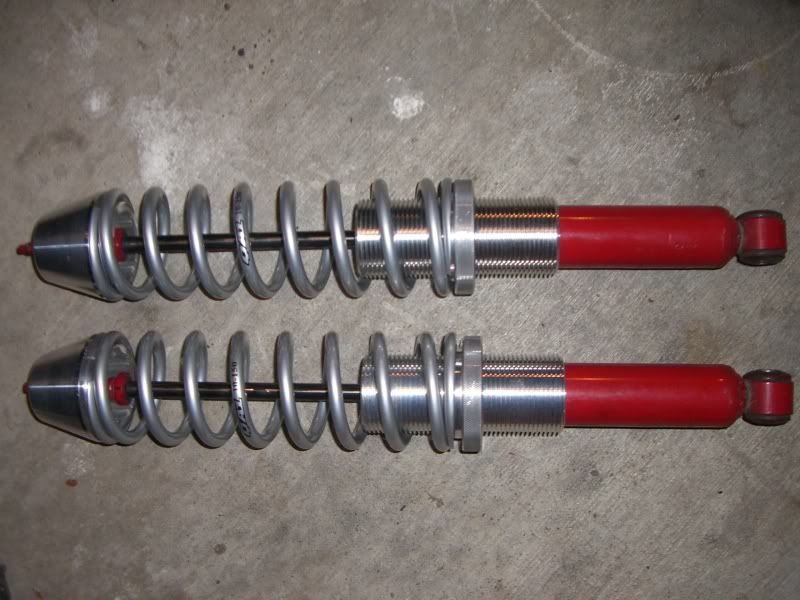
Here's a quick rundown of the actual coil-over assembly. Some schocks will have a dust cover that will require removal in order for the sleeve to fit over the shock.
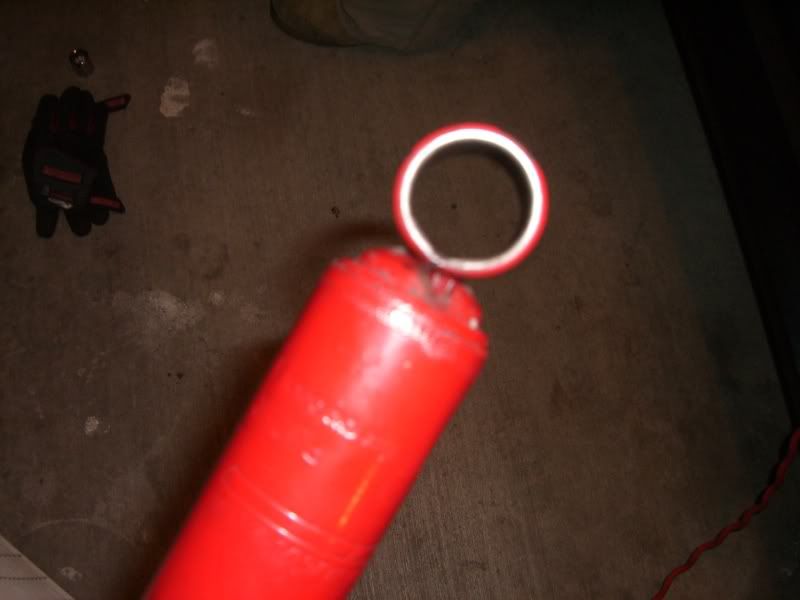
Slide the threaded sleeves over the shocks...don't worry, they only go on one way. Make sure they are pushed all the way down.
Now thread on the lower spring supports. Make sure the flat side is facing the bottom of the shock. There is a little ridge that the spring fits right around that should face the top of the shock. It is a good idea to also install the adjustment set screw while the coil-overs are not yet on the car. Do not tighten the set screw yet sinc you will need to adjust the ride height.
Before installing the springs, extend the shock all the way out by pulling on the ends. This may take some strength, so reach down and grab a hold.
Now place the upper spring support on top of the spring. This is what the assembly should look like (with the exception of the rubber bushings on the bottom) They should have been removed by this point. Make sure your springs have the labels facing right side up. This has no effect on the spring itself or anything else for that matter.....but only dorks install their springs upside down. :no
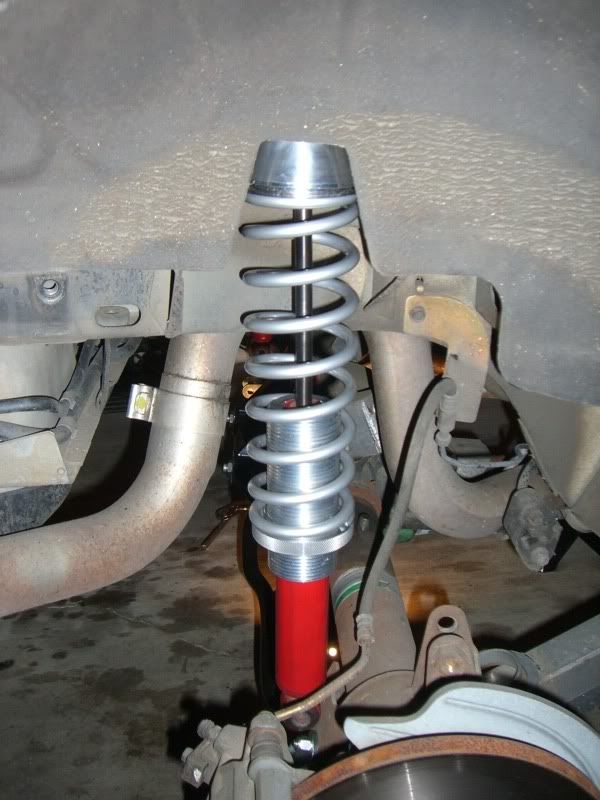
Install the spring/shock assembly on the car. This is much easier if you can enlist the help of a buddy or hot chick to either hold the spring/shocks up from the bottom while you thread the top mount nut back on the shock from above or visa versa. It is much easier to install the top portion first and then align and install the bottom mounts as opposed to doing the bottom first.

(as you can see I didn't know the kit even came with new bushings at first since the **** poor instructions don't even mention them. I initially though they went to the front suspension)
Once the nuts are started up top, then raise the axle with a floor jack to bring the shock mounts up and align the lower mounting points. Place the new billet aluminum bushings in the lower shock eyelets and finish installing the lower portion of the shocks with the new supplied hardware.
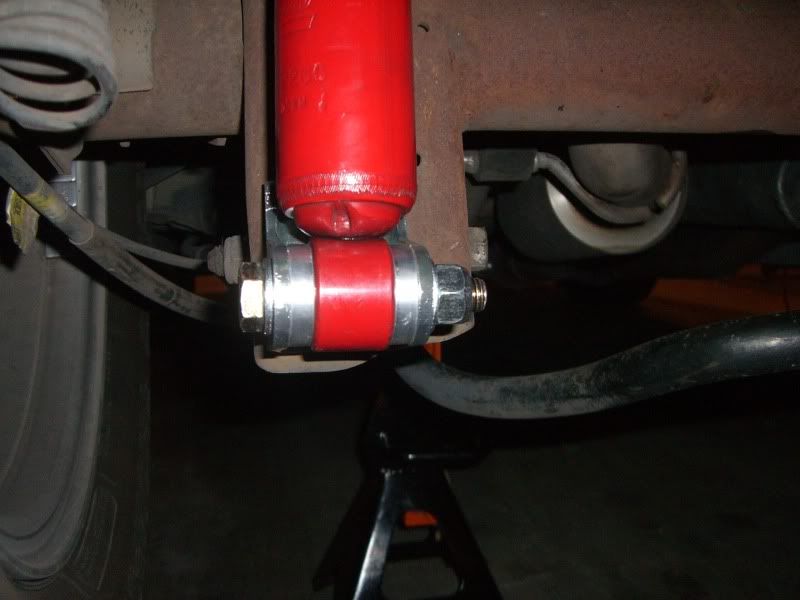
Put your wheels/tires back on the car, lower the car off the jack stands, and tighten the top shock nuts once again. You are done with the installation portion, and now all that needs to be done is adjust the ride height to suit your needs. Remember to tighten the set screw after all adjustments and only to adjust the ride height when the weight of the car is not resting on the wheels.
Slide the threaded sleeves over the shocks...don't worry, they only go on one way. Make sure they are pushed all the way down.
Now thread on the lower spring supports. Make sure the flat side is facing the bottom of the shock. There is a little ridge that the spring fits right around that should face the top of the shock. It is a good idea to also install the adjustment set screw while the coil-overs are not yet on the car. Do not tighten the set screw yet sinc you will need to adjust the ride height.
Before installing the springs, extend the shock all the way out by pulling on the ends. This may take some strength, so reach down and grab a hold.
Now place the upper spring support on top of the spring. This is what the assembly should look like (with the exception of the rubber bushings on the bottom) They should have been removed by this point. Make sure your springs have the labels facing right side up. This has no effect on the spring itself or anything else for that matter.....but only dorks install their springs upside down. :no
Install the spring/shock assembly on the car. This is much easier if you can enlist the help of a buddy or hot chick to either hold the spring/shocks up from the bottom while you thread the top mount nut back on the shock from above or visa versa. It is much easier to install the top portion first and then align and install the bottom mounts as opposed to doing the bottom first.
(as you can see I didn't know the kit even came with new bushings at first since the **** poor instructions don't even mention them. I initially though they went to the front suspension)
Once the nuts are started up top, then raise the axle with a floor jack to bring the shock mounts up and align the lower mounting points. Place the new billet aluminum bushings in the lower shock eyelets and finish installing the lower portion of the shocks with the new supplied hardware.
Put your wheels/tires back on the car, lower the car off the jack stands, and tighten the top shock nuts once again. You are done with the installation portion, and now all that needs to be done is adjust the ride height to suit your needs. Remember to tighten the set screw after all adjustments and only to adjust the ride height when the weight of the car is not resting on the wheels.
Thread Starter
5th Gear Member
Joined: Sep 2006
Posts: 4,039
From: CA
Ok here goes for the front install.
Before jacking up the car loosen the top shock/strut nut but do not remove them yet.
Jack up the car and place jack stands under front jacking points or SFCs if installed. Remove the front tires.
Starting on one side (pass side for me) remove the brake caliper by removing the two 15mm mounting bolts on the inner side of the caliper bracket.
Hang the caliper/bracket assembly out of the way using zip ties or whatever you have around. Lots of people use a bent metal coat hanger. Do not just let the caliper/bracket hang from the brake line as it is rubber and can easily be damaged.
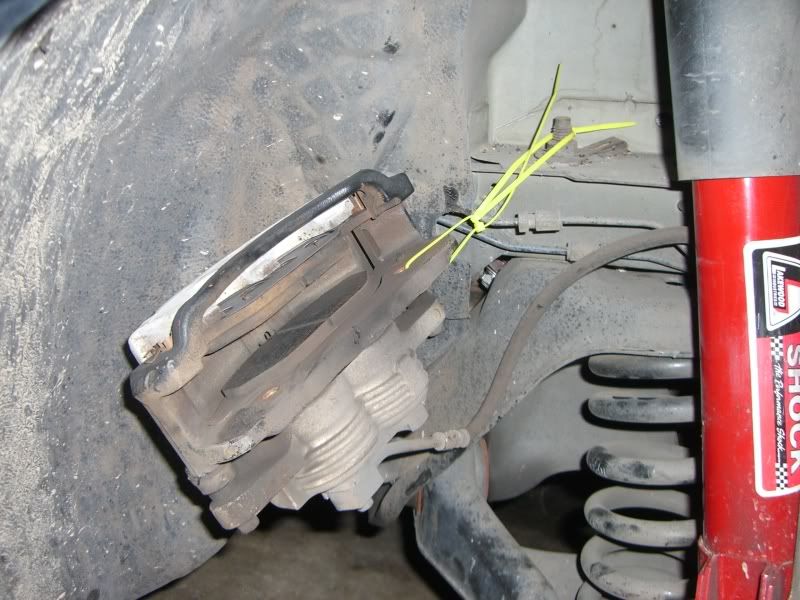
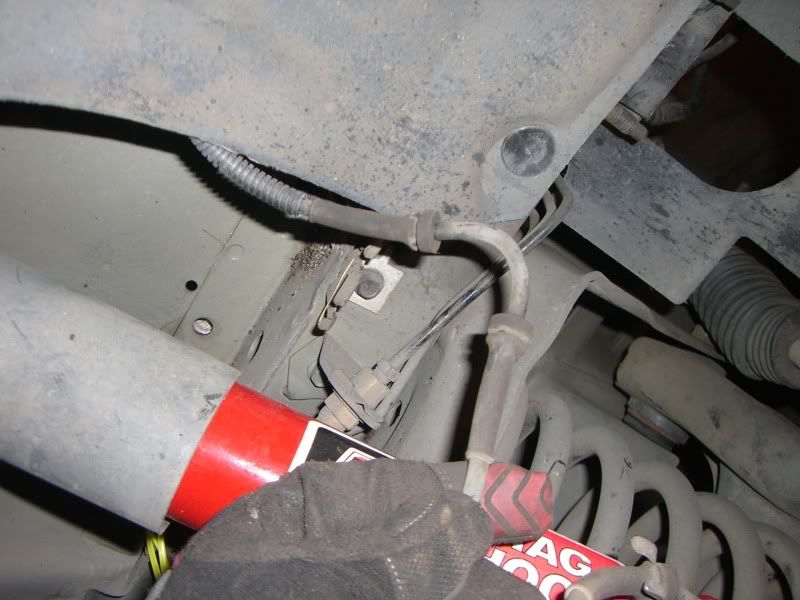
Also pull the ABS wiring grommets out of their mounting points to allow slack in the line when the suspension is relaxed.
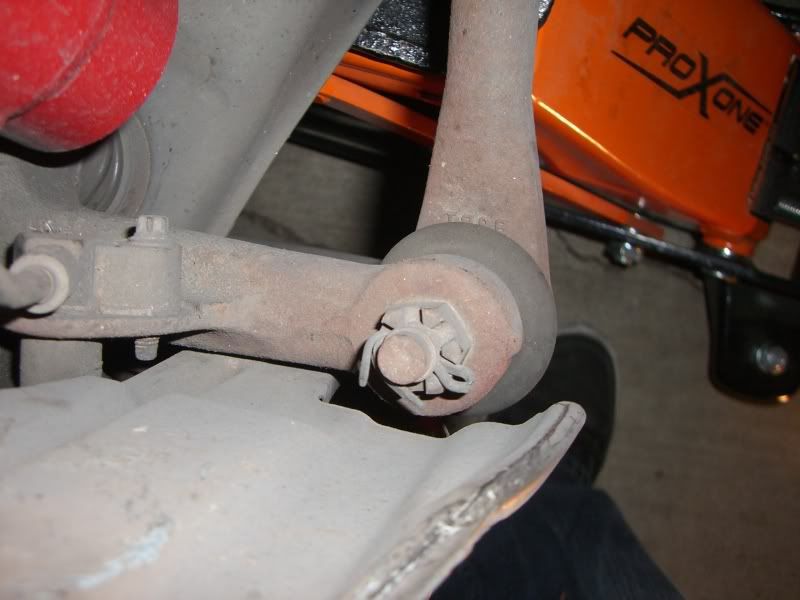
At this point, if you have one, remove the front sway bar end links. I have taken off my sway bar already.
If you have stock height springs, you may have to disconnect the steering rod ends from the spindle as well to allow enough articulation in the suspension to remove the stock springs.
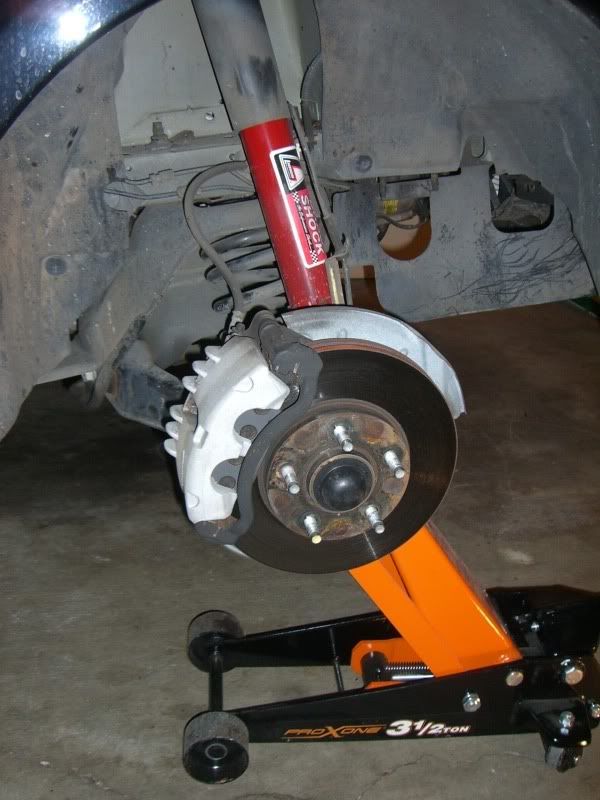
Place a floor jack under the passenger side lower a-arm and raise it to relieve the pressure on the top shock/strut nut. Once the pressure is relieved you can remove the nut. Note: at this point, the floor jack is the only thing supporting the a-arm, spindle, rotor, shock/strut, etc...
Slowly lower the floor jack to allow the suspension to relax and the shock will lower allowing you to get at it from inside the fender. Lower the jack to the point where the shock can be angled out of the fender so you will have access to work on the top. At it's lowest point, my Eibach springs were easily removed by hand. For stock height springs, removing the steering rod ends will allow the suspension to relax even farther in order to remove the springs.
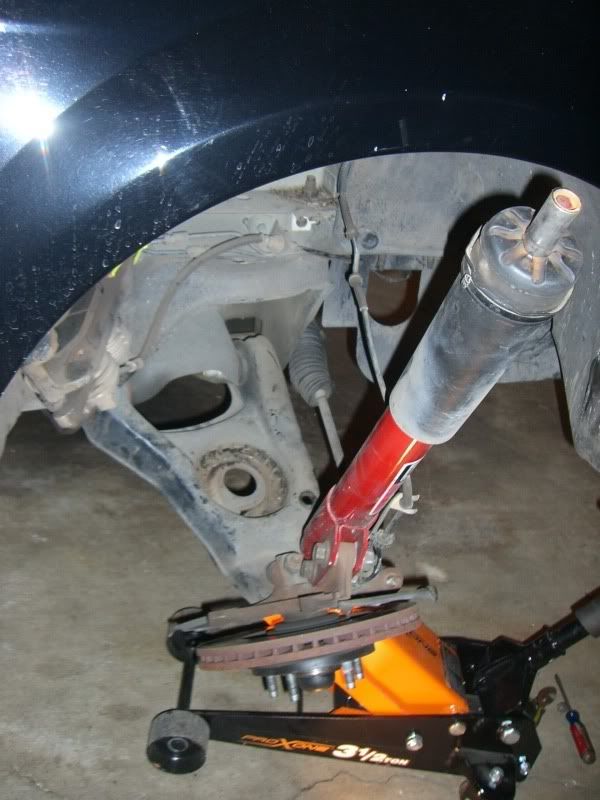
Remove the dust boot and old rubber bushing from the top of the strut.
With the springs removed, jack the a-arms back up a bit to relieve the tension on the suspension. This is a good time to start working on the CC plates if you do not already have them.
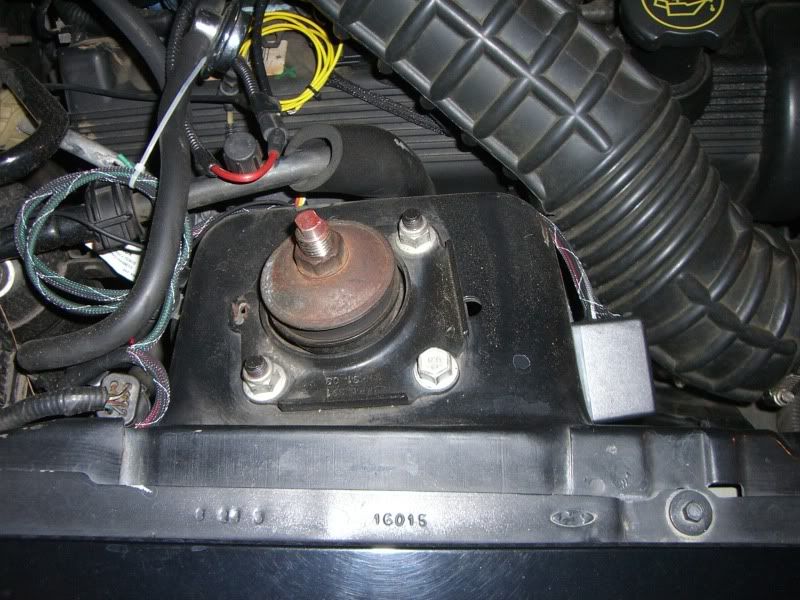
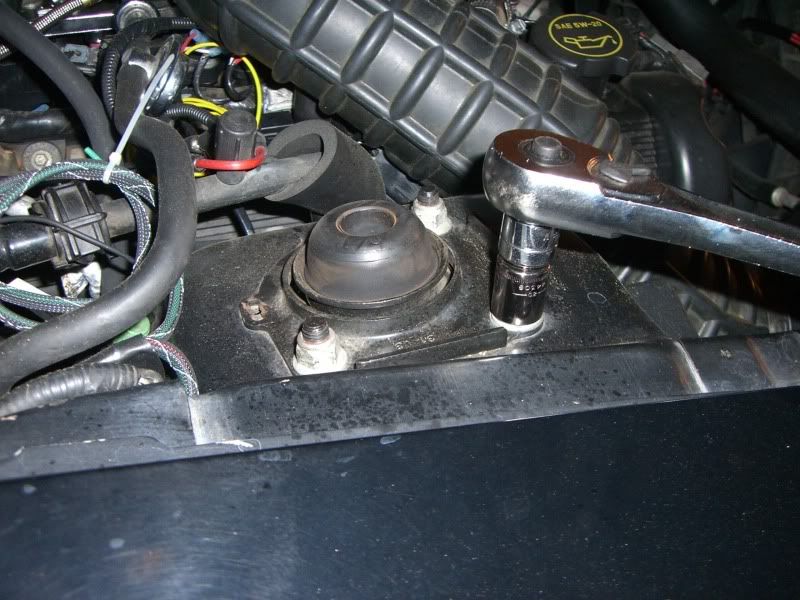
Remove the top 15mm bolts/nuts from the stock upper shock mounts. Remove the upper and lower portion of the mounts once the hardware is removed.
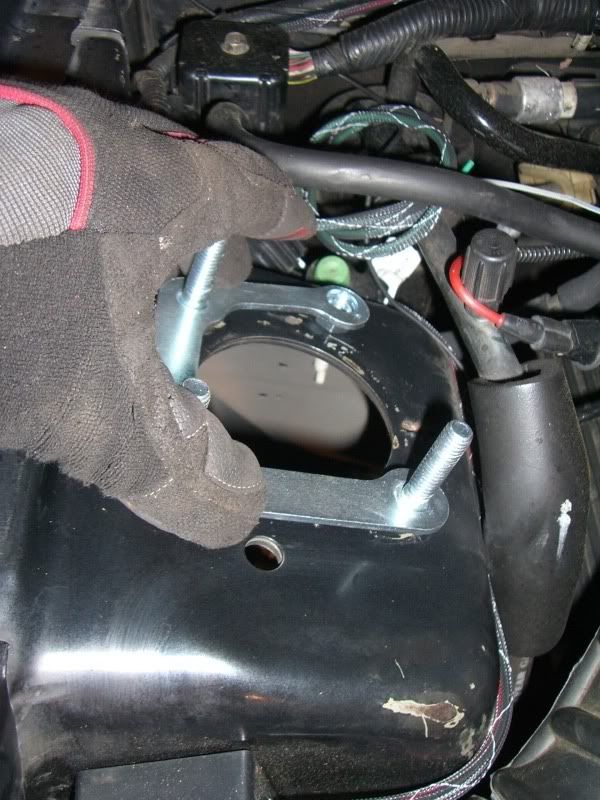
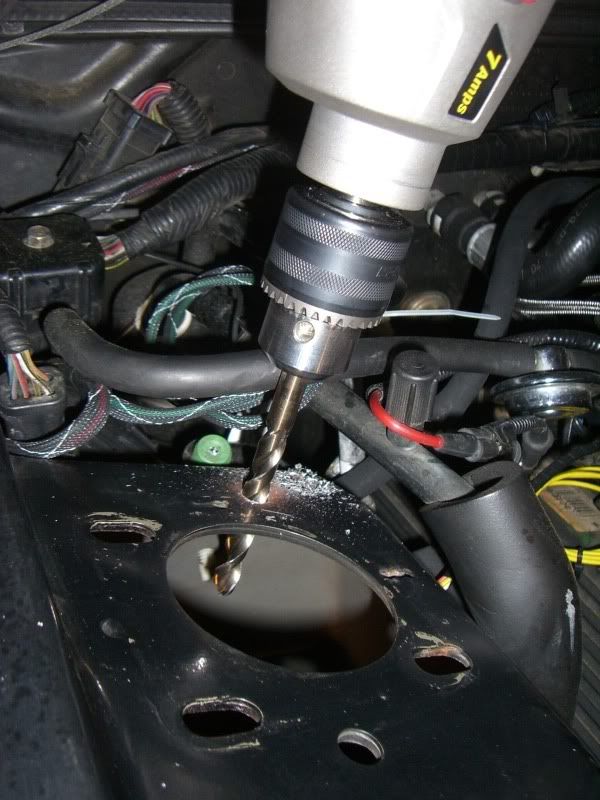
Once the stock mounts are out of the way, take the lower portion of the new cc plate and line it up with the stock holes from the top. Make sure you are using the passenger side plate!! These are 4 bolt cc plates so we will need to drill the 4th hole. With the holes lined up, make a small mark on the shock tower where the 4rth hole needs to be drilled.
Center punch the mark you just made for the 4th hole. With a drill and 3/8" drill bit, drill the 4th hole. ( you may need a different size bit depending on which cc-plates you end up using.
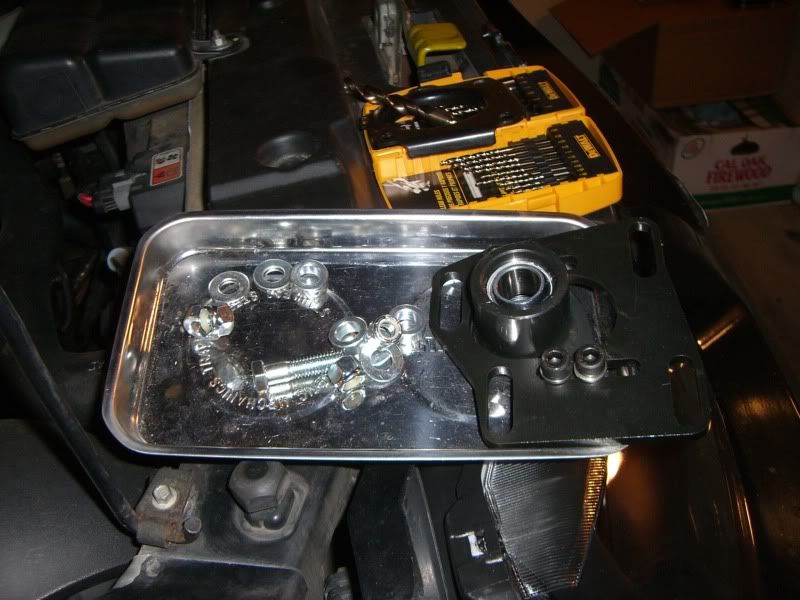
Get the upper cc-plate and all the hardware in one place and close enough for you to reach for pieces with you right hand while holding the lower mount in place. A $10 magnetic tray from your local parts store will be very handy for this job.
Before jacking up the car loosen the top shock/strut nut but do not remove them yet.
Jack up the car and place jack stands under front jacking points or SFCs if installed. Remove the front tires.
Starting on one side (pass side for me) remove the brake caliper by removing the two 15mm mounting bolts on the inner side of the caliper bracket.
Hang the caliper/bracket assembly out of the way using zip ties or whatever you have around. Lots of people use a bent metal coat hanger. Do not just let the caliper/bracket hang from the brake line as it is rubber and can easily be damaged.
Also pull the ABS wiring grommets out of their mounting points to allow slack in the line when the suspension is relaxed.
At this point, if you have one, remove the front sway bar end links. I have taken off my sway bar already.
If you have stock height springs, you may have to disconnect the steering rod ends from the spindle as well to allow enough articulation in the suspension to remove the stock springs.
Place a floor jack under the passenger side lower a-arm and raise it to relieve the pressure on the top shock/strut nut. Once the pressure is relieved you can remove the nut. Note: at this point, the floor jack is the only thing supporting the a-arm, spindle, rotor, shock/strut, etc...
Slowly lower the floor jack to allow the suspension to relax and the shock will lower allowing you to get at it from inside the fender. Lower the jack to the point where the shock can be angled out of the fender so you will have access to work on the top. At it's lowest point, my Eibach springs were easily removed by hand. For stock height springs, removing the steering rod ends will allow the suspension to relax even farther in order to remove the springs.
Remove the dust boot and old rubber bushing from the top of the strut.
With the springs removed, jack the a-arms back up a bit to relieve the tension on the suspension. This is a good time to start working on the CC plates if you do not already have them.
Remove the top 15mm bolts/nuts from the stock upper shock mounts. Remove the upper and lower portion of the mounts once the hardware is removed.
Once the stock mounts are out of the way, take the lower portion of the new cc plate and line it up with the stock holes from the top. Make sure you are using the passenger side plate!! These are 4 bolt cc plates so we will need to drill the 4th hole. With the holes lined up, make a small mark on the shock tower where the 4rth hole needs to be drilled.
Center punch the mark you just made for the 4th hole. With a drill and 3/8" drill bit, drill the 4th hole. ( you may need a different size bit depending on which cc-plates you end up using.
Get the upper cc-plate and all the hardware in one place and close enough for you to reach for pieces with you right hand while holding the lower mount in place. A $10 magnetic tray from your local parts store will be very handy for this job.
Thread Starter
5th Gear Member
Joined: Sep 2006
Posts: 4,039
From: CA
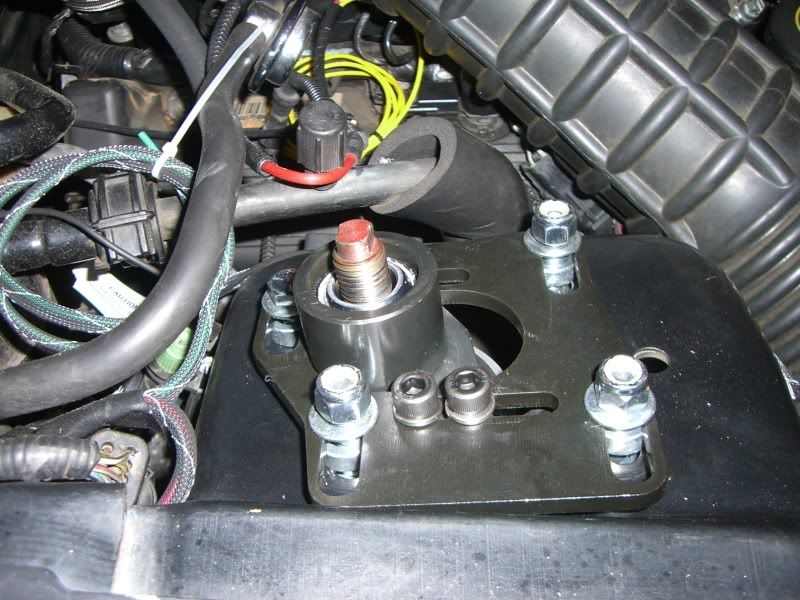
From the under side of the fender place put the bottom portion of the cc plate into the shock tower allowing the three bolts to protrude from the mounting holes.
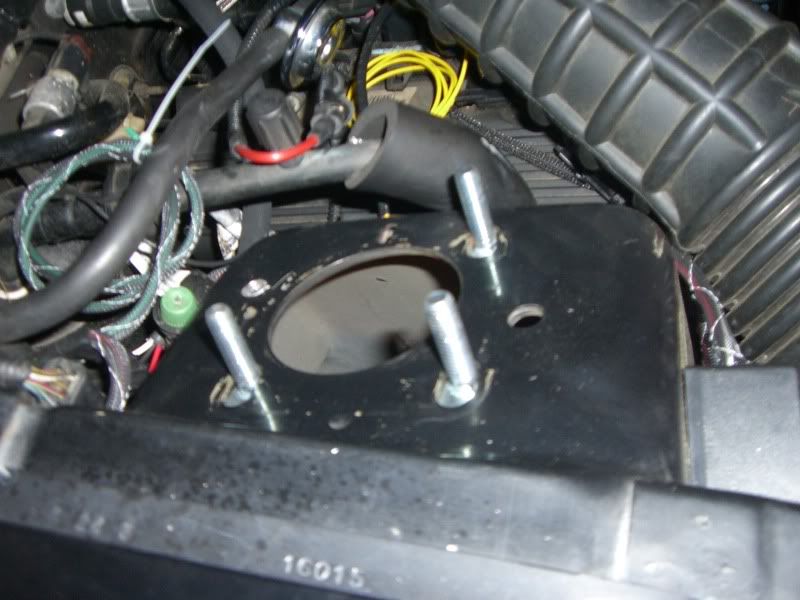
Next go on the spacers that will sit in between the upper cc- plate and the shock tower. You must hold the bottom plate in place with one hand until the nuts are threaded to release.
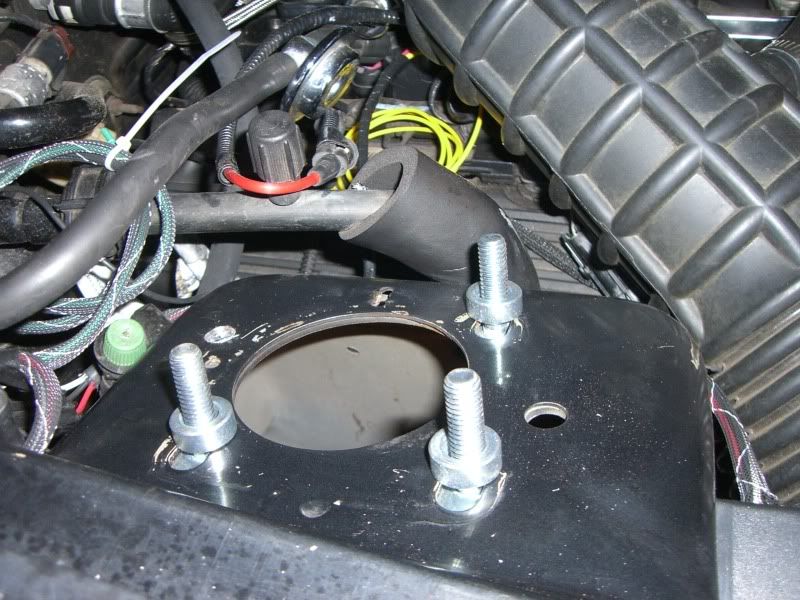
Then the cc plate
And now finally install the washers on top of the plate and thread the nuts onto all three bolts.
With the nuts now holding the plate in place, you can release the bottom of the plate. Now the bolt can be threaded into the bottom of the plate through the 4th hole you drilled a few steps ago. Make sure to install the bolt with the washer above the plate and the spacer in between the plate and the tower like on the 3 studs. Do not tighten the hardware just yet. With the CC Plates installed, we can move back to working on the struts.
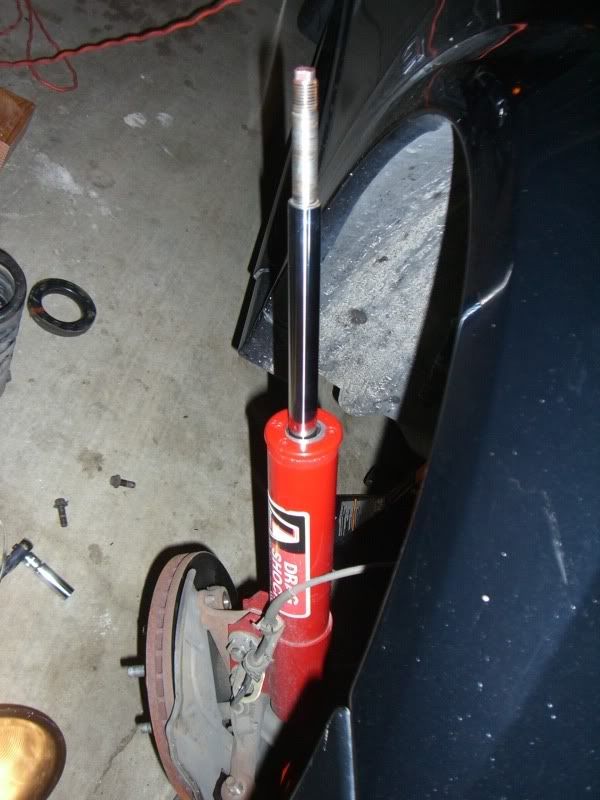
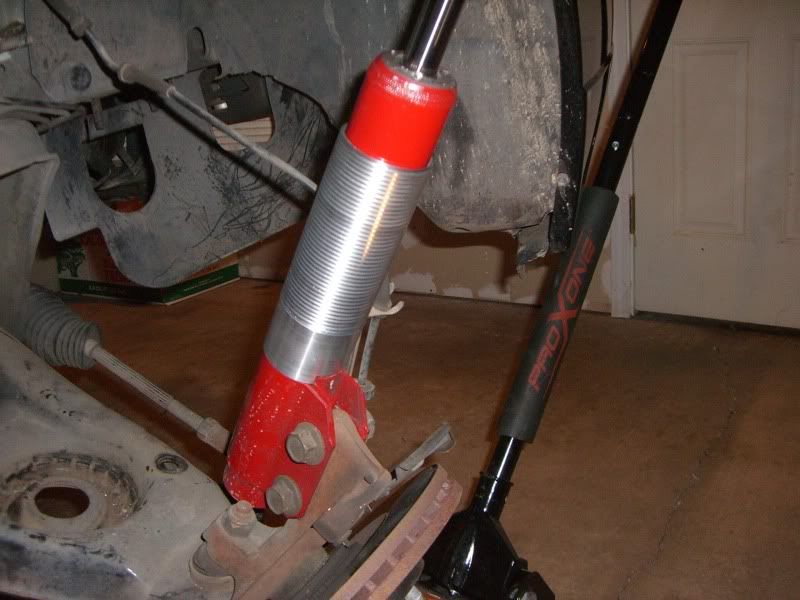
On the top of the strut, there is a dust cover mount that will need to be removed to allow the coil-over sleeve to slide over the strut. On the lakewood, there are three small spot welds holding this piece on. The welds may be drilled or ground off.....this is your choice. I opted for drilling, but make sure that if you drill, not to drill past the plate and into the body of the shock itself.
You can see where I have started drilling here on the three spot welds. They are obvious and you can't miss them.
To make sure there was no damage to the shock body, I drilled in very small increments and kept chick to see if I was through by prying on the plate with a pry bar. Once you are through the welds the plate will pry off very easily. I only had to drill about 1/8" into the welds for them to come off.
Clean up the drill shavings from the top of the strut and we are ready for the coil-over assembly.
First thing to go on is the sleeve
Then thread the bottom spring support onto the sleeve. I would start by leaving it about 3/4 of the way down. Install the set screw. Damn I don't have a pic of this.
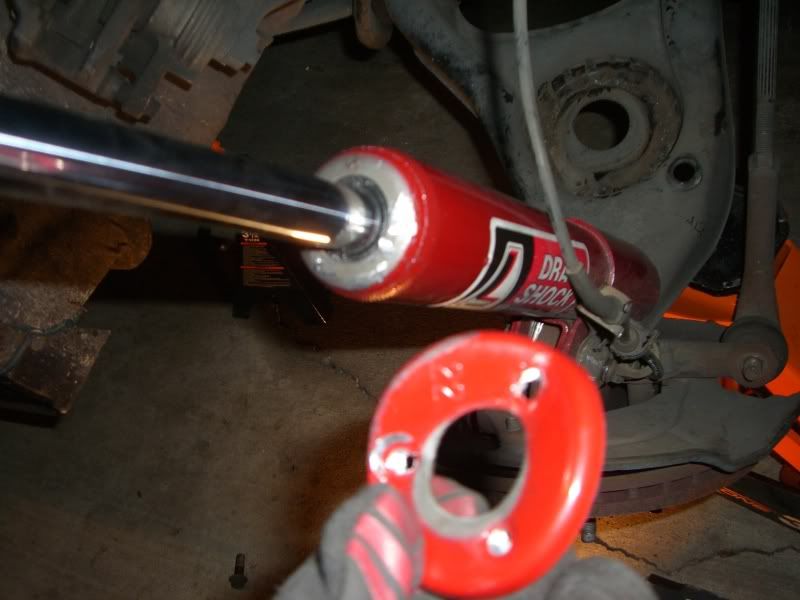
Next install the spring onto the strut.
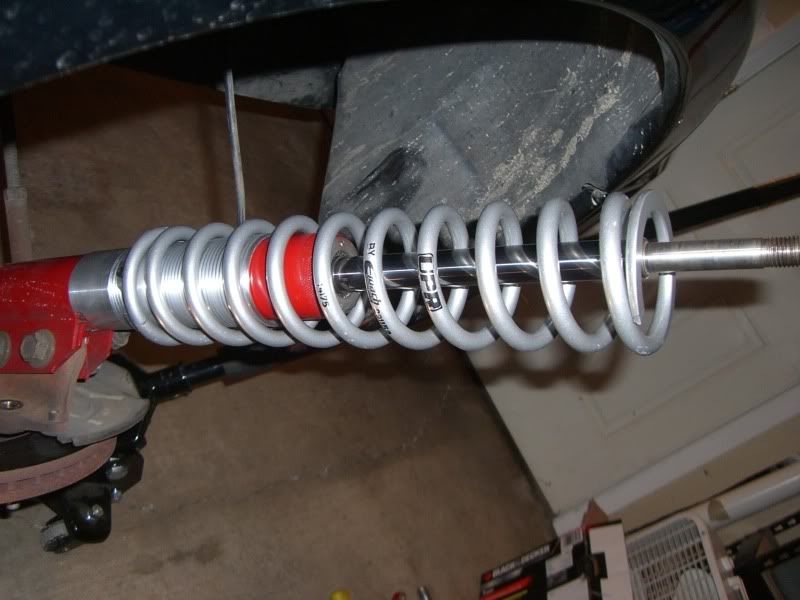
Install the upper spring support.
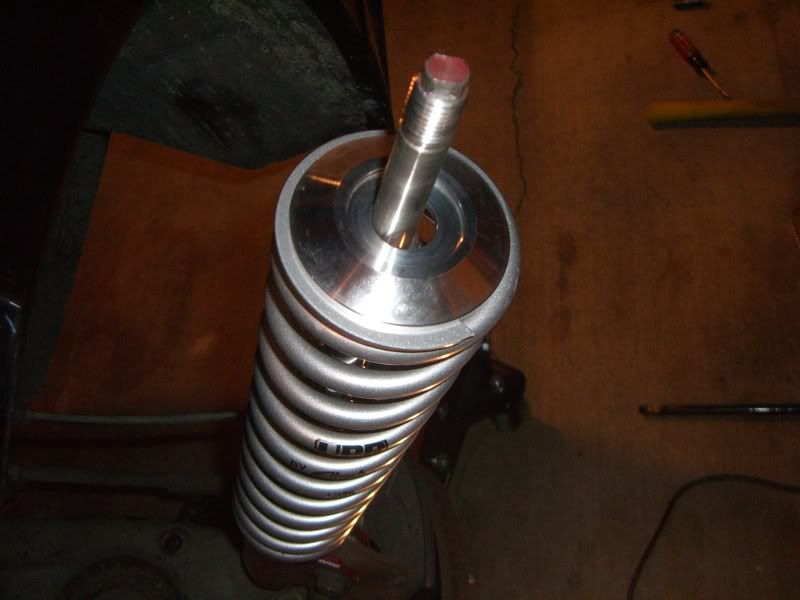
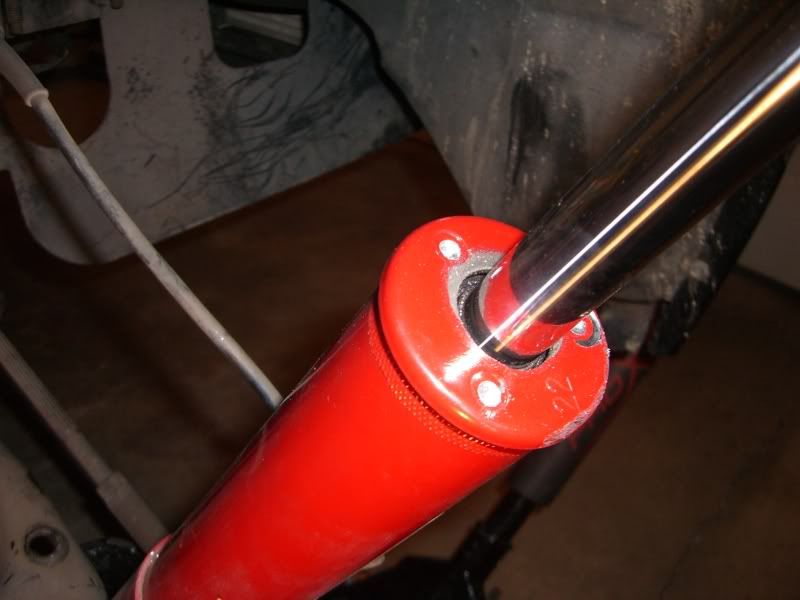
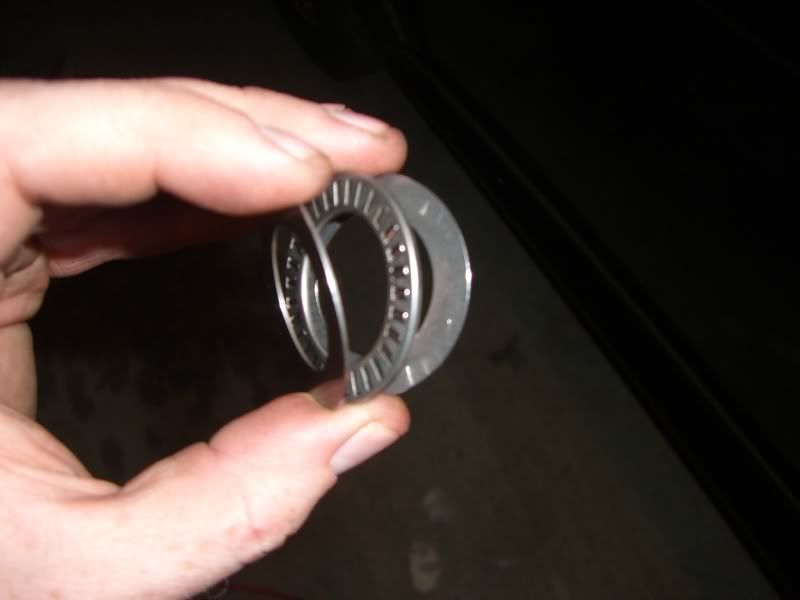
Next goes a bearing sandwiched between two washers supplied in the kit. There are two sets, one for each side.
And finally, install the bearing cover

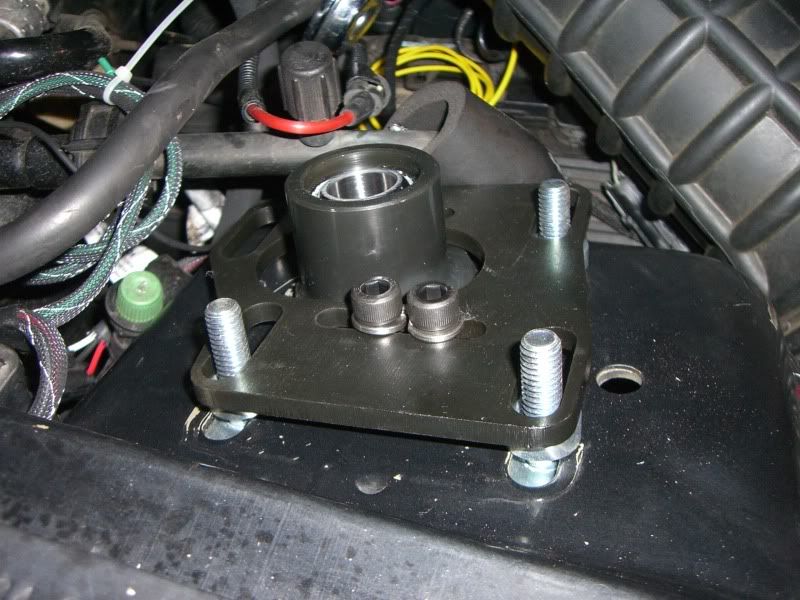
With all this in place, raise the a-arms with the floor jack while guiding the strut into the shock tower and up through the new cc plate.
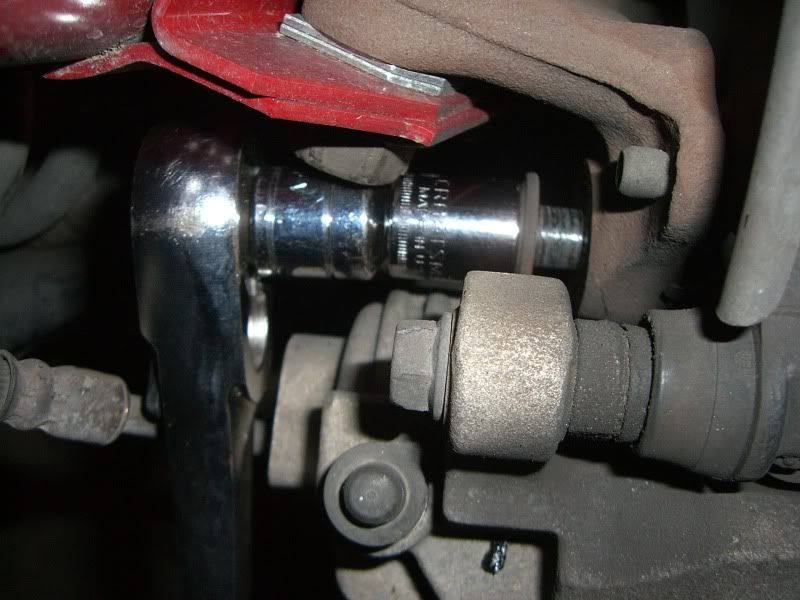
Now place the 7/8" stepped spacer (included in the cc-plate kit) onto the top of the strut.
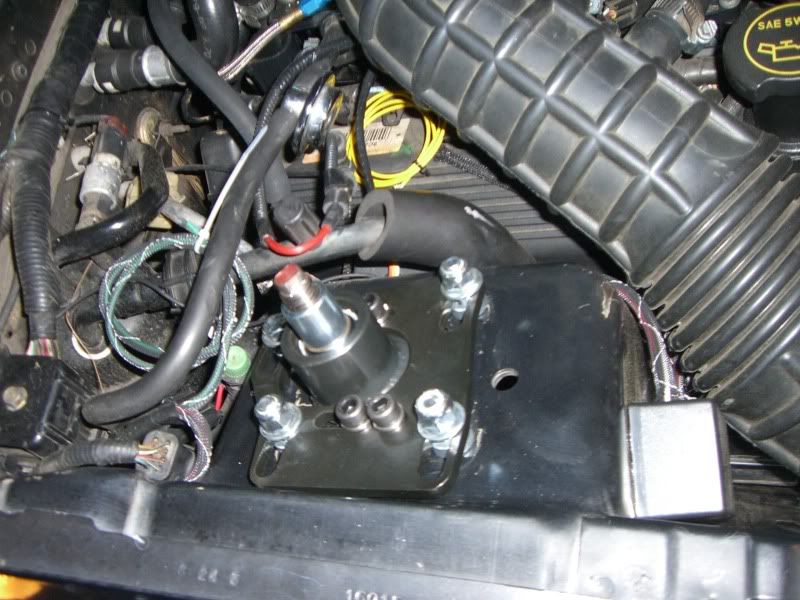
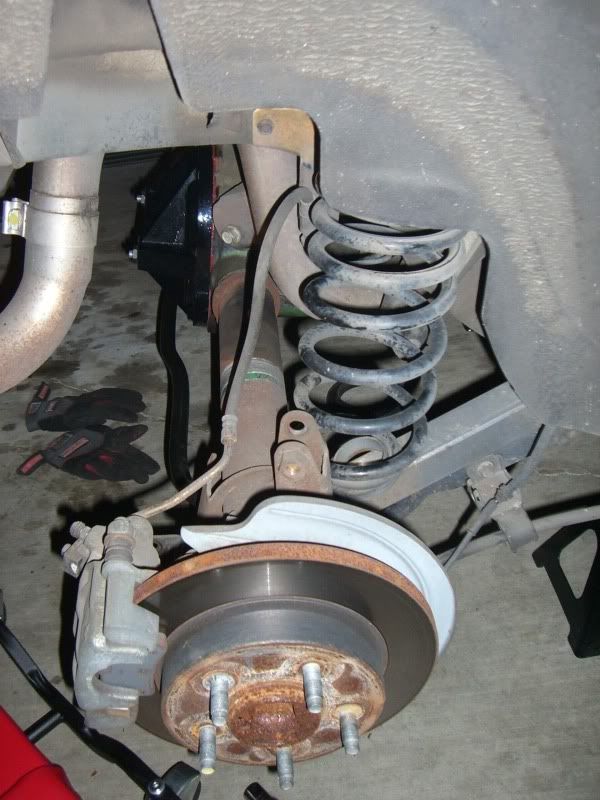
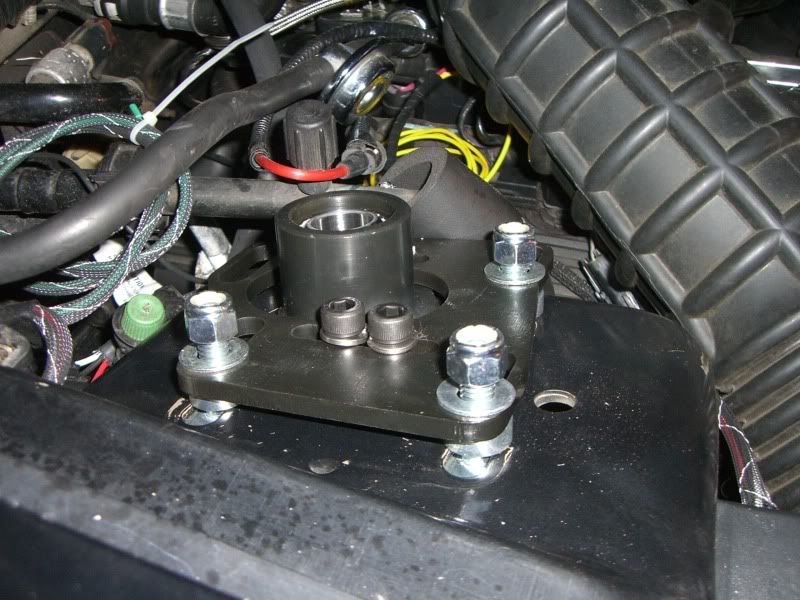
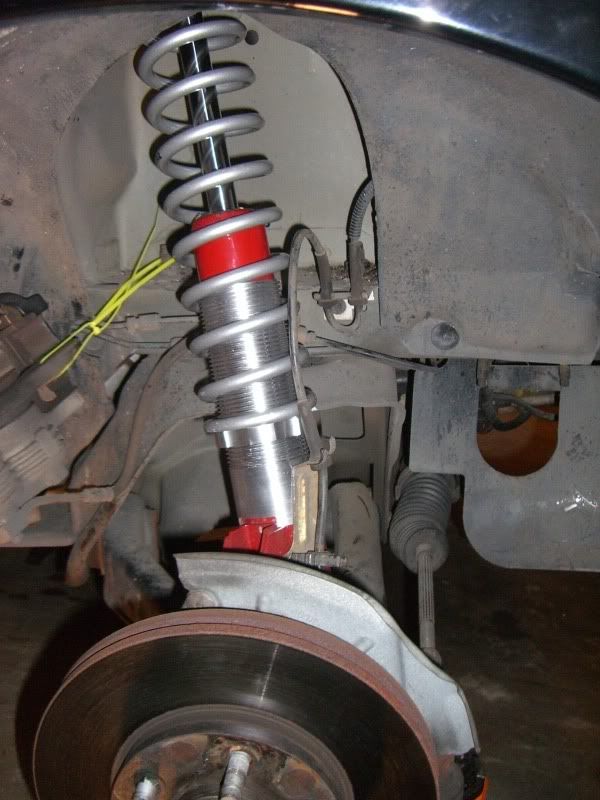
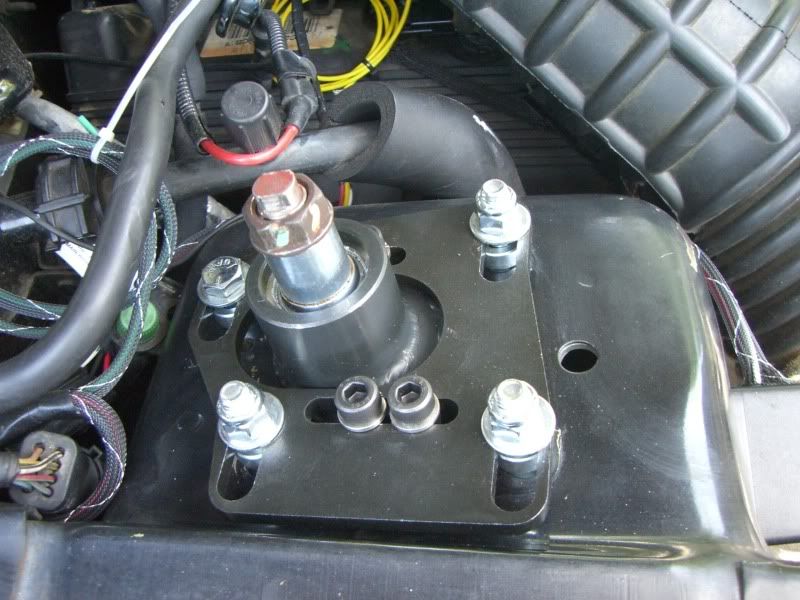
Now the top strut nut can be threaded on and tightened. Once the strut nut is installed you can now go back and tighten the hardware on the cc-plate. This is what the final product should look like up top.
Repeat all the previous steps for the drivers side. The install is identical on the opposite side.
Re-install the brake calipers, ABS line grommets, Sway bar (if applicable), and steering rod ends (if removed). Install the front wheels/tires and lower the vehicle and check the ride height. Adjustments to ride height can be made by raising the vehicle to relieve tension in the springs and adjusting the lower spring mount up or down to achieve the desired stance. Make sure to tighten the set screw after all adjustments to the lower spring support.
Next go on the spacers that will sit in between the upper cc- plate and the shock tower. You must hold the bottom plate in place with one hand until the nuts are threaded to release.
Then the cc plate
And now finally install the washers on top of the plate and thread the nuts onto all three bolts.
With the nuts now holding the plate in place, you can release the bottom of the plate. Now the bolt can be threaded into the bottom of the plate through the 4th hole you drilled a few steps ago. Make sure to install the bolt with the washer above the plate and the spacer in between the plate and the tower like on the 3 studs. Do not tighten the hardware just yet. With the CC Plates installed, we can move back to working on the struts.
On the top of the strut, there is a dust cover mount that will need to be removed to allow the coil-over sleeve to slide over the strut. On the lakewood, there are three small spot welds holding this piece on. The welds may be drilled or ground off.....this is your choice. I opted for drilling, but make sure that if you drill, not to drill past the plate and into the body of the shock itself.
You can see where I have started drilling here on the three spot welds. They are obvious and you can't miss them.
To make sure there was no damage to the shock body, I drilled in very small increments and kept chick to see if I was through by prying on the plate with a pry bar. Once you are through the welds the plate will pry off very easily. I only had to drill about 1/8" into the welds for them to come off.
Clean up the drill shavings from the top of the strut and we are ready for the coil-over assembly.
First thing to go on is the sleeve
Then thread the bottom spring support onto the sleeve. I would start by leaving it about 3/4 of the way down. Install the set screw. Damn I don't have a pic of this.
Next install the spring onto the strut.
Install the upper spring support.
Next goes a bearing sandwiched between two washers supplied in the kit. There are two sets, one for each side.
And finally, install the bearing cover
With all this in place, raise the a-arms with the floor jack while guiding the strut into the shock tower and up through the new cc plate.
Now place the 7/8" stepped spacer (included in the cc-plate kit) onto the top of the strut.
Now the top strut nut can be threaded on and tightened. Once the strut nut is installed you can now go back and tighten the hardware on the cc-plate. This is what the final product should look like up top.
Repeat all the previous steps for the drivers side. The install is identical on the opposite side.
Re-install the brake calipers, ABS line grommets, Sway bar (if applicable), and steering rod ends (if removed). Install the front wheels/tires and lower the vehicle and check the ride height. Adjustments to ride height can be made by raising the vehicle to relieve tension in the springs and adjusting the lower spring mount up or down to achieve the desired stance. Make sure to tighten the set screw after all adjustments to the lower spring support.
Thread Starter
5th Gear Member
Joined: Sep 2006
Posts: 4,039
From: CA
Here are a couple pics I took last night after finishing the install. Don't worry better pics of the car are coming, I just didn't have time or light. The spring need to settle still, and even now there is still about 1/2" left in the rears and over 1" left in the fronts. Once the springs settle down a bit, I'll have to raise it a bit so there isn't too much rub.


Thread Starter
5th Gear Member
Joined: Sep 2006
Posts: 4,039
From: CA
I have only driven it twice once the install, but it included some freeway driving, some around town stuff etc..... It handles surprisingly well. I thought converting to "drag springs" would cause me to sacrifice some handling. These things handle worlds better than when it just had shocks and eibach springs......well worth the money!!!