
my ongoing nitrous install thread...


Thread Starter
6th Gear Member
Joined: May 2007
Posts: 6,277
From: Dearborn, MI
 . I would not want to cut something like this by hand lol
3rd Gear Member
Joined: Feb 2008
Posts: 801
From: Delaware
I see alot of people hiding their arming switch.. its a cool idea, but it is not convenient at all. If you needed to shut the kit down at any given time, the switch is not readily available. While I know you could simply let your foot up, I like my main power switch close and easily accessed by me sitting comfortably in the driver seat
3rd Gear Member
Joined: Aug 2007
Posts: 670
From: Tulsa, OK
I see alot of people hiding their arming switch.. its a cool idea, but it is not convenient at all. If you needed to shut the kit down at any given time, the switch is not readily available. While I know you could simply let your foot up, I like my main power switch close and easily accessed by me sitting comfortably in the driver seat

Joined: Feb 2011
Posts: 3
From: CA
I just got a microedge and I'm wondering if you had a picture or could explain where you got your power, ground, and tps/rpm signal from around the pcm? That seems like it would be a lot more convenient than how I was planning on doing it and I'm sure it would end up a lot cleaner too
Thread Starter
6th Gear Member
Joined: May 2007
Posts: 6,277
From: Dearborn, MI
Well I sort of made negative progress today and am still pretty pissed/stumped. I got my switches hooked up, got the rest of the wideband hooked up and painted my gauge pod(and discovered I'm quite rich at wot). After all that I tested the microedge to make sure both my stage 1 and stage 2 wire were getting voltage at wot when armed, and what do ya know, neither one of them are getting any voltage even tho it's saying "spray" on the unit. Not sure why, whenever it said "spray" when i had this hooked up before those wires always got steady volts. now nothing. I just made a thread on the hsw help forum so hopefully they have an idea. I've heard that the internal fuses on these are extremely easy to blow and if I blew both of them and they're gonna try and charge me an insane amount of money I'm going to be heated.
But anyways, here's a picture of my gauge pod as it sits, covered the empty hole with electrical tape/a sticker so it didn't look so empty for now...

But anyways, here's a picture of my gauge pod as it sits, covered the empty hole with electrical tape/a sticker so it didn't look so empty for now...
Thread Starter
6th Gear Member
Joined: May 2007
Posts: 6,277
From: Dearborn, MI
I just got a microedge and I'm wondering if you had a picture or could explain where you got your power, ground, and tps/rpm signal from around the pcm? That seems like it would be a lot more convenient than how I was planning on doing it and I'm sure it would end up a lot cleaner too
Thread Starter
6th Gear Member
Joined: May 2007
Posts: 6,277
From: Dearborn, MI
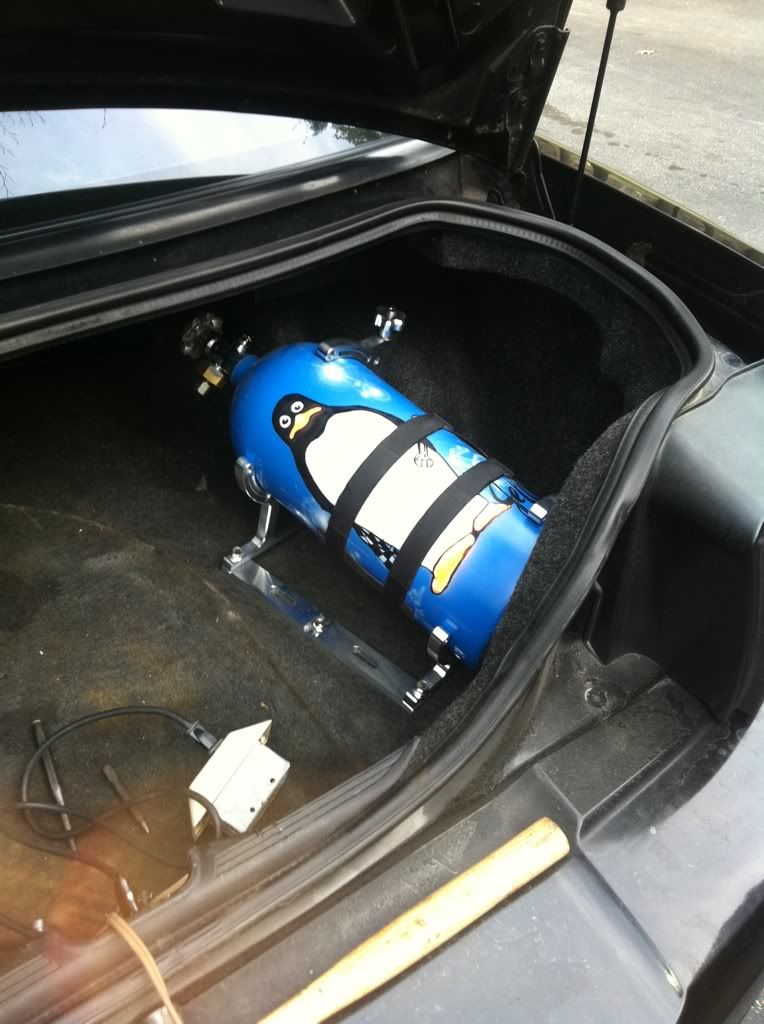
well even tho the microedge isn't working and i wont be spraying for a while now, I decided to keep on with the install. Got another task done...mounted jeffy in his new home. Since I couldn't think of any way to get my hands above the tank to put nuts on the screws, I just used the technique of drilling a small hole then punching some metal down so the hole was larger, then tapped it and used that to mount the holder, just like I did on my buddies oil pan. Works ok but I have a feeling it will wear out eventually. when I get a fuel pump to put in I'll throw some real nuts on the bolts. here's a pic tho...
I'm sure I wont make any more progress until next week. as this weekend is filled with putting in my converter then the holiday.
I'm sure I wont make any more progress until next week. as this weekend is filled with putting in my converter then the holiday.