
DVD Headunit Install S-197 Models


Thread Starter
'Dr. X'
Joined: Apr 2008
Posts: 4,388
From: Toto's Kansas
Well, I just installed a Pioneer avh-p3200dvd headunit (replacing my shaker 1000), and I figured I would help some of you out by doing an install write-up... it won't be too different from the avic write-up, but I made some minor changes, so I figured i'd note the differences. Overall, this isn't very hard to do, but it will take 4-5 hours for someone who hasn't installed a radio before (like me  ).
).
What You Will Need:
Pioneer avh-p3200 headunit (or similar)
Pac C2R-FRD1 interface
Metra Double-din dash kit
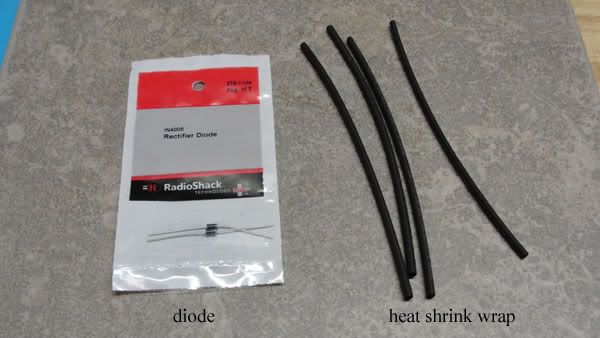
Micro 1-amp diode (1N4005) from Radio Shack
Heat Shrink Tubing from Radio Shack
Socket Wrench (sockets used range from 7mm to 10mm I believe)
Phillips Screwdriver
Dremel (with cutting tool)
Soldering Gun (with solder)
Hair Dryer
Electrical tape and/or wire ties
Wire cutter/stripper
What You Do:
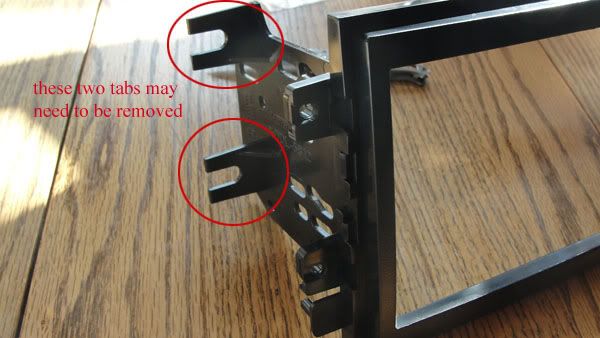
1) Start by putting the metra dash kit together and connecting it to the radio. Depending on the year, you may need to add some spacing tabs to the 'dash' part so it will fit flush when you put the radio into your car. There are side 'plates' that need to be installed onto the dash part, but depending on the year of your Mustang, you may have to remove the rear mounting tabs on the plates (I have a 2005 and removal of the tabs was necessary). Just use the Dremel with the cutting tool to cut the rear tabs off, leaving where they mount to the side plate intact:
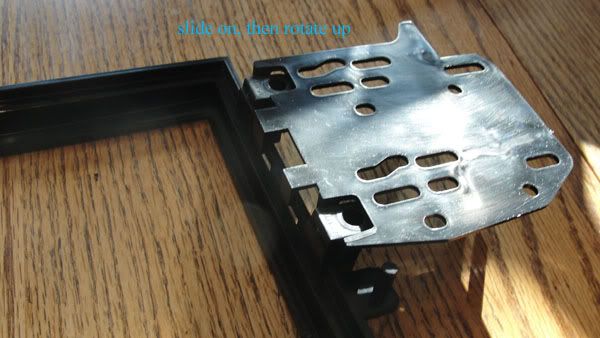
Next, to install the side plates to the main dash part, slide the plate into the dash mounting tabs and rotate the plate to secure it to the dash part.
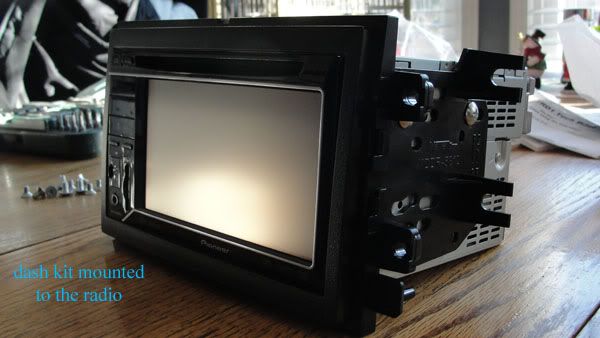
Then, align the radio with the dash kit, and screw the dash kit to the radio. When you do this, be sure to use the screws provided WITH THE HEADUNIT, not the ones provided with the dash kit; the screws should be no longer than 8 mm. Your first step is now done, the radio is secured to the dash mounting kit.
i forgot to remove the rear mounting tabs when I took this pic, so be sure to remove them (if need be) before you mount it so you don't make the same mistake and have to undo everything
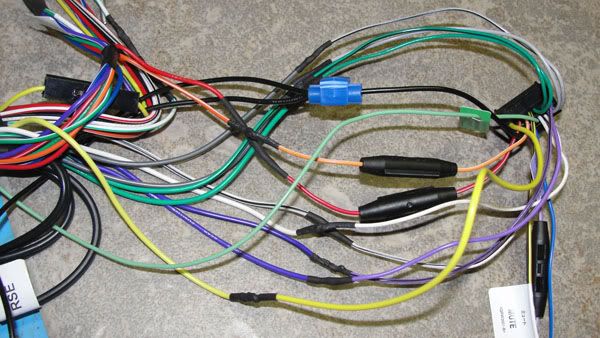
2) Now, you can solder the Pac harness to the headunit's harness. I didn't install any navigation, hd radio, or sat radio... so wiring is fairly straight forward; just match colors together, solder, and heat shrink each connection. Be sure to put the heat shrink tubing on the wires before you tie them together and solder them, too. You shouldn't need more than � of an inch to 1 inch of heat tubing for each connection. Use the hair dryer to 'shrink' the tubing
the color of the wires are a little off between the pac harness and the headunit's harness, but they are close enough you shouldn't have any problems telling them apart. The connections below are everything you need to have connected for the radio to have 'basic' functions (i.e. no hd radio, sat radio, etc). For the ground wire, I just spliced the pac ground to the headunit's gound.
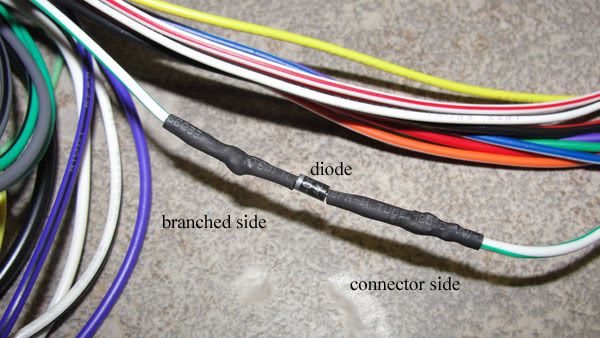
now, for the diode. The diode is needed to correct a powerflow problem from the sub amps (I believe); it prevents the headunit from rebooting. install it on the 'amp turn on' wire (which is a white wire with a green stripe and branches out from one lead into three). The diode itself had a gray stripe; when soldering the diode, be sure to have the gray striped end pointed towards where the wire branches off.
After you have everything soldered, it's time to turn your attention to your car.
3) first, disconnect the cable from the negative battery terminal. Then proceed to remove dash and existing radio. TacoBill has excellent instructions on removing the necessary parts to gain access to the radio: http://forums.themustangsource.com/f...nstall-445173/ (just follow the instructions until you reach the part that talks about removing the a-pillar trim). Unscrew the screws holding the old radio, pull it out and disconnect the existing harness from the radio. Once you have the old radio out, connect the pac end of the harness to the existing radio harness and find a place to connect the ground wire to a metal part of the car (there is a screw towards the front end that should be perfect for this). Then connect the headunit harness end to the headunit and screw it to the car.
For the subwoofers (i believe you have to do this for both the shaker 500 and 1000 units), connect the blue/white power amp wires together (the wire on the pioneer harness had a 'remote control system' sticker attached to it, but this is the wire you want to use) and hook up the RCA plugs into the radio. the pac sub male rca plugs are purple and green, and the radio sub rca female connectors are red and white; the purple is the right connector and the green is the left, so connect the purple with the red terminal and the green with the white terminal (i'm not 100% sure but you may only need to connect the white/green, which is a mono connection, which is what the oem sub connections are... i plugged both in, and it still worked fine). Reconnect the negative terminal on your battery and turn your car's power on to check and make sure your connections are good.
Now is also a good time to run the parking brake wire from the harness (for dvd playback; it's a light green wire with a splicer already connected to it); simply run it under the shifter trim and splice it to the positive wire (a red wire with a yellow line) for the parking brake sensor.
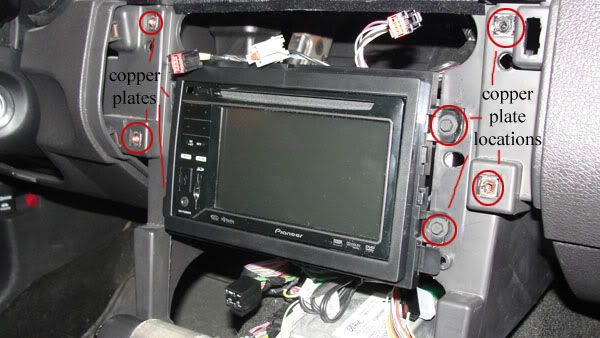
while the dash panels are off, it is a good time to 'fix' some potential rattles and vibrations some of you may have. You may have noticed some copper looking plates where you removed the screws that hold the trim; for me, those caused some of the vibration/rattle sounds my car makes. Fixing the problem is easy, too; simply take some electrical tape, and cover each copper plate before screwing the radio or any of the trim parts back.
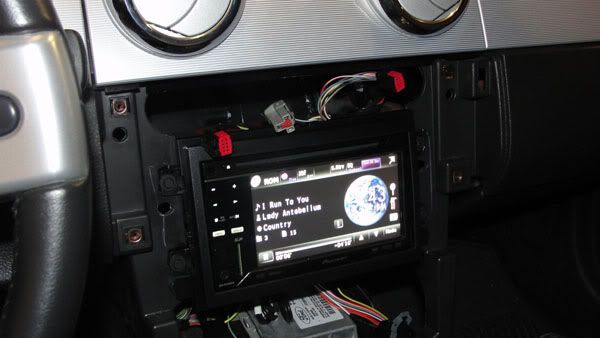
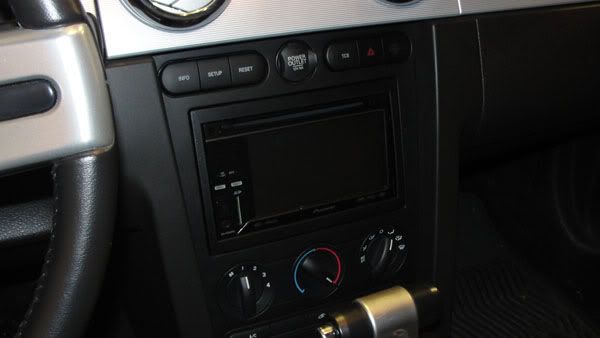
and, if all of your connections are good, you should get this:
4) last step! Secure any 'floating' wires (anything that might cause unwanted noise from your center console, like the unused wires from the pac/headunit harnesses ). then replace the trim and you should be done!
Enjoy your new radio!!
I think I included everything, but if you notice something that could be missing (or if you need additional details), point it out and I'll adjust my instructions accordingly
).What You Will Need:
Pioneer avh-p3200 headunit (or similar)
Pac C2R-FRD1 interface
Metra Double-din dash kit
Micro 1-amp diode (1N4005) from Radio Shack
Heat Shrink Tubing from Radio Shack
Socket Wrench (sockets used range from 7mm to 10mm I believe)
Phillips Screwdriver
Dremel (with cutting tool)
Soldering Gun (with solder)
Hair Dryer
Electrical tape and/or wire ties
Wire cutter/stripper
What You Do:
1) Start by putting the metra dash kit together and connecting it to the radio. Depending on the year, you may need to add some spacing tabs to the 'dash' part so it will fit flush when you put the radio into your car. There are side 'plates' that need to be installed onto the dash part, but depending on the year of your Mustang, you may have to remove the rear mounting tabs on the plates (I have a 2005 and removal of the tabs was necessary). Just use the Dremel with the cutting tool to cut the rear tabs off, leaving where they mount to the side plate intact:
Next, to install the side plates to the main dash part, slide the plate into the dash mounting tabs and rotate the plate to secure it to the dash part.
Then, align the radio with the dash kit, and screw the dash kit to the radio. When you do this, be sure to use the screws provided WITH THE HEADUNIT, not the ones provided with the dash kit; the screws should be no longer than 8 mm. Your first step is now done, the radio is secured to the dash mounting kit.
i forgot to remove the rear mounting tabs when I took this pic, so be sure to remove them (if need be) before you mount it so you don't make the same mistake and have to undo everything
2) Now, you can solder the Pac harness to the headunit's harness. I didn't install any navigation, hd radio, or sat radio... so wiring is fairly straight forward; just match colors together, solder, and heat shrink each connection. Be sure to put the heat shrink tubing on the wires before you tie them together and solder them, too. You shouldn't need more than � of an inch to 1 inch of heat tubing for each connection. Use the hair dryer to 'shrink' the tubing
the color of the wires are a little off between the pac harness and the headunit's harness, but they are close enough you shouldn't have any problems telling them apart. The connections below are everything you need to have connected for the radio to have 'basic' functions (i.e. no hd radio, sat radio, etc). For the ground wire, I just spliced the pac ground to the headunit's gound.
now, for the diode. The diode is needed to correct a powerflow problem from the sub amps (I believe); it prevents the headunit from rebooting. install it on the 'amp turn on' wire (which is a white wire with a green stripe and branches out from one lead into three). The diode itself had a gray stripe; when soldering the diode, be sure to have the gray striped end pointed towards where the wire branches off.
After you have everything soldered, it's time to turn your attention to your car.
3) first, disconnect the cable from the negative battery terminal. Then proceed to remove dash and existing radio. TacoBill has excellent instructions on removing the necessary parts to gain access to the radio: http://forums.themustangsource.com/f...nstall-445173/ (just follow the instructions until you reach the part that talks about removing the a-pillar trim). Unscrew the screws holding the old radio, pull it out and disconnect the existing harness from the radio. Once you have the old radio out, connect the pac end of the harness to the existing radio harness and find a place to connect the ground wire to a metal part of the car (there is a screw towards the front end that should be perfect for this). Then connect the headunit harness end to the headunit and screw it to the car.
For the subwoofers (i believe you have to do this for both the shaker 500 and 1000 units), connect the blue/white power amp wires together (the wire on the pioneer harness had a 'remote control system' sticker attached to it, but this is the wire you want to use) and hook up the RCA plugs into the radio. the pac sub male rca plugs are purple and green, and the radio sub rca female connectors are red and white; the purple is the right connector and the green is the left, so connect the purple with the red terminal and the green with the white terminal (i'm not 100% sure but you may only need to connect the white/green, which is a mono connection, which is what the oem sub connections are... i plugged both in, and it still worked fine). Reconnect the negative terminal on your battery and turn your car's power on to check and make sure your connections are good.
Now is also a good time to run the parking brake wire from the harness (for dvd playback; it's a light green wire with a splicer already connected to it); simply run it under the shifter trim and splice it to the positive wire (a red wire with a yellow line) for the parking brake sensor.
while the dash panels are off, it is a good time to 'fix' some potential rattles and vibrations some of you may have. You may have noticed some copper looking plates where you removed the screws that hold the trim; for me, those caused some of the vibration/rattle sounds my car makes. Fixing the problem is easy, too; simply take some electrical tape, and cover each copper plate before screwing the radio or any of the trim parts back.
and, if all of your connections are good, you should get this:
4) last step! Secure any 'floating' wires (anything that might cause unwanted noise from your center console, like the unused wires from the pac/headunit harnesses ). then replace the trim and you should be done!
Enjoy your new radio!!
I think I included everything, but if you notice something that could be missing (or if you need additional details), point it out and I'll adjust my instructions accordingly
Last edited by Xeno; Dec 29, 2010 at 11:40 AM.
4th Gear Member
Joined: Dec 2010
Posts: 1,597
From: Gallifrey
Good write-up. Very cool.
Just one minor thing, �wrap� == �tubing�, just so nobody asks for it at Rag shack by mistake.
Need a decent pair of wire-strippers/cutters as well for tools needed. The small yellow handled ones at rag-shack are great for this kind of wiring work.
No hair-dryer necessary IMO, butane lighter works great.
Couple of other preference things would be actually completely cover the diode with a long enough bit of heat-shrink tubing, rather than just the ends if your going to solder it on this way. Just to avoid a possible future short. And Possibly a reference to a soldering tutorial to avoid cold solder joints if this is their first time.
If your looking to just avoid the pop/thump from the factory amp turn ons due to them being 12v on an after-market unit, contrary to the sticky�d instructional you only need a 1.5k-2.2k resistor wired in series just as the diode was for the remote lead(s) going to the factory amp(s) on the basic harnesses. This will pull the voltage down to 5v instead of using a regulator.
The PAC and similar units are more for keeping the speed (VSS), reverse, and e-brake outputs, and sometimes more from the CAN-bus info intact; for the units that might need it (in addition to providing the dropped to 5v remote outs).
Last edited by wayne613; Jan 22, 2011 at 02:01 AM.

 thanks.
Thread Starter
'Dr. X'
Joined: Apr 2008
Posts: 4,388
From: Toto's Kansas
yesterday, when i was listening to is while driving around, i wasn't getting much bass... then i realized i made a mistake when i installed it... i forgot to hook up the subwoofer connection  . so i went back in this morning and hooked it up... and everything is working fine... again . that 'change' has been added to the write-up
. that 'change' has been added to the write-up

2nd Gear Member
Joined: Oct 2010
Posts: 305
From: Florida
I got mine in the mail today. just waiting for the antenna adapter and the wiring harness. Also thinking about getting http://www.amazon.com/PLCM10-License...3666645&sr=1-4. any prefences for backup cameras?

2nd Gear Member
Joined: Nov 2010
Posts: 309
From: VA
That looks sweet. Can someone verify for me that the P3200 allows the music to be controlled directly by the iPod/iPhone, or is it locked? Is it a separate setting? Also, does music from other applications like Pandora play through the car speakers???