TIG vs Spot Welding and Tunnel Weld for 65 Floor Pans
 08-22-2008, 06:44 AM
#11
5th Gear Member

Join Date: Nov 2006
Location:
Posts: 2,106
On clean metal, you will need to etch with something like phosphoric acid in order for the POR 15 to bond. Also if you plan to paint it, you need to spray some primer on when it just tacks up (feels sticky but does'nt stay on your finger), otherwise, after it cures, nothing likes to bond to it, and paint can flake off. I like using POR 15 but usually limit it to areas that are not seen like interior floor pans and in the door shell along the bottom (insted of seam seal) and had good results. On the bottom, a 2 part paint works great and will resist brake fluid. Remember that seam seal works two ways, it keeps water out, and it keeps water in. So be wise in its use. Heres a photo of butt and spot welds on a floorboard section that need replacment. The tranny tunnel was enlarged and the butts still need grinding. The rotisserie makes life easier.

 08-22-2008, 07:56 AM
#12
3rd Gear Member

Join Date: Mar 2007
Location: Antelope, Ca
Posts: 616
Hopefully this is a quick question, but I'm getting used to the fact that they never are:
I've cut out the old floor pan on the passenger side and am preping the new pan for welding. Turns out the shop I'm working at only has can only do TIG welds. What are the pros and cons of tig welding where there were factory spot welds? I figure we can weld the entire frame rail to the floor, weld along the top of the connection to the rocker panel and elsewhere. A guy who knows more about welding thought that drilling out holes to simulate some of the spot welds for the rocker panel connection might be a good idea to avoid the two pieces working themselves apart . . . Another option (although I'd like to avoid it) is to TIG as much as possible and then pay a local welding shop to do the spots. Any thoughts you guys have will be really helpful.
Alan
good luck
08-22-2008, 08:31 AM
#13
4th Gear Member
Join Date: May 2008
Location: Houston, Texas
Posts: 1,019
You know what I like about the forums....I can come here and read and learn a ton without even asking the question. :-)
A friend had told me to use rivets to hold in the floor pans but I was under the impression that butt welding was the way to go so I was trying to figure that out. Knowing overlap is ok helps everything make a lot more sense.
My only question is what do you use for seam sealer?
I am considering doing my floor pans soon so I have certainly printed out this thread for reference purposes.
 08-22-2008, 07:02 PM
#15
4th Gear Member
Join Date: Oct 2007
Location: Central Illinois
Posts: 1,751
I thought this was one of the most informational posts I have ever seen on floor welding so I messaged JamesW and asked if it could somehow be added to the FAQ. This is a post worth keeping around.
08-24-2008, 02:17 AM
#16
Thread Starter

Join Date: Apr 2008
Posts: 19
On clean metal, you will need to etch with something like phosphoric acid in order for the POR 15 to bond. Also if you plan to paint it, you need to spray some primer on when it just tacks up (feels sticky but does'nt stay on your finger), otherwise, after it cures, nothing likes to bond to it, and paint can flake off. I like using POR 15 but usually limit it to areas that are not seen like interior floor pans and in the door shell along the bottom (insted of seam seal) and had good results. On the bottom, a 2 part paint works great and will resist brake fluid. Remember that seam seal works two ways, it keeps water out, and it keeps water in. So be wise in its use. Heres a photo of butt and spot welds on a floorboard section that need replacment. The tranny tunnel was enlarged and the butts still need grinding. The rotisserie makes life easier.
08-24-2008, 07:04 AM
#17
5th Gear Member
Join Date: Nov 2006
Location:
Posts: 2,106
That should do it. POR does'nt like to stick on clean shiney metal and the acid (metal prep) will etch giving it a better surface to bond to. For me, I would rather use the acid as to leave some rust. As long as it has phorsphoric acid, it should work, their brand or some off the shelve. I would think a quart would be enough. Also have some plastic wrap ready to put under the lid of the POR can when you re-seal it. If you get it in the seam and put the lid back on, you will not get it back off. If using the POR, I'm not sure what else, if any on the interior of the car that needs to be seam sealed. Their are a couple of places in the trunk and under the car that will need it though. I let it flow into the cracks and have had good results. Just make sure you check under the car after to see if any has leaked thru. Also wear gloves, if not, and you get this stuff on your hands, you will wear if for a week or so.
08-25-2008, 02:05 PM
#18
Thread Starter
Join Date: Apr 2008
Posts: 19
Good call on the plastic wrap, I'm guessing that will save me a real headache. Now just so I'm clear: is there a need to paint on top of POR on the floor pans? Is it purely cosmetic? It sounds like a 2-part paint on the bottom of the car will help prevent crud buildup, but is this 2-part paint on top of a POR bottom coat or on its own? And does it change things that the floor pans I ordered are EDP coated? Do I etch on top of the EDP? Do I not need to POR on top of EDP? Or do I remove the EDP coat, etch, then POR?
Thanks again!
Thanks again!
09-08-2008, 02:38 AM
#19
Thread Starter
Join Date: Apr 2008
Posts: 19
So it sounds like I'm a complete idiot and won't be using POR b/c the new pans are rust free. I'm going to use a self-etching epoxy primer, then seam seal, then paint. I will then use an undercoating on the bottom. I figure that should work pretty well.
Any thoughts on how to patch up the hole shown below?
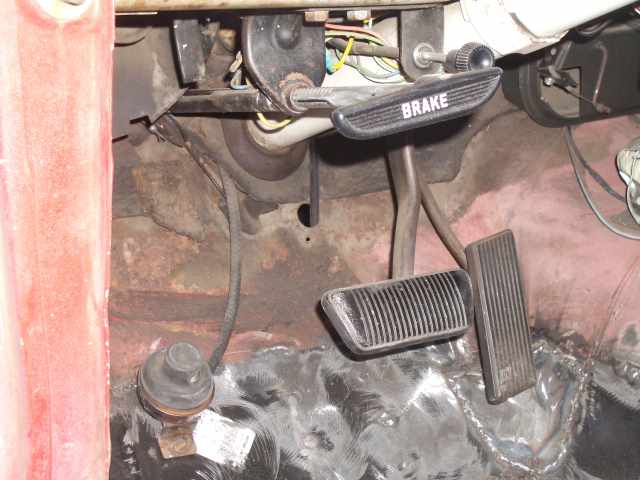
I think that's the speedometer cable (I could be wrong), but that seems like an awfully easy way for water to kick up into the carpeting/car. Any thoughts on how to seal that up without screwing up the cable going through it? Is there a part that is missing?
Thanks again.
Cheers!
Progress update: Finished painting the interior-side of the doors and the rear quarter-panels. Put on the rearseat seatback upholstery, but it turns out I was sent the wrong seat-portion upholstery from the rear. It is literally 8 inches more narrow than the original. Be careful when ordering if you're trying to re-upholster.
Any thoughts on how to patch up the hole shown below?
I think that's the speedometer cable (I could be wrong), but that seems like an awfully easy way for water to kick up into the carpeting/car. Any thoughts on how to seal that up without screwing up the cable going through it? Is there a part that is missing?
Thanks again.
Cheers!
Progress update: Finished painting the interior-side of the doors and the rear quarter-panels. Put on the rearseat seatback upholstery, but it turns out I was sent the wrong seat-portion upholstery from the rear. It is literally 8 inches more narrow than the original. Be careful when ordering if you're trying to re-upholster.
09-08-2008, 07:58 AM
#20
3rd Gear Member
Join Date: Mar 2007
Location: Antelope, Ca
Posts: 616
Sure looks like something is missing, your speedo cable should be much higher in the dash so i doubt that's it, i just checked my 68 and that hole is not there. i would find out exactly what that is and re rout it to its appropriate place and patch that mother up.