
 10-20-2015, 11:29 AM
Last edit by: IB Advertising
See related guides and technical advice from our community experts:
Browse all: Interior
- Ford Mustang V6 1994 to 2004 How to Replace Speakers
Step by step instructions for do-it-yourself repairs.
Browse all: Interior

Replacing factory rear deck speakers on 2010 Mustang
02-21-2010, 09:43 AM
#1
2nd Gear Member
Thread Starter

Join Date: Jul 2009
Location: Germany
Posts: 186
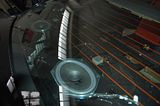
With the help of my 15 year old son, we finished the job in an hour and 15 minutes, which was not as bad as I expected. I had read several posts on various forums that stated you have to unbolt the rear seat belt to remove the rear deck panel, but you don�t have to do this. You can pull the panel forward far enough to gain access to the speaker screws.
The plastic fasteners, 8 total, were either easy to remove, or a total PITA. I resolved to get them out and in 2 cases, broke them. No worries, the local Ford dealer replaced them for me free of charge. They are much easier to press back in than they were to remove. Do yourself a favor and purchase spares prior to starting the job.. Just like me, they are cheap.

1. Remove the bottom rear seat cushions. Lift one side at a time revealing a button type fastener for each side. Simply press the tab and the cushions will lift out. Lower the rear seat backs.
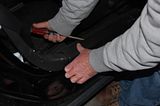
2. Using a flat blade screwdriver, carefully lift the door kick panels, starting from the rear. The panels will come loose with little to moderate pressure. Don�t unplug the electronic connector; just lay the panel against the bottom of the driver/passenger seats.


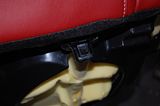
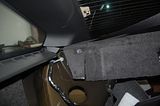
3. Pull the plastic fasteners holding the rear side panels using a panel tool or screwdriver. There are 2 per panel; one per side, near the floor board and the other behind the outboard side of the upper rear seat cushions. I see NO WAY to avoid scratches to the panel around the rear windows. You can fix this later. I used a damp paper towel to buff the scratches out. Just be careful and work the panel loose and remove, or if you choose (like me), just pull the side panels forward enough to allow room to access the fasteners securing the rear deck panel, and allowing enough room for step 4.

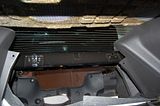
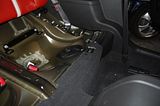
4. Pull the 4 plastic fasteners securing the rear deck panel. Why there are 4, I don�t know. Ford is smarter than me, but these were a PITA. I used pliers and steady force to pull them. I broke two of them. Once loose, pull the panel forward. The seat belts will give enough to allow room to access the speaker screws.
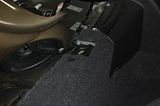
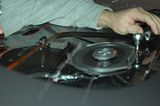
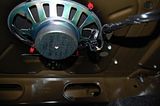
5. Using a �� ratchet and 7mm socket, loosen and remove the 8 screws (4 per) holding the speakers. BE CAREFULL. There is minimal room between the screws and the rear window. Your in an uncomfortable position, which could cause you tap that ratchet against the rear window. Do this hard enough and you have a disaster. Pull the disconnected speakers from the top, and replace with your aftermarket speakers. I used the Crutchfield supplied wire adapters to connect the speakers to the factory connectors, and this was a God-send. Time to put everything back in place.


The plastic fasteners, 8 total, were either easy to remove, or a total PITA. I resolved to get them out and in 2 cases, broke them. No worries, the local Ford dealer replaced them for me free of charge. They are much easier to press back in than they were to remove. Do yourself a favor and purchase spares prior to starting the job.. Just like me, they are cheap.
1. Remove the bottom rear seat cushions. Lift one side at a time revealing a button type fastener for each side. Simply press the tab and the cushions will lift out. Lower the rear seat backs.


2. Using a flat blade screwdriver, carefully lift the door kick panels, starting from the rear. The panels will come loose with little to moderate pressure. Don�t unplug the electronic connector; just lay the panel against the bottom of the driver/passenger seats.


3. Pull the plastic fasteners holding the rear side panels using a panel tool or screwdriver. There are 2 per panel; one per side, near the floor board and the other behind the outboard side of the upper rear seat cushions. I see NO WAY to avoid scratches to the panel around the rear windows. You can fix this later. I used a damp paper towel to buff the scratches out. Just be careful and work the panel loose and remove, or if you choose (like me), just pull the side panels forward enough to allow room to access the fasteners securing the rear deck panel, and allowing enough room for step 4.


4. Pull the 4 plastic fasteners securing the rear deck panel. Why there are 4, I don�t know. Ford is smarter than me, but these were a PITA. I used pliers and steady force to pull them. I broke two of them. Once loose, pull the panel forward. The seat belts will give enough to allow room to access the speaker screws.

5. Using a �� ratchet and 7mm socket, loosen and remove the 8 screws (4 per) holding the speakers. BE CAREFULL. There is minimal room between the screws and the rear window. Your in an uncomfortable position, which could cause you tap that ratchet against the rear window. Do this hard enough and you have a disaster. Pull the disconnected speakers from the top, and replace with your aftermarket speakers. I used the Crutchfield supplied wire adapters to connect the speakers to the factory connectors, and this was a God-send. Time to put everything back in place.


 02-21-2010, 09:52 AM
#2
2nd Gear Member
Join Date: Jan 2010
Location: NY
Posts: 369
Thanks for the walk through. Very nice. I still can't believe that you have to replace the speakers from above the deck lid. In the old days, you could remove them from the trunk. They were mounted on threaded studs with nuts. Much easier to remove.
How do they sound compared to the stock speakers? Worth it?
How do they sound compared to the stock speakers? Worth it?
02-21-2010, 09:58 AM
#3
2nd Gear Member
Thread Starter
Join Date: Jul 2009
Location: Germany
Posts: 186
Thanks for the walk through. Very nice. I still can't believe that you have to replace the speakers from above the deck lid. In the old days, you could remove them from the trunk. They were mounted on threaded studs with nuts. Much easier to remove.
How do they sound compared to the stock speakers? Worth it?
How do they sound compared to the stock speakers? Worth it?
08-10-2011, 08:31 PM
#4

Join Date: Aug 2011
Location: michigan
Posts: 1
Couldn't have done it without your help. THANK YOU VERY MUCH FOR POSTING THIS ONLINE! I read what you said about it being impossible to avoid scratching up your rear side panels, but I didn't put a single scratch on anything during the entire process. Maybe that's because I went ahead and removed the upper portion of the rear seats; that allowed the lower rear side panels to come out very easily. In fact, I didn't even need to use a flat head screw driver for anything because everything could be pulled off by hand; all I needed was a hammer for prying out the round plastic fasteners (some of course broke) and a ratchet for taking off the three metal bolts holding the upper portion of the rear seats.
I read a few places already that other people as well are using 6x8 Boston Acoustics S85 for their mustang's replacement speakers. I was wondering what people think about the 6x8 Infinity 6829cf. I was interested in Infinity because they offer 94 db sensitivity for efficiency and 2 ohm impedance for higher power (I heard it could be dangerous for the stock amp, but Harman Electronics claims it's safe for virtually any stock head unit.) Anybody know if they are better or worse than the Boston Acoustics S85? or if there is anything greater? I think the key to using the stock radio is sensitivity because the aftermarket speakers should use the smallest amount of power in order to create the smallest amount of distortion.
I read a few places already that other people as well are using 6x8 Boston Acoustics S85 for their mustang's replacement speakers. I was wondering what people think about the 6x8 Infinity 6829cf. I was interested in Infinity because they offer 94 db sensitivity for efficiency and 2 ohm impedance for higher power (I heard it could be dangerous for the stock amp, but Harman Electronics claims it's safe for virtually any stock head unit.) Anybody know if they are better or worse than the Boston Acoustics S85? or if there is anything greater? I think the key to using the stock radio is sensitivity because the aftermarket speakers should use the smallest amount of power in order to create the smallest amount of distortion.
08-12-2011, 09:42 AM
#5
1st Gear Member
Join Date: Jul 2011
Location: FL
Posts: 134
In my years of audio installations, Mustangs are always a PITA lol. What speaker you choose really depends on what you listen to and how loud you listen to it. Rock and Rap at high volumes, nothing can touch Kicker for the price. They can take a ton of abuse and never distort but they are pretty bright. For country, classic rock, and oldies I would recommend the Alpine, Infinity, Polk options. Pretty much anything will sound better than stock but it's whether or not you care enough to spend the time and money on swapping speakers.
 07-21-2013, 10:35 PM
#8

Join Date: Jul 2013
Location: Virginia
Posts: 1
Thanks again for the write up...was able to swap all four of my speakers without a hitch.
I did pre-order the OTC kit 6642 which is an eleven piece trim tool kit and helped in removing the panels and the push in fasteners without scratches or breaking anything.
Next time I would only loosen the center bolt on the top rear seat to see if each side of the seat will come out one at a time...
New speakers sound great!
thanks,
David

Thread
Thread Starter
Forum
Replies
Last Post
Diode Dynamics
Vendor For Sale / Group Buy Classifieds
28
05-26-2022 12:02 PM