3d Carbon Fender Vents
 08-19-2009, 05:53 AM
#41
1st Gear Member
Join Date: Jun 2008
Location: Cybertron
Posts: 136
 08-19-2009, 09:59 AM
#42
3rd Gear Member
Join Date: Oct 2006
Location: Spring, TX
Posts: 816
Prep work?
Cutting tool?
Choice of cutting bit or wheel?
etc etc
 08-20-2009, 06:08 AM
#44
1st Gear Member
Join Date: Jun 2008
Location: Cybertron
Posts: 136
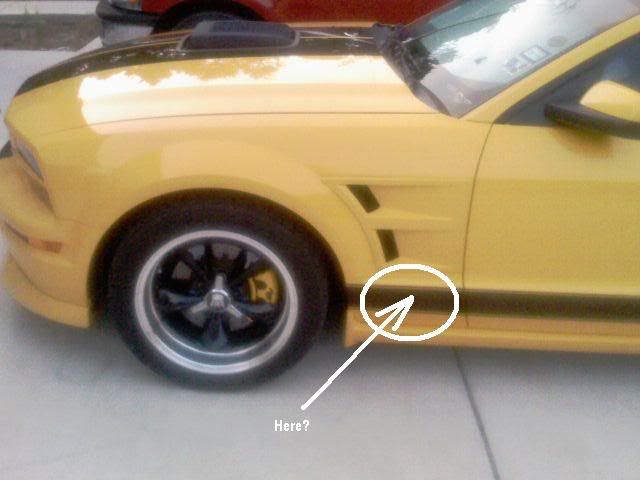
Centered on the rocker stripe...? hhhmmmmmmmmm....I will look.
Still no pix yet. been super busy here the last week.
Sure I will be glad to write up a brief how to.
Still no pix yet. been super busy here the last week.
Sure I will be glad to write up a brief how to.
Last edited by Barricade643; 08-20-2009 at 06:14 AM.
01-20-2010, 03:23 PM
#46
1st Gear Member

Join Date: Feb 2005
Location: Kirkland, WA
Posts: 84
01-30-2010, 08:01 AM
#47
1st Gear Member
Join Date: Jun 2008
Location: Cybertron
Posts: 136
Its easy cheesy....You just have to go slow.
After you get it painted apply the 3M adhesive tape all around the backside edge of the scoop.
There is an area that it fits into. Go all the way around and cut the edges to fit together flush.
I taped the template on then ran tape around the outside of it.
Pulled the template off then taped it all up around where I would be cutting.
I expanded the tape a good deal (tapes cheap...paint isnt) on both sides so that the saw's metal guide would not scratch anything.
put the template back on and drew a mark onto the tape where I was to cut.
I then drilled a small hole inside it, then made it bigger with a bigger bit. Did that till
the hole was large enough for a metal blade in the ricipricating saw.
I then put the blade in (please use safety glasses) and began cutting. Go very slow
as it will go through it like butter.
All was great until I got to the leading vertical edge closes to the door. I was hitting something behind it. in my mind i was thinking wires, coolant lines, pistons..lol...all the worst things I could think of. Soooo I grabbed a small piece of 2X4 wood. I then placed the wood against the side of the car and placed the saw's guide on it with the blade in the cut groove. This left just enough room so that as the blade came up it was still below the line of the metal so it wasnt going to rat tat tat down the side of the car.
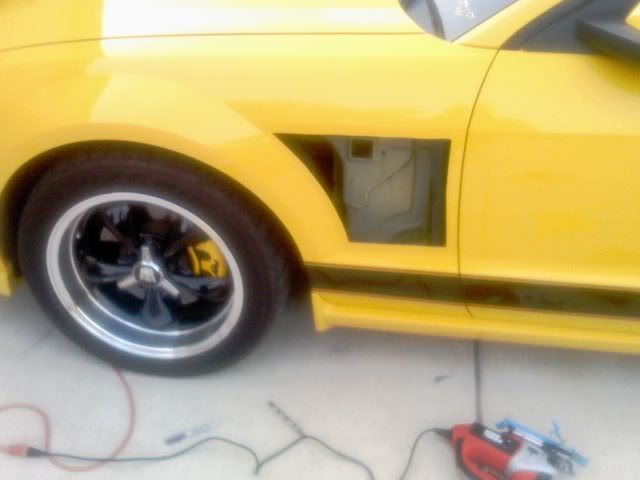
I then finished that back vertical line that way. Pulled the panel free to discover it was a piece of insulating foam. Nothing is back there on either side for you to worry about.
I then fit the recessed scoops to the panel. Cutting off a tad more in places so that it was fully recessed. There is a lip there to allow for very small messups so no worries unless you really go outside the lines!
At this point I took a can of flat black rattle can paint and painted inside the panel.
I allowed it to dry then pulled the tape off the side of the car & verified fitment.
At this point you want to take your touch up paint (you do have some right?) and touch up the edge all the way around. This is the worst part of the whole deal cause that takes you forever... lol
after that I placed the vent on the car and taped around it so I would know the edge location on the panel. Then take your 3m adhesive promoter and apply liberally to that area. once it dries you pull off a small section of the 3M tape red covering and fold it back to the outside so you can reach it. Do that on all four sides.
remove your outline promotor tape you put on the car and your ready to install it.
At theis point I would like to say that the promotor stuff will and can take the clearcoat off your car or cause it to discolor. That is why I did not want to go outside the lines or area that would not be below the edge of the scoop. Again...tape is cheap.
Now place the scoop in the hole and pull the tape off. When pulling try to pull parallel to the car. Dont pull toward you or you may tear the tape in which case you are in for a time removing that which already stuck, to be able to lift the scoop enough to grab the remaining tape left on the back side.
Once that is done just mash that badboy good and give the promoter 24 hrs to set up a bond with the tape and panel and your good to go.
Thats it.
I did not paint the screen. They came black.
Questions??? Im sure I missed something.
On the blade, just get the one for metal that has the most teeth you can find.
After you get it painted apply the 3M adhesive tape all around the backside edge of the scoop.
There is an area that it fits into. Go all the way around and cut the edges to fit together flush.
I taped the template on then ran tape around the outside of it.
Pulled the template off then taped it all up around where I would be cutting.
I expanded the tape a good deal (tapes cheap...paint isnt) on both sides so that the saw's metal guide would not scratch anything.
put the template back on and drew a mark onto the tape where I was to cut.
I then drilled a small hole inside it, then made it bigger with a bigger bit. Did that till
the hole was large enough for a metal blade in the ricipricating saw.
I then put the blade in (please use safety glasses) and began cutting. Go very slow
as it will go through it like butter.
All was great until I got to the leading vertical edge closes to the door. I was hitting something behind it. in my mind i was thinking wires, coolant lines, pistons..lol...all the worst things I could think of. Soooo I grabbed a small piece of 2X4 wood. I then placed the wood against the side of the car and placed the saw's guide on it with the blade in the cut groove. This left just enough room so that as the blade came up it was still below the line of the metal so it wasnt going to rat tat tat down the side of the car.
I then finished that back vertical line that way. Pulled the panel free to discover it was a piece of insulating foam. Nothing is back there on either side for you to worry about.
I then fit the recessed scoops to the panel. Cutting off a tad more in places so that it was fully recessed. There is a lip there to allow for very small messups so no worries unless you really go outside the lines!
At this point I took a can of flat black rattle can paint and painted inside the panel.
I allowed it to dry then pulled the tape off the side of the car & verified fitment.
At this point you want to take your touch up paint (you do have some right?) and touch up the edge all the way around. This is the worst part of the whole deal cause that takes you forever... lol
after that I placed the vent on the car and taped around it so I would know the edge location on the panel. Then take your 3m adhesive promoter and apply liberally to that area. once it dries you pull off a small section of the 3M tape red covering and fold it back to the outside so you can reach it. Do that on all four sides.
remove your outline promotor tape you put on the car and your ready to install it.
At theis point I would like to say that the promotor stuff will and can take the clearcoat off your car or cause it to discolor. That is why I did not want to go outside the lines or area that would not be below the edge of the scoop. Again...tape is cheap.
Now place the scoop in the hole and pull the tape off. When pulling try to pull parallel to the car. Dont pull toward you or you may tear the tape in which case you are in for a time removing that which already stuck, to be able to lift the scoop enough to grab the remaining tape left on the back side.
Once that is done just mash that badboy good and give the promoter 24 hrs to set up a bond with the tape and panel and your good to go.
Thats it.
I did not paint the screen. They came black.
Questions??? Im sure I missed something.
On the blade, just get the one for metal that has the most teeth you can find.
Last edited by Barricade643; 01-30-2010 at 08:07 AM.


Thread
Thread Starter
Forum
Replies
Last Post