
SHR Louver Install....56K = DEATH

Thread Starter
5th Gear Member
Joined: Feb 2005
Posts: 4,205
From: Anaheim, California
Alrighty.....Here we go......A couple of things first.....
1. Install started at 10:00am sharp. Finished at about 2:30 or so. But taking pics along the way slows you down, along with never having done the job before...Oh, and I DID take a lunch break....
2. The back seat of these cars is not made for anyone that is 6'1", and weighs 240 pounds, with bad knees.....
3. WHY DIDN'T SOMEBODY WARN ME ABOUT THAT FRICKEN ADHESIVE????
On with it....
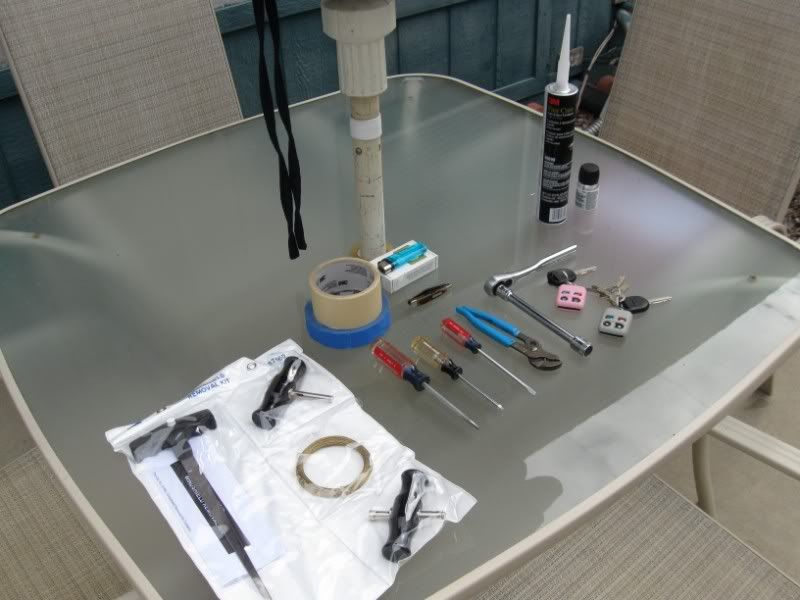
The arsenol, laid out and ready to go...
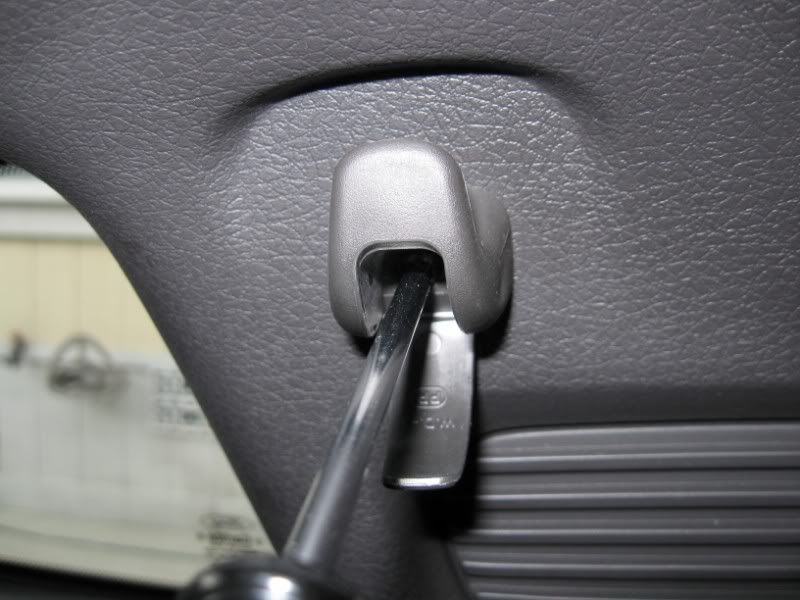
First up, remove the coat hanger hook, with a #20 Torx. Just unscrews right out..
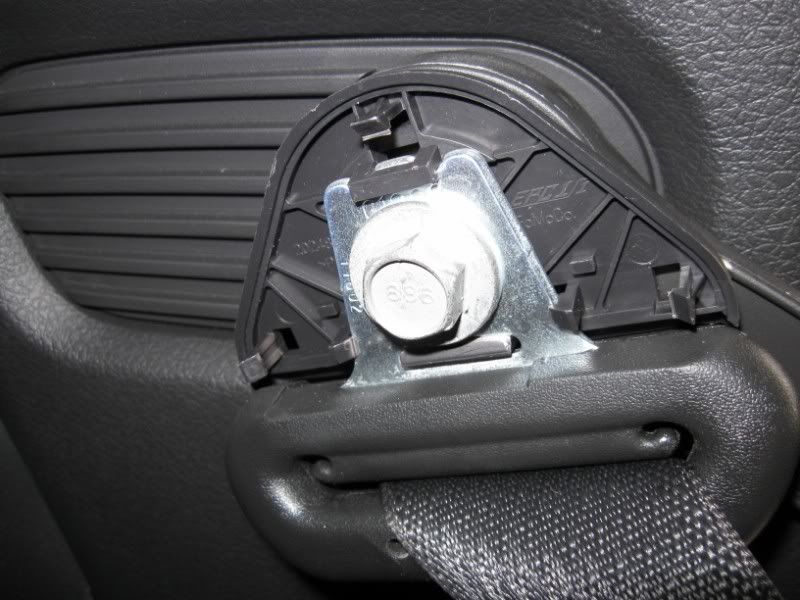
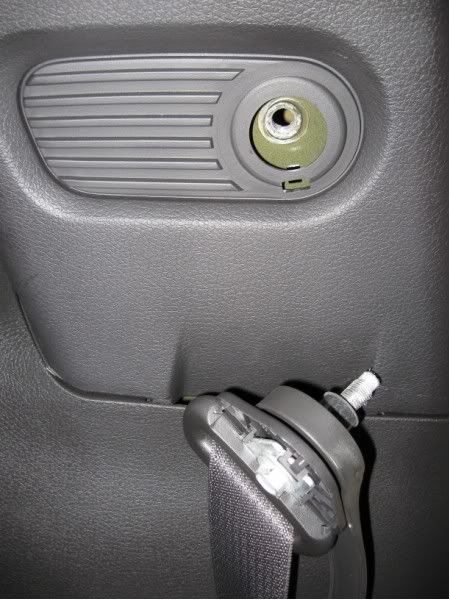
Next Up, remove the cover over the seat belt bolt, and remove the 14MM bolt. It will stay in the seat belt bracket...
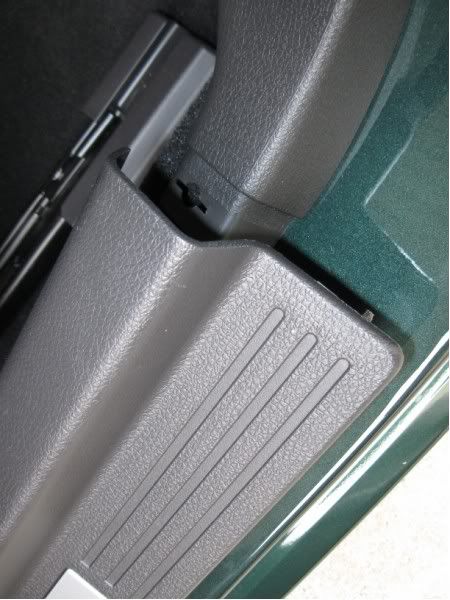
Lift straight up on the door sill plate. It is held with clips and adhesive tape. No need to remove the sill plate all the way, just the last couple of clips to allow the panel under it to be removed..
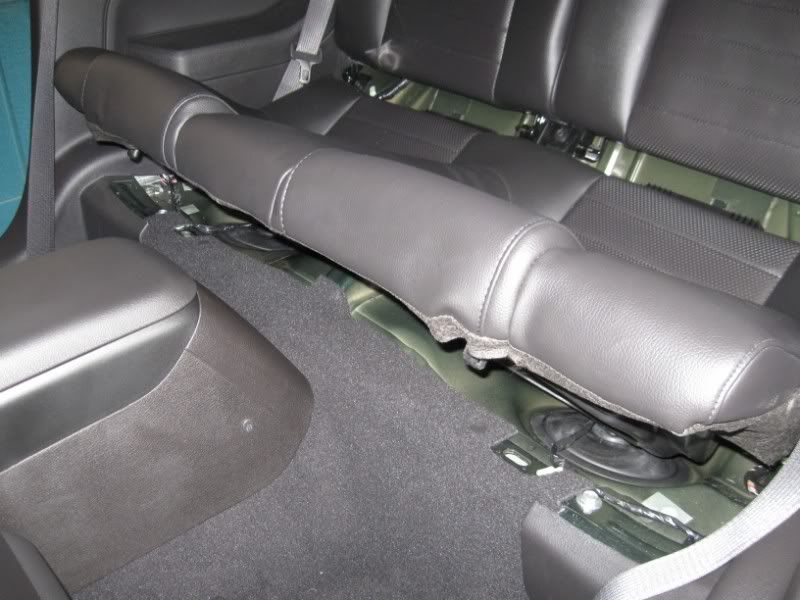
Remove the lower portion of the back seat. Push down and back, then pull up. The front of the seat is held down with two clips, one on either side...
Now, pull straight down on the A Pillar trim, above the door. No need to remove the trim piece all the way, just the very back push pin, to allow the panel under it to be removed...
With the lower seat removed, and the backs of the seats folded down, you will see two push pin fasteners right in front of you. Remove those two pins...

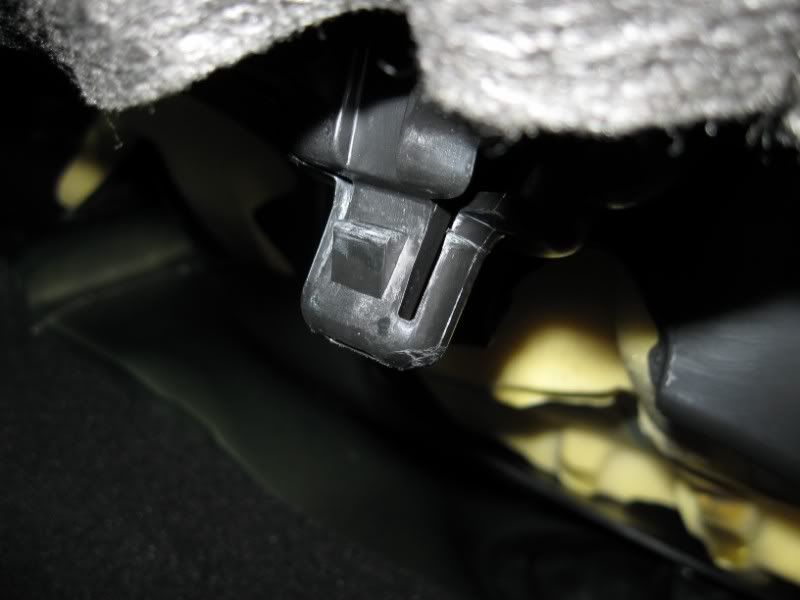
Down at the base of the seat, you will see another push pin. Remove this one as well...
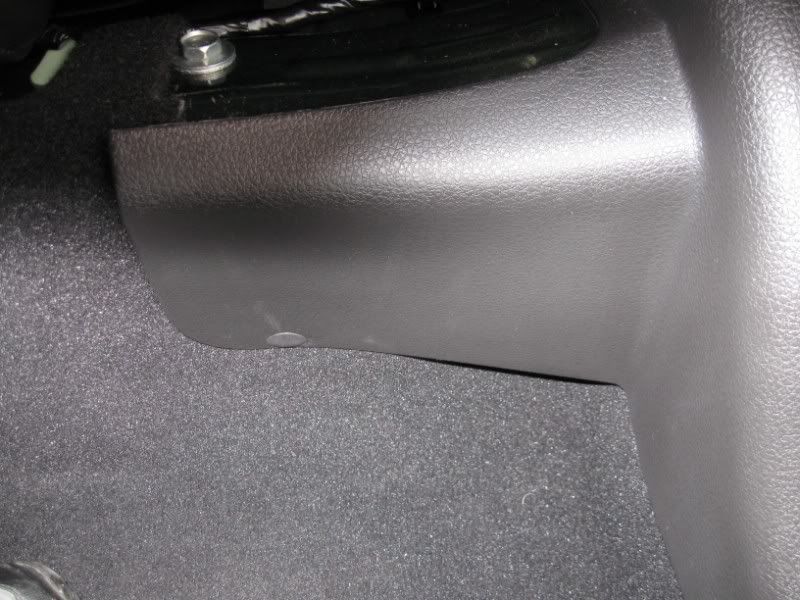
At this point, the side plastic piece next to the rear seat is ready to pull out....
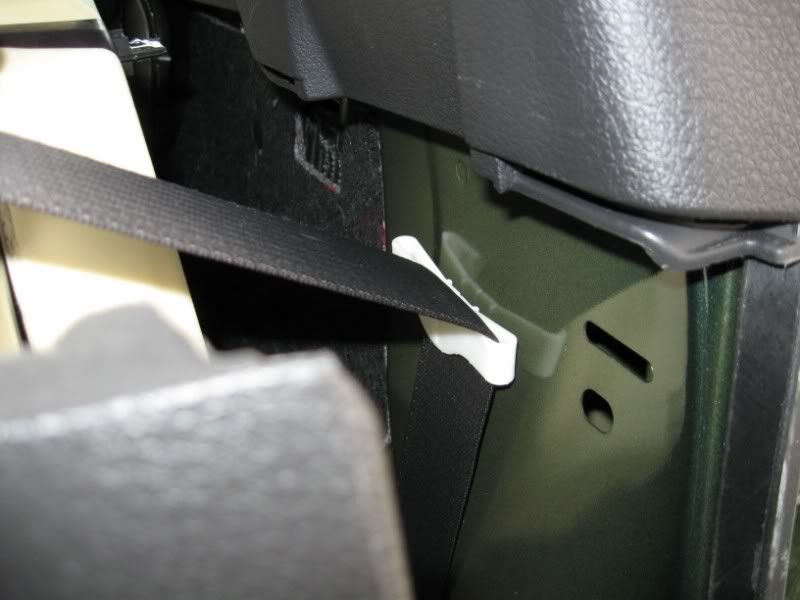
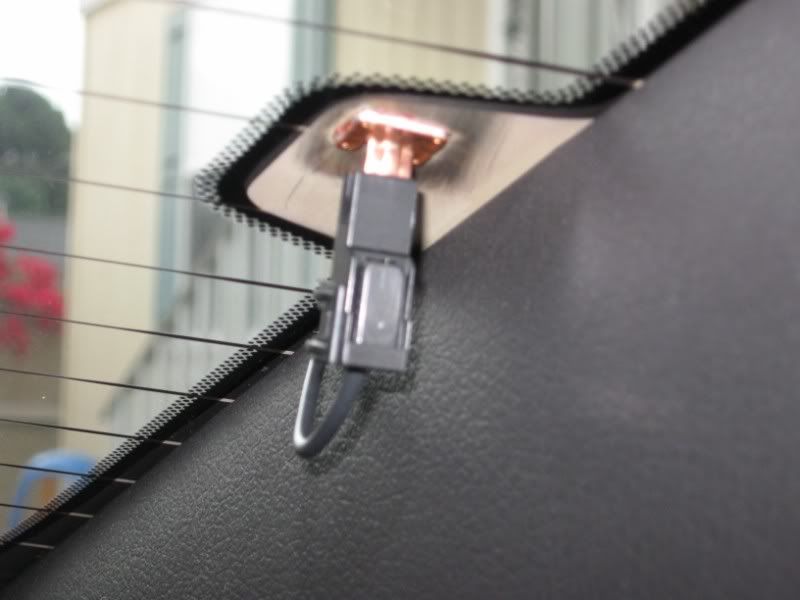
Next, do not forget to disconnect the wire going to your rear window defroster..
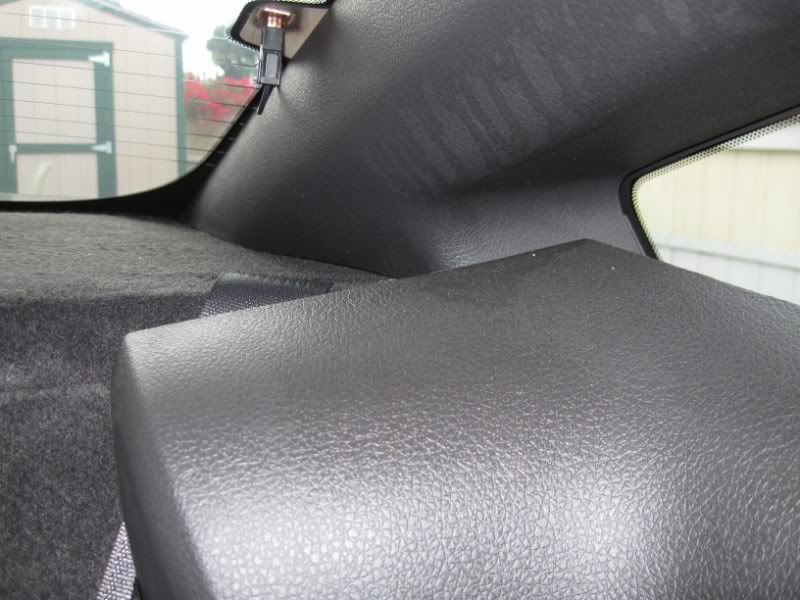
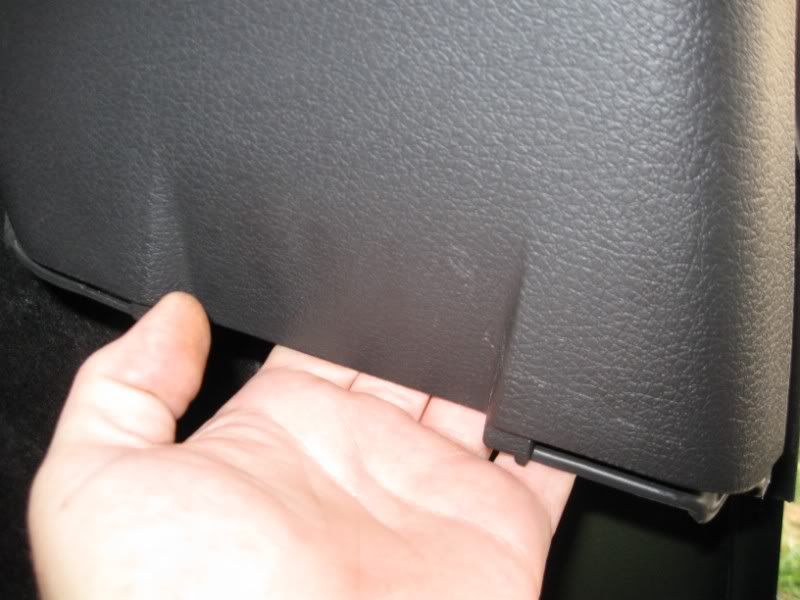
Now, just slip your hand under the lower lip of the upper plastic trim piece, and pull toward you..
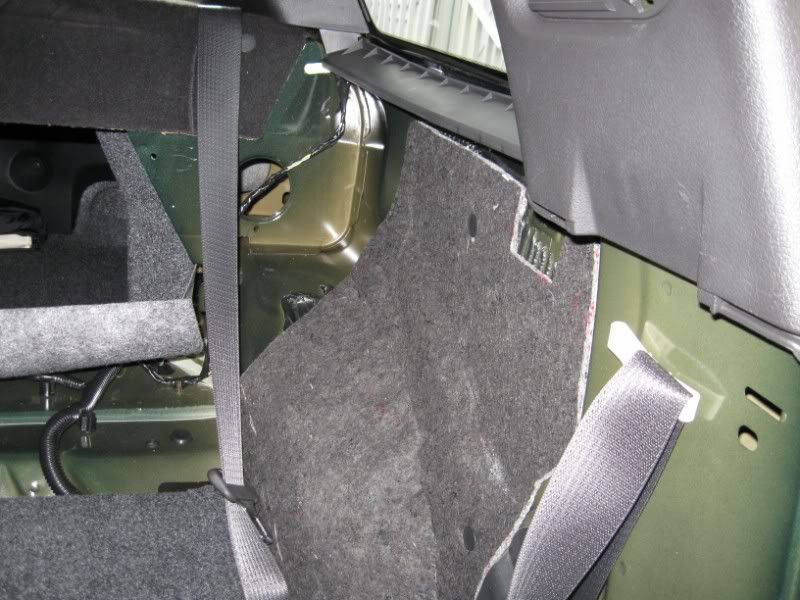
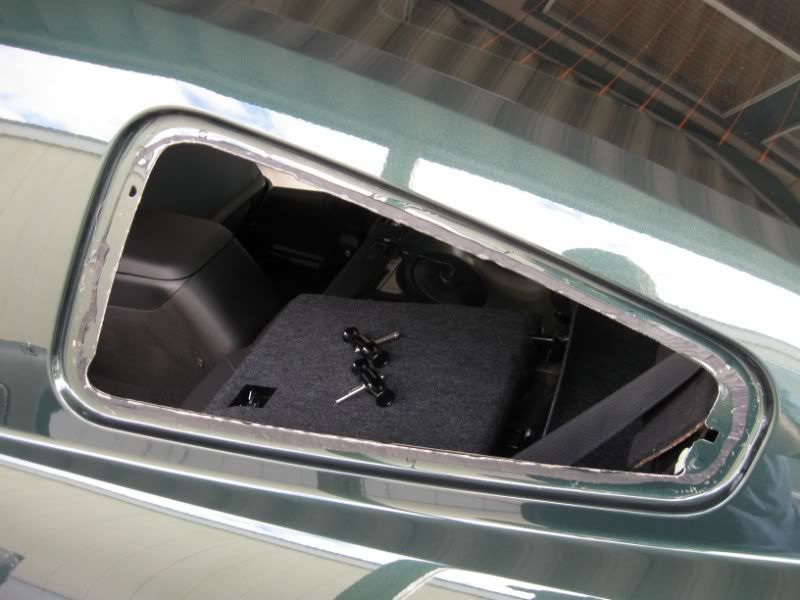
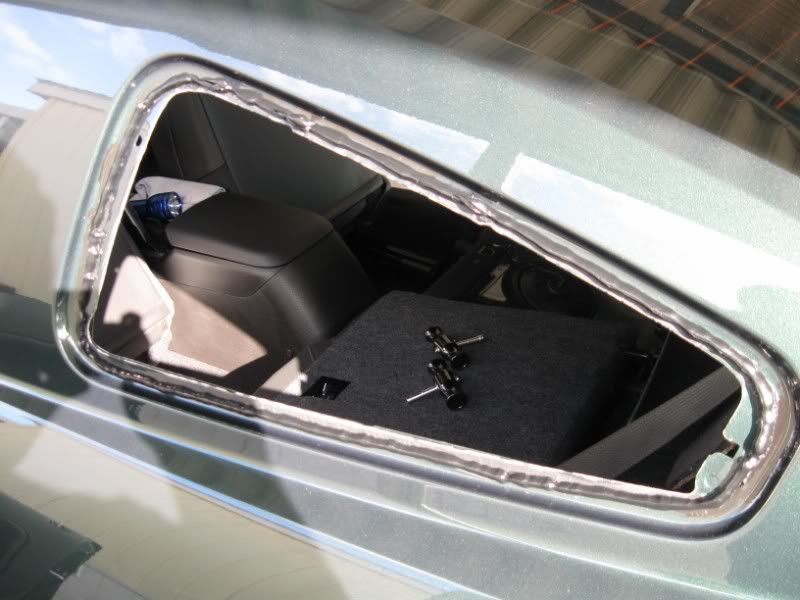
This is what you should now have left of your rear seating area....

Oh, almost forgot to mention...I did have some supervision looking over my shoulder during the entire installation process...


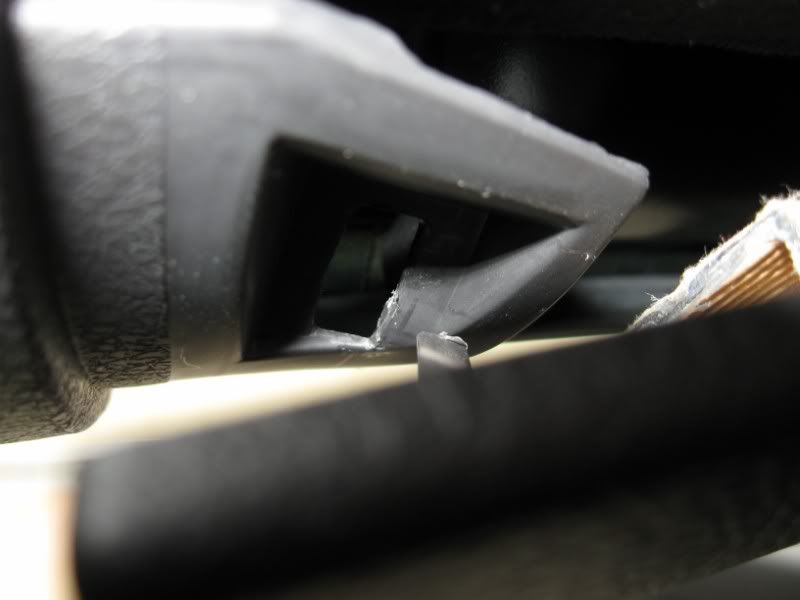
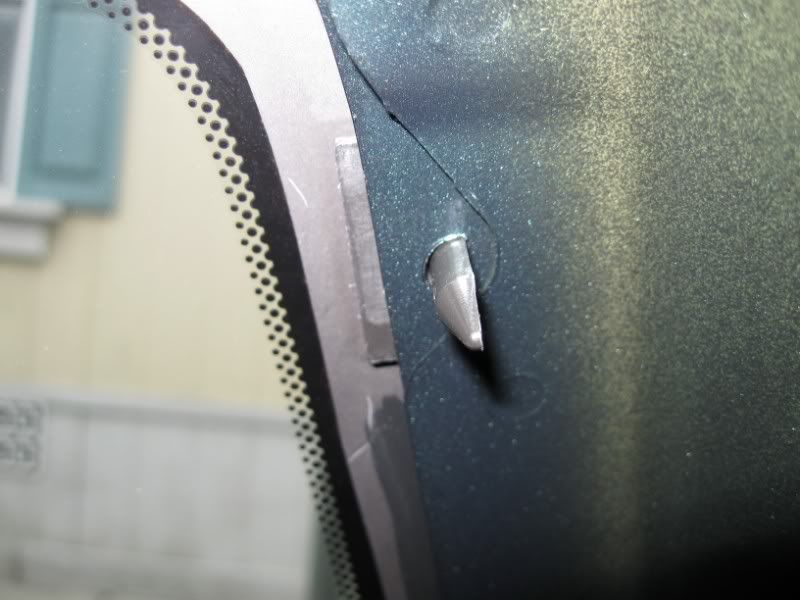
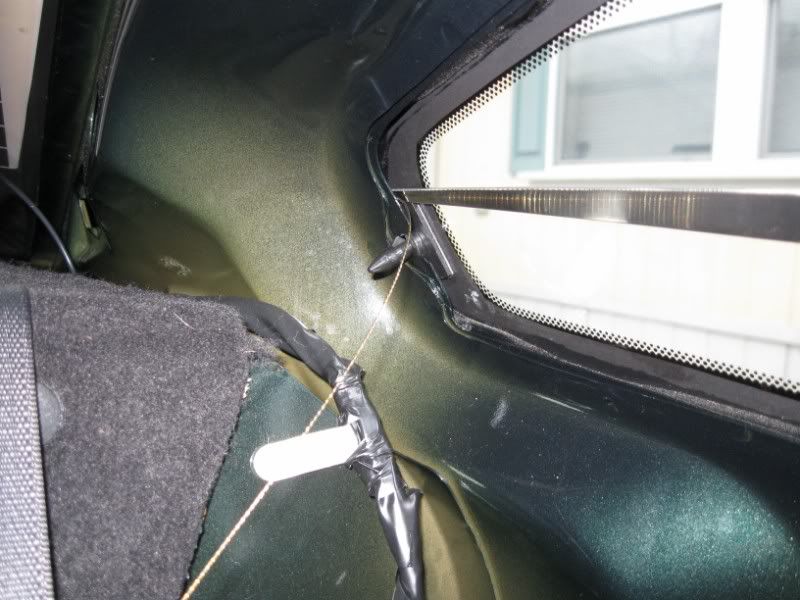
If you look at the inside of the rear windows, you will see two factory installed guidepins, that can either be removed at this point, or left intact. I would suggest leaving them in for now, as they will hold the window in place for the next steps...
CONTINUED, NEXT POST.......
1. Install started at 10:00am sharp. Finished at about 2:30 or so. But taking pics along the way slows you down, along with never having done the job before...Oh, and I DID take a lunch break....
2. The back seat of these cars is not made for anyone that is 6'1", and weighs 240 pounds, with bad knees.....
3. WHY DIDN'T SOMEBODY WARN ME ABOUT THAT FRICKEN ADHESIVE????
On with it....
The arsenol, laid out and ready to go...
First up, remove the coat hanger hook, with a #20 Torx. Just unscrews right out..
Next Up, remove the cover over the seat belt bolt, and remove the 14MM bolt. It will stay in the seat belt bracket...
Lift straight up on the door sill plate. It is held with clips and adhesive tape. No need to remove the sill plate all the way, just the last couple of clips to allow the panel under it to be removed..
Remove the lower portion of the back seat. Push down and back, then pull up. The front of the seat is held down with two clips, one on either side...
Now, pull straight down on the A Pillar trim, above the door. No need to remove the trim piece all the way, just the very back push pin, to allow the panel under it to be removed...
With the lower seat removed, and the backs of the seats folded down, you will see two push pin fasteners right in front of you. Remove those two pins...
Down at the base of the seat, you will see another push pin. Remove this one as well...
At this point, the side plastic piece next to the rear seat is ready to pull out....
Next, do not forget to disconnect the wire going to your rear window defroster..
Now, just slip your hand under the lower lip of the upper plastic trim piece, and pull toward you..
This is what you should now have left of your rear seating area....
Oh, almost forgot to mention...I did have some supervision looking over my shoulder during the entire installation process...
If you look at the inside of the rear windows, you will see two factory installed guidepins, that can either be removed at this point, or left intact. I would suggest leaving them in for now, as they will hold the window in place for the next steps...
CONTINUED, NEXT POST.......
Thread Starter
5th Gear Member
Joined: Feb 2005
Posts: 4,205
From: Anaheim, California
CONTINUED.....
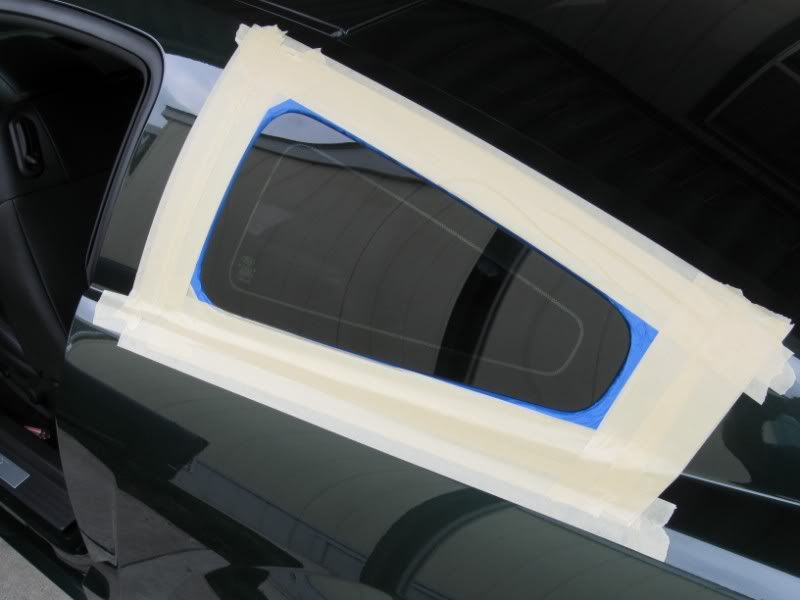
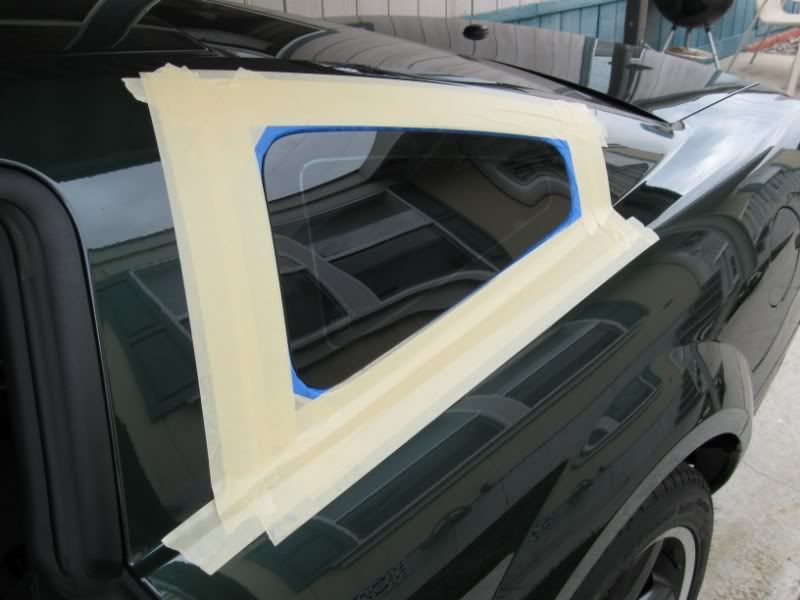
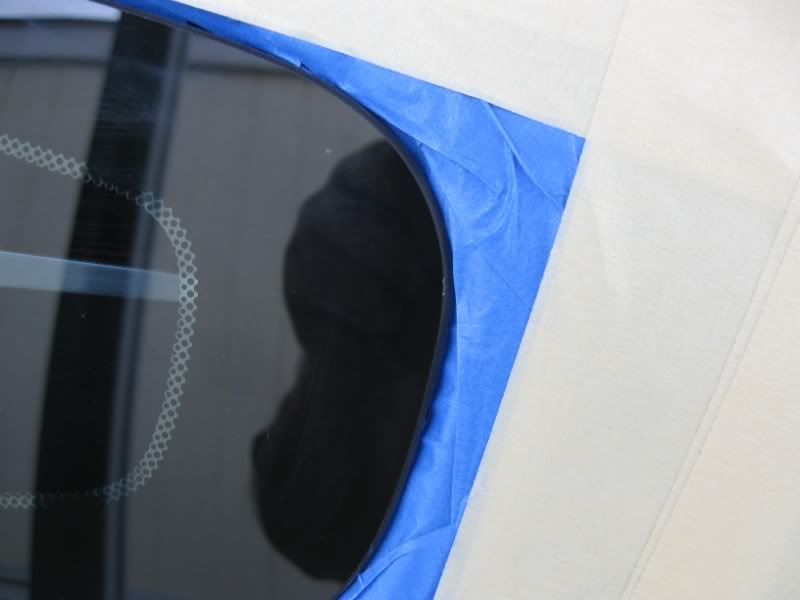
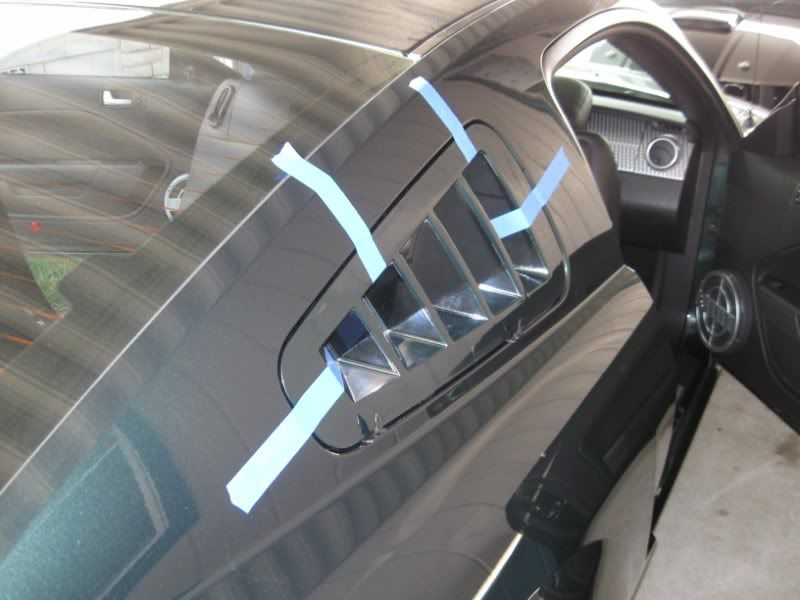
On to the exterior....Here is the taping I did prior to cutting the adhesive, to protect the paint as best as possible. Slide the tape between the window and the frame, and secure...
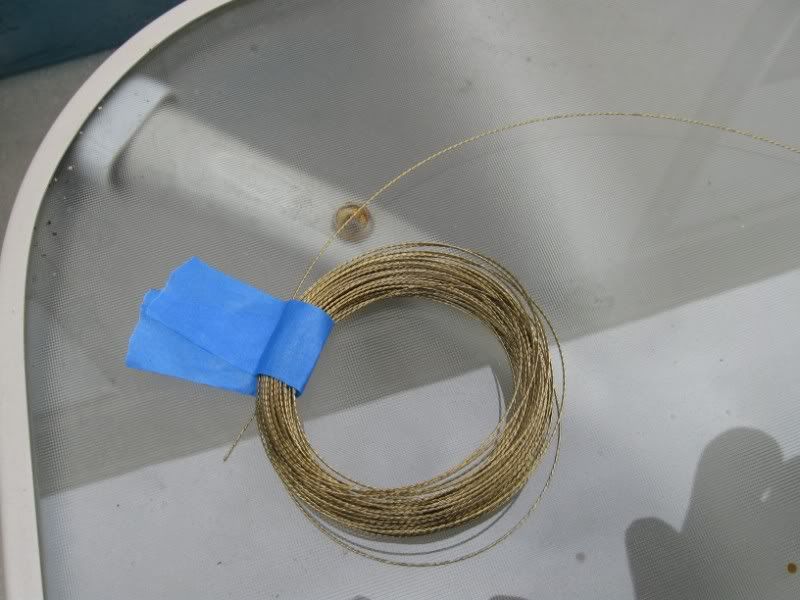
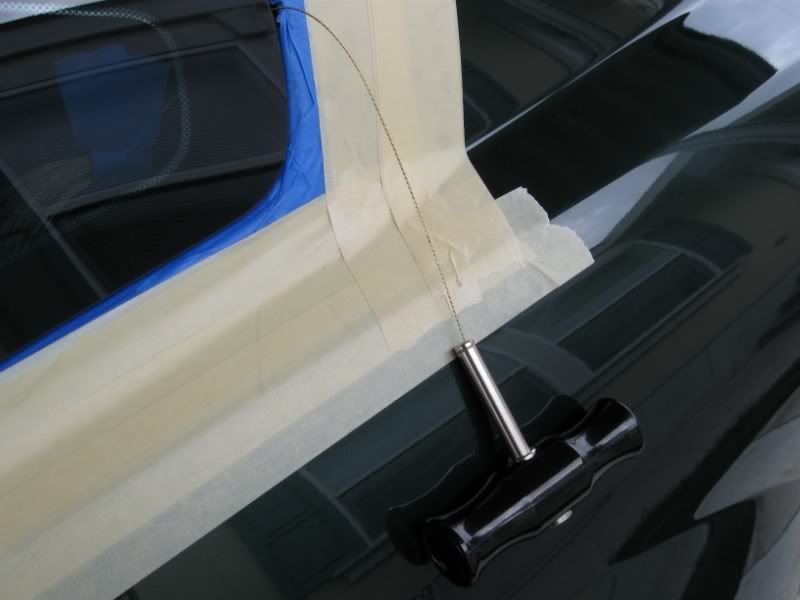
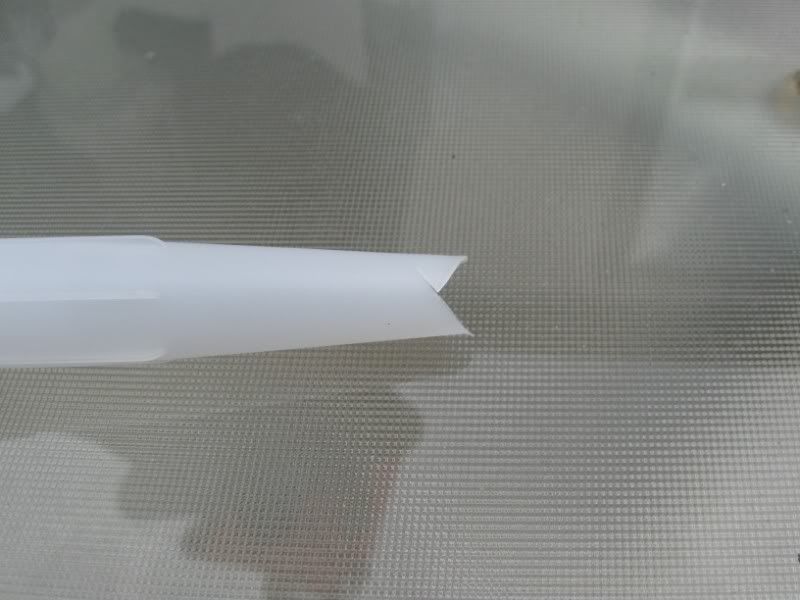
A quick tip here...Included in the window removal kit is this piano wire, that is used for cutting the adhesive seal around the window...Before you cut the twist ties that hold it coiled, grab a piece of tape, and secure it. Otherwise, it will spring like a clockspring....
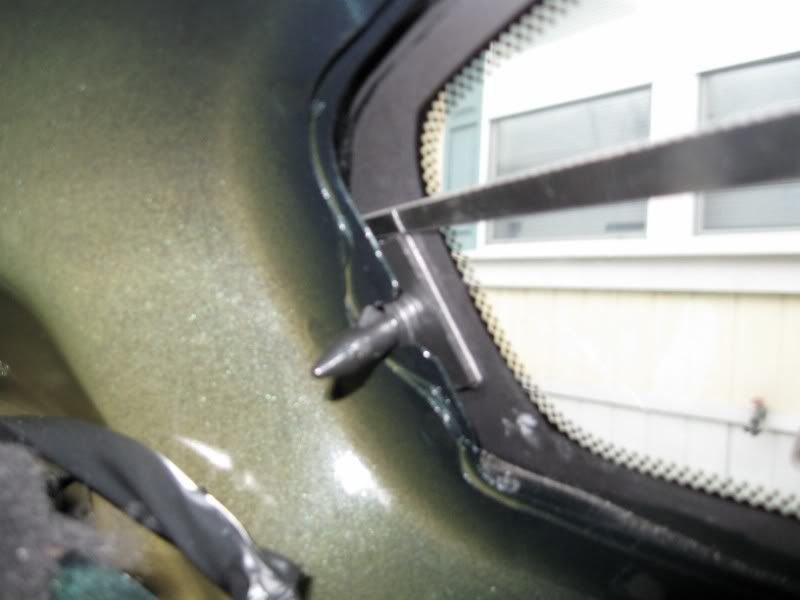
Now, back on the inside, lay the pick tool from the kit on top of the earlier mentioned guidepin. Push straight in with the pick tool flexing toward the glass. You will feel it give thru the adhesive, then break free when it goes thru. Go easy, as the pick tool easily scratches the exterior paint....
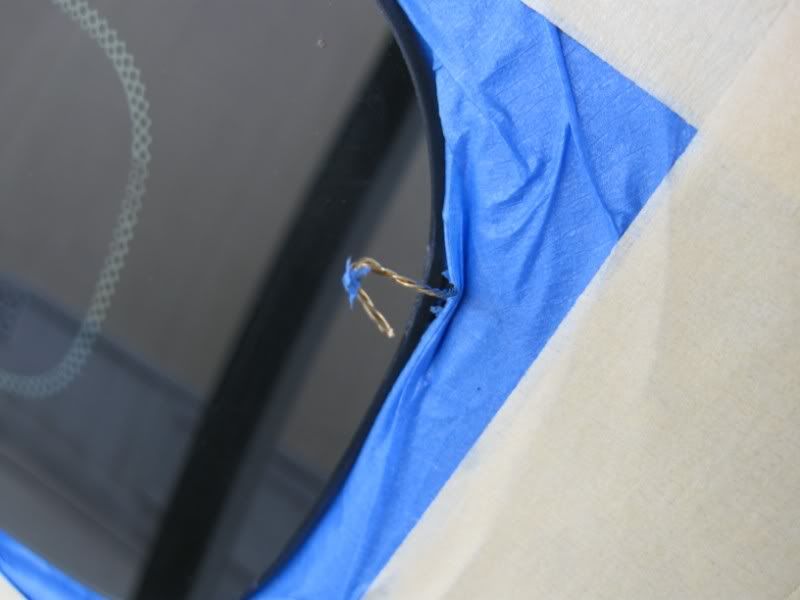
Now, remove the pick tool. It has a v notch in the tip. Put the piano wire thru the notch, bend it over, and insert it into the spot you just pushed thru the adhesive....Hold the piano wire in place, and gently pull back on the pick tool. This should leave the wire exposed enough on the outside, to be able to gently grab it with the pick tool end...
Attach the handles on both sides of the piano wire...
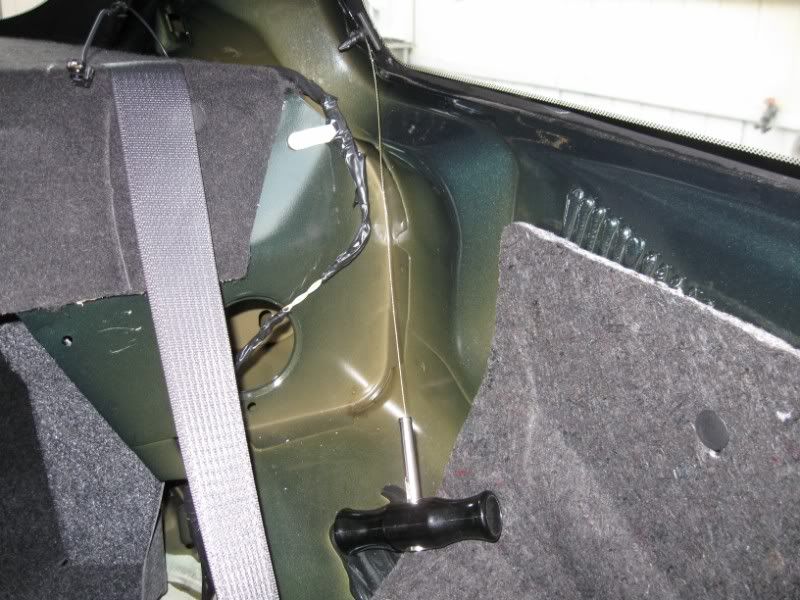
At this point, you basically use the piano wire and handles as a hand saw. Keep the pressure steady, and keep the wire on the edge of the glass. Pull the wire toward you, and saw at the same time. You can do either the top or bottom, then you will need to re-feed the wire as noted above, and do the other top or bottom. Reason for this is, you left the two guidepins intact, and because of this, you cannot go all the way around without stopping....It really is not terribly hard to cut thru, and I would suggest cutting both the top and bottom cuts twice.
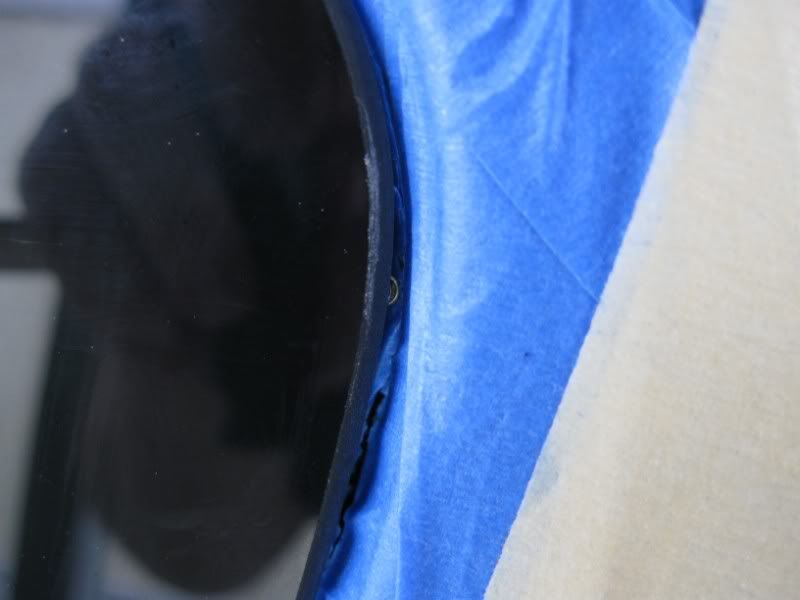
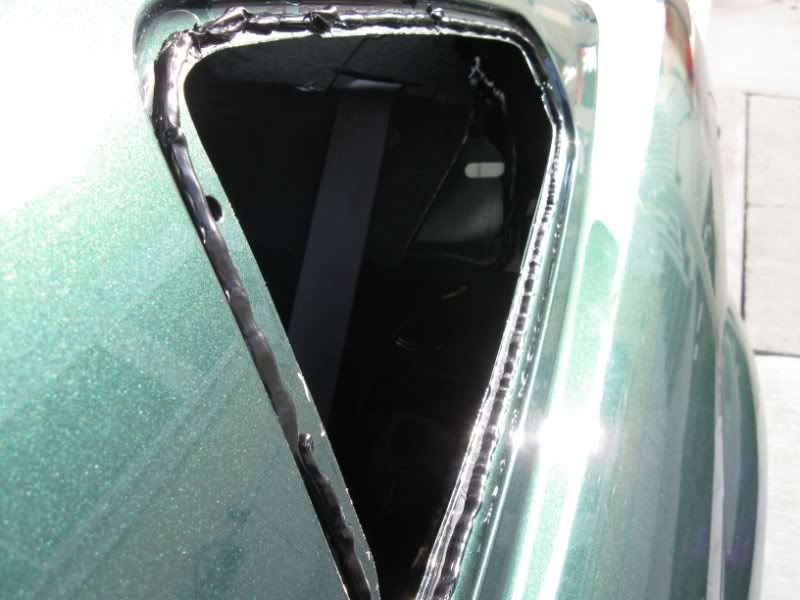
Once the cut is complete, I added some tape on the outside, to prevent the window from falling out.

Once this is done, I put gentle pressure on the glass from the inside, with one hand on the outside, with the tape there. It pops out fairly easily....
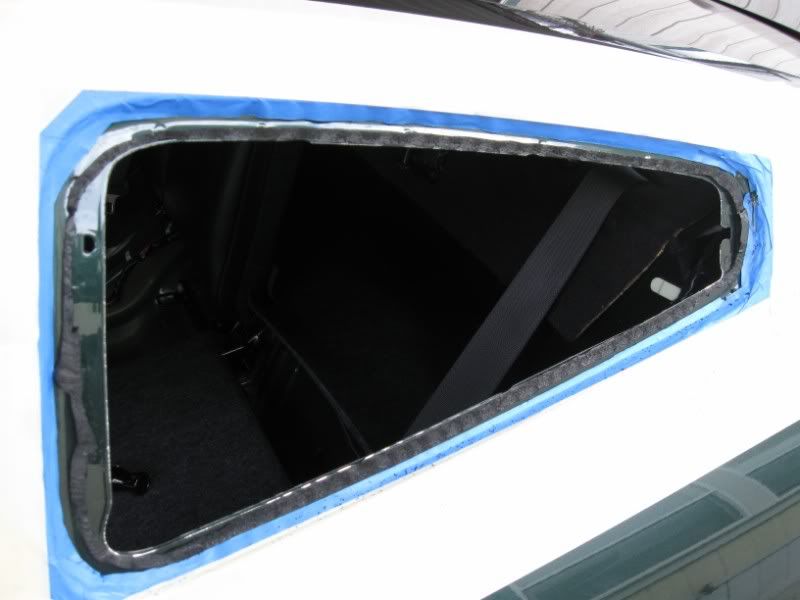
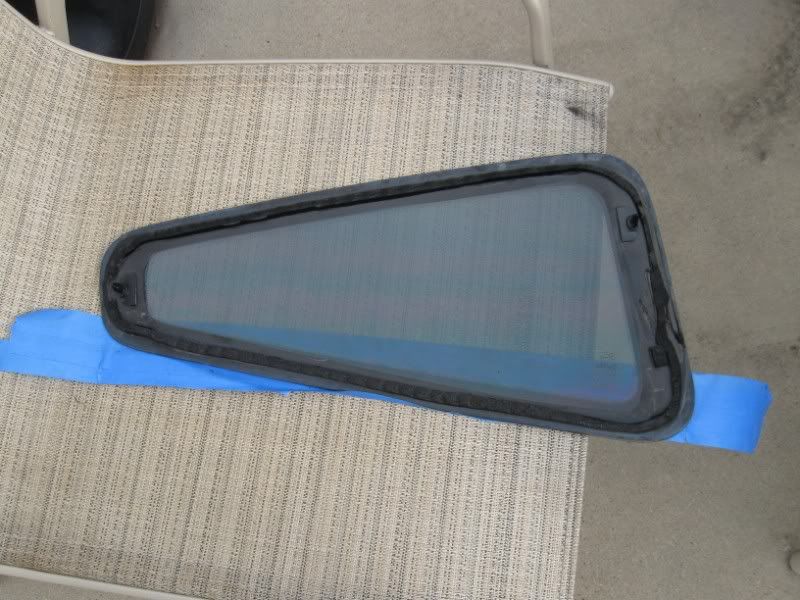
Once the window is out, take a utility or pocket knife, and CAREFULLY remove excess adhesive. It is not necessary, or suggested that you completely remove all the adhesive, as it helps the new adhesive to adhere..
Once done with this, you should apply the adhesive promoter to the inside of the louvers. I used Q Tips to apply the adhesive promoter, and it worked just fine. While the adhesive promotor is drying on the louver, cut the tip on the adhesive tube in a V notch. This is when it gets real fun..... Now, follow the existing bead of adhesive around the entire window. Don't be shy. Use plenty of adhesive, and there is room for it to squish around when you install the louver...
On to the exterior....Here is the taping I did prior to cutting the adhesive, to protect the paint as best as possible. Slide the tape between the window and the frame, and secure...
A quick tip here...Included in the window removal kit is this piano wire, that is used for cutting the adhesive seal around the window...Before you cut the twist ties that hold it coiled, grab a piece of tape, and secure it. Otherwise, it will spring like a clockspring....
Now, back on the inside, lay the pick tool from the kit on top of the earlier mentioned guidepin. Push straight in with the pick tool flexing toward the glass. You will feel it give thru the adhesive, then break free when it goes thru. Go easy, as the pick tool easily scratches the exterior paint....
Now, remove the pick tool. It has a v notch in the tip. Put the piano wire thru the notch, bend it over, and insert it into the spot you just pushed thru the adhesive....Hold the piano wire in place, and gently pull back on the pick tool. This should leave the wire exposed enough on the outside, to be able to gently grab it with the pick tool end...
Attach the handles on both sides of the piano wire...
At this point, you basically use the piano wire and handles as a hand saw. Keep the pressure steady, and keep the wire on the edge of the glass. Pull the wire toward you, and saw at the same time. You can do either the top or bottom, then you will need to re-feed the wire as noted above, and do the other top or bottom. Reason for this is, you left the two guidepins intact, and because of this, you cannot go all the way around without stopping....It really is not terribly hard to cut thru, and I would suggest cutting both the top and bottom cuts twice.
Once the cut is complete, I added some tape on the outside, to prevent the window from falling out.
Once this is done, I put gentle pressure on the glass from the inside, with one hand on the outside, with the tape there. It pops out fairly easily....
Once the window is out, take a utility or pocket knife, and CAREFULLY remove excess adhesive. It is not necessary, or suggested that you completely remove all the adhesive, as it helps the new adhesive to adhere..
Once done with this, you should apply the adhesive promoter to the inside of the louvers. I used Q Tips to apply the adhesive promoter, and it worked just fine. While the adhesive promotor is drying on the louver, cut the tip on the adhesive tube in a V notch. This is when it gets real fun.....
Thread Starter
5th Gear Member
Joined: Feb 2005
Posts: 4,205
From: Anaheim, California
CONTINUED.....
WHY THE HELL DIDN'T SOMEONE WARN ME ABOUT HOW STIFF THIS ADHESIVE IS GETTING OUT OF THE TUBE?????????
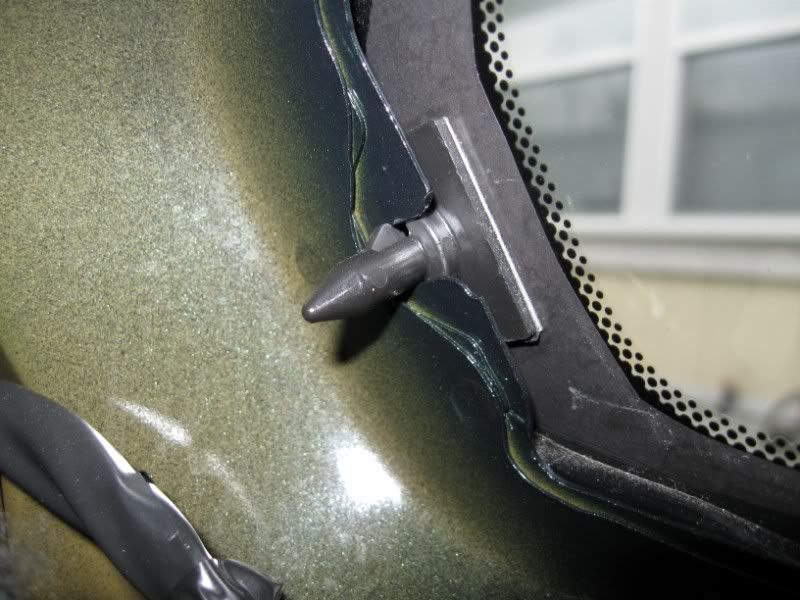
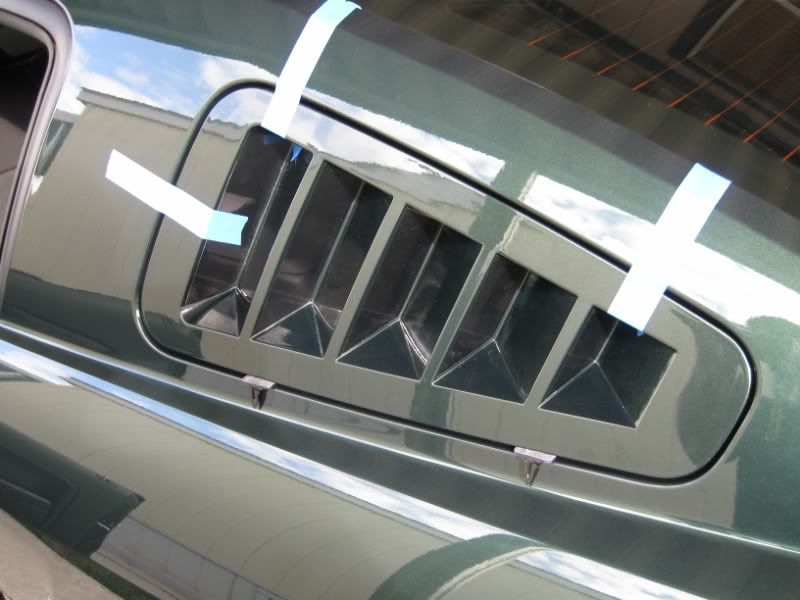
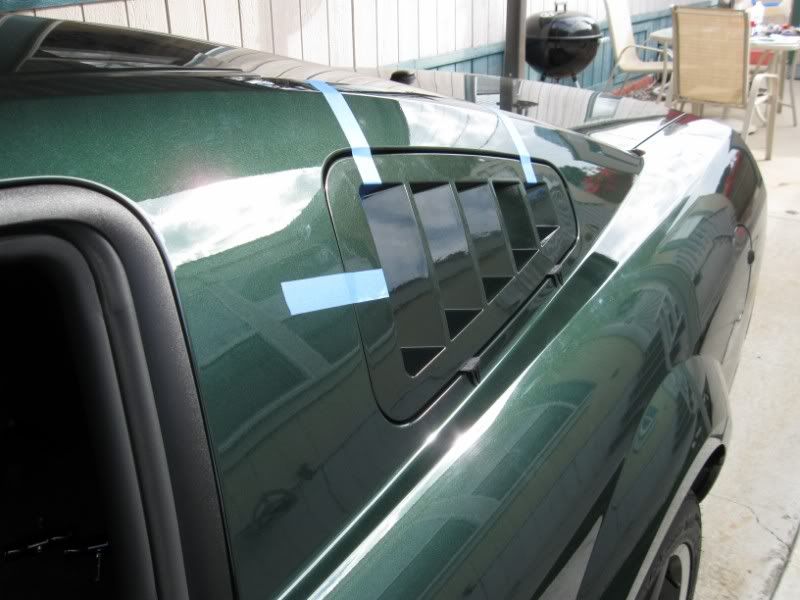
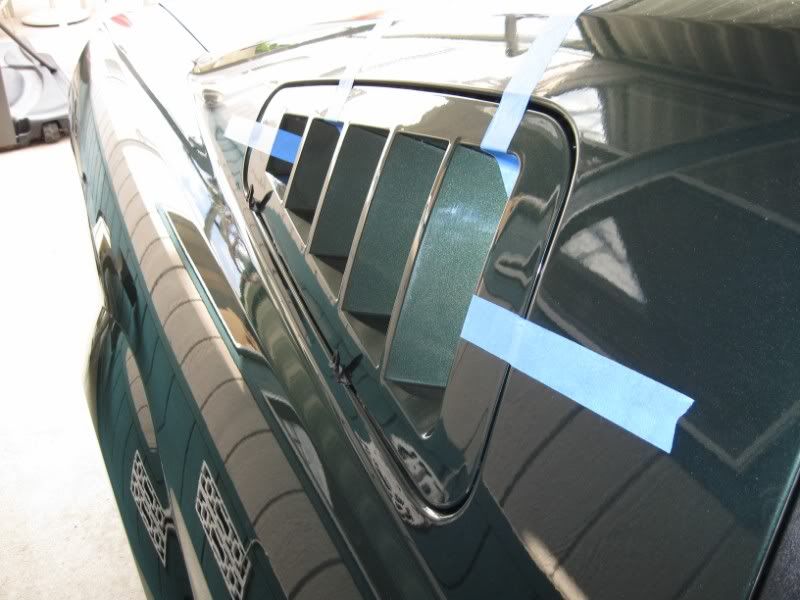
Now, after pushing the louver into position, and checking the clearance and seal all around, I took the two factory guidepins, and used them as a spacer / block, for the louver to rest on....
I then added a few pieces of tape, just to make sure my spacing stayed true, and to assure the louver did not fall out....(yeah, right.....)
Now, it's lather, rinse, and repeat for the other side......
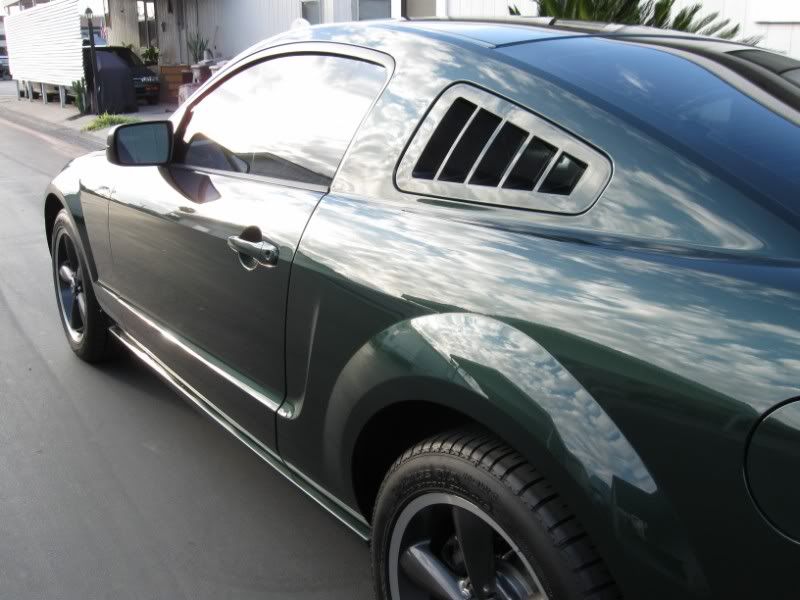
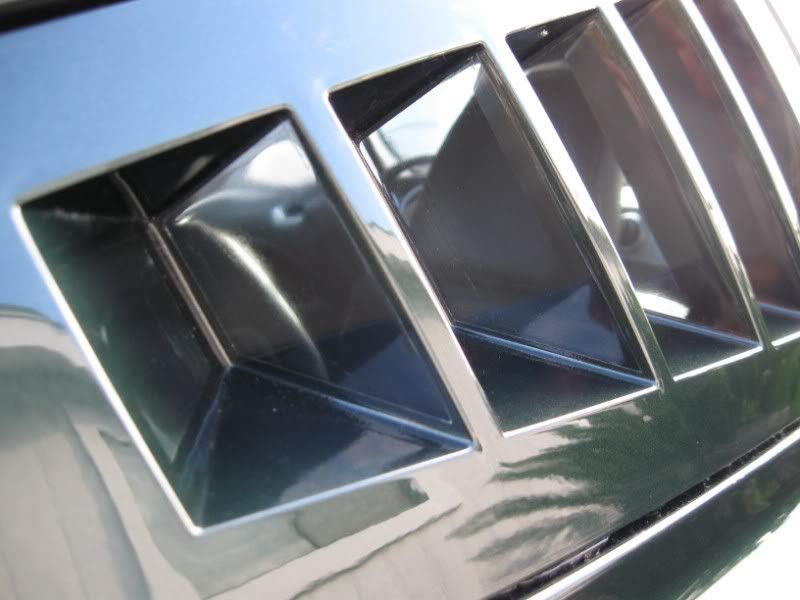
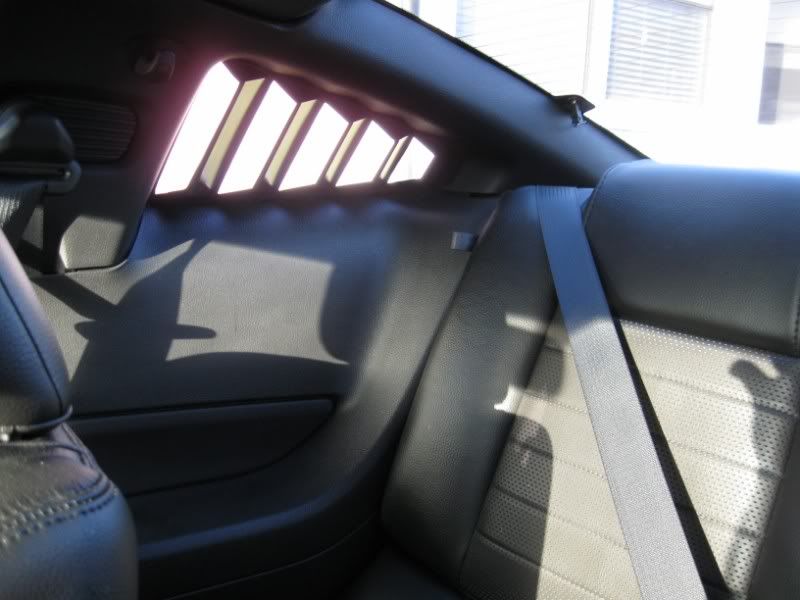
This is what it looks like on the inside, with the louver in place, before replacing all the interior trim pieces....
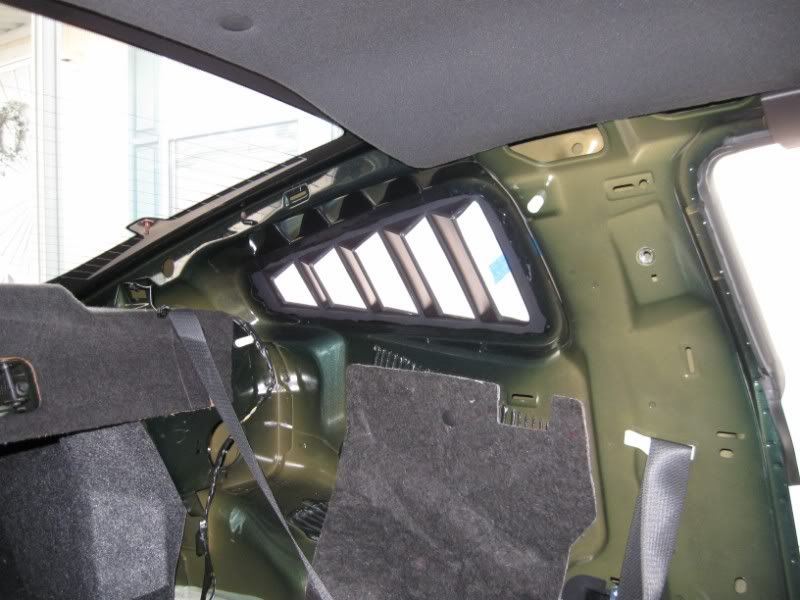
After letting the adhesive set up for a couple of hours, go back and reverse all the steps for re-installing the interior trim pieces. Be gentle with the pieces that butt up against the louver on the inside....
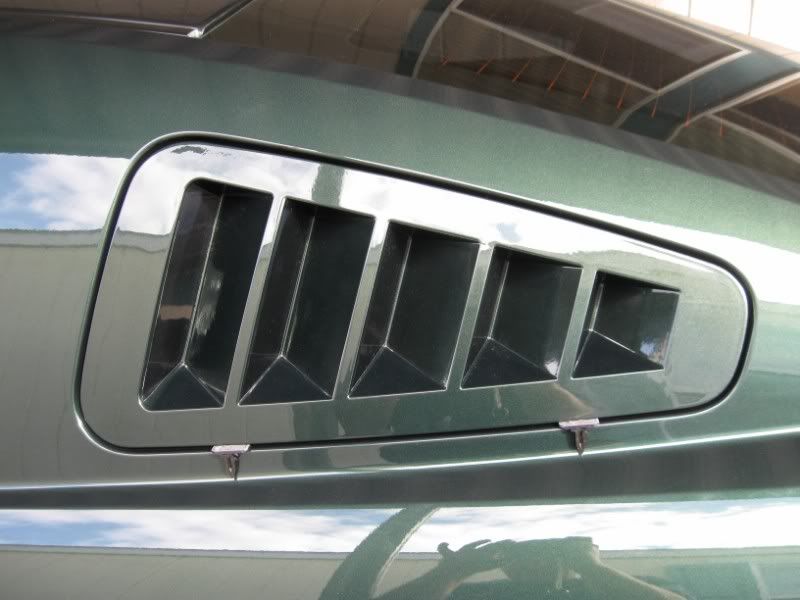
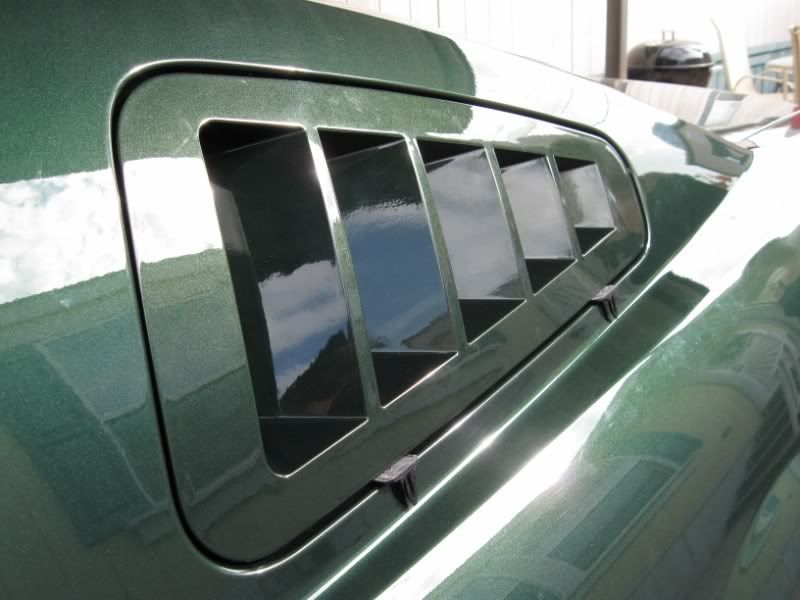
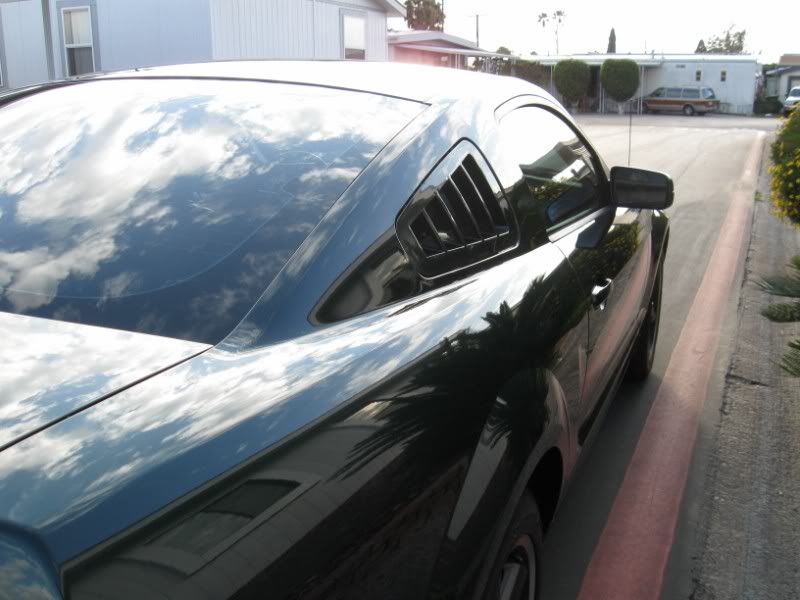
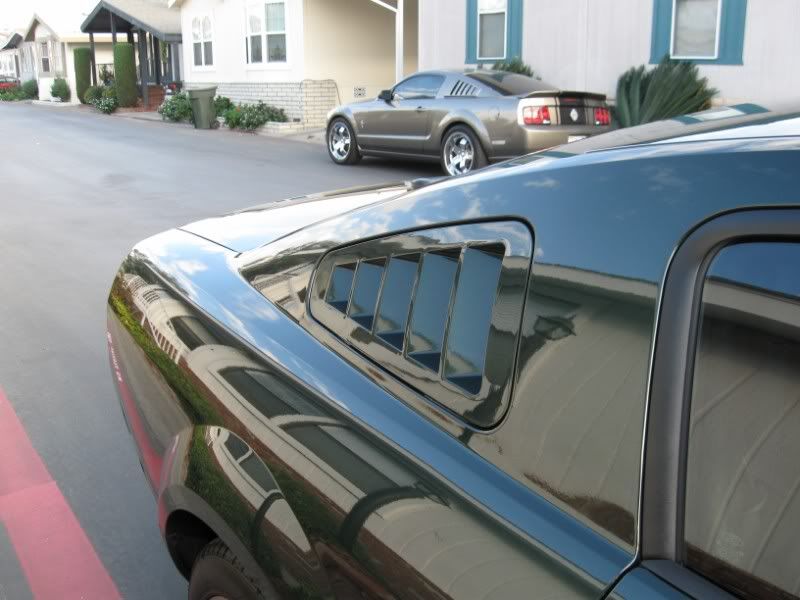
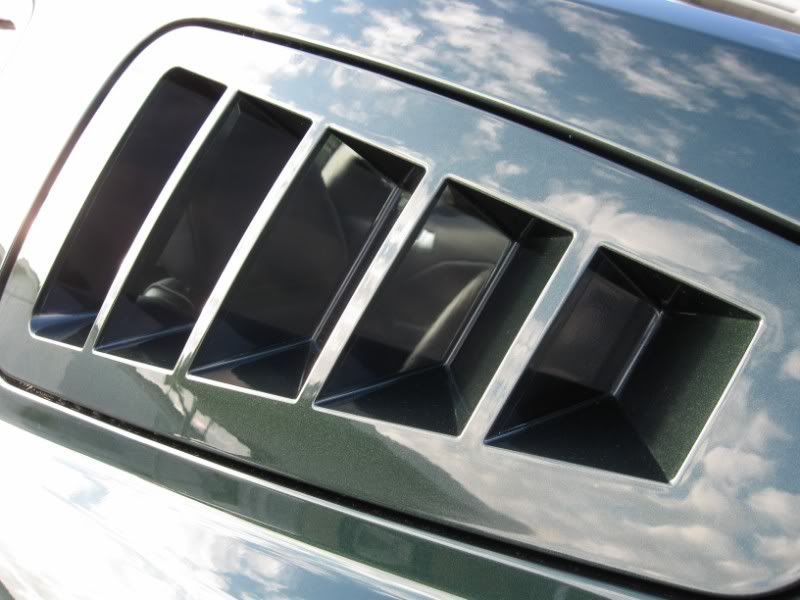
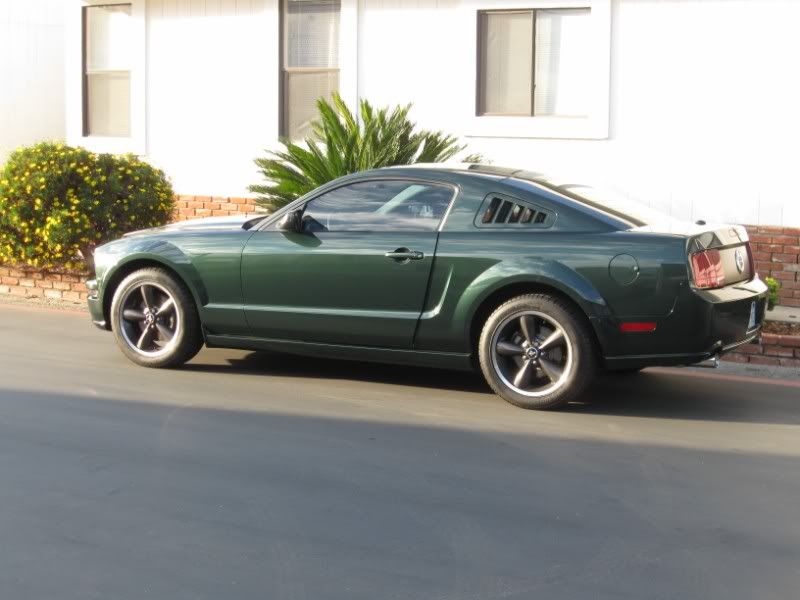
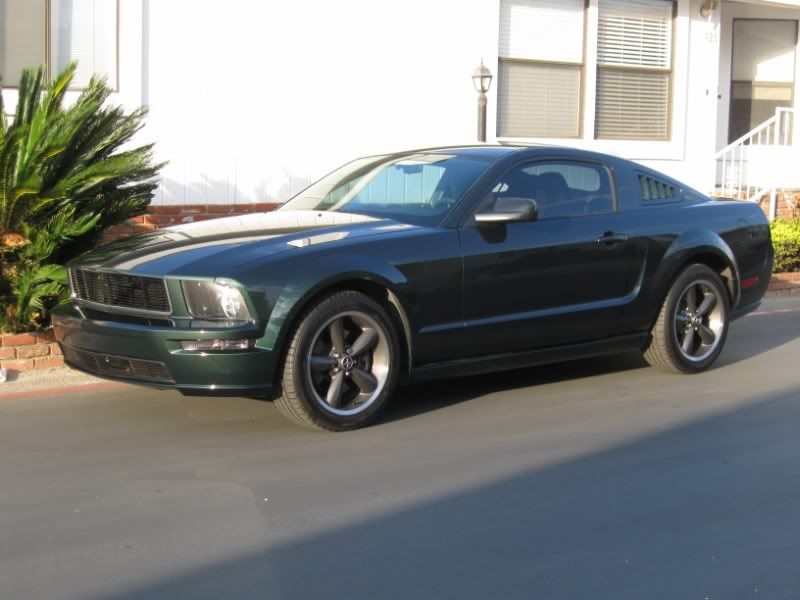
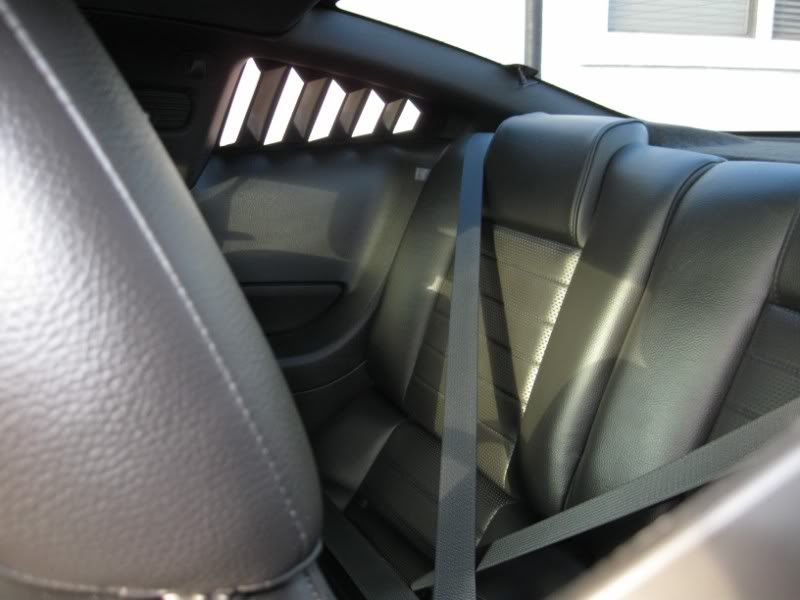
And, in no particular order, here are some pics of the finished product....I must tell you that before I re-installed the interior trim, Karen came out to check on the progress, and nearly had a coronary when she saw all the interior pieces gutted...I re-assured here that they would in fact go back together.....Thankfully, they did......
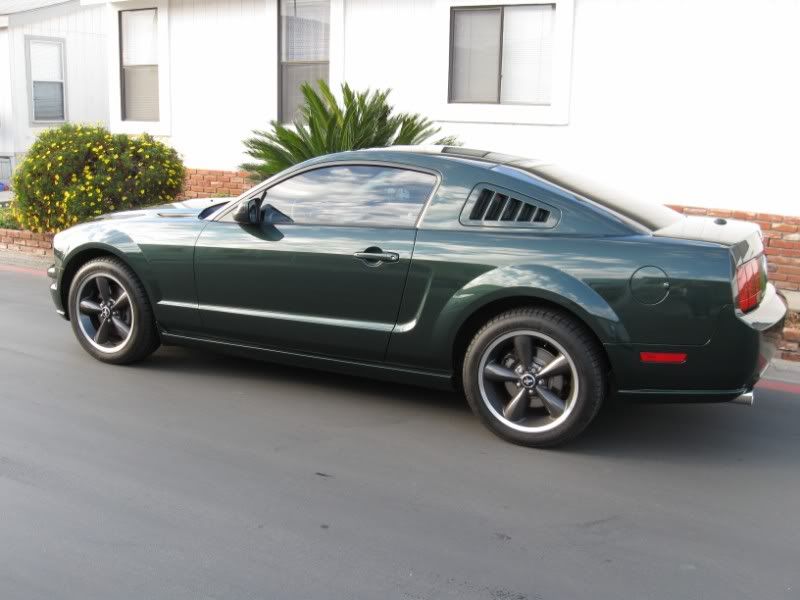
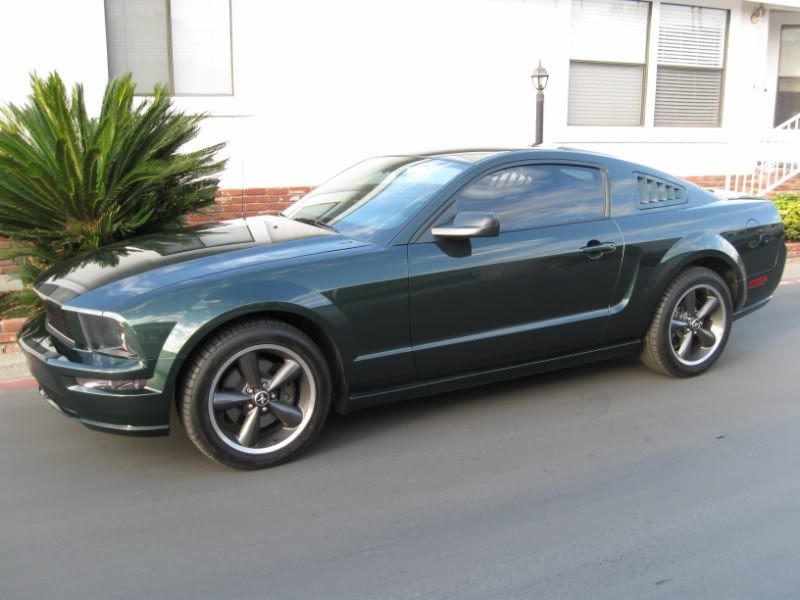


I really hope the pics help the next person that goes with these louvers...I love the look, Karen loves the look, and the install came out great!!
Now if you will excuse me, I must go find some Tylenol, as my left arm and knees are screaming at me....
I SURE WISH SOMEBODY HAD WARNED ME ABOUT THAT DAMN ADHESIVE.........
Regards,
Mike and Karen
WHY THE HELL DIDN'T SOMEONE WARN ME ABOUT HOW STIFF THIS ADHESIVE IS GETTING OUT OF THE TUBE?????????
Now, after pushing the louver into position, and checking the clearance and seal all around, I took the two factory guidepins, and used them as a spacer / block, for the louver to rest on....
I then added a few pieces of tape, just to make sure my spacing stayed true, and to assure the louver did not fall out....(yeah, right.....)
Now, it's lather, rinse, and repeat for the other side......
This is what it looks like on the inside, with the louver in place, before replacing all the interior trim pieces....
After letting the adhesive set up for a couple of hours, go back and reverse all the steps for re-installing the interior trim pieces. Be gentle with the pieces that butt up against the louver on the inside....
And, in no particular order, here are some pics of the finished product....I must tell you that before I re-installed the interior trim, Karen came out to check on the progress, and nearly had a coronary when she saw all the interior pieces gutted...I re-assured here that they would in fact go back together.....Thankfully, they did......
I really hope the pics help the next person that goes with these louvers...I love the look, Karen loves the look, and the install came out great!!
Now if you will excuse me, I must go find some Tylenol, as my left arm and knees are screaming at me....
I SURE WISH SOMEBODY HAD WARNED ME ABOUT THAT DAMN ADHESIVE.........
Regards,
Mike and Karen
4th Gear Member
Joined: May 2007
Posts: 1,039
From: OC, California
This is a most excellent write-up, mlcrycc. It looks like you did an excellent job getting out the factory window and getting the SHRLs in there.
That mineral Mustang in the background of that one pic looks familiar I must say...
Perhaps I'll see you on one of my commutes through Anaheim sometime. There doesn't seem to be all that many Bullitts around.
That mineral Mustang in the background of that one pic looks familiar I must say...
Perhaps I'll see you on one of my commutes through Anaheim sometime. There doesn't seem to be all that many Bullitts around.

3rd Gear Member
Joined: Jul 2005
Posts: 739
From:
a guy at themustangsource.com mentioned cutting from outside only- loop the wire around, and cut top/bottom at same time- if I ever put the set in my wifes 07, I'll try that- stretching around the back corners on my 06 wore me out- arms too short, no help...and if doing from outside only, the interior shouldnt need to come out- aside maybe popping the panel a little loose just in case the wire rubs...
your bullitt looks great in those BTW
your bullitt looks great in those BTW