

 Oct 20, 2015, 11:27 AM
Last edit by: IB Advertising
See related guides and technical advice from our community experts:
Browse all: Interior
- Ford Mustang V6 1994 to 2004 How to Paint Interior Trim
Step by step instructions for do-it-yourself repairs.
Browse all: Interior

How to paint interior trim
Thread Starter
5th Gear Member
Joined: May 2007
Posts: 4,524
From: Smyrna, TN
To start, DO NOT try this if your not comfortable with spray paint!!! If you mess these parts up they are not cheap to replace(radio bezel 105.95,shifter bezel 103.95,door panel inserts 38.00-52.00 each from late model resto)
Step 1
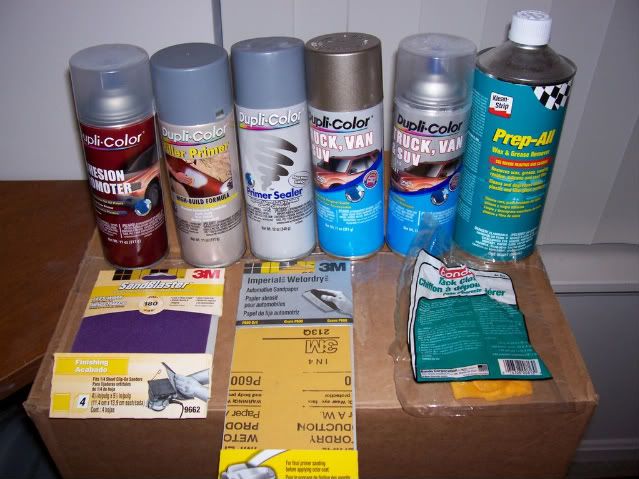
Stuff you will need
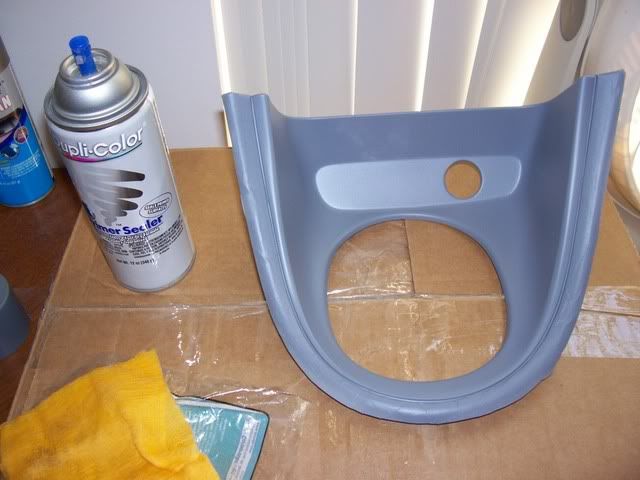
Paint - Adhesion promoter,Filler primer,Primer sealer,Color paint and Clear coat. DO NOT use cheap clear coat!!!! its best to buy all one brand so theres no problems. (example-i used Wal-Mart clear coat and it wrinkled everywhere ruining the model i painted!) I used all Dupli-color paint products,they can be bought from your local parts store and range from 5.99-6.99 a can.
Wax and grease remover and a lint free cloth
Tack cloth
Sand paper - 400,600,1200 and 2000 grit wet/dry sandpaper
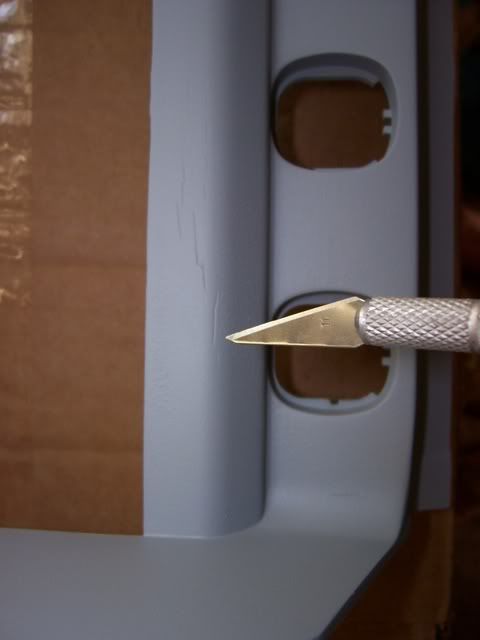
3M Automotive tape (Its green if that helps)
Latex gloves
Step 2
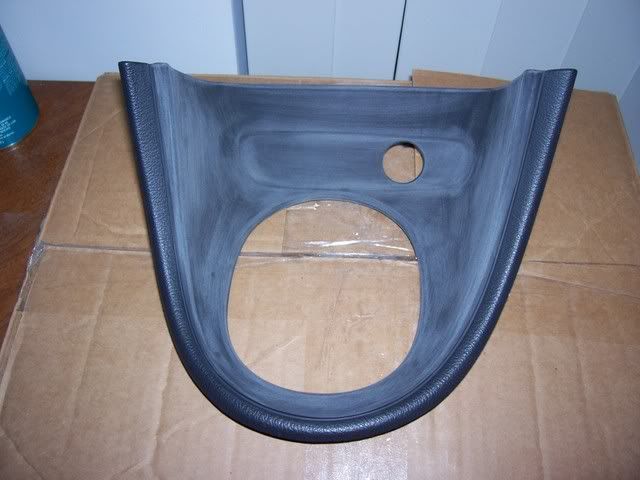
Remove any parts you want to paint from the car to avoid any over spray. Take the part or parts you will be painting and wash in warm soapy water to remove any Armor-All that might be still on the part. Once part is dry start sanding the part with 400 grit, after the whole part is sanded with 400 move on to 600 (this will help remove the deeper scratches from the 400).
After sanding use the Wax and grease remover and a lint free cloth to remove any sanding residue, turning the cloth frequently to trap any sanding residue. Let part air dry for about 10-15 mins. After cleaning the part DO NOT handle it with your bare hands.The oils from you skin could cause the paint not to stick where you touch it. ALWAYS WEAR GLOVES AFTER THIS STEP!!!! ALSO CHANGE THEM BEFORE MOVING ON TO THE NEXT STEP
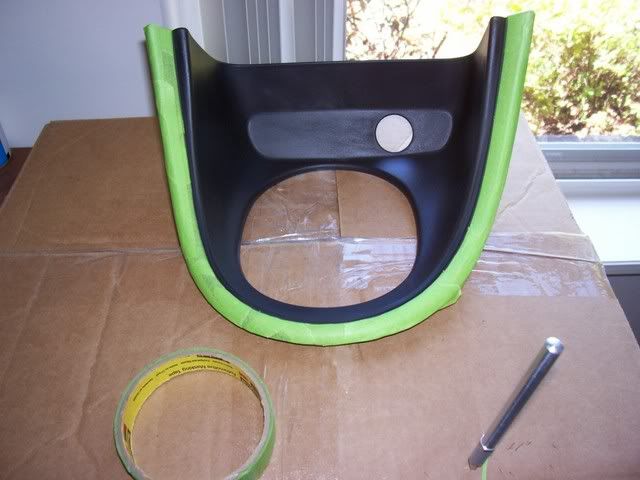
Step 3
Once part is dry, tape off anything you dont want painted. Start with the Adhesion promoter this helps the primer bond with the plastic parts better. Spray the coats lightly to avoid any runs or sags 2 to 3 light coats are better than 1 heavy wet coat. Let dry for about 10 mins
Step 4
After Adhesion promoter is dry its time for the Filler Primer. Start out with a light coat then build up with several more coats till the part has a good coat of primer.
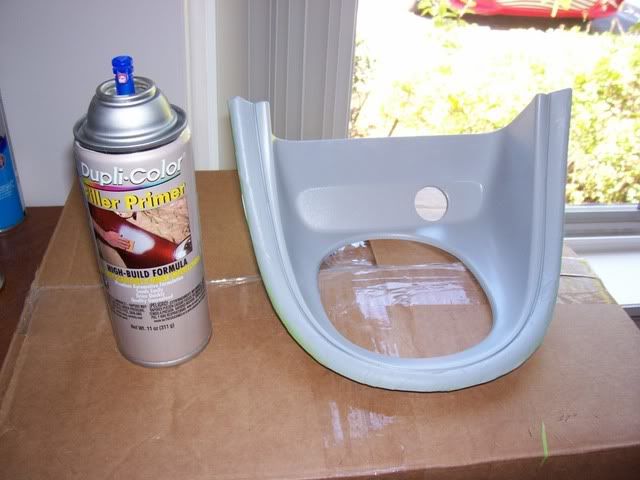
I like to sand the part with 600 grit with a little water to smooth out the finish. If you sand too much off and break thru or there is a blemish in the primer sand the bad spot down, use the tack cloth to remove the sanding residue and reprimer
Step 5
Appling the Primer sealer is the same process as the Filler primer. Start out with a light coat,then a couple more light coats till the part is covered evenly.
Remember to use the tack cloth inbetween each coat ONLY after the paint has dryed. DO NOT USE WAX AND GREASE REMOVER !!! It will eat thru the fresh paint.Ony use it if the paint is fully dry(this could take 3-4 days!!)
Step 6
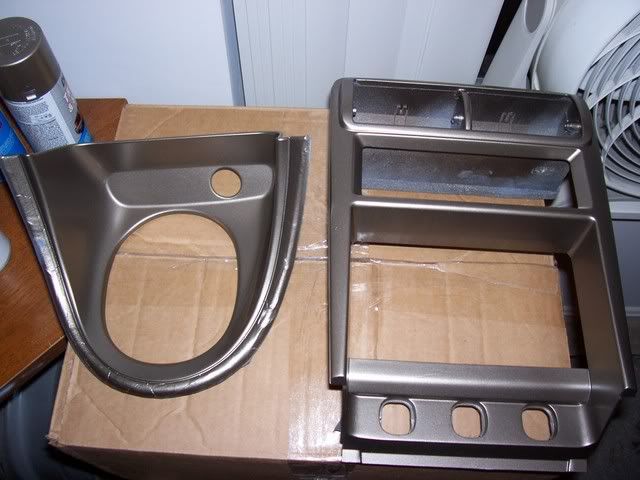
The color coat, clean the part using the tack cloth,removing any dust or hair that could have landed on it. Spray the color coat lightly and evenly to avoid any discoloration that will happen from too much paint in one spot. I like to hit all the corners and weird spots first then do the whole part. Remember spray light coats insted of heavy coats that could cause runs or sags.
If any runs or sags happen let part dry and wet sand with 1200 grit sandpaper, let dry use tack cloth and repaint.
Step 7
Clear coat. After the color is dry i like to wet sand lightly with 2000 grit to knock down the orange peal that will happen when you paint.
Let part dry and use the tack cloth to remove any residue. Spray the Clear coat lightly the first couple coats and a heavyer one after the first coats have tacked up a little bit.
If any sags or runs happen let the part dry and wet sand it with 2000grit till the imperfection is gone,use tack cloth and re-clear. If you want a smoother finish wet sand the whole part with 2000 grit and re-clear the part till you get the finish you want.
The paint wont fully cure for 3-5 days depending on the temp so use extra care when reinstalling any part on to the freshly painted parts and when re-installing them back into your car.
To help protect the paint i like to wait about 1-2 weeks for the paint to fully cure and use a spray wax to help with the shine and for a little bit of protection. ENJOY!!!!
Step 1
Stuff you will need
Paint - Adhesion promoter,Filler primer,Primer sealer,Color paint and Clear coat. DO NOT use cheap clear coat!!!! its best to buy all one brand so theres no problems. (example-i used Wal-Mart clear coat and it wrinkled everywhere ruining the model i painted!) I used all Dupli-color paint products,they can be bought from your local parts store and range from 5.99-6.99 a can.
Wax and grease remover and a lint free cloth
Tack cloth
Sand paper - 400,600,1200 and 2000 grit wet/dry sandpaper
3M Automotive tape (Its green if that helps)
Latex gloves
Step 2
Remove any parts you want to paint from the car to avoid any over spray. Take the part or parts you will be painting and wash in warm soapy water to remove any Armor-All that might be still on the part. Once part is dry start sanding the part with 400 grit, after the whole part is sanded with 400 move on to 600 (this will help remove the deeper scratches from the 400).
After sanding use the Wax and grease remover and a lint free cloth to remove any sanding residue, turning the cloth frequently to trap any sanding residue. Let part air dry for about 10-15 mins. After cleaning the part DO NOT handle it with your bare hands.The oils from you skin could cause the paint not to stick where you touch it. ALWAYS WEAR GLOVES AFTER THIS STEP!!!! ALSO CHANGE THEM BEFORE MOVING ON TO THE NEXT STEP
Step 3
Once part is dry, tape off anything you dont want painted. Start with the Adhesion promoter this helps the primer bond with the plastic parts better. Spray the coats lightly to avoid any runs or sags 2 to 3 light coats are better than 1 heavy wet coat. Let dry for about 10 mins
Step 4
After Adhesion promoter is dry its time for the Filler Primer. Start out with a light coat then build up with several more coats till the part has a good coat of primer.
I like to sand the part with 600 grit with a little water to smooth out the finish. If you sand too much off and break thru or there is a blemish in the primer sand the bad spot down, use the tack cloth to remove the sanding residue and reprimer
Step 5
Appling the Primer sealer is the same process as the Filler primer. Start out with a light coat,then a couple more light coats till the part is covered evenly.
Remember to use the tack cloth inbetween each coat ONLY after the paint has dryed. DO NOT USE WAX AND GREASE REMOVER !!! It will eat thru the fresh paint.Ony use it if the paint is fully dry(this could take 3-4 days!!)
Step 6
The color coat, clean the part using the tack cloth,removing any dust or hair that could have landed on it. Spray the color coat lightly and evenly to avoid any discoloration that will happen from too much paint in one spot. I like to hit all the corners and weird spots first then do the whole part. Remember spray light coats insted of heavy coats that could cause runs or sags.
If any runs or sags happen let part dry and wet sand with 1200 grit sandpaper, let dry use tack cloth and repaint.
Step 7
Clear coat. After the color is dry i like to wet sand lightly with 2000 grit to knock down the orange peal that will happen when you paint.
Let part dry and use the tack cloth to remove any residue. Spray the Clear coat lightly the first couple coats and a heavyer one after the first coats have tacked up a little bit.
If any sags or runs happen let the part dry and wet sand it with 2000grit till the imperfection is gone,use tack cloth and re-clear. If you want a smoother finish wet sand the whole part with 2000 grit and re-clear the part till you get the finish you want.
The paint wont fully cure for 3-5 days depending on the temp so use extra care when reinstalling any part on to the freshly painted parts and when re-installing them back into your car.
To help protect the paint i like to wait about 1-2 weeks for the paint to fully cure and use a spray wax to help with the shine and for a little bit of protection. ENJOY!!!!
Last edited by jrherald420; Feb 1, 2009 at 08:29 PM.

5th Gear Member
Joined: Nov 2007
Posts: 4,955
From: Maryland
i painted my door trim things but just back to black, a gloss black as opposed to flat, they look much better, i may have to do the raido bezzel and shift stuff also. pretty good writeup if you like to be a little different, looks like it came out well.

Thread Starter
5th Gear Member
Joined: May 2007
Posts: 4,524
From: Smyrna, TN
thanks !!! i got a price from a body shop to paint what i did and it was 200.00 with me removing the parts and waiting 2-3 weeks to get them back. oh and they wouldnt sand them at all.
Thread Starter
5th Gear Member
Joined: May 2007
Posts: 4,524
From: Smyrna, TN
thanks man!!!! i really tryed to make it as in depth but fool proof as i could. i hope it helps somebody out. the total cost for all the paint and supplys was around 75.00 but i used 2 full cans of paint and 2 cans of clear coat on the door inserts since they get used alot more than the radio and shifter bezels.
Thread Starter
5th Gear Member
Joined: May 2007
Posts: 4,524
From: Smyrna, TN
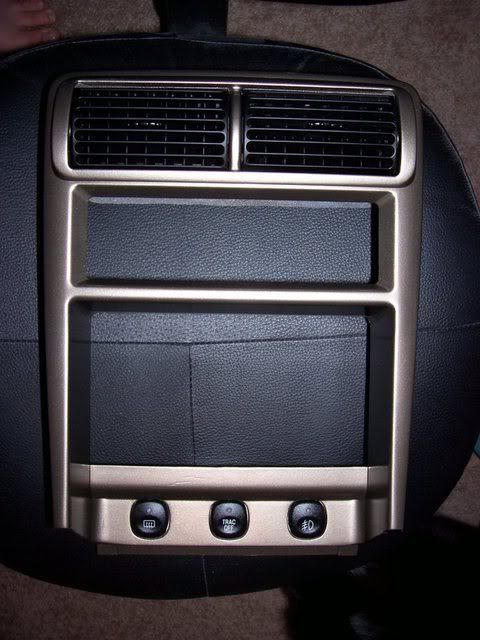
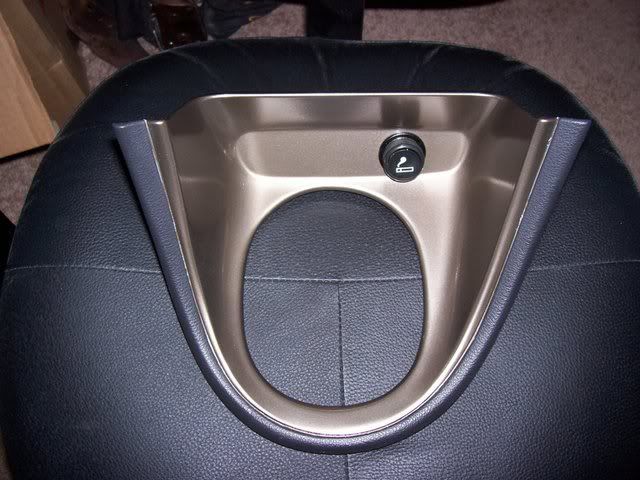
the color is arizona beige its the closest color to mineral grey with out having to have it mixed. heres a better pic compaired to the color of my car

