
Structural repairs start on the 67 Convertible

Thread Starter
4th Gear Member
Joined: Mar 2009
Posts: 1,110
From: NJ
Weather forecasters calling for 3-5" of snow, but I don't care now. LOL
Got me some heat:

Picked up this cart from Harbor Freight for $99. Built well and keeps my floor clean.

Got the fenders off


Now the problem areas, drivers and passengers side front frame rails.


I think I can save the radiator support, but if I am being stupid for trying please tell me. I have the passenger side frame rail complete, but plan on scabbing in from the motor mount forward.
First I will remove the engine, but need to get my hoist.
Got me some heat:
Picked up this cart from Harbor Freight for $99. Built well and keeps my floor clean.
Got the fenders off
Now the problem areas, drivers and passengers side front frame rails.
I think I can save the radiator support, but if I am being stupid for trying please tell me. I have the passenger side frame rail complete, but plan on scabbing in from the motor mount forward.
First I will remove the engine, but need to get my hoist.

Thread Starter
4th Gear Member
Joined: Mar 2009
Posts: 1,110
From: NJ
I was surprised that the radiator support was in better shape than I thought after taking a wire wheel to it. The shots here were before that.
Now I didn't think the driver's side rail was as bad as it is. The place that did the resto in the 90's tack welded the bumper brackets to the the passenger side frame. Wow, and they actually paid them!!!!
Just about every bolt is in the wrong place. I started bagging the bolts and it really almost made no sense.
Made some progress with some of the undercoating using a heat gun and a gasket scraper.


4th Gear Member
Joined: Feb 2006
Posts: 1,001
Does not look too bad - How's the lower cowl. Looks like cowl side panels and outer firewall (pass side) is going to need patched. The front of torque boxes on paasenger side looks good. The driver side looks like there has been some work. Not sure what you find under it. You can buy outer frame patches with bumper nut already tacked on. I had to patch both of mine pretty easy to do. +1 on rad support - Looks salvegable
Last edited by palerider; Feb 21, 2011 at 11:13 PM.
Thread Starter
4th Gear Member
Joined: Mar 2009
Posts: 1,110
From: NJ
Does not look too bad - How's the lower cowl. Looks like cowl side panels and outer firewall (pass side) is going to need patched. The front of torque boxes on paasenger side looks good. The driver side looks like there has been some work. Not sure what you find under it. You can buy outer frame patches with bumper nut already tacked on. I had to patch both of mine pretty easy to do. +1 on rad support - Looks salvegable
Torque boxes looked good when I replaced the floor pans, so that makes me rest easy.
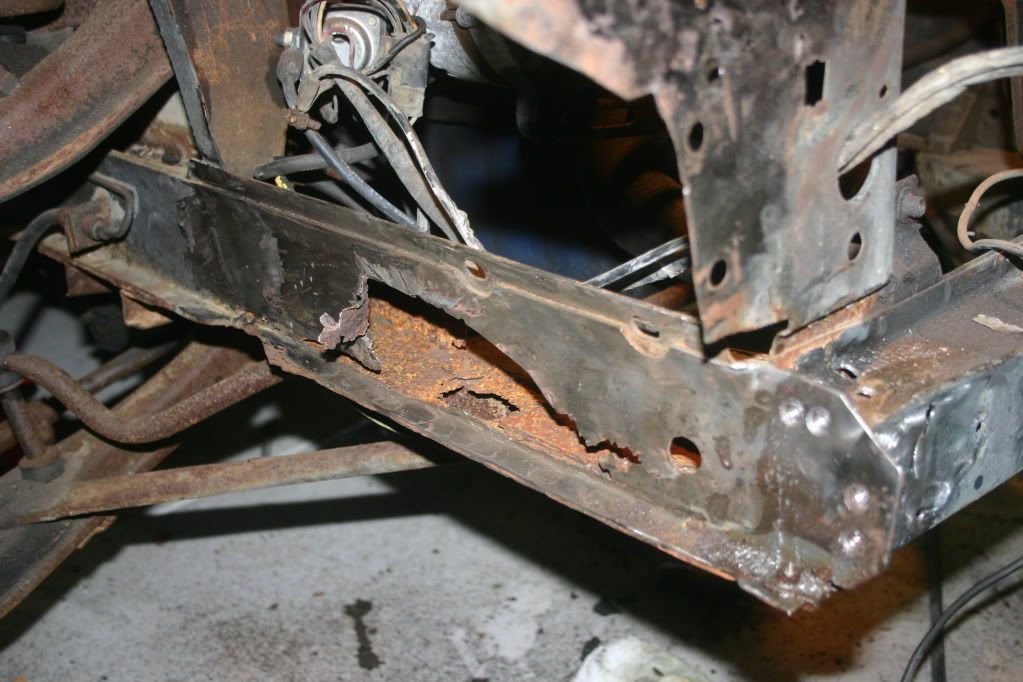
I think the damage to the frame rails is extensive enough to replace just about everything from the shock towers forward on the pass side and just about that on the driver's side.
Meanwhile we got some snow, but I don't care now.

Thread Starter
4th Gear Member
Joined: Mar 2009
Posts: 1,110
From: NJ
Tore out the battery apron yesterday and cut out rust that is present at the mating surfaces of the apron panels.


Cut out a replacement piece out of some scrap


Need to continue my welding practice.

Oh well you won't see it anyway


That was enough dry fitting, now on to the frame rail.
Started drilling out welds. Now I will have to figure out how far back to repair.


That's it for today.
Cut out a replacement piece out of some scrap
Need to continue my welding practice.
Oh well you won't see it anyway
That was enough dry fitting, now on to the frame rail.
Started drilling out welds. Now I will have to figure out how far back to repair.
That's it for today.
4th Gear Member
Joined: Apr 2010
Posts: 1,643
From: Madison, Georgia
Great work! I'm got one or two pin holes in my frame rail, I'm probably just going to cut them out and weld a patch in. Luckily it's not as bad as yours, but you really are doing this 'stang right by taking car of all the rust! 
4th Gear Member
Joined: Apr 2010
Posts: 1,643
From: Madison, Georgia
Apologies for the thread jack, feel free to PM me "JHPSTANG", haha