


Daily Driver Rollbar Project

Thread Starter
2nd Gear Member
Joined: Apr 2008
Posts: 187
From:
 Daily Driver Rollbar Project
Not a handling thread, but since this is one of the better S197 subforums for those who enjoy taking their cars on road courses...
With time off from work, I've had a chance to write up my rollbar project for my ’06 Mustang GT street car/track day car. It’s been an ongoing project that I started last winter and finally had a chance to finish up last month. It isn’t perfect , but I’m fairly happy with how it turned out. Needless to say, I can’t thank Alan Blaine and others enough for their shared experience in this thread from cornercarvers.com (http://www.corner-carvers.com/forums...ad.php?t=27556).
My main criteria was to have something that was (1) at least as safe, or preferably safer than an Autopower (i.e. no floorpan punch-through); and (2) something that could be *easily* installed/removed for track events, since my kids still love going for rides in the Mustang. This ruled out all the bolt-in designs out there I could find.
My idea for the main hoop mounting came from the Griggs and Maximum Motorsports designs. They validated in my mind that the bulkhead was a much stronger point to mount the hoop than the floorpan and that remaking the factory bulkhead gusset was the way to go. The only hitch is that neither design is easily removed/installed (i.e. the night before a track day in under 30 minutes).
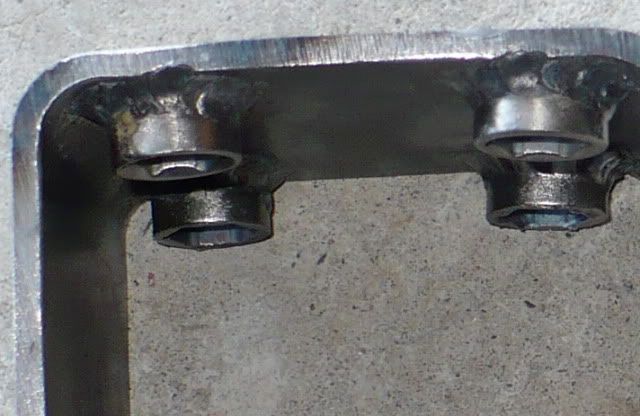
So what I did was basically remake the factory bulkhead gusset using 1/8” plate and a section of 4”x4” x 3/16” square tube. The 4” height off the bulkhead was perfect. I also welded in 4 captive nuts before closing off the end with a piece of 3/16”. Yes, probably way overkill using the section of socket (later capped off with a washer), but in my prior experience on my old Jeep with spot welded nuts they always seemed to fail:
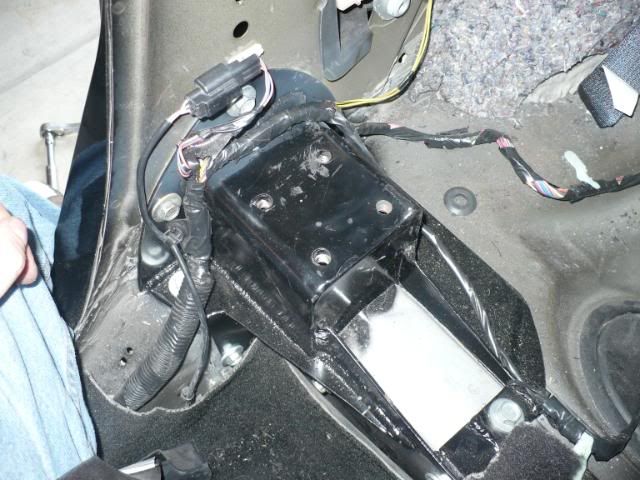
Here it is mounted:
And with the rollbar on it during construction while the interior was still apart to give a better idea of how it sits:
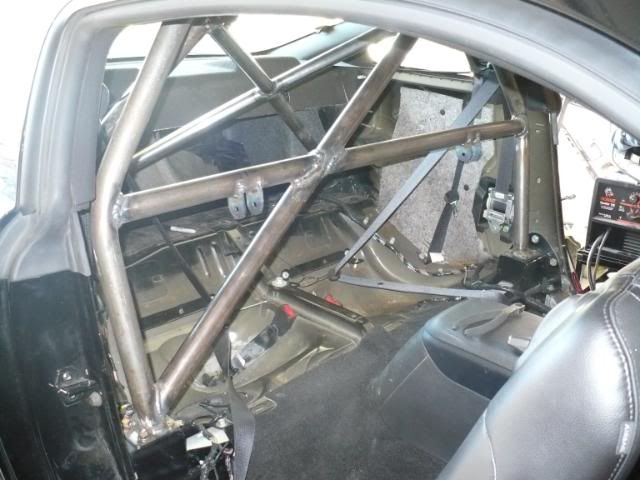
Once the interior is back together, the only hint that there is a provision for a rollbar is a cutout on either side of the back seat, which I trimmed with some edging from McMaster-Carr.
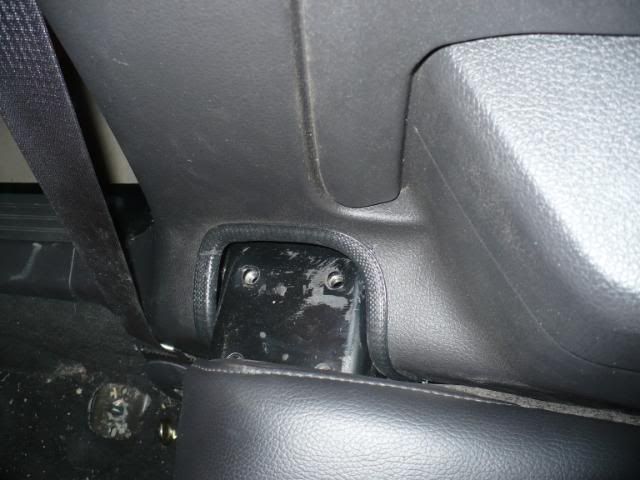
That picture reminds me I still have to touch it up with a fresh coat of Rustoleum black epoxy paint.
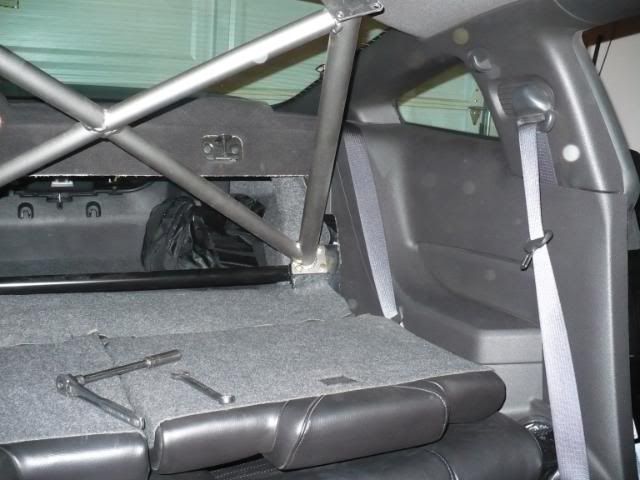
The other area where I wrestled with the design to keep it easily installed/removed was the rear stays. The Autopower slip fit design is something I contemplated, but I wanted at least one rear diagonal which would have made this *much* more difficult to keep aligned, etc… during welding—i.e. perfectly parallel is something I don’t think I could have managed.
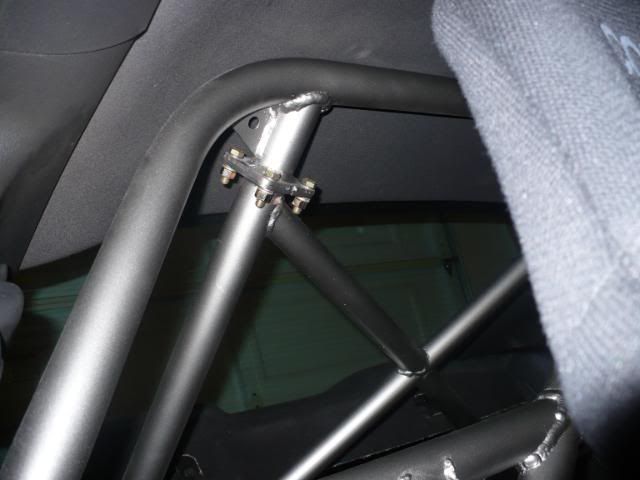
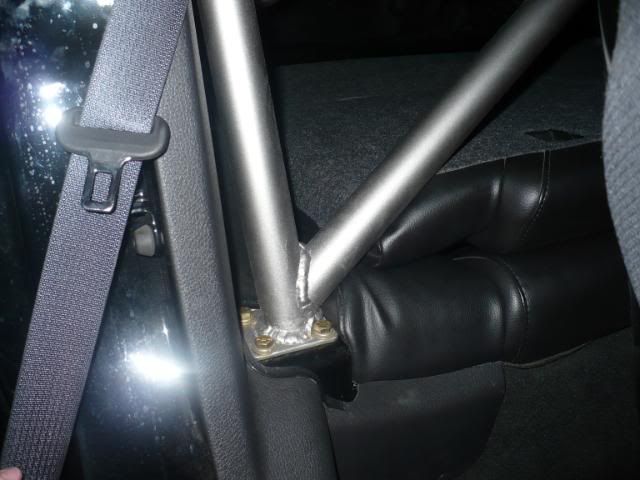
I settled on the 4-bolt flange design after seeing a nice S197 on the NASA forums using this design for a petty bar. For the actual rear stays I used 1.75 x 0.120 DOM, and then 1.5 x 0.090 DOM for the diagonals. The mounting plates are 3/16” drilled for 3/8” bolts. The gussets are 1/8” and placement still allows easy access to the bolts.
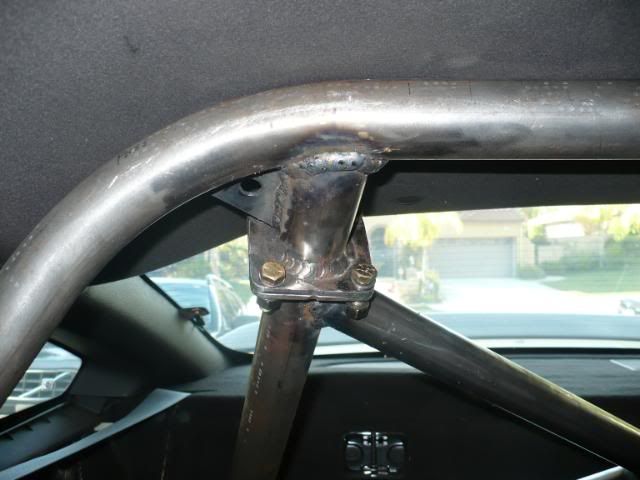
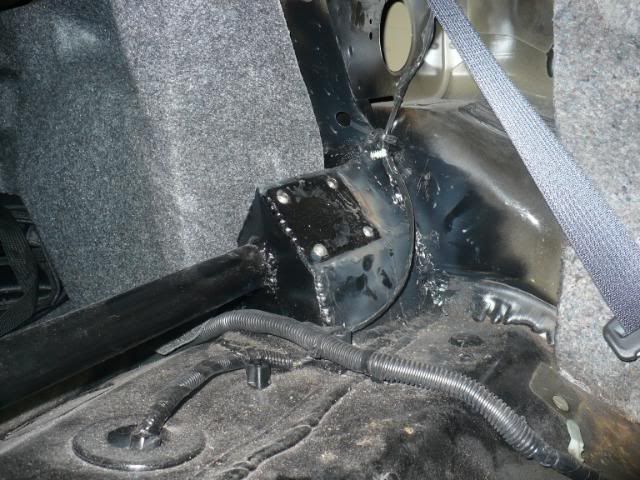
And again for the mounting box on the floor, I used 3/16” plate and captive nuts. I also threw in a crossbar, since I had leftover 1.5” tubing.
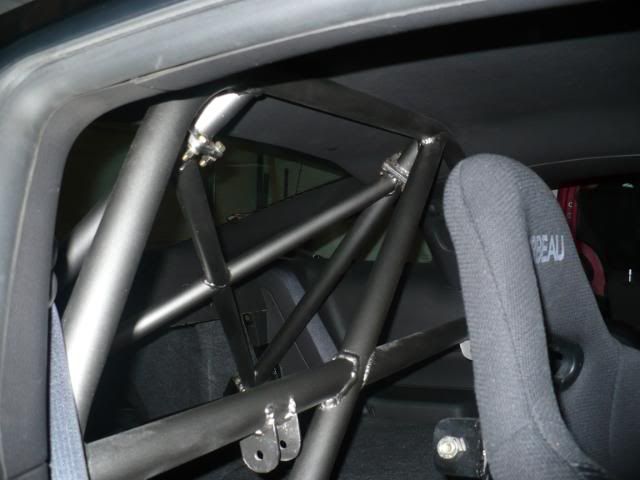
For the main hoop, since I don’t have a bender and wasn’t going to buy one for a one-off project, I sent measurements to a guy down by VIR. 4 days later I had my hoop. Nothing too special here—just 1.75 x 0.120 DOM tubing for the hoop, diagonal and harness bars. I landed the diagonal over my head in seating position, and intersected the rear stay with the same node. Thanks again to Alan Blaine at Blaine-Fabrication for the “steel teepee” visual from way back.
I finished it up with a few coats of Rustoleum appliance epoxy in silver. With it complete, installation is basically:
1) Fold down rear seats
2) Bolt the rear section in place (8 bolts total)
3) Place the main hoop on their landing pads on the bulkhead
4) Bolt the rear section to the main hoop (8 nuts/bolts)
5) Bolt the main hoop to the landing pad (8 bolts)
6) Bolt seats to seat back braces
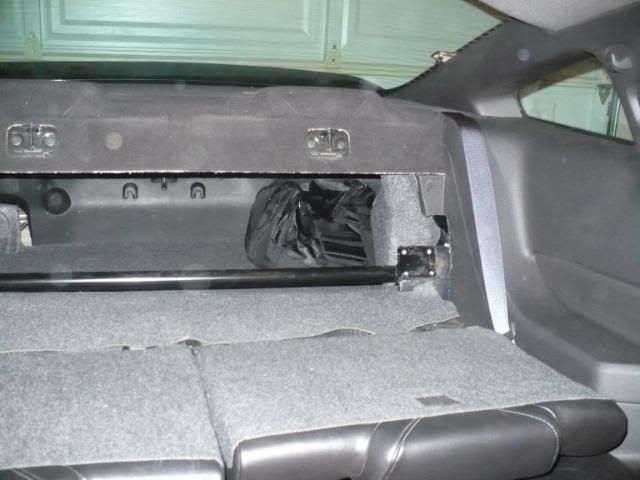
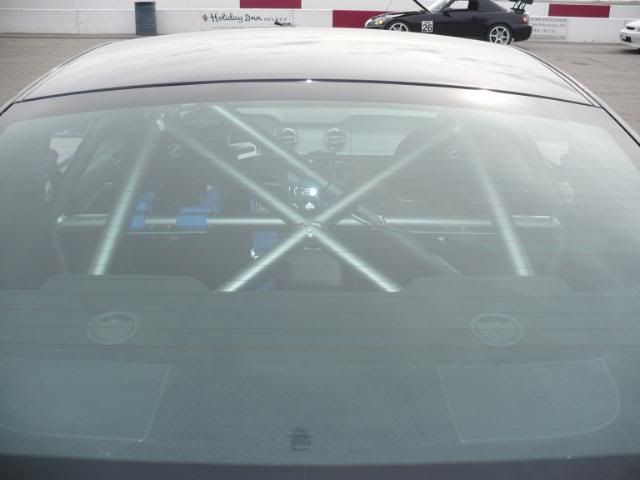
It’s a lot of bolts to fasten, but I timed myself and can install the entire thing in less than 20 minutes.
Things I would have done differently are (I’m sure there are more):
Like I said, not perfect, but I’m reasonably happy with it. I may add some seatbelt B-pillar mount provisions later this year if I can find time and I'm sure there are plenty of other improvements that could be done...
With time off from work, I've had a chance to write up my rollbar project for my ’06 Mustang GT street car/track day car. It’s been an ongoing project that I started last winter and finally had a chance to finish up last month. It isn’t perfect , but I’m fairly happy with how it turned out. Needless to say, I can’t thank Alan Blaine and others enough for their shared experience in this thread from cornercarvers.com (http://www.corner-carvers.com/forums...ad.php?t=27556).
My main criteria was to have something that was (1) at least as safe, or preferably safer than an Autopower (i.e. no floorpan punch-through); and (2) something that could be *easily* installed/removed for track events, since my kids still love going for rides in the Mustang. This ruled out all the bolt-in designs out there I could find.
My idea for the main hoop mounting came from the Griggs and Maximum Motorsports designs. They validated in my mind that the bulkhead was a much stronger point to mount the hoop than the floorpan and that remaking the factory bulkhead gusset was the way to go. The only hitch is that neither design is easily removed/installed (i.e. the night before a track day in under 30 minutes).
So what I did was basically remake the factory bulkhead gusset using 1/8” plate and a section of 4”x4” x 3/16” square tube. The 4” height off the bulkhead was perfect. I also welded in 4 captive nuts before closing off the end with a piece of 3/16”. Yes, probably way overkill using the section of socket (later capped off with a washer), but in my prior experience on my old Jeep with spot welded nuts they always seemed to fail:
Here it is mounted:
And with the rollbar on it during construction while the interior was still apart to give a better idea of how it sits:
Once the interior is back together, the only hint that there is a provision for a rollbar is a cutout on either side of the back seat, which I trimmed with some edging from McMaster-Carr.
That picture reminds me I still have to touch it up with a fresh coat of Rustoleum black epoxy paint.
The other area where I wrestled with the design to keep it easily installed/removed was the rear stays. The Autopower slip fit design is something I contemplated, but I wanted at least one rear diagonal which would have made this *much* more difficult to keep aligned, etc… during welding—i.e. perfectly parallel is something I don’t think I could have managed.
I settled on the 4-bolt flange design after seeing a nice S197 on the NASA forums using this design for a petty bar. For the actual rear stays I used 1.75 x 0.120 DOM, and then 1.5 x 0.090 DOM for the diagonals. The mounting plates are 3/16” drilled for 3/8” bolts. The gussets are 1/8” and placement still allows easy access to the bolts.
And again for the mounting box on the floor, I used 3/16” plate and captive nuts. I also threw in a crossbar, since I had leftover 1.5” tubing.
For the main hoop, since I don’t have a bender and wasn’t going to buy one for a one-off project, I sent measurements to a guy down by VIR. 4 days later I had my hoop. Nothing too special here—just 1.75 x 0.120 DOM tubing for the hoop, diagonal and harness bars. I landed the diagonal over my head in seating position, and intersected the rear stay with the same node. Thanks again to Alan Blaine at Blaine-Fabrication for the “steel teepee” visual from way back.
I finished it up with a few coats of Rustoleum appliance epoxy in silver. With it complete, installation is basically:
1) Fold down rear seats
2) Bolt the rear section in place (8 bolts total)
3) Place the main hoop on their landing pads on the bulkhead
4) Bolt the rear section to the main hoop (8 nuts/bolts)
5) Bolt the main hoop to the landing pad (8 bolts)
6) Bolt seats to seat back braces
It’s a lot of bolts to fasten, but I timed myself and can install the entire thing in less than 20 minutes.
Things I would have done differently are (I’m sure there are more):
- I would have landed the main diagonal about 2 inches further outboard, which then would have landed each rear stay about 2 inches further outboard.
- I also would have used a larger mounting flange/box to give more wiggle room for mounting the tubes after they shifted during welding.
- I would have built the rear stay mounting boxes an inch or two lower. I was overly concerned with having enough height to allow easy wrench access, but overdid it a bit.
Like I said, not perfect, but I’m reasonably happy with it. I may add some seatbelt B-pillar mount provisions later this year if I can find time and I'm sure there are plenty of other improvements that could be done...

3rd Gear Member
Joined: Jan 2006
Posts: 757
From: Chicago
Very nice!
Just out of curiosity, what prompted you to reconstruct the bulkhead gusset instead of modifying the factory piece? I only ask, because I had thought of a similar design that would just box off the top of the OEM piece with a similarly sized piece of square tube.
Glad to see the project worked out and you can install it quickly.
Best,
-j
Just out of curiosity, what prompted you to reconstruct the bulkhead gusset instead of modifying the factory piece? I only ask, because I had thought of a similar design that would just box off the top of the OEM piece with a similarly sized piece of square tube.
Glad to see the project worked out and you can install it quickly.
Best,
-j
Thread Starter
2nd Gear Member
Joined: Apr 2008
Posts: 187
From:
Thanks all. Philostang, that was actually something I considered after seeing the Maximum Motorsports design. I used a section of the 4x4 tubing and profiled it to fit the top of the gussets.

Seam welded the factory gussets (they are made of two pieces of sheet steel) and tacked the mounting brackets on. I know other S197 builders have gone a similar route, but it just didn't seem strong enough as I looked at it. I didn't trust the factory gussets to take the full load of an impact without pancaking, so I went back to my original plan of completely rebuilding the bulkhead gusset. It took an extra weekend, but if something is worth doing, it's worth overdoing. These pieces got recycled and used for the rear mounts.
Oh, and P.S. Philostang, I followed your fiberglass brake duct walkthrough and was successful in my first ever fiberglass project. Your write-up was much appreciated.
Seam welded the factory gussets (they are made of two pieces of sheet steel) and tacked the mounting brackets on. I know other S197 builders have gone a similar route, but it just didn't seem strong enough as I looked at it. I didn't trust the factory gussets to take the full load of an impact without pancaking, so I went back to my original plan of completely rebuilding the bulkhead gusset. It took an extra weekend, but if something is worth doing, it's worth overdoing.
These pieces got recycled and used for the rear mounts.Oh, and P.S. Philostang, I followed your fiberglass brake duct walkthrough and was successful in my first ever fiberglass project. Your write-up was much appreciated.
Last edited by Import_Slaya; Dec 27, 2009 at 04:55 PM.


2nd Gear Member
Joined: Jun 2006
Posts: 182
From: Farmington Hills, MI
Wow! That is a beautiful design/install. My hat's off to you.
As my speeds are going up, I'm starting to think about doing something similar to that or a full cage. Being able to take it out is definitely a plus with a family.
As my speeds are going up, I'm starting to think about doing something similar to that or a full cage. Being able to take it out is definitely a plus with a family.
Thread Starter
2nd Gear Member
Joined: Apr 2008
Posts: 187
From:


Thread
Thread Starter
Forum
Replies
Last Post
Matt's 95 Stang
5.0L (1979-1995) Mustang
2
Oct 5, 2015 07:16 AM
