LED Turn Signal Kit Converts Classic Mustang into Modern Marvel
All you need is a 9mm socket wrench, a Phillips-head screwdriver, and a wire crimper.
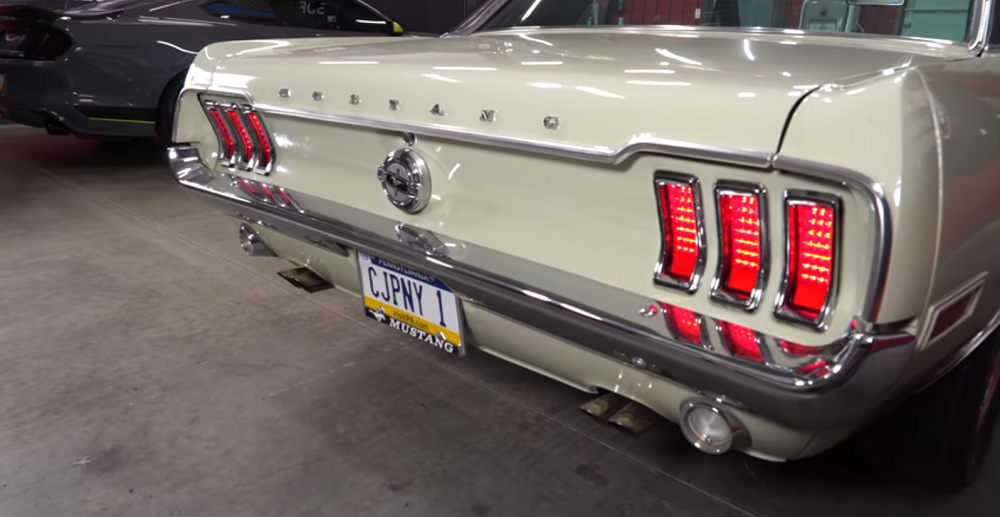
When it comes to classic cars like 1960s Ford Mustangs, you can go to one of two extremes. You can keep them completely stock and factory original down to the simple radio or you can restomod the daylights out of them and throw on aftermarket paint and flashy wheels. In between those two ends of the spectrum are mods such as these LED sequential turn signals for 1967-1968 Mustangs, which preserve the cars’ basic old-school looks while offering modern lighting technology.
In the above video from CJ Pony Parts official YouTube page , host Matt Mohl walks you through the process of how to install them in a 1968 Mustang notchback using only a few simple hand tools, including a 9mm socket wrench, a Phillips-head screwdriver, and a wire crimper. According to Mohl, the lighting assemblies “use a factory plug with one additional wire and feature an almost-plug-and-play design.”

Almost? Yes, there’s one catch to the process. Mohl adds, “In order to do this you have to run a single wire up to the front end of your Mustang. It’s gonna be fished along the side, right along the driver’s seat, go behind, and your brake switch – it’s going to tap into the output wire of that. So you’re gonna cut that wire to where it would normally go, tap in this single wire, and run it back through. And that’s gonna go into the yellow wire at the bottom of our sequential LED turn signal.”
Aside from that, the process is pretty simple. You pull out the bulb assembly, use a 9mm socket to remove the nuts from the six bolts that hold the exterior chrome taillight housings in place, then yank out the assemblies. Once you have them separated from the car, remove the outer seal, extract the six Phillips screws, and hold on to the inner seal.
Mohl does mention something to watch out for, though. “Before you install these turn signals, look in the back. There’s a small switch here. Now for the passenger side, you’re going to want to make sure that this is all the way towards the bottom of the circuit board. For the driver’s side, make sure that’s all the way up.”

Then it’s just a matter of popping in the new LED units, putting the six screws and outer seal where they need to go, re-inserting the assemblies back into the rear end of the Mustang, and plugging and tucking the wiring bundle back where it belongs. As for that bit of wiring Mohl mentioned earlier, he taps the pink wire into the yellow one from the new turn signals, secures the union with a connector, then crimps it and applies a little heat. The result is a classic Mustang with a bit of modern tech that doesn’t ruin its timeless looks.
You must be logged in to post a comment.